Elba EWF 1076 A User manual

Washing Machine
User’s Manual
2820522174_EN/030113.1704
Document Number
EWF 1076 A

2
EN
1 Important safety instructions
This section contains safety instructions that will
help protect from risk of personal injury or property
damage. Failure to follow these instructions shall
void any warranty.
General safety
• 8yearsandolderchildrenandpeoplewith
reduced physical, sensory, and mental abilities
as well as unskilled or inexperienced persons
can use this appliance provided that they are
supervised and instructed on safe use of the
appliance as well as to the related dangers.
Children should not play or tamper with the
appliance. Cleaning and user maintenance
should never be performed by children unless
supervised by a responsible adult.
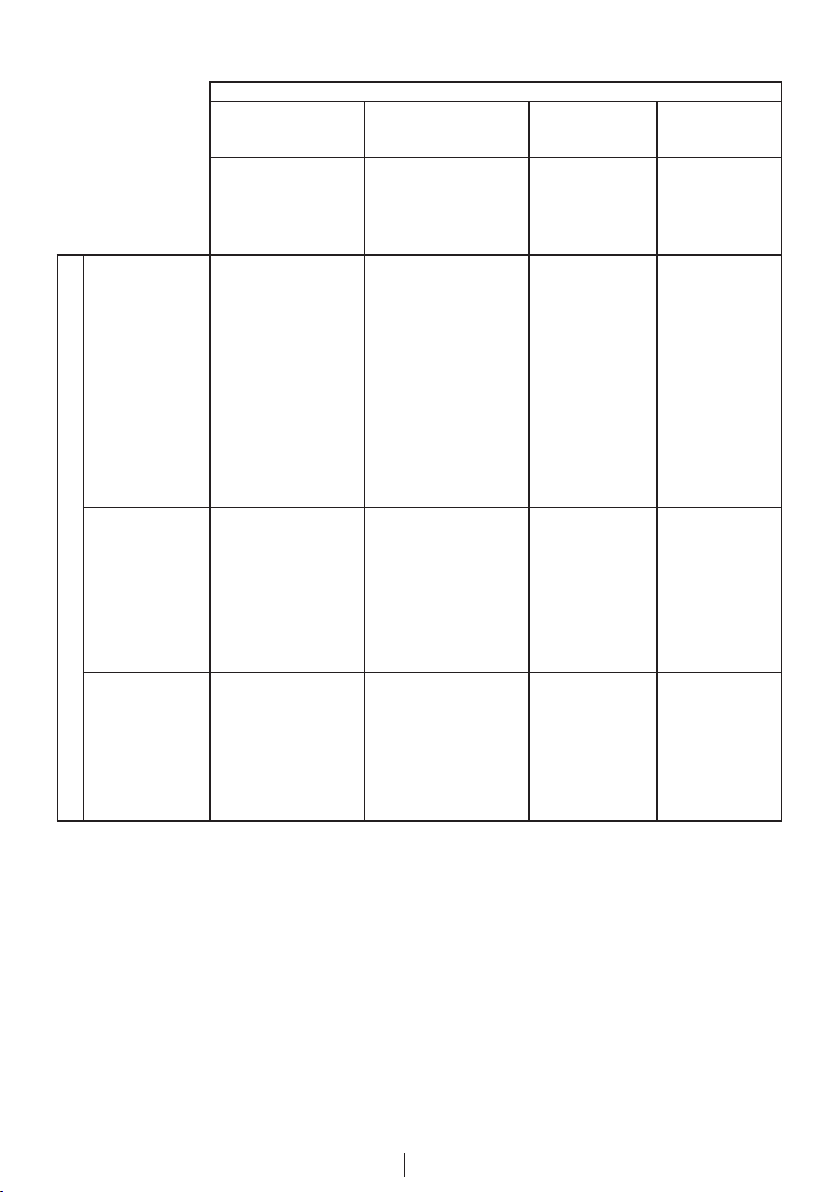
• Neverplacetheproductonacarpet-covered
floor; otherwise, lack of airflow beneath the
machine will cause electrical parts to overheat.
This will cause problems with your product.
• Donotoperatetheproductifthepowercable
/ plug is damaged. Call the Authorized Service
Agent.
• Haveaqualifiedelectricianconnecta
16-Amperefusetotheinstallationlocationof
the product.
• Iftheproducthasafailure,itshouldnot
be operated unless it is repaired by the
Authorized Service Agent. There is the risk of
electric shock!
• Thisproductisdesignedtoresumeoperating
in the event of powering on after a power
interruption.Ifyouwishtocancelthe
programme, see "Cancelling the programme"
section.
• Connecttheproducttoagroundedoutlet
protected by a fuse complying with the values
inthe"Technicalspecifications"table.Donot
neglect to have the grounding installation
madebyaqualifiedelectrician.Ourcompany
shall not be liable for any damages that
will arise when the product is used without
grounding in accordance with the local
regulations.
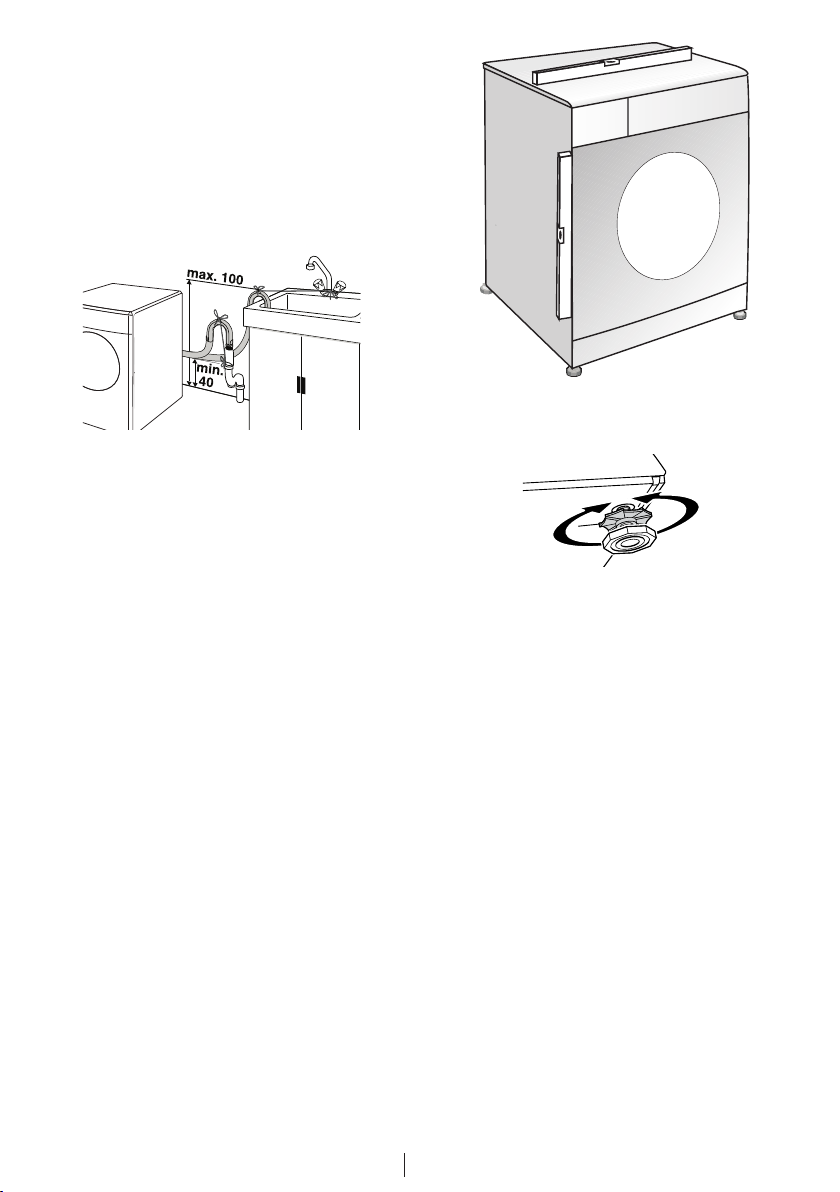
• Thewatersupplyanddraininghosesmustbe
securely fastened and remain undamaged.
Otherwise,thereistheriskofwaterleakage.
• Neveropentheloadingdoororremovethe
filter while there is still water in the drum.
Otherwise,riskoffloodingandinjuryfromhot
water will occur.
• Donotforceopenthelockedloadingdoor.
The loading door will be ready to open just a
few minutes after the washing cycle comes to
anend.Incaseofforcingtheloadingdoorto
open, the door and the lock mechanism may
get damaged.
• Unplugtheproductwhennotinuse.
• Neverwashtheproductbyspreadingor
pouring water onto it! There is the risk of
electric shock!
• Nevertouchtheplugwithwethands!Never
unplug by pulling on the cable, always pull out
by grabbing the plug.
• Usedetergents,softenersandsupplements
suitable for automatic washing machines only.
• Followtheinstructionsonthetextiletagsand
on the detergent package.
• Theproductmustbeunpluggedduring
installation, maintenance, cleaning and
repairing procedures.
• Alwayshavetheinstallationandrepairing
procedures carried out by the Authorized
Service Agent. Manufacturer shall not be
held liable for damages that may arise from
procedures carried out by unauthorized
persons.
Intended use
• Thisproducthasbeendesignedfordomestic
use.Itisnotsuitableforcommercialuseandit
must not be used out of its intended use.
• Theproductmustonlybeusedforwashing
and rinsing of laundry that are marked
accordingly.
• Themanufacturerwaivesanyresponsibility
arisen from incorrect usage or transportation.
Children's safety
• Electricalproductsaredangerousforthe
children. Keep children away from the product
whenitisinuse.Donotletthemtotamper
withtheproduct.Usechildlocktoprevent
children from intervening with the product.
• Donotforgettoclosetheloadingdoorwhen
leaving the room where the product is located.
• Storealldetergentsandadditivesinasafe
place away from the reach of the children.
2 Installation
Refer to the nearest Authorised Service Agent for
installation of the product. To make the product
ready for use, review the information in the
user manual and make sure that the electricity,
tap water supply and water drainage systems
are appropriate before calling the Authorized
ServiceAgent.Iftheyarenot,callaqualified
technician and plumber to have any necessary
arrangements carried out.
CPreparation of the location and electrical,
tap water and waste water installations at
the place of installation is under customer's
responsibility.
B Installationandelectricalconnectionsof
the product must be carried out by the
Authorized Service Agent. Manufacturer shall
not be held liable for damages that may arise
from procedures carried out by unauthorized
persons.
APrior to installation, visually check if the
producthasanydefectsonit.Ifso,donot
haveitinstalled.Damagedproductscause
risks for your safety.

3
EN
CMake sure that the water inlet and discharge
hoses as well as the power cable are not
folded, pinched or crushed while pushing
the product into its place after installation or
cleaning procedures.
Appropriate installation location
• Placethemachineonarigidfloor.Donot
place it on a long pile rug or similar surfaces.
• Totalweightofthewashingmachineandthe
dryer-withfullload-whentheyareplaced
on top of each other reaches to approx.
180kilograms.Placetheproductonasolid
and flat floor that has sufficient load carrying
capacity!
• Donotplacetheproductonthepowercable.
• Donotinstalltheproductatplaceswhere
temperaturemayfallbelow0ºC.
• Placetheproductatleast1cmawayfromthe
edges of other furniture.
Removing packaging reinforcement
Tilt the machine backwards to remove the
packaging reinforcement. Remove the packaging
reinforcement by pulling the ribbon.
Removing the transportation locks
A Donotremovethetransportationlocksbefore
taking out the packaging reinforcement.
ARemove the transportation safety bolts before
operating the washing machine, otherwise,
the product will be damaged.
1. Loosen all the bolts with a spanner until they
rotate freely (C).
2. Remove transportation safety bolts by turning
them gently.
3. AttachtheplasticcoverssuppliedintheUser
Manual bag into the holes on the rear panel.
(P)
CKeep the transportation safety bolts in a safe
place to reuse when the washing machine
needs to be moved again in the future.
C Nevermovetheproductwithoutthe
transportation safety bolts properly fixed in
place!
Connecting water supply
C Thewatersupplypressurerequiredtorun
theproductisbetween1to10bars(0.1–1
MPa).Itisnecessarytohave10–80litersof
water flowing from the fully open tap in one
minute to have your machine run smoothly.
Attach a pressure reducing valve if water
pressure is higher.
C Ifyouaregoingtousethedoublewater-inlet
productasasingle(cold)water-inletunit,you
must install the supplied stopper to the hot
water valve before operating the product.
(Applies for the products supplied with a blind
stopper group.)
C Ifyouwanttousebothwaterinletsofthe
product, connect the hot water hose after
removing the stopper and gasket group from
the hot water valve. (Applies for the products
supplied with a blind stopper group.)
AModels with a single water inlet should not
beconnectedtothehotwatertap.Insuch
a case the laundry will get damaged or the
product will switch to protection mode and will
not operate.
A Donotuseoldorusedwaterinlethoseson
thenewproduct.Itmaycausestainsonyour
laundry.
1. Connect the special hoses supplied with the
product to the water inlets on the product.
Redhose(left)(max.90ºC)isforhotwater
inlet,bluehose(right)(max.25ºC)isforcold
water inlet.
A Ensurethatthecoldandhotwater
connections are made correctly when
installingtheproduct.Otherwise,yourlaundry
will come out hot at the end of the washing
process and wear out.
2. Tightenallhosenutsbyhand.Neverusea
wrench when tightening the nuts.
3. Openthetapscompletelyaftermakingthe
hose connection to check for water leaks at
theconnectionpoints.Ifanyleaksoccur,turn
off the tap and remove the nut. Retighten
the nut carefully after checking the seal. To
prevent water leakages and damages caused
by them, keep the taps closed when the
machine is not in use.
Connecting to the drain
• Theendofthedrainhosemustbedirectly
connected to the wastewater drain or to the
washbasin.
AYour house will be flooded if the hose comes
out of its housing during water discharge.
Moreover, there is risk of scalding due to
high washing temperatures! To prevent such

4
EN
situations and to ensure smooth water intake
and discharge of the machine, fix the end of
the discharge hose tightly so that it cannot
come out.
• Thehoseshouldbeattachedtoaheightofat
least40cm,and100cmatmost.
• Incasethehoseiselevatedafterlayingiton
the floor level or close to the ground (less than
40cmabovetheground),waterdischarge
becomes more difficult and the laundry may
come out excessively wet. Therefore, follow
the heights described in the figure.
• Topreventflowingofdirtywaterbackintothe
machine and to allow for easy discharge, do
not immerse the hose end into the dirty water
ordriveitinthedrainmorethan15cm.Ifitis
too long, cut it short.
• Theendofthehoseshouldnotbebent,it
should not be stepped on and the hose must
not be pinched between the drain and the
machine.
• Ifthelengthofthehoseistooshort,useit
by adding an original extension hose. Length
of the hose may not be longer than 3.2 m.
To avoid water leak failures, the connection
between the extension hose and the drain
hose of the product must be fitted well with
an appropriate clamp as not to come off and
leak.
Adjusting the feet
A Inordertoensurethattheproductoperates
moresilentandvibration-free,itmuststand
level and balanced on its feet. Balance the
machinebyadjustingthefeet.Otherwise,the
product may move from its place and cause
crushing and vibration problems.
1. Loosen the lock nuts on the feet by hand.
2. Adjust the feet until the product stands level
and balanced.
3. Tighten all lock nuts again by hand.
A Donotuseanytoolstoloosenthelocknuts.
Otherwise,theywillgetdamaged.
Electrical connection
Connect the product to a grounded outlet
protected by a fuse complying with the values in
the"Technicalspecifications"table.Ourcompany
shall not be liable for any damages that will arise
when the product is used without grounding in
accordance with the local regulations.
• Connectionmustcomplywithnational
regulations.
• Powercableplugmustbewithineasyreach
after installation.
• Thevoltageandallowedfuseorbreaker
protection are specified in the “Technical
specifications”section.Ifthecurrentvalueof
the fuse or breaker in the house is less than
16Amps,haveaqualifiedelectricianinstalla
16 Amp fuse.
• Thespecifiedvoltagemustbeequaltoyour
mains voltage.
• Donotmakeconnectionsviaextension
cablesormulti-plugs.
B Damagedpowercablesmustbereplacedby
the Authorized Service Agents.
First use
Before starting to use the product, make sure
that all preparations are made in accordance
withtheinstructionsinsections"Importantsafety
instructions"and"Installation".

5
EN
To prepare the product for washing laundry,
performfirstoperationinDrumCleaning
programme.Ifyourmachineisnotfeaturedwith
DrumCleaningprogramme,useCottons-90
programmeandselectAdditionalWaterorExtra
Rinse auxiliary functions as well. Before starting
theprogramme,putmax.100gofpowder
anti-limescaleintothemainwashdetergent
compartment(compartmentnr.II).Iftheanti-
limescale is in tablet form, put only one tablet into
compartmentnr.II.Drytheinsideofthebellow
with a clean piece of cloth after the programme
has come to an end.
C Useananti-limescalesuitableforthewashing
machines.
CSome water might have remained in the
productduetothequalitycontrolprocesses
intheproduction.Itisnotharmfulforthe
product.
Disposing of packaging material
Packaging materials are dangerous to children.
Keep packaging materials in a safe place away
from reach of the children.
Packaging materials of the product are
manufacturedfromrecyclablematerials.Dispose
of them properly and sort in accordance with
recycledwasteinstructions.Donotdisposeof
them with normal domestic waste.
Transportation of the product
Unplugtheproductbeforetransportingit.Remove
waterdrainandwatersupplyconnections.Drain
the remaining water in the product completely;
see,"Drainingremainingwaterandcleaningthe
pumpfilter".Installtransportationsafetybolts
in the reverse order of removal procedure; see,
"Removing the transportation locks".
C Nevermovetheproductwithoutthe
transportation safety bolts properly fixed in
place!
Disposing of the old product
Disposeoftheoldproductinanenvironmentally
friendly manner.
Refer to your local dealer or solid waste collection
centre in your area to learn how to dispose of your
product.
For children's safety, cut the power cable and
break the locking mechanism of the loading door
so that it will be nonfunctional before disposing of
the product.
3 Preparation
Things to be done for energy saving
Following information will help you use the product
inanecologicalandenergy-efficientmanner.
• Operatetheproductinthehighestcapacity
allowed by the programme you have selected,
but do not overload; see, "Programme and
consumption table".
• Alwaysfollowtheinstructionsonthe
detergent packaging.
• Washslightlysoiledlaundryatlow
temperatures.
• Usefasterprogrammesforsmallquantitiesof
lightly soiled laundry.
• Donotuseprewashandhightemperatures
for laundry that is not heavily soiled or stained.
• Ifyouplantodryyourlaundryinadryer,select
the highest spin speed recommended during
washing process.
• Donotusedetergentinexcessoftheamount
recommended on the detergent package.
Sorting the laundry
• Sortlaundryaccordingtotypeoffabric,
colour, and degree of soiling and allowable
water temperature.
• Alwaysobeytheinstructionsgivenonthe
garment tags.
Preparing laundry for washing
• Laundryitemswithmetalattachmentssuch
as, underwired bras, belt buckles or metal
buttons will damage the machine. Remove
the metal pieces or wash the clothes by
putting them in a laundry bag or pillow case.
• Takeoutallsubstancesinthepocketssuch
as coins, pens and paper clips, and turn
pockets inside out and brush. Such objects
may damage the product or cause noise
problem.
• Putsmallsizeclothessuchasinfant'ssocks
and nylon stockings in a laundry bag or pillow
case.
• Placecurtainsinwithoutcompressingthem.
Remove curtain attachment items.
• Fastenzippers,sewloosebuttonsandmend
rips and tears.
• Wash“machinewashable”or“hand
washable” labeled products only with an
appropriate programme.
• Donotwashcoloursandwhitestogether.
New,darkcolouredcottonsreleasealotof
dye. Wash them separately.
• Toughstainsmustbetreatedproperlybefore
washing.Ifunsure,checkwithadrycleaner.
• Useonlydyes/colourchangersandlimescale
removers suitable for machine wash. Always
follow the instructions on the package.
• Washtrousersanddelicatelaundryturned
inside out.
• KeeplaundryitemsmadeofAngorawoolin
the freezer for a few hours before washing.

6
EN
This will reduce pilling.
• Laundrythataresubjectedtomaterialssuch
as flour, lime dust, milk powder, etc. intensely
must be shaken off before placing into the
machine. Such dusts and powders on the
laundry may build up on the inner parts of the
machine in time and can cause damage.
Correct load capacity
The maximum load capacity depends on the type
of laundry, the degree of soiling and the washing
programme desired.
The machine automatically adjusts the amount
of water according to the weight of the loaded
laundry.
AFollow the information in the “Programme
and consumption table”. When overloaded,
machine's washing performance will drop.
Moreover, noise and vibration problems may
occur.
Loading the laundry
• Opentheloadingdoor.
• Placelaundryitemslooselyintothemachine.
• Pushtheloadingdoortocloseuntilyouhear
alockingsound.Ensurethatnoitemsare
caught in the door.
CThe loading door is locked while a programme
is running. The door can only be opened a
while after the programme comes to an end.
A Incaseofmisplacingthelaundry,noiseand
vibration problems may occur in the machine.
Using detergent and softener
Detergent Drawer
The detergent drawer is composed of three
compartments:
-(1)forprewash
-(2)formainwash
–(3)forsoftener
–(*)inaddition,thereissiphonpieceinthe
softener compartment.
1
23
Detergent, softener and other cleaning agents
• Adddetergentandsoftenerbeforestartingthe
washing programme.
• Neveropenthedetergentdrawerwhilethe
washing programme is running!
• Whenusingaprogrammewithoutprewash,
do not put any detergent into the prewash
compartment(compartmentnr.I).
• Inaprogrammewithprewash,donot
putliquiddetergentintotheprewash
compartment(compartmentnr.I).
• Donotselectaprogrammewithprewashif
you are using a detergent bag or dispensing
ball. Place the detergent bag or the
dispensing ball directly among the laundry in
the machine.
• Ifyouareusingliquiddetergent,donotforget
toplacetheliquiddetergentcupintothemain
washcompartment(compartmentnr.II).
Choosing the detergent type
The type of detergent to be used depends on the
type and colour of the fabric.
• Usedifferentdetergentsforcolouredand
white laundry.
• Washyourdelicateclothesonlywithspecial
detergents(liquiddetergent,woolshampoo,
etc.) used solely for delicate clothes.
• Whenwashingdarkcolouredclothesand
quilts,itisrecommendedtouseliquid
detergent.
• Washwoolenswithspecialdetergentmade
specifically for woolens.
A Useonlydetergentsmanufacturedspecifically
for washing machines.
A Donotusesoappowder.
Adjusting detergent amount
The amount of washing detergent to be used
depends on the amount of laundry, the degree
of soiling and water hardness. Read the
manufacturer's instructions on the detergent
package carefully and follow the dosage values.
• Donotuseamountsexceedingthedosage
quantitiesrecommendedonthedetergent
package to avoid problems of excessive
foam, poor rinsing, financial savings and finally,
environmental protection.
• Uselesserdetergentforsmallamountsor
lightly soiled clothes.
• Useconcentrateddetergentsinthe
recommended dosage.
Using softeners
Pour the softener into the softener compartment of
the detergent drawer.
• Usethedosagesrecommendedonthe
package.
• Donotexceedthe(>max<)levelmarkingin
the softener compartment.
• Ifthesoftenerhaslostitsfluidity,diluteitwith
water before putting it in the detergent drawer.
Using liquid detergents
If the product contains a liquid detergent cup:
• Makesurethatyouhaveplacedtheliquid
detergent cup in compartment nr. “2”.
• Usethedetergentmanufacturer'smeasuring
cup and follow the instructions on the
package.
• Usethedosagesrecommendedonthe
package.
• Iftheliquiddetergenthaslostitsfluidity,dilute
it with water before putting in the detergent
cup.

7
EN
If the product does not contain a liquid
detergent cup:
• Donotuseliquiddetergentfortheprewashin
a programme with prewash.
• Usethedetergentmanufacturer'smeasuring
cup and follow the instructions on the
package.
• Liquiddetergentstainsyourclotheswhen
usedwithDelayedStartfunction.Ifyouare
goingtousetheDelayedStartfunction,do
notuseliquiddetergent.
Using gel and tablet detergent
When using tablet, gel, etc. detergents, read
the manufacturer's instructions on the detergent
packagecarefullyandfollowthedosagevalues.If
there is not any instruction on the package, apply
the following.
• Ifthegeldetergentthicknessisfluidaland
yourmachinedoesnotcontainaspecialliquid
detergent cup, put the gel detergent into the
main wash detergent compartment during first
waterintake.Ifyourmachinecontainsaliquid
detergent cup, fill the detergent into this cup
before starting the programme.
• Ifthegeldetergentthicknessisnotfluidalor
intheshapeofcapsuleliquidtablet,putit
directly into the drum before washing.
• Puttabletdetergentsintothemainwash
compartment(compartmentnr.II)ordirectly
into the drum before washing.
CTablet detergents may leave residues in the
detergentcompartment.Ifyouencounter
such a case, place the tablet detergent
between the laundry, close to the lower part of
the drum in future washings.
C Usethetabletorgeldetergentwithout
selecting the prewash function.
Using starch
• Addliquidstarch,powderstarchorthe
dyestuff into the softener compartment as
instructed on the package.
• Donotusesoftenerandstarchtogetherina
washing cycle.
• Wipetheinsideofthemachinewithadamp
and clean cloth after using starch.
Using bleaches
• Selectaprogrammewithprewashandadd
the bleaching agent at the beginning of the
prewash.Donotputdetergentintheprewash
compartment. As an alternative application,
select a programme with extra rinse and add
the bleaching agent while the machine is
taking water from the detergent compartment
during first rinsing step.
• Donotusebleachingagentanddetergentby
mixing them.
• Usejustalittleamount(approx.50ml)of
bleaching agent and rinse the clothes very
wellasitcausesskinirritation.Donotpourthe
bleaching agent onto the clothes and do not
use it for coloured clothes.
• Whenusingoxygenbasedbleaches,
follow the instructions on the package and
select a programme that washes at a lower
temperature.
• Oxygenbasedbleachescanbeusedtogether
with detergents; however, if its thickness is
not the same with the detergent, put the
detergent first into the compartment nr. “2”
in the detergent drawer and wait until the
detergent flows while the machine is taking in
water. Add the bleaching agent from the same
compartment while the machine is still taking
in water.
Using limescale remover
• Whenrequired,uselimescaleremovers
manufactured specifically for washing
machines only.
• Alwaysfollowinstructionsonthepackage.

8
EN
Tips for efficient washing
Clothes
Light colours and
whites Colors Dark colors Delicates/
Woolens/Silks
(Recommended
temperature range
based on soiling level:
40-90C)
(Recommended
temperature range based
onsoilinglevel:cold-40C)
(Recommended
temperature range
based on soiling
level:cold-40C)
(Recommended
temperature range
based on soiling
level:cold-30C)
Soiling Level
Heavily Soiled
(difficult stains
such as grass,
coffee, fruits and
blood.)
Itmaybenecessary
topre-treatthe
stains of perform
prewash. Powder
andliquiddetergents
recommended
for whites can be
used at dosages
recommended for
heavily soiled clothes.
Itisrecommendedto
use powder detergents
to clean clay and soil
stains and the stains
that are sensitive to
bleaches.
Powder and
liquiddetergents
recommended for
colours can be used at
dosages recommended
for heavily soiled clothes.
Itisrecommendedtouse
powder detergents to
clean clay and soil stains
and the stains that are
sensitive to bleaches.
Usedetergentswithout
bleach.
Liquiddetergents
suitable for
colours and dark
colours can be
used at dosages
recommended
for heavily soiled
clothes.
Preferliquid
detergents
produced for
delicate clothes.
Woollen and silk
clothes must
be washed with
special woollen
detergents.
Normally Soiled
(For example,
stains caused by
body on collars
and cuffs)
Powder and
liquiddetergents
recommended for
whites can be used at
dosages recommended
for normally soiled
clothes.
Powder and
liquiddetergents
recommended for
colours can be used at
dosages recommended
for normally soiled
clothes.Usedetergents
without bleach.
Liquiddetergents
suitable for
colours and dark
colours can be
used at dosages
recommended
for normally soiled
clothes.
Preferliquid
detergents
produced for
delicate clothes.
Woollen and silk
clothes must
be washed with
special woollen
detergents.
Lightly Soiled
(No visible stains
exist.)
Powder and
liquiddetergents
recommended for
whites can be used at
dosages recommended
for lightly soiled clothes.
Powder and
liquiddetergents
recommended for
colours can be used at
dosages recommended
for lightly soiled clothes.
Usedetergentswithout
bleach.
Liquiddetergents
suitable for
colours and dark
colours can be
used at dosages
recommended
for lightly soiled
clothes.
Preferliquid
detergents
produced for
delicate clothes.
Woollen and silk
clothes must
be washed with
special woollen
detergents.

9
EN
4 Operating the product
Control panel
1-ProgrammeSelectionknob(Uppermost
positionOn/Off)
2-ProgrammeFollow-upindicator
3-TemperatureAdjustmentbutton
4-SpinSpeedadjustmentbutton
5-AuxiliaryFunctionbuttons
6-DelayedStartbutton(insomemodels)
7-Start/Pausebutton
Preparing the machine
Make sure that the hoses are connected tightly.
Plug in your machine. Turn the tap on completely.
Place the laundry in the machine. Add detergent
and fabric softener.
Programme selection
1. Select the programme suitable for the type,
quantityandsoilingdegreeofthelaundry
in accordance with the "Programme and
consumption table" and the temperature table
below.
90˚C Heavilysoiledwhitecottons
and linens. (coffee table covers,
tableclothes, towels, bed sheets,
etc.)
60˚C Normallysoiled,coloured,fadeproof
cottons or synthetic clothes (shirt,
nightgown, pajamas, etc.) and lightly
soiled white linens (underwear, etc.)
40˚C-
30˚C-
Cold
Blended laundry including delicate
textile (veil curtains, etc.), synthetics
and woolens.
2. Select the desired programme with the
Programme Selection button.
CProgrammes are limited with the highest spin
speed appropriate for that particular type of
fabric.
CWhen selecting a programme, always
consider the type of fabric, colour, degree of
soiling and permissible water temperature.
C Alwaysselectthelowestrequired
temperature.Highertemperaturemeans
higher power consumption.
CFor further programme details, see
"Programme and consumption table".
Main programmes
Dependingonthetypeoffabric,usethefollowing
main programmes.
• Cottons
Usethisprogrammeforyourcottonlaundry(such
as bed sheets, duvet and pillowcase sets, towels,
bathrobes, underwear, etc.). Your laundry will be
washed with vigorous washing action for a longer
washing cycle.
• Synthetics
Usethisprogrammetowashyoursynthetic
clothes (shirts, blouses, synthetic/cotton blends,
etc.).Itwasheswithagentleactionandhasa
shorter washing cycle compared to the Cottons
programme.
Forcurtainsandtulle,usetheSynthetic40˚C
programmewithprewashandanti-creasing
functions selected. As their meshed texture
causes excessive foaming, wash the veils/tulle
by putting little amount of detergent into the main
washcompartment.Donotputdetergentinthe
prewash compartment.
1
2
7
5643

10
EN
• Woollens
Usethisprogrammetowashyourwoolenclothes.
Select the appropriate temperature complying
withthetagsofyourclothes.Useappropriate
detergents for woolens.
Additional programmes
For special cases, additional programmes are
available in the machine.
CAdditional programmes may differ according
to the model of the machine.
• Cotton Economic
You may wash your normally soiled durable cotton
and linen laundry in this programme with the
highest energy and water saving compared to
all other wash programmes suitable for cottons.
Actual water temperature may differ from the
declared cycle temperature. Programme duration
may automatically be shortened during later stages
of the programme if you wash less amount (e.g. ½
capacityorless)oflaundry.Inthiscaseenergyand
water consumption will be further decreased giving
you the opportunity for a more economical wash.
This feature is available for certain models having
remaining time display.
• Intensive
Usethisprogrammeforbabyclothesandclothes
wornbyallergicpeople.Increasedhygieneis
provided by a longer heating period and an
additional rinse cycle.
• Handwas (Hand wash) 20
Usethisprogrammetowashyourwoolen/delicate
clothesthatbear“notmachine-washable”tags
andforwhichhandwashisrecommended.It
washes laundry with a very gentle washing action
to not to damage clothes.
• Rapid (Quick wash)
Usethisprogrammetoquicklywashyourlightly
soiled cotton clothes.
• Mixed 40 (Mix 40)
Usethisprogrammetowashyourcottonand
synthetic clothes together without sorting them.
• Shirts
Usethisprogrammetowashtheshirtsmadeof
cotton, synthetic and synthetic blended fabrics
together.
Special programmes
For specific applications, select any of the following
programmes.
• Rinse
Usethisprogrammewhenyouwanttorinseor
starch separately.
• Spin + Drain
Usethisprogrammetoapplyanadditionalspin
cycle for your laundry or to drain the water in the
machine.
Before selecting this programme, select the
desired spin speed and press Start / Pause button.
First, the machine will drain the water inside of
it. Then, it will spin the laundry with the set spin
speed and drain the water coming out of them.
Ifyouwishtodrainonlythewaterwithoutspinning
your laundry, select the Pump+Spin programme
andthenselecttheNoSpinfunctionwiththehelp
of Spin Speed Adjustment button. Press Start /
Pause button.
C Usealowerspinspeedfordelicatelaundries.
Temperature selection
Whenever a new programme is selected, the
recommended temperature for the selected
programme appears on the temperature indicator.
To decrease the temperature, press the
Temperature Adjustment button. Temperature will
decrease gradually.
C Iftheprogrammehasnotreachedtheheating
step, you can change the temperature without
switching the machine to Pause mode.
Spin speed selection
Whenever a new programme is selected, the
recommended spin speed of the selected
programme is displayed on the spin speed
indicator.
To decrease the spin speed, press the Spin
Speed Adjustment button. Spin speed decreases
gradually. Then, depending on the model of the
product,"RinseHold"and"NoSpin"options
appear on the display. See "Auxiliary function
selection" section for explanations of these
options.
C Iftheprogrammehasnotreachedthe
spinning step, you can change the speed
without switching the machine to Pause
mode.

11
EN
Programme and consumption table
• Selectable
* Automaticallyselected,nocanceling.
** EnergyLabelprogramme(EN60456)
EN 2Auxiliary functions
ProgrammeProgramme
Max. Load (kg)
ProgrammeProgramme Duration (~min)
Water Consumption (l)Water Consumption (l)
Energy Consumption (kWh)
Max. Speed***
PrewashPrewash
Quick WashQuick Wash
Rinse Plus
Selectable
temperaturetemperature
range °C
Cottons 90 7 147 74 2.30 1000 ••• Cold-90
Cottons 60 7 118 70 1.54 1000 ••• Cold-90
Cottons 40 7 98 69 0.85 1000 ••• Cold-90
Cotton Economic 60** 7 160 44 1.00 1000 40-60
Cotton Economic 60 3.5 145 38 0.84 1000 40-60
Cotton Economic 40 3.5 130 38 0.65 1000 40-60
Rapid 90 7 88 60 1.90 1000 •Cold-90
Rapid 60 7 58 60 1.00 1000 •Cold-90
Rapid 30 7 28 60 0.25 1000 •Cold-90
Shirts 60 3.5 104 60 1.00 600 ••• Cold-60
Mix40 40 3.5 115 55 0.60 800 ••• Cold-40
Hand wash 20 20 1 43 34 0.20 600 20
WoollensWoollens 40 1.5 60 47 0.34 600 •Cold-40
Intensive 90 7 165 90 2.40 1000 •* 30-90
Synthetics 60 3 116 55 1.00 800 ••• Cold-60
Synthetics 40 3 106 55 0.55 800 ••• Cold-60
*** Ifmaximumspinspeedofthemachineislowerthenthisvalue,youcanonlyselectuptothe
maximum spin speed.
CWater and power consumption may vary subject to the changes in water pressure, water hardness
and temperature, ambient temperature, type and amount of laundry, selection of auxiliary functions
and spin speed, and changes in electric voltage.
CYou can see the washing time of the programme you have selected on the display of the machine.
Itisnormalthatsmalldifferencesmayoccurbetweenthetimeshownonthedisplayandthereal
washing time.
CThe auxiliary functions in the table may vary according to the model of your machine.
For Water Efficiency, Cotton Eco 60 °C [at load 7 kg] is the recommended program for normally soil clothes

12
EN
Auxiliary function selection
Usethefollowingauxiliaryfunctionsaccording
to your daily needs. Select the desired auxiliary
functions before starting the programme.
Furthermore, you may also select or cancel
auxiliary functions that are suitable to the running
programme without pressing the Start / Pause
button when the machine is operating. For this,
the machine must be in a step before the auxiliary
function you are going to select or cancel.
Iftheauxiliaryfunctioncannotbeselectedor
canceled, light of the relevant auxiliary function will
blink 3 times to warn the user.
CSome functions cannot be selected together.
For example, Prewash and Quick Wash.
C Ifasecondauxiliaryfunctionconflictingwith
the first one is selected before starting the
machine, the function selected first will be
canceled and the second auxiliary function
selection will remain active. For example,
if you want to select Quick Wash after you
have selected the Prewash, Prewash will be
canceled and Quick Wash will remain active.
CAn auxiliary function that is not compatible
with the programme cannot be selected. (See
"Programme and consumption table")
CAuxiliary Function buttons may vary according
to the model of the machine.
• Prewash
A Prewash is only worthwhile for heavily soiled
laundry.NotusingthePrewashwillsaveenergy,
water, detergent and time.
CPrewash without detergent is recommended
for tulle and curtains.
• Quick Wash
This function can be used in Cottons and
Syntheticsprogrammes.Itdecreasesthewashing
times and also the number of rinsing steps for
lightly soiled laundry.
CWhen you select this function, load your
machine with half of the maximum laundry
specified in the programme table.
• Rinse Plus
This function enables the machine to make
another rinsing in addition to the one already made
after the main wash. Thus, the risk for sensitive
skins (babies, allergic skins, etc.) to be effected by
the minimal detergent remnants on the laundry can
be reduced.
• Anti-Creasing
This function creases the clothes lesser when they
arebeingwashed.Drummovementisreduced
and spinning speed is limited to prevent creasing.
Inaddition,washingisdonewithahigherwater
level.Usethisfunctionfordelicatelaundrythat
creases easily.
• Rinse Hold
Ifyouarenotgoingtounloadyourclothes
immediately after the programme completes, you
may use rinse hold function to keep your laundry
in the final rinsing water in order to prevent them
from getting wrinkled when there is no water in
the machine. Press Start / Pause button after this
process if you want to drain the water without
spinning your laundry. Programme will resume and
complete after draining the water.
Ifyouwanttospinthelaundryheldinwater,adjust
the Spin Speed and press Start / Pause button.
The programme resumes. Water is drained,
laundry is spun and the programme is completed.
• Soaking
The Soaking auxiliary function ensures better
removal of stains ingrained into the clothes by
holding them in the detergent water prior to startup
of the programme.
• Pet hair removal
This function removes the pet hairs that remain on
your clothes more effectively.
Whenthisfunctionisselected,PrewashandExtra
Rinse steps are added to the normal programme.
Thus, pet hairs are removed more effectively by
performingthewashingwithmorewater(30%).
A Neverwashyourpetsinyourwashing
machine.
Delayed Start(Insomemodelsonly)
WiththeDelayedStartfunctionthestartupofthe
programme may be delayed up to 3, 6 or 9 hours.
C Donotuseliquiddetergentswhenyouset
DelayedStart!Thereistheriskofstainingof
the clothes.
Opentheloadingdoor,placethelaundryandput
detergent, etc. Select the washing programme,
temperature,spinspeedand,ifrequired,the
auxiliary functions. Set the desired time by pressing
theDelayedStartbutton.Whenthebuttonis
pressed once, 3 hours delayed start is selected.
When the same button is pressed again, 6 hours
delay is selected, and when it is pressed for the
thirdtime,9hoursdelayedstartisselected.If
youpresstheDelayedStartbuttononceagain,
DelayedStartfunctionwillbecanceled.PressStart
/ Pause button. Previous delayed start time light
turns off and next delayed start time light turns on
after every 3 hours. At the end of the countdown,
all delayed start lights will turn off and the selected
programme will start.
CAdditional laundry may be loaded during the
delayed start period.
Changing the Delayed Start period
PressDelayedStartbutton.Everytimethebutton
ispressed,theperiodwillchangein3-hour
increments and the light of the selected delayed
start time will turn on.
Canceling the Delayed Start function
Ifyouwanttocancelthedelayedstartcountdown
and start the programme immediately:
SettheDelayedStartperiodtozero(alldelayed
start period lights will turn off) or turn the
Programme Selection knob to any programme.

13
EN
Thus,DelayedStartfunctionwillbecanceled.The
End/Cancellightflashescontinuously.Then,select
the programme you want to run again. Press Start
/ Pause button to start the programme.
Starting the programme
Press Start / Pause button to start the programme.
Programmefollow-uplightshowingthestartupof
the programme will turn on.
C Ifnoprogrammeisstartedornokeyis
pressed within 1 minute during programme
selection process, the machine will switch
to Pause mode and the illumination level of
the temperature, speed and loading door
indicatorlightswilldecrease.Otherindicator
lightsandindicatorswillturnoff.Oncethe
Programme Selection knob is rotated or
any button is pressed, indicator lights and
indicators will turn on again.
Child Lock
Usechildlockfunctiontopreventchildrenfrom
tampering with the machine. Thus you can avoid
any changes in a running programme.
C IftheProgrammeSelectionknobisrotated
when the child lock is active, the lights on the
1st and 2nd auxiliary function buttons will blink
3 times. The child lock does not allow any
change in the programmes and the selected
temperature, speed and auxiliary functions.
C Evenifanotherprogrammeisselectedwith
the Programme Selection knob while the Child
Lock is active, previously selected programme
will continue running.
CWhen the Child Lock is active and the
machine is running, you can switch the
machine to Pause mode without deactivating
the Child Lock by turning the Programme
SelectionknobtoOn/Offposition.When
you turn the Programme Selection knob
afterwards, the programme will resume.
To activate the Child Lock:
Press and hold 1st and 2nd Auxiliary Function
buttons for 3 seconds. The lights on the 1st and 2nd
Auxiliary Function buttons will flash while you keep
the buttons pressed for 3 seconds.
To deactivate the Child Lock:
Press and hold 1st and 2nd auxiliary function
buttons for 3 seconds while any programme is
running. The lights on the 1st and 2nd Auxiliary
Function buttons will flash while you keep the
buttons pressed for 3 seconds.
C Inadditiontothemethodabove,todeactivate
the Child Lock, switch the Programme
SelectionknobtoOn/Offpositionwhenno
programme is running, and select another
programme.
CWhen the power is restored after a power
failure or after your machine is unplugged
and plugged in again, the Child Lock will not
be deactivated when the machine resumes
operating.
Progress of programme
Progress of a running programme can be followed
fromtheProgrammeFollow-upindicator.At
the beginning of every programme step, the
relevant indicator light will turn on and light of the
completed step will turn off.
You can change the auxiliary functions, speed
and temperature settings without stopping the
programme flow while the programme is running.
To do this, the change you are going to make must
beinastepaftertherunningprogrammestep.If
the change is not compatible, relevant lights will
flash for 3 times.
C Ifthemachinedoesnotpasstothespinning
step,RinseHoldfunctionmightbeactive
or the automatic unbalanced load detection
system might be activated due to the
unbalanced distribution of the laundry in the
machine.
Loading door lock
There is a locking system on the loading door of
the machine that prevents opening of the door in
cases when the water level is unsuitable.
Loading door light will start flashing when the
machine is switched to Pause mode. Machine
checksthelevelofthewaterinside.Ifthelevelis
suitable,LoadingDoorlightilluminatessteadily
within1-2minutesandtheloadingdoorcanbe
opened.
Ifthelevelisunsuitable,LoadingDoorlightturns
offandtheloadingdoorcannotbeopened.If
youareobligedtoopentheLoadingDoorwhile
theLoadingDoorlightisoff,youhavetocancel
the current programme; see "Canceling the
programme".
Changing the selections after
programme has started
Switching the machine to pause mode
Press the Start / Pause button to switch the
machine to pause mode while a programme is
running. The light of the step which the machine
isinstartsflashingintheProgrammeFollow-up
indicator to show that the machine has been
switched to the pause mode.
Also, when the loading door is ready to be opened,
LoadingDoorlightwillalsoilluminatecontinuously
in addition to the programme step light.
Changing the speed and temperature settings
for auxiliary functions
Dependingonthesteptheprogrammehas
reached, you may cancel or activate the auxiliary
functions; see, "Auxiliary function selection".
You may also change the speed and temperature
settings; see, "Spin speed selection" and
"Temperature selection".
C Ifnochangeisallowed,therelevantlightwill
flash for 3 times.
Adding or taking out laundry
Press the Start / Pause button to switch the
machine to pause mode. The programme

14
EN
follow-uplightoftherelevantstepduring
which the machine was switched into the
pause mode will flash.
WaituntiltheLoadingDoorcanbeopened.
OpentheLoadingDoorandaddortakeout
thelaundry.ClosetheLoadingDoor.Make
changes in auxiliary functions, temperature
and speed settings if necessary. Press Start /
Pause button to start the machine.
Canceling the programme
To cancel the programme, turn the Programme
Selection knob to select another programme.
Previousprogrammewillbecanceled.End/
Cancel light will flash continuously to notify that
the programme has been canceled.
Your machine will end the programme
when you turn the Programme Selection
knob; however, it does not drain the water
inside. When you select and start a new
programme, the newly selected programme
will start depending on the step the previous
programme was canceled in. For example,
it may take in additional water or continue to
wash with the water inside.
C Dependingonthestepwherethe
programme was canceled in, you may
have to put detergent and softener again
for the programme you have selected
anew.
Your machine is equipped
with a “Standby Mode”
Incaseofnotstartinganyprogrammeor
waiting without making any other operation
whenthemachineisturnedonbyOn/Off
button and while it is in selection step or if no
other operation is performed approximately
2 minutes after the programme you selected
has come to an end, your machine will
automatically switch to energy saving mode.
Brightness of indicator lights will decrease.
Also,ifyourproductisequippedwithadisplay
showing the programme duration, this display
willcompletelyturnoff.Incaseofrotatingthe
Programme Selection knob or pressing any
button, lights and display will restore to their
previous condition. Your selections made while
exiting the energy saving mode may change.
Check the appropriateness of your selections
before starting the programme. Readjust if
necessary. This is not a fault.
5 Maintenance and cleaning
Service life of the product extends and
frequentlyfacedproblemsdecreaseifcleaned
at regular intervals.
Cleaning the detergent drawer
Clean the detergent drawer at regular intervals
(every4-5washingcycles)asshownbelow
in order to prevent accumulation of powder
detergent in time.
Press the dotted point on the siphon in the
softener compartment and pull towards you
until the compartment is removed from the
machine.
C Ifmorethannormalamountofwaterand
softener mixture starts to gather in the
softener compartment, the siphon must
be cleaned.
Wash the detergent drawer and the siphon
with plenty of lukewarm water in a washbasin.
Wear protective gloves or use an appropriate
brush to avoid touching of the residues in the
drawerwithyourskinwhencleaning.Insertthe
drawer back into its place after cleaning and
make sure that it is seated well.
Ifyourdetergentdraweristheoneindicatedin
the following figure:
CLift the rear part of the siphon to remove
it as illustrated. After performing the above
mentioned cleaning procedures, replace
the siphon back to its seating and push
its front section downwards to make sure
that the locking tab engages.
Cleaning the water intake filters
There is a filter at the end of each water intake
valve at the rear of the machine and also at
the end of each water intake hose where they
are connected to the tap. These filters prevent
foreign substances and dirt in the water to
enter the washing machine. Filters should be
cleaned as they do get dirty.

15
EN
Close the taps. Remove the nuts of the water
intake hoses to access the filters on the water
intake valves. Clean them with an appropriate
brush.Ifthefiltersaretoodirty,takethemoutby
means of pliers and clean them. Take out the filters
on the flat ends of the water intake hoses together
with the gaskets and clean thoroughly under
running water. Replace the gaskets and filters
carefully in their places and tighten the hose nuts
by hand.
Draining remaining water and
cleaning the pump filter
The filter system in your machine prevents solid
items such as buttons, coins and fabric fibers
clogging the pump impeller during discharge of
washing water. Thus, the water will be discharged
without any problem and the service life of the
pump will extend.
Ifthemachinefailstodrainwater,thepumpfilter
is clogged. Filter must be cleaned whenever it
is clogged or in every 3 months. Water must be
drained off first to clean the pump filter.
Inaddition,priortotransportingthemachine
(eg., when moving to another house) and in case
of freezing of the water, water may have to be
drained completely.
AForeign substances left in the pump filter may
damage your machine or may cause noise
problem.
Inordertocleanthedirtyfilteranddischargethe
water:
Unplugthemachinetocutoffthesupplypower.
ATemperature of the water inside the machine
mayriseupto90ºC.Toavoidburningrisk,
filter must be cleaned after the water in the
machine cools down.
Openthefiltercap.
Ifthefiltercapiscomposedoftwopieces,
press the tab on the filter cap downwards and
pull the piece out towards yourself.
Ifthefiltercapisonepiece,pullthecapfromboth
sides at the top to open.
CYou can remove the filter cover by slightly
pushing downwards with a thin plastic tipped
tool, through the gap above the filter cover.
Donotusemetaltippedtoolstoremovethe
cover.
Some of our products have emergency draining
hose and some does not have. Follow the steps
below to discharge the water.
Dischargingthewaterwhentheproducthasan
emergency draining hose:
Pull the emergency draining hose out from its seat
Place a large container at the end of the hose.
Drainthewaterintothecontainerbypullingoutthe
plug at the end of the hose. When the container
is full, block the inlet of the hose by replacing the
plug. After the container is emptied, repeat the
above procedure to drain the water in the machine
completely. When draining of water is finished,
close the end by the plug again and fix the hose in
its place. Turn the pump filter to take it out.
Dischargingthewaterwhentheproductdoesnot
have an emergency draining hose:
Place a large container in front of the filter to
catch water from the filter. Loosen pump filter
(anticlockwise) until water starts to flow. Fill the
flowing water into the container you have placed
in front of the filter. Always keep a piece of cloth
handy to absorb any spilled water. When the water
inside the machine is finished, take out the filter
completely by turning it. Clean any residues inside
the filter as well as fibers, if any, around the pump
impellerregion.Installthefilter.
A Ifyourproducthasawaterjetfeature,be
sure to fit the filter into its housing in the
pump.Neverforcethefilterwhileinstallingit
into its housing. Seat the filter into its place
completely.Otherwise,watermayleakfrom
the filter cap.
Ifthefiltercapiscomposedoftwopieces,close
thefiltercapbypressingonthetab.Ifitisone
piece, seat the tabs in the lower part into their
places first, and then press the upper part to close.

16
EN
6 Technical specications
CTechnicalspecications may be changed withoutprior notice to improve the quality of the product.
CFigures in this manual are schematic and may not match theproduct exactly.
CValues stated on the product labels or in the documentation accompanying it are obtained in
laboratory conditions in accordance with the relevant standards. Depending on operational and
environmental conditions of the product, these values may vary.
Models
Maximum dry laundry capacity (kg)
Height (cm)
Width (cm)
Depth (cm)
Net weight (±4 kg.)
Electrical input (V/Hz)
Total current (A)
Total power (W)
Spin speed (rpm max.)
Stand-by mode power (W)
O-mode power (W)
This appliance’s packaging material is recyclable. Help recycle it and protect the
environment by dropping ito in the municipal receptacles provided for this purpose.
Your appliance also contains a great amount of recyclable material. It is marked with
this labelto indicatethe used appliances that should not be mixed with other waste.
This way, the appliance recycling organised by your manufacturer will be done under
the best possible conditions, in compliance with European Directive 2002/96/EC on
Waste Electrical and Electronic Equipment. Contact your town hall or your retailer for the
used appliance collection points closest to your home. We thank you doing your part to
protect the environment.
On/O Reset
3 sn.
Coton
Start
Pause
Synthetics Woollens Delicate Hand
wash
Intensive
ExpressRinse
hold
Anti
creasing Rinse
plus
Time
delay
No
heat
Temperature Cold Child
lock
Prewash Main
wash
Drain
Rinse Spin No
spin
Wash EndMix 40
Door
ready
Sport Quick
Cotton
Economic
Shirt
rapid
7
84
60
54
71
230 V / 50Hz
10
2200
1000
1.00
0.25
EWF 1076 A

17
EN
7 Troubleshooting
Programme cannot be started or selected.
• Washingmachinehasswitchedtoselfprotectionmodeduetoasupplyproblem(linevoltage,
waterpressure,etc.).>>>Tocanceltheprogramme,turntheProgrammeSelectionknob
to select another programme. Previous programme will be cancelled. (See "Canceling the
programme")
Water in the machine.
• Somewatermighthaveremainedintheproductduetothequalitycontrolprocessesinthe
production.>>>This is not a failure; water is not harmful to the machine.
Machine vibrates or makes noise.
• Machinemightbestandingunbalanced.>>>Adjust the feet to level the machine.
• Ahardsubstancemighthaveenteredintothepumpfilter.>>>Clean the pump filter.
• Transportationsafetyboltsarenotremoved.>>>Remove the transportation safety bolts.
• Laundryquantityinthemachinemightbetoolittle.>>>Add more laundry to the machine.
• Machinemightbeoverloadedwithlaundry.>>>Take out some of the laundry from the machine
or distribute the load by hand to balance it homogenously in the machine.
• Machinemightbeleaningonarigiditem.>>>Make sure that the machine is not leaning on
anything.
Machine stopped shortly after the programme started.
• Machinemighthavestoppedtemporarilyduetolowvoltage.>>>It will resume running when the
voltage restores to the normal level.
Programmetimedoesnotcountdown.(Onmodelswithdisplay)
• Timermaystopduringwaterintake.>>>Timer indicator will not countdown until the machine
takes in adequate amount of water. The machine will wait until there is sufficient amount of water
to avoid poor washing results due to lack of water. Timer indicator will resume countdown after
this.
• Timermaystopduringheatingstep.>>>Timer indicator will not countdown until the machine
reaches the selected temperature.
• Timermaystopduringspinningstep.>>>Automatic unbalanced load detection system might
be activated due to the unbalanced distribution of the laundry in the drum.
CMachine does not switch to spinning step when the laundry is not evenly distributed in the drum
to prevent any damage to the machine and to its surrounding environment. Laundry should be
rearrangedandre-spun.
Foam is overflowing from the detergent drawer.
• Toomuchdetergentisused.>>>Mix 1 tablespoonful softener and ½ l water and pour into the
main wash compartment of the detergent drawer.
CPut detergent into the machine suitable for the programmes and maximum loads indicated in
the “Programme and consumption table”. When you use additional chemicals (stain removers,
bleachs and etc), reduce the amount of detergent.
Laundry remains wet at the end of the programme
• Excessivefoammighthaveoccurredandautomaticfoamabsorptionsystemmighthavebeen
activatedduetotoomuchdetergentusage.>>>Use recommended amount of detergent.
CMachine does not switch to spinning step when the laundry is not evenly distributed in the drum
to prevent any damage to the machine and to its surrounding environment. Laundry should be
rearrangedandre-spun.
A Ifyoucannoteliminatetheproblemalthoughyoufollowtheinstructionsinthissection,consultyour
dealerortheAuthorizedServiceAgent.Nevertrytorepairanonfunctionalproductyourself.
Table of contents
Other Elba Washer manuals

Elba
Elba WM EA 15100-A User manual

Elba
Elba HWD100-BD14756 User manual

Elba
Elba EW 6080 DGT User manual

Elba
Elba EWF-6560E User manual

Elba
Elba EWF 1077 A User manual

Elba
Elba EWF-N1287D(GR) User manual

Elba
Elba Smart Drive Mounting instructions

Elba
Elba EWF-8120 User manual

Elba
Elba EWF 0861 A User manual

Elba
Elba EWF-B6151 User manual