Elcometer SAGOLA COMPACT 220 User manual

manual de instrucciones
instruction manual
compact
an Elcometer company
Lavadora
Washer

- 3 -
Índice
1 Atención pág.4
2 Introducción pág.4
3 Identificación del equipo pág.4
4 Datos técnicos pág.4
5 Descripción del equipo pág.5
6 Partes exteriores de la máquina pág.6
7 Instrucciones de uso pág.6
7.1. Lavado automático inicial de la pistola pág.6
7.2. Lavado automático final pág.7
8 Normas de seguridad pág.8
9 Instalación pág.8
9.1. Controles a la puesta en marcha pág.8
9.2. Proceso de puesta en marcha pág.8
10 Tabla de averías pág.9
11 Mantenimiento pág.9
12 Lista de repuestos pág.10
13 Condiciones de garantía pág.11
14 Declaración de conformidad pág.11

- 4 -
1. ATENCIÓN
2. INTRODUCCIÓN
3. IDENTIFICACIÓN DEL EQUIPO
4. DATOS TÉCNICOS
El equipo COMPACT 220 está dotado de una matrícula
que informa:
Marca Número de matrícula
Nombre y dirección Número de serie
Marca Año de construcción
Modelo
Peso 50 kg.
Altura 1.000 mm.
Largo 480 mm.
Ancho 550 mm.
Carga sostenible 20 kg.
Volumen zona lavado disolvente 38 L
Presión máxima de trabajo 7 bar
ATEX II 3GD
Antes de poner en marcha el equipo, deberá leer,
tener en cuenta y cumplir en su totalidad todas las
indicaciones descritas en este Manual.
Deberá conservarlo en un lugar seguro y accesible a
todos los usuarios del equipo.
El equipo sólo debe ser puesto en funcionamiento y
utilizado por personas instruidas en su manejo, y exclu-
sivamente para ser utilizado en los fines previstos.
Asimismo, deberá tener en cuenta las Normas de
Prevención de accidentes, los Reglamentos y Directi-
vas para los Centros de trabajo y las Leyes y restric-
ciones vigentes.
Los logotipos de SAGOLA y otros productos
SAGOLA, mencionados en este manual, son marcas
registradas o marcas de la empresa SAGOLA S.A.U.
El equipo que tiene en su poder pertenece a la
familia de equipos que se emplean para la limpieza
de pistolas aerográficas, sus accesorios y comple-
mentos, con disolvente, además de aire comprimido.
Fabricado con acero Inoxidable y construido en
conformidad con las disposiciones recogidas en la
directiva 2006/42/UE y sucesivas modificaciones.
Está por tanto provista de la marca .
De serie está compuesto por:
-
Maquina Lavadora, con mangueras y conexiones para
proyectar disolvente y aire comprimido necesarios.
- Manual de Instrucciones.
- Envase.
Elementos opcionales y complementarios del equipo:
- Mangueras de aire SAGOLA.
- Purificadores y/o Reguladores de aire SAGOLA.
- Conectores y acoplamientos de aire comprimido.
COMPACT 220

El equipo COMPACT 220 está fabricado totalmente
en acero inoxidable AISI 304. Básicamente constitui-
do por un depósito superior que se utiliza para el
lavado automático de piezas, que contiene una parri-
lla de trabajo (nº1 figura 1) sobre la cual se pueden
colocar las pistolas y accesorios para limpiar.
En el interior del depósito, existen varios pulverizado-
res (nº2 figura 1) para la limpieza interior y exterior
de la pistola de forma automática.
Además equipa dos dispositivos neumáticos para
colocar en la entrada de aire de la pistola y evitar que
el disolvente entre en la pistola durante su lavado
automático (nº3 figura 1).
El depósito interior incluye una salida de vapores
conectada a una extracción automática (nº4 figura 2)
además de dos anclajes de gatillo (nº5 figura 2) para
la mantener las pistolas abiertas durante su limpieza.
La zona inferior está diseñada para la introducción
de dos recipientes que contengan disolvente para
recirculación y disolvente limpio, la cantidad total
introducida de estos dos disolventes nunca debe
superar la capacidad del total de la garrafa que
contenga el disolvente de recirculación para evitar
desbordamientos.
Esta zona inferior tiene dos absorciones, una con
filtro de entrada (nº 6 figura 3) que se introducirá en
la garrafa de disolvente para recircular, y que a
través de una bomba de doble membrana (nº9 figura
3) permite una segunda utilización.
La otra absorción (nº7 figura 3) se introducirá en la
garrafa de disolvente limpio. Esta absorción de
disolvente limpio es para realizar la limpieza automá-
tica (a través de la doble membrana) bien de una
manera temporizada o de una manera manual
mediante un pulsador. En ambos casos el disolvente
limpio terminará en la garrafa del disolvente de
recirculación, a través del desague (nº8 figura 3).
CLASIFICACIÓN SEGÚN LA DIRECTIVA ATEX
La máquina cumple con los requisitos esenciales de
la Directiva 2014/34/UE de la UE, más conocida
como ATEX ("Atmósferas Explosivas"). Se clasifica
en el grupo II categoría G Sistema de 3 letras. Los
procedimientos de evaluación de la conformidad,
llevados a cabo por un control interno de fábrica,
permiten la instalación de la máquina en un entorno
donde pueda haber riesgo de explosión debido a la
presencia de gases, vapores o niebla.
Preparación para la extracción de gases
Para el cumplimiento de ATEX, la máquina está equi-
pada con un sistema de evacuación forzada de los
vapores generados durante la operación.
La evacuación de gases se lleva a cabo a través de
un tubo (nº4 figura 2) con conexión automática de la
máquina.
5. DESCRIPCIÓN DEL EQUIPO
- 5 -
Figura 1
Figura 2 45
Figura 3
7
6
9
8
1
32
- 6 -
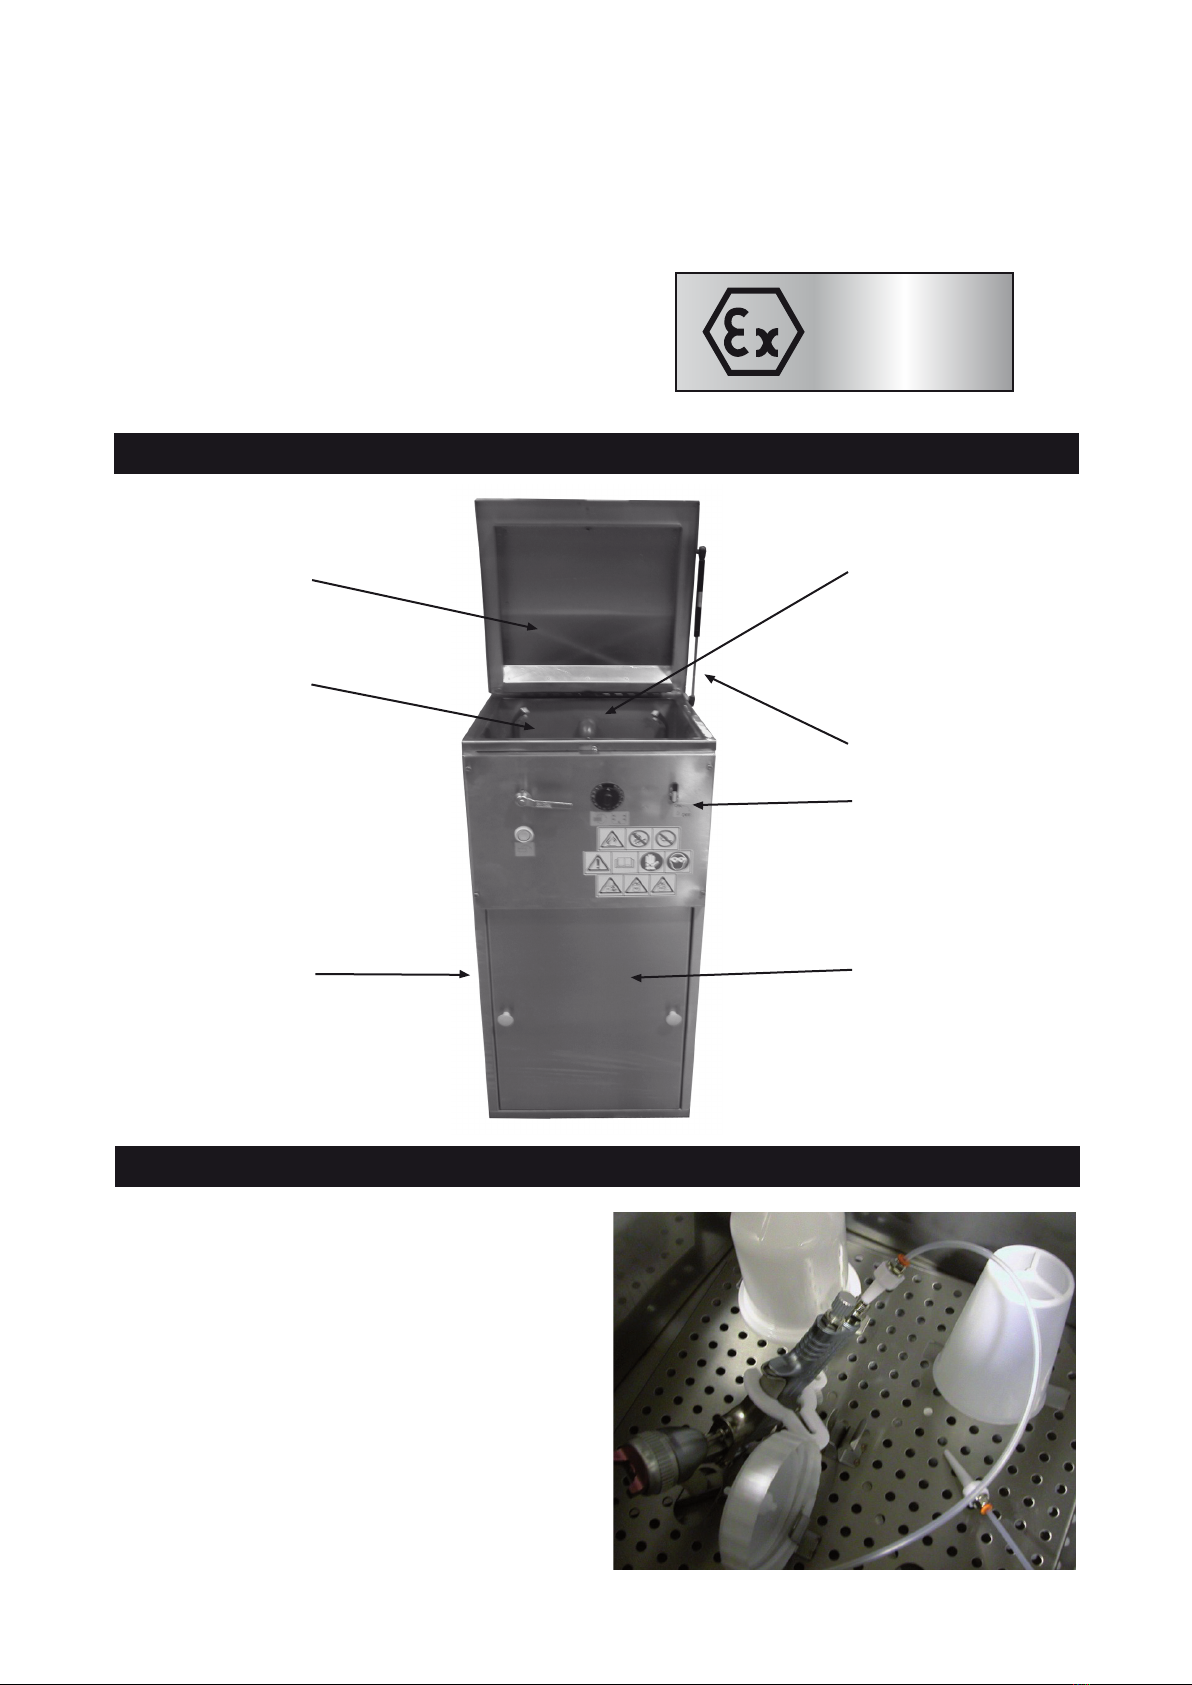
6. PARTES EXTERIORES DE LA MÁQUINA
TAPA EN ACERO
INOXIDABLE
ZONA INTERIOR DE
LIMPIEZA AUTOMÁTICA
PARA 2 PISTOLAS Y
ACCESORIOS
ENTRADA DE AIRE A LA
MÁQUINA EN LA PARTE
TRASERA
PORTÓN DE ACCESO
AL INTERIOR
CUADRO DE MANDOS
- ON / OFF
- TEMPORIZADOR
- PALANCA DISOLVENTE
SUCIO/LIMPIO
- PULSADOR PARA
INJECCIÓN MANUAL DE
DISOLVENTE LIMPIO
TAPA DE FÁCIL Y SUAVE
APERTURA MEDIANTE
AMORTIGUADOR
SISTEMA DE
EXTRACCIÓN DE
GASES
Este tubo se tiene que conectar a la extracción gene-
ral taller o llevado fuera del taller.
En este segundo caso, el tubo conectado a la máqui-
na debe tener al menos 1 metro vertical antes de ser
llevado fuera.
Para una instalación fácil, el tubo es generalmente
aluminio, flexible y extensible.
Los gases dispersos de disolvente, de esa manera
no necesitan tratamiento adicional
7. INSTRUCCIONES DE USO
7.1. LAVADO AUTOMÁTICO INICIAL
Al finalizar el trabajo de pintado y para conseguir una
mayor duración del disolvente en la máquina, se
recomienda un vaciado de la pintura sobrante, así
como un pequeño prelavado manual antes de
introducir la pistola en la máquina.
Abra la tapa y coloque la pistola y sus accesorios tal
como indican las foto, encajando el clip plástico de
apertura de gatillo que viene en la máquina y colocan-
do en la entrada de aire el dispositivo neumático de
protección de entrada de disolvente en zona de aire
de la pistola. Cierre la tapa.
II 3 GD
- 7 -
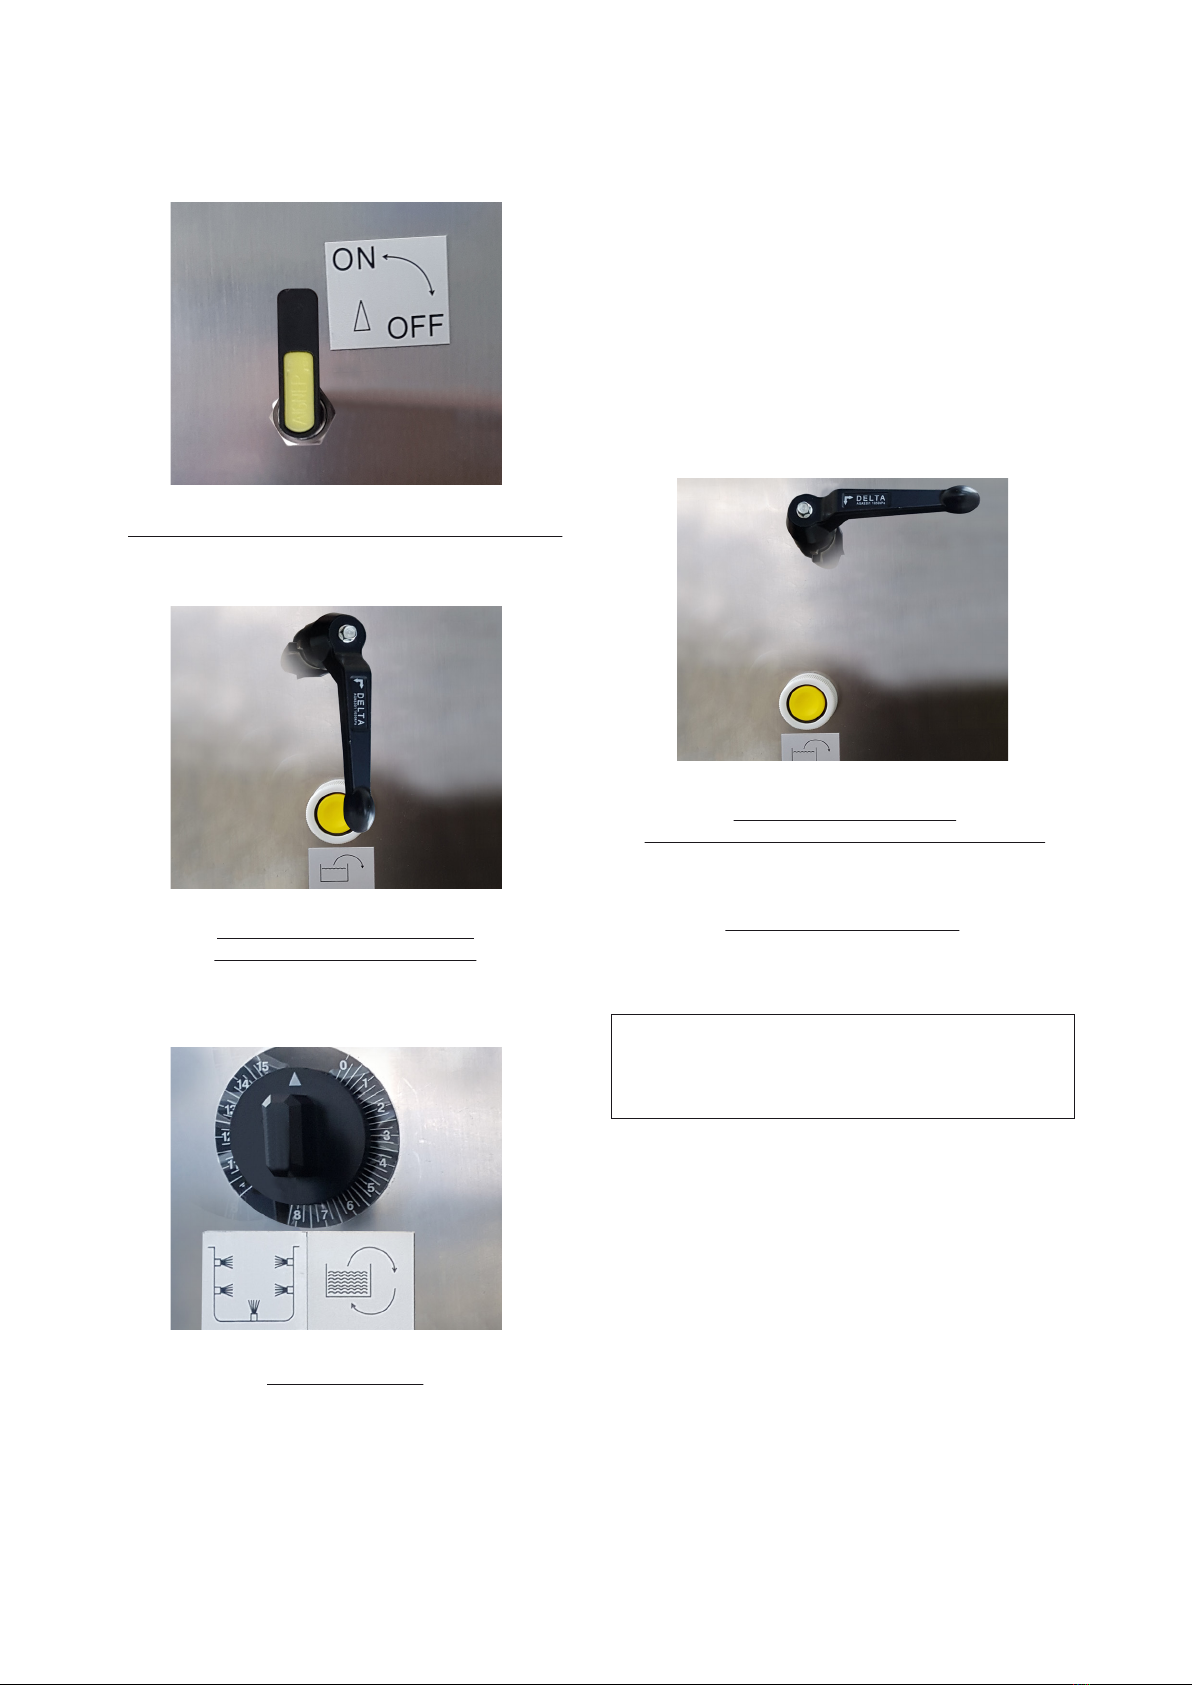
Accione el mando de encendido del sistema
ON/OFF. Programe el temporizador girándolo en el
sentido de las agujas del reloj.
PUESTA EN MARCHA Y PARADA DEL SISTEMA
Mientras esté en posición ON, estará en
funcionamiento la extracción de la máquina
PALANCA DE SELECCIÓN
DISOLVENTE DE TRABAJO
Hacia abajo, vertical: disolvente sucio. (el disolvente
recircula) sólo para trabajo automático
con temporizador
TEMPORIZADOR
La máquina en recirculación sólo funciona cuando el
temporizador esta en marcha y la tapa cerrada
Si durante el tiempo de lavado el operario abre la
tapa, la bomba dejará de trasvasar producto automá-
ticamente.
De todas formas se recomienda para evitar salpica-
duras no abrir la tapa y menos de una forma brusca
durante el lavado. Terminado el tiempo de lavado la
bomba se para y se inicia la aspiración de vapores.
7.2. LAVADO AUTOMÁTICO FINAL
Posicione la palanca de selección de disolvente de
trabajo hacia abajo. Accione el pulsador de limpieza.
Mientras se mantenga pulsado, la bomba enviará
disolvente limpio por los inyectores.
El disolvente limpio terminará siempre la garrafa de
disolvente de recirculación.
PALANCA Y PULSADOR
DE SELECCIÓN DISOLVENTE DE TRABAJO
Hacia arriba, horizontal: disolvente limpio. (el disolven-
te no recircula), puede trabajar en automático con
temporizador y realizar un bombeo manual mediante
EL PULSADOR INFERIOR.
ATENCIÓN
Se recomienda utilizar el pulsador sólo durante
unos segundos, el tiempo justo para realizar
esta operación, evitando de este modo agotar
con demasiada prontitud el disolvente limpio.
Abra y retire la pistola y los accesorios. En este punto
estará siempre funcionando la aspiración de vapores.
Si se considera adecuado se puede utilizar la pistola
sopladora de aire para evaporar y secar totalmente
la pistola y los accesorios.
Una vez terminada la operación cierre la tapa de la
zona de lavado. Vuelva siempre la palanca de
selección de disolvente de trabajo en la posición
vertical.

- 8 -
9. INSTALACIÓN
8. NORMAS DE SEGURIDAD
• Peligro genérico.Siempre
prestar atención al manipular
el equipo.
• Leer atentamente el manual
de instrucciones antes de iniciar
el trabajo.
• Usar guantes de protección y
vestuario adecuados.
• Usar gafas de seguridad y
dispositivos de protección
individual.
• Evitar fuentes de calor (estufas,
soldaduras) en las proximidades
de la máquina
• No fumar
• No encender fuego en las
cercanías del equipo.
• Controlar que los tubos de
aspiración y retorno de líquido
limpiador estén correctamente
introducidos y fijados en su
correspondiente depósito.
• Controlar que los tubos de
aspiración y retorno de líquido
limpiador no tengan ningún
deterioro o se encuentren
doblados.
• Controlar el nivel de líquido
limpiador presente en los
depósitos.El nivel de líquido
limpiador mínimo debe
cubrir por completo el filtro
del tubo de aspiración.
Todas las operaciones de instalación del equipo
COMPACT 22O, de regulación y de prueba deben
ser llevadas a cabo por personal técnico adecuado y
responsable que garantice trabajar con seguridad.
9.1. CONTROLES A LA PUESTA EN MARCHA
La presión del aire comprimido del equipo COM-
PACT 22O debe ser de 7 bar. En el caso de que la
presión sea superior, es necesario colocar un filtro
regulador de aire y regularlo a 7 bar.
El aire comprimido debe estar filtrado y seco.
9.2. PROCESO DE PUESTA EN MARCHA
Antes de efectuar la instalación del equipo COM-
PACT 220 verifique que no haya sufrido daños duran-
te el transporte.
Una vez verificado el embalaje coloque el equipo
COMPACT 22O en el sitio deseado que debe ser
plano, liso y perfectamente nivelado, con la ayuda de
un carro o con la ayuda de dos personas. Se aconse-
ja colocar un depósito debajo a fin de evitar derrama-
mientos de líquido.
Para alimentar el equipo conecte el aire comprimido
a través del enchufe rápido.
NO
OK NO
8.1. PICTOGRAMAS
8.2. ECOLOGÍA
El equipo COMPACT 22O no debe ser utilizada para
el lavado o desengrase de objetos destinados a
estar en contacto con alimentos.
Respete y aplique las leyes relativas al uso de
productos utilizados en la limpieza y lavado de
piezas así como del mismo equipo COMPACT 22O.
8.3. TRANSPORTE Y DESCARGA
El equipo COMPACT 22O se entrega embalado.
Debe ser transportado y almacenado según las
indicaciones del embalaje.
Dado el reducido peso del equipo COMPACT 22O,
puede ser movido por dos personas sin necesidad
de utilizar otros medios.
- 9 -
La presión de aire en la red de aire para
la alimentación:
DEBE SER MÁXIMO 7 BAR
EL EQUIPO COMPACT 220 ESTÁ YA
TARADO A 4 BAR
ATENCIÓN:
La bomba no debe trabajar nunca en vacío.
ATENCIÓN:
La cantidad total introducida de disolvente para
recirculación y limpio nunca debe superar la capaci-
dad de la total de la garrafa que contenga el disolven-
te de recirculación para evitar desbordamientos.
11. MANTENIMIENTO
Los dispositivos de seguridad deben estar siempre
en un óptimo estado y no deben ser retirados.
- Desconecte la alimentación del aire comprimido en el
caso que se efectuen reparaciones o mantenimiento.
- Controle periodicamente la integridad y la funcionali-
dad de los dispositivos de seguridad.
- Es obligatorio limpiar periodicamente la zona de
descarga, la zona de limpieza, y las vávulas de
mando.
- Es obligatorio limpiar y sustituir el filtro de aspira-
ción de la bomba.
- Las etiquetas de seguridad deben ser siempre bien
visibles, limpias e inmediatamente sustituidas si se
deterioran o son dañadas.
- Está absolutamente prohibido realizar operaciones
con el equipo cuando no estén perfectamente
visibles todas las etiquetas.
EL EQUIPO DEBE ESTAR SIEMPRE
CONECTADO A TIERRA
10. TABLA DE AVERÍAS
De vez en cuando se puede producir un mal funcio-
namiento de la máquina. En tales casos se absten-
gan de utilizar la máquina y organizar el manteni-
miento necesario antes de incurrir en el riesgo de
accidentes o daños.
Llamar al fabricante para cualquier información o si
tiene alguna duda antes de trabajar.
A continuación se describen las posibles averías,
causas y remedios:
Avería Causa de la avería Reparación
El cliclo de lavado no
arranca
La succión no arranca
El suministro neumático de la máquina se
desconecta.
La válvula de cierre de la línea de suministro
de aire comprimido está cerrada
La bomba neumática se ha estancado
El botón de la máquina ON/OFF está
apagado
La tapa del depósito de lavado automático
está abierta
La válvula en la tapa del depósito está
bloqueada
Temporizador roto / no funciona
El botón de la máquina ON/OFF está
apagado
El suministro neumático de la máquina está
desconectado
La válvula de cierre de la línea de suministro
de aire comprimido está cerrada
Conectar la máquina a la red neumática
Abra la válvula de cierre en la línea de
suministro de aire comprimido
Pulse el botón de reinicio de la bomba
usando una herramienta romo especial de
Ø 4/5 mm
Gire el interruptor ON / OFF a la posición
ON
Cierre la tapa del depósito
Vuelva a colocar la válvula en la tapa del
tanque
Remplazar
Gire el general, interruptor ON / OFF a la
posición ON
Conectar la máquina a la red neumática
Abra la válvula de cierre en la línea de
suministro de aire comprimido

- 10 -
12. LISTA DE REPUESTOS
01. Aquacleaner 5L.
Detergente lavapistolas
Ref. 40000205
05. Temporizador
completo
Ref. 49000091
06. Pulsador de lavado.
Disolvente limpio
Ref. 49000092
07. Clips de fijación para
pistolas (2 uds.)
Ref. 49000093
08. Terminales de protección
neumática (2 uds.)
Ref. 49000099
09. Kit inyector
lavadoras
Ref. 49000108
10. Vávula
PNV23PNSNC
Ref. 49000295
11. Amortiguador tapa
Ref. 49000436 12. Regulador de presión
Ref. 49000473
13. Filtro de absorción
Ref. 49000489 14. Tubo de aspiración
Ref. 49000495 16. Floculante 1 Kg
Ref. 55550047
15. Inyector metálico
Ref. 49000730
02. Válvulas ON/OFF
pulverización o brocha (2 uds.)
Ref. 49000087
03. Válvulas 3/2 1/8”
Ref. 49000088 04. Bomba neumática
completa
Ref. 49000090
17. Válvula final de carrera
Ref. 87560009
Las operaciones de mantenimiento ordinario deben
ser realizadas solamente por personal cualificado y
siguiendo las instrucciones de este manual. Cierre
siempre la alimentación de aire para las operaciones
de mantenimiento o reparación.
Las operaciones de mantenimiento ordinario son:
- Limpiar el plano de trabajo, la rejilla y la descarga.
- Mantener siempre los niveles de disolvente adecua-
do en cada una de las dos garrafas.
- Revisar y mantener limpio el filtro de aspiración de
la bomba.
- Mantener un grado adecuado de limpieza en el
disolvente de recirculación. Cambiarlo antes de que
acumule un exceso de residuo y pierda efectividad
de lavado. Una vez sustituido el disolvente el
tratamiento de este deberá seguir las normativas
vigentes.
- Controle periodicamente el correcto funcionamien-
to de los dispositivos de seguridad y los mandos de
accionamiento.
Realice la limpieza interna de la máquina semanal-
mente. Las limpiezas internas del equipo se harán
utilizando un disolvente adecuado. Cuando haya
presencia de color particularmente dificil de limpiar,
ayúdese de una espátula.
Realice la limpieza de los inyectores cada tres sema-
nas. Desmonte y sumérjalos en un recipiente de
disolvente limpio aproximadamente durante 1 hora.
Haga mientras un lavado con disolvente limpio de
aproximadamente 1 minuto para lavar las tuberias.
Coloque los inyectores limpios.
- 11 -
13. CONDICIONES DE GARANTÍA
14. DECLARACIÓN DE CONFORMIDAD
Fabricante: SAGOLA S.A.U.
Dirección: Calle Urartea, 6 · 01010 VITORIA-GASTEIZ (Álava) · ESPAÑA
Declaramos que el producto: LAVADORA
Marca: SAGOLA
Modelo: COMPACT 220
Es conforme con las disposiciones de la Directiva de la sobre máquinas (Directiva 2006/42/UE) incluidas
las modificaciones de la misma y la correspondiente trasposición a la Ley Nacional.
Es conforme a los requisitos de las siguientes Directivas europeas
2006/42/UE (Directiva de máquinas)
2014/34/UE (ATEX) II 3 GD
así como a sus modificaciones y actualizaciones, y a las disposiciones según el ordenamiento legislativo
nacional del país de destino
Es conforme a los requisitos de las siguientes Directivas Europeas, y de haber utilizado para su construcción
las siguientes normas técnicas:
EN 12100:2010 “Seguridad de las máquinas. – Principios generales para el diseño. – La evaluación de riesgos
y reducción de riesgos.”
EN 12921-1:2005+A1:2010 “Máquinas para la limpieza de superficies y pretratamiento de productos industriales
que utilizan líquidos o vapores – Requisitos comunes de seguridad”.
EN 12921-3:2005+A1:2008 “Máquinas para la limpieza de superficies y pretratamiento de productos industriales
que utilizan líquidos o vapores – Seguridad de las máquinas que utilizan líquidos de limpieza inflamables.”
EN ISO 13849-1:2008+AC:2009 “Seguridad de la maquinaria – Partes de los sistemas de mando sometidos
a la seguridad.”
EN 1127-1:2011 “Atmósfera explosiva – Prevención de la explosión – Conceptos fundamentales y metodología.”
En Vitoria-Gasteiz, a 01/05/2021 Director Técnico
Enrique Sánchez Uriondo
Este aparato ha sido fabricado con rigurosa
precisión. Habiendo sido sometido a numerosos
controles antes de su salida de fábrica.
La GARANTÍA concedida es de 2 años, a partir de la
fecha de compra, que será indicada por e estableci-
miento vendedor en el lugar habilitado para el respec-
to, junto con su sello.
Esta GARANTÍA cubre cualquier defecto de fabrica-
ción, que será subsanado sin cargo para e compra-
dor. Sin embargo quedan expresamente excluidas
todas aquellas averías resultantes de un mal uso de
aparato, tales como conexiones incorrectas, rotura
por caída o similares, desgaste normal y en general
cualquier deficiencia no imputable a la fabricación
del aparato.
Así mismo se perderá la GARANTÍA cuando se
constate que el aparato ha sido manipulado por
personas ajenas a nuestro Servicio de Asistencia
Técnica.
Esta GARANTÍA no respalda los compromisos
adquiridos con cualquier persona ajena al Servicio
Técnico.
Servicio de Asistencia Técnica
(Tel. 34 945 214 150 - Fax 34 945 214 147)
En caso de avería durante el periodo de GARANTÍA,
adjunte al aparato el justificante del certificado de
garantía y entréguelo en el Servicio de Asistencia
que más le interese o bien póngase en contacto con
fábrica.
Queda excluida cualquier exigencia de más trascen-
dencia contra el proveedor, en particular la indemni-
zación por daños y prejuicios. Esto se aplica
igualmente a los daños que se originasen durante el
asesoramiento, la adquisición de práctica y la demos-
tración.
Las prestaciones por garantía no tienen por conse-
cuencia una prolongación del periodo de la misma.
No se atenderá en garantía ningún equipo del cual
no conste en los archivos de SAGOLA el resguardo
adjunto, del certificado de garantía debidamente
cumplimentado.
Reservadas la modificaciones Técnicas.

Index
1 Atention page 13
2 Introduction page 13
3 Equipment identification page 13
4 Technical data page 13
5 Equipment description page 14
6 Machine external parts page 15
7 Instructions for use page 15
7.1. Initial automatic washing spray gun page 15
7.2. Final automatic washing page 16
8 Safety Devices page 17
9 Instalation page 17
9.1. Controls to start up page 17
9.2. Process start up page 17
10 Troubleshooting page 18
11 Maintenance page 18
12 Principal spare parts page 19
13 Conditions of warranty page 20
14 Declaration of conformity page 20
- 12 -
- 13 -
1. ATTENTION
2. INTRODUCTION
3. EQUIPMENT IDENTIFICATION
4. TECHNICAL DATA
The equipment COMPACT 220 is provided with an
enrollment that informs:
Brand commercializing company
Number Enrolment
Name and address
Serial number
Mark
Construction year
Model
Weight 50 kg.
Height 1,000 mm.
Long 480 mm.
Width 550 mm.
Sustainable load 20 kg.
Solvent wash zone volume 38 L
Working pressure 7 bar
ATEX II 3GD
Before activating the unit, you must read, take note
of, and entirely follow all the indications described in
this Manual.
You must keep the unit in a safe place and one
accessible for all unit users.
The unit must be started and handled exclusively by
personnel instructed in its use and must be employed
only for the purpose for which it was designed.
Likewise, Accident Prevention Standards, Regula-
tions, Work Centre Directives and current legislation
and restrictions must be taken into consideration.
The SAGOLA logotypes and other SAGOLA
products mentioned in this manual are registered
trademarks or brand names of the company
SAGOLA S.A.U.
The unit in your possession belongs to the family of
units used for cleaning aerographic spray guns, its
accessories, and complements, with dissolvent, as
well as compressed air.
Manufactured with stainless steel and constructed in
conformity with provisions found in the directive
2006/42/UE and subsequent modifications.
It is therefore provided with the mark.
It consists of the following standard features:
- Washing machine, with hoses, connections, and
spray guns to project the necessary dissolvent and
compressed air.
- Instruction Manual.
- Packaging.
Optional and complementary unit parts:
- SAGOLA air hoses.
- SAGOLA air Purifiers and/or Regulators.
- SAGOLA compressed air connectors and
couplings.
COMPACT 220
- 14 -
The COMPACT 220 is manufactured entirely of AISI
304 stainless steel. Basically is composed of an
upper tank that is used for automatic washing machi-
ne parts, containing a grill work (no.1 Figure 1) on
which can be placed spray guns and accessories for
cleaning.
Inside the tank, there are several spray jets (no.2
Figure 1) for the interior and exterior cleaning of the
spray gun automatically.
Also equipped pneumatic connectors to feet two tires
in the air inlet of the spray gun and prevent solvent
into the gun during automatic washing (no.3 Figure 1).
The inner tank includes a vapor outlet connected to a
automatic extraction (No.4 Figure 2) and two anchors
trigger (No.5 figure 2) to maintain the spray guns
open during cleaning.
The lower zone is designed to introduce two contai-
ners of solvent for recirculating and clean solvent, the
total amount introduced of these two solvents should
not exceed the total capacity of the recirculation tank
to prevent overflow.
This lower area has two absorptions, one with inlet
filter (No.6 Figure 3) to be introduced in the solvent
tank for recirculating it through a diaphragm pump
(No.9 Figure 3) allows a second use.
The other absorption (No.7 Figure 3) will be introdu-
ced into the clean solvent tank. This absorption of
clean solvent is for automatic cleaning (through the
diaphragm pump) either a timed way or manually by
a pushbutton. In each case the clean solvent will
return to the tank through the drain (No.8 Figure 3).
CLASSIFICATION ACCORDING TO THE ATEX
DIRECTIVE
The machine conforms to the essential requisites of
the EU Directive 2014/34/UE, better known as ATEX
(“Explosive atmospheres”). It is classified as group II
category 3 letter G system. The assessment proce-
dures of conformity, carried out by an internal factory
check, allow the installation of the machine in
surroundings where there may be potentially explosi-
ve atmospheres due to the presence of gas, fumes or
mist.
Preparation for extraction of fumes.
For the compliance ATEX, the machine is equipped
with a system of forced evacuation of the fumes
generated during the operation.
5. DESCRIPCIÓN DEL EQUIPO
Fig. 1
Fig. 2 45
Fig. 3
7
6
4
8
1
32

- 15 -
6. MACHINE EXTERNAL PARTS
STAINLESS STEEL
MANUFACTURING
AUTOMATIC INTERIOR
CLEANING ZONE FOR
2 GUNS AND
ACCESSORIES
AIR INLET TO THE
MACHINE IN BACKSIDE INTERIOR
ACCESS GATE
CONTROL PANEL
- ON / OFF
- TIMER
- SOLVENT LEVER DIRTY/CLEAN
- PUSH FOR INJECTION MANUAL
CLEAN SOLVENT
EASY AND SOFT
OPENING COVER WITH
SHOCK
VAPOURS
EXTRACTION SYSTEM
7. INSTRUCTIONS FOR USE
7.1. INITIAL AUTOMATIC WASHING
At the end of painting and to get a longer duration of
the solvent in the machine is recommended to
eliminate the excess of paint and a small manual
prewash before entering spray guns in the machine.
Open the lid and place the spray gun and acces-
sories as indicated in the picture, using the plastic
clip of the opening trigger that comes on the machine
and placed in the air inlet of the pneumatic device
protection. Close the lid.
The smoke evacuation takes place through a chim-
ney (No.4 Figure 2) with automatic connection of the
machine.
This chimney must then be connected to the general
workshop extraction or brought outside the workshop.
In this second case, the chimney connected to the
machine must cover at least a portion in the vertical
of 1 meter before being led outside.
For an easy installation, the chimney is generally an
aluminum tube, flexible and extensible.
The fumes of solvent dispersed in that way do not
need further treatment.
II 3 GD

- 16 -
Press the power button ON / OFF system. Set the
timer by turning it of clockwise.
STARTING AND STOPPING SYSTEM
While in ON position the extraction of machine
will be on
WORKING SOLVENT SELECTION LEVER
Downward vertical: dirty solvent.
(The recycled solvent) only automatic
work with timer
TIMER
The recirculation of the machine only works when
the timer is running and the lid close
If during the washing time the operator opens the lid
the pump will stop automatically.
Anyway, do not open cover during washing to avoid
splashing. Completed the washing time the pump will
stop and the suction vapor will start.
7.2. FINAL AUTOMATIC WASHING
Place the working solvent selection lever down way.
Press the cleaning button. While pressing the pump
will send clean solvent to the jets.
El disolvente limpio terminará siempre la garrafa de
disolvente de recirculación.
LEVER AND SWITCH
SELECTION OF WORKING SOLVENT
Upward, horizontal: clean solvent. (not recycled
solvent), can work in automatic with timer and make a
manual pump by pressing LOWER BUTTON.
WARNING
We recommend using the button for a few
seconds, just time for this operation, thereby
avoiding too fast clean solvent consumption.
Open and take out the spray gun and accessories. At
this point the aspiration of fumes will always be
operating.
If appropriate you can use the blow gun to evaporate
and totally dry spray gun and accessories.
Once the operation is finished close the lid of the
washing area. Always place the solvent leaber selector
upright.
- 17 -
9. INSTALATION
All installation operations of the equipment COM-
PACT 22O, and testing should be carried out by
appropriate and responsible personnel that ensures
safe working.
9.1. CONTROLS TO START UP
The compressed air pressure of the equipment COM-
PACT 22O must be 7 bar. In the event that the
pressure is higher, it is necessary to place the air
filter regulator and regulate to max. 7 bar.
The compressed air must be filtered and dry.
9.2. PROCESS START UP
Before installing the equipment COMPACT 22O
check that has not been damaged during transport.
Once verified place the equipment COMPACT 22O
in the requested area that must be flat, smooth and
perfectly level. We suggest to use a deposit below to
prevent liquid spills.
To feed the equipment connect the compressed air
through the quick coupling.
8. SAFETY DEVICES
• Generic danger. always
pay attention the handling
equipment.
• Read the instruction manual
carefully before starting work.
• Wear protective gloves and
suitable clothing.
• Wear safety glasses and
personal protective devices.
• Avoid heat sources (stoves,
welding) in near of the machine.
• No smoking.
• No fire near of the
equipment.
• Check that the suction pipes and
return cleaning liquid is properly
inserted and fixed in the
corresponding deposit.
• Check that the suction pipes and
return liquid cleaner have no
damage or are bent.
• Check the cleaning liquid level
present in the deposits. Cleaner
liquid minimum level should cover
completely the filter suction pipe.
NO
OK NO
8.1. APPAREL ICONS
8.2. ECOLOGY
The SAGOLA COMPACT 22O should not be used for
cleaning or degreasing objects destined to be in
contact with food.
Should be respected the laws concerning the use of
products used in cleaning and washing parts and the
equipment inshelf COMPACT 22O.
8.3. TRANSPORT AND DISCHARGE
The equipment COMPACT 22O is delivered packa-
ged. It must be transported and stored according to
the indications on the packaging.
Due to the low weight of the equipment COMPACT
22O can be moved by two people without using other
means.
- 18 -
11. MAINTENANCE
The air pressure in the air network:
MUST BE MAXIMUM 7 BAR
THE EQUIPMENT COMPACT 220
IS ADJUSTED ON 4 BAR
WARNING:
The pump should never work empty.
WARNING:
The total amount of solvent introduced to clean
recirculation and cleaning solvent should not exceed
the total capacity of the bottle containing the solvent
for recirculation to prevent overflow.
The safety devices should always be in an optimal
state and should not be removed.
- Disconnect the compressed air supply in case of
repairs or maintenance.
- Periodically check the integrity and functionality of
safety devices.
- Periodically clean the discharge area, cleaning area,
and control valves.
- Clean and replace the pump suction filter.
- The safety labels must always be clearly visible,
clean and immediately replaced in case of damage.
- It is absolutely forbidden to perform operations with
the equipment when all labels are not clearly visible.
THE EQUIPMENT ALWAYS MUST BE
CONNECTED TO GROUND
10. TROUBLESHOOTING
Occasionally poor functioning of the machine may
occur. In such cases refrain from using the machine
and arrange the necessary maintenance before
incurring in risk of accidents or damages.
Call the manufacturer for any information or if you
have any doubts before working.
The following describes the possible malfunctions,
causes and remedies:
Malfunction Cause Remedy
The automatic wash
cycle does not start
The suction does not
start
The pneumatic supply of the machine is
disconnected
The shut-off valve on the compressed air
supply line is closed
The pneumatic pump has stalled
The general ON/OFF switch machine is off
The lid of the automatic wash tank is open
The valve on the tank lid is blocked
Timer broken
The general ON/OFF switch machine is off
The pneumatic supply of the machine is
disconnected
The shut-off valve on the compressed air
supply line is closed
Connect the machine up to the pneumatic
supply
Open the shut-off valve on the compressed
air supply line.
Press the reset button on the pump using
the special blunt instrument of Ø 4/5 mm
Turn the general ON/OFF switch machine to
the ON position
Close the lid of the tank
Replace the valve on the tank lid
Replace the timer
Turn the general ON/OFF switch to the ON
position
Connect the machine up to the pneumatic
supply
Open the shut-off valve on the compressed
air supply line

- 19 -
The ordinary maintenance operations must be
carried out only by qualified personnel following the
instructions in this manual. Always cut the air supply
for maintenance or repair.
Ordinary maintenance operations are:
- Clean the working area, grid and discharge.
- Always maintain adequate levels of solvent in each
of the two tanks.
- Check and maintain clean the suction pump filter.
- Maintaining an adequate level cleaning of the
recirculation solvent. Change before accumulating
excess waste and lost washing effectiveness. Once
the solvent substituted, the treatment of this should
follow the applicable regulations.
- Check for proper operation the safety devices and
operating controls.
Do the internal cleaning of the machine weekly.
Internal cleaning of the machine is done by using a
suitable solvent.
Do the cleaning of jets every three weeks. Disassem-
ble and immerse then in a clean solvent for about 1
hour. Wash with clean solvent from about 1 minute to
wash the pipes. Place the injectors clean.
12. PRINCIPAL SPARE PARTS
01. Gun washing detergent
Ref. 40000205
05. Full timer
Ref. 49000091 06. Washing push button.
Clean solvent
Ref. 49000092
07. Fixing clips for
guns (2 units)
Ref. 49000093
08. Pneumatic protection
terminals (2 units)
Ref. 49000099
09. Washer injector kit
Ref. 49000108 10. PNV23PNSNC
Valve
Ref. 49000295
11. Cover shock absorber
Ref. 49000436 12. Pressure regulator
Ref. 49000473
13. Absorption filter
Ref. 49000489 13. Absorption filter
Ref. 49000495 16. Floculant 1 Kg
Ref. 55550047
15. Metallic injector
Ref. 49000730
02. ON / OFF valves
spray or brush (2 units)
Ref. 49000087
03. 3/2 1/8” valves
Ref. 49000088 04. Full pneumatic pump
Ref. 49000090
17. End stroke valve
Ref. 87560009
- 20 -
13. CONDITIONS OF WARRANTY
14. DECLARATION OF CONFORMITY
Manufacturer: SAGOLA S.A.U.
Address: Calle Urartea, 6 · 01010 VITORIA-GASTEIZ (Álava) · SPAIN
We declare that the product: WASHER
Brand: SAGOLA
Model: COMPACT 220
Is in conformity with the provisions of the Directive on machines (Directive 2006/42/UE) including
modifications of the same and the corresponding incorporation into National Law. Is in conformity with the
requirements of the following European Directives:
2006/42/UE (Machinery directive)
2014/34/UE (ATEX) II 3 GD
as well as its modifications and updates, and provisions according to the national legislative code of the
destination country.
Is in conformity with the requirements of the following European Directives, and has used the following
technical standards for its construction:
EN 12100:2010 “Safety of machinery – General principles for design – Risk assessment and risk reduction”
EN 12921-1:2005+A1:2010 “Machines for surface cleaning and pre-treatment of industrial items using liquids or vapours –
Common safety requirements.”
EN 12921-3:2005+A1:2008 “Machines for surface cleaning and pre-treatment of industrial items using liquids or vapours –
Safety of machines using flammable cleaning liquids”
EN ISO 13849-1:2008+AC:2009 “Safety of machinery – Parts of control systems linked to safety – General design principles”
EN 1127-1:2011 “Explosive atmospheres - Prevention of explosion and protection against explosion – Fundamental concepts
and methodology.”
In Vitoria-Gasteiz, on 01/05/2021 Technical Manager
Enrique Sánchez Uriondo
This guarantee has been manufactured with strict
precision an d has been subjected to a large number
of controls before it left the factory.
The GUARANTEE is for 2 years, counted as of the
date of purchase, which will be indicated by the
establishment where the apparatus is purchased in
the place provided for this purpose, together with its
stamp.
The GUARANTEE covers all nanufacturind defects
which will be repaired free of charge. Nevertheless,
all those malfunctions which are the result of the
incorrect use of the apparatus, such as incorrect
connections, breakage due to the apparatus being
dropped or similar, normal wear and tear and in gene-
ral, any deficiency not attributable to manufacture.
Likewise, the GUARANTEE will became invalid
should be abserved that the apparatus has been
handled by persons other than our Technical Service
personnel.
This GUARANTEE does not support any commit-
ment made by any person other than our Technical
Service personnel.
Technical Service Personnel
(Tel. 34 945 214 150 - Fax 34 945 214 147)
In the case of any malfunction during the peiod of
GUARANTEE, enclose the guarantee certificate with
the apparatus and deliver it to the nearest Technical
Service or get in contact with the factory.
Any other claims against the supplier beyond those
expressed above are excluded, especially regarding
indemnification for damages. This is equallu applica-
ble to damages arising during consultation, trainin-
gand demostration.
The provision of services during the Guarantee
period will not cause this period to be extended as a
consequence.
No gurantee claims shall be acepted for equipament
for which SAGOLA has noduly completed guarantee
certificate coupon in its files.
Technical modifications may be made without notice.
Ed. 00 (06/2021)
II 3 GD SAGOLA S.A.U.
Urartea, 6 · 01010 Vitoria-Gasteiz · ESPAÑA
Tel.: +34 945 214 150 · Fax: +34 945 214 147
SERVICIO DE ASISTENCIA TÉCNICA
GARANTÍA DE REPARACIÓN PROFESIONAL
TECHNICAL REPAIR SERVICE
PROFFESIONAL REPAIR GUARANTEE
SERVICE D’ASSISTANCE TECHNIQUE
GARANTIE DE RÉPARATION PROFESSIONNELLE
TECHNISCHER DIENST
PROFESSIONNELLE REPARATURGARANTIE
SERVIÇO DE ASSISTÊNCIA TÉCNICA
GARANTÍA DE REPARAÇAO PROFISSIONAL
SERVIZIO DI ASSISTENZA TECNICA
GARANZIA DI RIPARAZIONE PROFESSIONALE
Tel.: (34) 945 214 150 Fax: (34) 945 214 147
an Elcometer company
Table of contents
Languages:
Other Elcometer Washer manuals


