Elecrow CRT45259M User manual

Elecrow on-line store, make your making easier.
https://www.elecrow.com/
Crowtail Start Kit for micro:bit User Guide
The BBC micro:bit is a pocket-sized computer that can easily realize your creativity without
much electrical and coding knowledge. There are numerous possibility of creation you can dig
out by micro:bit, from robots to musical instruments. However if you want to create more things,
just 1 micro:bit is barely not enough, That’s why we introduce the Crowtail Start Kit for micro:bit
to you.
The crowtail start kit for micro:bit can make you do a lot of interesting things and brings
endless possibilities to your micro:bit. The core board in this kit is Crowtail- Base shield for
micro:bit,with which you can use plenty of crowtail sensors.All of that you need to know about
Crowtail, there is no need any soldering or jump wire. We have prepared 17 species basic
crowtail modules that let you get started with micro:bit. And we also write 20 lessons to teach
you use the micro:bit with the sensors step by step. Now, let us enjoy them.

Elecrow on-line store, make your making easier.
https://www.elecrow.com/
Contents
Lesson 1,How to use button control LED...................................................................................................3
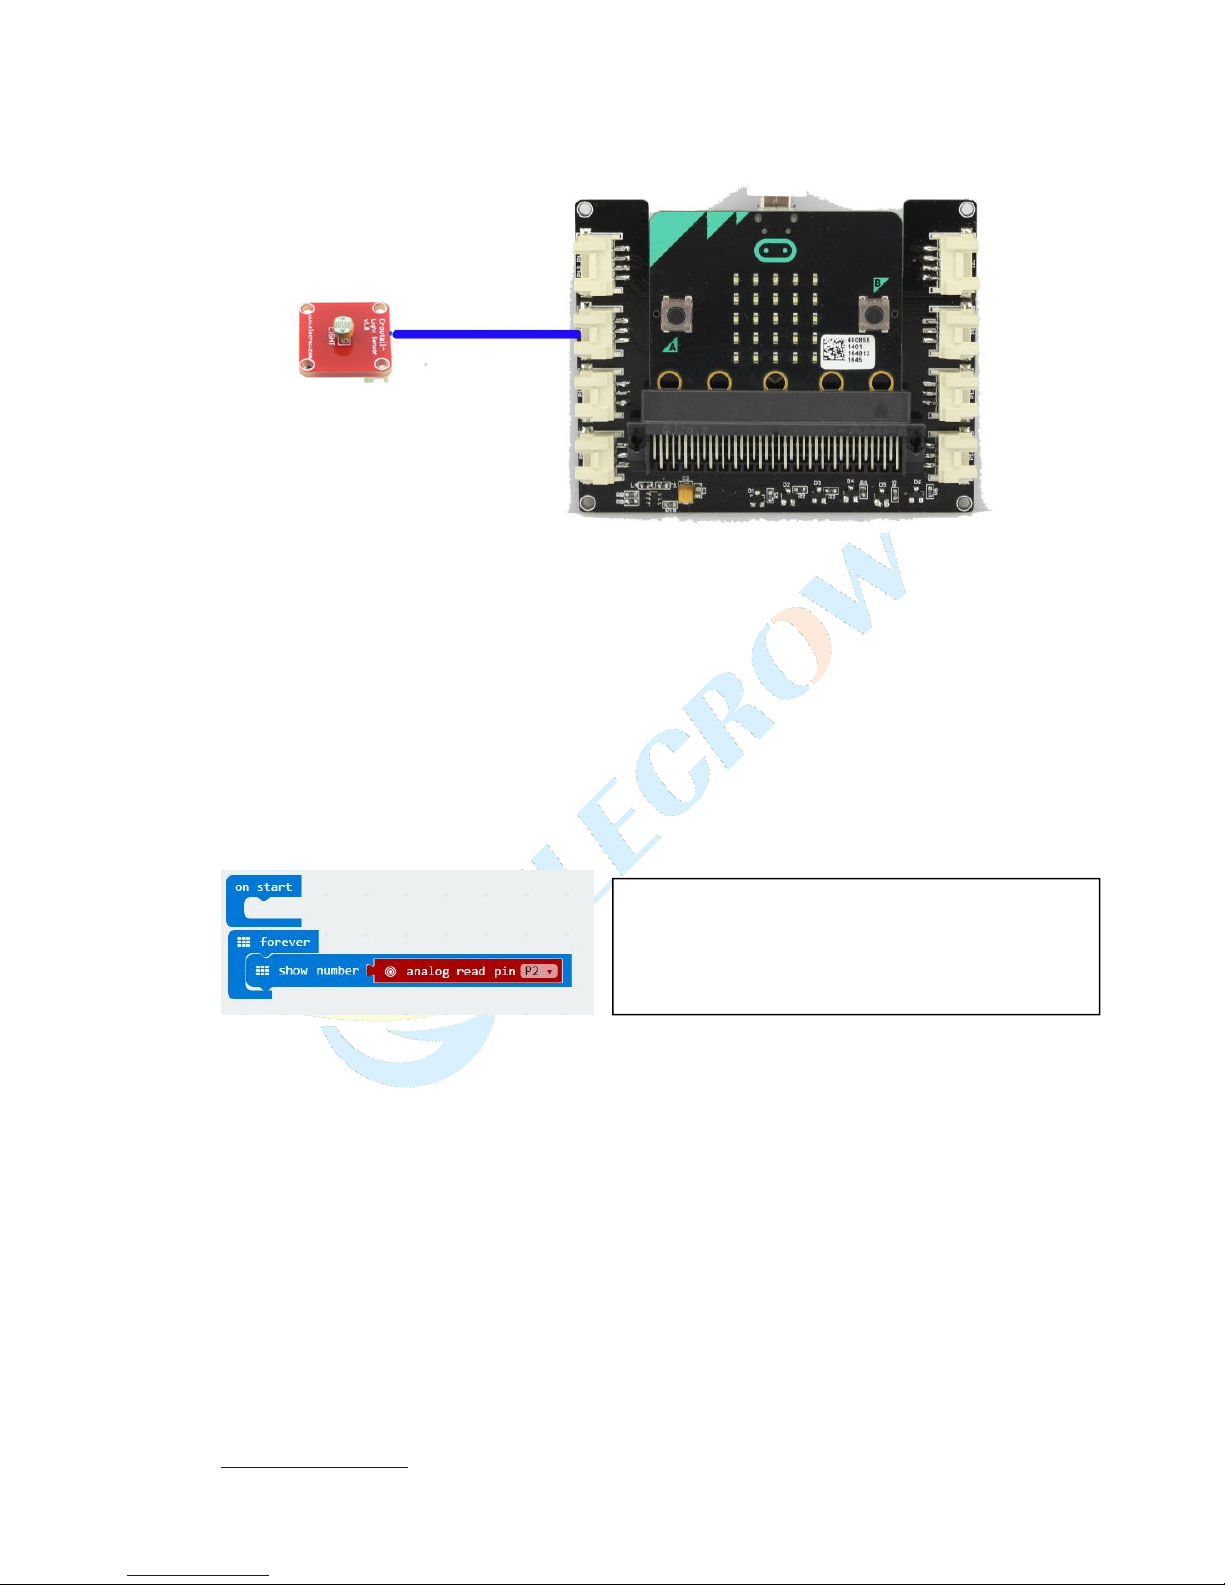
Lesson2, Brightness Measurement............................................................................................................4
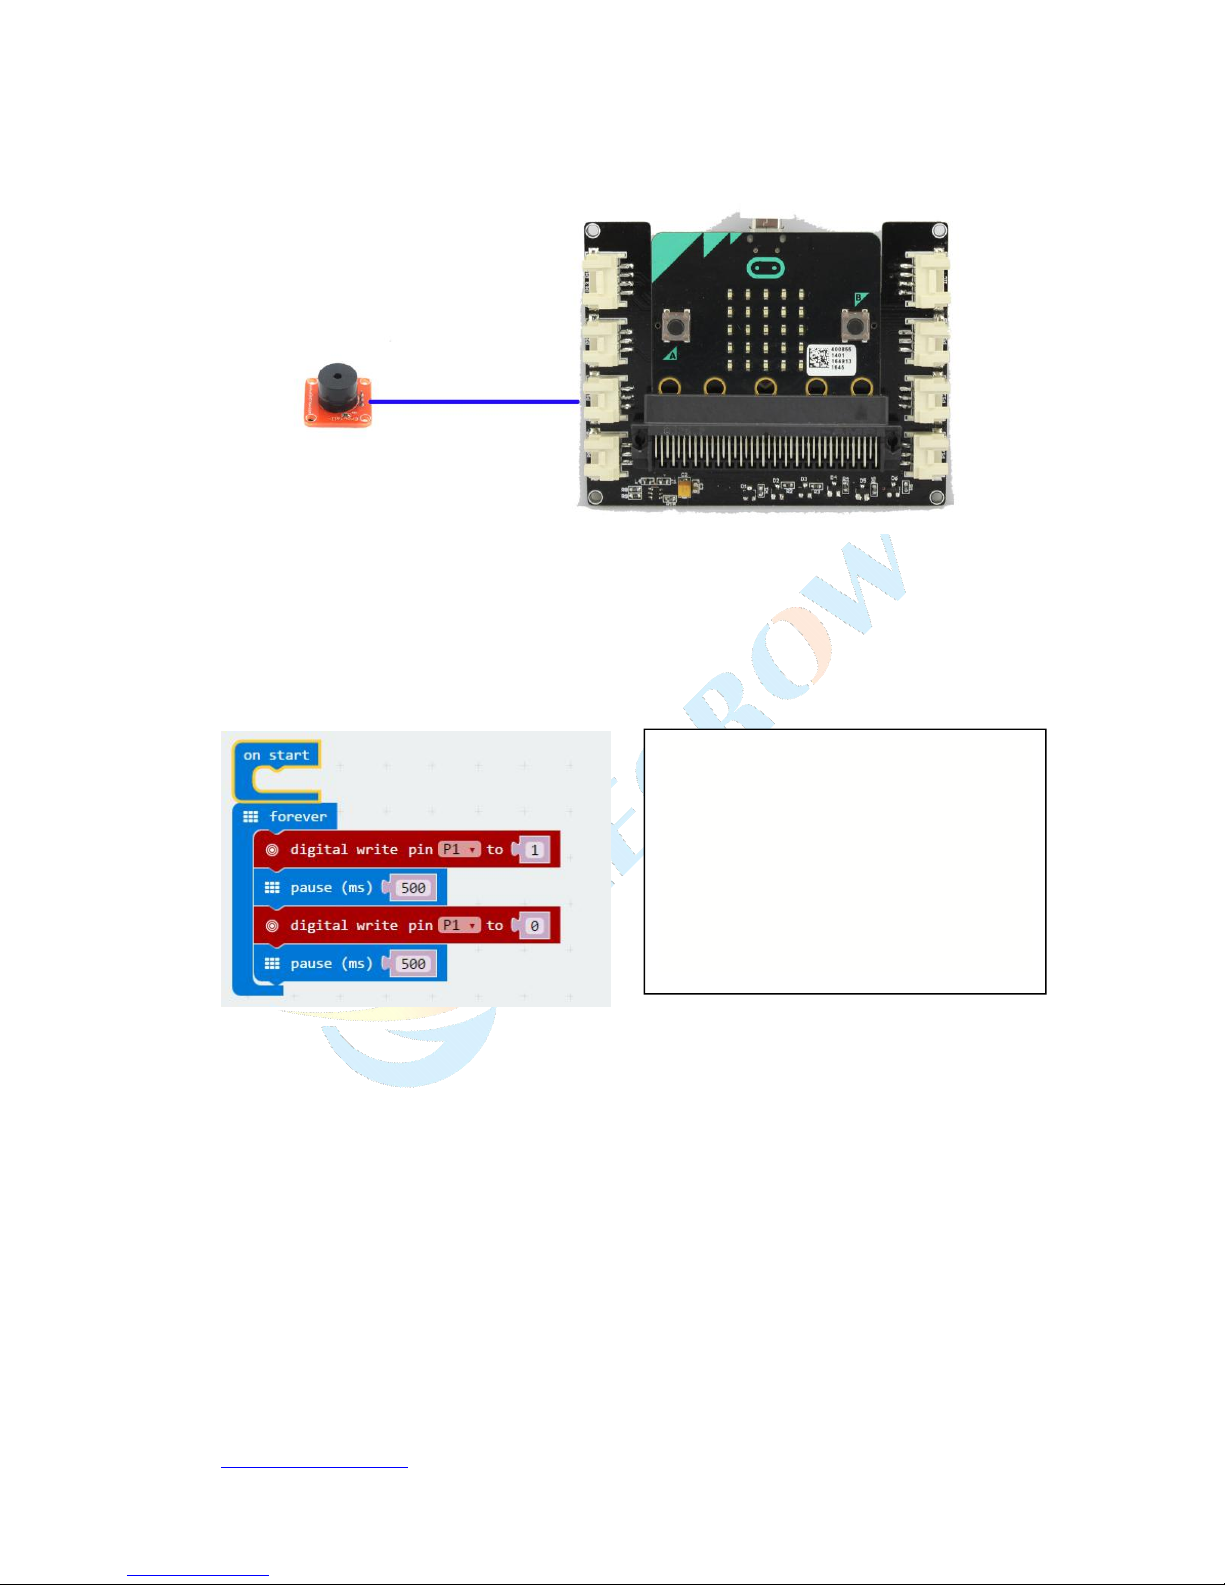
Lesson3, Make a Beeping Noise.................................................................................................................5
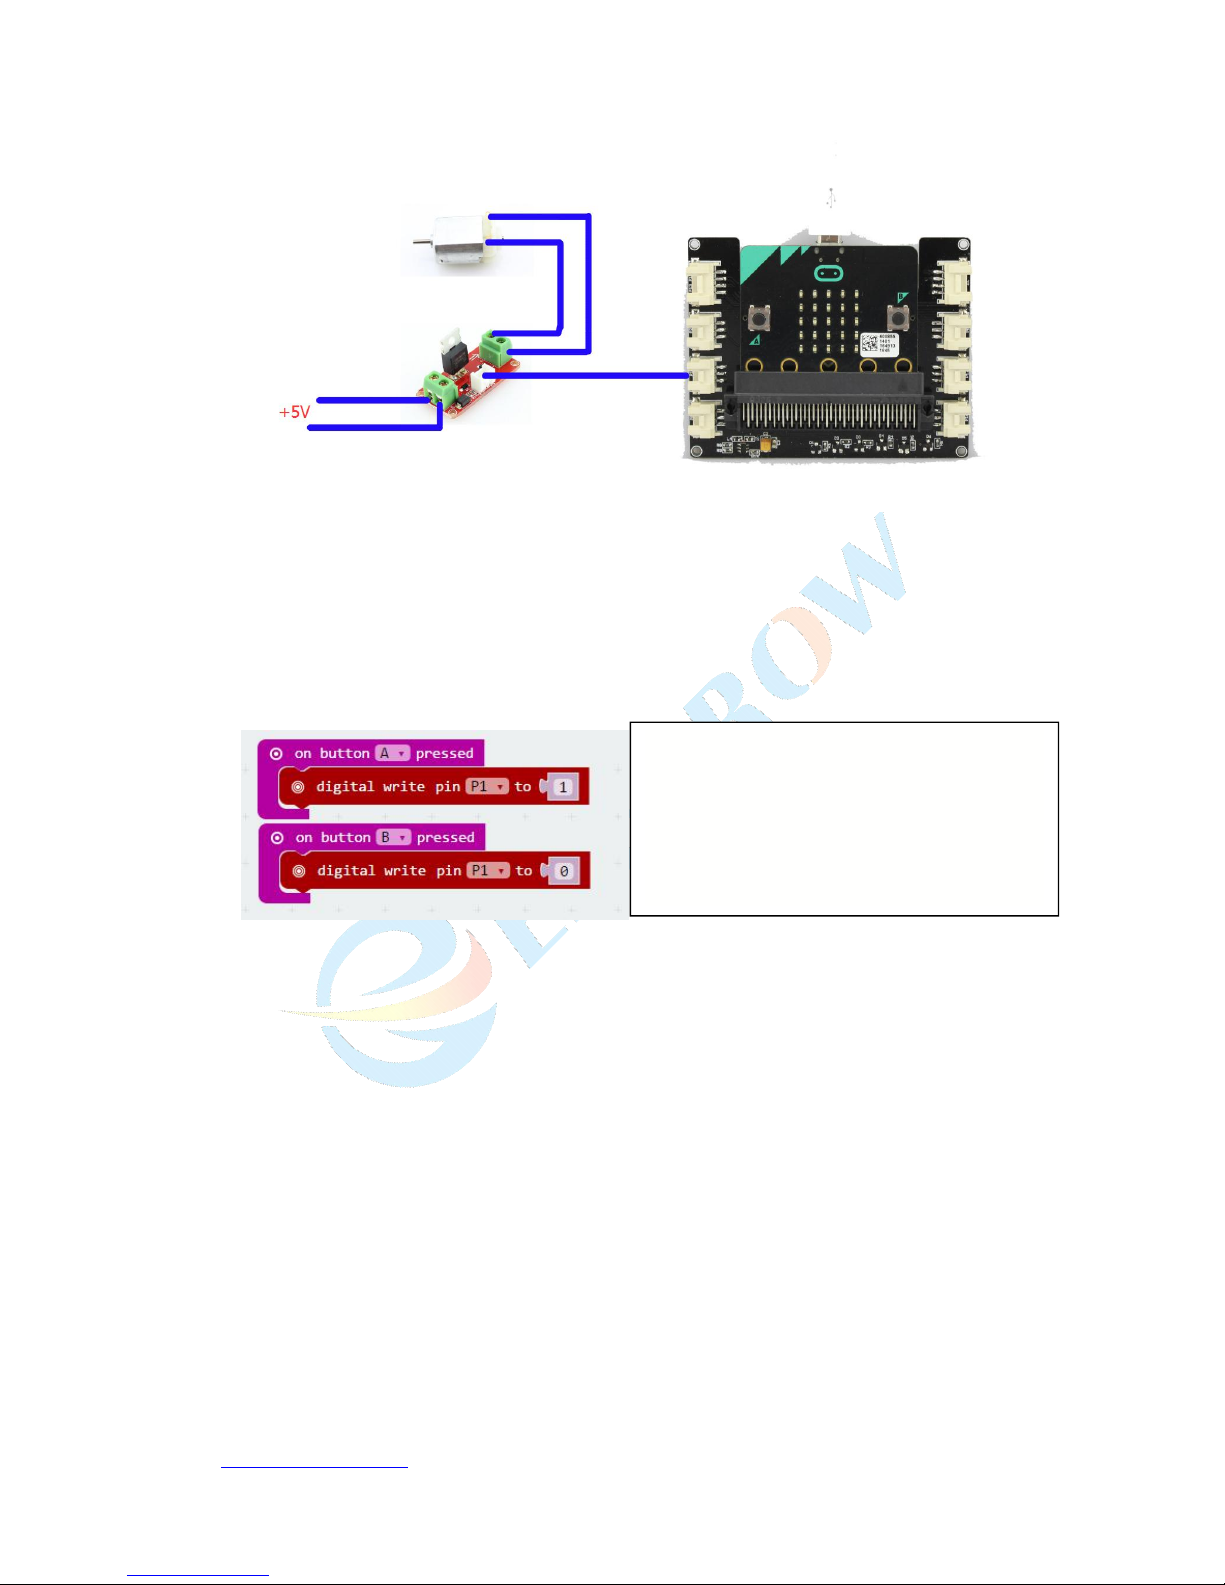
Lesson4. Motor Control............................................................................................................................. 6
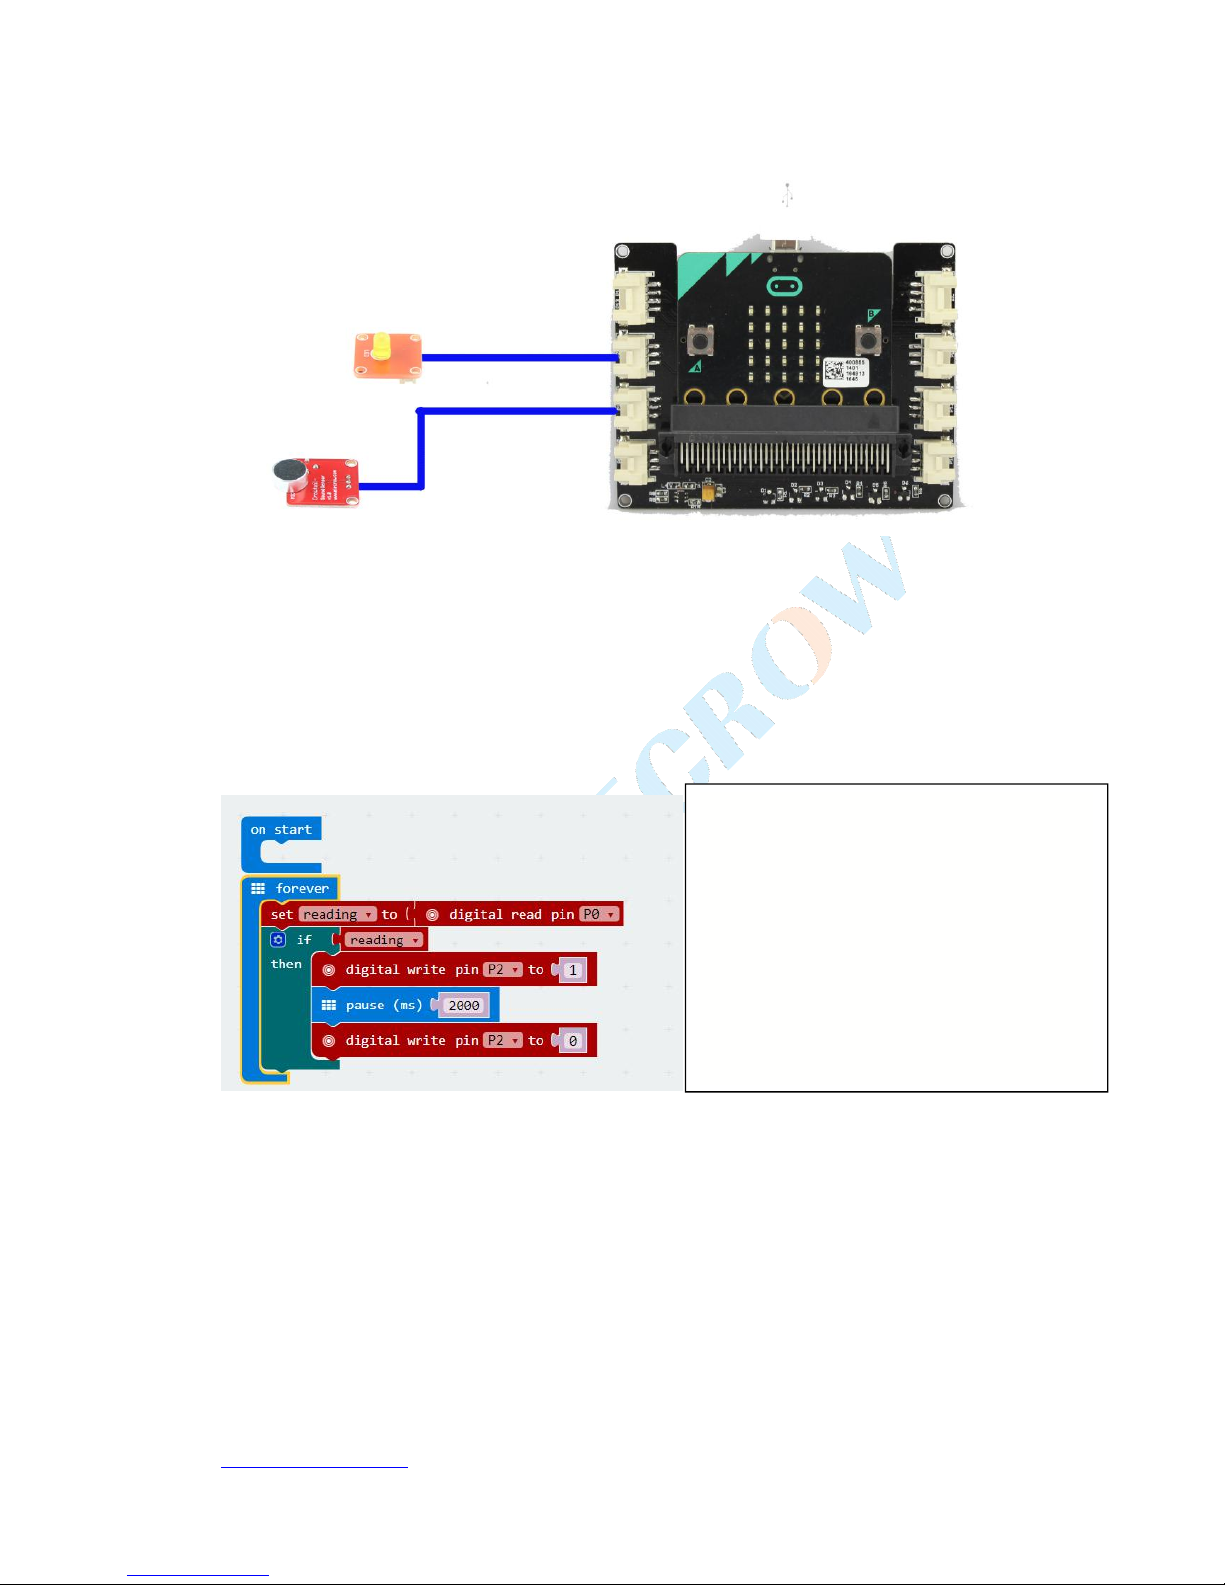
Lesson5.Motion Detection.........................................................................................................................6
Lesson6. Relay ON/OFF..............................................................................................................................7
Lesson7.Soil Moisture Detection............................................................................................................... 8
Lesson8.Sound Detection.......................................................................................................................... 9
Lesson9.Breathing LED.............................................................................................................................10
Lesson10.Servo Calibrator....................................................................................................................... 11
Lesson11.Magnetic Field Detection.........................................................................................................12
Lesson12.Control the MOSFET as a Switch..............................................................................................13
Lesson13.Obstacle Detection...................................................................................................................14
Lesson14. IR Distance Measurement.......................................................................................................15
Lesson15.Use Microwave Detect Movement..........................................................................................16
Lesson16.Stairs Lights.............................................................................................................................. 17
Lesson17.Alarm Clock.............................................................................................................................. 18
Lesson18.Anti-theft Device......................................................................................................................19
Lesson19.Mini Fan................................................................................................................................... 20
Lesson20.Automatic Watering.................................................................................................................21

Elecrow on-line store, make your making easier.
https://www.elecrow.com/
Lesson 1,How to use button control LED
This is a easy experiment, everyone will easy handle it. Connect Crowtail- LED to the P2
interface, upload the bellow code to micro:bit, then click the button A on the micro:bit, the LED
will light.
Material:
Micro:bit x1
Crowtail- Base Shield for Micro:bit x1
Crowtail- LED x1
Sofware:
Lesson2, Brightness Measurement
Our eyes can sense the brightness of the light, but it not a accurate value, just a sense, now
let us begin to measure the brightness. Please connect Crowtail- Light sensor to P2 interface,
upload the bellow code to micro:bit. You will see the brightness value on the LED dot matrix.
input.onButtonPressed(Button.A, () => {
pins.digitalWritePin(DigitalPin.P2, 1)
basic.pause(500)
pins.digitalWritePin(DigitalPin.P2, 0)
basic.pause(500)
})

Elecrow on-line store, make your making easier.
https://www.elecrow.com/
Material:
Micro:bit x1
Crowtail- Base Shield for Micro:bit x1
Crowtail- Light Sensor x1
Sofware:
Lesson3, Make a Beeping Noise
This Lesson teach you how to use a buzzer with Micro:bit, Connect the Crowtail- Buzzer to P1
interface, after you upload the code into the micro:bit, you will hear a beeping noise, and you can
adjust the delay time to control the beeping frequency.
basic.forever(() => {
basic.showNumber(pins.analogReadPin(AnalogPin.P2)
)
})

Elecrow on-line store, make your making easier.
https://www.elecrow.com/
Material:
Micro:bit x1
Crowtail- Base Shield for Micro:bit x1
Crowtail- Buzzer x1
Lesson4. Motor Control
DC motor is a very common component in DIY, this lesson will teach you control the motor
rotation. As we know, the motor need a large current to drive itself, so we need a mosfet to
control the motor run and stop. Connect the Crowtail- MOSFET to P1 interface and connect the
DC motor to the output terminal of the MOSFET. Upload the code, when press button A, the
motor start run, when press button B, the motor stop run.
basic.forever(() => {
pins.digitalWritePin(DigitalPin.P1,
1)
basic.pause(500)
pins.digitalWritePin(DigitalPin.P1,
0)
basic.pause(500)
})

Elecrow on-line store, make your making easier.
https://www.elecrow.com/
Material:
Micro:bit x1
Crowtail- Base Shield for Micro:bit x1
Crowtail- MOSFET x1
DC Motor x1
Lesson5.Motion Detection
This lesson teach you use the PIR Motion sensor to detect movement, then with other parts
can do many interest application. Connect the Crowtail- PIR sensor to P2 interface, and connect
one LED to P1 interface, then upload the code, when a person or other animals move close to
this motion sensor the LED will light on 1 second.
input.onButtonPressed(Button.A, () => {
pins.digitalWritePin(DigitalPin.P1, 1)
})
input.onButtonPressed(Button.B, () => {
pins.digitalWritePin(DigitalPin.P1, 0)
})

Elecrow on-line store, make your making easier.
https://www.elecrow.com/
Material:
Micro:bit x1
Crowtail- Base Shield for Micro:bit x1
Crowtail- PIR Motion Senor x1
Crowtail- LED x1
Lesson6. Relay ON/OFF
The relay has used in may place in our daily life, so we must to know how to use it. Connect the
Crowtail- Relay to P1 interface,then upload the code into Micro:bit, you will hear a mechanical
on/off sound from the relay every 2 seconds, if you connect some other high voltage device to
the output terminal of the relay, then we can control this device on/off.
basic.forever(() => {
pins.digitalWritePin(DigitalPin.P1, pins.digitalReadPin(DigitalPin.P2))
basic.pause(1000)
})

Elecrow on-line store, make your making easier.
https://www.elecrow.com/
Material:
Micro:bit x1
Crowtail- Base Shield for Micro:bit x1
Crowtail- Relay x1
Lesson7.Soil Moisture Detection
We like to raise some soil plants, but not know when and how much to watering the plants, so
this lesson will teach you detect the soil moisture. Connect the Crowtail- Moisture sensor to P0
interface, then upload the code into micro:bit, you will view the analog value of the soil moisture
of the soil on the LED dot matrix.
basic.forever(() => {
pins.digitalWritePin(Digita
lPin.P1, 1)
basic.pause(2000)
pins.digitalWritePin(Digita
lPin.P1, 0)
basic.pause(2000)
})

Elecrow on-line store, make your making easier.
https://www.elecrow.com/
Material:
Micro:bit x1
Crowtail- Base Shield for Micro:bit x1
Crowtail- Moisture sensor x1
Lesson8.Sound Detection
In our daily life, some people like lively, some like quiet , if we use sound reasonably, it will
play a huge role in the field of intelligence, this lesson will teach you detect the sound as a switch
to power on one LED. Connect the Crowtail- Sound sensor to P1 interface and connect one LED to
P2 interface, upload the code, if the sound senor detect some sound , the LED will light on 2
seconds.
let reading = 0
basic.forever(() => {
reading = pins.analogReadPin(AnalogPin.P0)
led.plotBarGraph(
reading,
1023
)
if (input.buttonIsPressed(Button.A)) {
basic.showNumber(reading)
}
})

Elecrow on-line store, make your making easier.
https://www.elecrow.com/
Material:
Micro:bit x1
Crowtail- Base Shield for Micro:bit x1
Crowtail- Sound sensor x1
Crowtail- LED x1
Lesson9.Breathing LED
Control the LED with different frequency PWM wave, in the lesson we use a loner
potentiometer to adjust the PWM frequency, the LED will light brighter and brighter,then light
darker and darker, which is like breathing . Connect the crowtail- LED to P0 interface and connect
the crowtial- liner potentiometer to P1 interface, upload the code into micro:bit, then slide the
line potentiometer and observe the LED.
let reading = 0
basic.forever(() => {
reading =
pins.digitalReadPin(DigitalPin.P0)
if (reading) {
pins.digitalWritePin(DigitalPin.P2, 1)
basic.pause(2000)
pins.digitalWritePin(DigitalPin.P2, 0)
}
})

Elecrow on-line store, make your making easier.
https://www.elecrow.com/
Material:
Micro:bit x1
Crowtail- Base Shield for Micro:bit x1
Crowtail- LED x1
Crowtail- Linear Potentiometer x1
Lesson10.Servo Calibrator
In this Lesson, will teach you how to use buttons to control the servo with different rotating angle,
and you can view the current angle from the LED dot matrix. Connect the Crowtail- Servo to P0
interface,then upload the code into micro:bit, press the button A, after seconds press button B,
view the servo rotated and read the current angle.
let value = 0
basic.forever(() => {
value =
pins.analogReadPin(AnalogPin.P0)
pins.analogWritePin(AnalogPin.P1,
value)
pins.analogSetPeriod(AnalogPin.P1,
20000)
})

Elecrow on-line store, make your making easier.
https://www.elecrow.com/
Material:
Micro:bit x1
Crowtail- Base Shield for Micro:bit x1
Crowtail- 9G Servo x1
Lesson11.Magnetic Field Detection
This lesson will teach you detect the magnetic filed , we use a magnet simulate the magnetic field,
when the magnetic sensor close to the magnet, it will have response and the LED will light on.
Connect the Crowtail- Magenet switch to P0 interface and connect the crowtail - LED to P1
interface.
let angle = 0
input.onButtonPressed(Button.A, () => {
angle += 0-Math.max(0,5)
pins.servoWritePin(AnalogPin.P0, angle)
led.stopAnimation()
})
input.onButtonPressed(Button.B, () => {
angle += Math.min(180,5)
pins.servoWritePin(AnalogPin.P0, angle)
led.stopAnimation()
})
angle = 90
pins.servoWritePin(AnalogPin.P0, angle)
basic.forever(() => {
basic.showNumber(angle)
})

Elecrow on-line store, make your making easier.
https://www.elecrow.com/
Material:
Micro:bit x1
Crowtail- Base Shield for Micro:bit x1
Crowtail- Magenet switch x1
Crowtail- LED x1
Lesson12.Control the MOSFET as a Switch
As MOSFET has a high speed response and high stability, we usually use it as a switch in some
application, this lesson will teach you how to control the MOSFET on/off. Connect the crowtail-
MOSFET to P0 interface and connect one LED to the output terminal of the MOSFET, then upload
the code into micro:bit, you will see the LED blink.
let value = 0
basic.forever(() => {
value = pins.digitalReadPin(DigitalPin.P0)
if (value) {
pins.digitalWritePin(DigitalPin.P0, 1)
}
})

Elecrow on-line store, make your making easier.
https://www.elecrow.com/
Material:
Micro:bit x1
Crowtail- Base Shield for Micro:bit x1
Crowtail- MOSFET x1
LED x1
Lesson13.Obstacle Detection
Smart car is the most common application in DIY, obstacle avoidance is the basic function,
this lesson will teach you how to use IR reflective sensor to detect obstacle. Connect the Crowtail
IR reflective sensor to P0 interface and connect the crowtail- buzzer to P1 interface. Upload the
code , when the sensor detect the obstacle, the buzzer will make a noise.
Note: The detection distance is 4-15 mm.
basic.forever(() => {
pins.digitalWritePin(DigitalPin.P0, 1)
basic.pause(500)
pins.digitalWritePin(DigitalPin.P0, 0)
basic.pause(500)
})

Elecrow on-line store, make your making easier.
https://www.elecrow.com/
Material:
Micro:bit x1
Crowtail- Base Shield for Micro:bit x1
Crowtail- IR Reflective Sensor x1
Crowtail- Buzzer x1
Lesson14. IR Distance Measurement
If we can make some tools that can measure the distance , it sounds very interesting .This Lesson
will teach you use IR to detect short distance. Connect the Crowtail- 80cm Infrared Proximity
Sensor to P0 interface, then upload code, aim the probe at the front object, you will view the
distance between the probe and the object, which show on the LED dot matrix.
Note:Distance measuring range: 10 cm to 80 cm
let value = 0
basic.forever(() => {
value =
pins.digitalReadPin(DigitalPin.P0)
if (value) {
pins.digitalWritePin(DigitalPin.P1, 1)
}else {
pins.digitalWritePin(DigitalPin.P1, 0)
}
})

Elecrow on-line store, make your making easier.
https://www.elecrow.com/
Material:
Micro:bit x1
Crowtail- Base Shield for Micro:bit x1
Crowtail- 80cm Infrared Proximity Sensor x1
Lesson15.Use Microwave Detect Movement
Because of Microwave with strong penetration, fast response characteristics, so we usually use
it in some exploration field.Connect the crowtail- microwave sensor to P1 interface, then upload
the code,put the sensor in a quiet area, if there is activity issue within a radius of 15m, the LED
on the sensor will blink. It means the sensor detect some movement.
let distance = 0
let item = 0
let a=0
let value = 0
basic.forever(() => {
value = pins.analogReadPin(AnalogPin.P0)
a = value - 3
item = 67870 / a
distance = item - 40
basic.showNumber(distance)
})

Elecrow on-line store, make your making easier.
https://www.elecrow.com/
Material:
Micro:bit x1
Crowtail- Base Shield for Micro:bit x1
Crowtail- Microwave sensor x1
Lesson16.Stairs Lights
In order to save power energy, the stair light not need light all the time, only when there are poor
light and the pace of someone's footsteps, then the light will on. Connect the crowtail- light
sensor to P0 interface , connect the crowtail- sound sensor to P1 interface and connect the
crowtail- LED to P2 interface, after upload the code , if detect some noise or the the Brightness is
dark, the LED will light.
let item = 0
basic.forever(() => {
item =
pins.digitalReadPin(DigitalPin.P1)
})

Elecrow on-line store, make your making easier.
https://www.elecrow.com/
Material:
Micro:bit x1
Crowtail- Base Shield for Micro:bit x1
Crowtail- Sound Sensor x1
Crowtail- LED x1
Crowtail- Light Sensor x1
Lesson17.Alarm Clock
Let us use the micro:bit to make a alarm clock, first connect the Crowtail -RTC to the IIC interface
to get the real time, then set the alarm clock rang time, when the time is up, the crowtail- Buzzer
will sound. Connect the Crowtail- RTC to P0 interface, connect the crowtail- Buzzer to P1
interface.
let a=0
let value = 0
basic.forever(() => {
value =
pins.analogReadPin(AnalogPin.P1)
a =
pins.digitalReadPin(DigitalPin.P0)
if (value <= 200 ||a==1) {
pins.digitalWritePin(DigitalPin.P2
,1)
basic.pause(10000)
}else {
pins.digitalWritePin(DigitalPin.P2
,0)
}
})

Elecrow on-line store, make your making easier.
https://www.elecrow.com/
Material:
Micro:bit x1
Crowtail- Base Shield for Micro:bit x1
Crowtail- RTC x1
Crowtail- Buzzer x1
First, you should add the package: https://github.com/robotfreak/pxt-ds1307
Lesson18.Anti-theft Device
We also see some infrared security in the movie, in this lesson will teach you use microwave to
built a Anti-theft device, if someone enter the detection area, the alarm will sound. Connect the
Crowtail- Microwave Sensor to P1 interface, connect the Crowtail- Buzzer to P0 interface.
Material:
Micro:bit x1
Crowtail- Base Shield for Micro:bit x1
let minutes = 0
let hour = 0
hour =
Time.getTimePart(DateTimePart.Hours)
minutes =
Time.getTimePart(DateTimePart.Minutes)
if (hour == 8&& minutes == 0) {
pins.digitalWritePin(DigitalPin.P1, 1)
basic.pause(20000)
}

Elecrow on-line store, make your making easier.
https://www.elecrow.com/
Crowtail- Microwave Sensor x1
Crowtail- Buzzer x1
Lesson19.Mini Fan
When a hot day outside, if there is a mini Fan near you, maybe it is a enjoyable things, this
lesson will teach you how to use use micro:bit built a mini Fan, we can use a button to control the
relay to switch the Fan on or off. Connect the Crowtail- Switch to P0 interface, connect the
Crowtail- Relay to P1 interface, connect the Fan to the other side of the Relay.
Material:
Micro:bit x1
Crowtail- Base Shield for Micro:bit x1
Crowtail- Switch x1
Crowtail - Relay x1
Mini Fan x1 This 5 V Fan not provide by us.
let item = 0
basic.forever(() => {
item =
pins.digitalReadPin(DigitalPin.P
1)
if (item == 1) {
pins.digitalWritePin(DigitalPin.
P0, 1)
basic.pause(500)
}
})
Table of contents