ElectrIQ iQ-SPEED User manual

USER MANUAL
HD BABY MONITOR CAMERA
WITH WIFI
iQ-SPEED
Thank you for choosing electriQ
Please read the manual before using this camera
and keep it safe for future reference.
Visit our page www.electriQ.co.uk for our entire productrange

2
CONTENTS
INTRODUCTION AND SAFETY
3
PARTS LIST
4
PRODUCT OVERVIEW
4
INSTALLATION
5
CAMERA ADJUSTMENT
5
CAMERA FUNCTIONS
6
APP INSTALLATION
6
PREPARING THE CAMERA FOR APP CONNECTION
6
WI-FI CONNECTION
7
DEVICE SCREEN
14
SETTINGS MENU
15
TROUBLESHOOTING
17
TECHNICAL SPECIFICATION
18
SUPPORT
19

3
Thank you for choosing electriQ
With your new HD baby camera, you can rest easy knowing that you can see your baby with
a few easy clicks. Watch your camera feed from the comfort of anywherein your home and
know that you can always be surethat your baby is safe.
Other features include:
•FHD 1080P IP Camera
•Support Echo/Google Assistant
•Motion Sensor, Instant AccurateAlerts
•Cry Detection
•Movement detection(16M Flash support)
•Two-way Audio
•Micro SD Card (max 128 GB) Storage
•Android /iOS System Mobile Devices
•Pan/Tilt
•IRDistance Max 10m
•Music Playing
•Temperature & Humidity Sensor
•One-touch Call
SAFETY WARNINGS
•Do not undertake repairs yourself. This will void the warranty. If the camera is
broken or there is any issue, contact the supplier.
•Only use the original accessories from the manufacturer.
•Disconnect the device from all power sources before cleaning it. Use a clean,
dry cloth to clean the product. Never submerge it in water.
•Do not use any abrasive agents, corrosive cleaning products or any substances
that contain bleach or solvents to clean the product.
•Do not position the camera behind glass or any other object, this may impair
the vision of the camera and leave you unable to view the camera feed.
Before installation always ensure that the cameras viewpoint is unobstructed.
•DO NOT mount the camera above the baby or anywhere that could lead to
the camera falling and injuring the baby. Maintain a safe distance between
the camera and the baby at all times.

4
PARTS LIST
PRODUCT OVERVIEW
CAMERA
USB CABLE (2 Meters)
BRACKET SCREWS
AND WALL PLIGS
PIN (FOR SD CARD REMOVAL)
POWER ADAPTOR
MOUNTING BRACKET
Working status indicator
Microphone
SD card slot
Reset
Speaker
Call button
Power inlet

5
INSTALLATION
Your baby monitor can be installed in two ways for increased adaptability. You
can install your camera by simply standing the camera on a flat surface, or use
the provided tools for wall mounting.
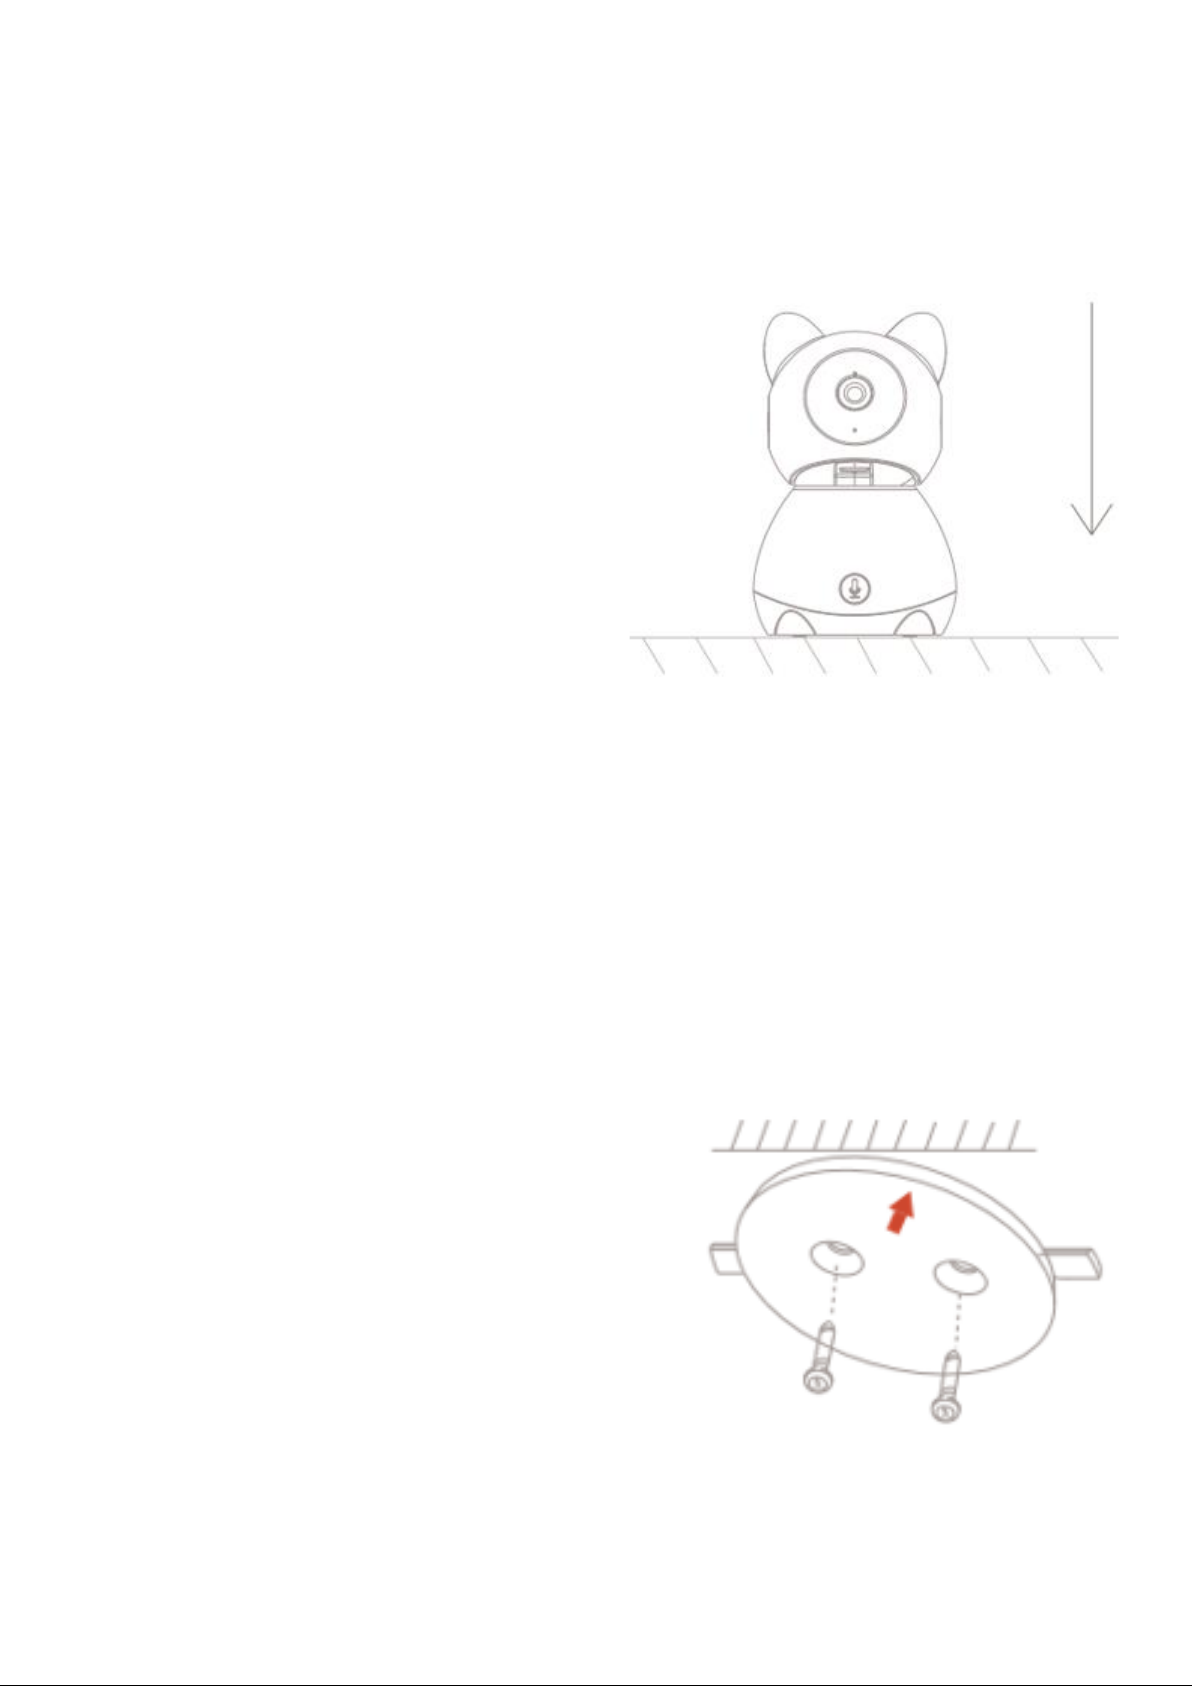
FLAT SURFACE INSTALLATION
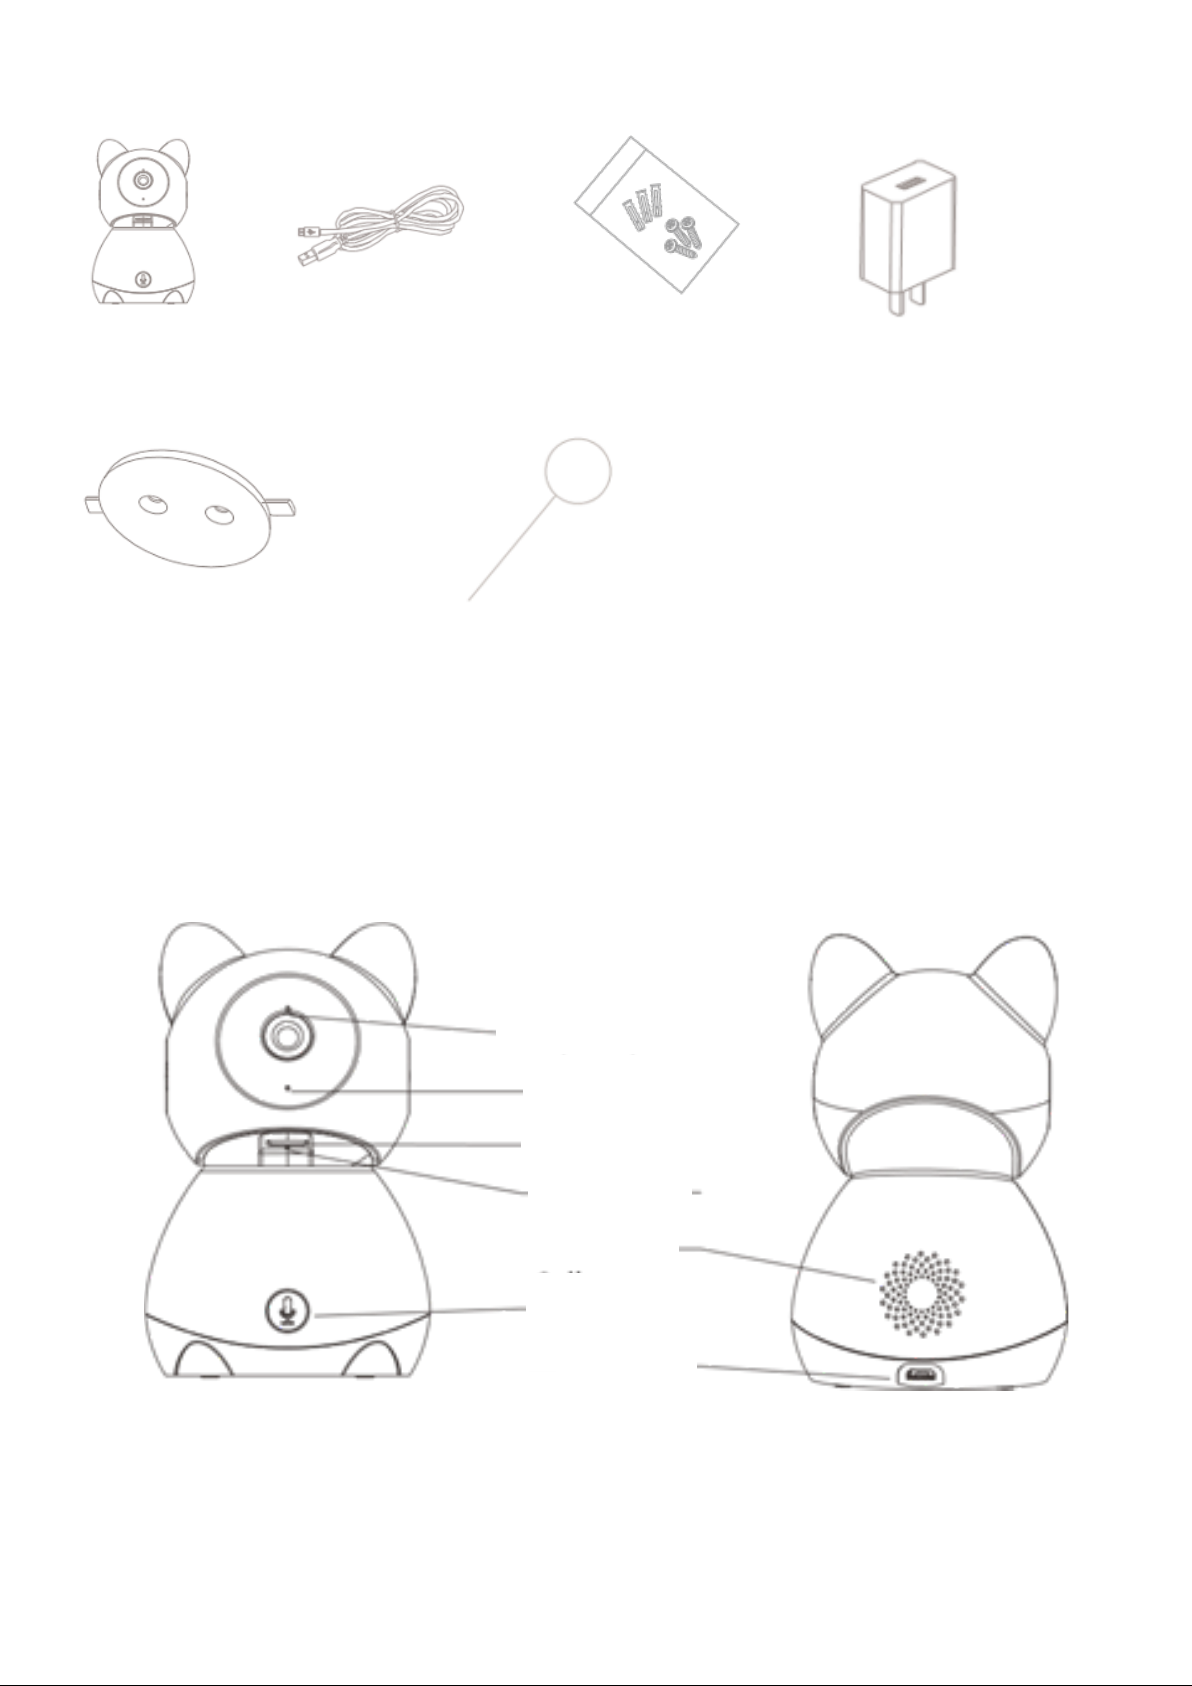
Simply unpackage your new baby
monitor, attach the provided USB cable
to the provided plug and plug into the
mains. Insert the power cable into the
back of the camera and place on a solid
flat surface.
WALL MOUNTED INSTALLATION
To wall mount your camera, first decide where you would like the camera to be
mounted. Please ensure that the location for mounting is not too far from a
plug socket, as the power able may not reach the final installation point. DO
NOT mount the camera above the baby or anywhere that could lead to the
camera falling and injuring the baby. Maintain a safe distance between the
camera and the baby at all times.
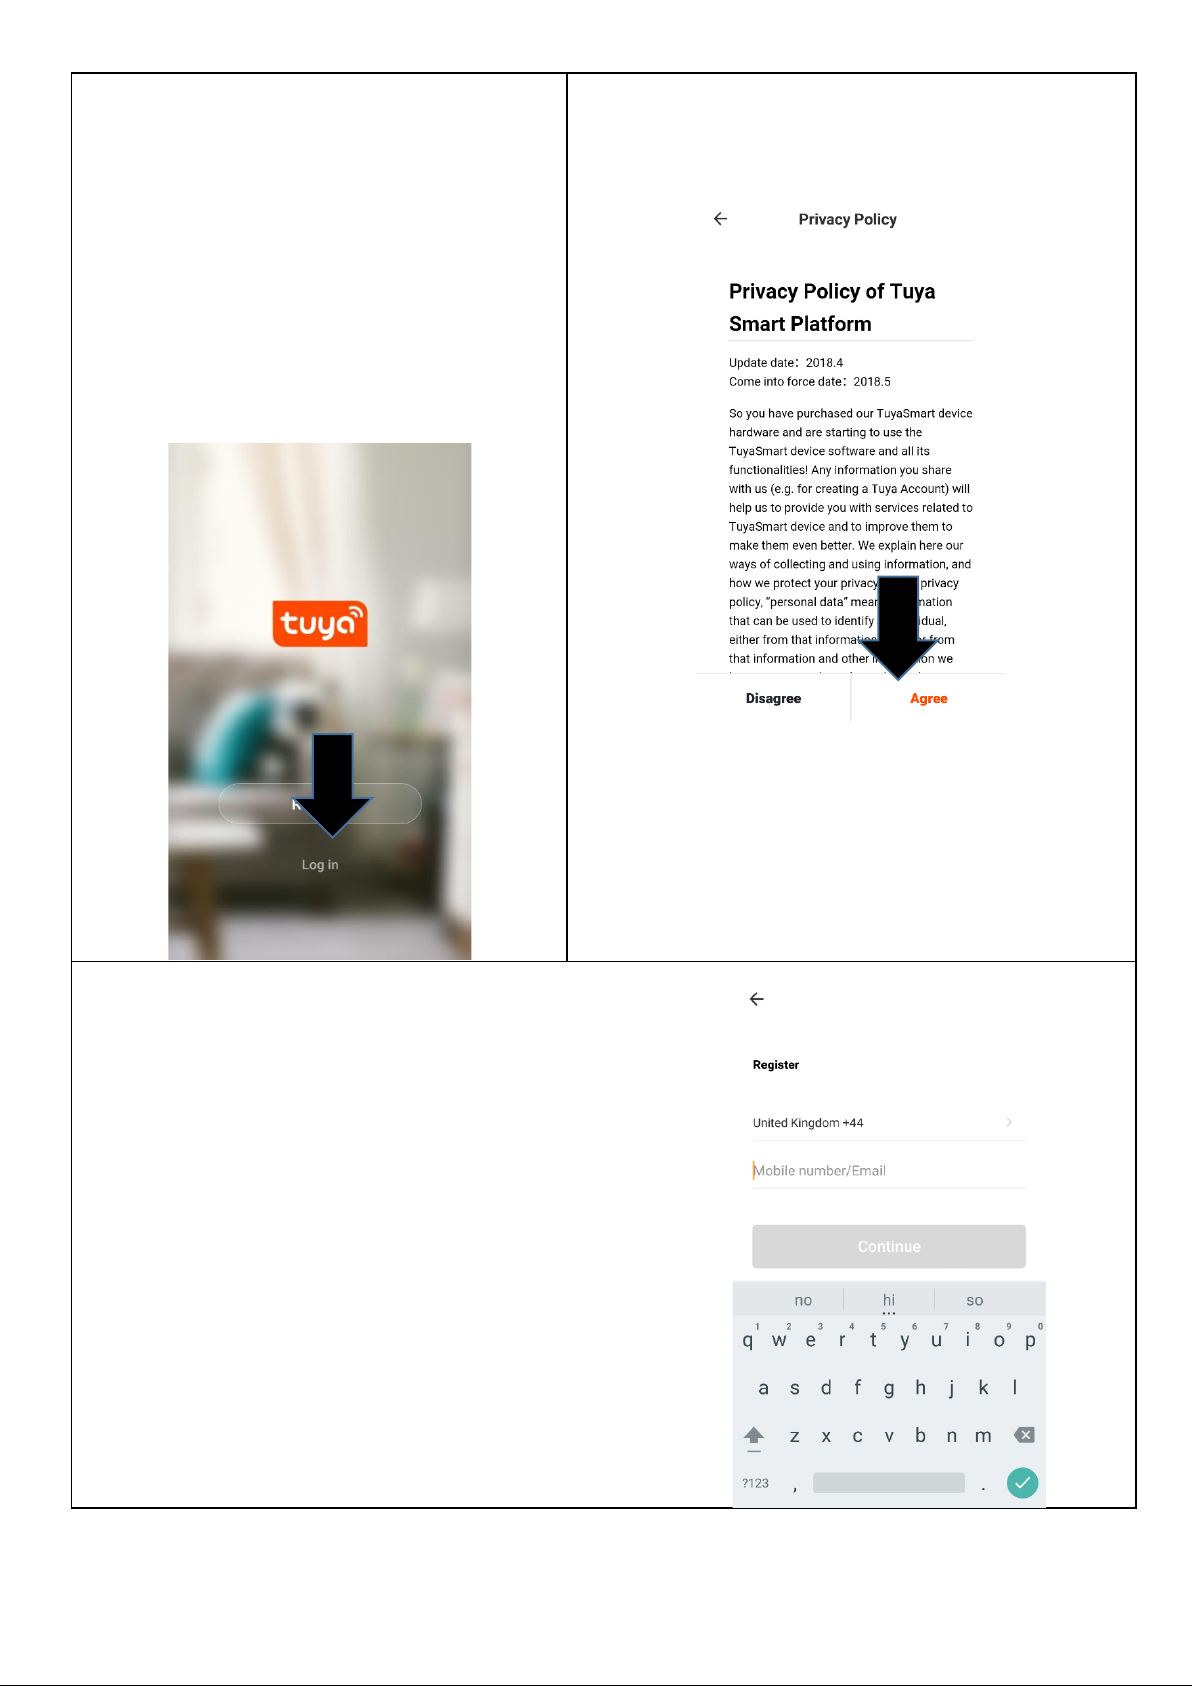
When you have decided where you want to
mount your camera, make a note of the
distance between the two holes on the wall
mounting plate. Mark two holes on the wall
of the same distance and drill both holes.
Once both holes are drilled insert the wall
plugs provided and screw the mounting
plate onto the wall using the screws
provided as shown to the right. Ensure that
the mounting plate is secure before
installing the camera.

6
CAMERA FUNCTIONS
WORKING STATUS INDICATOR
Red light: The camera network is abnormal.
Flashing red light: Awaiting Wi-Fi connection
Blue light: Camera running correctly
Flashing blue light: Currently connecting
MICROPHONE
Captures sound for your video
SD CARD
Supports local SD Card storage (Max.128G)
RESET
Press and hold for 5 seconds with provided pin to
reset the camera (if you have modified settings, they
will return to factory defaults).
CALL
Press the call button to receive an incoming call. You
will be able to speak with the caller.
SETTING UP YOUR CAMERA FOR CONNECTION
Ensure that your camer is set up and plugged into the power source.
When the camera is on, you can begin the wifi connection set up as
detailed on pages 7 –13.
INSTALLING THE APP
The app can be downloaded toyour phoneeither by using the QR codes
below, or by searching for “Tuya Smart App” in your chosen app store
Android
IOS

7
1. Once installed the app
needs to be registered,
following the next
steps:Press on the
register button at the
bottom of the screen.
2. Read the Privacy policy and
press the Agree button.
3. Enter your email address or
phone number and press
continue to register.

8
4. A verification code
will be sent by the
method selected in
step 3. Enter the code
into the app.
5. Type in the password you
would like to create. This
needs to be 6-20 characters,
containing letters and
numbers.
6. The app is now registered. It will
automatically log you in following
registration. You are now ready to
add your camera to your app.

9
SETTING UP YOUR HOME WITHIN THE APP
TUYA is designed so it can work with a large number of
compatible smart devices within your home. It can also
be set up to work with multiple devices within different
houses. As such during the setup process, the app
requires that different areas are created and named to
allow easy management of all your devices. When
devices are then added, they are assigned to one of the
rooms you have created.
1. Press the
ADD HOME
button.
2. Type in a name
for your home.
3. Press on the
Location button
to select the
location of your
home.
4. New rooms can
be added by pressing the ADD
ANOTHER ROOM option at the
bottom.
5. Untick any rooms that are not
required on the app.
6. Press DONE in the top right corner.

10
SETTING YOUR LOCATION
Use your finger to move the
orange HOME symbol.
When the symbol is in the
approximate location of your
home, press the CONFIRM button
in the top right corner.
ADD ANOTHER ROOM
Type the name of the room to
add, and press Done in the top
right corner.

11
CONNECTING USING QR CODE
Before initiating the connection, make sure your phone is
connected to the WiFi network you wish to connect the
camera.
1. Open app and press
“+” to add device, or
use the add device
button.
2. Select the type of device as
“Smart video Camera”

12
2. Press the orange button
at the bottom of the
screen to confirm.
3.Enter the password for
your WIFI network (Please
note this is case sensitive)

13
4. Choose “Continue” and
use camera to scan the QR
Code show on your
phone. Hold your phone
about 15-20cm from the
camera to scan the code
and wait for device to
connect.
(EXAMPLE)
5. The camera will then
attempt to connect to
your network, which can
take around 30 seconds.

14
DEVICE SCREEN –LIVE VIEW
Quality of feed
Mute video feed
Displays current
signal strength
Enter full screen
view
Press to speak
through the camera.
Capture a photo
of live feed.
Record live view
video.
Access previously
captured images
Access
previously
recorded videos
Settings

15
SETTINGS MENU
CHANGING THE NAME OF YOUR
DEVICE
When in any of the device screens
further settings for the device can be
accessed, by pressing on the three dots
in the top right hand corner. The top
option within this allows you to change
the name of the device to something
relevent to the use of the product,
such as “FRONT DOOR”
SHARE DEVICES
Create a QR code to share control and access to the camera
with a friend or relative.
POWER MANAGEMENT
Shows the remaining battery power, the power source
and allows the user to set a low battery battery warning
alarm. This can be between 50 percent and 10 percent.
The camera can be charged using the supplied USB
charging cable.
BASIC FUNCTION SETTINGS
Allows camera features to be changed, such as flipping the
image, time watermark and audio mode.

16
PIR
Press “PIR” to set the motion sesnsor sensitivity.
Low/Medium/High/Off
Low: Wake up and record footage if any motion.
Medium: Wake up and record footage if any motion in
front of the camera last for more than 5 seconds. A
notification will be sent to mobile devices at the same time.
High: Wake up and record footage if any motion in front of
the camera last for more than 1 second. A notification will
be sent to mobile devices at the same time.
Off: Motion detection will be turned off.
MEMORY CARD SETTINGS
Shows the capacity and free space on the memory card,
along with giving the option of formatting the memory
card.
FIRMWARE INFORMATION
Use to update the devices firmware.

17
TROUBLESHOOTING
CONNECTION
1. Ensure the WiFi password has been entered into the
app correctly ( Case sensitive)
2. Check that the phone is connected to the WiFi you are
connecting the device to.
3. Ensure the network you are connecting it to is 2.4Ghz
(5Ghz WiFi networks are not supported), and that
there is a strong WiFi signal to the item.
4. Check the settings on the router. Encryption should
be WPA2-PSK and authorisation type should be set to
AES
5. If you are unable to connect through one connection
method, try the alternative connection method.
CANNOT DETECT SD CARD
The SD card should be inserted while the camera is
diconnected. Please also ensure that the format of the
memory card is FAT32.
NOT GETTING NOTIFICATIONS FOR ALARM
Ensure the TUYA app is running on your phone, and that
notifications have not been deactivated through your
phones operating system.

18
TECHNICAL SPECIFICATION
Camera
Image sensor
1080P Colour Sensor 1/2.9''CMOS
Shutter
1/25~1/100,000per second
Adjust angle
Tilt:0°~60°;Pan:0~355°
Lens
3.6mm
Angle of view
105°
Day & night
Electronic (IR-CUTfilter with auto switch)
WDR
Digital WDR
Video Audio
Video compression
H.264
Bit rate
32Kbps~2Mbps
Audio Input/output
Built-in microphoneand speaker
Image
Image resolution
1080P (1920*1080)
Min illuminance
Colour 0.01Lux@F1.2
Image setting
Support HD/SD; support flip
Framerate
1~25fps
Network
Alarm trigger
Intelligent motion detection/cry detection
Wireless Security
WPA/WPA2, WPA-PSK/WPA2-PSK, WPS
Communication
Protocol
TCP/IP, HTTP, DHCP, DNS
Interfaceprotocol
Private
Wireless
2.4G WIFI(IEEE802.11b/g/n)
Supported mobile
phone OS
iOS 8 or later, Android 4.2 or later
Data Security
AES128
General
Operating
temperature
−20 °C to 50 °C
Power supply
Support DC 5V/1A
Storage
SD card (Max.128G) ,Cloud storage
IRdistance
Night visibility up to 10m

19
electriQ UK SUPPORT
www.electriQ.co.uk/support
Service Line: 03303903061
Office hours: 9AM - 5PM Monday to Friday
www.electriQ.co.uk
Unit J6, Lowfields Business Park
Lowfields Way, Elland
West Yorkshire, HX5 9DA
Disposal: Do not dispose this product as
unsorted municipal waste. Collection of such
waste must be handled separately as special
treatment is necessary.
Recycling facilities are now available for all
customers at which you can deposit your old
electrical products. Customers will be able to take any old
electrical equipment to participating civic amenity sites run by
their local councils. Please remember that this equipment will
be further handled during the recycling process, so please be
considerate when depositing your equipment. Please contact
the local council for details of your local household waste
recycling centers.
Table of contents
Other ElectrIQ Camcorder manuals