Electro Depot VALBERG MWO 23 CG K 902C2 User manual

976466 - MWO 23 CG K 902C2
INSTRUCTIONS FOR USE .....................02
CONSIGNES D'UTILISATION .....................24
GEBRUIKSAANWIJZINGEN .....................46
INSTRUCCIONES DE USO .....................68
03/2023 - V2
Microwave oven
Four à micro-ondes
Microgolfoven
Horno microondas
EN
WARRANTY CONDITION
This product has a 2-year warranty as of the date of purchase*, covering any fault resulting from
a manufacturing or material defect. This warranty does not cover defects or damage resulting
from incorrect installation, improper use or abnormal wear of the appliance.
*upon presentation of the sales receipt.
FR
CONDITION DE GARANTIE
Ce produit est garanti pour une période de 2 ans à partir de la date d’achat*, contre toute
défaillance résultant d’un vice de fabrication ou de matériau. Cette garantie ne couvre pas les
vices ou les dommages résultant d’une mauvaise installation, d’une utilisation incorrecte ou
de l’usure anormale du produit.
*sur présentation du ticket de caisse.
NL
GARANTIEVOORWAARDEN
Dit product wordt gegarandeerd voor een periode van 2 jaar vanaf de aankoopdatum*, voor
elke storing die het gevolg is van een fabricagefout of het materiaal. Gebreken of schade door
slechte installatie, onjuist gebruik of abnormale slijtage van het product worden niet gedekt
door deze garantie.
*op vertoon van kassabon.
ES
CONDICIONES DE GARANTÍA
El certificado de garantía de este producto tiene una duración de 2 años a partir de la fecha de
compra* que se limita a los defectos de fabricación y averías del material. Se excluyen de la
garantía deficiencias o daños originados por una mala instalación, errores en la manipulación
o por un uso inadecuado.
*previa presentación del comprobante de compra.
Made in PRC
ELECTRO DEPOT
1 route de Vendeville
59155 FACHES-THUMESNIL
FRANCE
2/2
1
2
3 45 6
78
9
2 3
FR FR
Aperçu de l’appareil
A A
3
Table of contents
APreview of the
appliance
CUseful information
BUsing the appliance Installation
Operation of control panel
Cleaning
Maintenance
Utensils guideline
Cooking tips
Correct disposal of this product
Product instruction
2
Thanks!
Thank you for choosing this VALBERG product.
Chosen, tested and recommended by ELECTRO DEPOT,
VALBERG branded products are easy to use, reliable,
and of an impeccable standard.
With every use of this appliance, you can be sure of
complete satisfaction.
Welcome to ELECTRO DEPOT.
Visit our website: www.electrodepot.fr
EN EN

5EN
Using the appliance
B
4EN
Preview of the appliance
A
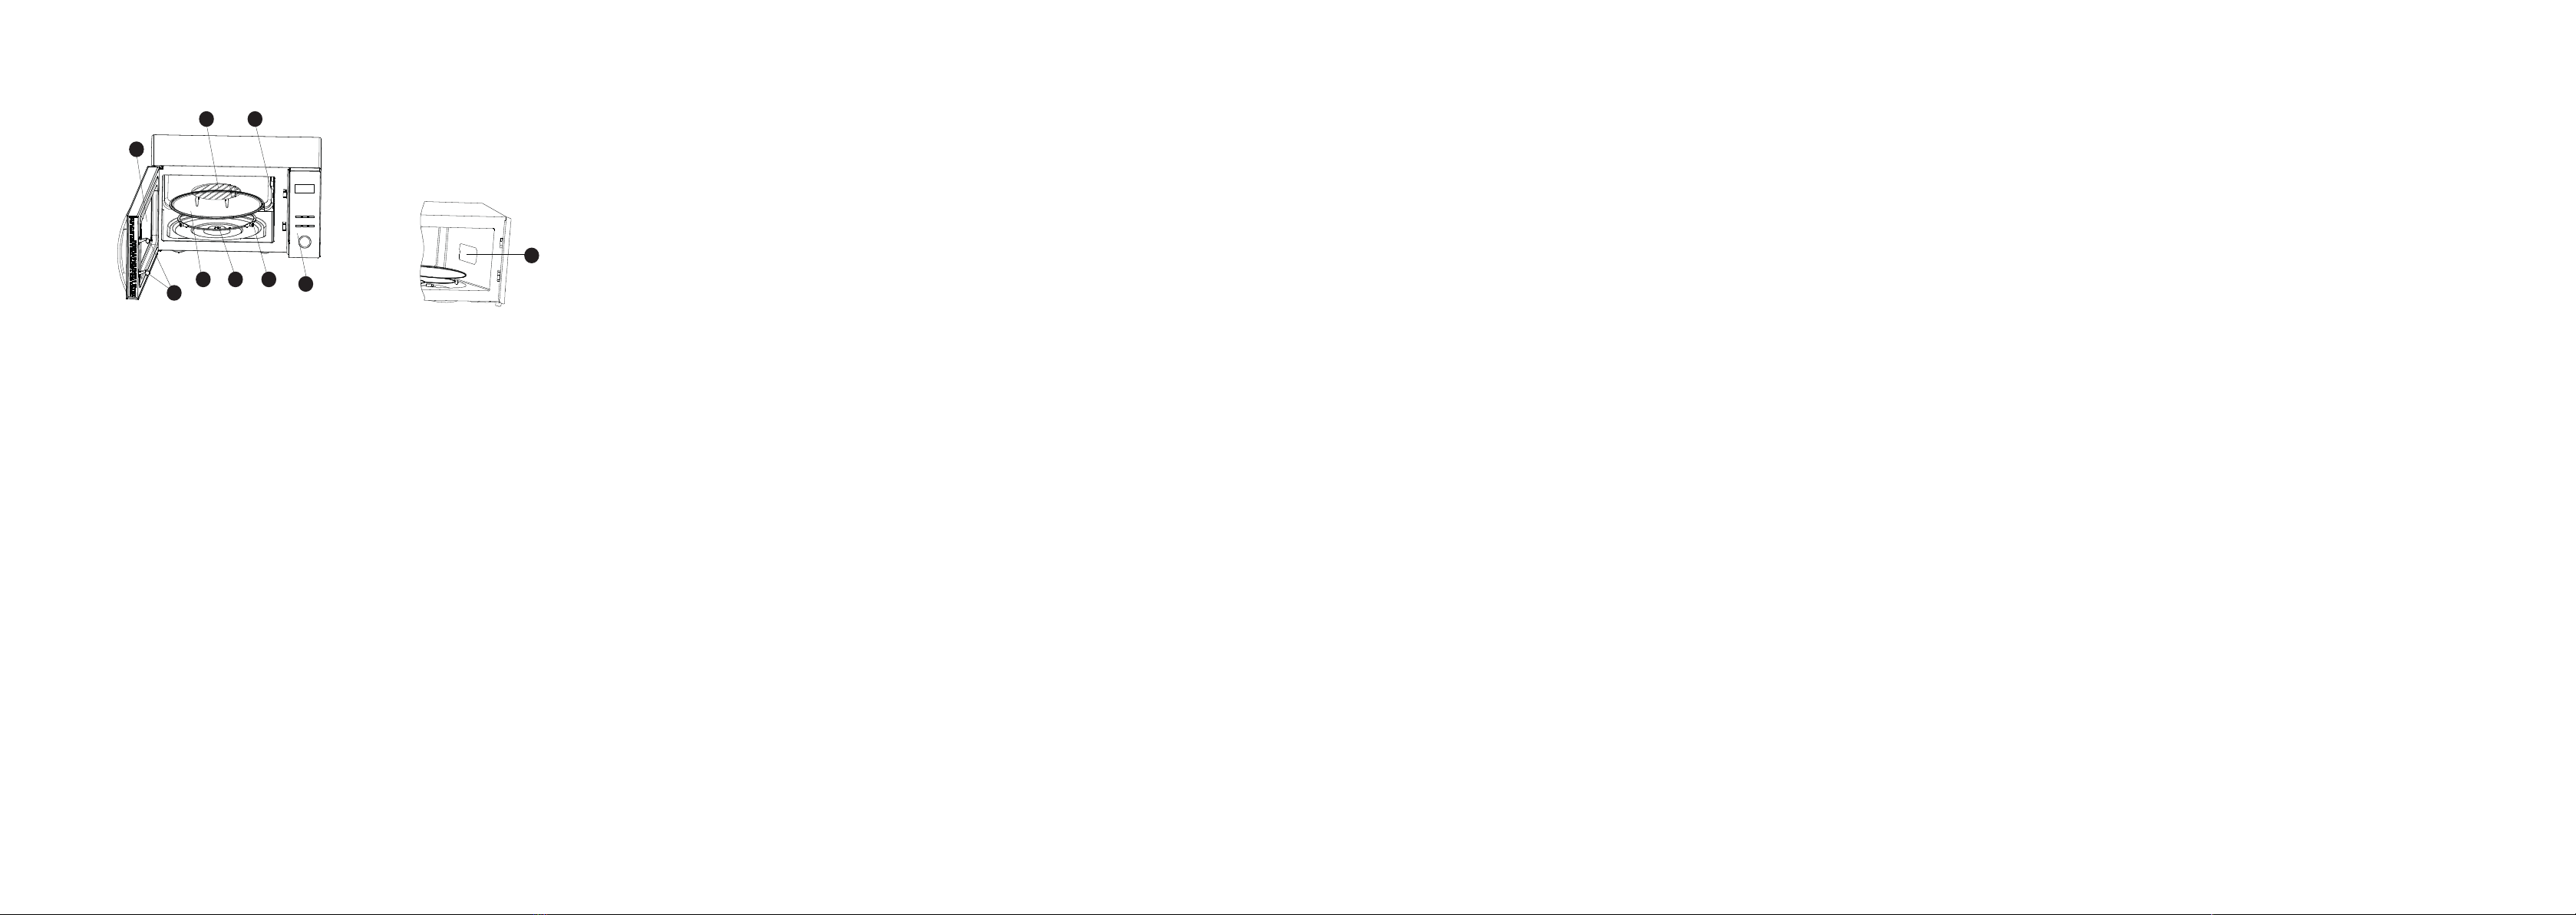
Product instruction
1Door lock
Microwave oven door must be properly closed in order for it to operate
2Viewing window
Allow user to see the cooking status
3
Rotating axis
The glass turntable sits on the axis; the motor underneath it drives the
turntable to rotate
4
Rotating ring
The glass turntable sits on its wheels; it supports the turntable and helps it
to balance when rotating
5
Turntable
The food sits on the turntable, its rotation during operation helps to cook
food evenly
CAUTION
- Place the rotating ring first
- Fit the turntable onto the rotating axis and make
sure that it is geared in properly
6
Control panel
See below in details (the control panel is subject to change without prior
notice)
7
Waveguide cover
It is inside the microwave oven, next to the wall of control panel.
WARNING
Never remove the waveguide cover
8Grill rack
Use to place the roasting food.
9Waveguide cover
Installation
1. Take out all the packing. If there is a safe film over the oven, tear it off before Use. Check
carefully for damage. If any, immediately notify dealer or send to the manufacturer’s service
center.
2. Microwave ovens must be placed under dry and non-corrosiveness environments, kept
away from heat and humidity, such as gas burner or water tank.
3. To ensure sufficient ventilation, the distance of the back of microwave to the wall should
be at least 10 cm, the side to the wall should be at least 5 cm, the free distance above the top
surface at least 20 cm. the distance of the microwave to the ground should be at least 85 cm.
4. The position of the oven shall be such that it is far from the TV, Radio or antenna as picture
disturbance .The distance should be more than 5m.
5. The appliance must be positioned so that the plug is accessible, and must ensure a good
grounding in case leakage, ground loop can be formed to avoid electric shock.
6. The microwave oven must be operated with the door closed.
7. The microwave oven must not be placed in a cabinet. The microwave oven is intended to
be used freestanding.
8. As there is manufacturing residue or oil remained on the oven cavity or heat element, it
usually would smell the odor, even a slight smoke, It is normal case and would not occur
after several times use, keep the door or window open to ensure good ventilation. So it is
strongly recommended to set the oven to grill mode and operate dry several times.

6 7
EN EN
Using the appliance Using the appliance
B B
Operation of control panel
Before cooking
The LED flashes 3 times when plugged in power supply. Then it flashes “:”, prompting you to
input the cooking menu and time.
/ knob
You can increase or decrease cooking time, weight, cooking temperature or select auto
cooking menu during operation by turning the knob.
At the initial or input stage: press once to cancel input programs and resume initial stage.
During cooking: press once to stop oven operation, press twice to cancel cooking programs.
Auto reminder
When your preset cooking procedure have finished, the LED display will show End and three
beeps sound will be heard to prompt you to take out the food. If you do not press button
once or open the door, the beep will be sounded at an interval of 3 minutes.
Clock setting
The button make it available for you to input current or preset time. When “:” flashes
onto LED display after plugged in, or try to skip it over to continue if unnecessary.
Example: to set 12:30
Steps Display
1 After power-up, the colon flashes :
2Press button once 0:00
3Turn / knob to set exact hours. 12:00
4Press button once again. 12:00
5Turn / knob to set exact minutes. 12:30
6Press button once again or wait for 5 seconds,
and the numbers will go steadily.
Microwave cooking
This function is used for cooking and heating food. Press button, LED cycles to show
100P — 80P — 60P — 40P — 20P
High power 100% microwave power. Applicable for quick and thorough cooking
Medium High power 80% microwave power. Applicable for medium express cooking
Medium power 60% microwave power. Applicable for steaming food
Medium Low power 40% microwave power. Applicable for defrosting food
Low power 20% microwave power. Applicable for keeping warm
Caution:
a. The max time which can be set is 60minutes
b. Never operate the oven empty.
c. Never use the grill rack when microwave cooking.
d. At the maximum microwave power, the oven will automatically lower the power after a
certain time of cooking to lengthen the service life.
8 9
EN EN
Using the appliance Using the appliance
B B
e. If you turn the food during operation, press the button once and the preset cooking
procedure will continue.
f. If you intend to remove the food before the preset time, you must press button once
to clear the preset procedure to avoid unintended operation of next time use.
Example: To cook at P80 for 10 minutes.
Steps Display
1 After power-up, the colon flashes :
2Select the desired microwave power by pressing button
consecutively
80P
3Set cooking time by turning / knob 10:00
4Press button to start and LED will count down to show running time.
Convection and grill cooking
This function is used for grilling food. Press button LED display will cycle to show C –
C.1-C.2-G-G.1-G.2
Convection cooking
C
Convection, convection unit will be energized during entire operation time. In this
mode, hot air is circulated throughout the oven cavity to brown and crisp foods
quickly and evenly.
C.1 Combination of Convection Grill and microwave cooking. 30% of time microwave
output and 70% of time Convection Grill
C.2 Combination of Convection Grill and microwave cooking. 55% of time microwave
output and 45% of time Convection Grill
Temperature setting
Select operating temperature by different task, Temperature includes 80°C, 100°C, 120°C,
140°C, 160°C, 180°C.
In combination mode, the cooking temperature you set can’t exceed 180°C as the oven
cannot be heated to the temperature higher than 180°C.
Example: Cook with convection function C. at 180°C for 20 minutes
Steps Display
1 After power-up, the colon flashes :
2Press button consecutively to select desired menu C
3Set the operating temperature by turning / knob 180C
4Press button confirm it
5Set the cooking time by turning / knob 20:00
6Press button start cooking
Grill cooking
G
Grill, the heat element will be energized during operation time. Which is applicable
for rolling thin meats or pork, sausage, chicken wing as good brown color can be
obtained
G.1 Combination of grill and microwave cooking. 30% of time microwave output and
70% of time grilling
G.2 Combination of grill and microwave cooking. 55% of time microwave output and
45% of time grilling
Caution:
In the mode of convection/combi/grill, all of the oven parts, as well as the rack and cooking
containers, may become very hot. Use caution when removing any item from the oven. Use
heavy potholders or oven mitts to PREVENT BURNS.
Example: To grill food with G.2 cook menu for 10 minutes
Steps Display
1 After power-up, the colon flashes :
2Press button to select desired grill menu G.2
3Set cooking time by turning the / knob 10:00
4Press to start cooking

10 11
EN EN
Using the appliance Using the appliance
B B
Defrost
This function use for defrost food; press button and the LED display will cycle to show
d.1-d.2-d.3.
d.1 For defrosting meat, the weight range from 0.1 to 2.0 kg.
d.2 For defrosting poultry, the weight range from 0.2 to 3.0kg.
d.3 For defrosting seafood, the weight range from 0.1 to 0.9kg.
Caution:
a. It is necessary to turn over the food during operation to obtain uniform effect.
b. Usually defrosting will need longer time than that of cooking the food.
c. If the food can be cut by knife, the defrosting process can be considered completed.
d. Microwave penetrates around 4cm into most food.
e. Defrosted food should be consumed as soon as possible, it is not advised to put back to
fridge and freeze again.
Example: To defrost 0.4kg poultry
Steps Display
1 After power-up, the colon flashes :
2Press button to set the food kind. d.2
3Turn / knob to set the defrost weight 0.4
4Start cooking by pressing
5
During defrosting, 3 beep sound will be heard two times to prompt you
turn over the food. Open the door and turn over the food. Then close the
door. Press button again to continue defrosting
Auto cooking
The oven has default cooking menu for simple operation. When the LED flash colon, turn the
knob and LED will cycle to show A.1, A.2 …… A.8
Choose the appropriate menu according to the food type and weight and strictly observe the
directions in below table, otherwise the cooking effect will be largely influenced.
Display Kind Method
A.1 Rice
Wash rice and soak for 30 minutes. Place rice in a deep and
large bowl. Refer to the water volume as follow.
Rice 100g 200g 300g
Water 180ml 330ml 480ml
**Rice -After cooking, stand cover for 5 minutes or until water is
absorbed.
A.2 Vegetable
Place 0.2-0.8kg vegetable in a microwave-safe bowl. Add water.
Cover with wrap, After cooking, stir and allow standing. Add
water amount according to the vegetable quantity.
**0.2-0.4kg: 2 Tablespoon;
**0.5-0.8kg: 4 Tablespoon
A.3 Frozen
vegetable Same as Fresh vegetable
A.4 Popcorn
Suitable for popping a bag of corn, which is available in
the market, weighting 3.0oz (85g) or 3.5oz (100g). Prior to
completion, if the popping speed has been decreased to 1 time
per 1-2 seconds you should press button to stop the
popping process.
A.5 Beverage Heating a cup of 250ml or 500ml liquid. The liquid temperature
is about 5-10°C. Use a big mouth cup and do not seal.
A.6 Potato
Choose medium sized potatoes approx. 200g, wash and dry it,
total weight is about 0.45kg or 0.65kg. Place potatoes on a large
dish and cover the dish with a thin film to prevent water loss.
Turning the potatoes is necessary halfway.
A.7 Pizza Warm a piece of chilled pizza of 0.15kg.
A.8 Fish
Suitable for steaming a fish of 0.45kg. After the fish washed and
scales removed, make a slits on the skin of fish .Put the fish on
a shallow dish of 22-27 cm diameter sprinkle lightly with some
ingredient. After cooking, stand for 2 minutes.
Caution:
a. The temperature of food before cooking would be 20-25°C. Higher or lower temperature of
the food before cooking would require increase or decrease of cooking time.
b. The temperature, weight and shape of food will largely influence the cooking effect. If any
deviation has been found to the factor noted on above menu, you can adjust the cooking time
for best result.

12 13
EN EN
Using the appliance Using the appliance
B B
Example: Steam 0.45kg fish
Steps Display
1 After power-up, the colon flashes :
2Turn / knob to set the cooking menu A.8
3Start cooking by pressing button and LED will count down to show
running time.
Automatic starting (delayed function)
If you do not want the menu be started immediately, you can preset the cooking menu and
time and the preset menu will be automatically started at your set time. The setting will
consist of 2 steps:
• Setting the current clock;
• Setting the cooking menu and time.
Example: Now it is 12:30 clock, if you hope that the microwave oven will automatically
start cooking with 100P microwave power for 9 minutes and 30 seconds at 14:20
Steps Display
1 After power-up, the colon flashes :
1.1 Press button 0:00
1.2 Set hours by turning / knob 12:00
1.3 Press button again to confirm hours 12:00
1.4 Set minutes by turning / knob 12:30
1.5 Press button once or waiting for 5 seconds, and the numbers will go
steady.
12:30
2 Set the cooking menu and time
2.1 Set power level by pressing button 100P
2.2 Turn / knob to set cooking time 9:30
2.3 Press and hold button for 3 seconds to return to current clock.
3 Set the time you expect to start. Repeat the steps of 1.2, 1.3, 1.4
Example: Now it is 12:30 clock, if you hope that the microwave oven will automatically
start cooking with 100P microwave power for 9 minutes and 30 seconds at 14:20
Steps Display
4Press button to confirm the delayed menu. Now the program has
been activated. And the menu will be started at 14:20.
5You may check the preset starting time by pressing button.
Multi-sequence cooking
To obtain best cooking result, some recipes call for different cook mode and time. You may
program your personalized menu as follow:
Example: You want cook food with 100P microwave for 3 minutes then grilling for
9 minutes. This is 2 sequence setting.
Steps Display
1 100P microwave for 3min
1.1 Press button to select power level. 100P
1.2 Turn / knob to set cooking time. 3:00
2 Grill for 9min
2.1 Press button to select desired grill menu G
2.2 Turn / knob to set cooking time. 9:00
3Start cooking by pressing
Caution:
a. When microwave power cooking is finished, microwave oven will begin grilling operation
automatically.
b. Max 4 sequences can be set per time, repeat the steps.
Child lock function
Use this feature to lock the control panel when you are cleaning or so that children can not
use the oven unsupervised. All the buttons are rendered inoperable in this mode.
1) Set lock: Hold button about 3 seconds.
2) Cancel lock: Hold button about 3 seconds.

14 15
EN EN
Useful information Useful information
C C
Cleaning
Microwave oven care
CAUTION
The oven should be cleaned regularly and any food deposits
removed.
1. Remove the power cord from the wall outlet before
cleaning. Don’t immerse the appliance in water or other
fluids when cleaning.
2. Failure to maintain the oven in a clean condition could lead
to deterioration of the surface that could adversely affect
the life of the appliance and possibly result in a hazardous
situation
3. Never use hard detergent, gasoline, abrasive powder or
metal brush to clean any part of the appliance
4. Do not remove the waveguide cover
5. When the microwave oven has been used for a long time,
there may be some strange odors exist in oven, Following
3 methods can get rid of them:
a. Place several lemon slices in a cup, then heat with high
Micro Power for 2-3 min.
b. Place a cup of red tea in oven, then heat with high micro
power.
c. Put some orange peel into oven, and then heat them with
high Micro Power for 1 minute.
WARNING
Only allow children to use the oven without supervision
when adequate instructions have been given so that the
child is able to use the oven in a safe way and understands
the hazards of improper use;
Tips for cleaning
Details for cleaning door seals, cavity and adjacent parts:
Exterior:
• Wipe the enclosure with a dampened soft cloth
Door:
• Using a dampened soft cloth, wipe clean the door and
window
• Wipe the door seals and adjacent parts to remove any spill
or spatter
• Wipe the control panel with a slightly dampened soft cloth
Interior walls:
• Wipe clean the cavity with a dampened soft cloth
• Wipe clean the waveguide cover to remove any food
splashed

16 17
EN EN
Useful information Useful information
C C
Turntable/ Rotation ring/ Rotation axis:
• Wash with mild soap water
• Rinse with clean water and allow drying thoroughly
Maintenance
Servicing
Please check the following before calling for services.
1. Place one cup of water (approx.150ml) in a glass measure in the oven and close the door
securely. Oven lamp should go off if the door is closed properly. Let the oven work for 1 min.
2. Does the oven lamp light?
3. Does the cooling fan work? (Put your hand over the rear ventilation openings.)
4. Does the turntable rotate? (The turntable can rotate clockwise or counter clockwise. This
is quite normal.)
5. Is the water inside the oven hot? If “NO” is the answer to any of the above questions, please
check your wall socket and the fuse in your meter box. If both the wall socket and the fuse are
functioning properly, CONTACT YOUR NEAREST SERVICE CENTER APPROVED.
Servicing safeguards
Caution: MICROWAVE RADIATION
1. The high voltage capacitor remains charge after disconnection; short the negative terminal
of H. V capacitor to the oven chassis (use a screwdriver) to discharge before touching.
2. During servicing below listed parts are liable to be removed and give access to potentials
above250V to earth.
• Magnetron
• High voltage transformer
• High voltage capacitor
• High voltage diode
• High voltage fuse

18 19
EN EN
Useful information Useful information
C C
3. The following conditions may cause undue microwave exposure during servicing.
• Improper fitting of magnetron;
• Improper matching of door interlock, door hinge and door;
• Improper fitting of switch support;
• Door, door seal or enclosure has been damaged.
CAUTION
1. If LED displays Err0 during working, it indicates that
sensor has been short circuit and you need replace it at
the nearest repaired department.
2. If LED displays Err1 during working, it indicates that
sensor has been open circuit and you need replace it at
the nearest repaired department.
Utensils guideline
It is strongly recommended to use the containers which are suitable and safe for microwave
cooking. Generally speaking, the containers which are made of heat-resistant ceramic, glass
or plastic are suitable for microwave cooking. Never use the metal containers for microwave
cooking and combination cooking as spark is likely to occur. You can take the reference of
below table.
Material of
container Microwave Grill Convection Combi Notes
Heat-resistant
ceramic Yes Yes Yes Yes Never use the ceramics which are
decorated with metal rim or glazed
Heat-resistant
plastic Yes No No No Can not be used for long time
microwave cooking
Heat-resistant
glass Yes Yes Yes Yes
Plastic film Yes No No No
It should not be used when cooking
meat or chops as the over-
temperature may do damage to the
film
Grill rack No Yes Yes Yes
Metal container No No No No
It should not be used in microwave
oven. Microwave can not penetrate
through metal.
lacquer No No No No Poor heat resistant. Can not be used
for high temperature cooking
Bamboo wood
and paper No No No No Poor heat resistant. Can not be used
for high temperature cooking

20 21
EN EN
Useful information Useful information
C C
Cooking tips
The following factors may affect the cooking result:
Food arrangement
Place thicker areas towards outside of dish, the thinner part towards the centre and spread
it evenly. Do not overlap if possible.
Cooking time length
Start cooking with a short time setting, evaluate it after it times out and extend it according
to the actual need. Over cooking may result in smoke and burns.
Cooking food evenly
Food such as chicken, hamburger or steak should be turned once during cooking.
Depending on the type of food, if applicable, stir it from outside to centre of dish once or twice
during cooking
Allow standing time
After cooking times out, leave the food in the oven for an adequate length of time, this allows
it to complete its cooking cycle and cooling it down in a gradual manner
Whether the food is done
Color and hardness of food help to determine if it is done, these include:
- Steam coming out from all parts of food, not just the edge
- Joints of poultry can be moved easily
- Pork or poultry shows no signs of blood
- Fish is opaque and can be sliced easily with a fork
Browning dish
When using a browning dish or self-heating container, always place a heat-resistant insulator
such as a porcelain plate under it to prevent damage to the turntable and rotating ring.
Microwave safe plastic wrap
When cooking food with high fat content, do not allow the plastic wrap come into contact with
food as it may melt
Microwave safe plastic cookware
Some microwave safe plastic cookware might not be suitable for cooking foods with high fat
and sugar content. Also, the preheating time specified in the dish instruction manual must
not be exceeded.

23 EN
Notes
22 EN
Useful information
C
Correct disposal of this product
This marking indicates that this product should not be disposed with other
household wastes throughout the EU. To prevent possible harm to the
environment or human health from uncontrolled waste disposal, recycle
it responsibly to promote the sustainable reuse of material resources. To
return your used device, please use the return and collection systems or
contact the retailer where the product was purchased. They can take this
product for environmental safe recycling.

24 25
FR FR
Aperçu de l’appareil
A A
25
Table des matières
AAperçu de l'appareil
CInformations
pratiques
BUtilisation de
l'appareil
Installation
Fonctionnement du panneau de commande
Nettoyage
Entretien
Consignes concernant les ustensiles
Conseils de cuisson
Mise au rebut correcte de cet appareil
Consignes d'utilisation de l'appareil
24
Merci!
Nous vous remercions d'avoir choisi ce produit
VALBERG.
Choisis, testés et recommandés par ELECTRO DEPOT,
les produits de la marque VALBERG sont simples
d'utilisation, tout en offrant des performances
fiables et une qualité irréprochable.
Grâce à cet appareil, vous êtes assuré(e) que chaque
utilisation vous apportera satisfaction.
Bienvenue chez ELECTRO DEPOT.
Consultez notre site Internet: www.electrodepot.fr
FR FR

27 FR
Utilisation de l’appareil
B
26 FR
Aperçu de l’appareil
A
Consignes d'utilisation de l'appareil
1
Verrouillage de la porte
La porte du four à micro-ondes doit être correctement fermée pour que
l'appareil fonctionne.
2Vitre
Permet à l'utilisateur de surveiller la cuisson.
3
Axe de rotation
Le plateau tournant en verre repose sur l’axe; le moteur en-dessous fait
tourner le plateau
4
Anneau de rotation
Le plateau tournant en verre repose sur ses roues; il soutient le plateau
tournant et maintient l’équilibre pendant la rotation
5
Plateau tournant
Les aliments doivent être placés sur le plateau tournant; ses rotations
lors du fonctionnement de l'appareil aident les aliments à cuire de manière
uniforme.
ATTENTION
- Positionnez d'abord l'anneau de rotation.
- Placez le plateau tournant sur l'axe de rotation
et assurez-vous de l'avoir correctement installé.
6
Panneau de commande
Voir la présentation détaillée ci-dessous (le panneau de commande peut être
modifié sans notification préalable).
7
Protection du guide d'ondes
Elle se trouve à l'intérieur du four à micro-ondes, près de la paroi du
panneau de commande.
AVERTISSEMENT
Ne retirez jamais la protection du guide d'ondes.
8Grille métallique
Vous pouvez placer des aliments à rôtir sur cette grille.
9Protection du guide d'ondes
Installation
1. Retirez tous les matériaux d'emballage. Si le four comporte un film de sécurité, décollez-
le avant d'utiliser l'appareil. Vérifiez soigneusement que l'appareil n'est pas endommagé. Le
cas échéant, prévenez immédiatement le revendeur ou envoyez-le au centre de réparation
du fabricant.
2. Les fours à micro-ondes doivent être installés dans des environnements secs et non
corrosifs, à l'écart des sources de chaleur et d'humidité, comme les brûleurs à gaz ou les
réservoirs d'eau.
3. Pour assurer une ventilation suffisante, la distance doit être d'au moins 10cm entre
l'arrière du micro-ondes et le mur, et d'au moins 5cm entre les parois latérales et le mur.
Un espace libre d'au moins 20cm doit être prévu au-dessus du four. La distance entre le four
à micro-ondes et le sol doit être de 85cm au minimum.
4. Le four à micro-ondes ne doit pas être placé à proximité d'un téléviseur, d'une radio ou
d'une antenne car il pourrait perturber la réception. La distance doit être supérieure à 5m.
5. L'appareil doit être positionné de sorte que la prise soit accessible et à garantir une mise
à la terre correcte. En cas de fuite, une boucle de terre peut se former pour éviter un choc
électrique.
6. Vous devez faire fonctionner le four à micro-ondes avec la porte fermée.
7. Ce four à micro-ondes ne doit pas être placé à l'intérieur d'un placard. Cet appareil est
destiné à être utilisé de manière indépendante, sans être encastré.
8. Des résidus de fabrication ou de la graisse pouvant subsister dans la cavité du four ou sur
les éléments chauffants, l'appareil peut initialement dégager une odeur et parfois un peu
de fumée. Ceci est normal et cessera au bout de plusieurs utilisations. Ouvrez la porte ou la
fenêtre pour assurer une bonne ventilation. Par conséquent, il est vivement recommandé de
régler le four en mode gril et de le faire fonctionner à sec plusieurs fois.

28 29
FR FR
Utilisation de l’appareil Utilisation de l’appareil
B B
Fonctionnement du panneau de commande
Avant de cuisiner
L'affichage LED clignote 3fois quand l'appareil est branché à l'alimentation électrique.
Ensuite, le symbole «:» clignote, pour vous inviter à indiquer le programme et le temps de
cuisson.
Bouton /
Vous pouvez augmenter ou réduire le temps de cuisson, le poids, la température de cuisson
ou sélectionner le menu de cuisson automatique en tournant ce bouton.
Après un premier réglage: appuyez une fois pour annuler le programme choisi et revenir à
l'état initial.
Pendant la cuisson: appuyez une fois sur ce bouton pour arrêter le fonctionnement du four;
appuyez deux fois dessus pour annuler les programmes de cuisson.
Rappel automatique
À la fin du programme de cuisson prédéfini, l'affichage LED indique «Fin» et trois bips
retentissent pour vous rappeler que vous pouvez sortir les aliments du four. Si vous
n'appuyez pas une fois sur le bouton ou n'ouvrez pas la porte, le bip continuera à
retentir toutes les 3minutes.
Réglage de l'horloge
Le bouton vous permet de régler l'heure ou de régler une durée. Lorsque «:» clignote
sur l'affichage LED après le branchement de l'appareil, réglez l'heure ou passez pour
continuer si nécessaire.
Exemple: pour régler 12h30
Étapes Affichage
1 Une fois que l'appareil est sous tension, les deux-points clignotent. :
2Appuyez une fois sur le bouton 0:00
3Tournez le bouton / pour régler l'heure exacte. 12:00
4Appuyez à nouveau sur le bouton .12:00
5Tournez le bouton / pour régler les minutes exactes. 12:30
6Appuyez une nouvelle fois sur le bouton ou attendez 5secondes et
les chiffres cesseront de clignoter.
Cuisson au micro-ondes
Cette fonction permet de cuire et réchauffer des aliments. Appuyez sur le bouton , les
LED affichent de manière cyclique 100P — 80P — 60P — 40P — 20P
Forte puissance 100% de la puissance du micro-ondes. Convient pour une cuisson
rapide et complète
Puissance moyenne
forte
80% de la puissance du micro-ondes. Convient pour une cuisson
moyennement rapide
Puissance moyenne 60% de la puissance du micro-ondes. Convient pour la cuisson à
la vapeur
Puissance moyenne
basse
40% de la puissance du micro-ondes. Convient pour la
décongélation
Puissance faible 20% de la puissance du micro-ondes. Convient au maintien au
chaud des aliments.
30 31
FR FR
Utilisation de l’appareil Utilisation de l’appareil
B B
Attention :
a. Le temps de cuisson maximal que vous pouvez régler est de 60minutes.
b. Ne faites jamais fonctionner le four à vide.
c. N'utilisez jamais la grille pour la cuisson au micro-ondes.
d. À la puissance maximale du micro-ondes, le four abaissera automatiquement la puissance
au bout d'un certain temps de cuisson pour prolonger la durée de vie de l'appareil.
e. Si vous retournez les aliments en cours de cuisson, appuyez une fois sur le bouton
pour que le programme de cuisson préréglé se poursuive.
f. Si vous souhaitez retirer les aliments du four avant la fin du temps de cuisson prédéfini,
vous devez appuyer une fois sur le bouton pour annuler le programme réglé, afin
d'éviter qu'il ne reprenne lors de la prochaine utilisation.
Exemple: pour une cuisson à P80 pendant 10minutes
Étapes Affichage
1 Une fois que l'appareil est sous tension, les deux-points clignotent. :
2Sélectionnez le niveau de puissance souhaité en appuyant
successivement sur le bouton 80P
3Réglez la durée de cuisson en tournant le bouton / 10:00
4Appuyez sur le bouton pour démarrer la cuisson. L'affichage LED
indiquera le décompte du temps de cuisson.
Cuisson par convection et gril
Cette fonction est utilisée pour griller des aliments. Appuyez sur le bouton , l'affichage
LED indiquera de manière cyclique C – C.1-C.2-G-G.1-G.2
Cuisson par convection
C
Convection: l'unité de convection sera alimentée pendant toute la durée de
fonctionnement. Dans ce mode, l'air chaud circule dans toute la cavité du four pour
colorer les aliments et les rendre croustillants, de manière rapide et uniforme.
C.1 Combinaison de gril à convection et de cuisson aux micro-ondes. Micro-ondes à
30% du temps et gril à convection à 70% du temps
C.2 Combinaison de gril à convection et de cuisson aux micro-ondes. Micro-ondes à
55% du temps et gril à convection à 45% du temps
Réglage de la température
Choisissez la température de fonctionnement pour les différentes tâches. La température
peut être de 80°C, 100°C, 120°C, 140°C, 160°C ou 180°C.
En mode combiné, la température de cuisson réglée ne peut dépasser 180°C car le four ne
peut pas être chauffé à une température supérieure en 180 °C.
Exemple: Cuisson avec la fonction convection à 180°C pendant 20minutes
Étapes Affichage
1 Une fois que l'appareil est sous tension, les deux-points clignotent. :
2Appuyez sur le bouton plusieurs fois pour sélectionner le menu
souhaité C
3Réglez la température de cuisson en tournant le bouton /
Température. Temps. Poids 180C
4Appuyez sur pour confirmer
5Réglez le temps de cuisson en tournant le bouton / 20:00
6Appuyez sur pour commencer la cuisson
Cuisson au gril
G
Gril: l'élément chauffant sera alimenté pendant la durée de fonctionnement.
Convient pour la cuisson de morceaux de viande fins, saucisses, ailes de poulet, car
il permet une belle coloration.
G.1 Combinaison de gril et de cuisson aux micro-ondes. Micro-ondes à 30% du temps
et gril à 70% du temps
G.2 Combinaison de gril et de cuisson aux micro-ondes. Micro-ondes à 55% du temps
et gril à 45% du temps
Attention :
En mode convection/combi/gril, toutes les parties du four, ainsi que la grille et les récipients
de cuisson, peuvent devenir très chauds. Faites attention lorsque vous retirez les aliments
du four. Utilisez des maniques ou des gants pour ÉVITER LES BRÛLURES.

32 33
FR FR
Utilisation de l’appareil Utilisation de l’appareil
B B
Exemple: Pour griller des aliments avec le menu de cuisson G.2 pendant 10 minutes
Étapes Affichage
1 Une fois que l'appareil est sous tension, les deux-points clignotent. :
2Appuyez sur le bouton plusieurs fois pour sélectionner le menu
souhaité G.2
3Réglez le temps de cuisson en tournant le bouton / 10:00
4Appuyez sur pour commencer la cuisson
Décongeler
Cette fonction permet de décongeler des aliments; appuyez sur le bouton et l'affichage
LED fera défiler les programmes suivants: d.1 - d.2 - d.3.
d.1 Pour décongeler de la viande dont le poids est compris entre 100 et 200g.
d.2 Pour décongeler de la volaille dont le poids est compris entre 200 et 300g.
d.3 Pour décongeler des fruits de mer dont le poids est compris entre 100 et 900g.
Attention :
a. Il est nécessaire de retourner les aliments en cours de décongélation pour obtenir un
résultat uniforme.
b. Le temps de décongélation est généralement plus long que la cuisson des aliments.
c. Si les aliments peuvent être coupés avec un couteau, la décongélation peut être considérée
comme terminée.
d. Les micro-ondes pénètrent dans la plupart des aliments sur environ 4cm.
e. Les aliments décongelés doivent être consommés aussi rapidement que possible, il n'est
pas conseillé de les remettre au réfrigérateur ni de les congeler à nouveau.
Exemple: pour décongeler 400g de volaille
Étapes Affichage
1 Une fois que l'appareil est sous tension, les deux-points clignotent. :
2Appuyez une fois sur le bouton pour régler le type d'aliment. d.2
3Tournez le bouton / pour régler le poids des aliments à
décongeler 0,4
Exemple: pour décongeler 400g de volaille
Étapes Affichage
4Démarrez la cuisson en appuyant sur le bouton
5
Au cours de la décongélation, 3 bips retentiront deux fois pour vous
rappeler de retourner les aliments. Ouvrez la porte et retournez les
aliments. Ensuite, refermez la porte. Appuyez à nouveau sur le bouton
pour poursuivre la décongélation.
Cuisson automatique
Ce four dispose de programmes de cuisson par défaut pour plus de simplicité. Quand les
deux-points clignotent sur l'affichage LED, appuyez sur le bouton et l'affichage LED fera
défiler les programmes suivants: A.1, A.2, ..., A.8.
Choisissez le programme approprié en fonction de la catégorie et du poids de l'aliment, puis
respectez scrupuleusement les instructions figurant dans le tableau ci-dessous, sinon vous
n'obtiendrez pas une cuisson optimale.
Affichage Catégorie Méthode
A.1 Riz
Rincez le riz et laissez-le tremper 30minutes. Placez le riz
dans un bol large et profond. Ajoutez le volume d'eau suivant.
Riz 100g 200g 300g
Eau 180ml 330ml 480ml
**Riz -Après cuisson, laissez à couvert pendant 5minutes ou
jusqu'à ce que toute l'eau soit absorbée.
A.2 Légumes
Placez 200 à 800g de légumes dans un bol passant au micro-
onde. Ajoutez de l'eau. Couvrez d'un film. Après cuisson,
remuez et laissez reposer. Ajoutez une quantité d'eau
correspondant à la quantité de légumes.
**200-400g: 2 cuillères à soupe;
**500-800g: 4 cuillères à soupe
A.3 Légumes
surgelés Identique à la cuisson des légumes frais
A.4 Pop-corn
Convient pour la cuisson des sachets de pop-corn de 85g ou
100g disponibles sur le marché. Avant de terminer, si la vitesse
d'éclatement a diminué à 1 fois toutes les 1 ou 2 secondes, vous
devez appuyer sur le bouton pour arrêter le processus.
A.5 Boissons
Réchauffer une tasse de 250 ou 500ml de liquide. La
température du liquide est d'environ 5 à 10°C. Utilisez une
tasse à ouverture large, sans couvercle.

34 35
FR FR
Utilisation de l’appareil Utilisation de l’appareil
B B
Affichage Catégorie Méthode
A.6 Pommes
de terre
Choisissez des pommes de terre de taille moyenne, d'environ
200g, lavez-les et séchez-les, pour un poids total de 450
à 650g. Placez les pommes de terre dans un plat large et
couvrez-le avec un film fin pour éviter la déperdition d'eau. Il
est nécessaire de tourner les pommes de terre à mi-cuisson.
A.7 Pizza Réchauffer un morceau de pizza surgelée de 150g.
A.8 Poisson
Convient pour un poisson de 450g. Une fois le poisson vidé et
écaillé, faites des entailles sur la peau du poisson. Placez le
poisson dans un plat peu profond de 22 à 27cm de diamètre,
et ajoutez l'assaisonnement. Après cuisson, laissez reposer
2minutes.
Attention :
a. La température des aliments avant la cuisson doit être de 20 à 25°C. Si leur température
est supérieure ou inférieure, vous devrez diminuer ou augmenter le temps de cuisson.
b. La température, le poids et la forme des aliments influent nettement sur la cuisson.
En cas d'écart par rapport aux valeurs indiquées dans le tableau ci-dessus, vous pouvez
adapter le temps de cuisson pour obtenir un résultat optimal.
Exemple: Cuire à la vapeur un poisson de 450g
Étapes Affichage
1 Une fois que l'appareil est sous tension, les deux-points clignotent. :
2Tournez le bouton / pour régler le menu de cuisson A.8
3Démarrez la cuisson en appuyant sur le bouton . L'affichage LED
indiquera le décompte du temps de cuisson.
Démarrage automatique (fonction de départ différé)
Si vous ne souhaitez pas que le programme démarre immédiatement, vous pouvez prérégler
le programme et le temps de cuisson, puis le programme démarrera automatiquement à
l'heure fixée. Le réglage comporte 2étapes:
• Réglage de l'heure actuelle de l'horloge;
• Réglage du programme et du temps de cuisson.
Exemple: il est maintenant 12h30 et vous souhaitez que le four à micro-ondes
démarre automatiquement la cuisson à une puissance de 100P pendant 9minutes et
30secondes à 14h20
Étapes Affichage
1 Une fois que l'appareil est sous tension, les deux-points clignotent. :
1.1 Appuyez sur le bouton 0:00
1.2 Réglez les heures en tournant le bouton / 12:00
1.3 Appuyez à nouveau sur le bouton pour confirmer les heures. 12:00
1.4 Réglez les minutes en tournant le bouton / 12:30
1.5 Appuyez une nouvelle fois sur le bouton ou attendez 5secondes et
les chiffres cesseront de clignoter.
12:30
2 Réglez le programme et le temps de cuisson.
2.1 Réglez le niveau de puissance en appuyant sur le bouton 100P
2.2 Tournez le bouton / pour régler le temps de cuisson 9:30
2.3 Maintenez appuyé le bouton pendant 3secondes pour revenir à
l'heure actuelle sur l'horloge.
3Réglez l'heure à laquelle vous souhaitez que le programme démarre.
Répétez les étapes 1.2, 1.3 et 1.4.
4Appuyez sur le bouton pour confirmer le départ différé. Le
programme est maintenant activé. La cuisson démarrera à 14h20.
5Vous pouvez vérifier l'heure de démarrage préréglée en appuyant sur
le bouton .
Cuisson en plusieurs étapes
Pour obtenir un résultat optimal, certaines recettes requièrent des modes et temps de
cuisson différents. Vous pouvez programmer votre cuisson personnalisée de la manière
suivante:

37 FR
Informations pratiques
C
36 FR
Utilisation de l’appareil
B
Nettoyage
Entretien du four à micro-ondes
ATTENTION
Le four doit être nettoyé régulièrement et tous les résidus
de nourriture doivent être éliminés.
1. Débranchez la fiche de la prise murale avant de nettoyer
l'appareil. Ne plongez pas l’appareil dans l'eau ou dans
d'autres liquides lors du nettoyage.
2. Si le four n'est pas maintenu dans un bon état de propreté,
les surfaces risquent de s'abîmer, ce qui peut nuire à la
durée de vie de l'appareil et éventuellement provoquer des
situations dangereuses.
3. N'utilisez jamais de détergents agressifs, d'essence, de
poudres abrasives ni de brosses métalliques pour nettoyer
de quelconques parties de l'appareil.
4. Ne retirez pas la protection du guide d'ondes.
5. Si le four à micro-ondes est utilisé depuis longtemps,
il est possible qu'il présente des odeurs anormales. Les
3méthodes suivantes permettent de s'en débarrasser:
a. Placez plusieurs rondelles de citron dans une tasse, puis
faites-la chauffer à forte puissance pendant 2à 3minutes.
b. Placez une tasse de thé rouge dans le four, puis chauffez-
la à forte puissance.
Exemple: Vous souhaitez cuire des aliments au micro-ondes à une puissance de 100P
pendant 3minutes, puis au gril pendant 9minutes Il s'agit ici de programmer une
cuisson en 2étapes.
Étapes Affichage
1 Puissance de 100P pendant 3min
1.1 Appuyez sur le bouton pour sélectionner le niveau de puissance. 100P
1.2 Tournez le bouton / pour régler le temps de cuisson. 3:00
2 Gril pendant 9 min
2.1 Appuyez sur le bouton plusieurs fois pour sélectionner le menu
gril souhaité G
2.2 Tournez le bouton / pour régler le temps de cuisson. 9:00
3Démarrez la cuisson en appuyant sur le bouton
Attention :
a. À la fin de la cuisson à une puissance de 100P, le four démarrera automatiquement l'étape
suivante.
b. Vous pouvez régler un maximum de 4étapes pour chaque cuisson, en répétant la
procédure ci-dessus.
Fonction sécurité enfants
Utilisez cette fonction pour verrouiller le panneau de commande quand vous nettoyez
l'appareil ou pour que des enfants ne puissent pas utiliser le four sans surveillance. Lorsque
ce mode est activé, tous les boutons sont rendus inutilisables.
1) Réglage du verrouillage: Maintenez le bouton appuyé pendant au moins 3secondes.
2) Déverrouillage: Maintenez le bouton appuyé pendant au moins 3secondes.
This manual suits for next models
1
Table of contents
Languages:
Popular Microwave Oven manuals by other brands

Sharp
Sharp YC-QS204AE user manual

Scarlett
Scarlett SC-MW9020S10D instruction manual

Samsung
Samsung FG87KST Owner's instructions and cooking guide

Panasonic
Panasonic NN-3456 Operating instructions & cookery book

GE
GE JES738BK - Countertop Microwave Oven owner's manual

Baumatic
Baumatic BTM17.5SS user manual


