ELEMENTICE Walker+ User manual


Contents
Compliance Statements .............................................................................................3
Mounting and Connecting Walker to your Camera ................................................5
Battery Charging and Maintenance ..........................................................................8
Powering on, powering off + rebooting a Walker .................................................10
Important Camera Settings......................................................................................11
Status Lights on Walker............................................................................................14
Pairing a Reader ........................................................................................................15
Reader Screen & Control Basics..............................................................................16
Using the Barcode/QR Code Scanner.....................................................................17
Console + remote management of device settings ..............................................18

Compliance Statements (for North American devices)
Information to the user (FCCPart 15.105)
Class B product:
This equipment has been tested and found to comply with the limits for a Class
B digital device, pursuant to Part 15 of the FCC Rules. These limits are designed
to provide reasonable protection against harmful interference in a residential
installation. This equipment generates, uses and can radiate radio frequency
energy and, if not installed and used in accordance with the instructions, may
cause harmful interference to radio communications. However, there is no
guarantee that interference will not occur in a particular installation. If this
equipment does cause harmful interference to radio or television reception,
which can be determined by turning the equipment off and on, the user is
encouraged to try to correct the interference by one or more of the following
measures:
•Reorient or relocate the receiving antenna
•Increase the separation between the equipment and receiver
•Connect the equipment into an outlet on a circuit different from that to
which the receiver is connected
•Consult the dealer or an experienced radio/TV technician for help
Modification Warning (FCC Part15.21)
Warning: Any changes or modifications not expressively approved by MENTIS
TECHNOLOGIES (trading as ELEMENTICE) could void the user's
authority to operate this equipment.
This Device complies with Part 15 of the FCC Rules and Innovation, Science and
Economic Development Canada’s license-exempt RSS(s). Operation is subject to
the following two conditions:
(1) This device may not cause interference; and
(2) This device must accept any interference, including interference that may
cause undesired operation of the device.
CAN ICES-3 (B)/NMB-3(B)

L’émetteur/récepteur exempt de licence contenu dans le présent appareil est
conforme aux CNR d’Innovation, Sciences et Développement économique
Canada applicables aux appareils radio exempts de licence. L’exploitation est
autorisée aux deux conditions suivantes :
1. L’appareil ne doit pas produire de brouillage;
2. L’appareil doit accepter tout brouillage radioélectrique subi, même si le
brouillage est susceptible d’en compromettre le fonctionnement.

Mounting and Connecting Walker to your Camera
The included L-Bracket is a universal 38mm mounting bracket. Use the shorter
included D-bolt to mount the L-Bracket to your camera as pictured. The Walker
has a corresponding dovetail slot to slide onto the mount, either to the left of
the camera or underneath.
Left Side Mount (recommended for most cases)
1) Slide the Walker into position from the top so that the blue face is facing the
back of the camera and the indicator lights are visible to you while shooting.
2) Finger tighten the Position Locking Bolt (longer D-bolt) so that the Walker can’t
slide off the mount by accident.
3) Select the correct camera cable for your camera and plug the 2.5mm
headphone jack into the Walker pushing firmly, and the USB end into your
camera’s USB port.

4) Secure the L-Bracket to your camera body so that the L-Bracket’s vertical side
safely covers and protects the USB port of the Camera.
Bottom/Right side mount
Bottom/Right side mount is usually only used for shooting with the camera in
portrait orientation, on a tripod when this can't be done using a Left side mount.
We'll start by setting up with the camera sitting normally on the table, and then
you can turn it 90 degrees for portrait orientation when you attach it to the
Tripod.
1) Select the correct camera cable for your camera and plug the USB end into
your camera’s USB port.
2) Secure the L-Bracket to your camera body so that the L-Bracket’s vertical side
safely covers and protects the USB port of the camera, but there is additional
space for the Position Locking Bolt (longer D-bolt) to use the 1/4" thread at the
bottom, near the corner of the L-Bracket.

3) Slide the Walker onto the longer side of the L-Bracket from the right of
camera so that the blue face is facing the back of the camera and the indicator
lights are visible to you while shooting.
4) Finger tighten the Position Locking Bolt so that the Walker can’t slide off the
mount by accident.
5) Take the loose end of the USB cord you already plugged in, (it will be a 2.5mm
headphone jack) and plug it in to the Walker, pushing firmly.

Mounting to Tripod.
You can now mount the camera to your tripod using any compatible universal
quick release or directly using the 1/4" threads on the L-Bracket.
Bottom/Right side mount is usually only used for shooting with the camera in
portrait orientation, on a tripod when this can't be done using a Left side mount.
We'll start by setting up with the camera sitting normally on the table, and then
you can turn it 90 degrees for portrait orientation when you attach it to the
Tripod.
*If your quick release system is incompatible with the L-Bracket directly, you can
also use the 1/4" threads on the L-Bracket as mounting points for your own
quick release plates.
Battery Charging and Maintenance
The Walker does not have a display of its' own, but the connected Reader
displays the battery level of itself (R) and the Walker (W) it is paired to, in the top
right corner of it's screen.
You can also see the battery level of all online devices on the ELEMENTICE
Console, including at the Device Page.

Our devices are compatible with Fast Charging. Using a fast charger, a Walker
would charge to 50% in 30-40 minutes and 100% in around 90 minutes. Using a
standard charger approximately doubles these times.
If the device battery was completely depleted on last use or the device was left
off charge for an extended period, battery protection will have kicked in and you
will need to charge the device to 100% before it will turn on again.
To ensure the ongoing health of your device's battery, each of your ELEMENTICE
devices should be fully charged at least once every two weeks.
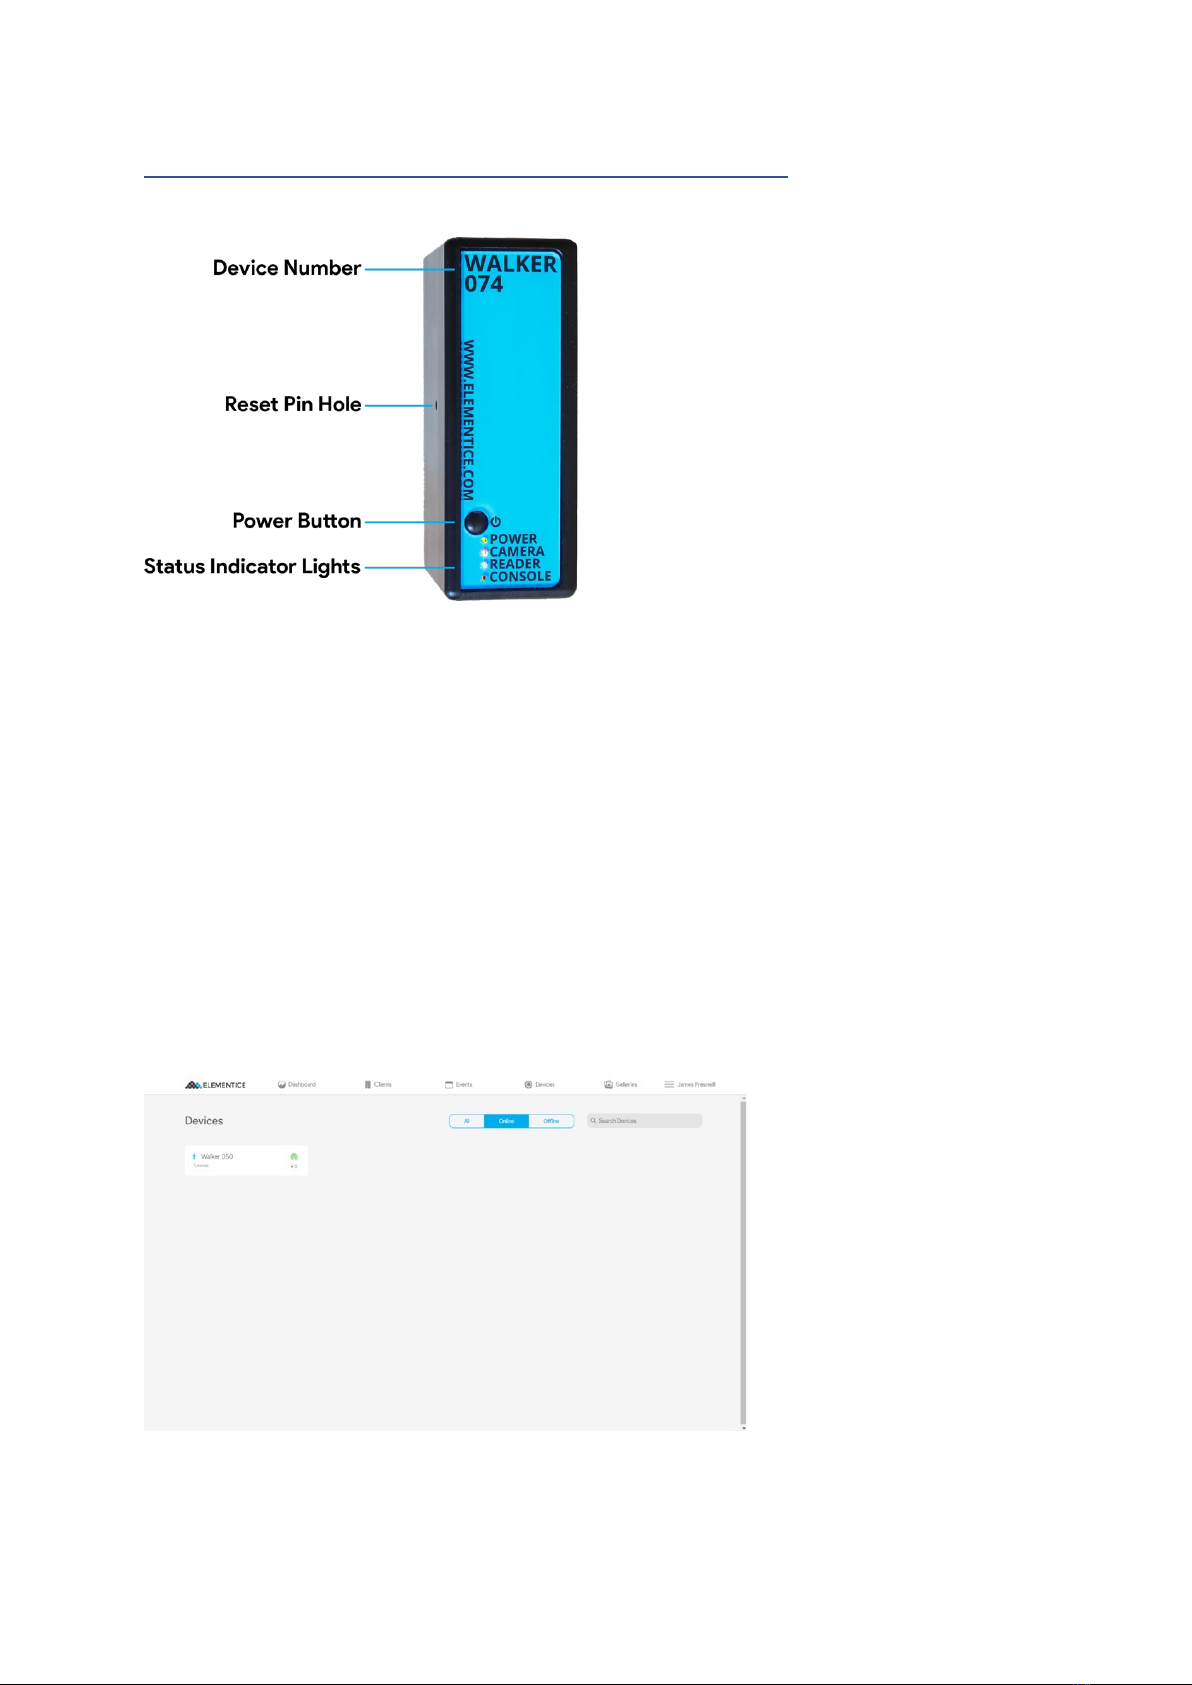
Powering on, powering off + rebooting a Walker
Powering On
Press and HOLD the Power button for approximately three seconds (black
button located on the blue face of your Walker... the only button on the entire
Walker), then watch the four status lights next to the power button, as it boots...
Powering Off
Press and HOLD the Power button for approximately three seconds until most
of the status lights turn off. The green Power light will stay on for a short time
while it completes power-down procedures. (If a Reader is paired, it will also
shutdown automatically after the Walker shuts down.)
Restart or shutdown from Console
With your Walker turned on, open the ELEMENTICE Console and click on
"Devices" tab on the top banner of the Console and select the relevant Walker.
You are now on the Device Page and can access the Shutdown or Restart
commands from the row of controls above the image feed.
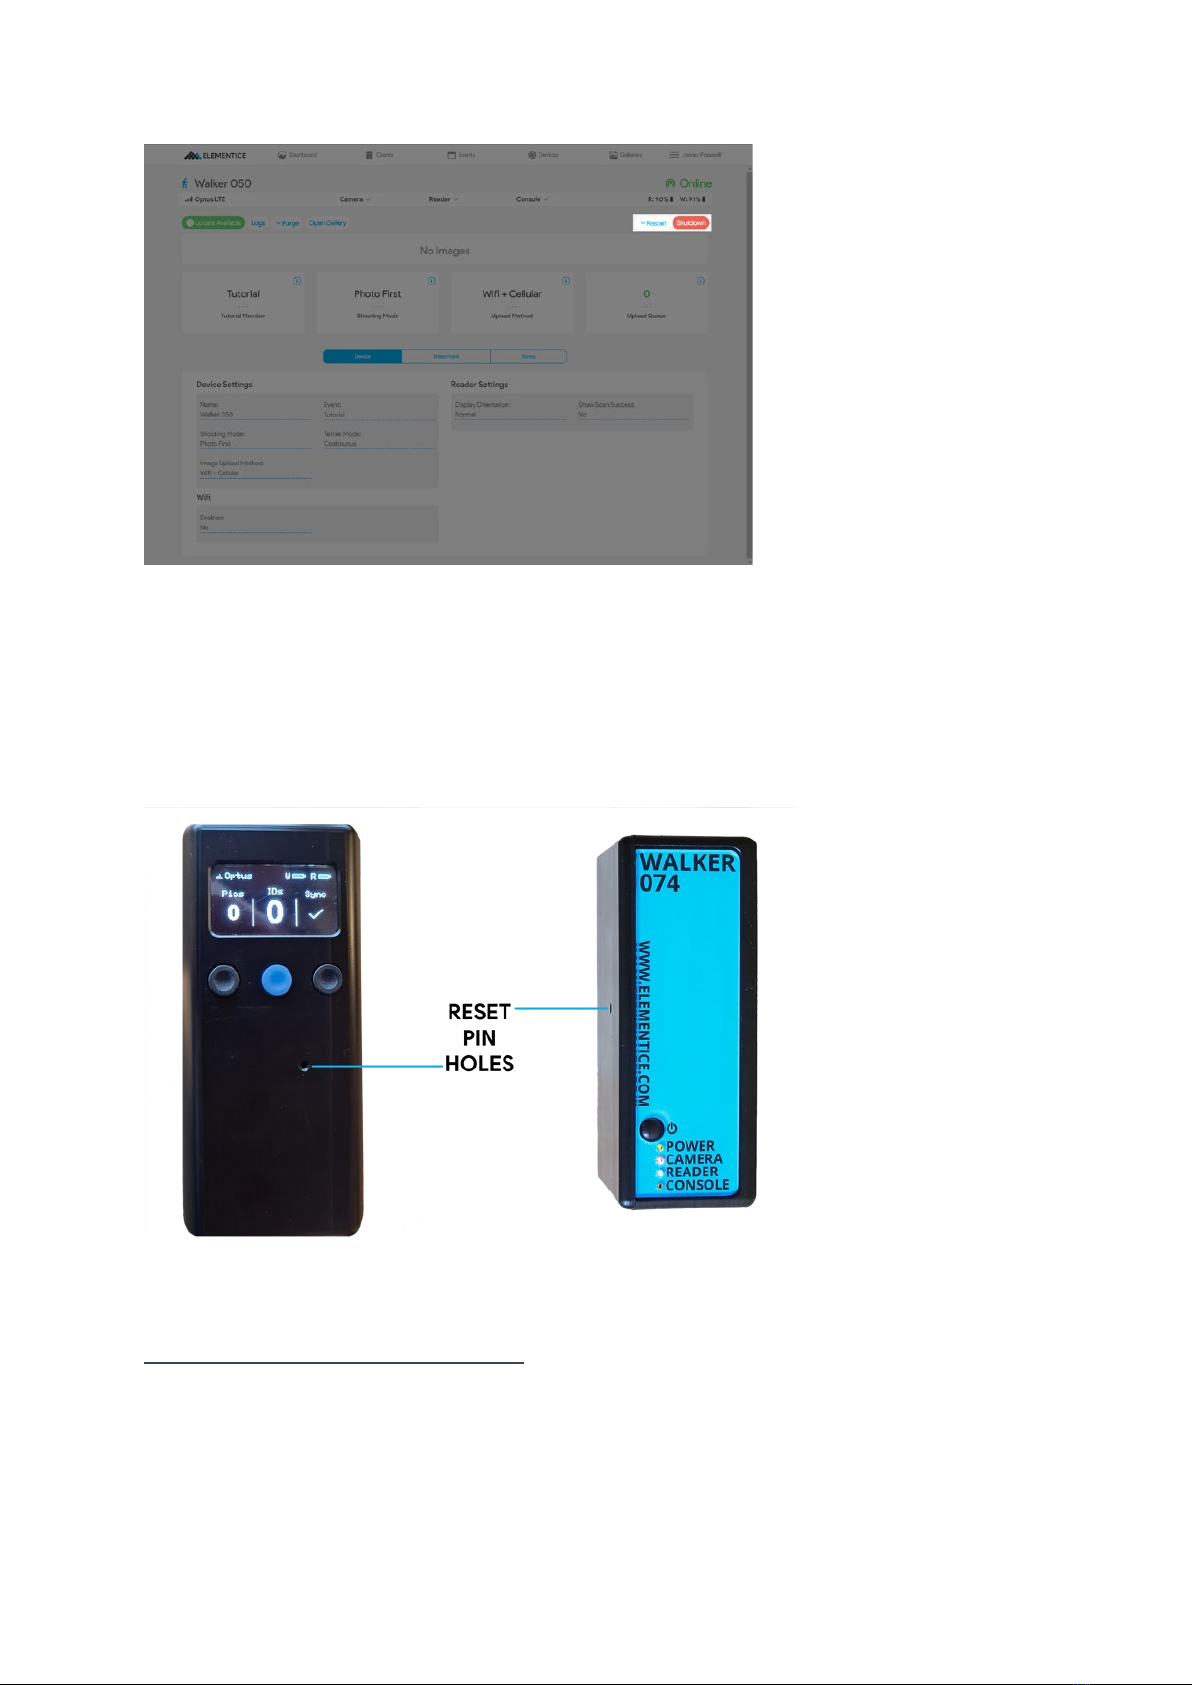
Hard Reset
If all else fails and you can't shut down your Walker, insert a paperclip into the
reset pin hole on the device to push the internal button. The power will cut out
immediately. Then you can follow normal power-on procedures.
Important Camera Settings
Memory Card
You must have a memory card in your camera. The faster, the better – if your

card is slow, it will take longer for the Walker to download the images off your
camera and will slow down the entire system.
WiFi off
If your camera has WiFi, please turn it off so that it does not interfere with other
signals.
Auto Power off / Standby Timer
Must be set to greater than 10 minutes so that the Walker can always
communicate with the camera. If the camera goes to sleep it may cause images
to not be uploaded.
Why 10 minutes? If there is a continuous period of 10 minutes of inactivity, the
Walker will shut down to save battery – at this point, it is ok for the camera to go
to sleep too.
Image aspect ratio
Our system is expecting 3:2 ratio images to uploaded, if you need to use a
different ratio, please contact us to ensure that you have appropriate
adjustments in place prior to use.
Image Rotation/Auto Rotate
If this is turned off, there will be no metadata in the images to tell whether they
are portrait or landscape, and can cause issues with watermarks. Make sure it is
turned on either for both camera and computer or just for computer.
Picture Style
If you are used to photographing in RAW, you probably haven't changed this
setting from neutral. Since we are delivering images Straight Out Of Camera, you
should select a Picture Style setting which gives the jpeg images a level of colour
and contrast that you are happy with. We tend to use 'Standard' setting on a
Canon 5Dmk3.
Image Quality
Our system will only download JPEG files, so you must have JPEG files being
saved to the/one of the memory cards.

We recommend using the smallest practical file size in order to save time
uploading and to keep your data costs down.
Canon 5Dmk3
Image Resolution
File Size (approx)
Prints to (@250dpi)
S1 Small JPEG 2880x1920 (5.5 MP)
1.5MB 11.5"x7.5" Approx A4
Medium JPEG
3840x2560 (9.8MP)
3MB
15"x10" Approx A3
Large JPEG 5760x3840 (22MP) 5MB 23"x15" Approx A2
Saving JPEG + RAW
If you wish to save RAW files in addition to the JPEG files which are used for
Walker, we recommend using a camera with dual card slots and using ‘Record
Separately’. This will allow you to save JPEG to one card, and RAW to the other
card.
If you only have one memory card, make sure your camera is set to save both
RAW and JPEG to the same card. Our system will ignore the RAW files and copy
the JPEG files. The process will be slightly slower because the camera is writing
two files before we can copy the JPEG, but it is an option.
*Warning. We do NOT recommend using ‘Record to Multiple’ as this will save a copy
of the photo on each card. If you are shooting JPEG only, Walker will take both images
and upload both – doubling your data usage and creating duplicate images in the
user's gallery.
If you are saving JPEG and RAW, you will end up with a RAW and a JPEG on each card.
Walker will again, take both JPEGs and upload both, but it will take much longer
because the camera needs to finish saving four files before Walker can access them.

Status Lights on Walker
Power (Green)
The green Power LED will light up to show that the Walker is powered on. This
should happen immediately upon pressing the power button, but it will be up to
30 seconds before other status lights begin indicating.
Camera (Orange)
The orange Camera LED will keep flashing until the camera is BOTH plugged in
and powered on.
Reader (Blue)
The blue Reader LED won’t turn on until you try to pair the Reader.
Console (Yellow)
The yellow Console LED will keep flashing until it is able to connect to the
internet (via 3G/4G) and make a connection with the ELEMENTICE Console. If
there is decent mobile reception, the light should automatically go solid after
approximately 10 seconds of flashing.
Wifi (Green) / some models
The wifi status light will illuminate if wifi is turned on and connected, or flash if
wifi is turned on but not connected.
A solid light means
If a light is solid, it means it is connected or working (good).

A flashing light means
If the light is flashing, it means it is trying to connect. Usually you just need to
give it a minute before it will go solid.
No light means
If a status light is not turning on at all, it means it isn't trying to do anything (for
example the blue Reader light will not turn on until it is told to try and pair with a
Reader). You might need to do an action or change a configuration in the
Console to make it do things.
Pairing a Reader
With the Walker powered on (and other lights either flashing or solid), press the
Power button once. The Walker will enter 'pairing mode' for 10 seconds and the
blue 'Reader' light will begin to flash rapidly.
While the blue ‘Reader’ light on the Walker is flashing, press the centre (blue)
button on the Reader. The Reader will show an ELEMENTICE logo on the screen
as it boots, and then connect to the Walker.
When connected, the blue ‘Reader’ light on the Walker will stop flashing and go
solid to indicate a connection. Meanwhile, the Reader will display useful
information.
If you need to disconnect a Reader, press the power button on the Walker
again. The Walker will drop the current reader connection and enter pairing
mode again. You can either reconnect with the same Reader by pressing the
centre Reader button again (while the blue 'Reader' light is still flashing quickly)
or pair with a new Reader by pressing that Reader’s centre button instead.

Reader Screen & Control Basics
1) IDs - Shows number of IDs scanned in this session.
2) Battery - Battery indicators for the Walker and Reader.
3) Sync - Shows the number of full-size images in the queue to upload. If there
are no images waiting, it will display a tick.
4) Right-hand button – if held enters ‘Continuous Scan Mode’
5) Reset pin slot - If required, insert a paperclip here to hard-reset the Reader.
6) Centre button - Used to pair the Reader with a Walker and once paired,
activates the barcode/QR reader.
7) Left-hand button – Currently unmapped. A new feature will be added later.
Check the online knowledgebase for updates.
8) Pics - Shows you the number of photos in this session.
9) Network - Shows mobile network provider and 3G/4G signal strength.
Inverted Screen Mode

If the normal orientation of the Reader screen doesn’t fit with your workflow,
you can change the Walker’s settings to invert the screen of the paired Reader
via the ELEMENTICE Console.
Using the Barcode/QR Code Scanner
Once the Reader is connected and displaying the standard screen, pressing the
centre (blue) Reader button will activate the barcode scanner. A red dot and
square will be projected from the end of the Reader. Point that red dot at the
barcode or QR code that you wish to scan. If it’s not scanning, try moving the
Reader closer or further away from the barcode or QR code.
The red light will turn off again when it achieves a successful scan or after five
seconds (whichever happens first). You’ll know you’ve had a successful read if
the Reader beeps and buzzes, plus the number of IDs displayed on the screen
will increase. You can see this in action in the Shooting Modes video available at
the online knowledgebase.
Continuous Scan Mode
Continuous scan mode on the Reader makes the Barcode/QR code reader
motion activated, rather than having to press the centre button of the Reader to
activate the scanner.
To activate Continuous Scan mode, hold down the right-hand button on the
Reader until the Reader beeps twice and ‘CS’ appears at the top of the Reader
screen (alongside the battery icons).
To scan while in CS mode, simply wave something in front of the barcode/QR
code scanner. You’ll notice the red light activate. The Reader will beep and buzz
to indicate a successful read, plus the number of IDs displayed on the screen will
increase.
To return to normal scanning mode, hold down the right-hand button on the
Reader until the Reader beeps twice and ‘CS’ disappears from the top of the
Reader screen.

Show Scan Success
Sometimes a beep and buzz just aren't enough, if you'd also like a big tick to
display on the Reader screen upon successful scan... This can be configured via
the ELEMENTICE Console.
Console + remote management of device settings
For information on configuring your device for different shooting modes, tether
modes, performing device software updates etc. (with a bunch of helpful tutorial
videos) see the online Knowledge base at:
https://knowledge.elementice.com/
Table of contents


 operating instructions")


