Elements PRO 32 User manual

BELGARD.COM
BUILT-IN GRILL
USER MANUAL

21 BELGARD.COMBUILT-IN GRILL USER MANUAL
ELEMENTS BUILT IN GRILL ELEMENTS BUILT IN GRILL
PRO 32" BUILT-IN GRILL NG
70585054
PRO 40” BUILT-IN GRILL NG
70585056
PRO 32” BUILT-IN GRILL LP
70585055
PRO 40” BUILT-IN GRILL LP
70585057
BBQ Dimensions 32 1/2” x 25 5/8” x 20”
BTU Output 14,000 BTU per Burner x4
Infrared Back Burner 15,000 BTU x1
Flame Ignition Match Thrower & Manual
Cooking Area 795sq. in. (including
warming area)
Drip Tray Stainless Steel
Flame Tamer Stainless Steel
Soft Cover Optional Accessory
Rotisserie Kit (Motor & Forks) Optional Accessory
Burner Cast Stainless
Gas Type Available in LP and NG
BBQ Dimensions 39 5/8” x 25 ½” x 20”
BTU Output 14,000 BTU per Burner x5
Infrared Back Burner 15,000 BTU x1
Flame Ignition Match Thrower & Manual
Cooking Area 985sq. in. (including
warming area)
Drip Tray Stainless Steel
Flame Tamer Stainless Steel
Soft Cover Optional Accessory
Rotisserie Kit (Motor & Forks) Optional Accessory
Burner Cast Stainless
Gas Type Available in LP and NG

43 BELGARD.COMBUILT-IN GRILL USER MANUAL
When using your Elements grill, please read and follow these basic precautions:
GRILL INSTALLATION
This gas grill must be installed in accordance with all local codes.
If installation is planned in an area with no local codes, the gas grill must be installed
in accord with the National Fuel Gas Code ANSI Z223.1 and storage and handling of
liquefied petroleum gases, ANSI/NFPA 58 or CSA B149.1 natural gas and propane
installation code.
CALIFORNIA PROPOSITION 65 WARNING
The burning of gas cooking fuel generates some by-products which are on the
list of substances which are known by the State of California to cause cancer or
reproductive harm. California law requires businesses to warn customers of potential
exposure to such substances. To minimize exposure to these substances, always
operate the unit according to the use and care manual, ensuring you provide good
ventilation when cooking.
WARNING: Improper installation, adjustment, alteration, service or maintenance can
cause injury or property damage. Read the installation, operating and maintenance
instructions thoroughly before installing or servicing this equipment.
Safety Information…………………….………...….………….………….........
Gas Specifications…………………….………...….………….…………….......
Installing the Grill in a BBQ Island………....….………..…………….......
Lighting the Grill……..……….………...….………........….…………….......
First Time Operation……………….………...….………….……………........
Maintenance Tips..........……………….………...….……….…………….......
Warranty..................………………………...….…………...…………........
4
7
11
16
17
18
19
SAFETY INFORMATIONTABLE OF CONTENTS
To reduce the risk of fine, electric shock, or injury, read and follow these basic pre-
cautions before operating your gas grill or side burners.
WARNING:
EXPLOSION HAZARD
Do not use the grill as storage area for flammable materials. Keep area clear and
free from combustible materials, gasoline, and other flammable vapors and liquids.
Failure to do so can result in death, explosion, or fire.
WARNING:

65 BELGARD.COMBUILT-IN GRILL USER MANUAL
Please read all instructions before installing or operating your gas grill to prevent
injury and appliance damage.
All gas grills will get hot during use. Use extreme caution when operating the grill.
Do not touch hot surfaces. Always use the handle to open or close the grill.
Close supervision is necessary when this or any appliance is used near children. Keep
children away from the grill during operation and until the grill has cooled off.
Do not store any LP cylinder or tank not connected for use with the grill, in the area of
this grill or any other appliance. Never store an LP cylinder or tank indoors, or within
the reach of children.
• Keep any electrical supply cord and fuel supply hose away from any heated
surfaces and dripping grease.
• Do not twist the gas supply hose.
• Before each use, visually inspect the gas supply hose for cracks, cuts or excessive
wear. Replace the hose if necessary.
• Never test the grill for gas leaks using a lighted match or any other open flame;
see leak test procedures using soap/water solutions - included in following pages
of this manual.
• The use of accessories, regulators, or components not recommended by the
appliance manufacturer may cause injuries and will void warranty.
• Never light the grill with the hood closed and be certain that the burners are
positioned and seated over the gas valves and on the burner support.
• Never lean over the cooking surface when lighting or operating the grill.
• Use barbecue tools with wood handles and insulated oven mitts when
operating the grill.
SAFETY INFORMATION SAFETY INFORMATION
This unit is for outdoor use only! Do not operate in a building, garage or an other
enclosed areas. This could result in carbon monoxide buildup which could result in
injury or death.
Most importantly, this is an outdoor appliance. Ensure your barbecue is positioned
safely away from anything that can catch fire. Under no circumstance is this barbecue
to be used indoors. This includes garages or any other enclosed area.
CLEARANCE FROM COMBUSTIBLES
Ensure your barbecue remains at a distance of at least 18” from any combustible
material such as wood, gyprock, paper and plants. Do not store combustible
materials, gasoline or flammable liquids or vapors within 18” of the barbecue.
ADEQUATE VENTILATION
Ensure there is adequate ventilation for both the barbecue and cylinder. This is
required not only for proper combustion, but also to prevent gas build up.
FIRM LEVEL SURFACE
Use your barbecue only on a firm level surface. This barbecue is not designed for
recreational vehicles and should not be installed on a boat or marine craft.
PROTECTION FROM WEATHER
Keep the barbecue protected from adverse weather, including rain and high winds.
Polyvinyl covers are available that have been specially designed for this range of
barbecues. Allow clear access to the entire gas supply hose and regulator.
MAINTENANCE ACCESS
When your barbecue is installed, you should be able to access the gas supply line
including the gas piping or hose, gas regulator, gas cylinder and any shut off valves.
PARTIAL ENCLOSURES
Many backyards have areas that are partially closed off, such as balconies and
pergolas. In some cases, it is hard to decide whether these partially enclosed areas
should be classified as indoor areas, particularly in terms of permanent (non-
closable) ventilation. The gas safety authorities have agreed on the definition of
partial enclosures below.
WARNING:

87 BELGARD.COMBUILT-IN GRILL USER MANUAL
NATURAL GAS REQUIREMENTS
• Always check the Rating Plate to make sure the gas supply you are hooking up to
is the gas type the grill is manufactured for.
• The installation of this appliance must conform with local codes or in the absence
of local codes, to the national fuel gas code, ANSI Z223.1a-1998. Installation in
Canada must be in accordance with the standard CAN/CGA-B149.2, Propane
Installation Code.
• A licensed contractor or local gas company representative must perform all
natural gas connections.
• Ensure that the service supplying the grill is fitted with a shut off valve
conveniently positioned near the grill and giving ease of access.
• The grill must be isolated from the gas supply piping system by closing its
individual manual shutoff valve during any pressure testing of the gas supply
piping system at test pressures equal to or less than 0.5 psi (3.5 kPa).
• The grill and its individual shutoff valve must be disconnected from the gas supply
piping system during any pressure testing of that system at test pressure in
excess of 0.5 psi (3.5 kPa).
IMPORTANT: NEVER CONNECT THE GRILL TO AN UNREGULATED GAS SUPPLY.
CONNECTION
1. Slide the grill forward to gain access to the regulator and gas connection point in
the rear.
2. Connect a suitable natural gas flex connector to the grill regulator.
3. Check the grill controls to ensure all control valves are in the full OFF position.
4. Turn on the main gas supply and check all connections for leaks using soapy water
as described in the leak testing procedure section.
WARNING: If you see bubbles in the soapy solution at any of the connections, turn off
the gas supply and tighten the connection. If tightening the connection does not seal
the leak, it may be necessary to replace the flex hose.
GAS SPECIFICATIONS GAS SPECIFICATIONS
Be sure that the gas supplied to the grill conforms to the model you purchased. A
Natural Gas grill requires natural gas to operate; an LP grill requires liquid propane
gas to operate.
Check the rating label on the left-hand side of the unit.
RATING PLATE LOCATION
• Never connect the appliance to an unregulated gas supply line. Grills operated
without a regulator are unsafe and will not be serviced until installed properly and
safely. Unsafe operation without a gas regulator will void warranty of the grill.
• Grills operated with NG (natural gas) gas must be installed with the NG regulator
supplied with the unit and set to 4.0" water column pressure.
• Grills operated with LP (liquid propane) gas must be installed with an LP
regulator Not supplied with the unit and set to 11" water column pressure.
• The gas valves used in the grills are preset at the factory for Natural Gas or Liquid
Propane operation. Please contact your dealer and use a licensed contractor or
installer to convert your grill to a different gas type.
• The self-contained LP system barbeque grill is design certified to be used with a
standard 20 lb., 12 1/4" diameter, 18" high cylinder with right-hand connection
threads and this is the maximum LP tank to be used. The cylinder must be marked
in accordance with the latest U.S. Department of Transportation specifications for
LP gas cylinders. (DOT. CFR49 or National Standards of Canada CAN/CSA-B359
Cylinders, Spheres and Tubes for the Transportation of Dangerous Goods) a
Propane Tank with an OPD (Overfill Prevention Device) must be always used.

109 BELGARD.COMBUILT-IN GRILL USER MANUAL
GAS SPECIFICATIONS GAS SPECIFICATIONS
LIQUID PROPANE (LP) GAS REQUIREMENTS
LP TANK REQUIREMENTS:
• An arrangement for gas vapor withdrawal.
• A safety relief device having direct communication with the vapor
space of the cylinder.
• A method of mounting.
• When not in use, the tank shut off valve should be turned off.
If you smell gas or hear a hiss of gas escaping from the tank, get away from the
tank and do not attempt to correct the problem yourself. Call the Fire Department
immediately. If your grill has no leak at the cylinder, then re-check for loose
connections and retest for leaks using the method detailed in the following pages
with soapy solution. Do not subject your LP gas cylinder to excessive heat, and always
store the cylinder in an upright position. Never store your LP cylinders indoors.
Make sure that when attaching components, all connections are secured and fully
tightened to prevent leakage. If one is not already available, it is recommended
that an ON-OFF shutoff valve be installed at the gas supply source, and that the gas
supply be turned off when either Natural Gas or LP Gas grills are not in use.
TRANSPORTING AND STORING LP GAS
Transport only one cylinder at a time. Ensure the cylinder is secured in an upright
position with the control valve turned off and the dust cap in place. Store cylinders
outdoors and out of reach of children. Do not store cylinders in a building, garage, or
any other enclosed area.
CHECKING FOR GAS LEAKS
• Perform a leak test at least once a year whether the gas supply cylinder has been
disconnected or not.
• In addition, whenever the gas cylinder is connected to the regulator or whenever
any part of the gas system is disconnected or replaced, perform a leak test.
• As a safety precaution, remember to always leak test your grill outdoors in a well-
ventilated area.
• Never smoke or permit sources of ignition in the area while doing a leak test.
• Do not use a flame, such as a lighted match to test for leaks.
• Prepare a leak testing solution of soapy water by mixing in a spray bottle one part
liquid soap to one part water.
• Make sure all the control knobs are in the OFF position.
TURNING ON THE GAS
• On Natural Gas systems, turn the main feed valve to the grill.
• On LP systems, turn the cylinder valve knob counterclockwise one turn to open.
Apply the leak-testing solution by spraying it on joints of the gas delivery system.
Blowing bubbles in the soap solution indicates that a leak is present.
• Stop a leak by tightening the loose joint or by replacing the faulty part with a
replacement part recommended by the manufacturer. Do not attempt to repair the
cylinder valve if it is damaged. The cylinder must be discarded to a proper LP tank
location and then replaced.
• Turn all control knobs back to the full OFF position.
• If you are unable to stop a leak turn all control knobs back to the full OFF
position, shut off the gas supply to the grill and release pressure in the hose and
manifold by pushing in and turning any of the control valves one quarter turn
counterclockwise. On LP systems, remove the cylinder from the grill. Call an
authorized gas appliance service technician or an LP gas dealer. Do not use the
appliance until the leak is corrected.
All purging and refilling of LP gas cylinders must be performed by qualified per-
sonnel in the LP gas industry. Never store a spare LP gas cylinder under or near this
appliance. Never fill the LP gas cylinder beyond 80 percent full. Failure to follow
these instructions may result in explosion, personal injury or death.
WARNING:

1211 BELGARD.COMBUILT-IN GRILL USER MANUAL
INSTALLING THE GRILL IN A BBQ ISLAND INSTALLING THE GRILL IN A BBQ ISLAND
UNIT INSTALLATION:
• Your Elements Grill comes pre-assembled and requires very little setup. We do;
however, recommend the use of professional help during the installation of your
unit as improper installation may affect your warranty.
• Remove the unit from the box along with all accessories and check that no damage
has occurred to the unit or any parts.
• Burners: Check the burner tubes and remove any obstructions that may be in
the ports or holes. Using cold water and a brush will be sufficient. Make sure
all foreign particles are removed from the burner before use. Make sure the air
shutter on the burners is slightly opened (to about 1/8").
• You will need a second person to help you avoid damaging the grill or your
barbecue island.
• Before installing a grill in any island or cut out, make sure that the opening is not
bigger than the outside frame of the grill unit. The grill should rest on the lip of
the frame.
• Pay careful attention to the location of the gas line. It should be routed away from
sources of heat and should make as few bends as possible.
• Check to see if the gas line connection will be accessible when grill is installed.
• If the gas line connection is not easily accessible when the grill is installed,
support the grill above counter level and attach the gas line to the grill. When the
gas connection is made, slide the grill into the cut out. If the gas line connection is
accessible when the grill installed, slide the grill into the cut out and then attach
the gas line.
• Be very careful not to kink the gas line when lowering the grill into the cut out.
• Keep your fingers away from where the grill will be supported on counter. Your
fingers could become trapped and serious injury could occur.
• Check to make sure the grill is level and is supported around the entire outside
edge. If the grill is not level or is unstable, use non-combustible shims under the
outside lip to stabilize it.
• Perform the leak test procedure as described earlier in this manual.
**BBQ ISLANDS MUST BE MANUFACTURED FROM
“NON-COMBUSTIBLE” MATERIAL**
MINIMUM CLEARANCE TO ADJACENT COMBUSTIBLE CONSTRUCTION AT 14” FROM
SIDES & 16” FROM BACK
MODEL DESCRIPTION WIDTH (A) WIDTH (B) HEIGHT (C)
Pro 32”
Built-In 4 Burner 30 5/8” 20 3/4” 8 1/2”
Pro 40”
Built-In 5 Burner 37 3/4” 20 3/4” 8 1/2”
NOTE: The oven will operate best if it
is not facing directly into the wind
Check with City and Fire department
for Local Building Codes. A Permit
may be required for outdoor kitchen
construction.
HOOD CLEARANCE

1413 BELGARD.COMBUILT-IN GRILL USER MANUAL
INSTALLING THE GRILL IN A BBQ ISLAND INSTALLING THE GRILL IN A BBQ ISLAND
Installation Method for Propane Installation Method for Natural Gas
CONNECTION METHOD FOR
DUAL SIDE BURNER
When connecting your Side
Burner to LP or NG, no regulator is
required on the side burner
Check the burner tubes and remove any obstructions that may be in the ports or
holes. Using cold water and a brush will be sufficient. Make sure all foreign particles
are removed from the burner before use. Make sure the air shutter on the burners is
slightly opened (to about 1/8").
For proper operation, burners must be aligned with the valve orifice and seated
in the bracket slot. This is accomplished by first placing the burner tube shutter
hole securely over the valve orifice and then secure with the screw at the rear
of the barbecue.
ELECTRICAL PRECAUTIONS
Extension cords are available and may be used if care is exercised in their use. If an
extension cord is used:
• The marked electrical rating of the cord set, or extension cord, should be at least
as great as the electrical rating of the appliance
• The cord should be arranged so that it will not touch hot surfaces or drape over
the countertop or tabletop (where it can be pulled on by children or tripped over
unintentionally).
• Outdoor extension cords should be used with products suited for outdoor use.
They are surface marked with suffix letters "W" or "W-A" and with a tag stating,
"Suitable for Use with Outdoor Appliances".
• To protect against electrical shock, the power cord and plug should be kept dry
and off the ground.
• Do not clean this product with water spray; do not spray cleaners into the lamp
socket area.
• Do not operate any appliance with a damaged power cord or power plug, and do
not operate any appliance after the appliance malfunctions or has been damaged
in any manner. If this should occur, return the appliance to the nearest authorized
service facility for examination, repair or adjustment.
• This appliance conforms to all uniform electrical safety codes and electrical
grounding regulations. Install unit according to I.A.W. local codes or with National
Electrical Code ANSI/NFPA 70 or CSA C22.1 in their absence.
GENERAL USE
NOTE: THE MANUFACTURER CANNOT BE HELD RESPONSIBLE FOR DAMAGE OR
INJURY CAUSED BY IMPROPER USE OF THIS APPLIANCE.
• Be certain your appliance is properly installed and grounded by a qualified
technician in accordance with applicable codes. To guarantee the electrical safety
of this appliance, continuity must exist between the appliance and an effective
grounding system. It is imperative that this basic safety requirement be met.
The manufacturer cannot be held responsible for damages caused by the lack or
inadequacy of an effective grounding system.
• Installation, repair and maintenance work should be performed by an authorized
service technician. Work by unqualified persons could be dangerous and will void
the warranty. Before installation or service, disconnect the power supply to the
work area by removing the fuse, "tripping" the circuit breaker, or unplugging the
unit.
• Gasoline, lighter fluid or other flammable liquids and vapors should never be
stored in the area of this grill or any other appliance.
• Do not store anything in the grill. Make sure food is not forgotten in the grill;
forgotten items could melt or catch fire when the appliance is turned on.
• To prevent injuries, do not use accessories that are not recommended by the
manufacturer.

1615 BELGARD.COMBUILT-IN GRILL USER MANUAL
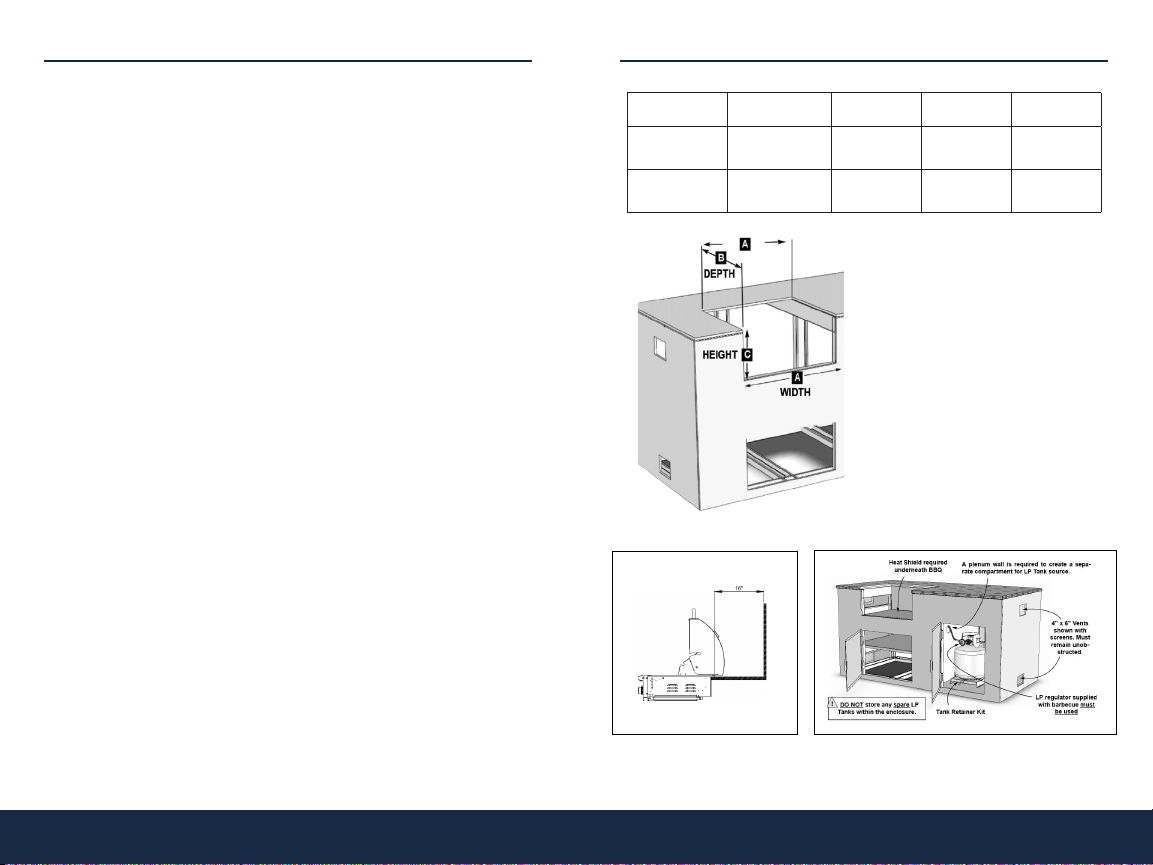
INSTALLING THE GRILL IN A BBQ ISLAND LIGHTING THE GRILL
• Before cleaning the appliance, "trip" the circuit breaker and allow the appliance to
cool.
• Always open the grill hood carefully, using only the handle - the hood may be hot.
• Children should not be left alone or unattended in an area where any appliance is in
use. They should never be allowed to touch, sit or stand on any part of the appliance.
• Do not store items of interest to children in cabinets above the grill or in the grill.
Children climbing on the appliance to reach these items could be
seriously injured.
• Wear proper clothing when operating appliances. Loose-fitting or hanging garments
should never be worn while using the grill.
• Do not leave the grill unattended while in use.
• Do not use water on grease fires! A violent steam explosion may result. Instead,
smother the fire with a dry chemical or foam fire extinguisher.
Before lighting the burners inspect the gas supply piping or hose. If there is evidence
of cuts, wear, abrasion, it must be replaced prior to use. Always keep your face and
body as far away from the grill as possible when lighting.
CAUTION: NEVER OPERATE THE GRILL UNATTENDED.
DO NOT OPERATE THE ROTISSERIE BURNER WITH THE HOOD CLOSED.
Prior to using your grill, verify that all the following is correct:
• The burner tube is free of insects and insect nests, webs, etc.
• Installation of the proper gas type and regulator settings.
• The proper gas connection is complete.
• Minimum clearances are maintained.
• All packaging has been removed.
• All parts and components are properly in place.
• An installer-supplied manual gas shut-off valve is fully accessible.
• LP hose is clean and inspected for cuts, wear, abrasion, or leaks. Replace, if
necessary, with a suitable UL, ETL or CSA Listed part with internally threaded
Become familiar with the safety instructions at the front of this manual. Do not smoke
while lighting the grill or checking the gas supply connections.
Make sure that all gas connections are securely tightened and have been leak-tested
with a soapy water solution - never with a flame!
WARNING:
VALVE IGNITION
PLEASE KEEP YOUR FACE AND BODY AWAY FROM THE GRILL TOP WHEN LIGHTING.
1. Open the hood before lighting; do not attempt to ignite the burners while the hood
is closed.
2. Make sure gas supply is turned on.
3. Make sure the burner control knobs are in the “OFF” position.
4. Press in the control knob then slightly turn the knob counterclockwise while still
pressing in.
5. Hold in the above position for 5 seconds allowing the gas to reach the manifold.
6. Turn the knob counterclockwise past the ignition to the high setting to ignite. You
will hear the one time clicking sound of the spark ignition.
7. After ignition, set the knob to the desired setting.
NOTE:
1. If the burner doesn’t ignite, wait five (5) minutes before repeating steps 4-7.
2. DO NOT turn on more than one valve at a tie for either.
MANUAL IGNITION
CAUTION: ALWAYS WAIT FIVE (5) MINUTES FOR GAS TO CLEAR AFTER ANY
UNSUCCESSFUL LIGHTING ATTEMPTS!
Follow steps 1-3
1. Place either a burning long-barrel butane lighter or a burning long-stem match
near the manual flash tube to the right of the grill. For back burners, hold the
flame against the surface of the back burner.
2. Hold the lighter or match flame at the top of the manual flash tube for five (5)
seconds, or, next to the back burner. Then depress the appropriate control knob
and while pressing, turn it counterclockwise to the “HI” position. Remove the
lighter or match when the burner lights and release the control knob.
3. If the burner does not light within five (5) seconds of turning the control knob,
immediately depress the knob and turn the control knob to “OFF”. Wait five (5)
minutes before repeating steps 3-4 of the MANUAL LIGHTING instructions.
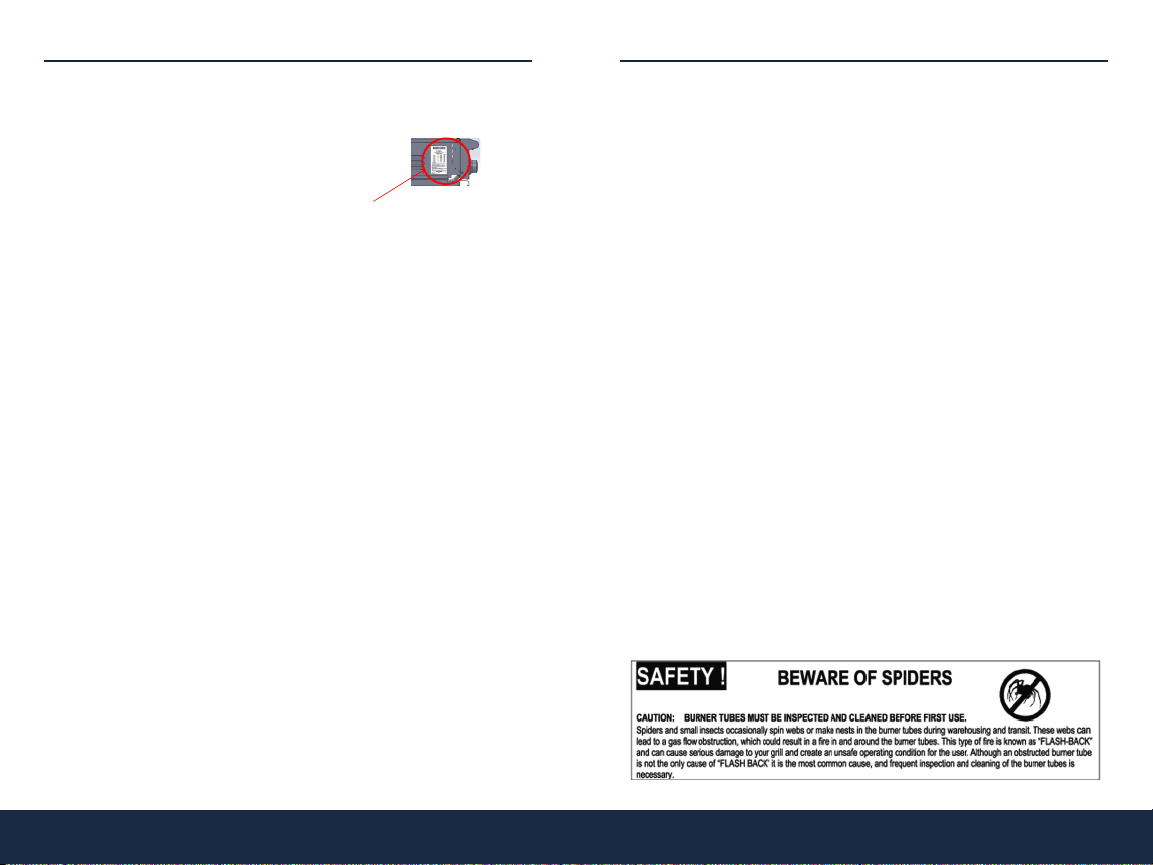
WARNING: “Flashback” may occur in or around the burner tubes. Flashback exhibits
a characteristic “whooshing” sound. If this should occur, immediately turn off your
burners, then remove and clean them with soap and water and a brush until all
foreign objects are removed.

1817 BELGARD.COMBUILT-IN GRILL USER MANUAL
FIRST TIME OPERATION FIRST TIME OPERATION
MAIN BURNERS:
• Before cooking with your grill for the first time, burn off any foreign matter and rid
the unit of any odors by operating the unit for about five minutes.
• When lit, the flame should have a bluish color to it. It may have a tint of yellow and
adjustment to the air shutters can be made to obtain a blue flame and proper gas
flow.
Although the grill can be operated with the hood closed, while fired by the rod-
shaped burners for short periods of time (5-10 minutes)
Do Not operate the rotisserie burner with the hood closed. This may damage the grill.
The grill should be preheated with the front panel (main burner) control settings on
HIGH for five minutes with the hood closed.
TEMPERATURE SETTINGS
• Use HIGH burner setting for searing, heavy cooking, preheating and cleanup.
• Use other burner settings to create temperatures to suit your personal cooking
preferences.
• Temperatures may vary with outside temperatures and wind conditions.
You can cook poultry and larger cuts of meat slowly if you turn OFF the burner directly
under the food and use adjacent burners to supply heat (a.k.a. “convection cooking”
or “indirect cooking”). Fats and juices that drip down can cause flare-ups. Since
some flare-up does impart a distinctive and desirable flavor, taste and color to foods
being grilled, they should be carefully and reasonably encouraged. Uncontrolled or
excessive flare-ups, however, will damage your food. (When cooking foods with a
high fat content, using indirect heat also greatly reduces flare- ups.
FUEL (GAS) CONVERSION INSTRUCTIONS FOR ELEMENTS GAS GRILLS
CAUTION: THIS SHOULD ONLY BY PERFORMED BY A LICENSED GAS PROFESSIONAL
NATURAL GAS TO PROPANE CONVERSION - MAIN BURNERS:
Currently all grills are supplied with a regulator set at a pressure of 4” water column.
Fuel Conversion of Main Burners:
1. Determine the existing gas type (LP or Natural gas). The process for changing the
gas type (orifice change-out) is the same for both gases.
2. You must remove all cooking grills and flame tamers to expose the main burners
in the grill.
3. On the bottom rear of each burner is a screw. Remove screw.
4. To remove burner, slide burner toward the rear of the grill and upward. Repeat for
each burner.
5. Where the burner was previously located, connecting to the main valve through
the hole in the basin, should now be evacuated space.
6. Inside the space you will find the end of the valve (toward the front of grill), with
an orifice (brass fitting), screwed into the end of the valve stem. Carefully remove
the orifice with a 7mm socket set and extension. (These are extremely fragile)
When unscrewing, be extremely gentle, for you could easily break the brass fitting
and must replace the valve).
7. Once the orifice is removed, replace it with the new change-out orifice, (repeat
for all burners). When re-installing orifice, do not over tighten or you will strip the
brass fitting. Little pressure is needed!
8. Replace burners and test for proper flame height. Flame should stand between
½” - 1” on LOW and 1.5” - 2” on HIGH.
9. Replace burner flame tamers and cooking grills
10.If necessary, adjust the LOW flame setting screw located under the knob on the
front of the valve.
REAR BURNER
Replace the back burner orifice by removing the plate on the rear of the BBQ and
carefully removing the fitting. Replace with the provided conversion back burner
orifice – large brass fitting (differs from small BBQ burner orifice).
NOTE: When converting to LP – remove the Natural gas Regulator that is located
under the grill and in line with the gas manifold and valves. When converting to
Natural Gas add a Natural gas regulator (4” Water Column Approved Natural Gas
Regulator) to the gas grill either directly on the manifold or placed in line between
the Natural gas supply and the barbecue. On the NG Regulator an arrow shows you
the gas flow OR the words “In” – “Out”. If regulator is placed the wrong way, it will not
work. (Use only a Licensed Professional when converting a Gas Appliance)

2019 BELGARD.COMBUILT-IN GRILL USER MANUAL
MAINTENANCE TIPS WARRANTY
CLEANING THE DRIP TRAY
The drip tray should be cleaned after each use. After the grill is completely cool,
remove the drip tray by pulling it out until it stops, then lift the front edge until the
drip tray comes free. Clean it with hot soapy water or an oven-style cleaning product
and re-install. When using an oven-style cleaning product, be sure to carefully
follow the manufacturer’s instructions. Also, check the tray after rain. If you’ve left
the grill uncovered, you may need to remove the drip tray to drain the water from
the tray.
STAINLESS STEEL CLEANING
Routinely wash with warm soapy water and apply stainless steel polish to protect the
grill exterior. After each use, wipe down the exterior of the grill to remove grease and
splatter. Use a stainless-steel cleaner to clean and polish the exterior surfaces.
When removing stubborn stains:
• Do not use metallic abrasives and always rub in the direction of the grain.
• Some household cleaning products are not suitable for stainless steel; be sure to
read the label before using on the grill.
• Specks of grease may gather in the grain of the stainless steel and bake into the
surface, giving the appearance of rust.
• To remove these baked-on foods, use a fine to medium grit, non-metallic abrasive
pad, such as Scotch Brite, in conjunction with a stainless-steel cleaner.
• Solutions used for cleaning concrete and masonry can be very corrosive and will
“attack” stainless steel.
• Always place the grill cover over the grill after it has completely cooled for
maximum protection.
STAINLESS WARRANTY
Elements is backed by the strongest warranty in the industry! In addition to precision
engineering and outstanding performance, the Elements series include a LIFETIME
WARRANTY. Now you can use a grill with the peace of mind that you have an industry
leading warranty.
ELEMENTS GRILL SERIES
• Lifetime Warranty on construction and manufacturer defects
• Lifetime Warranty on frame and housing
• Lifetime Warranty on cooking grates, burners, valves, flame tamers, and heat-zone
separators
• 3 Year Warranty on all other parts, components, and electrical
LIMITED WARRANTY – 2021
The end-user must provide a bill of sale, canceled check, or payment record to verify the
purchase date and to establish the warranty period. This Limited Warranty shall be valid
and limited to the original purchaser only.
WARNING: Any modification to the product will void the warranty.
This Limited Warranty shall be limited to the repair and/or replacement of parts that have
been proven to be defective under normal use and service. All warranty claims must be
made by the OEM/Distributor/Dealer account on behalf of the end-user. You may contact
Technical Support at 800-966-8126.
Our Technical Service Department must confirm all approved defects. If a defect is
confirmed and we approve the claim, we will replace such parts without charge. This
warranty gives you specific legal rights, and you may also have other rights, which vary
from state to state.
The manufacturer may request defective products returned with an RMA (Return
Merchandise Authorization) issued by Oldcastle for specific products, which is considered
to be the nature of the defect and or warranty claim. Product to be returned should; be
packed so as not to incur damages during transportation. Oldcastle is not responsible for
damages on returned items. RMA is valid for thirty (30) days from the date issued. The
RMA must be clearly marked on the outside of the package.
Please check with your local building code department or governing agency for proper
approvals before purchasing. Oldcastle is not responsible for any violation of local codes.

21 BUILT-IN GRILL USER MANUAL
WARRANTY
Travel, diagnostic cost, service labor to repair the defect on warranty parts to and from
the factory will be the responsibility of the owner. We will not be responsible for labor
charges and/or damage incurred in installation, repair, and replacement. Oldcastle is not
responsible for issues related to gas or electrical installation.
The Limited Warranty is voided if not assembled, installed, and operated as intended.
This Limited Warranty does not cover any defects due to accident, abuse, misuse,
alteration, misapplication, vandalism, improper installation or improper maintenance or
service, removal from the original location, or re-installation into another location, or
failure to perform normal and routine maintenance.
Damage due to severe weather conditions such as hail, hurricanes, earthquakes,
tornadoes, discoloration due to overheating, exposure to chemicals (including chlorine
and salt), either directly or in the atmosphere, or very high humidity, is not covered by this
Limited Warranty. Coastal, humid and/or salt environments are subject to manufacturer
review. All out-of-box claims must be made within 30 days of purchase and must be made
prior to installation. Any product installed damaged will be considered damaged during
installation and not covered under warranty.
There are no other express warranties except as set forth herein. For consumer
applications, any applicable implied warranties of merchantability and fitness are limited
in duration to the period of coverage of this Limited Warranty. Some states do not allow
limitation on how long an implied warranty lasts, so this limitation may not apply to you.
For Commercial Applications, the liability of Oldcastle is limited to the express terms
of this warranty. We expressly disclaim any and all implied warranties, including any
warranties of fitness for a particular purpose or merchantability.
We are not liable for any special, indirect or consequential damages. Our maximum
liability is limited to the purchase price of the purchased units. Some states do not allow
the exclusion or limitation of incidental or consequential damages, so this limitation or
exclusion may not apply to you.
We do not authorize any person or company to assume for it any other obligation or
liability in connection with the sale, installation, use, removal, return, or replacement of
its equipment, and or such representation are binding.
This manual suits for next models
5
Table of contents