Elgo HERMETIC ECO 120-2 User manual
1)
B
2)
C
A
D
Instrukcja monta¿u i eksploatacji
HERMETIC ECO 120-2
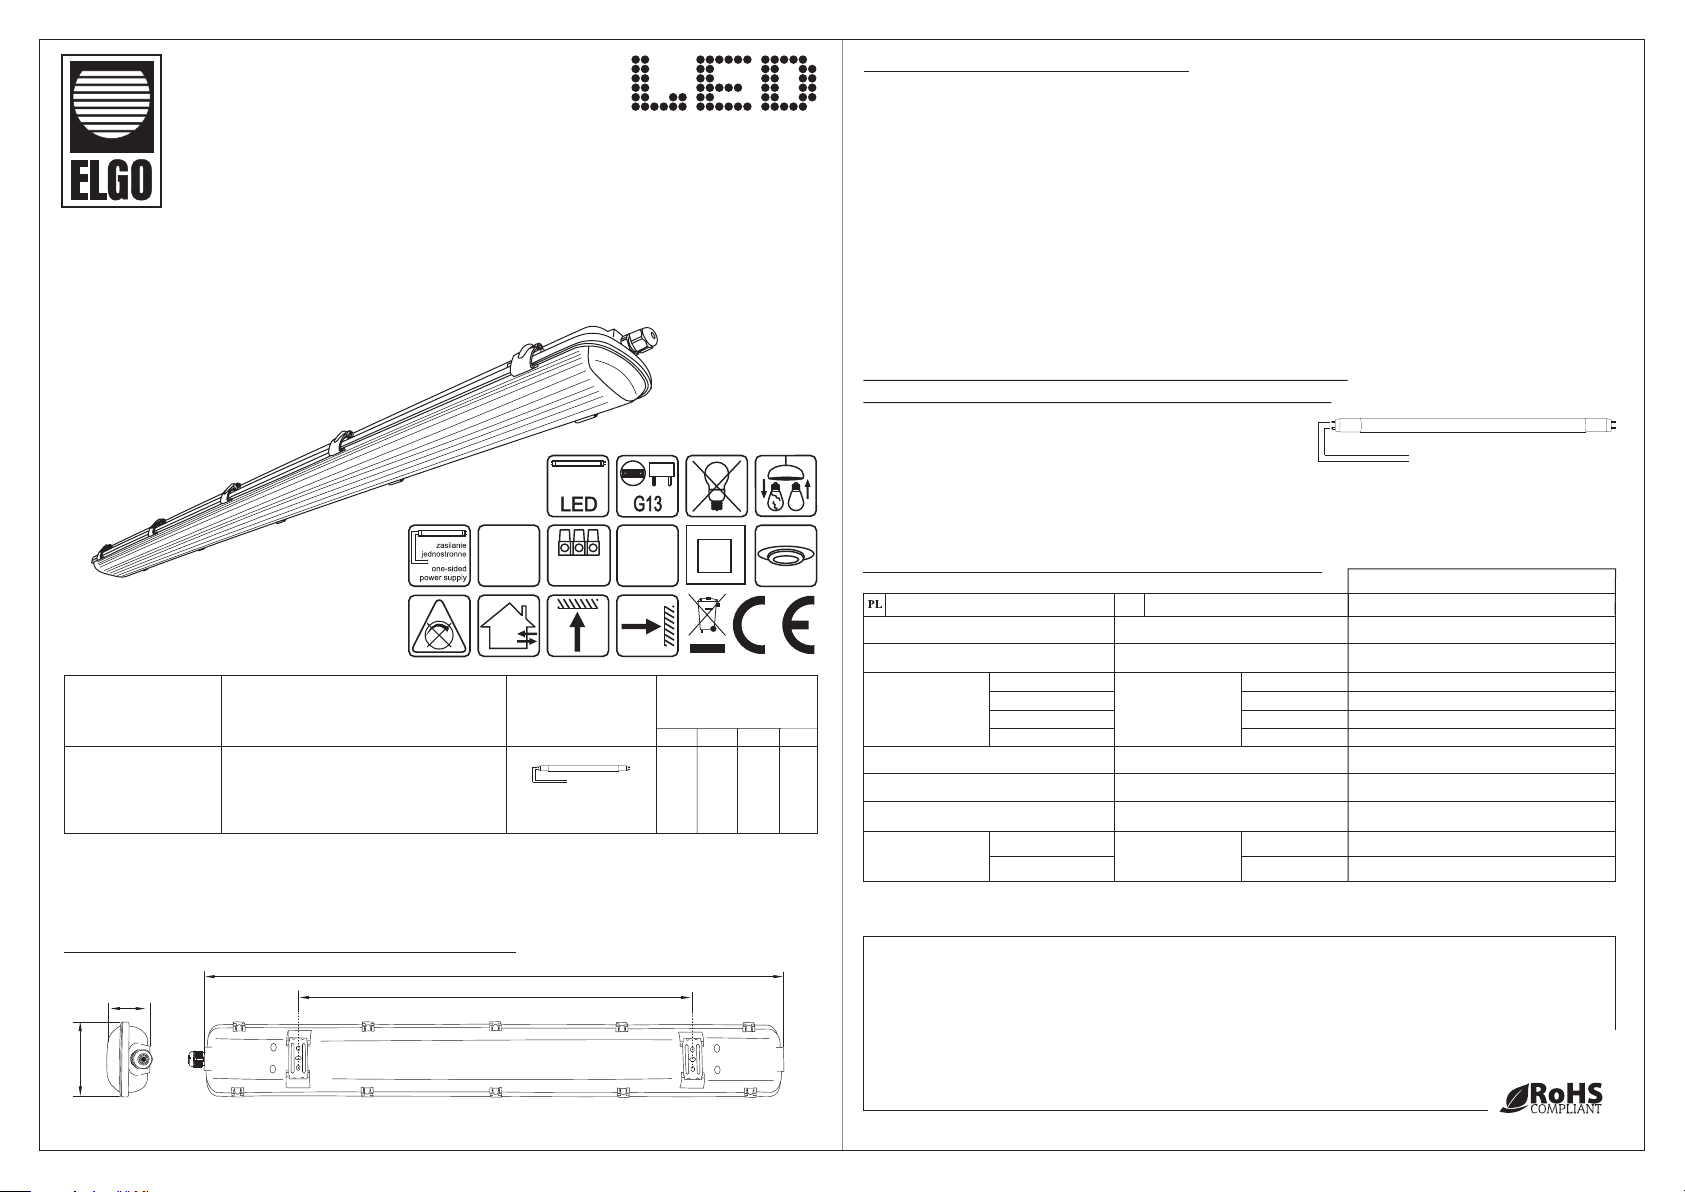
WYMIARY GABARYTOWE / DIMENSIONS [mm]
1270 115 65
HERMETIC ECO 120-2 do 2 tub LED T8 (G13), d³ugoœæ
for 2 LED T8 tubes, lenght 1200mm
Model Tuby LED (brak w komplecie)
LED tubes (not included)
Wymiary gabarytowe
Dimensions [mm]
D
860
PARAMETRY TECHNICZNE / TECHNICAL DATA
Installation and operating manual
A1)
B2)
C
~230V
jednostronne /
one-sided
1) wymiar podany w tabeli dotyczy samej oprawy; wymiar oprawy z zamkami wynosi 120mm / dimension refers to the luminaire itself;
dimension of the luminaire with the clips is 120mm
2) wymiar podany w tabeli dotyczy samej oprawy; wymiar oprawy z uchwytami monta¿owymi wynosi 70mm / dimension refers
to the luminaire itself; dimension of the luminaire with mounting brackets is 70mm
BRILUM S.A.
Poland
05-520 Konstancin-Jeziorna
www.brilum24.pl
ul. Wilanowska 1A
Napiêcie zasilania
Czêstotliwoœæ
HERMETIC ECO
~230V
50/60Hz
Frequency
Supply voltage
Zasilanie tub LED
Stopieñ ochrony
Klasa ochronnoœci
jednostronne / one-sided
IP 65
II
Power supply of LED tubes
Protection rate
Protection class
Materia³y Materials polistyren (PS) / polystyrene (PS)
obudowa
klosz diffuser
120-2
ród³a œwiat³a*
(brak w komplecie)
typ
trzonek
d³ugoœæ
iloϾ
Light sources*
(not included)
type
lamp base
lenght
quantity
tuby LED T8 / LED T8 tubes
1200mm
G13
2
ENG
polistyren (PS) / polystyrene (PS)
2
2,5mm
IP 65
~230V
50/60Hz
2xT8
PRZEZNACZENIE / APPLICATION
Oprawy przemys³owe HERMETIC ECO przeznaczone s¹ do oœwietlania hal przemys³owych,
pomieszczeñ warsztatowych, pomieszczeñ o du¿ej wilgotnoœci i zapyleniu. Mog¹ byæ te¿ stosowane
jako oœwietlenie wiat, zadaszeñ, itp. Obudowa z polistyrenu (PS). Klosz przezroczysty z polistyrenu (PS).
Oprawa o stopniu szczelnoœci IP 65. Dostarczana w komplecie z zamkami z ABS, uchwytami mocuj¹cymi
ze stali nierdzewnej, d³awnic¹, podstawkami mocuj¹cymi, ko³kami rozporowymi i wkrêtami.
Przystosowana do monta¿u na suficie lub œcianie. Uchwyty mocuj¹ce umo¿liwiaj¹ równie¿ zwieszenie
oprawy na linkach lub ³añcuszkach.
Industrial luminaires HERMETIC ECO are intended for illumination of industrial halls, workshops,
interiors with high humidity and pollination as well as carpots and sheds etc. The housing is made
of polystyrene (PS). Transparent diffuser is made of polystyrene (PS). Protection rate IP 65.
Clips are made of ABS. Clips, stainles steel mounting brackets, gland, mounting bases, rawplugs
with screws are intended in the set with luminaire. The luminaire is adapted for ceiling or wall mounting.
Mounting brackets allow to suspend the luminaire on suspension wires or chains.
Oprawy przeznaczone s¹ do dwóch tub LED T8 (G13)
z wewnêtrznym uk³adem zasilaj¹cym (zasilanie jednostronne).
D³ugoœæ tub LED 1200mm.
RÓD£A ŒWIAT£A - tuby LED T8 (brak w komplecie) /
LIGHT SOURCES - LED tubes (not included in the set)
zasilanie: jednostronne
~230V
power supply: one-sided
Luminaires are destined to two T8 LED tubes (G13 lamp base)
with built-in internal electronic system (one-sided).
Length of LED tubes 1200mm.
* Rekomendowane tuby LED marki ELGO o nazwie NANO LED T8 lub LEDstar pro T8. / Recommended LED tubes ELGO brand named
NANO LED T8 or LEDstar pro T8.
housing
Zastrzegamy sobie prawo do zmian w konstrukcji produktu.
UWAGA! / CAUTION!
We reserve the right to apply changes in the construction of the product.
Informacje zawarte w niniejszym dokumencie mog¹ulegaæzmianie bez uprzedzenia. Ewentualne zmiany
bêd¹uwzglêdniane w kolejnych wydaniach instrukcji obs³ugi lub w publikacjach idokumentach uzupe³niaj¹cych.
The information included in this document may undergo changes without warning. Possible changes will be taken
into consideration while working with other issues of the instructions for use or complementary
documents.
Zasilanie
Power supply
Symbol oznacza selektywne zbieranie sprzêtu elektrycznego i elektronicznego, czyli tego produktu nie wolno traktowaæ jak
innych odpadów domowych. Nale¿y oddaæ go do w³aœciwego punktu zbieraj¹cego zu¿yty sprzêt elektryczny i elektroniczny.
W³aœciwa realizacja zadañ zwi¹zanych ze zbieraniem zu¿ytego sprzêtu elektrycznego i elektronicznego ma znaczenie
szczególne w przypadku, gdy w tym sprzêcie wystêpuj¹ sk³adniki niebezpieczne, które maj¹ szczególnie negatywny wp³yw
na œrodowisko i zdrowie ludzi.
BEZPIECZEÑSTWO I KONSERWACJA
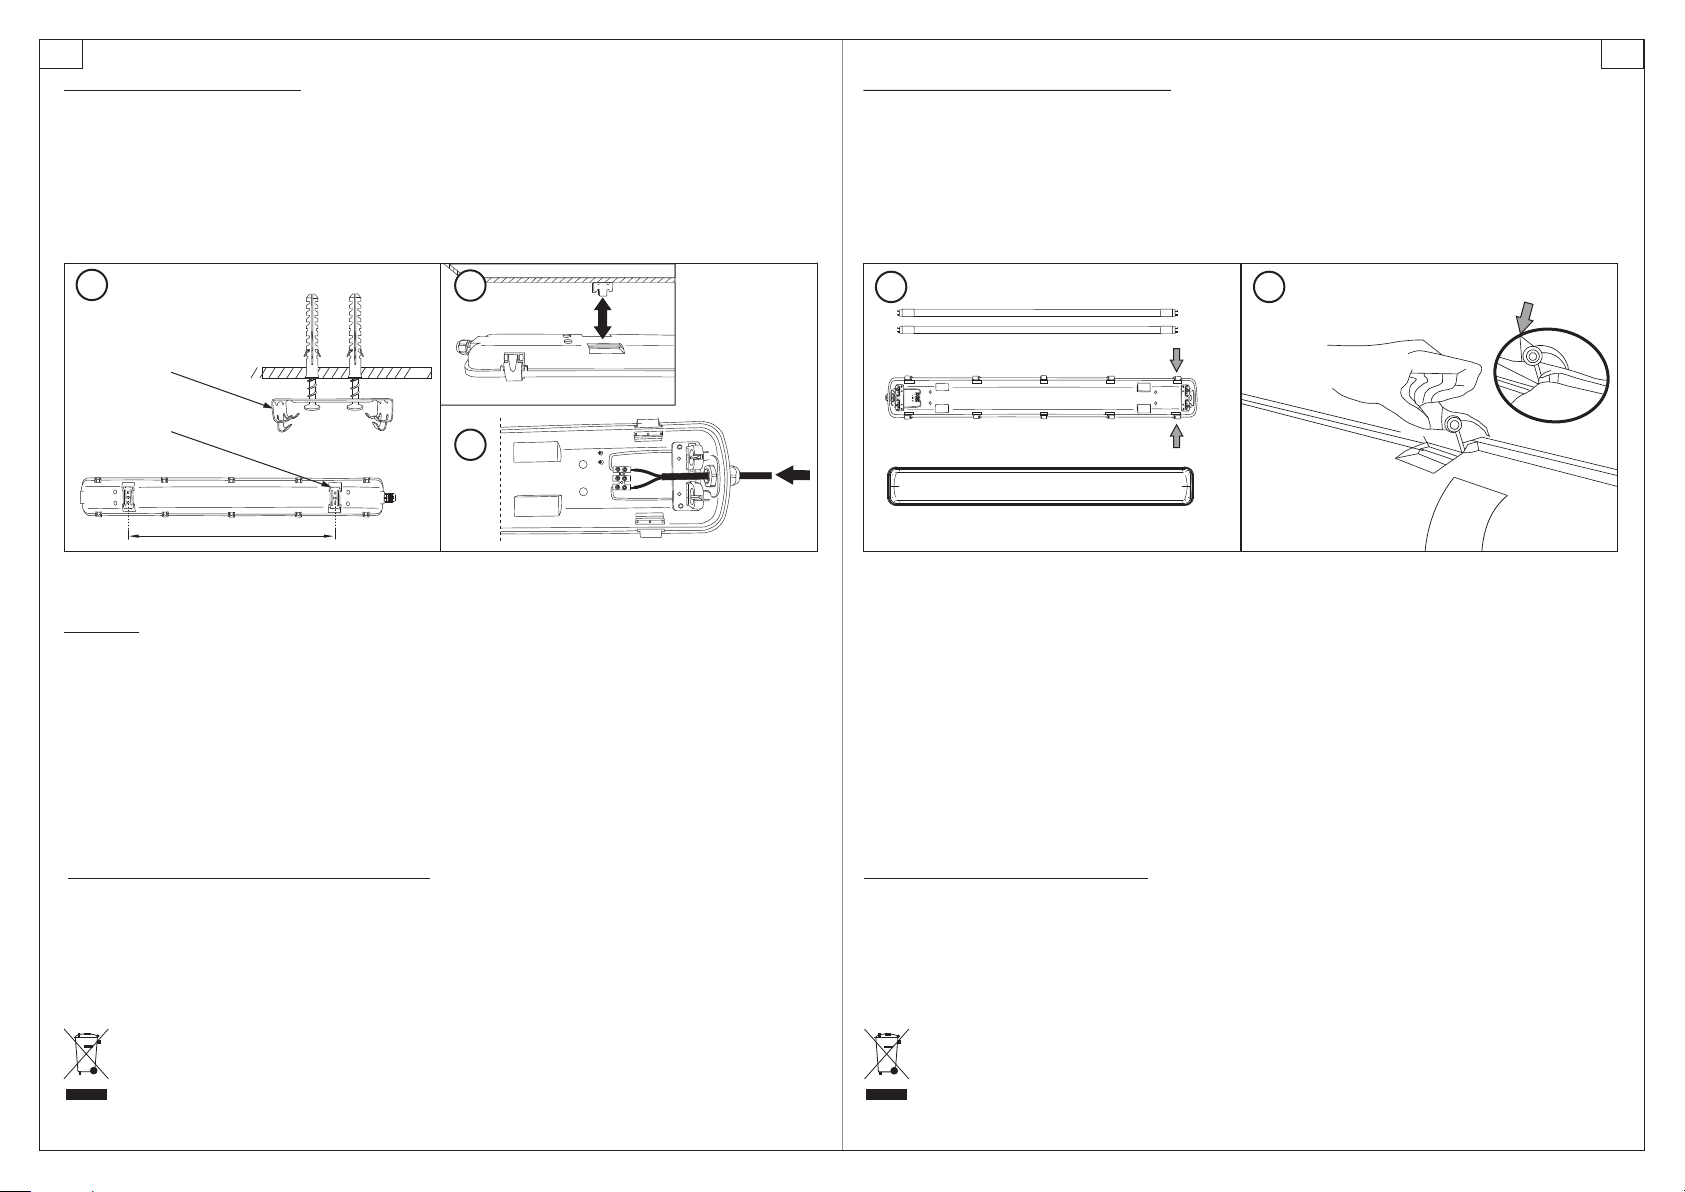
MONTAÝ
UWAGA! Nie wierciæ otworów w obudowie - do celów monta¿owych! Do monta¿u oprawy s³u¿¹
wy³¹cznie uchwyty mocuj¹ce ze stali nierdzewnej, dostarczone w komplecie, które zatrzaskuje siê
na obudowie oprawy, w przeznaczonych do tego miejscach.
[ ] Wykonaæ otwory monta¿owe w pod³o¿u (np. suficie), pod ko³ki rozporowe (w komplecie),
a nastêpnie umieœciæ ko³ki w otworach [Rys.1A] - rozstaw otworów D [Rys.1B] podany zosta³
w tabeli z wymiarami gabarytowymi.
[2]Przykrêciæ uchwyty mocuj¹ce do pod³o¿a za pomoc¹ wkrêtów (w komplecie) [Rys.1A].
[3] Zamocowaæ obudowê oprawy do uchwytów, zatrzaskuj¹c je na obudowie oprawy [Rys.2].
[4] Przeprowadziæ przewód zasilaj¹cy przez d³awnicê i przykrêciæ ¿y³y przewodu do z³¹czki
zamocowanej w podstawie oprawy [Rys.3].
[5] W oprawkach œwietlówek zamocowaæ odpowiednie tuby LED T8 - brak tub LED komplecie [Rys.4A].
[6] Za³o¿yæ klosz [Rys.4B] i zamkn¹æ go za pomoc¹ zamków [Rys.5].
1
This symbol stands for selective collecting of the electrical and electronic equipment, therefore, this product cannot
be treated as other household's waste. It has to be left at a special used-equipment collection point. The appropriate dealing
with the collection of used electrical and electronic equipment is crucial, especially if the equipment includes dangerous
components which have a negative influence on the environment and on the health of people.
SAFETY AND MAINTENANCE
INSTALLATION
IMPORTANT! Do not drill any holes in the housing of luminaire!
mounted onto the ceiling or the wall with stainless steel mounting brackets which are in the set!
The luminaires have to be
[1]
The hole spacing D [Fig.1B] is shown in the dimensions table.
[2] The mounting brackets should be mounted into the surface by screws (included in the set) [Fig.1A].
[3] Fix the luminaire’s housing by snapping mounting brackets on it (as depicted in the Fig.2).
[4] Insert the power cable into the housing through the cable gland. Connect the cable to the terminal
block which is fixed to the base of the luminaire [Fig.3].
[5] Install T8 LED tubes appropriate for the luminiare version. Tubes are not included in the set [Fig.4A].
[6] Put on the luminaire’s diffuser [Fig.4B] and lock it with clips [Fig.5].
Drill the holes in the mounting surface and input rawplugs (included in the set) into them [Fig.1A].
A
B
1
3
2
ENG
INSTRUKCJA MONTA¯U INSTALLATION INSTRUCTIONS
45
A
B
D
UWAGA!
Instalacjê oprawy powinien przeprowadziæ uprawniony i doœwiadczony elektryk. Przed rozpoczêciem instalacji
nale¿y koniecznie wy³¹czyæ dop³yw pr¹du do sieci elektrycznej, do której ma byæ pod³¹czona oprawa,
aby zabezpieczyæ siê przed przypadkowym za³¹czeniem napiêcia! Przewody elektryczne musz¹ byæ pod³¹czone
zgodnie z instrukcj¹ oraz obowi¹zuj¹cymi przepisami. Dokonywanie jakichkolwiek czynnoœci wewn¹trz oprawy
przy w³¹czonym zasilaniu grozi pora¿eniem pr¹dem elektrycznym! Nie ponosimy odpowiedzialnoœci za szkody
powsta³e wskutek nieprawid³owego monta¿u.
!
Installation of the luminaire should be done by the certified and experienced electrician. Before starting
the installation you must absolutely turn off the main power supply, where the luminaire should be connected
to, to avoid accidental voltage connection! Electrical cables must be connected according to the instruction
and regulations in force. Performing any operations inside the luminaire while the power supply is switched
on may result in an electric shock! We take no responsibility for any damages due to improper installation.
WARNING
1.
Przed rozpoczêciem czyszczenia produktu nale¿y od³¹czyæurz¹dzenie od zasilania. Zlekcewa¿enie tego ostrze¿enia
mo¿e spowodowaæniebezpieczeñstwo pora¿enia pr¹dem elektrycznym.
2. Producent nie ponosi odpowiedzialnoœci za wady wynik³e z niestosowania siê do zaleceñ niniejszej instrukcji.
Zgodnie z art. 568 § 1 uprawnienia z tytu³u rêkojmi za wady fizyczne wygasaj¹ po up³ywie dwóch lat, licz¹c od dnia
wydania oprawy kupuj¹cemu.
Dla zapewnienia optymalnych parametrów technicznych oprawy nale¿y okresowo przeprowadzaæ jej konserwacjê.
Obudowê oprawy nale¿y czyœciæ ogólnie
dostêpnymi œrodkami myj¹cymi i wytrzeæ do sucha miêkk¹ tkanin¹. Nie u¿ywaæ œrodków ¿r¹cych i rozpuszczalników.
Nie stosowaæ strumienia wody pod ciœnieniem.
1.
2.
To keep the optimal technical parameters of the luminaire the periodical maintenance should be carried out. The housing
of the luminaire should be cleaned by generally available cleaning supplies and also dried with a soft cloth.
Do not use corrosives chemicals and solvents. Do not use stream of water under pressure.
The manufacturer is not liable for faults resulting from non-compliance with the above instructions.
According to article 568 pt 1 of the Polish Civil Code, the right resulting from a warranty for physical defects are extinct
after the lapse of 2 (two) years after delivery of the luminaire to the Consumer.
PL
Popular Light Fixture manuals by other brands


Home Accents Holiday
Home Accents Holiday 21RT1772111 Assembly instructions

Ibiza
Ibiza MH-ASTRO-LASER-WASH manual

NERI
NERI LIGHT 32 Series Instruction booklet

Sound Sation
Sound Sation Twilight 60 ENDLESS user manual

Cooper Lighting
Cooper Lighting SSRxx installation instructions

Cooper Lighting
Cooper Lighting Metalux P410 Series Specifications


