Elnapress 320 User manual

Instruction manual
for the Elnapress 320
ironing press


3
3
Contents
Important safety instructions p. 4
Main parts p. 7
Opening and closing the press p. 8
Power supply p. 8
Turning the Elnapress on p. 9
and setting the temperature.
Safety features p. 9
Spray bottle p. 10
Pressing hints p. 11
Preparing your laundry p. 12
Storing your Elnapress p. 13
Maintenance p. 14
Technical specifications p. 15
Basic ironing
Doilies p. 16
Tablecloth p. 16
Trouser p. 18
Shirt p. 19
T-shirt p. 21
Touching up
Pleated skirt p. 22
Jacket p. 22
Elnapress accessory
Cushion p. 24
Special techniques
Jeans or denim p. 25
Velvet p. 25
Delicate knits p. 25
Embroidery p. 25
Elastic p. 26
Applications & Embellishments
Fusible patches p. 27
Interfacing p. 27
Rhinestones, iron-on transfers p. 27

Important safety instructions
Save these instructions
Read all instructions before using your Elnapress. The ironing press is intended for household use only.
In order to avoid any risk of electrical shock, burns, fire or personal injury:
• Always lock the Elnapress before carrying, moving or storing.
• Never immerse the appliance in water or any other liquid.
• Do not use the Elnapress if it has fallen or been damaged. Do not try to disassemble or repair it yourself.
Take it to a qualified person to be checked or repaired. Improper repair or re-assembly might cause one
of the above-mentioned risks and will render the guarantee null and void.
• Never use the Elnapress with a damaged cord or plug. Replace the cord with one provided by an
authorised Elnapress representative.
• Connect the Elnapress to a grounded wall socket only. Do not modify the plug provided with the product.
Have a qualified electrician change the plug if it does not correspond to the wall socket.
• If an extension cord is required, make sure that the ampere rating of the ironing press does not exceed
the ampere rating of the extension cord. A cord with less amperage might overheat. Use a grounded
extension cord only. Make sure the cord cannot be accidentally pulled out or tripped over.
• To avoid overloading the circuit, do not use another high watt consumption appliance on the same circuit
at the same time.
• The cord must not touch a hot surface.
• Let the Elnapress cool down completely before locking and storing.
• Be especially careful while operating the Elnapress when children are present. Never leave the Elnapress
unattended when it is hot or plugged in.
• Immediately unplug the Elnapress after use. To unplug, never yank the cord; instead, grasp the plug and
pull to disconnect.
• Read the chapter on Maintenance before cleaning the Elnapress. Touching the heating shoe while still hot
can cause burns.
• This appliance is not suitable for use by anyone (including children) with reduced physical, sensory or
mental ability, or people lacking experience in and knowledge of its use, unless they are monitored or
taught how to use it by someone responsible for their safety.
• Watch children to prevent them from playing with this appliance.
4

Congratulations on your purchase of the Elnapress 320! With your new Elnapress we are certain that
you will find ironing quicker, easier and more efficient. The Elnapress has been designed to provide you
with a professional finish on all items you press.
Use this instruction manual to learn the techniques that will help you maximise the benefits of your
Elnapress. Study the illustrations to ensure proper placement of your articles and application of the
Elnapress and its accessories.
Safety
Before using your Elnapress for the first time, please be sure to read all the "IMPORTANT SAFETY
INSTRUCTIONS". In addition, according to recommendations made by standards and safety organi-
sations, unplug your Elnapress from the electric power supply when left unattended, during maintenance
and when accessories are being replaced.
Service
For questions regarding your Elnapress, accessories, or service requirements, please contact an autho-
rised Elnapress representative. Please note that only authorised Elnapress personnel can provide techni-
cal service without voiding the warranty.
To find contact information for an authorised Elnapress representative near you, please check our Inter-
net site at: www.elnapress.com
It is recommended that you keep your box and packaging material for the Elnapress for safe moving or
in case you need to ship your press.
General
The Elnapress product is subject to change without notice. Please keep this manual for future reference.
The Elnapress complies with TUV certification.
Thank you for choosing the Elnapress.
Sincerely,
Elna International Corporation
5

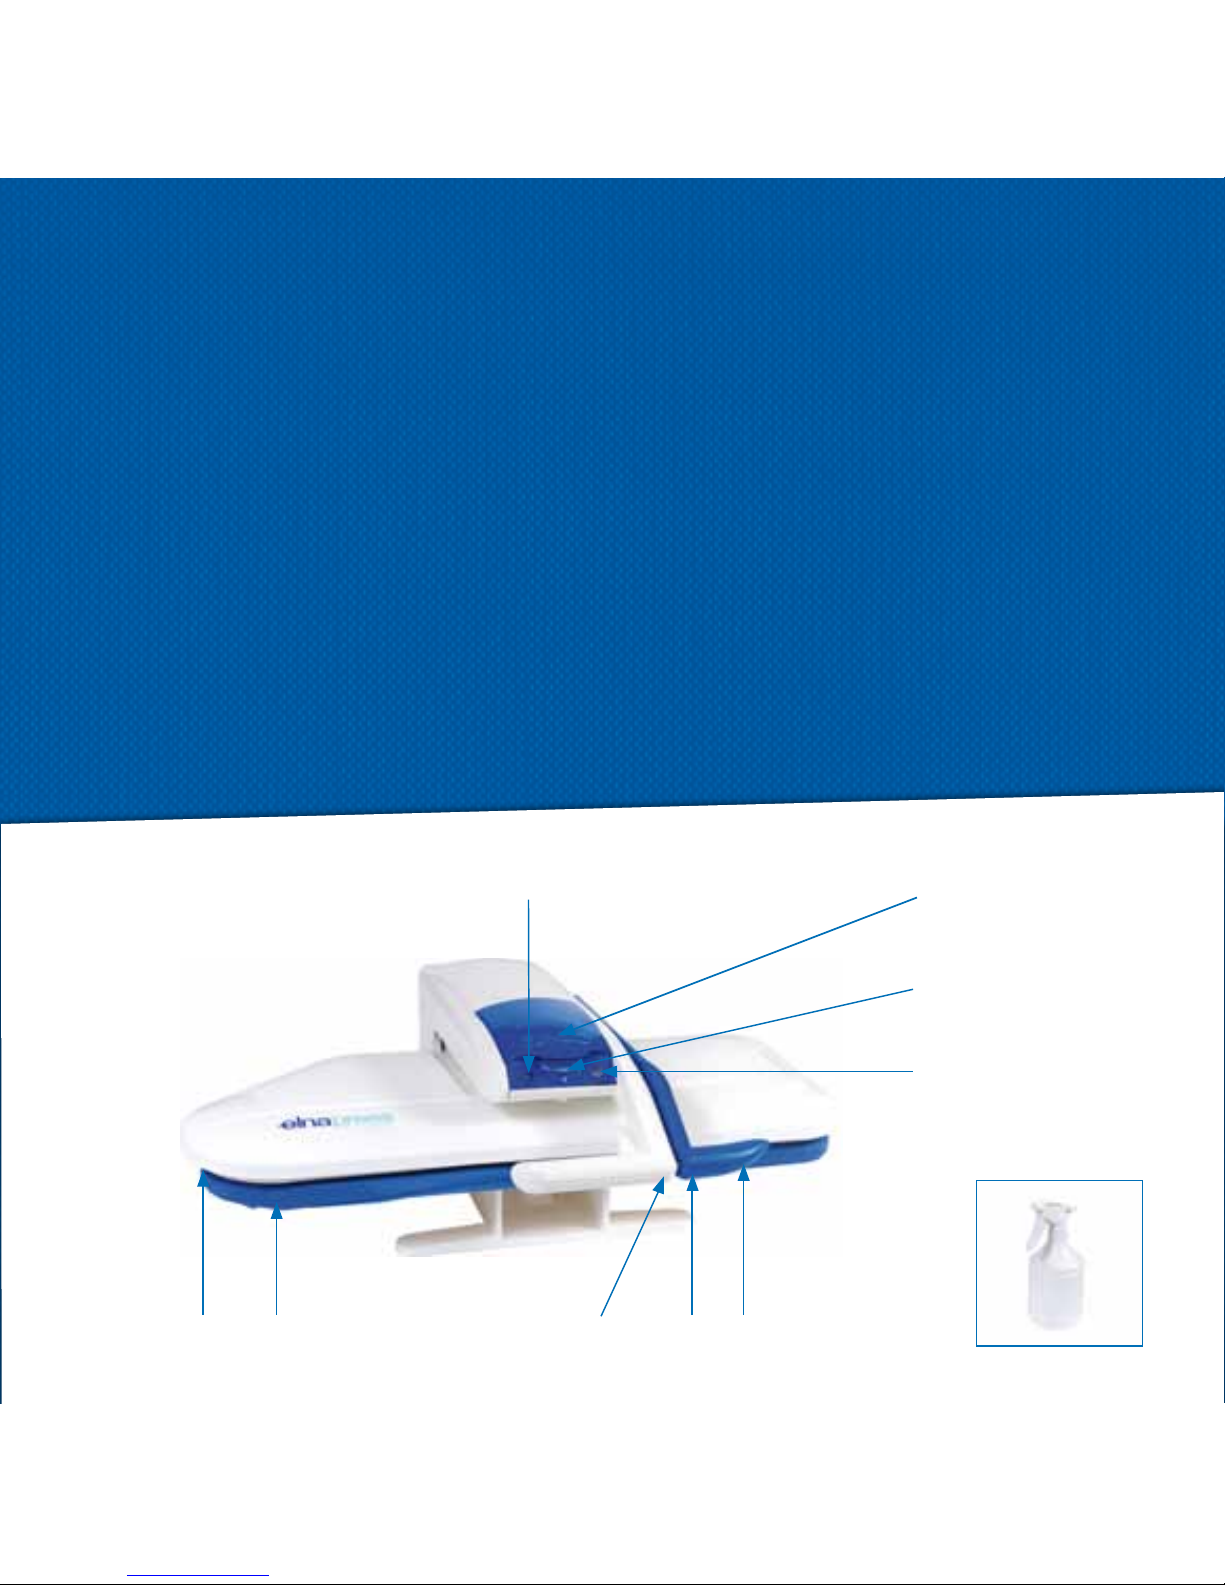
Main parts
1. Movable heating shoe
2. Padded ironing board
3. Fixed handle
(To open and close the press)
4. Movable handle
(To apply ironing pressure)
5. Safety lock
(Slides to the left to lock; always lock for
transporting)
6. ON/OFF switch
7. Temperature control dial
8. Thermostat light
9. Spray bottle
10. Electronic security with safety buzzer
7
9
1 2 3 5 4
8
7
10
6
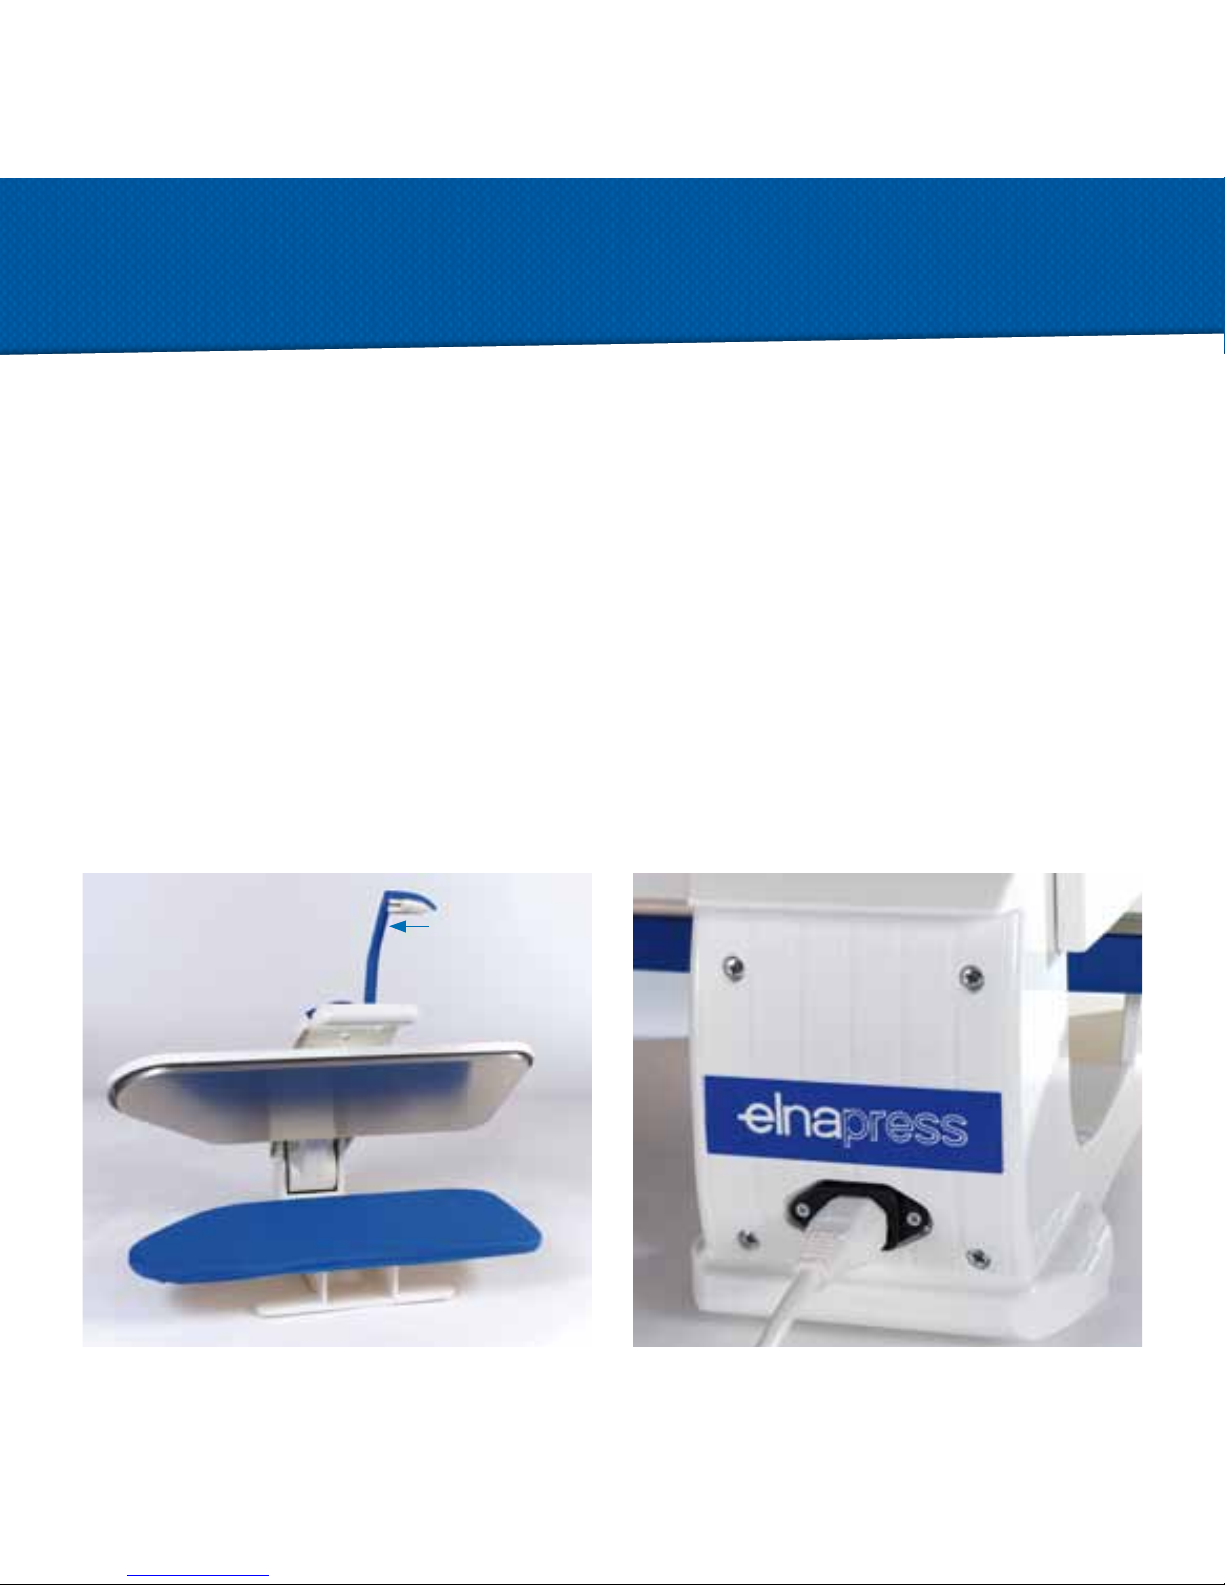
Opening and closing
the press
Slide the safety lock to the right to unlock.
Always use both handles when opening and closing
the Elnapress.
With your left hand, use the fixed handle to raise
and lower the heating shoe. (Operating the press
this way keeps your hand from accidentally touching
the heating shoe while pressing.)
With your right hand, lower the movable handle and
apply ironing pressure. Raise the movable handle to
release ironing pressure. With your left hand, gently
raise the heating shoe to open the press.
Power supply
The specification plate (located under the base) indi-
cates the voltage of the ironing press.
Make sure this voltage corresponds to the voltage
you are using.
Connect the mains lead by pushing the plug firmly
into the socket.
Note : The Elnapress has a grounded plug and must
be connected to a grounded wall socket only. See
IMPORTANT SAFETY INSTRUCTIONS.
8

Turning the Elnapress
on and setting the
temperature
Once you have opened the Elnapress, press the
ON/OFF switch to switch the press on. The green
and red LED will illuminate to indicate that the
Elnapress is in the process of heating.
Turn the temperature control dial to the desired
setting. When the correct temperature has been
reached, the red light will go off.
To switch off the Elnapress, press the ON/OFF
switch, and the red and green LED lights will go off.
The temperature cannot be adjusted if the press is
closed.
Ironing temperatures
Prior to pressing a garment, check the ironing instruc-
tions on the garment’s care label.
•Nylon
•Silk
••Wool
•••Cotton
Safety features
If the Elnapress is switchen on and closed for more
than 10 seconds, the buzzer sound and the power
supply is automatically switched off. When the
Elnapress is opened again, the power supply is auto-
matically switched back on.
If the Elnapress is left on, in its open position and
unused for more than 15 minutes, the power supply
is automatically switched off.
To turn it on again, simply press the ON/OFF switch.
9
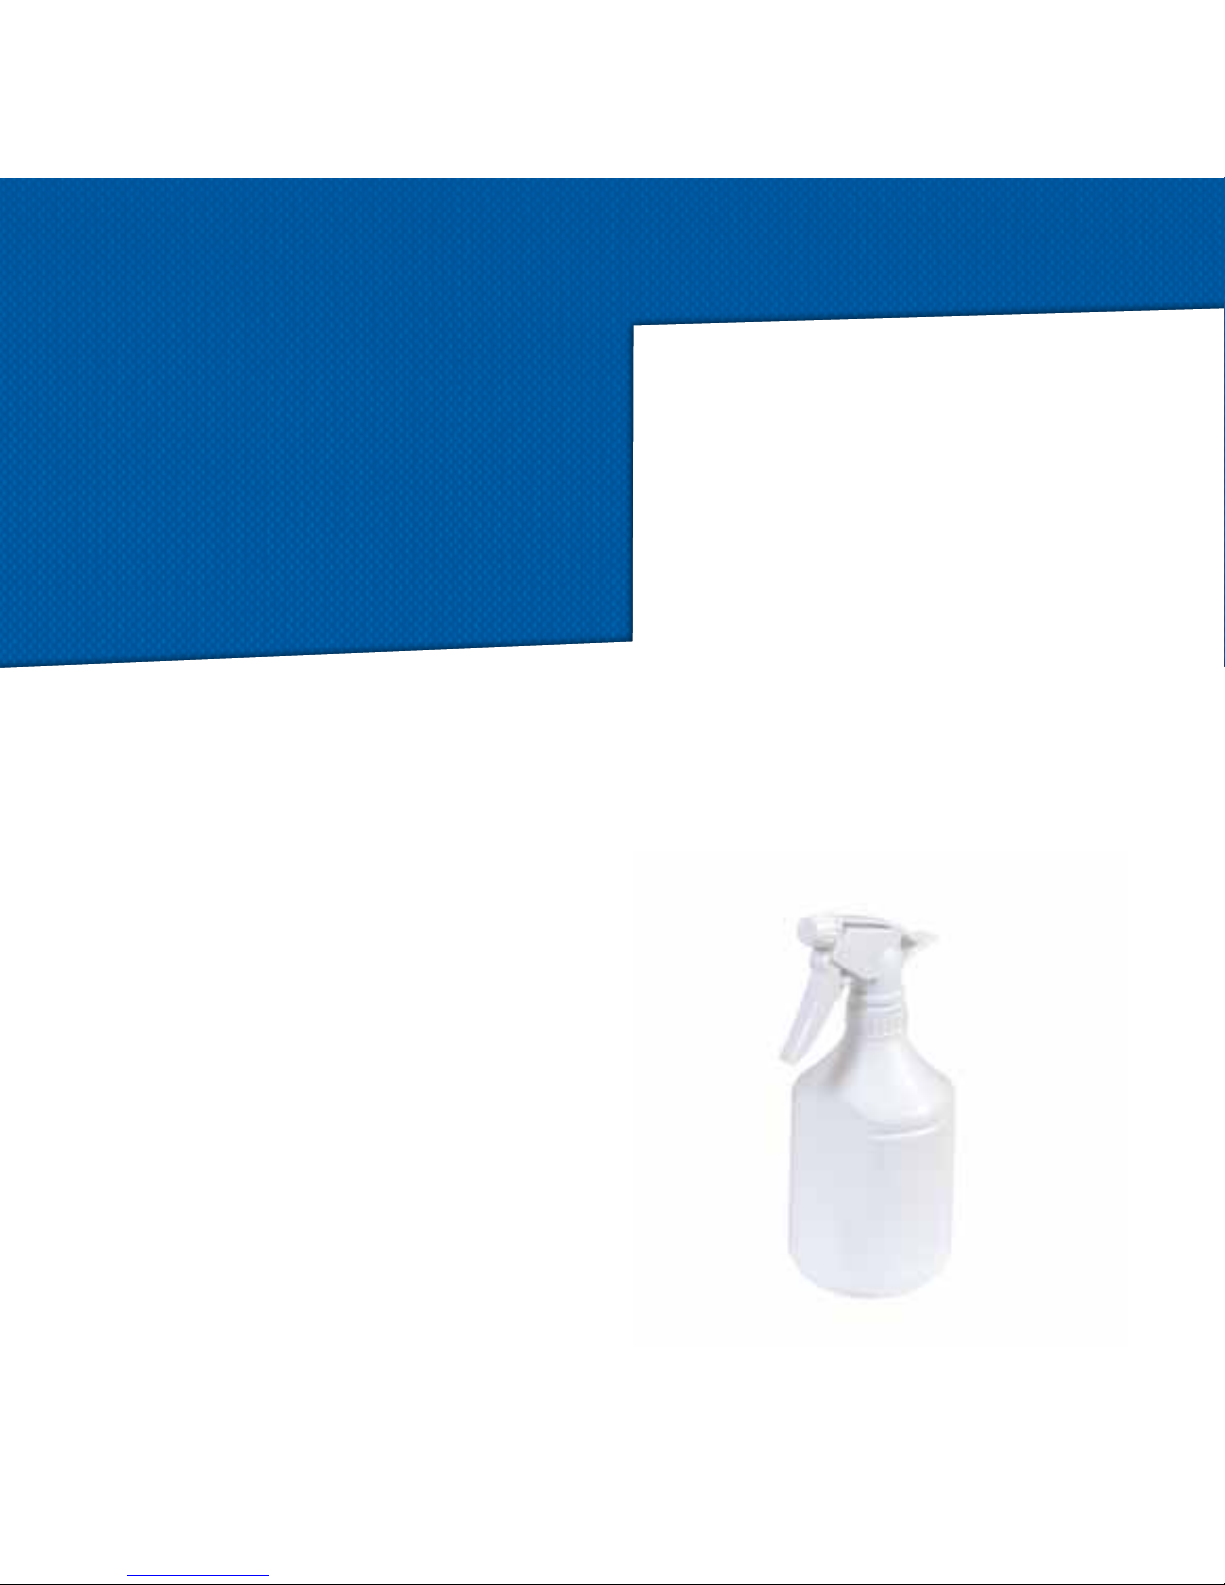
Spray bottle
The spray bottle allows items to be dampened
before and during pressing.
The spray bottle disperses a mist of water over the
surface to be pressed. When the heating shoe
is lowered, the mist is converted into steam,
which penetrates the fibres of the material.
The spray bottle uses regular tap water.
Note : Do not fill the spray bottle with starch or
perfumed products.
10

Pressing hints
As a general rule, pressing can be done in the same
way as ironing. If necessary, pin items to the padded
board, but be sure not to use plastic head pins.
Dry
Press synthetic fabrics, nylon, silk, etc. at a low tempe-
rature (with a dry pressing cloth if necessary).
Damp
Press cottons, linens and blended fabrics (towels,
sheets, shirts, blouses, etc.) at a high temperature,
using steam.
Pressing Cloth
Press wool, knitwear and jersey at a medium tempe-
rature, using steam.
To create steam with the spray bottle, place your dry
pressing cloth on the item and pump the spray bottle
to dampen. Close the Elnapress for a few seconds
and then open to allow excess steam to escape.
Close the press again to finish pressing.
Decorations
Items decorated with transfers, pearls or embroidery
must be placed with the design face down into the
padded board, or covered with a pressing cloth.
Starch or Special Finishes
To use starch, spray a light coating directly on the
item and press as usual. Don’t saturate the item with
starch; it is better to use several light coatings.
Note : After pressing with starch be sure to clean the
heating shoe with a damp cloth. Do not fill the water
spray with starch.
Mini Pressure
Certain fabrics and special techniques may require
applying less than 45 kilos (100 pounds) of pressure
when ironing. By lowering the movable handle par-
tially, approximately half way or less, you can apply
mini pressure. Use mini pressure when touching up
items or for pressing delicate fabrics such as knits,
wool, mesh, etc.
Ironing Cushion
The ironing cushion is used to isolate areas that are
especially difficult to press, such as pleats, sleeve
caps, and yokes.
Buttons, Zippers, Pins
The padded surface allows ordinary buttons to sink
into the padding without breaking. Be careful not
to use too high a temperature, which can melt any
synthetic material. If you are unsure, place the right
side of the item against the padded board.
11

Preparing your laundry
Begin with items requiring the lowest temperature
setting and press the most delicate items first. Increase
the temperature according to the items you are pres-
sing.
Two Golden Rules of pressing:
1) Get in the habit of correctly positioning the item in
the large open space behind the ironing board.
2) Always pull the item towards you while pressing.
Position the item on the ironing board, being careful
not to touch the heating shoe.
Lower the heating shoe. Leave the press closed for a
few seconds to press your item.
If the press is closed for more than 10 seconds, the
electronic safety buzzer sound and the power supply
is automatically switched off. When the Elnapress
is opened again, the power supply is automatically
switched back on.
Note : It is possible to use a higher temperature for
pressing items that need a medium temperature.
You will need to reduce the pressing time.
12

Storing your Elnapress
Turn the Elnapress off by pressing the ON/OFF switch
until the green and red LEDs lights go off. Unplug the
mains lead from both the press and the wall socket.
While the press is still hot, open and close several
times to dry the board cover.
Note : Do not close or lock the Elnapress before it
has cooled down completely.
The heating shoe should be cleaned as needed, and
the padding foam and board cover should be regu-
larly replaced. The board cover can be washed at
60°. (Please see the Maintenance section.)
Carrying the Elnapress
Always close and lock the Elnapress before moving
it. Grasp the fixed handle to carry.
13

Maintenance
Padding foam and Board Cover
Padding foam flattens after prolonged use, and your
pressing results will be unsatisfactory.
If the press does not open and close properly or the
padding foam begins to hang off the board, replace
the padding foam.
The board cover can be laundered (60 degrees) and
should be replaced when it becomes worn.
Cleaning the Heating Shoe
The heating shoe needs occasional cleaning to
remove dry cleaning chemicals, thread fibres and
any other residue.
Clean the heating shoe while it is warm. Turn the
press over so the heating shoe faces up.
Use one of these methods:
• Wipe the surface with a lint-free cloth soaked in
white vinegar. Wipe with a clean cloth to remove
vinegar residue.
• You can also use the Elna cleaning stick (optional
accessory). Follow it’s own enclosed instruction.
Never use alkaline products, such as oven cleaners.
Never use abrasive cleaning products or steel wool
pads.
After cleaning the heating shoe, with a lint-free cloth
apply a thin protective coating (optional accessory)
to the warm surface. Leave the press open for about
20 minutes, set at the maximum temperature. Switch
off the press. Allow it to cool before locking the
handles.
14

Technical specifications
Electrical input 1000 watts / 230V
1000 watts / 120V (For
USA and CANADA only)
700 watts / 100V (For
JAPAN only)
Voltages 100V, 120V (For JAPAN,
USA and CANADA only)
or
220-240V
Dimensions of 62 x 25 cm
the ironing board (243/4 x 10 in)
Ironing level 10 cm (4 in)
above table top
Overall
Dimensions 65 x 541/2 x 211/2 cm
(26 x 213/4 x 81/2 in)
Weight 12 Kg
(261/2 lb)
Ironing pressure 33.4 g/cm2
Total pressing 45 kg
power (100 lbs.)
15
1)
5)
6)
8)
4)
2)
7 )
3)
Accessories for
separate purchase
1) Vapojet system
2) Cleaning stick
3) Protective cover
4) Padding foam
5) Protective liquid (for aluminium heating shoe
only)
6) Small ironing cushion
7) Vaporiser
8) Board cover
- Long ironing cushion
- Pressing cloth

16
For all ironing, use your vaporiser as necessary. For cotton items it is generally helpful to give your vaporiser a
few squirts each time before lowering the heating shoe. Do not use the vaporiser for applications and special
fabrics.
Doilies
You can press multiple items at one time because of the large
surface of the heating shoe and ironing board.
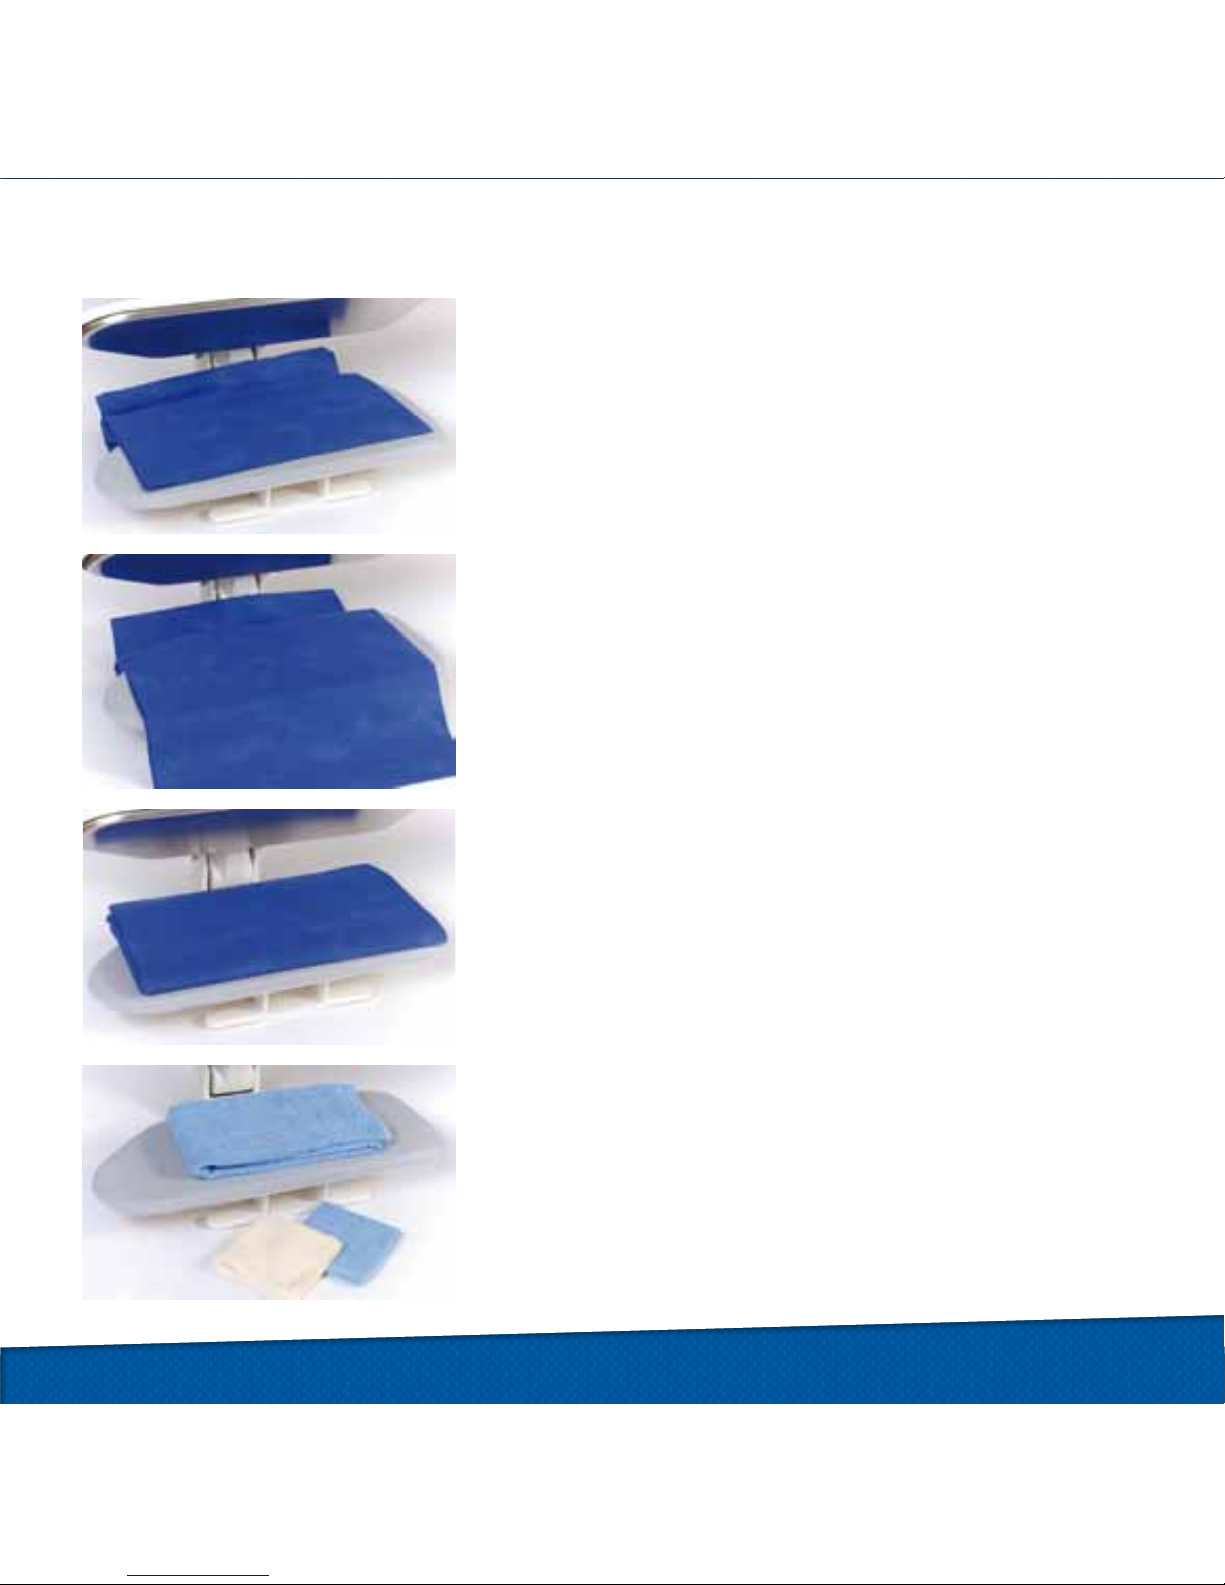
Tablecloth
Fold the length of fabric in either half or thirds and place on the
ironing board.
Accordion pleat the length on the ironing board and move the
pleated item into the large open space behind the ironing board.
Basic ironing
17
Move the tablecloth forward towards you. Press.
To store, fold it, place it on the ironing board and close the press.
Apply mini-pressure. If necessary, refold the tablecloth to press any
areas that were hanging off the sides of the ironing board. Repeat
the pressing procedure.
Continue moving forward until the entire item is pressed.
Use this same method for most large items, such as duvet covers,
bed sheets, pillowcases, table runners, towels, blankets, quilts, etc.
18
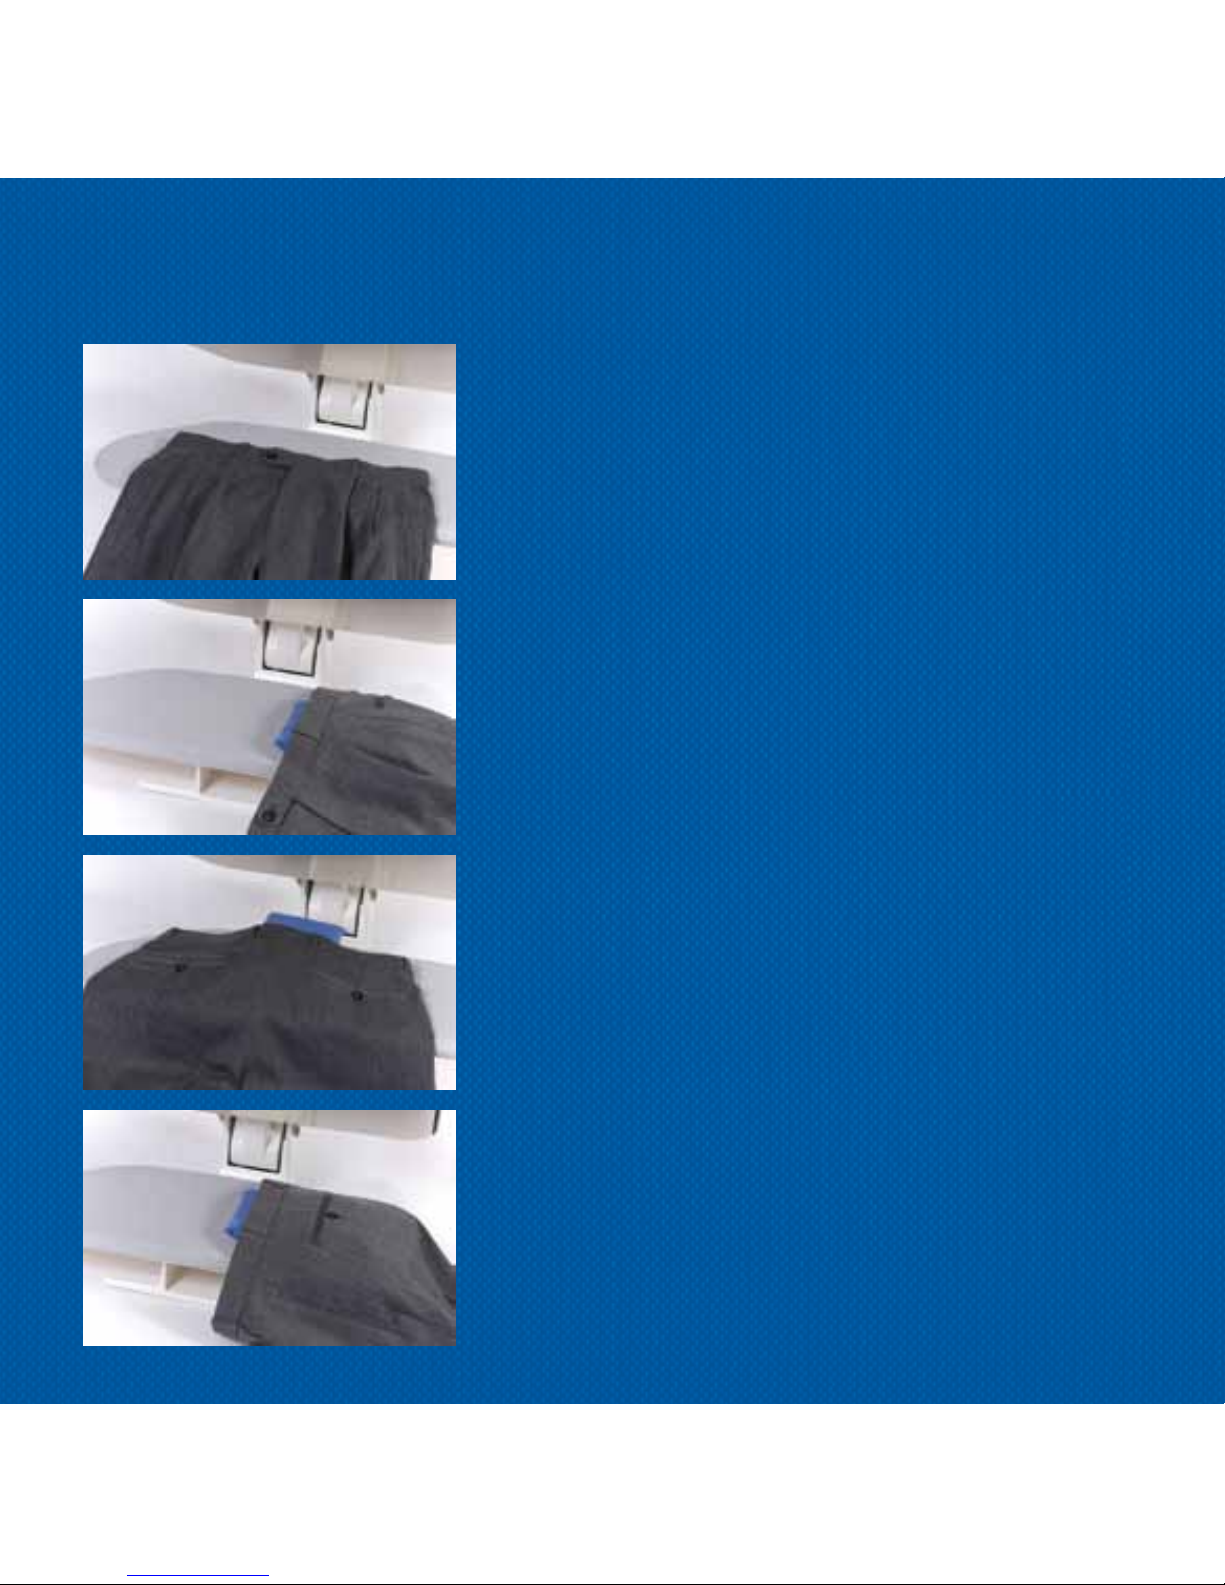
Trouser
Waistband: ironing board
Place the top of the trousers on the press and spray with the vapo-
riser. Use the ironing cushion or the board to press the waistband.
Waistband: cushion
Place the waistband around the board. Arrange the pleats. Press.
Use mini pressure if only lightly wrinkled. Rotate to press entire
waistband.
Waistband: cushion
Place the trousers on the ironing board. Use the cushion to move
around the waistband and to fan out the shape.
Pockets: cushion
Slide the pocket onto the board. Press.

19
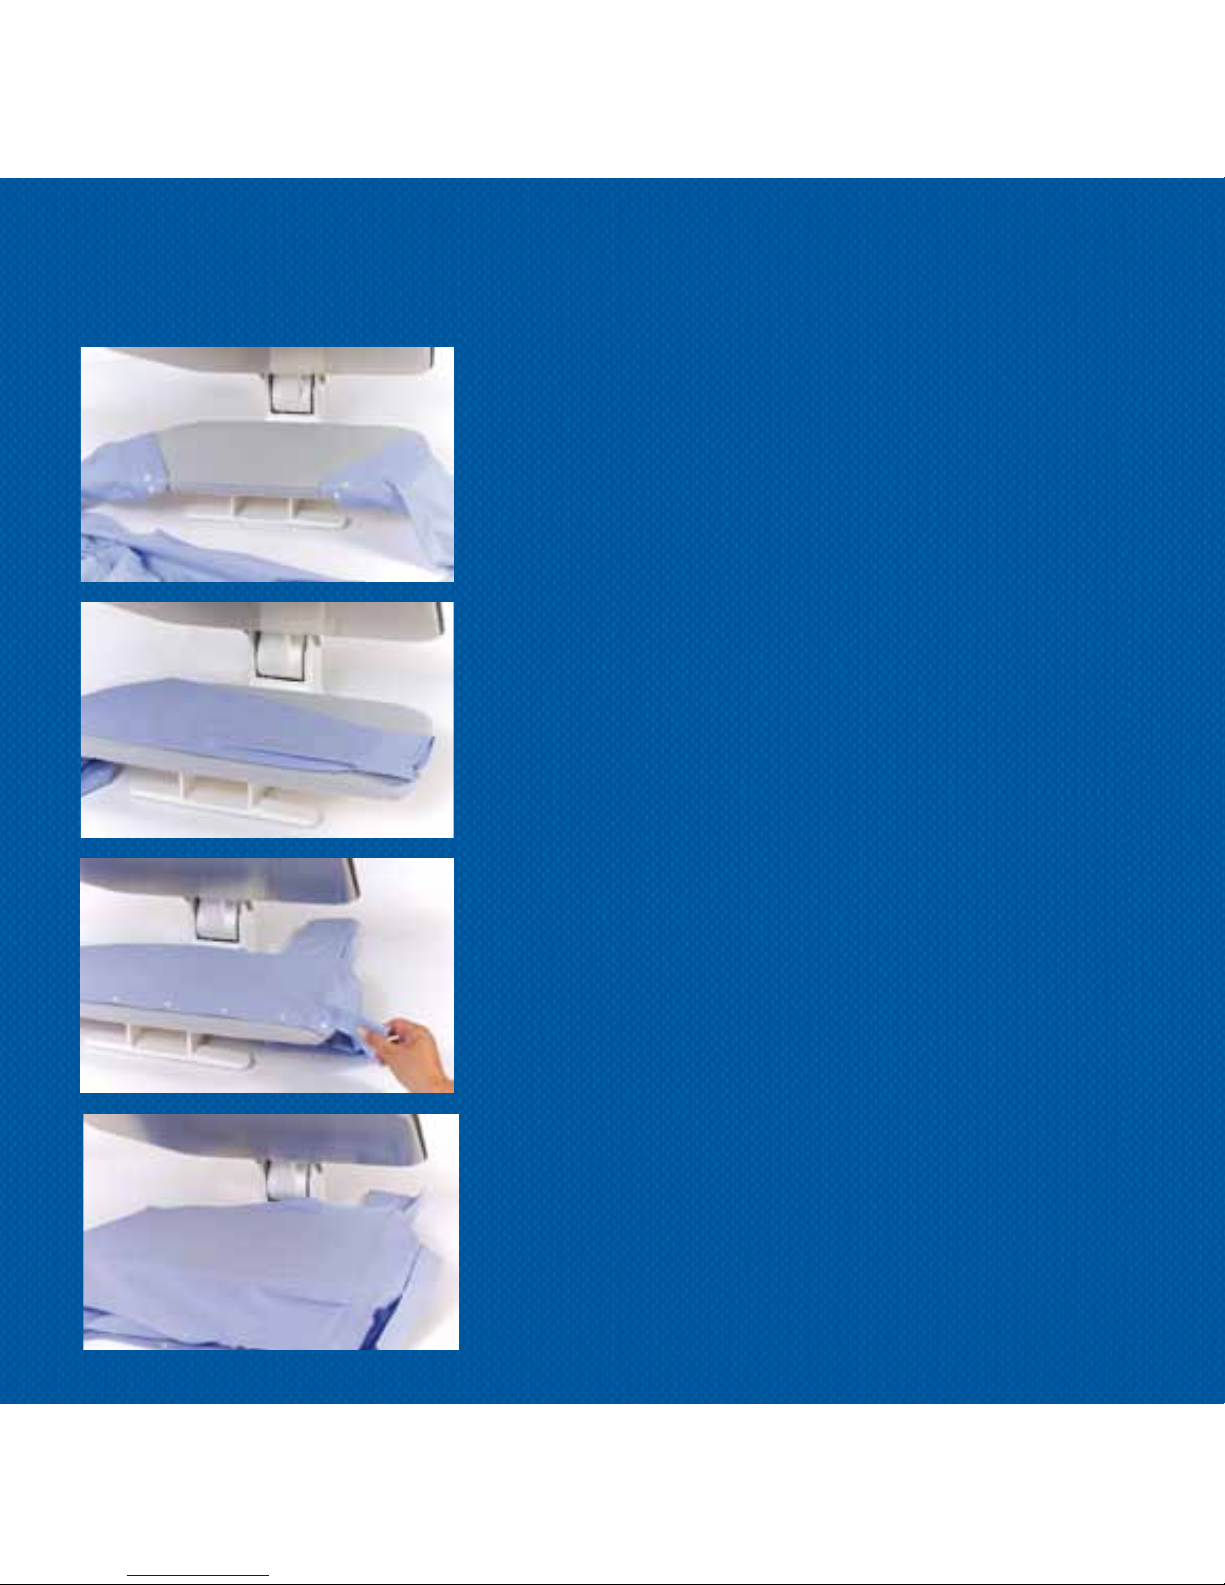
Shirt
Yoke: sleeve board
Arrange the shoulders around the sleeve board. Let the collar hang
off the edge. Press.
Legs: ironing board
Place top of one trouser leg half way on the ironing board. Press
front crease.
Place bottom of same trouser leg half way on the ironing board.
Allow the hem or cuff to hang off the end of the board. Press.
Follow the same method for pressing the back crease.
To press trousers without creases, see Jeans, page 25.
Note : The hems of the trousers can be pressed by placing them
both on the ironing board and applying mini pressure.
Crotch Area: ironing board
Place the inside of the crotch area on the board, facing up. Align
with the slanted left side of the board. Press.
20
Cuffs: ironing board
Place the cuffs and plackets around the edges of the ironing board.
Arrange any pleats. Press.
Sleeves: ironing board
Place the garment to the left side of the press with the collar towards
you. Place the first sleeve on the ironing board with the curve of the
garment fitted to the curve of the board (the second sleeve will lay
in front of the press off the board). Press. Remove first sleeve and
place second sleeve on board. Press.
Body: ironing board
Put the sleeves together and fold the shirt in half. Place it at the
back of the ironing board, extending the sleeves behind the board
on the right. Bring the shirt front with the buttons forward first. With
your right hand, hold the collar so that the curved edge of the neck
opening is flat against the ironing board. Do not release the collar
until you have lowered the heating shoe. Press.
Keep pulling the shirt forward until you have worked the whole
way around.
Table of contents
Other Elnapress Iron manuals


