Elnur Gabarron BRISS Mounting instructions

Por favor, lea estas instrucciones atentamente antes de instalar o utilizar el aparato por primera vez.
Please read these instructions carefully before installing or using this appliance for the first time.
Veuillez lire attentivement ce manuel d’instructions avant d’installer ou d’utiliser votre appareil.
INSTRUCCIONES DE INSTALACIÓN Y USO
INSTALLATION INSTRUCTIONS AND USER GUIDE
INSTRUCTIONS D’INSTALLATION ET GUIDE D’UTILISATION
CLIMATIZADOR EVAPORATIVO
EVAPORATIVE AIR COOLER
CLIMATISEUR ÉVAPORATIF
BRISS

MEDIDAS DE SEGURIDAD IMPORTANTES
1. Asegúrese de que su suministro de electricidad sea 220-240v – 50Hz
2. Utilice el aparato solo como se describe en este manual. No se recomiendan otros
usos, ya que puede causar un incendio o una descarga eléctrica.
3. No tire del cable de alimentación con las manos mojadas. Puede sufrir una descarga
eléctrica.
4. No use la unidad en áreas donde haya temperaturas extremas. No exponga la unidad
a la luz solar directa. Solamente para uso en interiores.
5. No use cables de extensión para evitar el sobrecalentamiento y el riesgo de incendio
6. No supere el nivel máximo en el tanque de agua.
7. No lo mueva rápidamente si hay agua en el tanque de agua para evitar salpicaduras.
8. No coloque la unidad cerca de explosivos, hornos calientes o superficies calientes.
9. Sujete el enchufe para desconectarlo de la toma de corriente. Nunca tire del cable de
alimentación.
10. Por favor, no use la función “COOL” en un área cerrada con poca ventilación durante
mucho tiempo para evitar la humedad alta.
11. La unidad debe estar colocada en una superficie plana y resistente.
12. Este aparato no está pensado para ser usado por personas (incluidos niños) con
capacidades físicas reducidas, sensoriales o mentales, con poca experiencia o co-
nocimiento, al menos que estén bajo supervisión de una persona responsable de su
seguridad con las instrucciones de uso del aparato. Los niños deben ser supervisa-
dos para asegurar que no juegan con el aparato.
- Los niños menores de 3 años deben mantenerse fuera del alcance del aparato a
menos que sean continuamente supervisados. Los niños desde 3 años y menores de
8 años deben sólo encender/apagar el aparato siempre que éste haya sido colocado
o instalado en su posición de funcionamiento normal prevista y que sean supervisa-
dos o hayan recibido instrucciones relativas al uso del aparato de una forma segura y
entiendan los riesgos que el aparato tiene. - Los niños desde 3 años y menores de 8
años no deben enchufar, regular y limpiar el aparato o realizar operaciones de mante-
nimiento.
- Este aparato puede ser usado por niños mayores de 8 años y por personas con
discapacidades físicas, sensoriales o mentales, o sin experiencia o conocimientos,
siempre y cuando hayan sido debidamente formados y sean supervisados por alguien
que entienda los riesgos.
13. Apague y desenchufe el evaporativo de la corriente antes de limpiarlo.
14. Si no va a usar la unidad por un tiempo prolongado, desenchúfela y vacíe el depósito.
15. Cambie el agua regularmente para mantener el agua limpia.
16. Nunca sumerja la unidad ni el cable de alimentación ni el enchufe en el agua.
NOTA
Para evitar el peligro de descarga eléctrica, desenchúfelo de la corriente cuando no esté
en uso y antes de limpiarlo. Si el cable de alimentación está dañado, deje de usarlo inme-
diatamente y llévelo al servicio técnico para su reparación.

DESCRIPCIÓN PRODUCTO
Ruedas
Depósito de agua
Filtro para el polvo
Mando a distancia
Mando a distancia
Mando a distancia
Receptor para el mando a distancia
Ventilador superior
Ventilador inferior
Cortina de agua
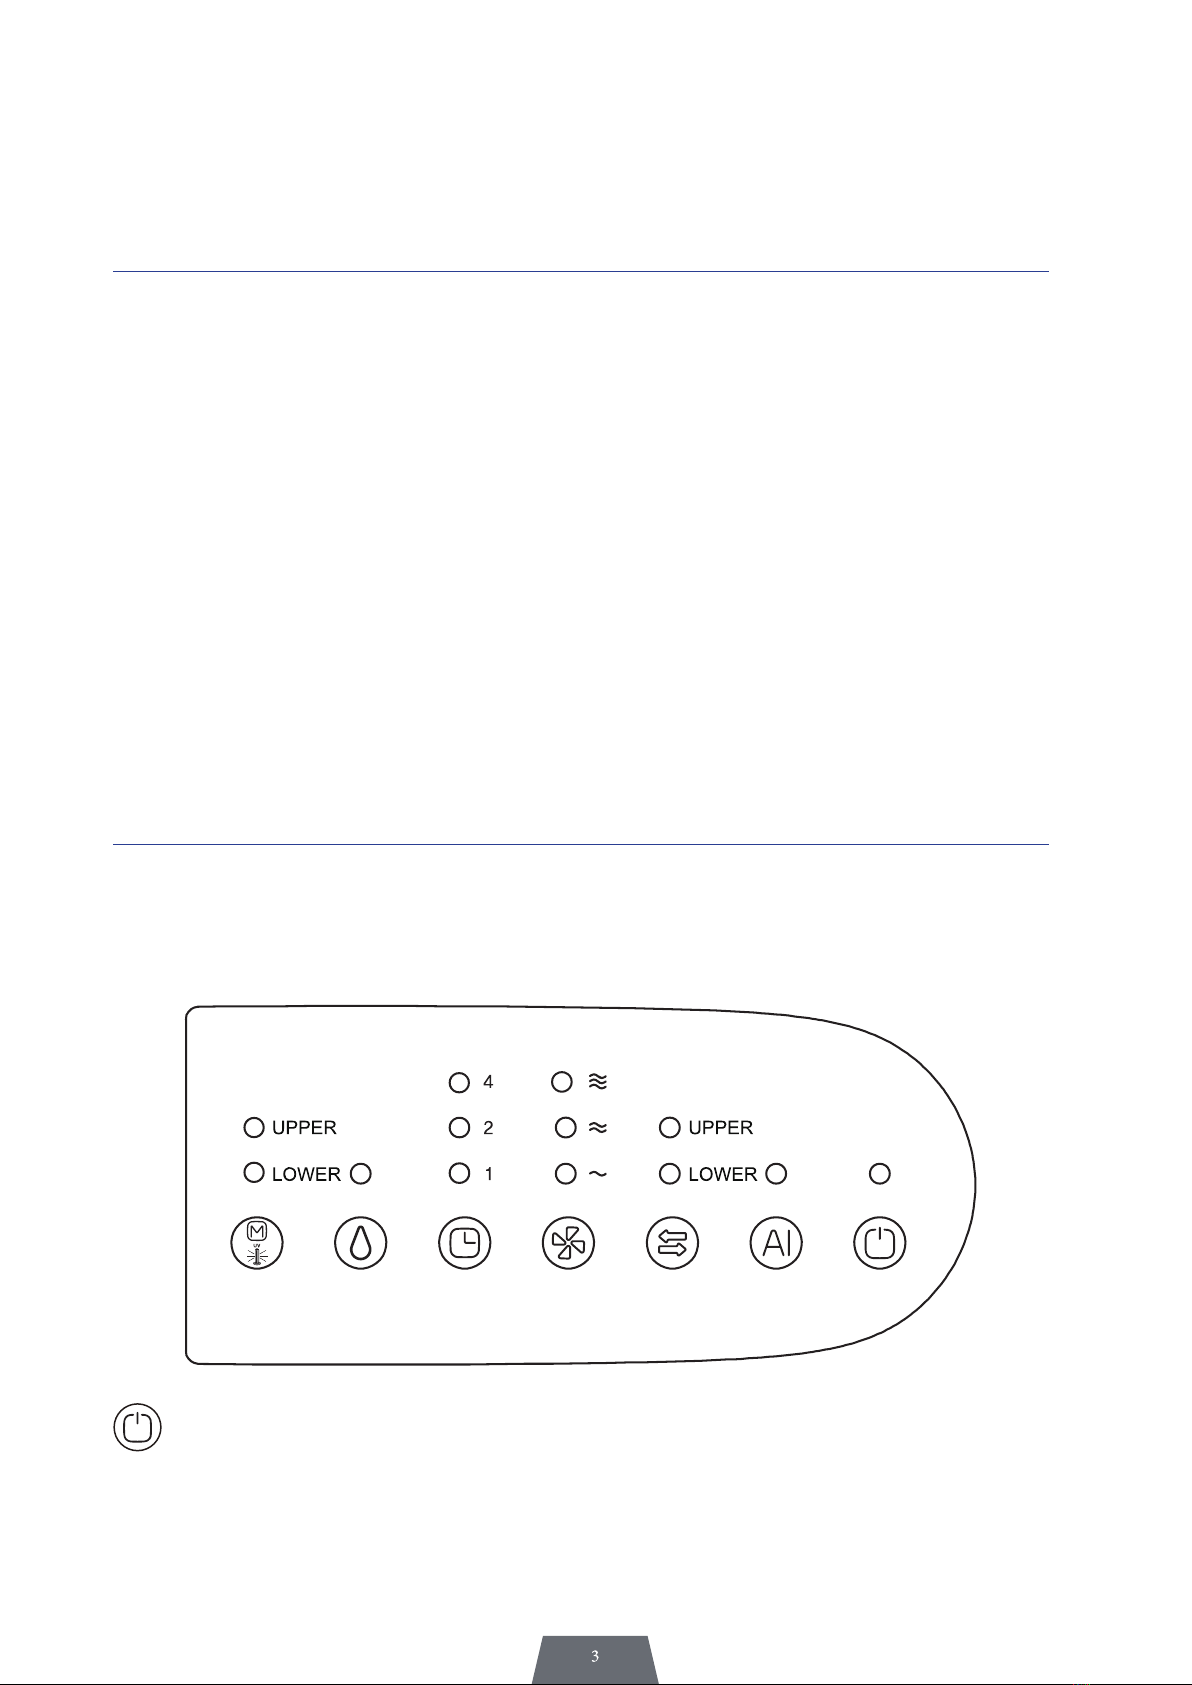
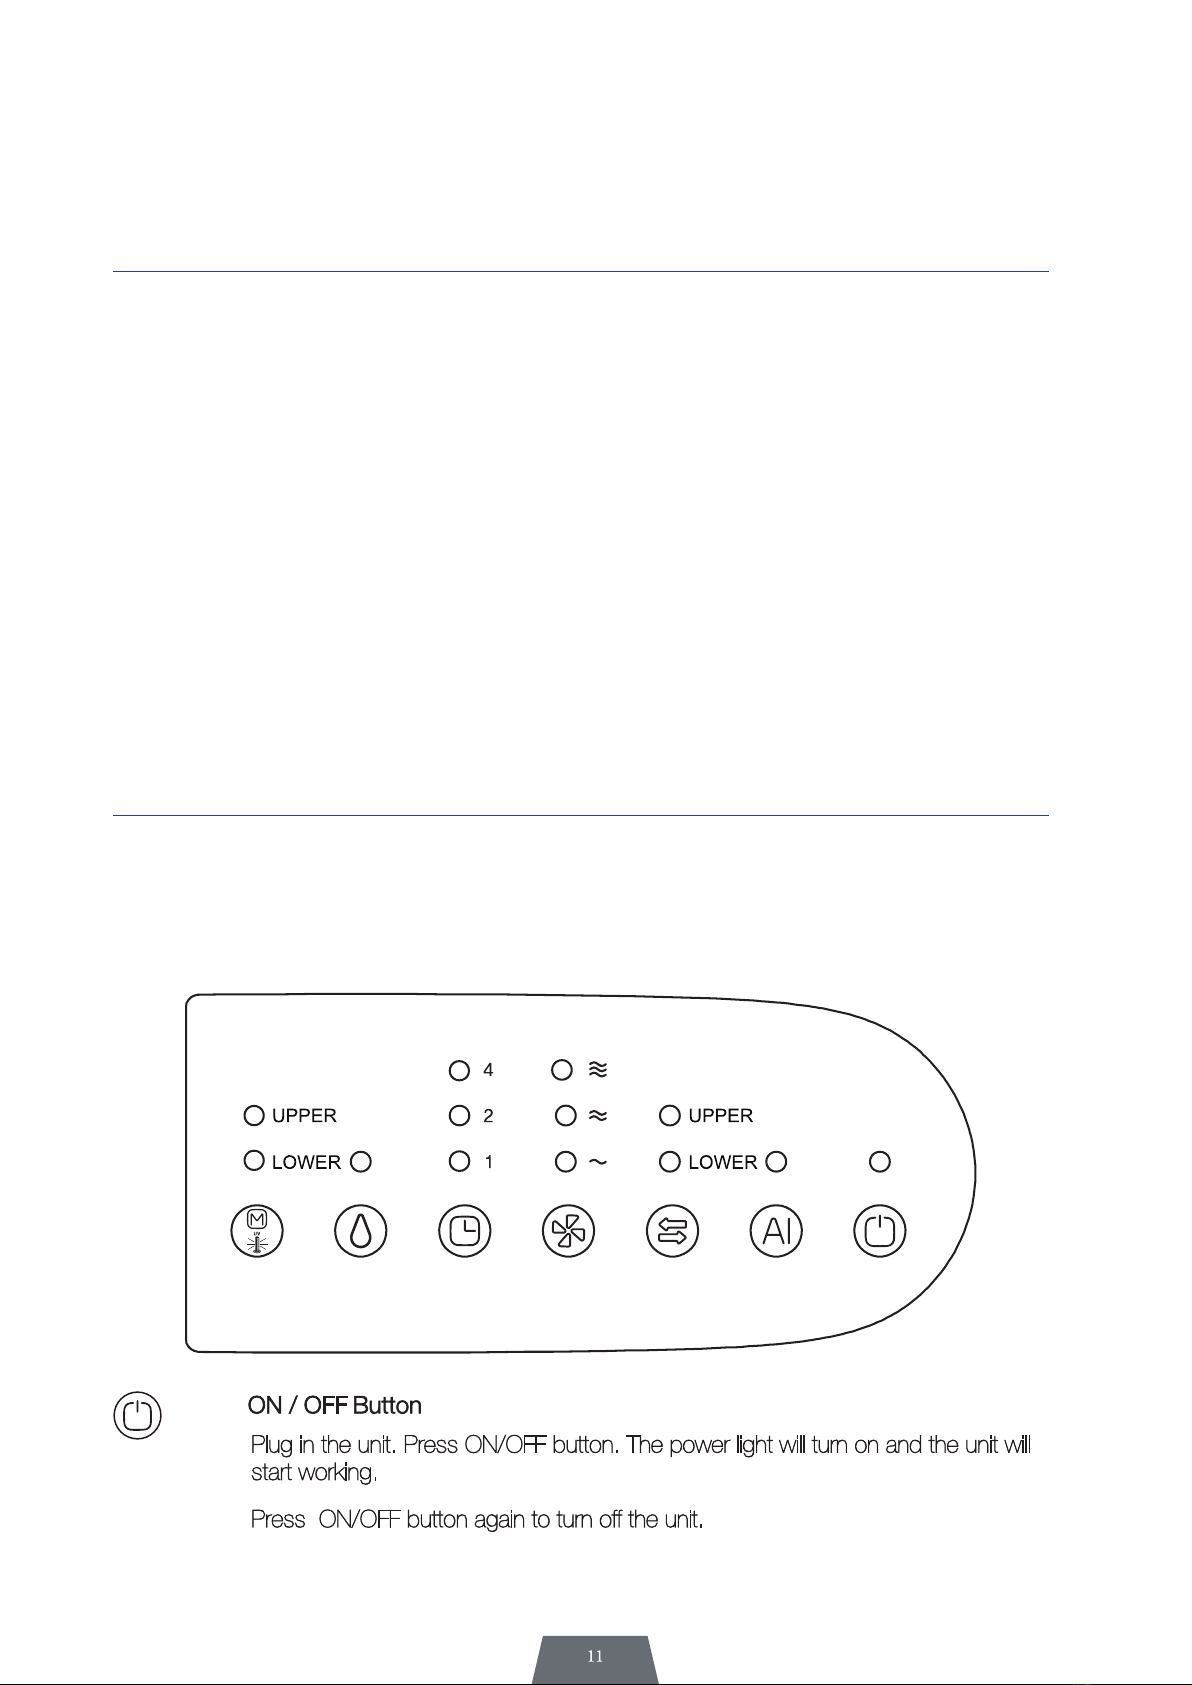
1- Botón ON/OFF
a. Conecte el aparato al enchufe. Presione el botón ON/OFF. La luz indicadora
se enciende y la unidad comenzará a funcionar.
b. Presione el botón ON/OFF nuevamente para apagar el evaporativo.
PRIMER USO
1. Abra la caja y desembale el producto.
2. Asegurarse de que disponga de suficiente espacio antes de comenzar el montaje.
3. Es necesario sacar el tanque de agua para llenarlo.
4. Poner agua limpia hasta la señal MAX. Vuelva a colocar el tanque en su sitio y seque
cualquier resto de agua. Si tiene alguna dificultad para colocar el tanque en la posi-
ción correcta, lea Limpieza y mantenimiento.
5. Para usar cubitos de hielo, abra el tanque e introdúzcalos en el interior del depósito
del agua.
6. Enchufe la unidad
MODOS DE FUNCIONAMIENTO
Panel de control
MODOS DE FUNCIONAMIENTO
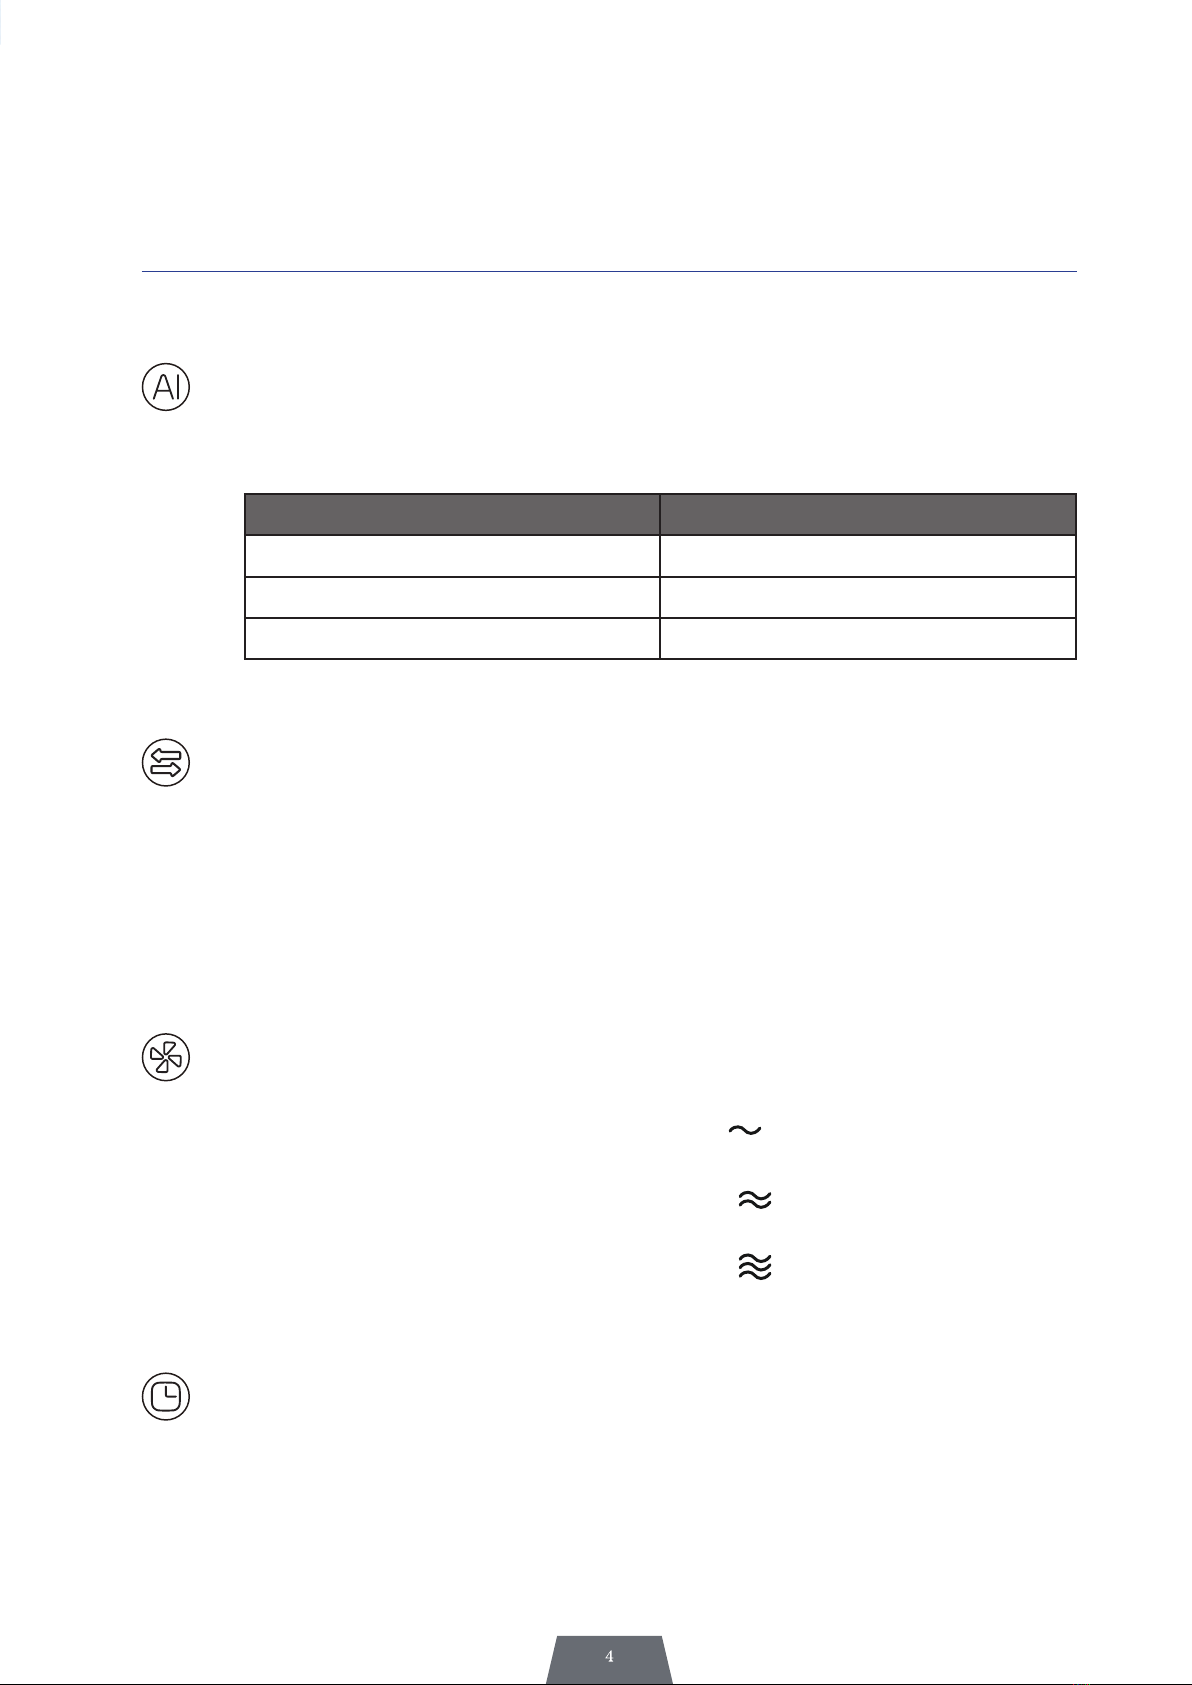
2- Botón AI
Ajusta de manera automática la velocidad del ventilador de acuerdo a la tempe-
ratura ambiente; el indicador de luz LED se ilumina cuando esta función está en
marcha.
3- Botón SHAKE
Presionando el botón una vez, se iluminarán las luces LED Upper y Lower y los
dos ventiladores se moverán en la misma dirección, de izquierda a derecha.
Presionando el botón una vez más, puede seleccionar mover el ventilador de arri-
ba (upper) o el de abajo (lower).
Modos de movimiento: Ambos ventiladores se mueven, ventilador inferior se mue-
ve, ventilador superior se mueve y finalmente ambos dejan de moverse.
4- Botón SPEED
Presione el botón SPEED para seleccionar la velocidad de viento.
Presionando una vez se ilumina el piloto “LO” para una velocidad de viento
baja
Presionando dos veces se ilumina el piloto “MI” para una velocidad de viento
media.
Presionando tres veces se ilumina el piloto “HI” para una velocidad de viento
alta.
5- Botón TIMER
Presione el botón TIMER para ajustar la duración de funcionamiento del aparato
desde 1 hasta 7 horas, en tramos de 1 hora, 2 horas, 4 horas.
Presione el botón TIMER otra vez más para pasar a la siguiente franja horaria.
Si el piloto no está encendido, el aparato funcionará de manera continua.
Temperatura ambiente Velocidad
Por encima de 35ºC Alta
28ºC – 34ºC Baja
Por debajo de 27ºC Brisa

MODOS DE FUNCIONAMIENTO
6- Botón COOLER
Presionando este botón, se ilumina el piloto y el aparato comienza a bombear
agua para humedecer la cortina de agua
Cuando el tanque está vacío, el piloto se ilumina en roo y sonará un pitido.
NOTA:
1. Por favor, asegúrese de que hay agua por encima del nivel MIN en el depó-
sito antes de usar la función COOL, si no esta no se activará.
2. El aparato puede ser usado sin agua como un ventilador convencional. Por
favor, mantenga el modo COOL apagado con ambiente muy húmedo.
3. Si coloca el paquete de hielo frio o cubitos de hielo dentro del depósito,
bajará la temperatura del agua y se incrementará la sensación de fresco en
COOL.
7-Botón MODE/UV
Pulsando el botón MODE/UV podrá controlar qué ventiladores funcionan,
ambos a la vez, sólo el superior o sólo el inferior. El piloto automático correspon-
diente se iluminará para informarle de su selección.
La función UV se encenderá automáticamente cuando el ventilador empiece a
funcionar, esterilizando el aire para mejorar su calidad.

LIMPIEZA Y MANTENIMIENTO
ANTES DE LIMPIAR EL APARATO, ASEGÚRESE de apagar y desconectar el enchufe para
evitar riesgo de descarga eléctrica.
Para prolongar la vida útil del producto y mantener el mejor rendimiento posible, se reco-
mienda limpiar la unidad con regularidad.
1. Limpieza general.
No utilice gasolina, disolventes u otros productos químicos para la limpieza y el man-
tenimiento.
Use un paño suave para la limpieza.
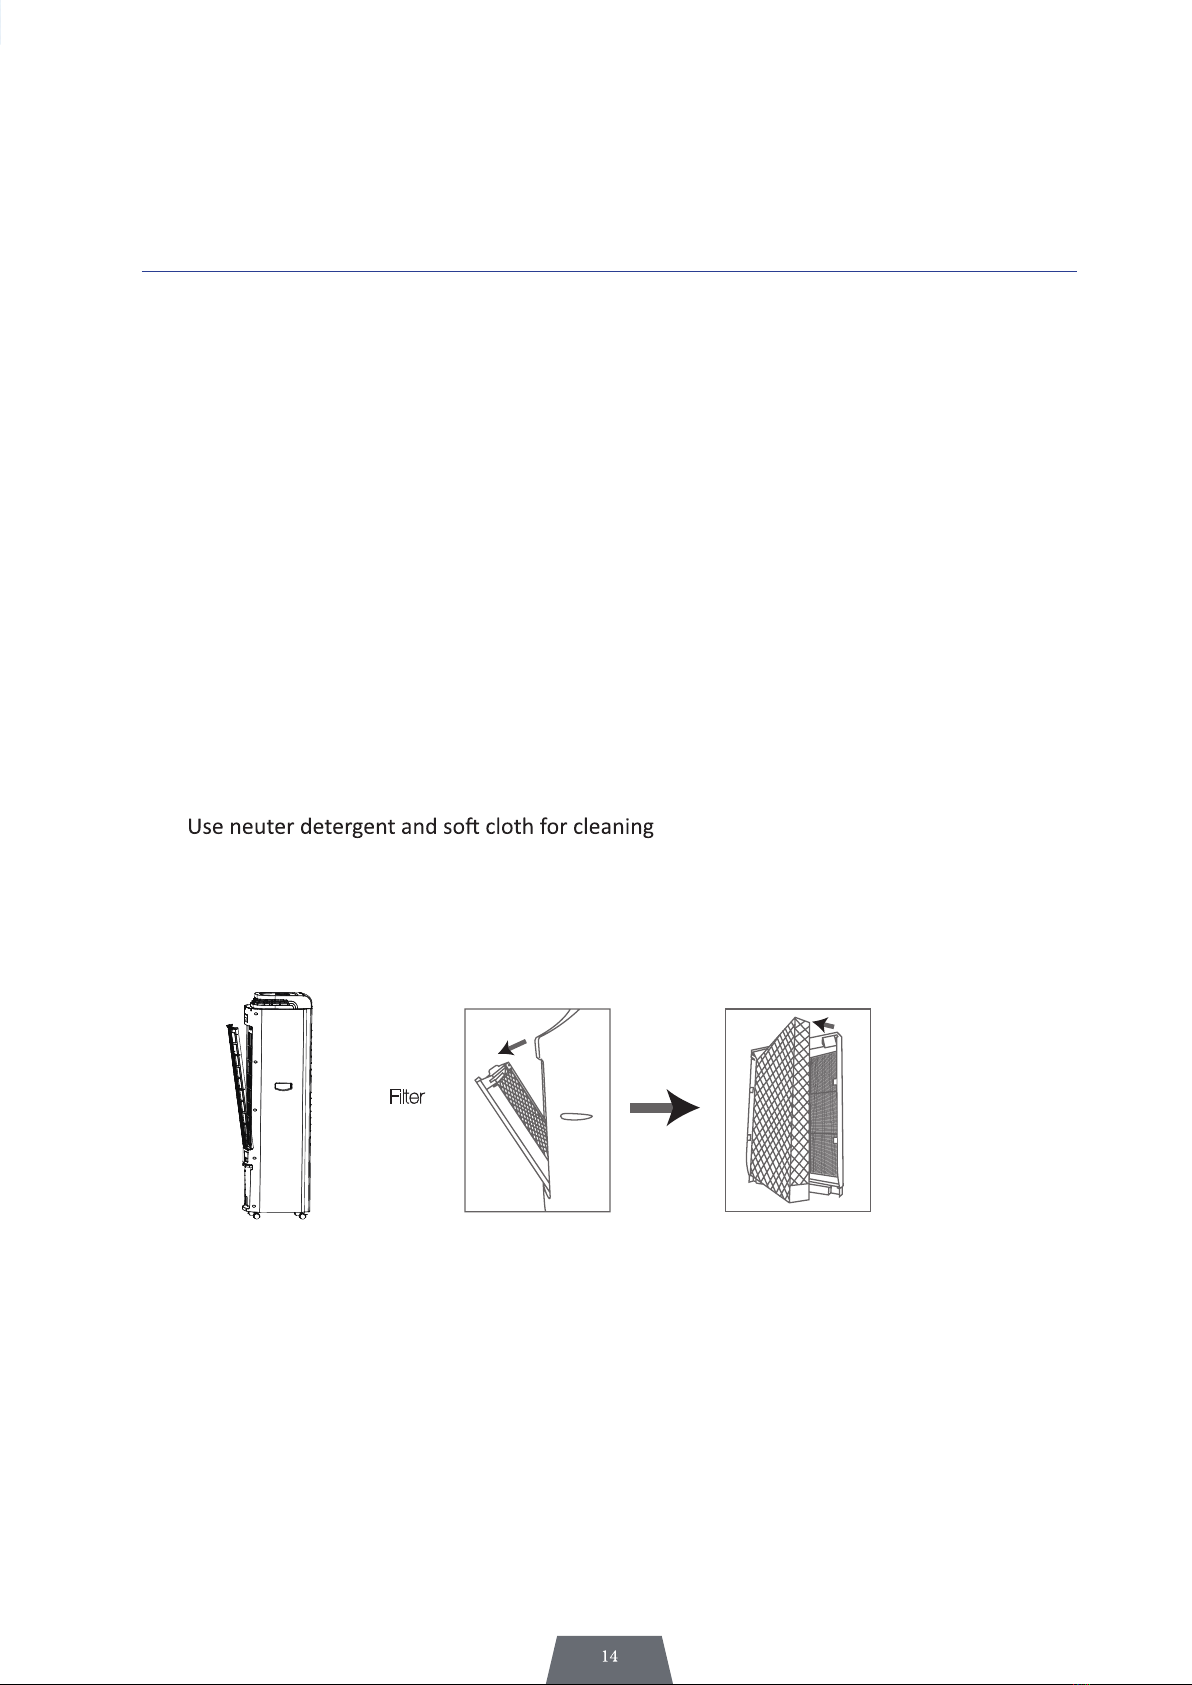
2. Limpieza del filtro.
Retire el filtro de polvo y lávelo con agua corriente utilizando un cepillo suave o un paño.
Retire el depósito de agua, tirando de él. Antes de que el tanque esté completamente
fuera, levántelo para liberar el localizador de la abrazadera debajo de él. Use un paño
húmedo con detergente neutro para la limpieza. Enjuague con agua corriente, seque
y vuelva a instalar el tanque.
3. Limpieza del exterior.
Use un detergente neutro y un paño suave para limpiar el exterior del aparato.
NOTA:
1. El sistema de seguridad parará el aparato si se retira la carcasa trasera
2. Para un correcto mantenimiento de la humidificación y purificación, por favor, limpie fre-
cuentemente el sistema de filtros
3. Nunca sumerja el aparato, el cable o el enchufe en líquido
4. No repare la unidad, debe hacerlo un servicio técnico oficial
Filtro Cortina de agua
RESOLUCIÓN DE PROBLEMAS
FALLO POSIBLE CAUSA SOLUCIONES
No sale aire de la
unidad
No hay electricidad.
No está conectado.
Alguna pieza puede estar dañada.
Compruebe que está enchufado a la corriente eléctrica.
Presione MODE.
Llevar el aparato al servicio técnico.
La unidad no se puede
apagar
No ha presionado el botón “ON / OFF”.
Ha saltado el dispositivo de seguridad.
Alguna pieza puede estar dañada.
Presione el botón “ON / OFF” para apagar la unidad.
Compruebe que los filtros estén colocados correctamente.
Llevar el aparato al servicio técnico.
El aparato tiene un
ruido extraño
Algún objeto extraño se ha colado en el
interior.
El motor está dañado.
Retirar posibles objetos (si los hubiere).
Llevar el aparato al servicio técnico.
No funciona el modo
COOL (humidificador)
Bajo nivel o falta de agua en el depósito.
La tubería interior del agua, se ha podido
soltar.
La bomba puede estar dañada.
Rellenar el depósito de agua.
Reconectar la tubería de agua.
Llevar la unidad al servicio técnico.
No oscilan las rejillas El motor está dañado. Llevar el aparato al servicio técnico.
El aire no sale frío
El filtro trasero puede estar obstruido por
el polvo.
No hay suficiente agua.
Botón de aire frío no presionado.
Lavar el filtro trasero.
Añadir agua al depósito.
Presionar el botón COOL.
Sustituir filtro.
ALMACENAMIENTO
* Si se marcha de viaje , o no va a utilizar el aparato por un período prolongado, debe apa-
garlo y desconectarlo del enchufe de la toma de corriente. Recuerde vaciar el tanque ya
que de lo contrario, la vida útil de la bomba y de la carcasa se verá afectada.
* Limpie el producto antes de almacenarlo. Retire el filtro de panal, límpielo y luego séquelo
antes de guardarlo. Esto evitará que quede maloliente o mohoso después de que no se
use durante mucho tiempo. Cubra con una bolsa de plástico el aparato para evitar que
coja polvo.
* Guárdelo en un lugar seco y ventilado.

ESPECIFICACIONES
Tensión: 220-240V // 50Hz
Potencia: 70W
Capacidad del depósito de agua: 7 l
Dimensiones: 334 x 308 x 779 mm // 13,15 x 12,13 x 30,67 inch
Peso neto: 7,25 kg // 16 lbs
IMPORTANTE:
1. Este aparato está pensado solamente para un uso en interiores.
2. Uso comercial o industrial queda fuera de garantía.

IMPORTANT SAFETY INSTRUCTIONS
1. Make sure your electricity supply are 220-240v – 50Hz
2. Use the device only as described in this manual. Other uses are not recommended, as
it may cause fire or electric shock.
3. Do not pull out the power cord with a wet hand. This may cause an electric shock
accident
4. Do not use the unit in extreme temperatura áreas. Do not expose the unit to the direct
sunlight. Only for indoor use.
5. Do not use extensión cord to avoid overheating or fire risk.
6. Do not exceed the maximun level on the water tank
7. Do not move it quickly if there are wáter in the tank in order to avoid splaslh
8. Do not put he unit near explosives, hot oven or hot surfaces.
9. Hold the plug to disconnect it from the socket. Never pull on the power cord.
10. Please, do not use COOL function ofunction in a few ventilated closed área for a long
time to avoid high humidity.
11. The unit must be placed on a flat and resistant surface.
12. This appliance is not intended to be used by people (included children) with reduced
physical, sensorial or mental abilities, with few experience or knowledge, unless they
are under the supervisión of a person responsible of their safety with the use instruc-
tions of the appliance. Children should be supervised to ensure they do not play with
the device
- Children under 3 years of age should be kept out of the reach of the appliance un-
less they are continuously supervised. Children from 3 years and under 8 years should
only turn on / off the device as long as it has been placed or installed in its normal
operating position and that they are supervised or have received instructions regarding
the use of the device in a safe manner and understand the risks that the device has.
- Children from 3 years and under 8 years should not plug in, regulate or clean the
appliance or carry out maintenance operations.
- This device can be used by children over 8 years and for person with physical, sen-
sorial or mental disabilities or without experience or knowledge as long as they have
been properly trained and been supervised for someone who undestand the risks.
13. Switch off and plug off the air cooler before to clean it
14. If you are not going to use the device for a long time, please swith off it and empty the
tank.
15. Change the water regulary to kept clean the water.
16. Never immerse the unit, the power cord or rthe plug in water
NOTE
To avoid the danger of electric shock, unplug it from the mains when it is not in use and
before cleaning it.
If the power cord is damaged, stop using it immediately and take it to the service center
for repair.
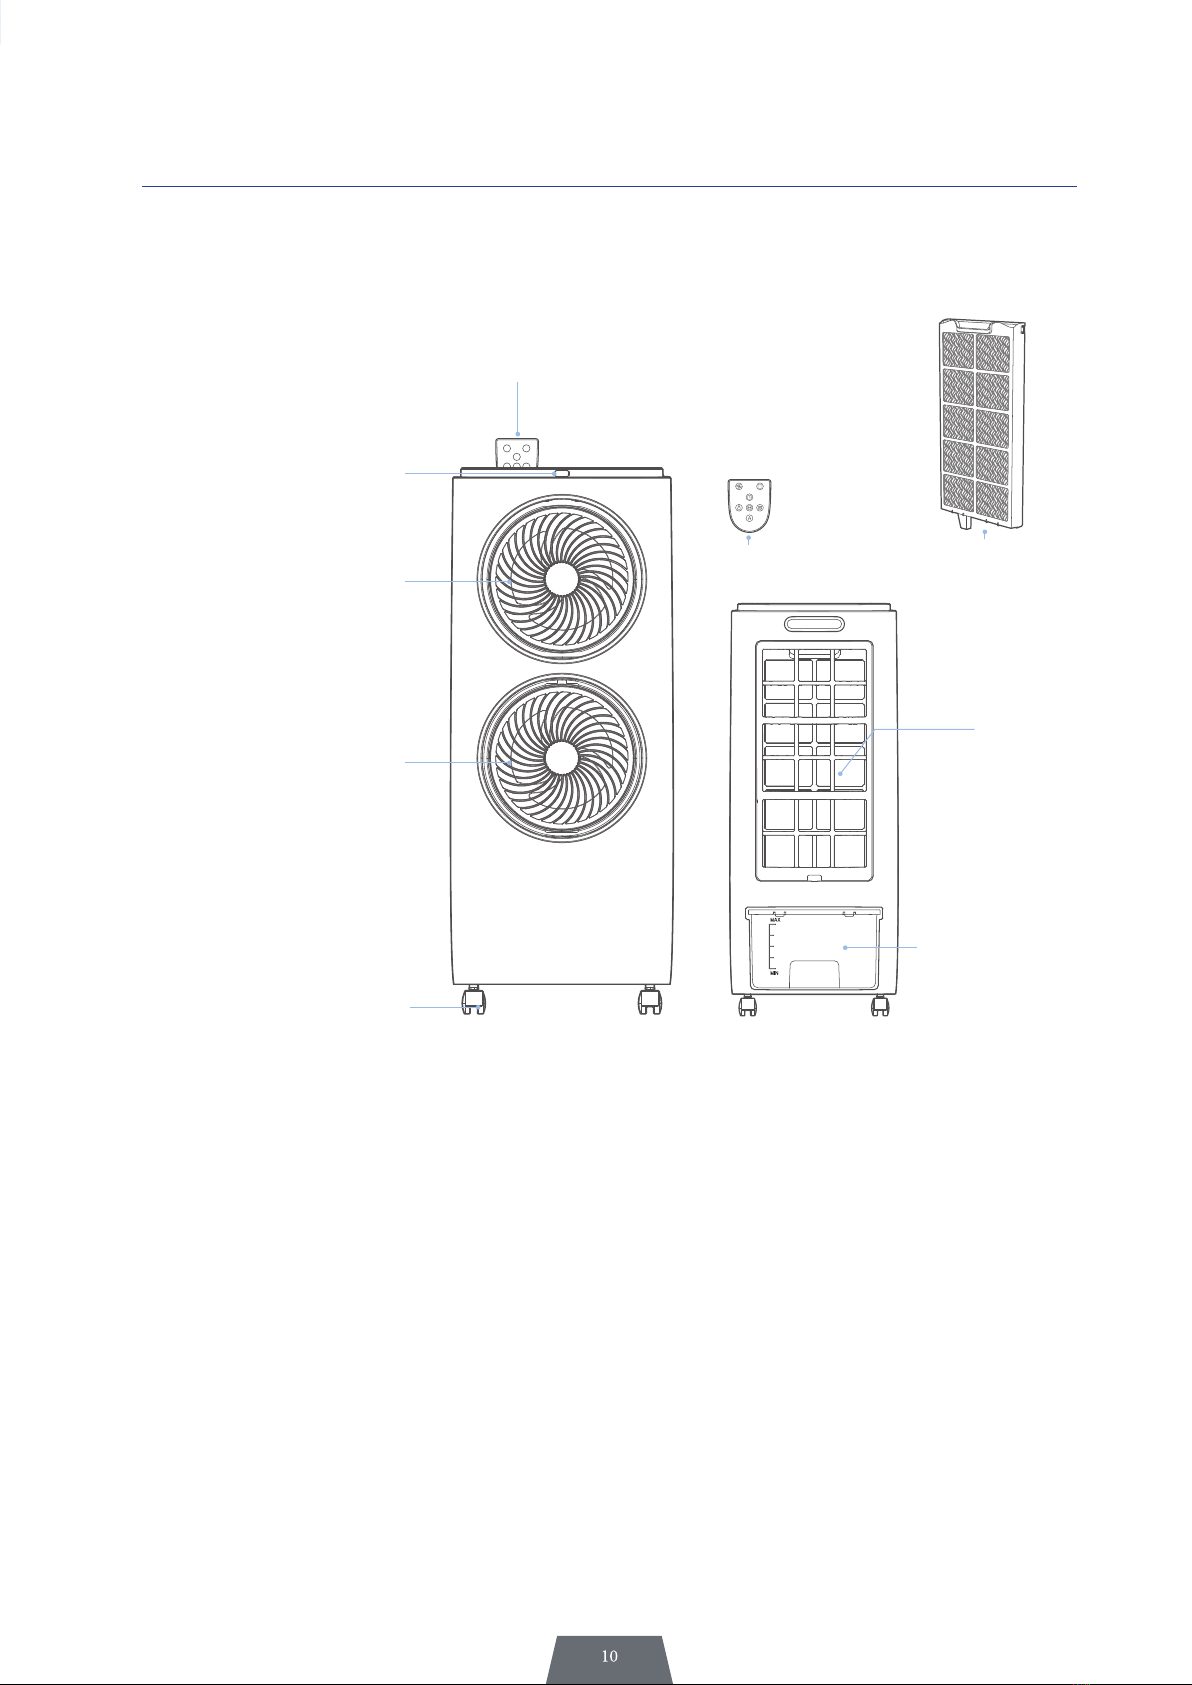
PRODUCT DESCRIPTION
Caster
Water Tank
Dust Filter
Remote control
Remote control
Remote control
Remote control Receiver Window
Fan ( Upper)
Fan ( Lower)
Water Curtain
FIRST USE
1. Open the box and unpack the product.
2. Make sure there is enough space to pull all parts before starting assembly
3. Necessary to remove the water tank to fill it.
4. Put clean water until MAX signal. Replace the water tank at its place and dry any pie-
ce of water. If you have any difficulty placing the tank in the correct positionm, please
read “cleaning and maintenance”
5. To use ice cubes, open the tank and insert them inside the water tank
6. Plug in the unit
OPERATING MODES
1-
a.
b.
Control panel

OPERATING MODES
2- AI Button
Automatically adjust the fan speed according to the ambient temperature, the LED
indicator will light up when it is in the working state.
3- Shake Button
Press the button once, the upper and lower LED lights will be on, the two fans will
shake its hands in same direction to the left and right.
Press the button again, one of the upper and lower fans can be selected to shake
its head.
Working instruction: Upper and lower fans shake their heads, lower fan shakes its
head, upper fan shakes its head, and then stop shaking their heads.
4- Speed Button
Press the Speed button to select 3 different wind speed
Press once “LO “ lights up for Low wind speed
Press twice “MI” lights up for Medium wind speed
Press thrice “HI” lights up for High wind speed
5- Timer Button
Press the timer button to seat the length of operation from 1 up to 7 hours in the
setting of 1 hour, 2 hour, 4 hours.
Press timer button once to shift the setting to the next time zone
The unit works continuously if no time indicator lights is on.
Ambient temperature Speed
Above 35ºC High wind
28ºC – 34ºC Low wind
Bellow 27ºC Breeze

OPERATING MODES
6- Cooler Button
Press the cool air button, the cool indicating light will be in and the unit starts to
pump up water and shower the water curtain. The humid and comfortable cool
wind comes out.
When there is no water in the water tank, the LED indicator will show red, and the
beeping sounded.
NOTE:
1. Please fill in with water before using the Cool Air function. If the water is under
low level or without water, the Cool Air function will not be activated until the
water tank is refilled.
2. The unit can be used without water as a normal electric fan. Please keep the
“Cooler” button at off mode during the humid weather.
3. Place the ice cubes or ice pack into the water tank can lower the water tem-
perature and strengthen cool air function.
7-Mode/UV Button
By pressing the mode/UV button you can control which fans operate, both
together, upper only or lower only. The relevant lights illuminate to inform you of
your selection.
And the UV function will be on automatically when the fan starts to work and
sterilize the air quality.
CLEANING AND MAINTENANCE
BEFORE CLEANING THE DEVICE, MAKE SURE to turn off and unplug the plug to avoid risk
of electric shock.
1. In order to prolong the life of the product and maintain the best possible performance,
it is recommended to clean the unit regularly.
1. General cleaning.
Do not use gasoline, solvents or other chemical products for cleaning and maintenance.
Use a soft cloth for cleaning.
2. Filter cleaning.
Remove the dust filter and wash it under water using a soft brush or cloth.
3. Water tank cleaning.
Remove the water tank by pulling it. Before the tank is completely out, lift it up to
liberate the locator from the clamp below it. Use a wet cloth with neutral detergent for
cleaning. Rinse with water, dry off and instal the tank again.
4. External Parts Cleaning.
NOTE:
1. The safety switch system will stop the unit automatically while the back cover is removed.
2. In order to keep good condition for humidifying and purifying, please clean the filtering
system frequently.
3. Never immerse the unit, power cord and plug into water.
4. Do not attempt the unit; must be repaired in an official technical service.

TROUBLE SHOOTING
FAILURE POSSIBLE CAUSE SOLUTIONS
No wind
No power.
It is not connected.
Some piece may be damaged.
Check it is plugged into the electrical power.
PressMODE.
Take the device to technical service.
The unit can not be
switched off.
The button ON/OFF has not been pressed
Safety switch is released.
Some piece may be damaged.
Press the ON/OFF button to switch off the unit.
Check the filter are correctly installed.
Take the device to technical service.
The device has abnor-
mal noise.
Foreign objets got inside.
The engine is damaged.
Remove possible objects (if any). Take the device to
technical service.
COOL mode (humidifier)
does not work.
Low level or lack of water in the tank.
The inner water pipe has been droped off.
The pump may be damaged.
Fill the water tank.
Reconnect the water pipe.
Take the unit to the technical service.
The louvers do not
oscillate The engine is damaged. Take the unit to the technical service.
The air is not cold
The back filter may be blocked by dust.
There is not enough water.
Cool air button not pressed.
Wash the rear filter.
Add water to the tank.
Press the COOL button.
Replace filter.
STORAGE
*If you are travelling, or you are not going to use the device for a long period of time, must
be switch it off and unplug it. Remenber empty the tank as otherwise, the life of pomp and
the case will be affected.
* Clean the unit before storing it. Remove honeycomb filter, clean it and dry it off before sto-
ring it. This will prevent it from becoming smelly or moldy after it has not been used for a
long time. Cover the device with a plastic bag to prevent it from picking up dust.
* Store it in a dry and ventilated place.

SPECIFICATIONS
Voltage: 220-240V ~ 50 Hz
Power: 70W
Water tank capacity: 7 l
Dimensions: 334 x 308 x 779 mm // 13,15 x 12,13 x 30,67 inch
Net Weight: 7,25 kg // 16 lbs
IMPORTANT:
1. The unit is designed for indoor household use only.
2. Commercial or industrial users will not obtain the regular warranty as stated in the terms
of the warranty cards

MESURES DE SÉCURITÉ IMPORTANTES
1. Assurez-vous que votre alimentation électrique est 220-240v - 50Hz
2. Utilisez l’appareil uniquement comme décrit dans ce manuel. Les autres utilisations ne
sont pas recommandées car cela pourrait provoquer un incendie ou un choc électri-
que.
3. Ne tirez pas sur le cordon d’alimentation avec les mains mouillées, vous risqueriez de
vous électrocuter.
4. N’utilisez pas l’appareil dans des zones où il y a des températures extrêmes. N’expo-
sez pas l’appareil à la lumière directe du soleil. Seulement pour une utilisation à l´inté-
rieur.
5. Ne pas utiliser de rallonges pour éviter la surchauffe et le risque d’incendie
6. Ne pas dépasser le niveau maximum dans le réservoir d’eau.
7. Ne déplacez pas rapidement s’il y a de l’eau dans le réservoir pour éviter les écla-
boussures
8. Ne pas placer l´appareil à proximité d’explosifs, de fours chauds ou de surfaces chau-
des.
9. Maintenir la prise pour débrancher l´appareil. Ne tirez jamais sur le cordon d´alimenta-
tion.
10. Veuillez ne pas utiliser la fonction “COOL” dans une zone fermée avec peu de ventila-
tion pendant une longue période pour éviter une humidité élevée.
11. L’appareil doit être placé sur une surface plane et résistante.
12. Cet appareil n’est pas destiné à être utilisé par des personnes (y compris des enfants)
ayant des capacités physiques, sensorielles ou mentales réduites, possédant peu
d’expérience ou de connaissances, à moins qu’elles soient sous la surveillance d’une
personne responsable de leur sécurité, avec les instructions d’utilisation de l’appareil.
Les enfants doivent être surveillés pour s’assurer qu’ils ne jouent pas avec l’appareil.
- Les enfants de moins de 3 ans doivent restés hors de portée de l’appareil à moins
d’être surveillés continuellement. Les enfants de 3 ans et moins de 8 ans peuvent
allumer// éteindre l’appareil seulement s’il a été placé ou installé dans sa position de
fonctionnement normal et s´ils sont surveillés ou s´ils ont reçu des instructions relatives
à l’utilisation de l’appareil de manière sûre.et qu’ils comprend les risques que présente
l’appareil.
- Les enfants âgés de 3 à 8 ans ne doivent pas ni régler, ni nettoyer l´appareil, ni effec-
tuer des opérations de maintenance.
- Cet appareil peut être utilisé par des enfants de plus de 8 ans et par des personnes
souffrant d’un handicap physique, sensoriel ou mental, ou sans expérience ni con-
naissances, à condition qu’ils aient été correctement formés et supervisés par une
personne comprenant les risques.
13. Éteignez et débranchez le climatisseur adiabatique avant de le nettoyer.
14. Si vous n’allez pas utiliser l’appareil pendant une longue période, débranchez-le et
videz le réservoir.
15. Changez l’eau régulièrement afin de conserver l’eau propre.
16. Ne plongez jamais l´appareil, ni le cordon d´alimentation ou la fiche électrique dans
l´eau.
REMARQUE
Pour éviter tout risque d’électrocution, ébranchez l´appareil une fois éteint avant de le net-
toyer.

DESCRIPTION DU PRODUIT
Roues
Réservoir d´eau
Filtre à poussière
Télécommande
Télécommande
Télécommande
Récepteur pour la télécommande
Ventilateur supérieur
Ventilateur inférieur
Rideau d´eau

PRIEMIÈRE UTILISATION
1. Ouvrez l´emballage et déballez le produit.
2. Assurez vous qu’il y a suffisamment d’espace disponible avant de commencer le
montage
3. Retirez le réservoir d’eau pour le remplir.
4. Versez de l’eau propre jusqu’au l´indication MAX et replacer le réservoir à sa place et
séchez toute l’eau restante. Si vous rencontrez des difficultés pour placer le réservoir
dans la position correcte, lisez la section “Nettoyage et entretien”
5. Pour utiliser des glaçons, ouvrez le réservoir et insérez-les à l’intérieur du réservoir
d’eau.
6. Branchez l’appareil
MODES DE FONCTIONNEMENT
a.
b.
Panneau du contrôle
Table of contents
Languages:
Other Elnur Gabarron Air Conditioner manuals


