Elura SUBR10IC User manual
model SUBR10IC
high performance
custom installed subwoofer
EQ 1 EQ 3
POWER MODE
EQ 2
SPEAKER OUTPUT
LINE IN
L
R
LFE IN
CROSSOVER PHASE
(Su b 1+Sub 2 ) minim um 4Ω
Total I mpeda nce
SUB 1
+
-
SUB 2
+
-
DC 12V
IN
OUT AUTO
ON
SETTINGS
TRIGGER
50 200 0°180°
S/N:
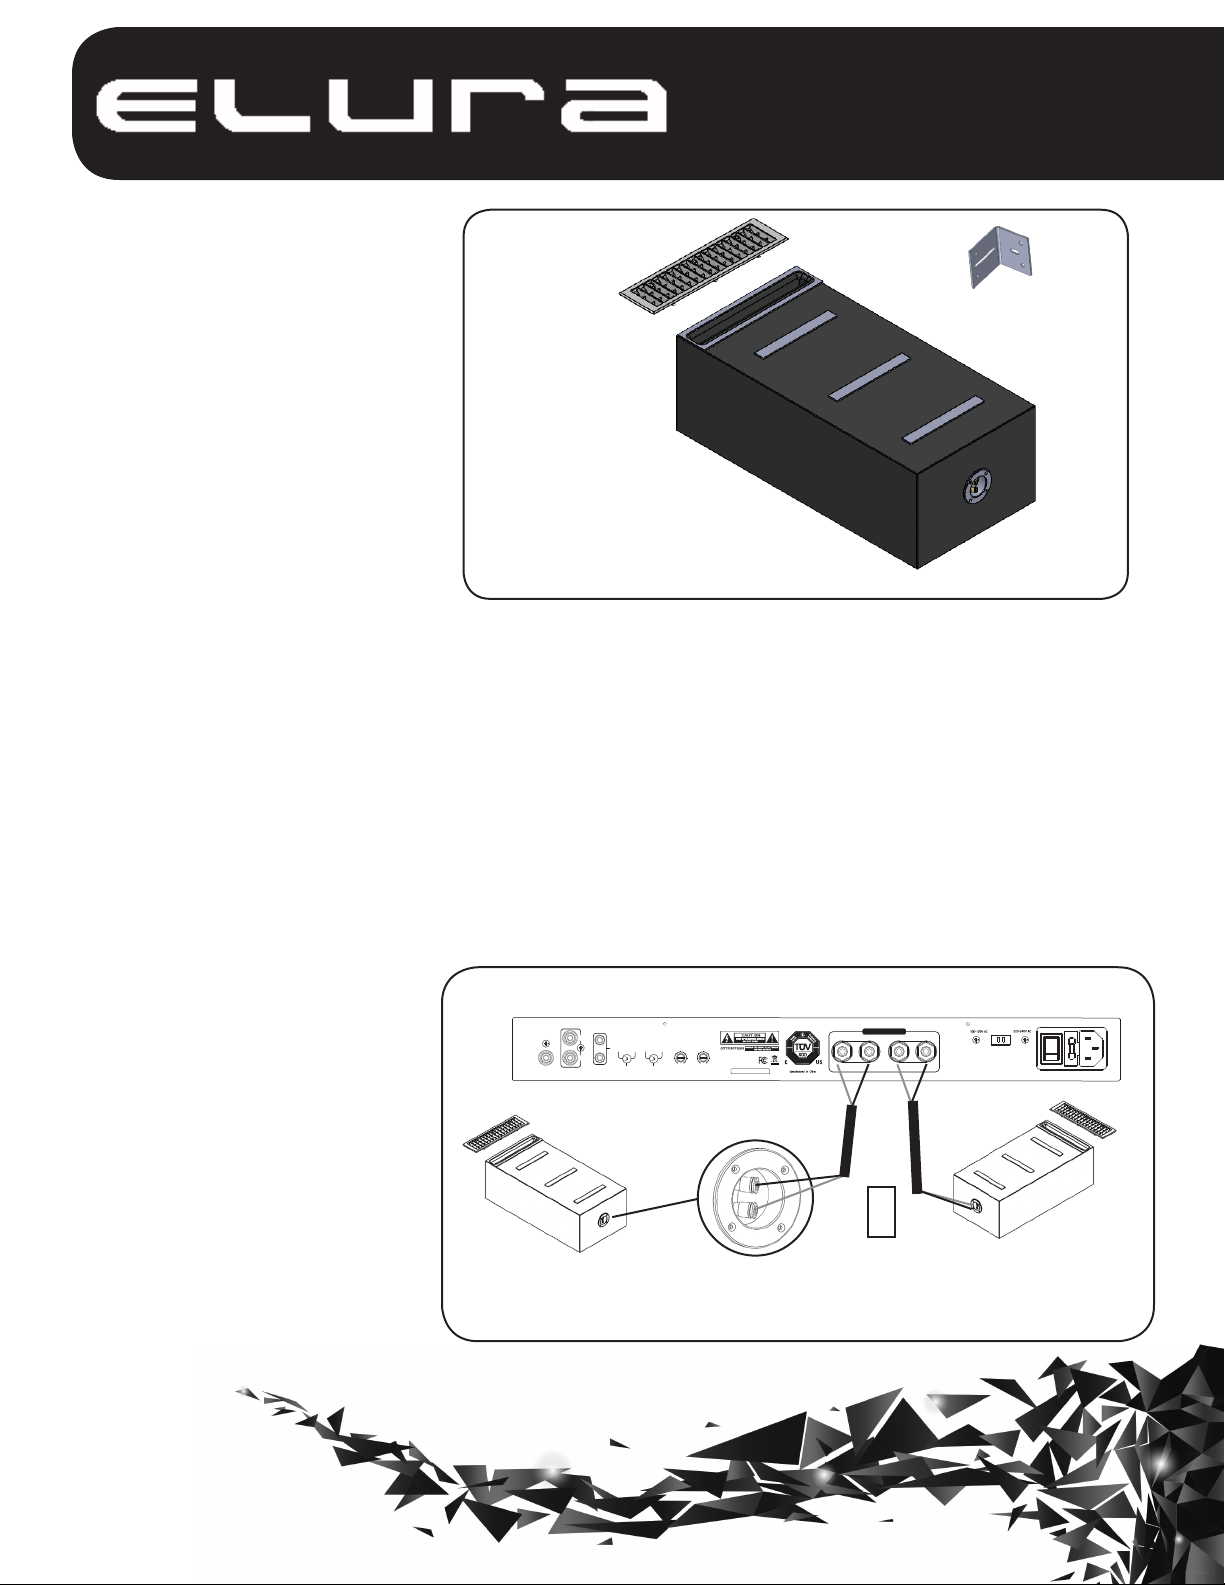
Speaker Terminal Cup
Elura AMP500/1 Rear Panel
Subwoofer
Grille Kit
• Grille
• 6 - Painted screws
• 1 - Grille Gasket
Accessories
• 5 - Acoustic foam strips
• 1 - MDF Cover / Template
• 1 - Retrofit Locating Template
Mounting Kit
• 16 - Screws
• 4 - L brackets
-
* Note: You can add
up to (2)SUBR10IC
subwoofers to (1)
Elura AMP500/1
Sub 1
Sub 2
+
Features.
• Conveniently hide the subwoofer
into a ceiling or floor joists without
degrading performance.
• Long throw 10” woofer.
• Braced and slot-vented rigid MDF
enclosure.
• Designed to use anHVAC like vent
grille to blend into the environment.
• Engineered to work with Elura
subwoofer amp, model AMP500/1.
Overview.
Thank you for purchasing Elura speaker
products. Elura is a high performance
custom installed product engineered
for movie and music enthusiasts. Each
Elura product is manufactured to the
highest quality standard using state of
the art components and built for years
of enjoyment.
Considerations.
Before connecting, mounting or
installing any Elura products, please
read all instructions. Careful
considerations should be given to avoid
obstacles such as electrical wires,
plumbing or HVAC products.
If you are unsure or inexperienced with
construction methods, please consult a
professional.
Use the proper tools and pay close
attention to detail while connecting the
speaker wires. Make sure all equipment
is powered off while connecting and
disconnecting any equipment.
Improper use, not following precautions
or instructions may cause damage to
property, equipment, and possible injury
or electrocution.
Contents.
• Elura SUBR10IC
• All hardware needed to attach
the speaker enclosure onto the
ceiling or floor joists.
• Sound deadening foam adhesive
strips
• HVAC like speaker grille &
screws
• Retrofit locating template
• Installation Manual
Connections.
Connect the subwoofer speaker
connections to high-quality 14 to 16
gauge stranded CL3 speaker wire and
connect to the AMP500/1 speaker
output connections. The stripped bare
ends of the speaker wire may be
connected directly to the speaker’s
binding posts. Twist the speaker wire
to avoid strands from shorting from
one connection to the other and pay
careful attention to polarity (+ / - ).

model M-SUBR10IC
high performance
model SUBR10IC
high performance
custom installed subwoofer
Speaker Wire Connections
to AMP500/1
Use screws provided to
mount the brackets to the
joists.
Grille Kit
Includes:
- Gasket
- Painted Screws
- Grille
Studs
Acoustic
Dampening
Foam Strips
Grille Slot
Brackets
Terminal Cup
General Maintenance.
If mounting in the floor, debris can end
up sitting on the subwoofer cone.
Occasionally remove the grille to
vacuum out the debris. Be careful not
to damage the speaker. Avoid spilling
water or other liquids into the grille and
onto the speaker. Use caution when
cleaning floors.
Warranty.
All Elura products come with a
limited liability warranty. This
warranty includes parts and labor
repairs on all components found to be
defective in material or workmanship
under normal conditions of use. This
warranty shall not apply to products
which have been abused, modified or
disassembled.
A speaker that fails under conditions
other than those covered will be re-
paired at the current price of parts and
labor in effect at the time of repair. Such
repairs are warranted for 90 days from
the day of reshipment to the BUYER. If
the unit is delivered by mail, customers
agree to insure the unit or assume the
risk of loss or damage in transit.
Under no circumstances will a unit be
accepted without a return authorization
number. The warranty is in lieu of all
other warranties expressed or implied,
including without limitations, any other
implied warranty or fitness or merchant-
ability for any particular purpose, all of
which are expressly disclaimed. Proof of
sale may be required in order to claim
warranty.
www.elura.audio
Specifications.
•Woofer: 10” Long Throw,
2” Voice Coil
• Impedance: 8Ω
• Sensitivity: 90 +/- 3 dB
• Freq. Response: 25 to 140 Hz
• Inputs: Gold Plated, Spring Loaded
Push Terminals
• Power Handling: 300 Watts
• Dimensions: 26.6” (675mm) L x
13” (330mm) W x 9.2” (233mm) D
• Weight: 34lbs
Speaker Placement.
The versatility of the Elura custom
installed subwoofer offers hidden
performance and opens up floor space.
The subwoofer installs in a standard
floor or ceiling joist construction. Take
note of the speaker connections before
mounting and wiring. Take precautions
to properly mount the speaker and
avoid obstacles commonly found inside
ceilings and floors. All hardware for
mounting and installation is included.
Installation Notes.
This subwoofer works best if mounted
using the correct hardware provided.
The SUBR10IC is a heavy product.
When installing overhead, have
a co-worker give you a hand. Avoid
choosing areas on the ceiling near
lights, wall sconces or other mounted
objects. Subwoofers can shake and
vibrate walls.
Pre-Construction Ceiling
& Floor Installations.
Attach the mounting brackets to each
corner of the subwoofer as shown.
Apply the additional sound deadening
foam strips to areas that may cause
unwanted noise. Mount the brackets to
the joists with the supplied screws.
Completely tighten down the screws to
avoid any vibrations. The SUBR10IC
comes with a 1/2” protective MDF
cover installed. This MDF cover can also
be used as a cut out template for the
white plastic grille. If the SUBR10IC is
installed before the drywall or flooring is
installed, leave the MDF cover installed
so that the installers can cut around the
MDF cover. After the drywall or flooring
is installed, remove the MDF cover and
install the white plastic and supplied
gasket, if necessary.
Retro Fit Ceiling
Installations.
If you are installing the SUBR10IC into a
finished ceiling or floor, first find a
suitable location away from light
fixtures, duct work, plumbing or
anything else that the subwoofer can
rattle/shake. Mark off the dimensions of
the SUBR10IC and protective MDF
cover using the supplied template to
locate the grille opening. Remove the
MDF cover and utilize it as a cut out
template for the grille. Attach the
mounting brackets to each corner of the
subwoofer as shown. Apply the
additional sound deadening foam strips
to areas that may cause unwanted
noise. Mount the brackets to the joists
with the supplied screws. Completely
tighten down the screws to avoid any
vibrations. Install the white plastic grille
and the supplied gasket if necessary.
MSTR
This manual suits for next models
1
Other Elura Subwoofer manuals


Popular Subwoofer manuals by other brands

Lithe Audio
Lithe Audio LWF1 instruction manual

B&C Speakers
B&C Speakers Woofer 10PS26 specification

Magnat Audio
Magnat Audio ALPHA RS 8 Owner's manual/warranty document

Anthony Gallo Acoustics
Anthony Gallo Acoustics TR-3 owner's manual

Roth Audio
Roth Audio OLi KH30 owner's manual

DLS
DLS Magnesium MW10 instruction manual


