Elwa HOTRUN X24 Instruction Manual

- 1 -
HOTRUN X24
Electric Instantaneous Water Heater
Installation & User Manual
Keep this instructions manual in a safe place once your unit is installed,
you may need to refer to it for general instructions or future maintenance.

- 2 -
Safety Instructions
1. For continued safety of this water heater, it must be installed, operated and
maintained in accordance with the manufacturer’s instructions.
2. This water heater may deliver water at a high temperature. Refer to the
plumbing code of Australia (PCA) and/or any further local requirements and
installation instructions to determine if additional delivery temperature control
is required.
3. When positioning the water heater, ensure that the electrical supply cord is not
trapped or damaged. If the electrical supply cord is damaged, it must be
replaced by the manufacturer, its service agent or similarly qualified persons
authorised by Elwa to avoid a hazard.
4. This water heater is not intended for use by person/s (including children) with
reduced physical, sensory, intellectual capabilities or lack of experience and
knowledge unless the person/s –
•are given specific instructions how to safely operate the water heater.
•are directly supervised concerning the safe operation of water heater.
•are made aware of the hazards involved in the use of the water heater.
by a person responsible for their safety.
5. Shower heads and aerators in tapware must be descaled regularly.
6. DO NOT SWITCH ON, if there is a possibility the water inside the water heater
is frozen.
7. To avoid a hazard due to inadvertent resetting of the thermal cut-out, the
power supply to this water heater must not be supplied through an external
switching device, such as a timer, or connected to a circuit that is regularly
switched on and off.
Please read and follow the installation and operation instructions carefully, to
ensure long life and reliable operation of this HOTRUN water heater.
Attention!
This water heater must be installed by a licensed plumber and electrician.
Not doing so will void all warranties.
Under no circumstances should you attempt to install, repair, or disassemble
the HOTRUN water heater Hotrun without first isolating POWER to the water
heater at the circuit breaker and lock-out & tag that circuit. Warranty is void if
not installed according to all instructions in this manual.

- 3 -
Content
Page:
2. Safety Instructions
3. Content, Product Features
4. General Installation Guidelines, Opening the casing
5. Power cord / Cable, Mounting instructions
6. Water Connections, Non/concealed installation
7. Electrical Connections
8. Electrical Diagram, Technical Specifications
9. Operation Instructions, Troubleshooting
10.Components
11.Warranty
12.Correct disposal of this product
Product Features
ELWA Hotrun water heaters are manufactured with patented heating technology
incorporating multiple safety devices. The Hotrun X24 has the following features:
1. Instantaneous heating for on demand hot water, no pre-heating, no stand-by
losses. This feature can save 60-70% power consumption compared to storage
type water heaters.
2. Patented heating technology. Water channels are completely separated from
electric elements in solid metal heat exchanger.
3. Display diagnostic – The water heater can last you a lifetime, but if any parts ever
fail, a fault-code will appear in the display to indicate what the problem is.
4. Micro-processor control of power & water consumption that can also be used to
calculate water & energy usage, and efficiency (with optional LoRa
communication in future models).
- 4 -
General Installation Guidelines.
The installation must be compliant with the local electrical and plumbing
standards.
1. Please make sure the main power supply circuit breaker, water pressure, earth
connection, cable & wire size meet the installation requirements.
2. The water heater MUST always be connected to an uninterrupted solid earth
connection directly from to the main earth connection in the switchboard.
3. This water heater MUST be connected to a dedicated electrical circuit breaker.
4. DO NOT install this water heater near an open fire or a strong magnetic field.
This model water heater can only be mounted in a vertical position.
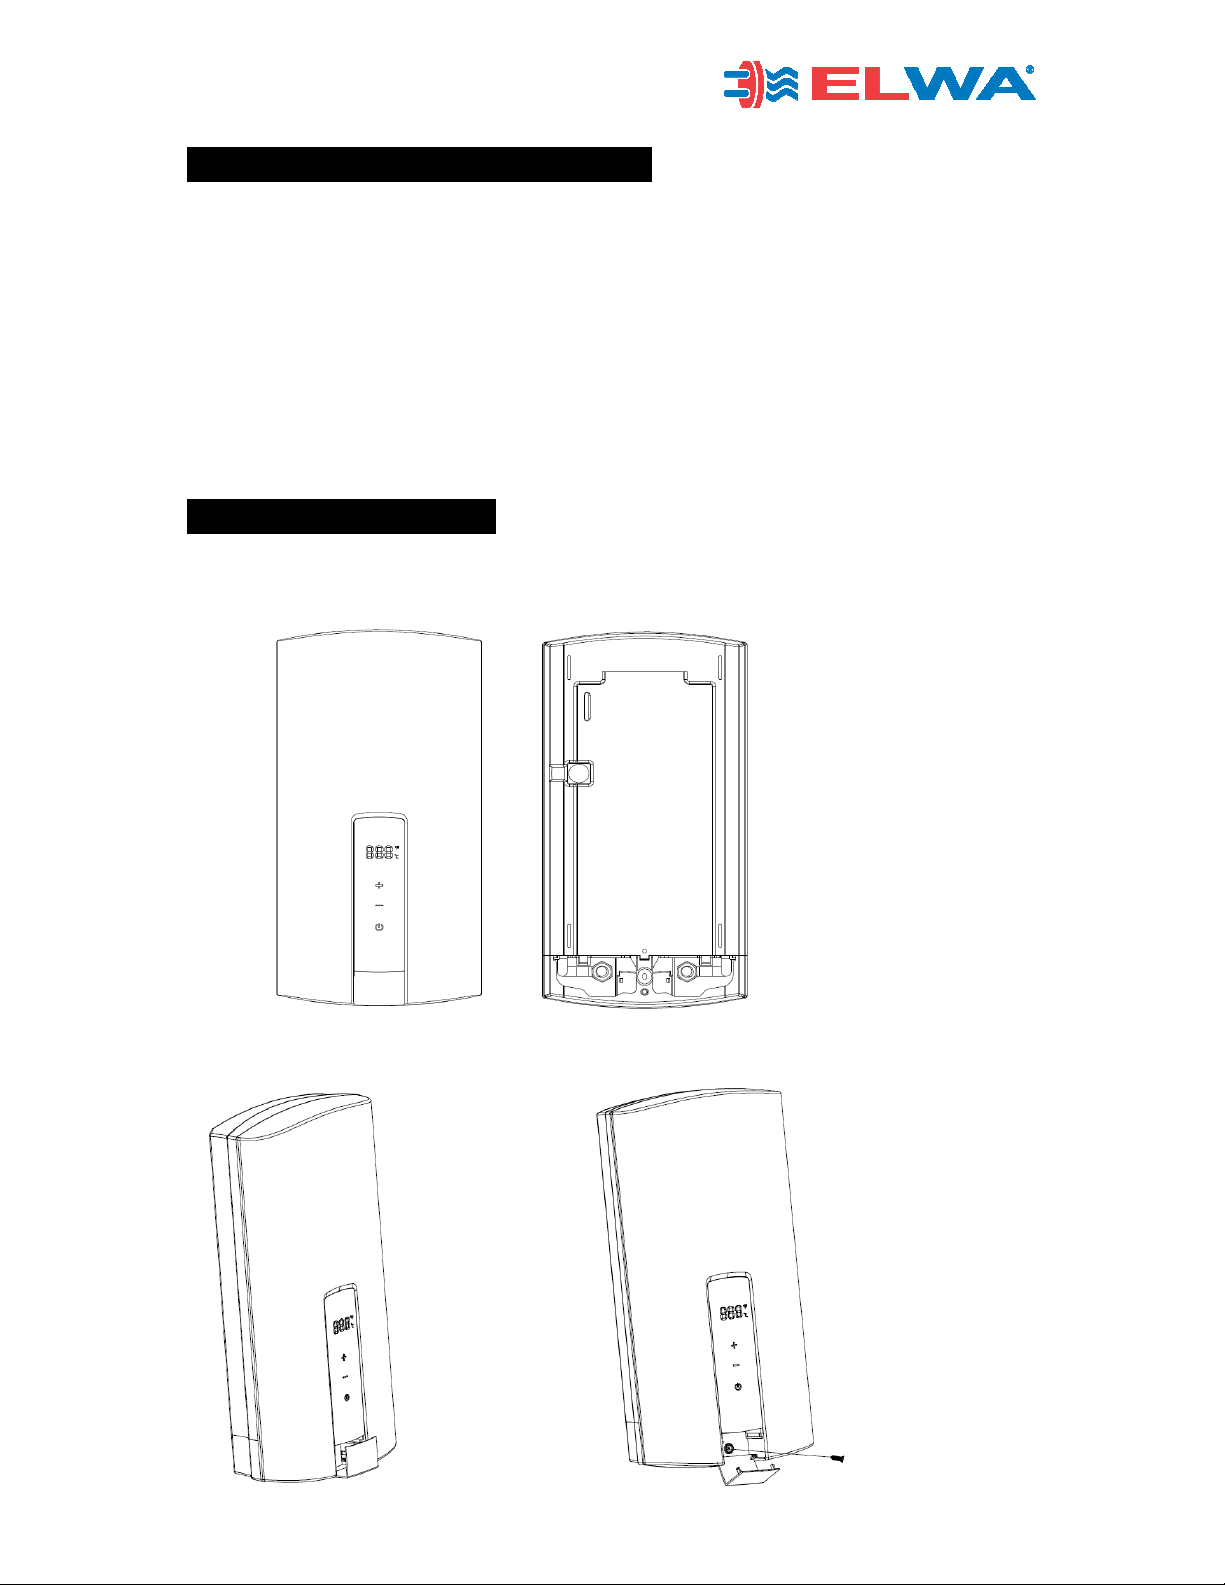
Opening the casing
Choose an appropriate location to install the water heater.
Fig 1: Front and back of the water heater
Fig 2: To open the front cover of the casing – press the small cover at the
bottom-centre downwards and open to access the screw to release the cover.
- 5 -
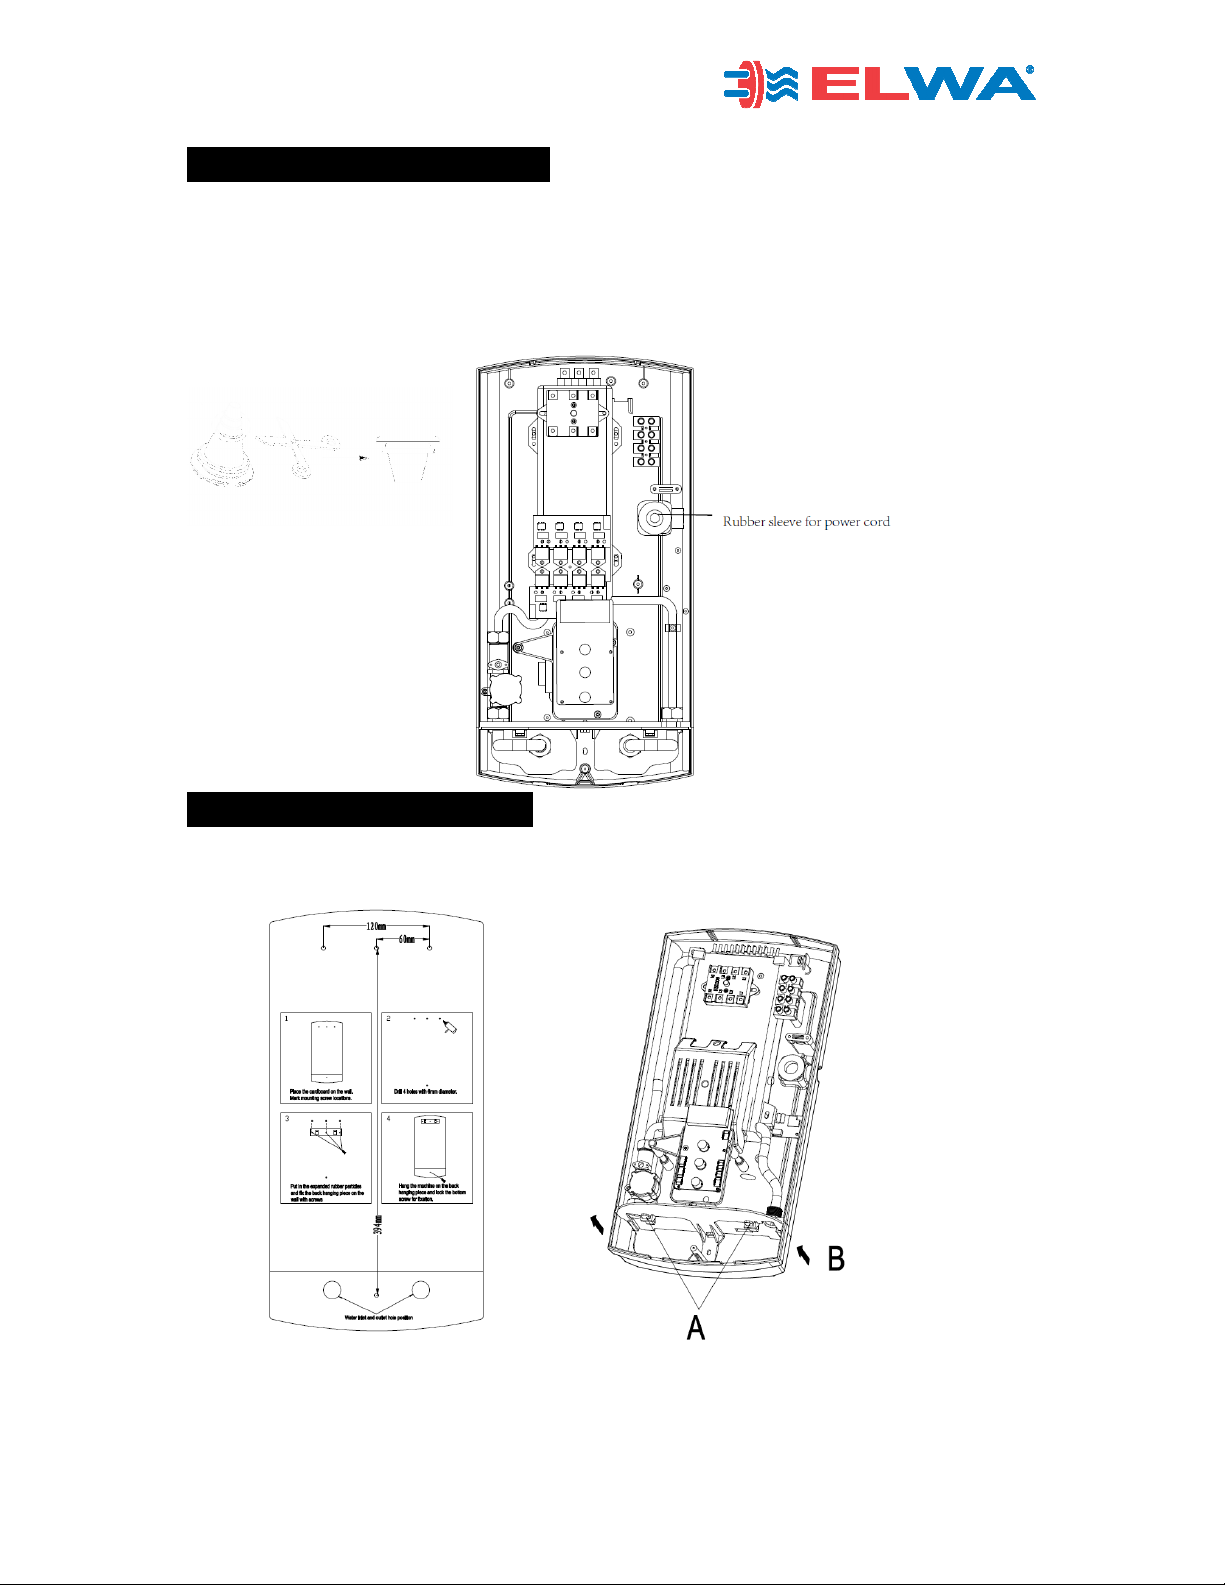
Entry power cord/cable
Fig 3: If you need to replace the supplied flexible power cord by hard wiring, remove
the supplied flexible cord, use the rubber grommet (adjust to the required size) for the
new power cable to be used. Pass the cable through the rubber grommet and
terminate the wires firmly to the terminal block. Terminate the power cable to the
terminal blocks with L1, L2, L3 and Earth wires as indicated.
Mounting instructions
Fig 4: Mark the holes for wall mounting using the supplied template, drill the holes
with Ø6mm wall plugs and fit the mounting bracket to the wall.
Install the mounting bracket on the wall according to the template supplied.
Slide the water heater onto the bracket and secure with the bottom screw inside the
bottom compartment.

- 6 -
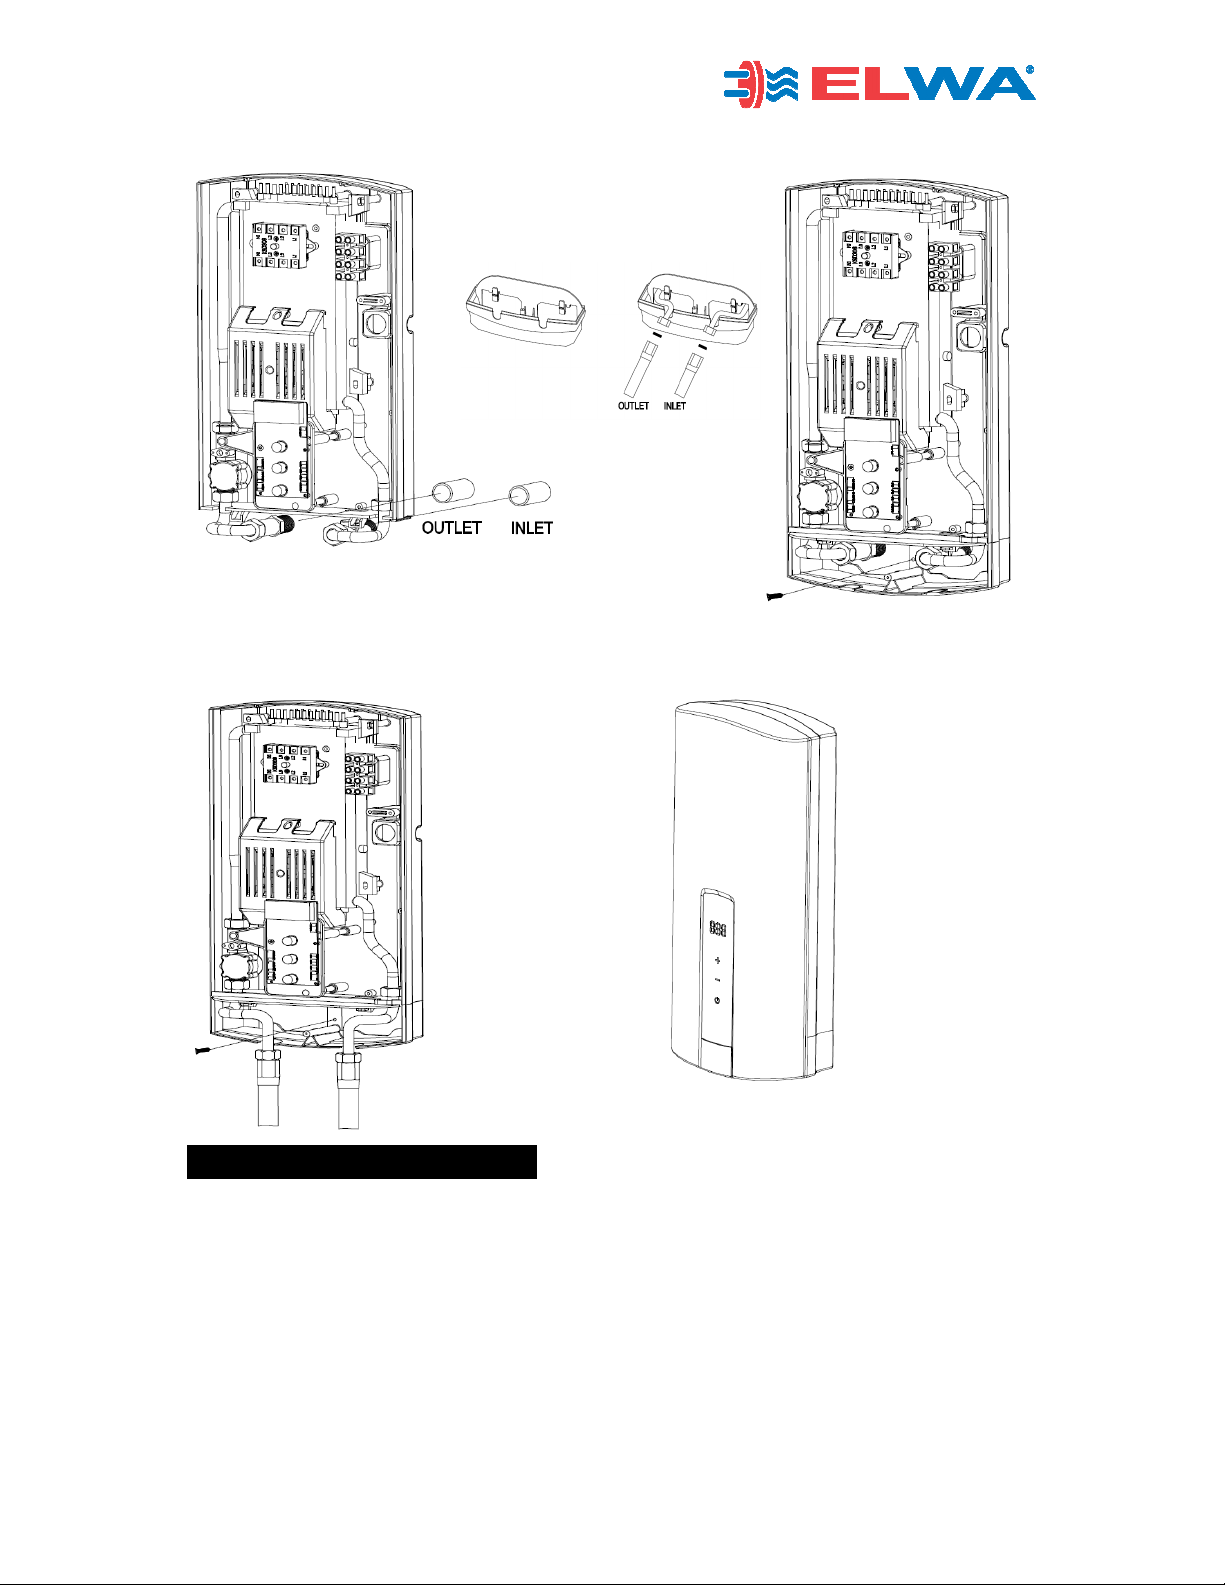
Water connections
1. The HOTRUN X range of water heaters can be connected to a mains cold water
supply with a pressure of minimum 60KPa and maximum of 1.2MPa. On a rainwater
supply the water must be filtered and have a constant and stable pressure & flow rate
to avoid temperature variations during use.
2. The hot and cold-water connections can not be swapped, the Hotrun will fail to turn
on. Blue marked fitting is the cold-water inlet, Red marked fitting is the hot water
outlet connection.
2. Flush pipes to remove any debris or loose particles.
3. Always use the 1/2
"
/ 15mm full bore isolation valve in the cold-water supply and
flat-sealing flexible hoses supplied to connect the hot & cold water for both concealed
and surface mounted pipework. The flexible hoses supplied are rated to the pressure
and highest temperature of the Hotrun and Watermark approved.
4. Install supplied fiber washers in all connections. After completing the water
connections check thoroughly for any leaks and fix before proceeding.
5. When replacing an existing water heater that is already connected with flexible
hoses, do not re-use any old flexible hoses. Install the new water heater with the new
flexible hoses supplied with each Hotrun X.
When tightening the water connections, avoid any force on the water heater fittings
that can cause damage inside the water heater (not covered by warranty).
Connect incoming cold water to the blue marked fitting outgoing hot to the red marked
fitting with the supplied flexible hoses. You can remove the bottom cover part by
pressing the two locking tabs at point A and pulling the lower section B of the back
panel upwards (see fig. 4)
Connect inlet water connector with the water flow control valve and outlet water
connector with the supplied green fiber washers only.
IMPORTANT: Plumbing tape MUST NOT be used on the connectors.
The flow needs to be set according to the selected kWatt power, see specifications on
page 8.
For concealed installation (Fig 5-A), you can remove the bottom part of the cover to
secure the corrugated stainless steel flexible hoses to the inlet water connector with
the shut-off valve (if possible) and the outlet water connector, slide the bottom part
back onto the main base and secure with the lower screw.
For non-concealed installation (Fig 5-B), install the lower cover part onto the main
base, connect the inlet and outlet pipes to the pipework holding the fittings in place
with a spanner to avoid rotating internal pipework and leaks. Secure the water pipes
to the inlet water connector with the shut-off valve and outlet water connector.
- 7 -
Fig 5-A: Concealed installation
Use the 2 supplied stainless steel flexible hoses.
Internally to connect the hot & cold-water
pipes
coming out from the wall
Fig 5-B: Surface installation Fig 6: Put front cover back onto the heater
Electrical connections
1. Before starting the electrical installation, ensure that the power supply is isolated,
locked out & tagged to avoid any danger of electric shock.
2. Mounting and plumbing must be completed before proceeding with electrical
connections.
3. All electrical work must comply with national & local electrical standards.
4. Water heater must be connected to a secure earth & dedicated electrical circuit
supplying the correct voltage & current rating.
5.Terminate the power cable wires securely to the terminal block and circuit breaker.
- 8 -
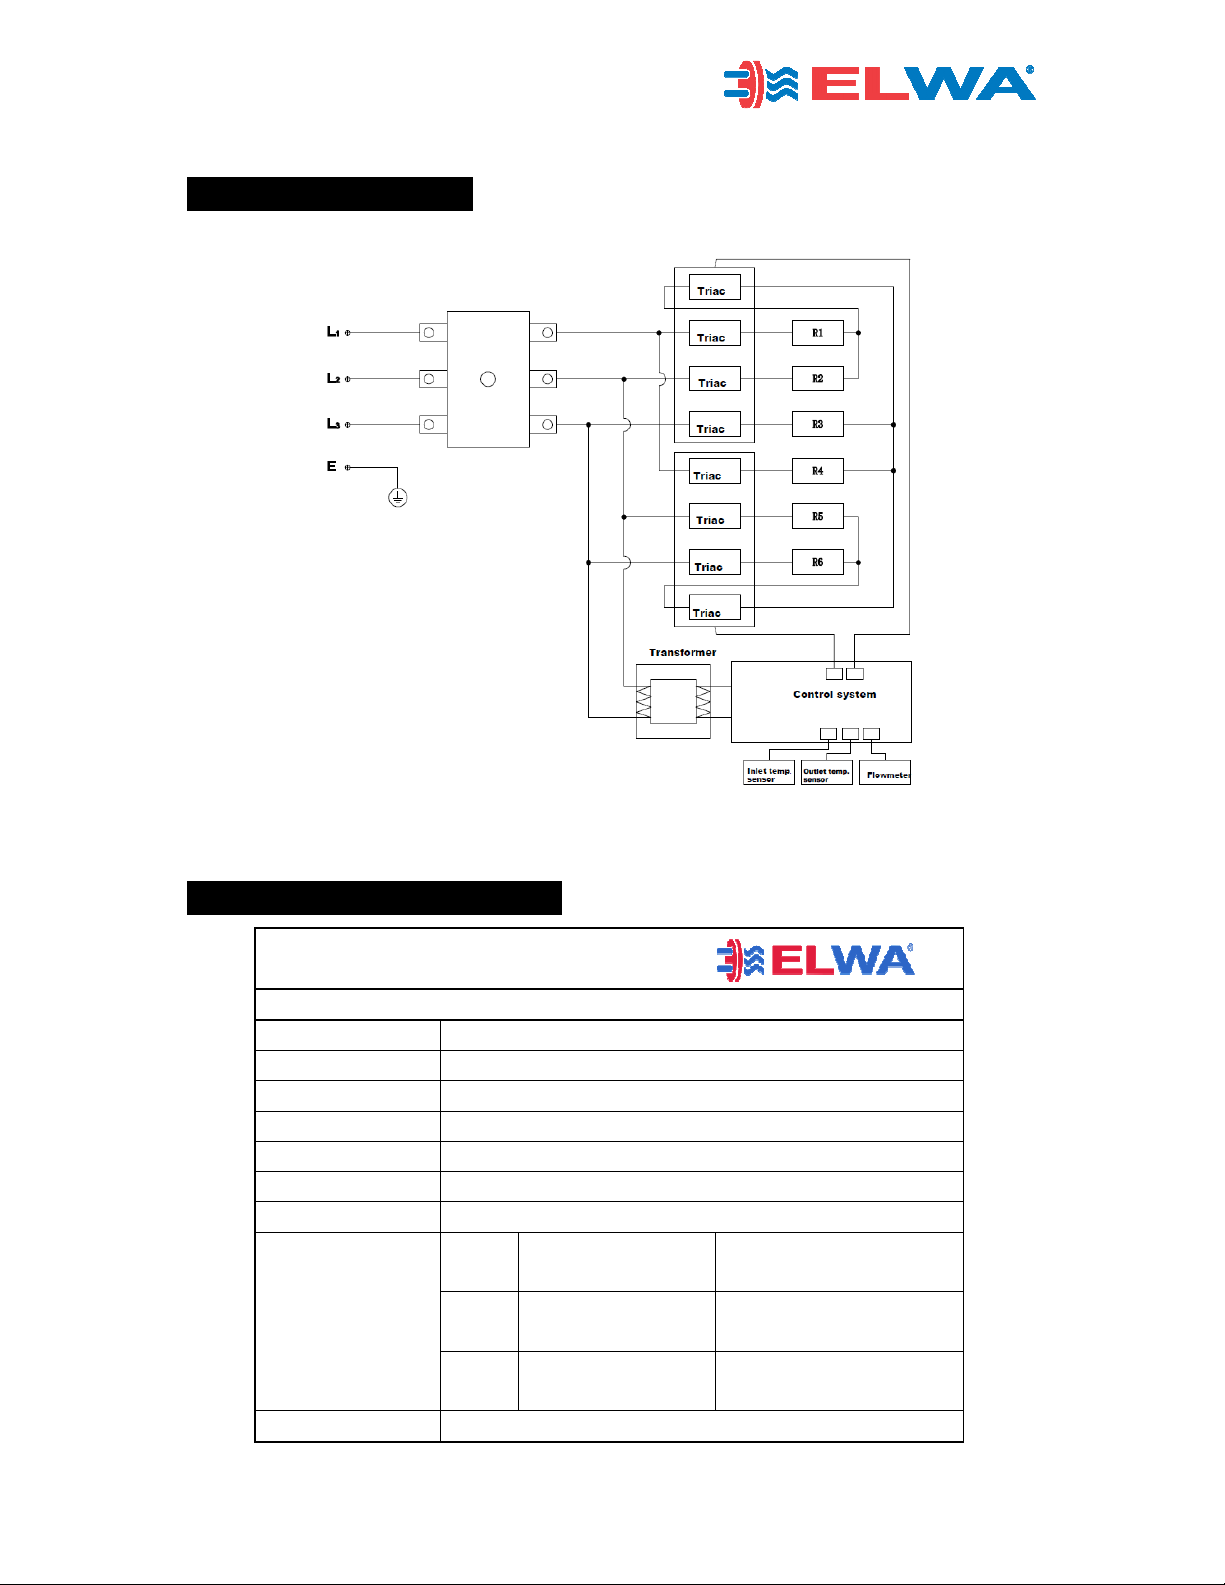
Electrical Diagram.
Technical Specifications.
Hotrun X24
3-Phase power connection (no neutral wire required)
Dimensions 480 x 240 x 120 mm
Power rating 12kW / 18kW / 24kW
Voltage 415 V
Current 3 x 16 / 3 x 25 / 3 x 35 Amps
IP rating IP24
Connection 1/2" BSP
Weight 6 kg
Performance (at
ΔT = 25°C)
Set to
12kW
Flowrate 8 L/min 415V-3x16Amps
Set to
18kW
Flowrate 12
L/min 415V-3x25Amps
Set to
24kW
Flowrate 14
L/min 415V-3x40Amps
Water pressure
1.2 MPa max
- 9 -
Operating Instructions.
1. Run the water for a few minutes until water flow is continuous and all air is purged
from the pipework and the water heater before activating power supply.
2. After the power supply has been turned on the water heater will beep; the display
will illuminate for 2 seconds and Hotrun will enter a standby mode.
3. Press “ ” to turn ON/OFF. When the Hotrun is ON, the LED display will show the
set temperature for 2 seconds, then the display will show the actual outlet water
temperature. The display will time out after 30 seconds, the screen switches to the
screensaver mode (the display screen will be off) The screen will become activated
again when you touch one of the buttons or when there is demand for hot water.
4. Press the up or down button to adjust the outlet temperature. The temperature can
be set from 30°C to 60°C.
5. After a power supply interruption, the memory function will retain the set
temperature & limiter as previously set.
6. To Lock the control panel: Touch & hold the up & down button for 5 seconds to lock
the operation panel and display code ”Loc”, will appear. Then touch & hold up & down
for 5 seconds to unlock the operation panel, and display code ”UnL” will appear
Troubleshooting
If the heating has been paused, you may initially get a short burst of hot water
when you open the tap again. Please run the water through for a few seconds to
let the temperature settle down. Always check the outlet hot water temperature to
avoid scalding.
If the heater Hotrun is not being used in winter and to avoid the water heater to be
exposed to the risk of freezing, isolate power & water supplies & drain out water
completely.
Periodically clean the inlet strainer, aerators in taps and shower heads from
debris and calcium build-up.
Over temperature protection: When the outlet water temp. rises over 65°C, the water
heater will enter pause mode and cease operation until the temperature drops below
51°C. The display will show E1 when the outlet water temperature exceeds 72°C
Fault codes Possible Causes Corrective Actions
LED displays
E1
Outlet temp. is over
72
℃
.
Faulty temperature sensor
or Triac to replace
LED displays
E3
Inlet temperature sensor
failure or loose plug
Plug in tighter
Replace the temperature
sensor
LED displays
E4
Outlet temperature
sensor failure or loose
plug
Plug in tighter
Replace the temperature
sensor

- 10 -
Components.
Note: Do not attempt to repair this water heater yourself. Call a licensed service
person for assistance. Always shut off the power supply while performing
maintenance.
Accessories supplied:
X24 Water Heater
4 Fiber washers, 2 flexible
hoses, plugs and screws
Operation and Installation
instructions, wall template
Approval Standards: IEC/AS/NZS 60335.2.35 & AS3498

- 11 -
Warranty.
On the provision that the installation instructions have been followed, ELWA gives a
warranty of twelve months onsite service in Australia and the 2
nd
year return and
repair service. The warranty begins on the date of purchase as per the invoice.
Elwa goods come with guarantees that cannot be excluded under the Australian
Consumer Law. You are entitled to receive a replacement or refund in case of a major
failure and compensation for any other reasonably foreseeable loss or damage. You
are also entitled to have the goods repaired or if the goods fail to be of acceptable
quality and failure does not amount to a major failure.
If, despite our extensive product control, complaints arise, first inform your installer to
make sure the power and water supply to the water heater are fine. Your installer can
call the ELWA service department when on site if any questions arise. Before you
contact the installer, we advise you to read the directions for use. You can avoid
needless discomfort and possible costs.
After following the instructions in the above paragraph and you or your installer
cannot fix the problem, contact our office, and if your installer can’t solve the problem,
fill in a service request form on our website www.elwa.com.au/customerservice
Warranty Terms:
The warranty claim is valid only on presenting the original invoice, a copy of the
certificate of compliance when the Hotrun was installed, stating the date of purchase,
the name of the supplier/installer and the model & serial number of the Hotrun, name,
address, all contact details of the owner, description of fault, address and contact
where the Hotrun is located, providing a signature agreeing & accepting the terms
should request for service be proven to not be a Elwa product fault but an installation
fault. In that case a call-out fee and labour costs can be charged to the person making
the request. ELWA will repair or replace, subject to the warranty exclusions and at our
discretion, a faulty component under warranty, the warranty period is not extended
from the time of the repair or replacement.
Warranty Exclusions:
ELWA may void the warranty if the invoice is not legible.
If the barcode or serial number is missing, the warranty will be voided.
The warranty will be voided from the moment the water heater has been tampered
with or has been modified in any way.
Damages caused because of improper use, or faulty installations are not covered by
warranty. Incorrect installation or maintenance issues such as blocked filters in
aerators or flow restrictors, too low or too high-water supply pressure etc. are not
warrantable items and may result in a charge from ELWA or the contractor
responsible for the service call out service.

- 12 -
Warranty can be voided when too much force is used on the water connections and
that has damaged the pipes & fittings inside the water heater. Only the supplied
flexible hoses are to be used for hot and cold-water connections.
If the Hotrun was not installed by a licensed tradesperson.
Damage to the Hotrun through normal wear and tear is not covered.
Damage to the Hotrun via incorrect or faulty power supply, electric surges or
lightning strikes, including all other actions of the natural elements.
Connection to faulty equipment. Accidental or malicious damage.
Non approved or non-genuine parts used on or inside the water heater.
Correct disposal of this product
© Copyright to Elwa Group of companies, nothing from this manual can be
reproduced by others without written permission from Elwa Pty Ltd Australia.
This manual has been made with care, Elwa holds the right to adjust products in
the future for various reasons.
Product by:
Elwa Pty Ltd
Australia
Phone +61 (0)8 8377 6666
Email service@elwa.com.au
www.elwa.com.au
Manual V2-2023
This symbol on the product, or in its packaging,
indicates that this product may not be treated as
household waste. Instead, it should be taken to the
appropriate waste collection point for the recycling of
metals & electronic equipment to ensure this product
is disposed of correctly. This action will help prevent
potential negative consequences for the environment
and human health, which could otherwise be caused
by the inappropriate waste handling of this product.
For more detailed information about the recycling of
this product, please contact your local council, your
household waste disposal service, or the retail outlet
where you purchased the product.
Table of contents
Other Elwa Water Heater manuals


Popular Water Heater manuals by other brands


Lochinvar
Lochinvar GAS HEATER FOR COMMERICAL POOL Installation and service manual

Mestek
Mestek 108A Installation & parts manual

American
American BCL380T1206NOX instruction manual

Lowenergie
Lowenergie Solar Pool user manual

Burco
Burco 76500 Instructions for use

EverHot
EverHot 271 SERIES Owner's guide and installation instructions

Rheem
Rheem 54KW datasheet

A.O. Smith
A.O. Smith Promax Tall ECT-30 Specification sheet

VOKERA
VOKERA Indirect SC 120L installation instructions

Slant/Fin
Slant/Fin SENTINEL SE-42 Installation and operating instructions

Danfoss
Danfoss Termix VMTD-F-B instructions

Thermaflow
Thermaflow TH-750 Series Operation manual