emerio WC-126433 User manual


- 1 -
Content –Inhalt –Teneur –Inhoud
Instruction manual –English......................................................................................- 2 -
Bedienungsanleitung –German...............................................................................- 18 -
Mode d‘emploi – French..........................................................................................- 35 -
Gebruiksaanwijzing –Dutch.....................................................................................- 53 -

- 2 -
Instruction manual –English
SAFETY INSTRUCTIONS
Before use make sure to read all of the below instructions in
order to avoid injury or damage, and to get the best results
from the appliance. Make sure to keep this manual in a safe
place. If you give or transfer this appliance to someone else
make sure to also include this manual.
In case of damage caused by user failing to follow the
instructions in this manual the warranty will be void. The
manufacturer/importer accepts no liability for damages
caused by failure to follow the manual, a negligent use or use
not in accordance with the requirements of this manual.
1. Read and save these instructions. Attention: pictures in
the instructions are for reference only.
2. This appliance can be used by children aged from 8 years
and above and persons with reduced physical, sensory or
mental capabilities or lack of experience and knowledge if
they have been given supervision or instruction
concerning use of the appliance in a safe way and
understand the hazards involved. Children shall not play
with the appliance. Cleaning and user maintenance shall
not be made by children without supervision.
3. Children aged from 3 to 8 years are allowed to load and
unload refrigerating appliances.
4. If the supply cord is damaged, it must be replaced by the
manufacturer, its service agent or similarly qualified
persons in order to avoid a hazard.
5. WARNING: Keep ventilation openings, in the appliance
enclosure or in the built-in structure, clear of obstruction.
6. WARNING: Do not use mechanical devices or other means
to accelerate the defrosting process, other than those
recommended by the manufacturer.
7. WARNING: Do not damage the refrigerant circuit.

- 3 -
8. WARNING: Do not use electrical appliances inside the food
storage compartments of the appliance, unless they are of
the type recommended by the manufacturer.
9. Do not store explosive substances such as aerosol cans
with a flammable propellant in this appliance.
10. This appliance is intended to be used in household and
similar applications such as
-staff kitchen areas in shops, offices and other working
environments;
-farm houses and by clients in hotels, motels and other
residential type environments;
-bed and breakfast type environments;
-catering and similar non-retail applications.
11. WARNING: When positioning the appliance, ensure the
supply cord is not trapped or damaged.
12. WARNING: Do not locate multiple portable socket-outlets
or portable power supplies at the rear of the appliance.
13. To avoid contamination of food, please respect the
following instructions:
-Opening the door for long periods can cause a significant
increase of the temperature in the
compartments of the appliance.
-Clean regularly surfaces and accessible drainage systems.
-Clean water tanks if they have not been used for 48h;
flush the water system connected to a water supply if
water has not been drawn for 5 days. (Only applicable to
water dispenser and water inlet system.)
-If the refrigerating appliance is left empty for long
periods, switch off, defrost, clean, dry, and leave the
door open to prevent mould developing within the
appliance.
14. This refrigerating appliance is not intended to be used as a
built-in appliance.
15. Climate class:
-Extended temperate (SN): 'this refrigerating appliance is
intended to be used at ambient temperatures ranging
from 10°C to 32 °C';

- 4 -
-Temperate(N): 'this refrigerating appliance is intended to
be used at ambient temperatures ranging from 16 °C to
32 °C';
-Subtropical (ST): 'this refrigerating appliance is intended
to be used at ambient temperatures ranging from 16 °C
to 38 °C';
-Tropical(T): 'this refrigerating appliance is intended to be
used at ambient temperatures ranging from 16 °C to
43 °C'.
16. This appliance is intended to be used exclusively for the
storage of wine.
17. This refrigerating appliance is not suitable for freezing
foodstuffs.
18. Do not use it outdoors. Keep it away from sources of heat,
direct sunlight and humidity.
19. Children should be supervised to ensure that they do not
play with the appliance.
20. It is recommended to check regularly the supply cord for
any sign of possible deterioration, and the appliance
should not be used if the cable is damaged.
21. This appliance should not be used for commercial or
industrial purposes or for any purpose other than the one
for which it was designed. This appliance is intended for
wine storage.
22. Before inserting the plug into the mains socket, please
check that the voltage and frequency comply with the
specifications on the rating label.
23. To remove the plug from the plug socket, pull the plug. Do
not pull the power cord.
24. Do not wind the cord around the appliance and do not
bend it.
25. Do not connect the device to a power outlet that is not
protected from overloads.
26. Never use power boards with multiple sockets to connect
the device.

- 5 -
27. WARNING: Do not immerse the cord in water, handle the
electrical components or grip them with wet hands.
28. The power socket to which the appliance is connected
must be easily accessible, so it can be disconnected quickly
in an emergency.
29. Turn the appliance off before unplugging the power cord
from the socket.
30. This appliance is not intended to be activated by an
external timer, by a separate remote-control system or any
other device that automatically switches on the device.
31. If you do not use the appliance for a long period of time,
please turn it off and unplug it from the power supply.
32. Do not store explosive materials such as aerosol containers
with a flammable thruster in this device.
33. Any maintenance or repair of this device must be carried
out by a licensed professional. Do not attempt to repair the
device yourself.
34. WARNING: The ventilation openings on the appliance's
casing must remain uncovered. Be careful not to block
them.
35. WARNING: Do not use mechanical devices inside the
appliance.
36. WARNING: Do not dismantle or otherwise damage the
refrigeration system.
37. This appliance is heavy. Be careful when moving it.
38. When transporting the appliance, be careful not to damage
any part of the refrigeration system.
39. Important! Leave your device vertical for 24 hours before
plugging it in for the first time so the refrigerant gas can
equalize.
40. If your device has been horizontal during transport, wait 48
hours before turning it on.
41. After installation, make sure the appliance is not resting on
the power cable.
42. Never clean the appliance with flammable products. The
fumes could cause a fire or explosion.

- 6 -
43. WARNING: Do not use electrical devices to clean your
appliance.
44. Regarding the information pertaining to the installation,
handling, use, servicing, replacement of lamp (if applicable),
cleaning and disposal of the appliance, thanks to refer to
the below paragraph of the manual.
WARNING: Risk of fire / flammable materials
The coolant circuit of this unit contains the refrigerant
isobutane (R600a), a natural gas that is flammable and of high
environmental compatibility. Make sure no parts of the
coolant circuit get damaged during transport and installation
of the appliance.
If the coolant circuit is damaged:
avoid any open flames or ignition source;
disconnect the plug;
thoroughly air the room in which the appliance is installed
and contact an authorized technician.

- 7 -
WC-126433 EN
TRANSPORT AND PACKAGING
Transport the appliance
Transport the appliance, if possible, in vertical position. Otherwise, it is absolutely necessary to allow the
appliance standing upright for 24 hours before installation. Protect the appliance during transport against
weather influences.
Unpacking the appliance
Remove the appliance from its packaging.
To prevent hazards, check the appliance for any transport damage.
NOTE: Production residue or dust may have collected on the appliance. We recommend cleaning the appliance
according to chapter “Cleaning and Maintenance”.
APPLIANCE EQUIPMENT
Appliance overview
1. Fan
2. Control panel & digital display
3. Glass door
4. Metal shelf with wooden trim
5. Temperature sensor
6. Adjustable foot
INSTALLATION
Conditions for the installation location
Good ventilation is required around the appliance to dissipate the heat properly and to guarantee efficient
cooling operation at low power consumption. Enough clearance is necessary.
To ensure adequate ventilation of the appliance, allow a minimum of 15 cm between the appliance and
the nearby walls as shown in the illustration below.

- 8 -
Only install at a location with an ambient temperature suitable for the climate class of the appliance. The
climate class can be found under "TECHNICAL SPECIFICATIONS".
Place the appliance on a steady and safe surface. If the appliance is not horizontally leveled, adjust the
feet accordingly.
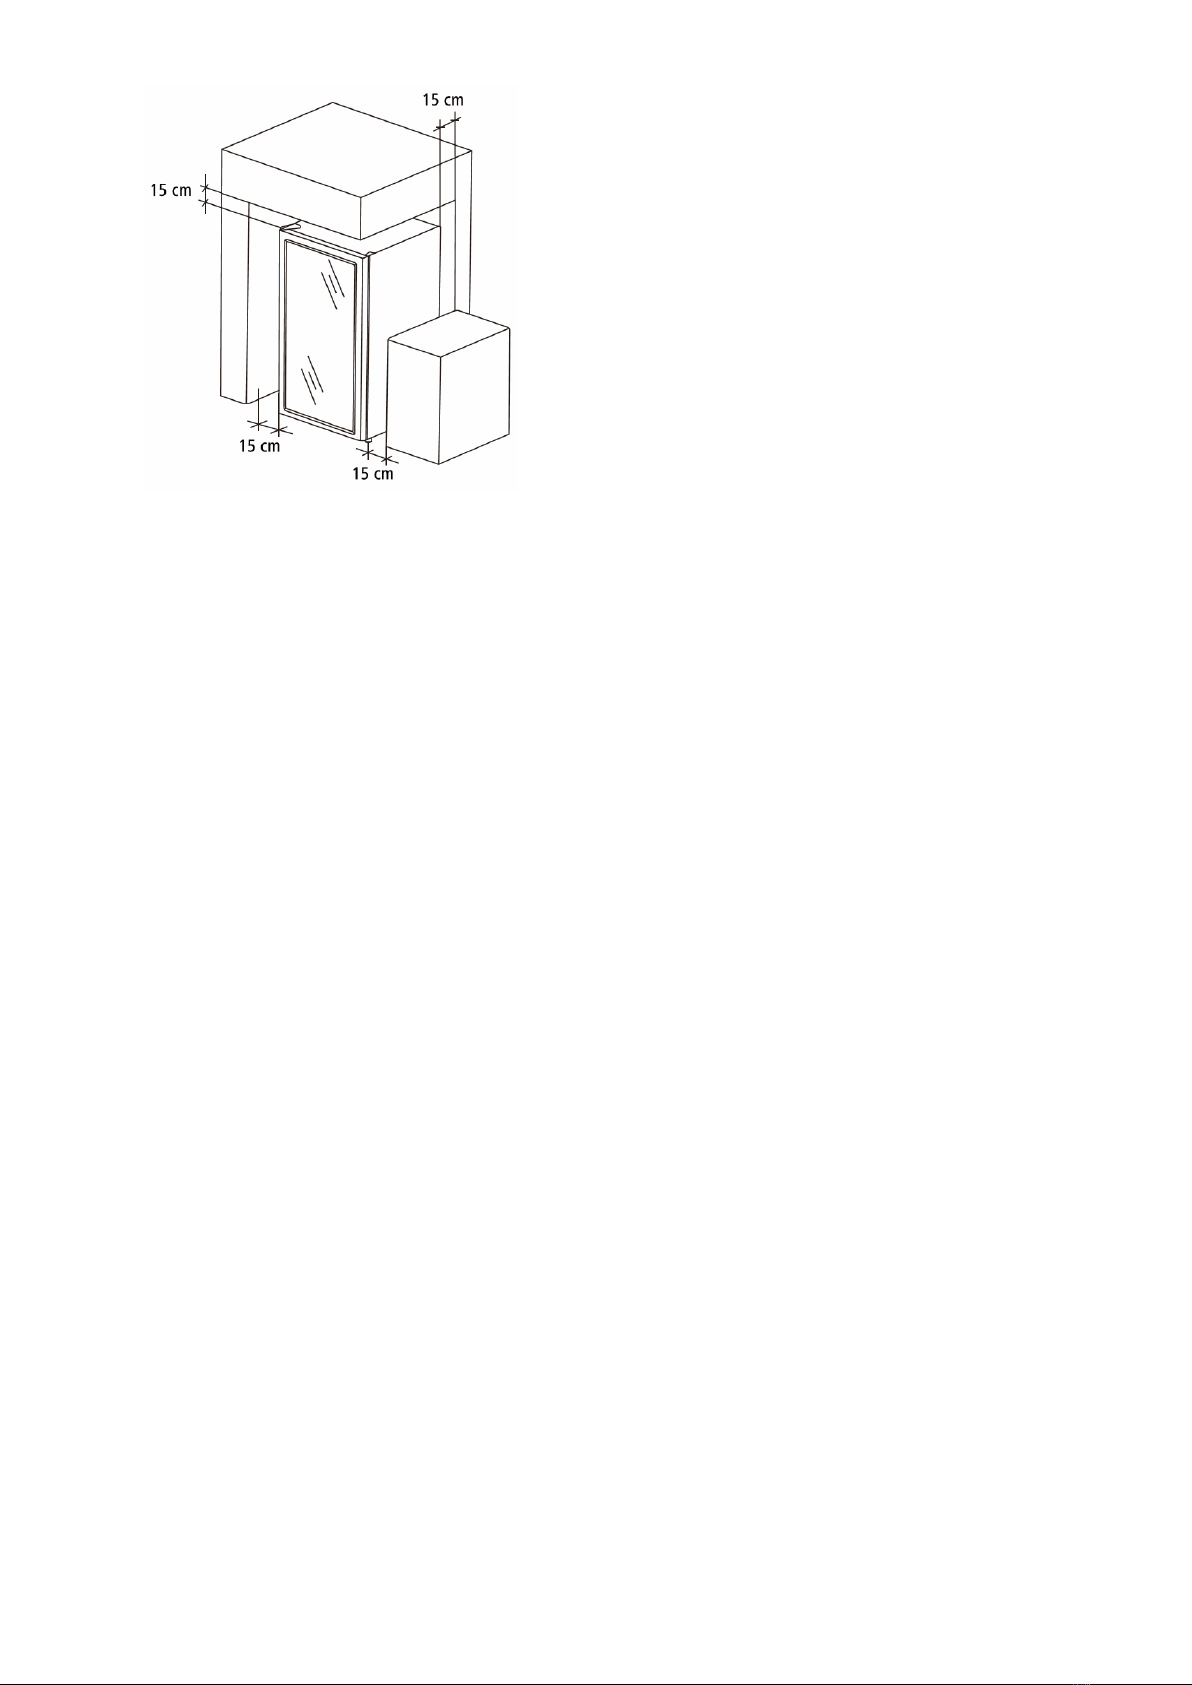
Avoid the installation:
-near heaters, next to a stove, direct sunlight or any other heat sources;
-at locations with high humidity (e.g., outdoors, bathroom), as metal parts would be susceptible to
corrosion under such circumstances;
-near volatile or flammable materials (e.g., gas, fuel, alcohol, paint, etc.), in rooms which may have
poor air circulation (e.g., garages).
-Do not expose the appliance to any weather.
-Some microwaves do not have a wave jamming shield so when your appliance is placed less than 1m
from a microwave, the operation of your appliance can be affected.
The appliance must be positioned so that the power socket remains accessible after installation.
Unwind the power cord but do not plug it into the electricity supply immediately.
Install your appliance in its final location before loading it. If the appliance is moved while loaded, the
appliance’s walls may be permanently deformed.
IMPORTANT: Two people are required to properly and safely install the appliance.
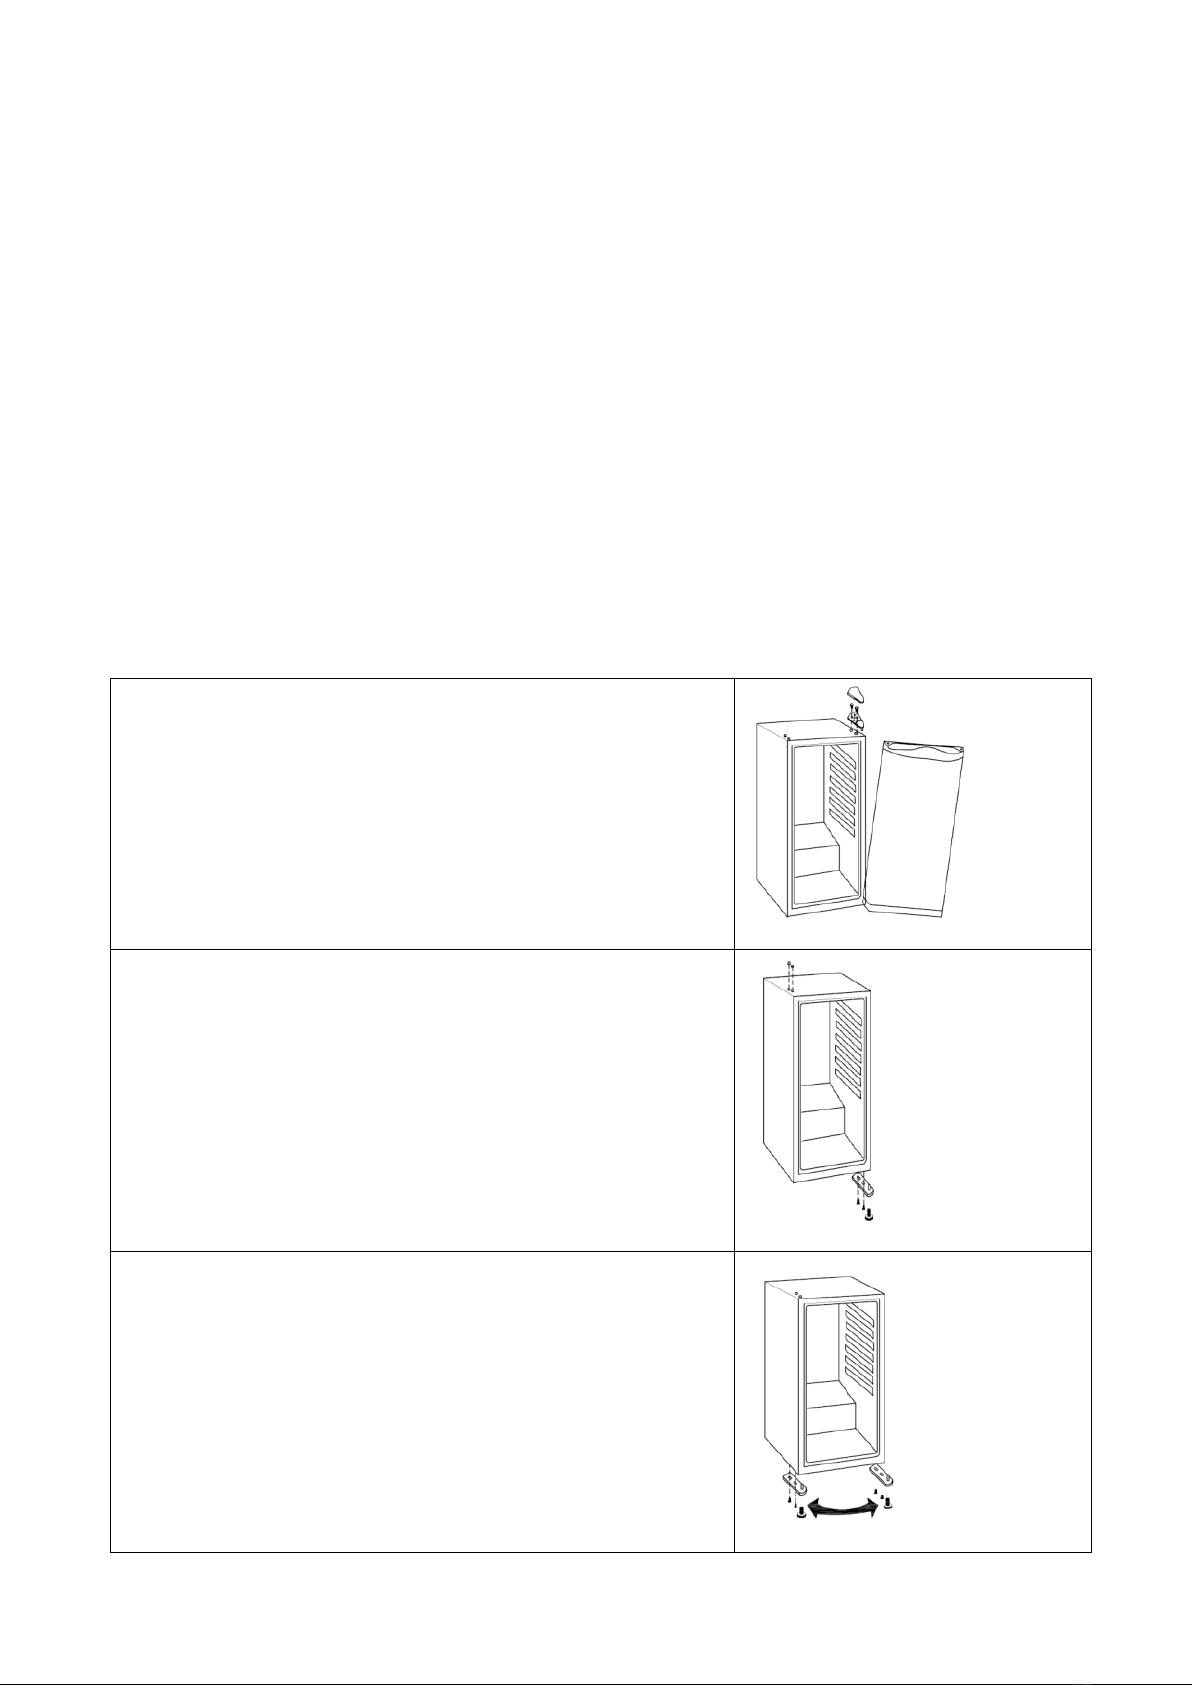
Foot adjustment
Your appliance is equipped with an adjustable foot to facilitate levelling.
It is recommended to adjust the front feet to level the appliance. Correctly levelled feet will limit noise and
vibration of the appliance.
Turn the adjustable foot by hand (be careful not to jam your fingers).
-Turn the foot anti-clockwise to raise the level of the appliance.
-Turn the foot clockwise to lower the level of the appliance.
Before loading your appliance
Levelling: The appliance must be levelled before loading your wine.
Stable floor: Place the appliance on a stable surface where the ground can support the loaded weight.
Ambient temperature
The appliance should be placed in a room with temperature between 16-38˚C. If the ambient temperature is
above or below the climatic class, the performance of the appliance will be impacted. Cold or warm
temperature can cause fluctuating fridge temperatures, the appliance may not reach the set temperature or
may stop working.

- 9 -
Electrical connection
Warning:
The installation to the mains supply must conform to the local standards and regulations.
Improper connection may cause to an electric shock!
Do not modify the appliance plug. If the plug does not fit properly to the outlet, let install a proper outlet
by an authorized specialist.
The accessibility of the power plug must be ensured to disconnect the appliance from the power supply in
case of emergency.
Make sure that the voltage supply matches the specifications on the rating label before connecting.
Connect the mains cable to a properly installed and earthed wall outlet.
If the plug after installation is not accessible, a corresponding disconnect device must be available to meet
the relevant safety regulations.
Changing the orientation of the door
The door can be right or left opening. Change the door by following the instructions below. Making this change
requires 2 people.
Instructions for changing the "right-hung" door and reassembling it so it is "left-hung":
(The pictures below are for the guideline to reverse the door. The appearance of the appliance may be different
from the product you purchased.)
1. Unplug the power cord from the socket.
2. Remove the top hinge cover.
3. Unscrew the top hinge and remove it, then remove the door by
gently lifting it.
4. Unwind the front right foot completely until it comes off. Remove
it.
5. Unscrew the lower hinge and remove it.
6. Place the lower hinge on the opposite side after removing the
front foot and attach the hinge with the screws you have just
removed from the right side.
7. Replace the foot on the left side of the appliance with the
adjustable foot removed from the right side. Screw the smaller foot
onto the right side.

- 10 -
8. Place the door on the lower hinge. Make sure the glass door is
upright and closes easily.
9. Place the top hinge on the opposite side.
10. Place the door on the appliance, then loosely screw the hinge
without tightening completely.
11 Once the door is installed, adjust the hinge by tightening the
screws until the door is in the correct place.
12. Replace the top hinge cover.
Note: The door seal may come out of its place when changing the door. If you notice gaps between the seal and
the appliance frame when the door is closed, pull carefully on the seal to close these openings. The correct
positioning of the seal is important to ensure the appliance is waterproof.
BEFORE USE
Prior to first use
Caution:
After transport, the appliance should be left standing upright for 24 hours before connectingto the power supply.
Nonobservance could lead to malfunction of the cooling system and causes an appliance break-down.
Clean the appliance interior including all accessory parts. Consider the instructions which we provide in the
chapter “Cleaning and Maintenance”.
Leave the appliance open to eliminate residual odors.
Recommendations:
Place the appliance in a cool place away from sunlight and heat sources.
Certain parameters such as room temperature, door opening time or the number of bottles stored inside
could affect the internal temperature of your appliance. We recommend that you check the internal
temperature regularly and adjust it if necessary.
Do not cover the vents.
Operating noise:
To reach the desired temperature, this appliance, like all wine fridges with compressor cooling systems, can
produce certain noises, which are normal operating noises.

- 11 -
Gurgling noise: caused by the refrigerant gas circulating in the refrigeration area of the unit.
Cracking noise: resulting from the contraction and expansion of the gas to produce the cold.
The perception of noise by the individual is directly related to the environment in which the appliance is located.
Noise in normal operation is not a cause of the warranty's application.
USING YOUR APPLIANCE
1. Loading your appliance
You can load your wine bottles in single or double rows.
For loading, take note of the following: if you don’t have enough bottles to completely fill your appliance,
it’s best to spread the load over the entire height of the appliance to avoid a thermal imbalance at the top
or bottom of the appliance.
The balanced distribution of bottles throughout the height of the appliance is the most efficient way to use
the energy of the appliance.
The bottle capacity is expressed in bottles of the “Bordeaux” type. If larger bottles are stored, or if
additional shelves are used, the maximum bottle capacity is reduced.
To accommodate the largest type of bottle or increase the capacity of the appliance by stacking the bottles,
when necessary, the shelves must be removed or moved (see paragraph “Adjustable shelves”).
Keep a gap between the bottom of the appliance and the bottles to allow air to flow. As in an underground
wine cellar, air circulation is important for a homogeneous temperature inside your wine fridge. This will
also reduce energy consumption.
Important information about the serving temperature of wine
Your appliance has been designed to allow you to set desired serving temperature of your wine. Each wine
varietal is served at a different ideal temperature.
The temperature is adjustable from 5-18 ˚C. Unless the wine producer recommends a different temperature for
your particular wine, champagne should be served at 7˚C, white wine should be served at 12˚C and red wine
should be served at 18˚C (see table in “Wine service temperatures”).
Some wines can be served young (2 to 3 years), while others are much better aged (10 years and older). Each
wine peaks at a different age. Check the ideal drinking age for your wine with your wine merchant.
Setting types: Please note that depending on where your appliance is kept, how often the door is open, the
ambient temperate and the loading, the time taken to reach the set temperate varies. Usually, it takes about 24
hours for the appliance to reach the desired temperature and indicate a stable temperature on the digital display.
The temperature displayed will change when the desired temperature is adjusted or whenever a large number
of bottles are added to the appliance.
2. Loading plan
Your appliance can accommodate up to 105 bottles, of light Bordeaux type, with a stack based on three
shelves.
While loading several levels of bottles on the same shelf, please gently store your bottles in the 1st row to
prevent them from colliding with the 2nd row. Store the bottles in a "head to tail" - crossing the neck and
bottom of each bottle, so you can get close to the stated maximum capacity.
If you store larger bottles or add a shelf to more easily access of your bottles, storage capacity will be
reduced.
The way you load your appliance and the number of shelves, determines capacity. Below you will find an
explanatory diagram for loading (capacity with load “head to tail”):

- 12 -
The indoor fan helps keep the temperature consistent throughout the appliance. The appliance door should
not be kept open for long periods of time as it will impact the appliance’s ability to remain cool.
This appliance is a multi-zone fridge which allows you to set the temperature of each compartment
independently. As wine is best served at different temperatures depending on the type of wine, you can
store multiple types of wine in your appliance at their ideal temperatures following the temperature settings
below:
-Top compartment of the unit (5-12˚C): rosé wines, champagne and white wines
-Bottom compartment of the unit (from 12-18˚C): red wines
3. Adjustable shelves
Your appliance has 4 adjustable metal shelves, which gives the strength to stack several rows of bottles
(the moulding at the bottom of the appliance allows bottles to be stacked underneath the bottom shelf).
The shelves can be adjusted to different spacings depending on your needs (be careful not to place bottles
on the temperature zone separator).

- 13 -
Door seal protection: Ensure you open the door completely before removing shelves from their rails.
Do not slide multiple loaded shelves outwards as it may cause bottles to fall or may cause the appliance
to tip forward.
Do not cover shelves with material like aluminum foil or metal plate as this will impact internal airflow.
Do not move your appliance while it is loaded with bottles. This could distort the walls of the appliance
and cause back injuries.
4. Functions and temperature setting
Please note that depending on the selected settings and the loading, it can take 24 hours for the appliance to
reach the desired temperature.
-Plug the power cord into a suitable power supply.
-Set the thermostat to adjust the temperature using the K4 and K5 keys
K1: On/Off
Press the key to start or turn off the appliance.
K2: Light
Press the key to turn on / off the inside light.
K3: Select the storage area
Press this key to select the top or bottom zone.
A
B

- 14 -
L1: View temperature by selected area
Temperature display:
A: Top zone: 5-12 ˚C
B: Bottom zone: 12-18 ˚C
Note: Symbol “%” in the lower right corner means humidity. It is not applicable to this product/model you
purchased.
K4: Increase temperature
Press the key once, the LED display will flash indicating the current temperature. Press again to set the
temperature. One touch will increase the temperature by one degree. The blink stops after 5 seconds without
action on your part, and the newly set temperature is recorded. The LED display then shows the actual
temperature inside.
K5: Decrease temperature
Press the key once, the LED display will flash indicating the current temperature. Press again to set the
temperature. One touch will reduce the temperature by one degree. The blink stops after 5 seconds without
action on your part, and the newly set temperature is recorded. The LED display then shows the actual
temperature inside.
K6: Settings
Fahrenheit/Celsius
Switch the temperature display between Fahrenheit/Celsius by pressing the key.
There are two internal fans for airflow however fluctuations of up to 3 degrees is expected. The average
temperature throughout the appliance will be a maximum of 1.5˚C of the requested temperature (once
sufficient time for cooling has passed). Once a temperature difference of 3˚C above the set temperature is
detected, the cooling cycle will start to bring the temperature down to below the set temperature. Once the
cooler temperature is reached, the cooling stops and the temperature inside the appliance is allowed to slowly
increase. This cycle is continuous and results in a very small range of constant fluctuation.
The temperature sensor is placed halfway down the compartment and reads the temperature instantaneously.
Small amounts of deviation in temperature are expected (less than 6˚C).
Please do not open the door too often as this will disrupt the operation of the temperature sensors. The
appliance automatically adjusts moisture and condensation levels within the appliance as required.
Attention
When the temperature sensor is failing due to power outage or bug, an error code appears.
E1: internal temperature problem
E2: ambient temperature problem
CE: communication problem
5. Wine service temperatures
The table below shows the recommended serving temperatures for different wine.
Wine
Recommended temperature
Champagne, sparkling
6 °C
White: Sémillon, Sauvignon Blanc
8 °C
Vintage Champagne
10 °C
Dry white: Chardonnay
10 °C
Dry white: Gewürztraminer, Riesling, Pinot gris
10 °C

- 15 -
Sweet late harvested white: Sauternes, Barsac, Monbazillac
10 °C
Beaujolais
13 °C
Sweet white wine: Sauternes...
14 °C
White Chardonnay vintage
14 °C
Pinot Noir Red
16 °C
Red Grenache, Syrah
16 °C
Red vintage Pinot Noir
18 °C
To bring the wine to the serving temperature, it is recommended to place it in your appliance at least 48 hours
before serving and uncork or aerate a few minutes before tasting.
6. Power outage
In the event of a power outage, all temperature settings will be automatically preserved, unless you change the
thermostat setting.
A power outage of an hour or two will not affect the temperature of your appliance. To avoid a sudden change
in temperature when the power supply is turned off, you should avoid opening the door. In the event of a
prolonged cut, storage alternatives must be found to preserve your wine.
If you plan to temporarily shut off the electrical power or if there is a power outage scheduled by your power
provider, it is imperative to disconnect the power socket rather than have your power meter shut down. A
sudden shutdown of the current could damage the mother board in your appliance.
CLEANING AND MAINTENANCE
Defrosting
Your appliance is designed with a "natural" defrosting system. When the engine is shut down, the refrigerated
surfaces of the appliance will automatically defrost. The de-icing water descends into a drainage container near
the compressor at the back of the appliance. This water is evaporated by the heat produced by the compressor.
Important: Keep the drain and gutter clean to prevent it to clog and water to flow inside the appliance.
Cleaning
Before cleaning or restarting, unplug at the socket.
Never use abrasive products or sponges with scrapers for cleaning inside or outside your device.
•Remove all accessories (e.g., shelves, water pan located at the bottom of the back of the appliance). Wash
them with lukewarm water with a mild, odorless detergent (an unscented dish liquid, for example), rinse
with water containing bleach and dry thoroughly.
•Wash the interior walls in the same way; take special care of the shelves.
•Wash the door seal without omitting to clean also under the door seal.
•Reconnect the device and get it back into operation.
Occasionally, dust the condenser at the back of the unit; a build-up of dust could reduce the performance of the
unit.
At certain times of the year, condensation on the door may occur. If this happens, wipe the water from the door
and avoid opening the door of the appliance often as this amplifies the difference between the inside of the
appliance and the ambient temperature.
In case of prolonged absence, empty and clean the appliance; keep the door ajar for the duration of non-use.
Important!
When the appliance is not used:
•Unplug the appliance.
•Remove all objects inside.
•Clean and dry the interior space of the appliance per the above instructions.
•Leave the door slightly ajar to avoid mold.

- 16 -
TROUBLESHOOTING
Some issues can be easily resolved. Before using after-sales service or a repairman, please see the following
table:
Problem
POSSIBLE CAUSES
The appliance doesn't
work.
The appliance is not plugged in or it is switched off.
The circuit breaker is triggered, or the fuse is damaged.
Check to see if the power outlet is powered by connecting another electrical
appliance.
The appliance is not
cold enough.
Check the temperature setting.
A high ambient temperature may require a higher setting.
The door is opened too often.
The door is not completely closed.
The door seal is not properly positioned.
The compressor works
and goes out often.
The room temperature is warmer than normal.
A large quantity of bottles has been added to the appliance.
The door is opened too often.
The door is not completely closed.
Temperature control is not properly defined.
The door seal is not properly positioned.
The light doesn't work.
The socket is not plugged in.
The circuit breaker has gone off or a fuse is damaged.
Vibration.
The appliance may not be level.
The appliance seems
to be making too much
noise.
Squeaking or slamming may come from the circulation of the refrigerant gas, which
is normal.
At the end of the cycle, the compressor emits a noise caused by the passage of the
refrigerant into your appliance.
The contraction and expansion of the gas inside the walls can emit hissing and
crackling.
The appliance is not level. Check the setting of the feet.
The door doesn't close
properly.
The door was reversed and not properly reinstalled.
The seal is defective (the magnet or rubber is altered).
The shelves block the door closure.
If your appliance doesn't seem to be working normally, unplug the device for a few minutes, then plug it in again
to reset the appliance.
If the problem persists or for any other problems occurring at your device: contact the After-Sale Service.
Any service or repair on the cooling process must be carried out by a licensed professional who will have to carry
out an inspection of the refrigeration circuit.
Similarly, any service or repairs on the electrical circuit must be carried out by a qualified electrician.
Note: Any repair by an unlicensed technician will result in cancellation of the warranty.
TECHNICAL SPECIFICATIONS
Rated voltage:
220-240V~
Rated current:
2.0A
Rated frequency:
50Hz
Climate class:
N/ST
Refrigerant:
R600a (28g)
Protection against electrical shock:
I
Insulation blowing gas:
CYCLOPENTANE

- 17 -
Climate class:
-Extended temperate (SN): 'this refrigerating appliance is intended to be used at ambient temperatures
ranging from 10°C to 32 °C';
-Temperate(N): 'this refrigerating appliance is intended to be used at ambient temperatures ranging from
16 °C to 32 °C';
-Subtropical (ST): 'this refrigerating appliance is intended to be used at ambient temperatures ranging from
16 °C to 38 °C';
-Tropical(T): 'this refrigerating appliance is intended to be used at ambient temperatures ranging from 16 °C
to 43 °C';
Note: More data information, please scan the QR code on the energy label.
GUARANTEE AND CUSTOMER SERVICE
Before delivery our devices are subjected to rigorous quality control. If, despite all care, damage has occurred
during production or transportation, please return the device to your dealer. In addition to statutory legal rights,
the purchaser has an option to claim under the terms of the following guarantee:
For the purchased device we provide 2 years guarantee, commencing from the day of sale. If you have a
defective product, you can directly go back to the point of purchase.
Defects which arise due to improper handling of the device and malfunctions due to interventions and repairs
by third parties or the fitting of non-original parts are not covered by this guarantee. Always keep your receipt,
without the receipt you can’t claim any form of warranty. Damage caused by not following the instruction
manual, will lead to a void of warranty, if this results in consequential damages then we will not be liable. Neither
can we hold responsible for material damage or personal injury caused by improper use or if the instruction
manual are not properly executed. Damage to accessories does not mean free replacement of the whole
appliance. In such case please contact our service department. Broken glass or breakage of plastic parts is always
subject to a charge. Defects to consumables or parts subjected to wearing, as well as cleaning, maintenance or
the replacement of said parts are not covered by the warranty and are to be paid.
The guarantee period of the spare parts is 2 years. If you need replacement, please contact our customer service.
ENVIRONMENT FRIENDLY DISPOSAL
Recycling –European Directive 2012/19/EU
This marking indicates that this product should not be disposed with other household wastes. To
prevent possible harm to the environment or human health from uncontrolled waste disposal,
recycle it responsibly to promote the sustainable reuse of material resources. To return your used
device, please use the return and collection systems or contact the retailer where the product was purchased.
They can take this product for environmental safe recycling.
For professional repair and ordering spare parts, please contact our customer service.
Emerio Deutschland GmbH (no service address)
Lerchenweg 3
40789 Monheim am Rhein
Deutschland
Customer service:
T: +49 (0) 3222 1097 600

- 18 -
Bedienungsanleitung –German
SICHERHEITSINFORMATIONEN
Lesen Sie vor dem Gebrauch unbedingt die nachfolgenden
Anleitungen, um Verletzungen oder Beschädigungen zu
vermeiden und das beste Ergebnis mit dem Gerät zu erzielen.
Bewahren Sie diese Bedienungsanleitung an einem sicheren
Ort auf. Wenn Sie dieses Gerät an eine andere Person
weitergeben, stellen Sie sicher, dass Sie auch diese
Bedienungsanleitung aushändigen.
Im Falle von Beschädigungen, die durch die Missachtung der
Anleitungen in dieser Bedienungsanleitung verursacht
wurden, wird die Garantie ungültig. Der Hersteller/Importeur
haftet nicht für Schäden, die durch Missachtung der
Bedienungsanleitung, fahrlässigen Gebrauch oder Benutzung,
die nicht in Übereinstimmung mit den Anforderungen dieser
Bedienungsanleitung erfolgt, verursacht wurden.
1. Lesen und bewahren Sie diese Anleitungen auf. Achtung:
Die Bilder in der Bedienungsanleitung dienen nur zur
Veranschaulichung.
2. Dieses Gerät kann von Kindern ab 8 Jahren und von
Personen mit eingeschränkten physischen, sensorischen
oder geistigen Fähigkeiten oder ohne Erfahrung und/oder
Wissen benutzt werden, wenn diese durch eine für ihre
Sicherheit zuständige Person beaufsichtigt werden oder
von ihr Anweisungen erhielten, wie das Gerät sicher zu
benutzen ist und sie auf die Risiken aufmerksam gemacht
wurden. Kinder dürfen nicht mit dem Gerät spielen. Kinder
sollten dieses Gerät nicht unbeaufsichtigt reinigen oder
warten.
3. Kinder im Alter zwischen 3 und 8 Jahren dürfen Kühlgeräte
befüllen und leeren.
4. Wenn die Netzanschlussleitung dieses Gerätes beschädigt
wird, muss sie durch den Hersteller oder seinen
Kundendienst oder eine ähnlich qualifizierte Person ersetzt
werden, um Gefährdungen zu vermeiden.

- 19 -
5. WARNUNG: Halten Sie die Lüftungsöffnungen im Gehäuse
oder direkt im Gerät frei von Hindernissen.
6. WARNUNG: Verwenden Sie keine anderen als die vom
Hersteller empfohlenen mechanischen Geräte oder andere
Mittel, um den Abtauvorgang zu beschleunigen.
7. WARNUNG: Beschädigen Sie den Kältemittelkreislauf nicht.
8. WARNUNG: Verwenden Sie keine elektrischen Geräte in
den Lebensmittelfächern des Geräts, es sei denn, sie
entsprechen dem Typ, der vom Hersteller empfohlen wird.
9. Lagern Sie keine explosiven Substanzen wie Aerosoldosen
mit einem brennbaren Treibmittel in diesem Gerät.
10. Dieses Gerät ist dazu bestimmt, im Haushalt und ähnlichen
Anwendungsbereichen benutzt zu werden, wie z.B.:
-in Personalküchen von Ladengeschäften, Büros und
anderen Arbeitsumgebungen,
-auf Bauernhöfen, von Gästen in Hotels, Motels und
anderen Wohnumgebungen,
-Pensionen und ähnlichen Unterkünften,
-im Catering und ähnlichen Nicht-Einzelhandelsbereichen.
11. WARNUNG: Stellen Sie das Gerät so auf, dass das
Versorgungskabel nicht eingeklemmt oder beschädigt wird.
12. WARNUNG: Stellen Sie keine Mehrfachsteckdosen oder
tragbare Stromquellen an der Rückseite des Geräts auf.
13. Um eine Kontamination von Lebensmitteln zu vermeiden,
beachten Sie bitte folgende Hinweise:
-Ein längeres Ö ffnen des Deckels kann zu einer deutlichen
Erhöhung der Temperatur im Gerät führen.
-Reinigen Sie regelmäßig die Oberflächen und den
zugänglichen Abläufen.
-Reinigen Sie die Wasserbehälter, wenn diese 48 Stunden
lang nicht benutzt wurden. Spülen Sie den
Wasserkreislauf, wenn 5 Tage lang kein Wasser
verbraucht wurde. (Gilt nur für Wasserspender und
Wasserzulauf)
-Wenn das Kühlgerät längere Zeit leer bleibt, schalten Sie
es aus, tauen Sie es ab, reinigen und trocknen sie es.
Table of contents
Languages: