EMIX EMKP-8001 Quick start guide

1
OPERATIONAL MANUAL
EMKP-8001
180 Zones Paging Microphone
Version 1.4

2
Produc Overview
The EMKP-8001 is a 180 zones digital paging microphone. As the name digital paging microphone, EMKP-8001
operates digitall . On each paging microphone it is possible to select 180zones with the possibilit to connect
up to 30 paging console b using single CAT-5E extension cable. Through a 4X20 characters LCD panel on top
of the paging console is used for showing more reliable information such as selected zone, t pe of chime,
priorit and other user is on call on the moment. Furthermore, this EMKP-8001 equipped with a cardioid
condenser microphone which offers minimum sensitivit at an angle of 180 degrees, reducing pick up of
sounds from the rear. It’s also tightl controlled unidirectional polar pattern provides excellent ambient noise
control allowing the wanted speech stand out from the background of nois confusion and features selectable
microphone gain output. Because the digital paging console provides a balanced line level output, it can be
positioned up to 1.2KM awa from the zone selector.

3
Fea ures.
•Built-in microchip controller compile all the features into a single device
•A LCD 4 X 20CH with blue back light to displa s stem status, zones settings and grouping function
•Simple ke pad la out make operation simple and user friendl
•Appropriate for a s stem less than 180zones.
• Allowed data communication distance up to 1.2KM.
•Instead of analogue s stem, digital s stem can avoid complicated hardwire configuration b using
single CAT5E cable which carrier balanced audio signal, power and data.
•Built-in 8 t pe of chime with volume gain at the bottom of the console.
•Preset call duration limit from 1 to 10minute to avoid accidentl pressed or overlook after used.
•CALL function either can be set in toggle or momentar mode (Press-To-Talk).
•One touch emergenc button to override the entire paging console during emergenc .
•9nos of grouping can be saved and recalled from the internal memor .
•B pressing the S nchronize button and send all the setting to other EMKP-8001 except priorit level.
•Cardiod condenser microphone with tightl controlled unidirectional polar pattern provides excellent
ambient noise control allowing the wanted speech stand out from the background of nois confusion.
•Adjustable Microphone sensitivit at the rear of the microphone.
•Easil being integrated with EMIX range public address equipment.

4
Top View and Rear View
Figure 1.1 Top view of the digital paging console
Figure 1.2 Rear view of the paging console

5
Figure 1.3: Bottom view of the Digital Paging Microphone

6
Keypad and Rear Panel Indica ion
EMKP-8001 Digi al Paging Microphone
1.1 Keypad Indica or
1
LCD Display
– 4 X 20 Characters LCD to displa s stem status & message eas for reading. Zones setting
and zone grouping are displa ed in multi pages for eas viewing
2
Keypad
– The large 24 labeled matrix buttons make operation simple & user friendl .
3
Page Up
– Navigation ke for page menu and configuration selection. For example, current page is
zone 11 to zone 20, after button pressed will be switched to zone 1 to zone 10. For configuration
selection, the menu will be switched reversel when button pressed.
Used as primaril (next page) as parameter setting button too.
4
Page Down
– Navigation ke for page menu and configuration selection. For example, current page is
zone 1 to zone 10, after button pressed will be switched to zone 11 to zone 20. For configuration
selection, the menu will be switched forwardl when button pressed.
Used primaril (previous page) as parameter setting button too.
5
Emergency
– To activate immediate paging. When button pressed, all zones will be selected
automaticall .
6
Call
– To activate paging after zone selection. Used as primaril (Enter) as parameter setting button
too.
7
Clear All
– To clear all selected zone.
8
Priori y
– To enter priorit setting menu.
9
Selec All
– To select all zones.
10
PTT
– To enter paging mode configuration. 2 configurations are included which is Push to Talk
(momentar ) mode and Toggle mode (Push to on & push to off).
11
Synchronize
– To s nchronize group memor or device setting.
12
Chime
– To enter chime configuration. 7 t pes chime configuration included.
13
Save
– To save zones group. Maximum 10 setting can be saved.
14
Delay
– Dela (Paging countdown timer) is an added feature which able to prevent unwanted paging.
User might not deactivate the device after paging and this causes unwanted paging. B setting Dela ,
the device will automaticall deactivate when the dela period is time out.
15
Load
– To load saved zones group. Maximum 10 setting can be loaded.

7
16
Zone Selec ion
– To select zone within ever page menu. 1 page contain 10zones for example 1
st
page
is zone 1 to zone 10, press
Page Down (3)
will be next 10 zones
e.g.
zone 11 to zone 20.
1.2 Rear Panel indica or
17
Mic sensi ivi y
– To adjust microphone sensitivit .
18
Communica ion Por
– This RJ45 socket accepts the CAT5 straight cable connected to EMZS-8006 6CH
speaker zone selector and EMZS-8012 12CH speaker zone selector. It also can be linked to extension
unit.
1.3 Bo om Panel indica or
19
Chime Volume
– To adjust the chime volume.

8
2.0 Ins alla ion Diagram / Schema ic Diagram
Figure 1.3: There are 4nos of 180zones paging console connected up with 2nos of 12CH Zone selector
EMZS-8012 through RJ45 to line converter. All of the paging consoles have a loop through connection
from the last paging console to zone selector. From the single line shown above, there is total 7nodes
taken up for the s stem.
Notes: Maximum 32nos nodes can be connected up.

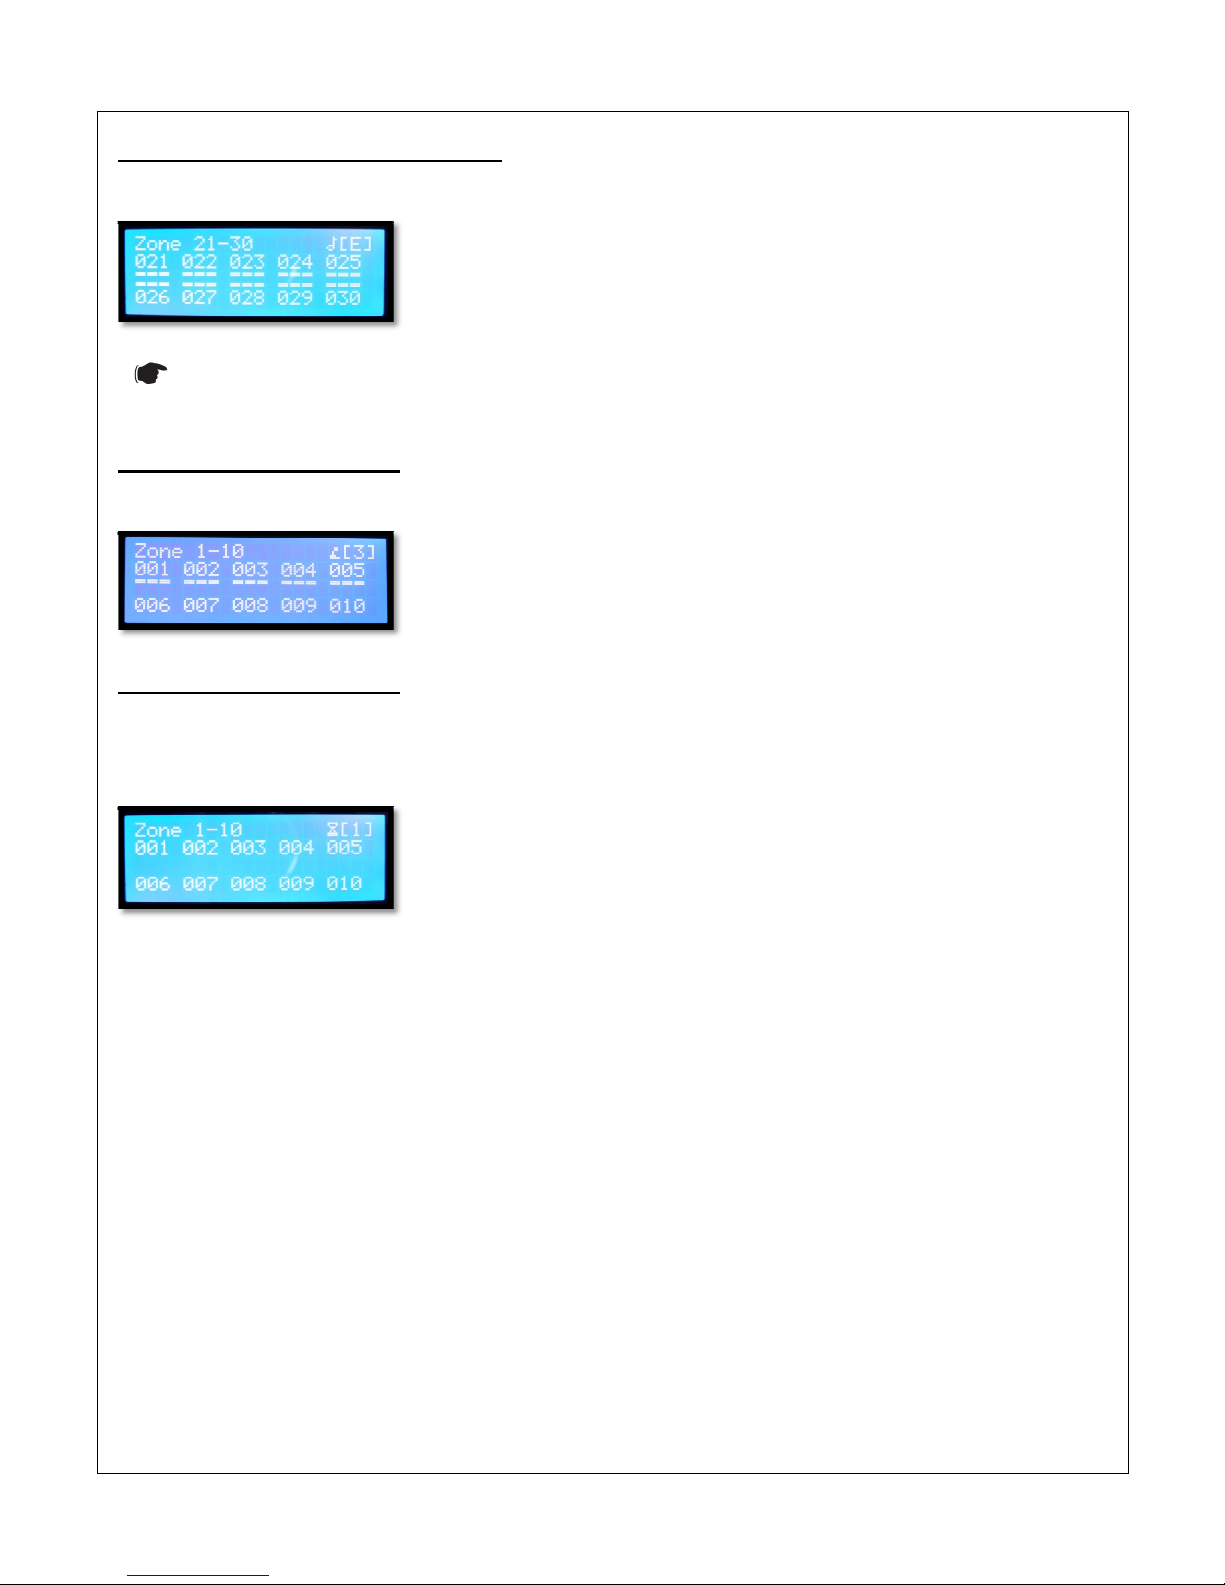
3.0 Uni Se up - Zone c
onfigura ion
Press Zone button
to enter zone setting
Figure: Zone setting. B default, number of zone is set to 180 zones.
Press Page Up or Page Down button
Figure: Page Down button pressed
Figure: Page Down button
pressed again
Once total number of zone is confirmed
You are able to view total 3 pages o
f zoning from zone 1 to zone 30 after chosen as the diagram shown above
Notes:
This setting must be done
paging.
onfigura ion
to enter zone setting
menu as below:-
Figure: Zone setting. B default, number of zone is set to 180 zones.
to select total usage number of zone in the s stem
pressed again
Once total number of zone is confirmed
, pressed CALL button (Enter)
f zoning from zone 1 to zone 30 after chosen as the diagram shown above
This setting must be done
to reduce the hassle of
too man pages exists when
Pages &
Page 01 :
Page 02 :
Page 03 :
Page 04 :
Page 05 :
Page 06 :
Page 07 :
Page 08 :
Page 09 :
Page 10 :
Page 11 :
Page 12 :
Page 13 :
Page 14 :
Page 15 :
Page 16 :
Page 17 :
Page 18 :
9
to select total usage number of zone in the s stem
f zoning from zone 1 to zone 30 after chosen as the diagram shown above
too man pages exists when
operator making
Pages &
Number of Zone:
Page 01 :
1-10 Zones
Page 02 :
11-20 Zones
Page 03 :
1-30 Zones
Page 04 :
1-40 Zones
Page 05 :
1-50 Zones
Page 06 :
1-60 Zones
Page 07 :
1-70 Zones
Page 08 :
1-80 Zones
Page 09 :
1-90 Zones
Page 10 :
1-100 Zones
Page 11 :
1-110 Zones
Page 12 :
1-120 Zones
Page 13 :
1-130 Zones
Page 14 :
1-140 Zones
Page 15 :
1-150 Zones
Page 16 :
1-160 Zones
Page 17 :
1-170 Zones
Page 18 :
1-180 Zones

3.1 Unit Setup -
Dela (Paging period timer) configuration
The purpose of setting up the timeout dela to prevent the microphone accidentl turned on and left
unoccupied after an announcement has been made.
Press
Delay
button
to enter dela period setting:
Press
Up
or
Down
button to select our timeout dela
Notes: If no entr is made within 10seconds,
front page.
Once confirm the Timeout dela setting
Dela (Paging period timer) configuration
The purpose of setting up the timeout dela to prevent the microphone accidentl turned on and left
unoccupied after an announcement has been made.
to enter dela period setting:
button to select our timeout dela
Notes: If no entr is made within 10seconds,
the setup menu shall exit automaticall and return to the
Once confirm the Timeout dela setting
press
CALL
button it will result as below:
-
10
The purpose of setting up the timeout dela to prevent the microphone accidentl turned on and left
the setup menu shall exit automaticall and return to the
-
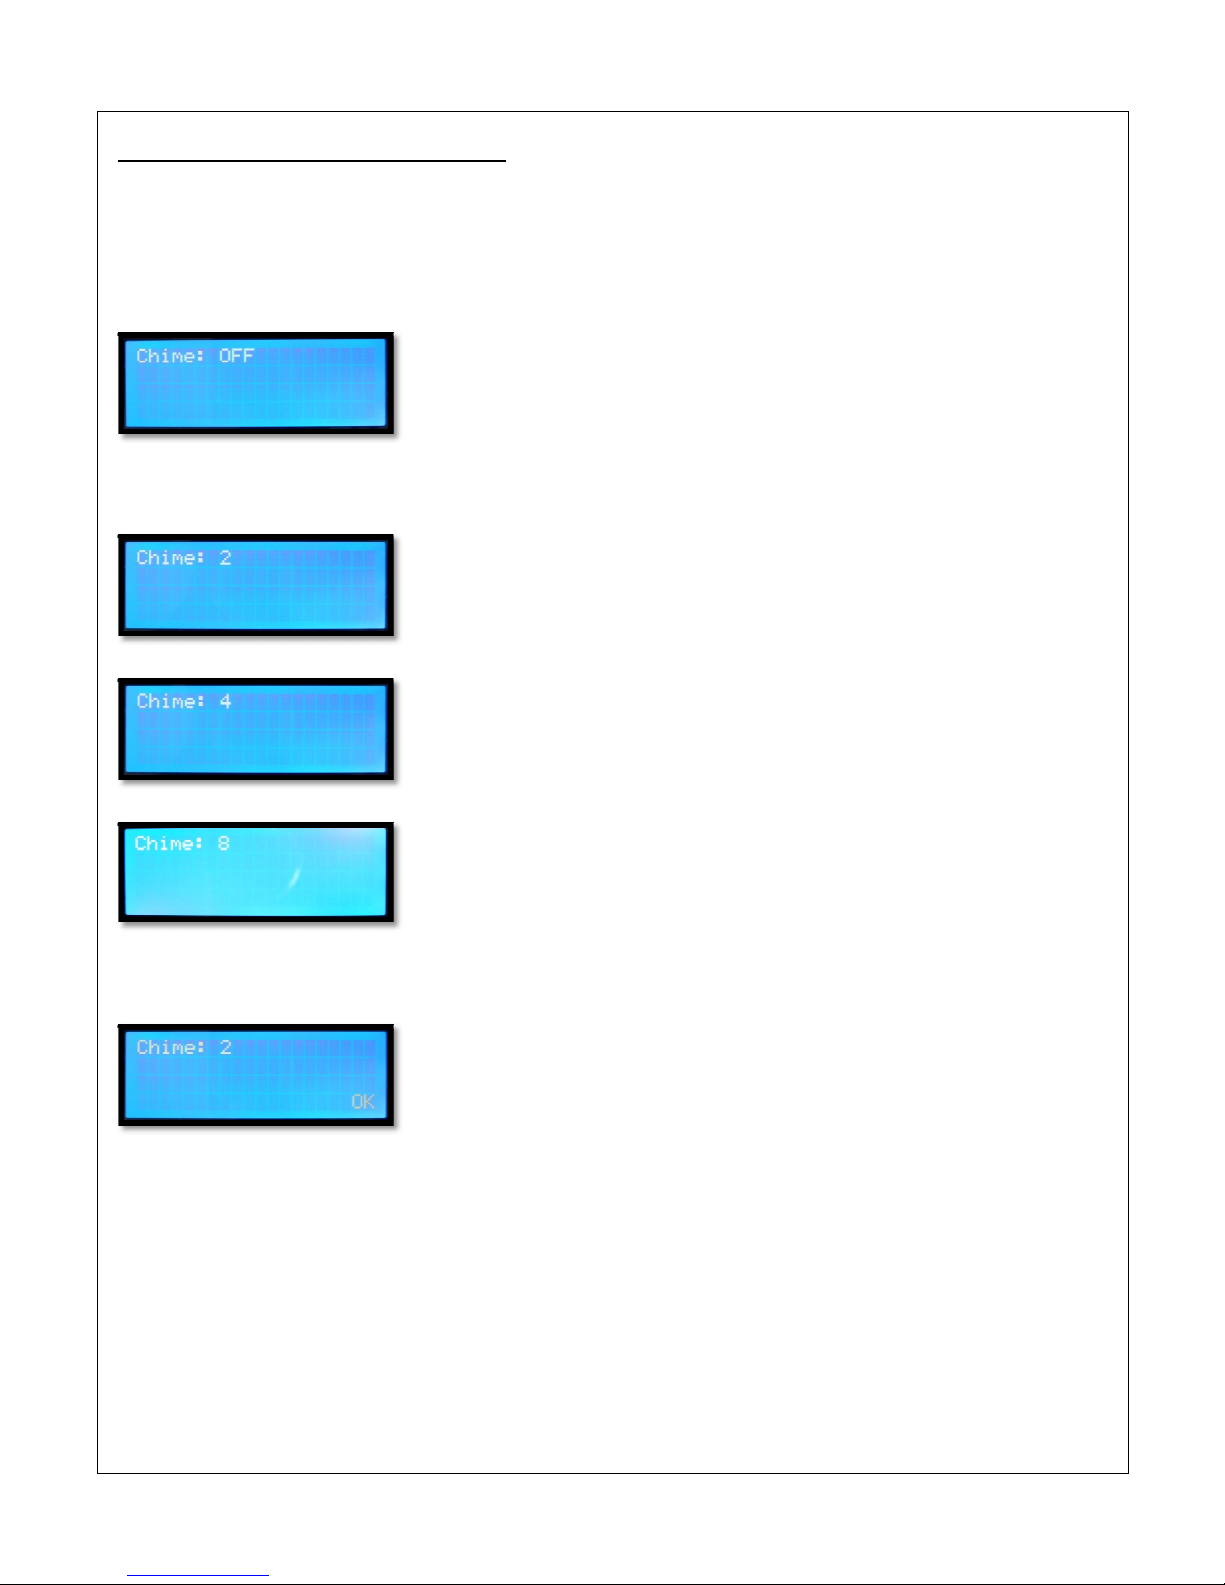
3.2 Uni Se up -
Chime configura ion
This unit has built-in 7t pe of
different
menu.
Press
Chime
button
to enter Chime setting:
Press
Up
or
Down
button to select our desire chime.
Once confirm the chime setting
b user, kindl
Chime configura ion
different
chime, usuall user given to choose their desire of chime through this
to enter Chime setting:
button to select our desire chime.
b user, kindl
press
CALL
button it will shown as below:
11
chime, usuall user given to choose their desire of chime through this
button it will shown as below:
-

3.3 Uni Se up -
PTT configura ion
To select momentar (press
to talk) or toggle press to on and press to off when the user used for paging.
Press
PTT
button
to enter paging mode configuration:
Press
Up
or
Down
button to select our toggle or momentar when paging.
Once confirm the PTT setting press
CALL
Notes: Manufacturing default Setting will be alwa s on Toggle mode where the user need to press the
CALL button for paging and press the CALL button to end the calling.
PTT configura ion
to talk) or toggle press to on and press to off when the user used for paging.
to enter paging mode configuration:
button to select our toggle or momentar when paging.
CALL
button it will shown as below:-
Notes: Manufacturing default Setting will be alwa s on Toggle mode where the user need to press the
CALL button for paging and press the CALL button to end the calling.
12
to talk) or toggle press to on and press to off when the user used for paging.
Notes: Manufacturing default Setting will be alwa s on Toggle mode where the user need to press the
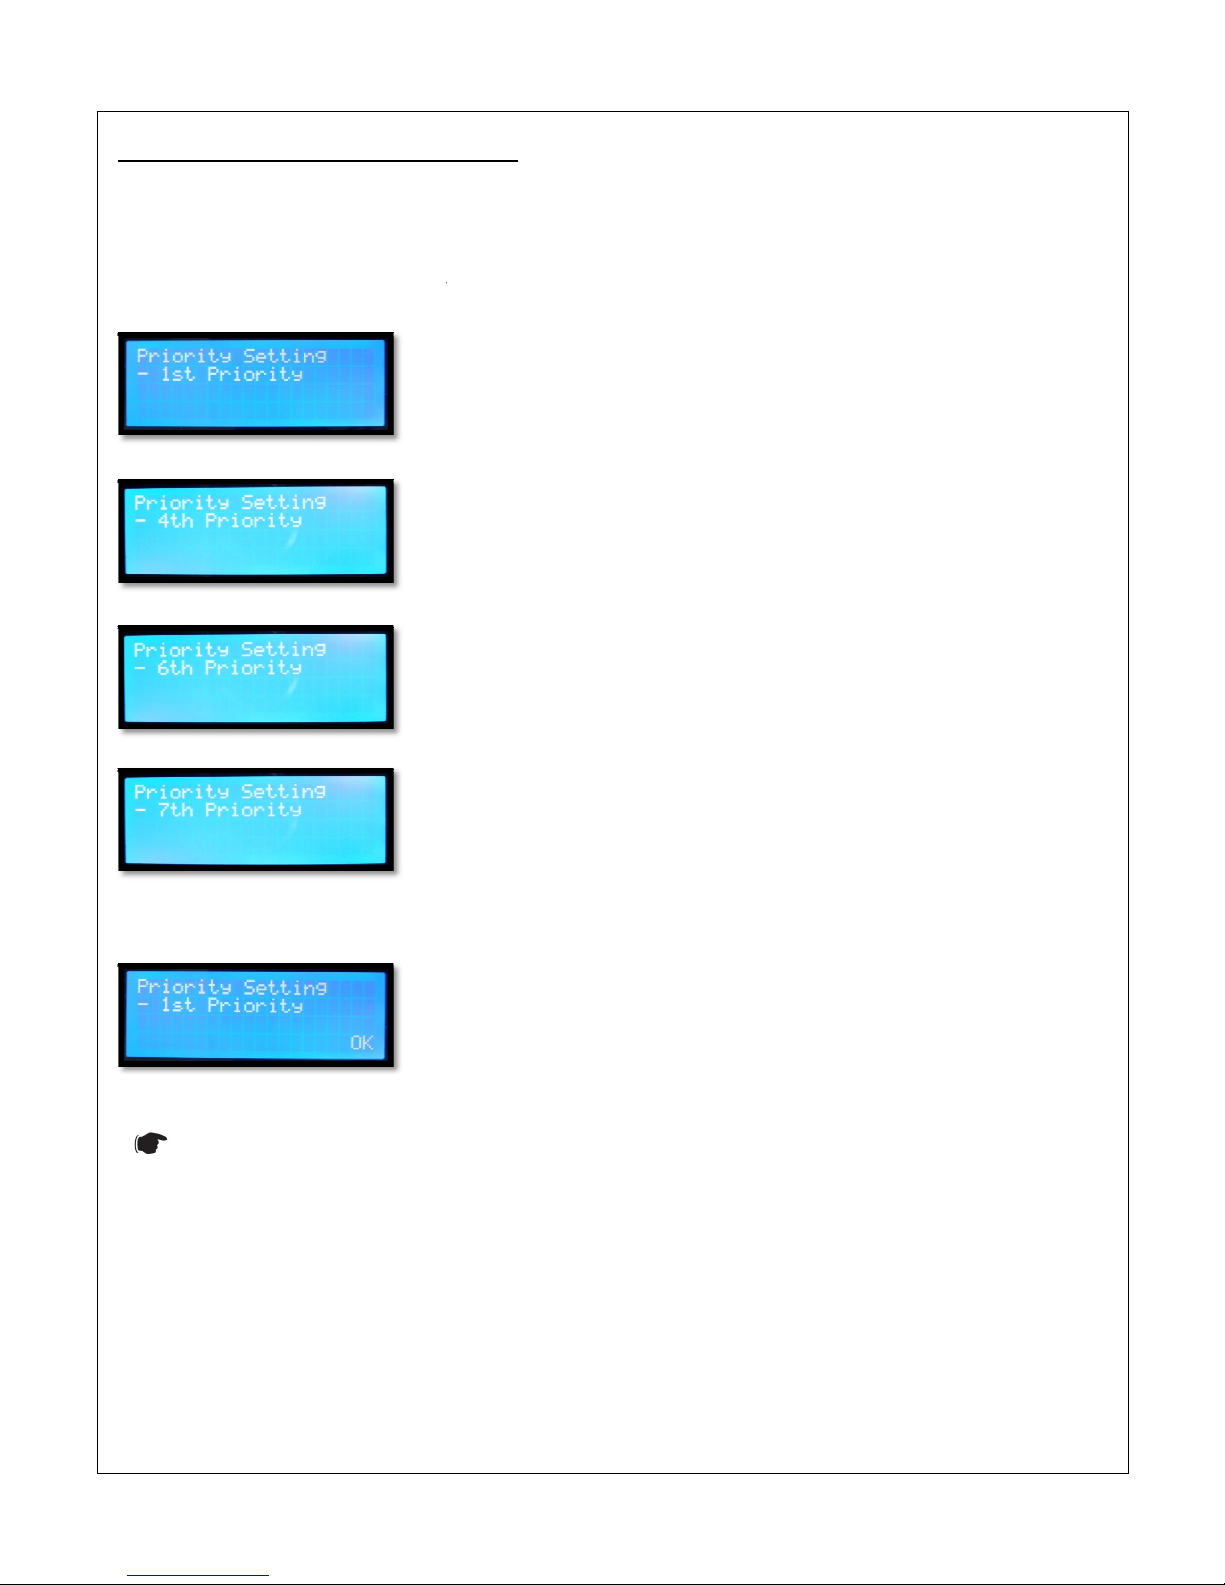
3.4 Uni Se up - Priori y
configura ion
This is to set the priorit
level of the paging microphone.
priorit .
Press
Priori y
button
to set device priorit :
Once confirm the Priorit level setting press
Notes:
Manufacturing default Setting will be alwa s
configura ion
level of the paging microphone.
Priorit 1
st
is the highest while 7th
to set device priorit :
Once confirm the Priorit level setting press
CALL
button it will shown as below:-
Manufacturing default Setting will be alwa s
set on 1
st
Priorit Setting.
13
is the highest while 7th
is the lowest
Priorit Setting.

3.5 Uni Se up - Group SAVE
se ing
Zone grouping consider a pre-
configured action which means user can select the require zone and
selected zone together.
enable eas access to a group of zone when paging.
Kindl select the preferred
channel where ou wish to get
Press [
Save
+ no.
1]
button
at the same time
Which means Zone 01, 02, 03, 04 & 05 are grouped together in Group 1.
Press [
Save
+ no.
8]
button
at the same time
Notes: Repeat the step shown above to program other grouping.
3.6 Uni Se up – Group LOAD
se ing
Zones grouping that had been grouped during the earlier stage
Press [
Load
button and no.
1
]
at the same time to load saved zone groups from particular memor :
Kindl find the groups setting
shown below
After p
erforming a load function from the paging console of recall from
press the
CALL
button to perform paging.
se ing
configured action which means user can select the require zone and
enable eas access to a group of zone when paging.
channel where ou wish to get
-
together into same group.
at the same time
to save zones group
as shown below to
Which means Zone 01, 02, 03, 04 & 05 are grouped together in Group 1.
at the same time
to save zones group
as shown below to memor 8:
Notes: Repeat the step shown above to program other grouping.
se ing
Zones grouping that had been grouped during the earlier stage
and this
can be recall back
at the same time to load saved zone groups from particular memor :
shown below
which has been saved in memor 1.
erforming a load function from the paging console of recall from
Group 1 consists of zone 1, 2, 3, 4 & 5
button to perform paging.
14
configured action which means user can select the require zone and
group the
together into same group.
as shown below to
memor 1:
as shown below to memor 8:
can be recall back
for paging purpose.
at the same time to load saved zone groups from particular memor :
Group 1 consists of zone 1, 2, 3, 4 & 5
,

3.7 Uni Se up - Synchronize
se ing
Press
SYNC
button
to s nchronize device setting with other devices.
select for s nchronize:
Press numeric ke pad [No.
1
or No.
2
]
Press
No.1
button on the numeric ke pad to s nchronize group of zone for paging
transfer to other linked up digital paging console
Example of application:-
All lobbies of different floors can be merged under single group to allow simultaneous paging to
entire floor.
Press
No.2
button on the numeric ke pad to s nchronize group of zone for paging
Dela time, Chime t pe & PTT
settings will be transfer to other linked up digital paging console.
se ing
to s nchronize device setting with other devices.
There are 2
different
]
to select which setti
ng is wanted to be sending to another paging
button on the numeric ke pad to s nchronize group of zone for paging
transfer to other linked up digital paging console
All lobbies of different floors can be merged under single group to allow simultaneous paging to
button on the numeric ke pad to s nchronize group of zone for paging
settings will be transfer to other linked up digital paging console.
15
different
settings for user to
ng is wanted to be sending to another paging
console.
button on the numeric ke pad to s nchronize group of zone for paging
. The saved groups will be
All lobbies of different floors can be merged under single group to allow simultaneous paging to
the
button on the numeric ke pad to s nchronize group of zone for paging
. The saved setting such as
settings will be transfer to other linked up digital paging console.
4.0 -
Emergency (Immedia e) paging
To do immediate paging,
user has to press
will be activated once
EMER
but
ton has been pressed:
Notes: This is the highest priorit , no matter what is our paging console priorit level setting was set
the previous setting.
4.1 O her - Paging Console
Paging console priorit no.3 itself is doing announcement through the digital paging console.
4.2 O her - Paging Console
When there is another
p
aging console
announcement through the s stem.
This digital paging console LCD will show up a Funnel where
does not allow to do calling or paging at this moment.
Emergency (Immedia e) paging
user has to press
EMERGENCY
. All zones will be automaticall selected and paging
ton has been pressed:
Notes: This is the highest priorit , no matter what is our paging console priorit level setting was set
Paging console priorit no.3 itself is doing announcement through the digital paging console.
aging console
higher priorit (no.1) than the current
paging console
This digital paging console LCD will show up a Funnel where
does not allow to do calling or paging at this moment.
16
. All zones will be automaticall selected and paging
Notes: This is the highest priorit , no matter what is our paging console priorit level setting was set
on
Paging console priorit no.3 itself is doing announcement through the digital paging console.
paging console
making
This digital paging console LCD will show up a Funnel where
b the user

17
Technical Specifica ions
Input voltage 24VDC
Max. Power consumption 100mA
Zoning Capacit >180Zones
Data Communication RS485 protocol
Input connectors Double RJ-45, via CAT-5 cable
Operation distance up to 1.2KM data communication
Chimes Settings 8nos t pe of chime selection
Displa 4 x 20CH LCD with blue back light
Frequenc response 100 Hz to 12 KHz
S/N ratio >60dB
Grouping Capacit 9nos groups, each group can be store up to 180 zones
Microphone Condenser T pe
Output impedance Audio signal Balanced, 600Ω
Output level Audio signal Balanced, 0-700mV
Output Dr contact N.A
Output Gain control Chime volume & adjustable gain for Microphone
Microphone length 400mm (excluded paging console)
Dimension (W x H x D) 400 x 105 x 230mm
Gross Weight 1.75 kg
Net Weight 1.6 kg

18
Onl EMIX Technical Service Centers are allowed to make warrant repairs. Send the equipment directl to AV
Electronics Marketing Sdn Bhd, or contact us for a list of Emix Technical Centers. This warrant is not valid if
repairs are performed b unauthorized personnel or service centers.
This warrant covers onl repairs and replacement of defective parts. Costs and risk of transportation as well
as removal and installation of the product/equipment from the main s stem are to be borne b the purchaser.
This warrant shall not extend to the replacement of the unit.
This warrant does not cover damages caused b misuse, neglect, accident of the products as well as using the
product with power suppl voltage other than shown on the product, or an other power suppl source /
adaptor not recommended b the manufacturer. This warrant does not cover damages caused b fire,
earthquakes, floods, lightning and ever cause not directl related to the unit.
This warrant does not include an indemnit in favor of the purchaser or the dealer for the period of use of
the unit; moreover the warrant does not cover an damages which ma be caused to people and things when
using the products.
This warrant certificate is valid onl for the described product, and is valid for a period of 12 months from the
date of purchase or for a longer period in countries where this is stated b a national law. In this case, the
extension is valid onl in the countr where the product is purchased.
AV ELECTRONICS MARKETING SDN BHD is not obliged to modif previousl manufactured products under
warrant if the design changes or improvements are made.
Information contained in this manual is subject to change without prior notice and does not represent a
commitment on the part of the vendor. AV ELECTRONICS MARKETING SDN BHD shall not be liable for an loss
or damages whatsoever arising from the use of information or an error contained in this manual.
It is recommended that all services and repairs on this product be carried out b AV Electronics Marketing Sdn
Bhd or its authorized service centers/agents.

19
EMIX products must onl be used for the purpose the were intended b the manufacturer and in conjunction
with this operating manual.
AV ELECTRONICS MARKETING SDN BHD cannot accept an liabilit whatsoever for an loss or damages caused
b service, maintenance or repair b unauthorized personnel, or b use other than that intended b the
manufacturer.

20
Professional Public Address S stem
www.emix.com.m
Table of contents


