EML SB325 User manual

1
SB325/ HF-T100
ELECTRIC SHAVER WITH 360 DEGREE FLEXIBLE SHAVING HEAD
360° ROTARY SHAVER
INSTRUCTION MANUAL
This appliance can be used by children aged
from 8 years and above and by persons with
reduced physical, sensory or mental
capabilities or lack of experience and
knowledge if they have been given supervision
or instruction concerning use of the appliance
in a safe way and understand the hazards
involved. Children shall not play with the
appliance. Cleaning and user maintenance
shall not be made by children unless they are
supervised.
Please read the user’s manual before using the product
and keep it for future reference.
English
ais

2
I. SAFETY INSTRUCTIONS
When using an electric shaver, basic safety precautions should always be followed, including the
following:
1. Use this shaver only for its intended household use as described in this manual.
2. Make sure that the supply voltage corresponds to the voltage marked on the instruction
manual in part II: Specifications.
3. Do not reach for an electric shaver in a charging operation that has fallen into water. Unplug
immediately.
4. Use the shaver only in dry conditions. Do not use the shaver while bathing or in a shower.
5. Do not place or store a shaver where it can fall or be pulled into a tub or sink. Do not place or
drop a shaver into water or other liquid.
6. Always unplug this shaver from the electrical outlet immediately after use, except when shaver
is (re)charging.
7. Do not use an adapter not recommended by the manufacturer. Only use with the adapter
supplied.
8. Never operate this shaver if it has a damaged adaptor, if it is not working properly, if it has
been dropped or damaged, or dropped into water while plugged in.
9. Keep the shaver and adaptor away from heated surfaces.
10. Never drop or insert any object into any opening.
11. Do not charge or plug in the shaver outdoors or operate where aerosol (spray)
products are used.
12. Do not charge or place the device in direct sunshine or near a heating system or wet
place. Otherwise, troubles may occur.
13. Make sure the USB charging cord and the adaptor does not get wet.
14. This marking indicates that the shaver head can be cleaned under running water.
II. SPECIFICATIONS
Battery : 1x Lithium battery 600mAh, 5V, 1A
Adaptor: Input: AC100-240V 50/60Hz 0.2A/ Output: DC5.0V 1000Ma
Shaver: DC5V, 1.0 A
III.DESCRIPTION
Fig.1
A. Protection cap
B. Button to lift up the click-on shaving head
unit
C. LED indicator charging light
D. ON/ OFF button
E. Socket for USB cord ( type C)
F. Cleaning brush (x1)
G. USB cable
H. Adaptor
IV. CHARGING YOUR SHAVER
For recharging, only use the detachable supply unit provided with this appliance.
Do not charge the device for more than 10 hours.
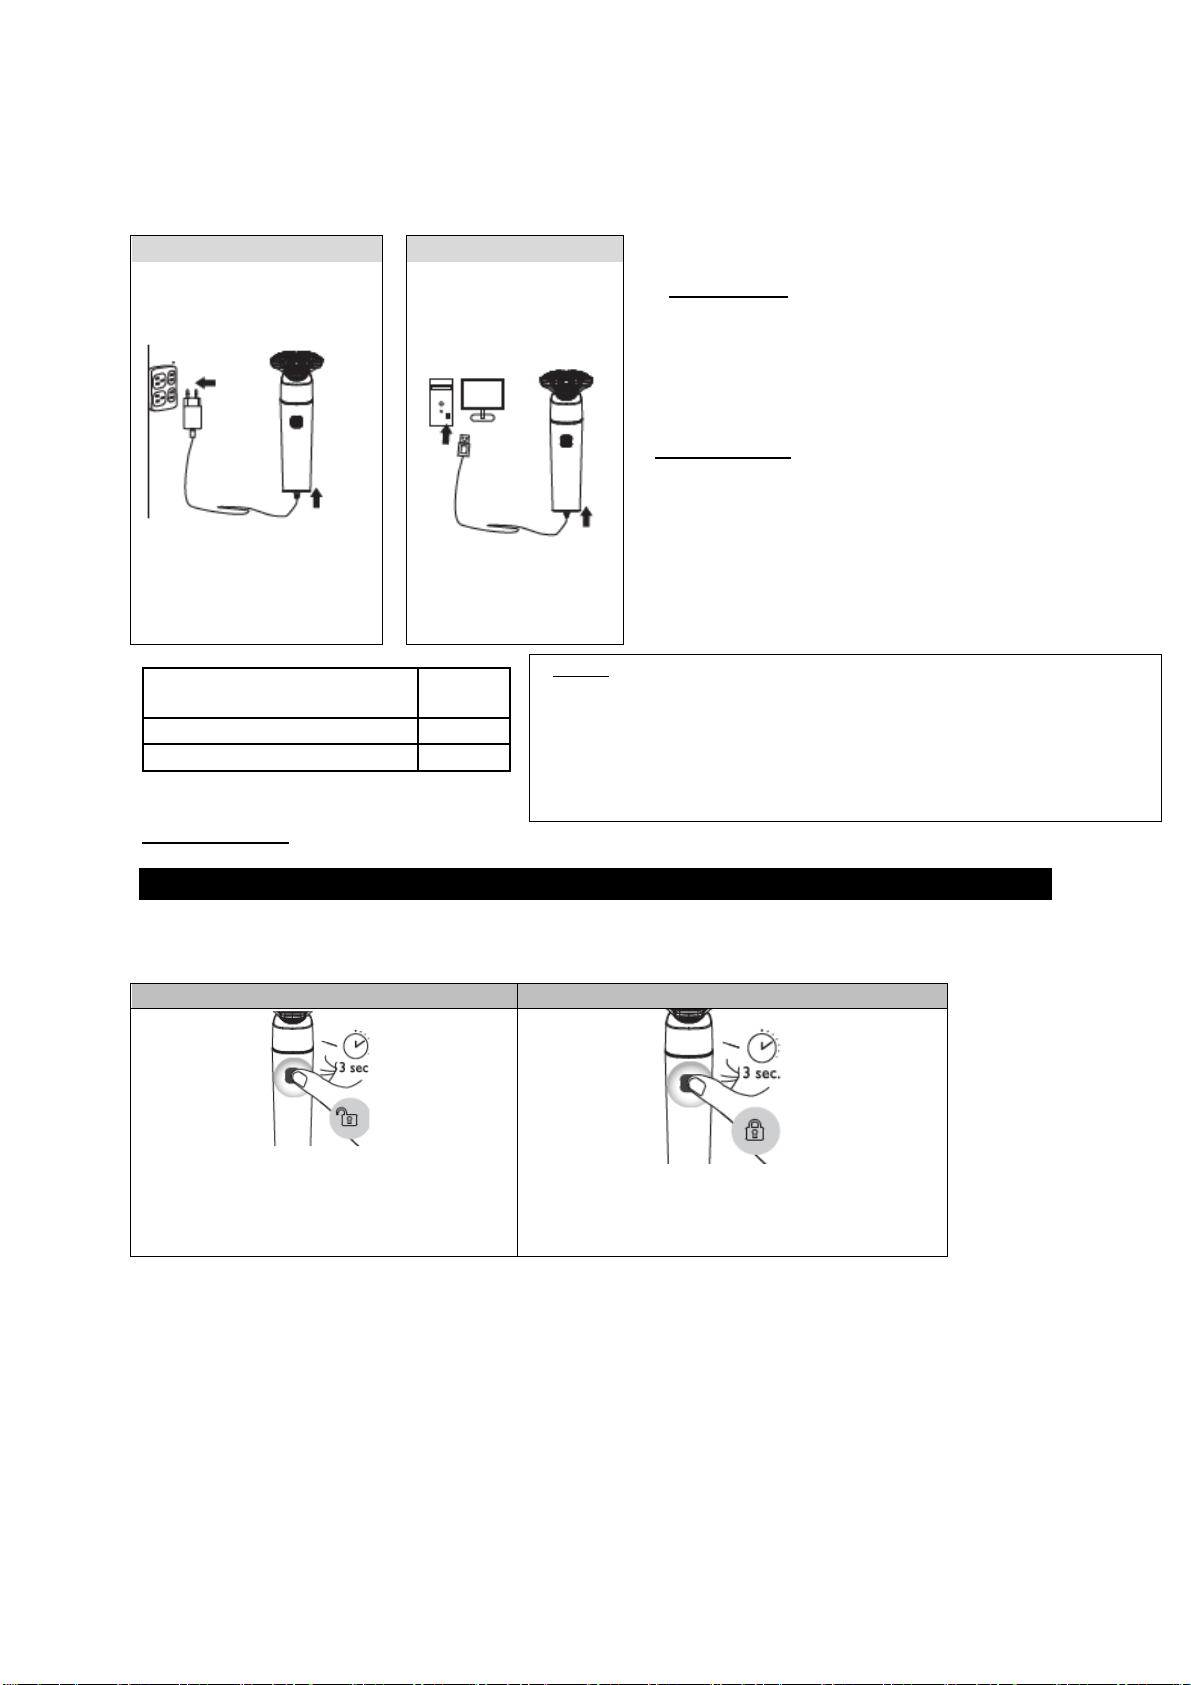
3
The shaver is delivered pre-charged, and is normally ready for use. However if it needs to be
recharged, proceed as indicated in the figures below:
There are 2 ways of recharging, as described and illustrated below:
1
2
1) AC charging
Before charging, make sure the power is off.
Connect the USB cord to the USB port of the
shaver and adapter. Then plug into mains to
recharge. Note: A click is heard when the USB
cord is well connected to the device.
2)USB Charging = Charge by computer or power
bank (It is recommended to use 5V 1A to charge
it.)
Connect the USB cord to the USB port of the
shaver and the computer USB interface. Note: A
click is heard when the USB cord is well connected
to the device.
Note: The LED light will be bright and flashing when
charging.
LOW BATTERY: The LED light will flash 3 times and the shaver will shut off. Recharge it.
V. TRAVEL LOCK
You can lock the shaver when you are going to travel. The travel lock prevents the shaver from being
switched on by accident.
Charging time before first
use:
90min
Charging time for next uses:
90min
Autonomy after full charge:
90min
Notes:
To optimize the lifetime of the rechargeable batteries, charge it
when the LED indicator flash 3 times and motor stop working.
Then fully recharge the battery.
Once the power cord is damaged. It must be replaced by the
manufacturer,after-service center or a similarly qualified
technician .
Activate
Deactivate
Press the on/off button for 3 seconds to
enter the travel lock mode, While you
activate the travel lock, the LED indicator
will flash for 3 times.
Press the on/off button for 3 seconds, the LED
indicator will flash for 3times.
The shaver is now ready for use again.

4
VI. HOW TO USE THE SHAVER
A. TURNING ON AND OFF YOUR SHAVER
NOTE: An adaptation period of 2 or 4 weeks may be necessary to allow the skin to get used to
the shaving system of our shaver, and thus to obtain optimal shaving efficiency.
The outer razor blade (dual foil) is thin and refined. When using, DO NOT touch your skin
too hard with the blade, nor drop the shaver. Your skin may be hurt or the outer blade will
be damaged.
VII. HOW TO REPLACE THE SHAVER HEAD?
For optimal shaving performance, replace the shaving heads every two years with original
ones provided by the manufacturer. The shaver can only be used and be functional with them.
1
2
3
4
Turn the shaving head
anticlockwise. Then lift
it up.
Remove the used
head.
Replace it with a
new one.
Close the shaving head. Turn the shaver head
clockwise till it is secured.
VII. CLEANING AND MAINTENANCE
Regular cleaning is recommended to guarantee optimal shaving performance.
DO NOT CLEAN THE SHAVER WHEN IT IS CHARGING.
MAKE SURE IT IS TURNED OFF AND REMOVE THE USB CORD IF IT IS CONNECTED
BEFORE CLEANING.
The shaver is washable and can be cleaned under the tap. DO NOT wash
the shaver with water hotter than 60℃.
Shaver head cleaning
1. Take off the shaver head.
1
2
3
4
5
TURN ON
TURN OFF
After cleaning the
shaver and
accessories, put the
cap again.

5
2. Press the release button to open the inner blade before washing the hair chamber and the
inner blade.
3. Use the brush to clean the shaver heads and hair chamber after use. If they are too dirty,
wash them with hot water(40-60℃).
Avoid damaging the shaving heads when cleaning.
Do not dry the shaving heads with the towel or tissue.
Please note that if there are too many beard crumbs stored in the shaver, their presence
may affect the quality of shaving, and the outer blade may not be sharp enough.
4. For efficient cleaning when needed, use a degreasing liquid (e.g.Alcohol) to clean shaving
heads. Then, lubricate the shaving heads with a drop of sewing machine oil after cleaning to
prevent wear of them.
IX. SAFE INSTRUCTIONS FOR BATTERY
ATTENTION :
Before dismantling the battery, you must be sure that turn off the power of appliance without
remaining electricity. If there is some, turn on the shaver until the motor stops.
The battery should not be removed until it is not completely discharged.
The battery must be removed from the appliance before it is scrapped.
The appliance must be disconnected from the mains supply when removing the battery. You
should unplug the charger and then remove the plug that connects to the shaver.
Do not plug the shaver after removing the battery.
The battery must be disposed of safely in the government designated collection places.
Procedure to remove the battery
Before starting any operation of the removal of the battery, please read the safety instructions written
above and follow them.
1
2
3
4
Press the button to lift up
the shaving head unit.
Remove it.
Lubricate with oil.
Close the shaving head.
Turn the shaver head
clockwise till it is secured.
1
2
3
4
5
Insert the end of
screwdriver in the
USB port.
Then pull the
bottom panel
off the
appliance.
Unscrew the 2
screws on the
inside of the
bottom panel.
Unscrew the
screw inside to
separate the
power unit from
the front panel.
Cut the wires
close to the
batteries and
then remove the
battery.
6
WARNING: You should not dispose of this device with your household waste. A selective
collection system for this type of product is implemented by your local authorities. Please
contact your local authorities to find out how and where collection takes place. These
restrictions apply because electrical and electronic devices contain dangerous substances that
have harmful effects on the environment or on human health and must be recycled.
This symbol indicates that electrical and electronic devices are collected selectively. The
symbol shows a waste container crossed out with an X symbol.
If the power cable is damaged, it must be replaced by the manufacturer, his after sales service,
or a person qualified in this area in order to avoid any accidents arising.
Imported by EML –trading name Prodis,1 rue de Rome, 93110 Rosny-sous-Bois, France/
Made in P.R.C
This manual suits for next models
1
Table of contents


