Emotiva Precision airmotiv Stealth 6 User manual


Page 1
Contents
Introduction.................................................................3
About This Manual ........................................................ 4
Features......................................................................5
Unpacking ...................................................................6
The Emotiva airmotiv Powered Monitor ............................ 7
Quick Start .................................................................. 8
About Near-Field Monitors ............................................. 9
Speaker Placement ..................................................... 10
Connections............................................................... 17
Operation .................................................................. 20
Adjustments .............................................................. 21
Care and Maintenance................................................. 22
Specications............................................................. 23
Troubleshooting.......................................................... 24
Warranty ................................................................... 27
Contact Information.................................................... 27
Accessories................................................................ 28
Safety Instructions ..................................................... 29
Notes........................................................................ 30
Powered Bi-Amplied Monitors

Page 2
Emotiva Pro and Airmotiv are registered trademarks of Emotiva Professional Systems, LLC.
Emotiva and the “E” are registered trademarks of Emotiva Audio Corporation.

Page 3
Introduction
Thank you for purchasing Emotiva airmotiv bi-amplied powered monitors.
The powerful discrete internal ampliers, coupled with our advanced input processing
circuitry, deliver exceptional performance and stunning sound quality from a
moderately sized system. The 32 x 60 mm airmotiv high-frequency transducer
produces crystal clear highs with vanishingly low distortion, excellent detail, and
impressive dynamics. The 6.5 inch airmotiv low-frequency transducer delivers a fast,
natural, extended low end and a beautifully integrated and cohesive midrange. The
airmotiv are at within +0 /-3 dB from 42 Hz to 25 kHz; amazing for a speaker that
occupies less than 2/3 of a cubic foot of volume.
The exceptional performance of the airmotiv monitors ensures that they will work
seamlessly in a wide variety of critical listening applications.
Happy listening!
The Emotiva Professional Team

Page 4
About This Manual
This manual will provide you with all the information you need to get great
performance, accurate sound, and many years of reliable service from your
Emotiva airmotiv powered monitors.
Many of you are experienced studio professionals and are very familiar with powered
near-eld monitors. Since the airmotiv is intended for several different applications,
you may nd that some of the sections of the manual don’t apply to you.
We suggest that you read through the entire manual as we kept things as short and
direct as possible. Even if you’re an expert user, you might nd some interesting
information and useful suggestions.
If you’re really in a hurry to get started, please read the Quick Start section
(on page 8) and glance at the Safety Instructions (on page 29); you may then read the
remainder of the manual at your leisure.
You may wish to record serial numbers or other purchase information on the Notes
page at the back of this manual.

Page 5
Features
Each Emotiva airmotiv is a fully self-contained bi-amplied powered studio monitor.
The airmotiv is a two-way design that features quality construction and engineering
throughout and incorporates discrete power ampliers, precision active crossovers,
effective yet unobtrusive overload protection, and a wide array of professional features.
Some of the more important features of the Emotiva airmotiv include:
• Accuracy and consistency. The gain and frequency balance of each airmotiv is
factory calibrated to be within 1 dB of our reference standard.
• Emotiva’s exclusive airmotiv high-frequency transducer, which delivers
at frequency response, low distortion, virtually nonexistent signal compression,
smooth off-axis response, superb transparency, and uncanny imaging.
• Emotiva’s airmotiv low-frequency transducer which, with its advanced Curv®
cone material and synthetic butyl rubber surround, delivers clean accurate bass and
is immune to moisture.
• Perfectly balanced sound. Together, both transducers deliver balanced full-range
sound at moderate listening levels.
• An advanced cabinet made from 18 mm MDF, with computer optimized bracing,
and a 3 mm layer of acoustic panel damping material to suppress vibration.
• A tough exterior. The front bafe sports our attractive black lacquer nish, while
the sides and back are covered with a durable heavy-duty textured vinyl laminate
that resists scuffs, water, and ngerprints.
• Plenty of clean power. The airmotiv is fully bi-amplied. The high-frequency
transducer is powered by a 100 watt RMS amplier, while the low-frequency
transducer sports its own 110 watt RMS amplier; both of which are fed by a
precision multi-pole active crossover.
• Effective yet unobtrusive protection, which individually protects each amplier
and transducer and prevents dangerous overdrive conditions, but doesn’t limit
normal music peaks, or produce artifacts under normal listening conditions.
• Maximumapplicationexibility, with both unbalanced (RCA) and balanced
(XLR) inputs, and both high frequency and low frequency equalization adjustments.
• High quality construction throughout, including all double-sided FR4 circuit
boards, all precision resistors and precision lm capacitors in the signal path,
extensive use of surface mount technology, and an efcient low noise toroidal
power transformer.
• Full magnetic shielding. The airmotiv low-frequency transducer features
full-coverage traditional magnetic shielding while the airmotiv high-frequency
transducer is inherently shielded by its advanced design.
You can nd a more detailed list of features and more information about Emotiva’s
exclusive airmotiv technology on our Web site at http://www.emotivapro.com

Page 6
Unpacking
Your Emotiva airmotiv powered monitors were carefully packed and should reach you in
perfect condition. If you notice any shipping damage or other issues when you unpack
them, please contact Emotiva immediately.
Gently remove your airmotiv powered monitors from the packing carton and remove all
wrappings and shipping material. Avoid pressing directly on the front of the
low-frequency transducer or dropping any bits of packing material into the
high-frequency transducer or rear port opening.
It is important to save the box and all packing materials in case your airmotiv monitors
ever need to be moved or shipped back to the factory for service.
Please keep your sales receipt in a safe place. It is the easiest way to verify your
purchase date for warranty purposes, and may also be required if you ever have to le
an insurance claim.
We truly value customer feedback and would like to hear from you.

Page 7
The Emotiva Powered Monitor
Emotiva’s exclusive
airmotiv high-frequency
transducer
Emotiva’s exclusive
airmotiv low-frequency
transducer
Level control and
Power/Status indicator
Balanced input
(XLR)
Unbalanced input
(RCA)
Linear tuned port High-frequency
Equalization
adjustment
AC Power switch
IEC power cable
receptacle with
integral fuse holder
Low-frequency
Equalization
adjustment
AC Line Voltage
Selector switch

Page 8
Quick Start
To get the most from your Emotiva airmotiv powered monitors, we strongly urge you to
read the entire manual. If you just can’t wait to hear how great your airmotiv powered
monitors sound, this section will cover the basics you need to get started.
• Find a secure location for your airmotiv powered monitors.
• Verify that the airmotiv monitors you received use the correct operating voltage
for your location (the AC line voltage may be changed using the AC Line Voltage
Selector switch on the rear panel).
• Verify that the front panel Level control on each airmotiv is in the calibrated (fully
clockwise) position.
• Plug your airmotiv powered monitors into grounded AC electrical outlets. If you use
a different power cord or extension cord, use only a three-prong grounded type.
• Connect a signal source to either the unbalanced (RCA) or balanced (XLR) input on
the rear panel of each airmotiv monitor. (We recommend using a signal source with
a variable output level, as this is much more convenient than having to adjust the
level on the speaker itself.)
• Turn on the Power switch on the rear panel of each airmotiv.
• Enjoy the music.
While you’re enjoying your airmotiv monitors, it would be a great time to read the rest
of the manual to learn more about them.

Page 9
About Near-Field Monitors
In the past most recording studios used huge monitor loudspeakers, elaborate acoustic
treatments, and large power ampliers, in a large control room. Although a control
room like that sounded great (usually), and made a big impression on customers, it
also required large investments of space, time, and money. Ironically, many recording
engineers preferred to be able to listen to their mix on a system that sounded more or
less like what it would eventually be played on by the customer. A control room that
sounded more like a concert hall than a living room didn’t work very well for them.
Also, even though many of those impressive studio control rooms had a very nice
sound, it was a very distinctive sound, so a mix might sound different when played in
a different studio (or even a different room at the same studio). This made it difcult
for the engineer to judge what a mix would actually sound like - which is, after all,
the whole point of monitoring. All of this led to the current revolution in near-eld
monitors.
A near-eld monitor is simply a small accurate monitor loudspeaker that is positioned
close to the console so that it is “playing directly to the engineer”. This location helps
to reduce contributions from control room acoustics, especially those due to room
reections. In addition, the human brain tends to focus its attention on the sounds that
arrive earliest, so the reected sound that does arrive later has minimal inuence on
the overall sound. The result is a more accurate, and more repeatable, presentation of
the music. By eliminating most of the control room’s contribution to the sound, near-
eld monitors allow the recording engineer to hear what the music really sounds like.
Many large studios, while they still have their big control rooms that allow large groups
to listen at levels approaching a live performance, do a lot of their serious work on
near-eld monitors, and many recording engineers prefer them.The fact that near-eld
monitors work very well in small rooms with minimal acoustic treatment, and so reduce
cost and space requirements, is also a major benet for smaller studios and serious
home recordists.
The most signicant requirement for near-eld monitors is sound quality. Unlike a
big speaker intended to play loud in a huge room, a near-eld monitor must sound
perfect at moderate listening levels, when located very close to the listener. It must
deliver every nuance and detail of the music with perfect clarity, near-perfect accuracy,
and extremely low residual noise. Because it may be located only a few feet from the
recording engineer’s ears, it can’t make a lot of hiss, and the cabinet and drivers can’t
contribute signicant noise or distortion to the sound.
In short, because the near-eld monitor is almost a direct pipeline between the music
and the engineer’s ears, it must do a superb job of delivering the music with virtually
no coloration or distortion. Emotiva’s airmotiv monitors are your direct link to the
music.
Page 10
Speaker Placement
Speaker placement is often a compromise between optimum performance, personal
preference, and site requirements. The following guidelines will serve as a starting
point to help you decide where to place your airmotiv powered monitors to achieve the
best possible performance.
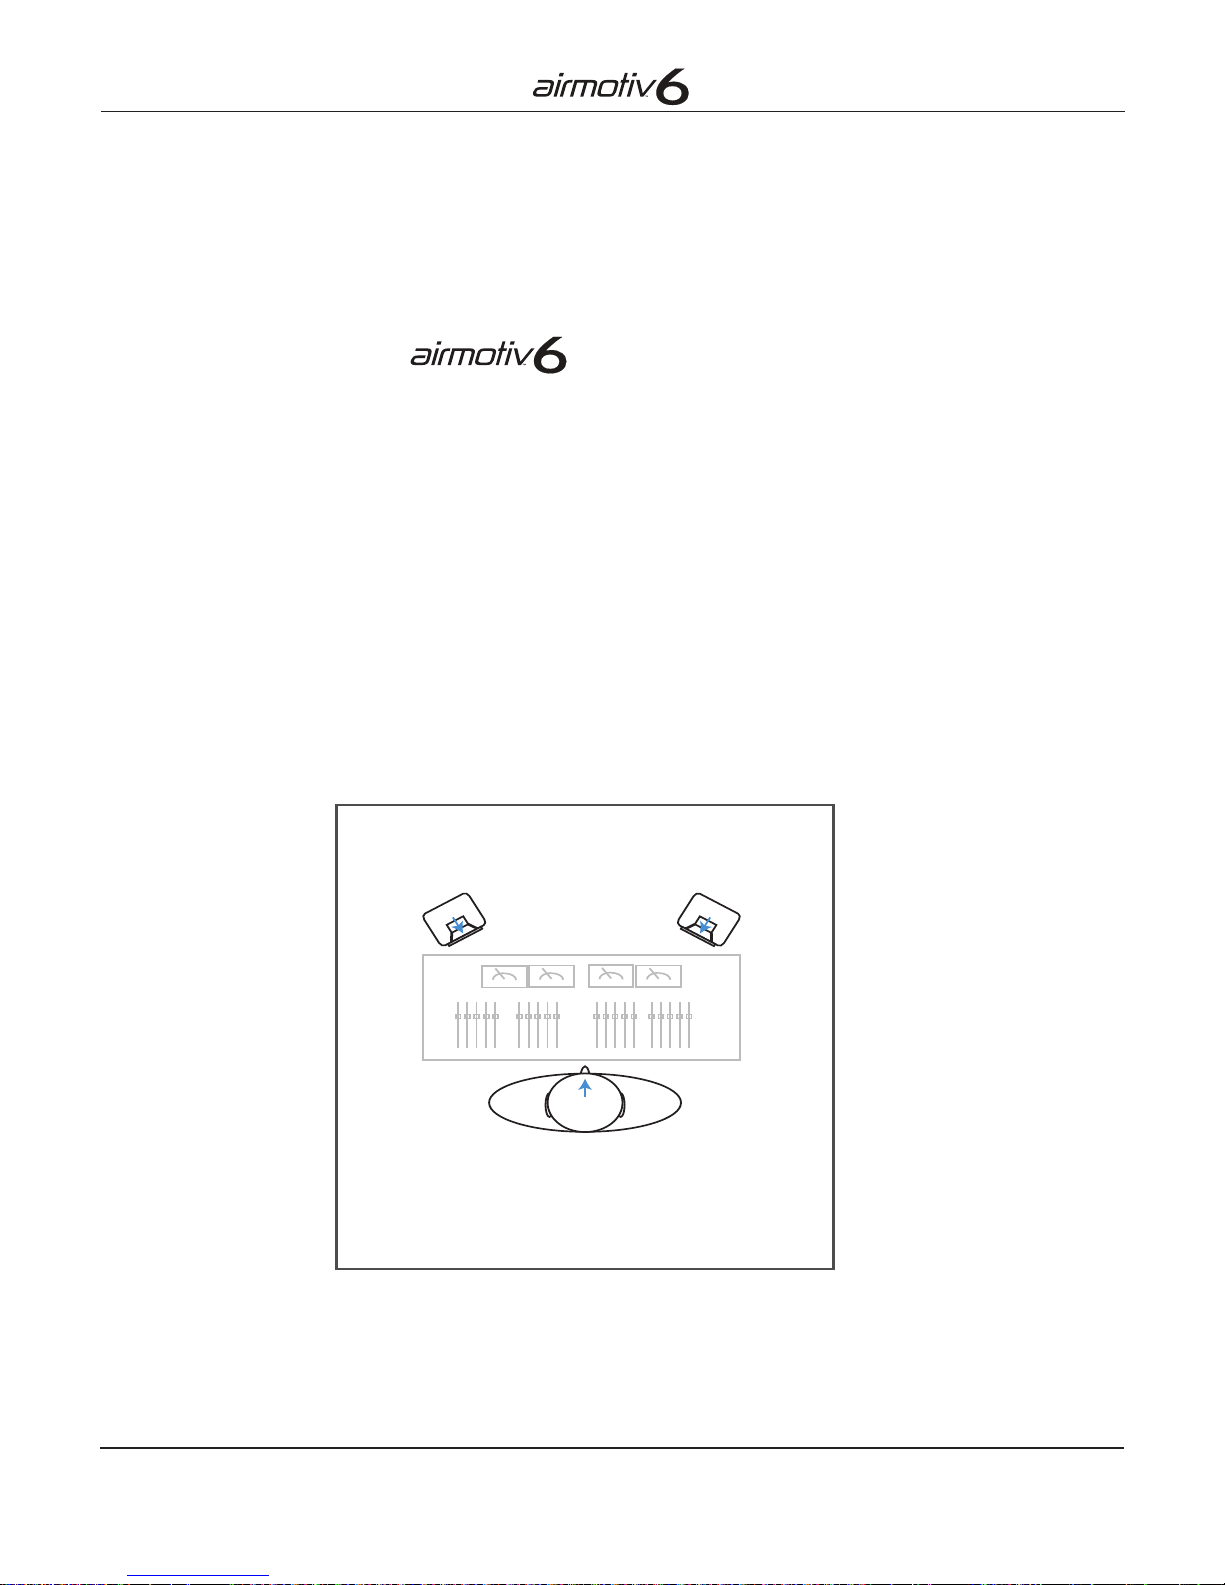
Positioning your monitors as
near-eld monitors
The Emotiva airmotiv was designed primarily as a superlative near-eld monitor. When
choosing optimum locations for near-eld monitors, the goal is to locate them close to
the recording console, and far from any walls or other reective surfaces, to maximize
direct sound while minimizing reected sound.
• Mount your airmotiv powered monitors on separate stands, or mounts, if possible.
If you place them directly on the meter bridge or the same table as your console,
vibrations may be coupled to the console. You should consider using a decoupling
platform beneath each monitor.
• Locate your monitors close to the recording console, and away from walls or other
large reective surfaces. If there are large reective surfaces nearby, covering them
with commercial sound absorbing materials (or felt, or a tapestry) may improve
frequency response and imaging.
Listener
Typicalnear-eldmonitorplacement

Page 11
• If possible, mount your airmotiv monitors upright (with the high-frequency
transducer on top), vertically (not angled upwards or downwards), with the middle
of the front bafe at approximately the same height as the engineer’s seated head
height, and toe in each speaker so the front is directly facing towards the engineer’s
head.
• Locate your airmotiv monitors so that the distance between them is approximately
the same as the distance between each monitor and the engineer’s head
(the monitors and the engineer should form an equilateral triangle).
• If your monitors must be mounted above head height, tilting them down to directly
face the engineer’s seated head position is suggested, and mounting them upside
down (high-frequency transducer towards the oor) will produce better results
in many cases. The goal is to maximize direct sound reaching the engineer and
minimize reected sound. If possible, avoid mounting your monitors in the upper
or lower corners of the room (doing so will enhance bass output, but will often
produce muddy bass and adversely affect imaging.)
• If conditions require that your monitors be placed on a table or other horizontal
surface, or with other large reective surfaces between them and the console, you
can minimize reections by covering the surface with sound absorbing material.
• Always leave several inches of clearance behind your airmotiv powered monitors to
avoid blocking the rear-positioned port and to allow the ampliers to dissipate heat
via the aluminum back plate ns, which will get warm in normal
operation.
Page 12
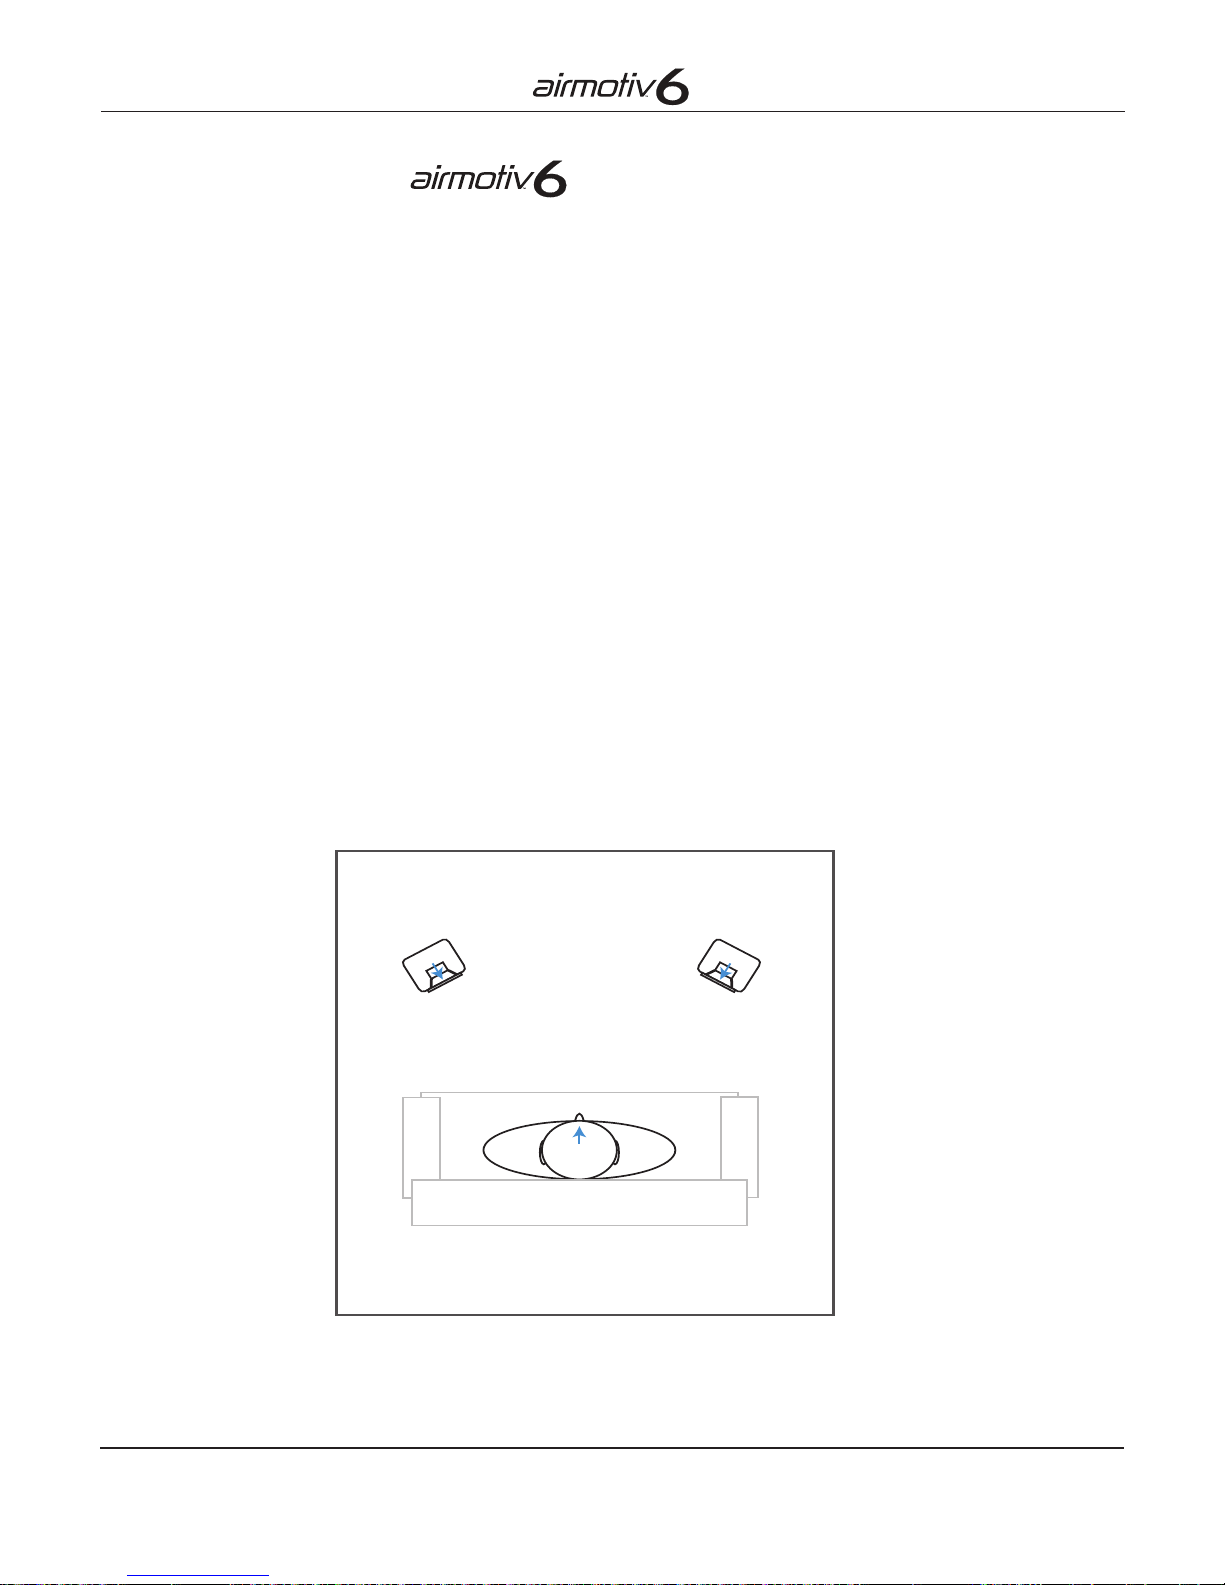
Positioning your monitors as
stereo speakers
The Emotiva airmotiv works beautifully as a full-range speaker in a moderately sized
audiophile two-channel system, and as a satellite speaker in a larger two-channel
system with the addition of a sub-woofer. When choosing optimum locations for
speakers in an audiophile home stereo system, the goal is usually to optimize the
frequency response and imaging.
• Mount your airmotiv speakers on separate stands, or using brackets if possible.
Locating your speakers away from the front wall will usually result in better imaging
and frequency response. Placing them directly on a (sturdy) wall-mounted shelf
may also produce satisfactory results. If possible, mount your airmotiv speakers
upright (with the high-frequency transducer on top), vertically (not angled upwards
or downwards), with the middle of the front bafe at approximately the same
height as the listener’s seated head height, and toe in each speaker so the front is
directly facing towards the listener’s head.
• Locate your airmotiv speakers so that the distance between them is approximately
the same as the distance between each speaker and the listener’s head
(the speakers and the listener should form an equilateral triangle).
• In larger rooms, or if you wish to optimize speaker performance for several listeners
or a wide listening area, mounting the speakers with no toe-in will result in a wider
sweet spot with a slightly wider soundstage.
Listener
Typical stereo speaker placement

Page 13
• Avoid locating your airmotiv speakers close to side walls if possible. If you have
large reective or sound-absorbing surfaces on the side walls, try to make them as
symmetrical as possible. (If there is a large glass window on one side wall, balance
it by hanging a large glass picture on the other, or by covering it with a material
which more closely matches the acoustic properties of the opposite wall. If there is
a large couch on one side of the room, try balancing it with a tapestry on the other
side.)
• If you prefer to mount your airmotiv speakers above head height, tilting them down
to directly face the listener’s seated position is suggested, and mounting them
upside down (high-frequency transducer towards the oor) will produce better
results in many cases. The goal is to maximize direct sound reaching the listener.
If possible, avoid mounting your speakers in the upper or lower corners of the
room (doing so will enhance bass output, but will often produce muddy bass and
adversely affect imaging.)
• If you place your speakers on a table, wide shelf, or other horizontal surface,
covering the surface in front of the speakers with a felt pad or other similar material
will reduce reections and improve the sound.
• Always leave several inches of clearance behind your airmotiv powered monitors to
avoid blocking the rear-positioned port and to allow the ampliers to dissipate heat
via the aluminum back plate ns, which will get warm in normal operation.
• If your system includes a sub-woofer, position and congure it according to the
manufacturer’s instructions.
Listener
Listener Listener
Typical placement of stereo speakers
to cover a wide listening area

Page 14
Positioning your monitors as satellite speakers
in a multi-channel mastering or surround sound system
Emotiva’s airmotiv powered monitors work great as satellite speakers in a high-quality
multi-channel playback or mastering system. When choosing optimum locations for
speakers in a multi-channel system, the goal is to optimize the frequency response
and imaging. However, because more speakers are required, you are more likely to
encounter practical constraints on where they can be located. Various surround-sound
systems and standards also recommend slightly different speaker placement for
optimum performance.
When listening to most music, the surround speakers are primarily used for ambience
information. In most movies, important and highly localized information is present in
the front and side channels. It is therefore more critical that those speakers be placed
in their optimum locations.
A typical surround sound system may also use a mix of different models and types
of satellite speakers (possibly including bipole or dipole speakers for surrounds). For
example, a superb system could be built by using Emotiva’s airmotiv6powered monitors
for front speakers and airmotiv4(or airmotiv5) powered monitors for surrounds. Since
all airmotiv monitors share the same basic technology, and are voiced similarly, they
will work exceptionally well together in any combination in a surround or multi-channel
playback system.
Some systems may also use a mix of airmotiv powered monitors and traditional
speakers and ampliers. For example, if you already own passive monitors and a stereo
power amplier, you could upgrade to surround-sound by adding a pre-processor
and three airmotiv powered monitors (one front center and two surrounds). This way
you would avoid the need for more amplier channels and minimize the number of
additional connections.
Sound is subjective,and both room acoustics and personal preference play a big part
in the listening experience, so use these guidelines as a starting point, but feel free to
experiment until you achieve the sound you like best.
• If possible, for best imaging and soundstage, mount all of your airmotiv speakers
upright (with the high-frequency transducer on top), vertically (not angled upwards
or downwards), with the middle of the front bafe at approximately the same
height as the listener’s seated head height.
• Place your left-front and right-front speakers anking the video display (TV).
The distance between left-front and right-front speakers is a matter of preference;
placing them close to the display will tend to focus attention on the picture
(especially with smaller displays), while moving them further apart will tend
to widen the soundstage. Whether to apply toe-in or not is also a matter of
preference.

Page 15
• Place your front-center speaker either directly above or directly below the display.
If you have a large display and the front-center speaker must be placed above
head height, better results may be achieved if it is mounted upside down (high-
frequency transducer towards the oor) and slanted slightly downwards toward the
listener. Next in order of preference would be to place the center speaker on its side
in either location. If both of these locations are impractical, and especially if the
left-front and right-front speakers are located far from the display, the front-center
speaker can be located directly to one side of the display (this location isn’t optimal,
but may work reasonably well in some situations).
• If your location permits it, the ideal arrangement is to place your left-front and
right-front speakers on stands away from both the front and side walls. They should
be placed such that the left-front, center-front, and right-front speakers form an arc
equally distant from the central listening position.
• Side surrounds are typically mounted above head height and approximately even
with the center of the listening position.
• Rear surrounds are located, as you might guess, at the rear of the listening
position, and are typically mounted on brackets on the rear wall above the listening
position.
Listener
Center
Left Side
Surround
Right Front
Display
Right Side
Surround
Left Rear
Surround
Right Rear
Surround
Sub-woofer
Left Front
Listener
One example of placement for
surround-sound speakers

Page 16
• Because surround speakers carry mostly ambience information and are inuenced
by the listening room, and because they are also used differently by different
surround-sound decoding standards, you should experiment to nd the best
locations and orientations for your particular installation. We suggest you try them
at various angles, and in various orientations (vertical, upside down, and even
sideways) to identify the location and orientation that work best with your room.
Some installations locate the surrounds facing sideways along the side or rear
wall. The best way is whatever works well for you in your room. Surrounds should
always, however, be positioned symmetrically (so, for example, if you locate your
left side surround on its side with the high-frequency transducer towards the rear
of the room, you should also locate it’s counterpart, your right-side surround, on its
side with the high-frequency transducer towards the rear of the room.
• While you should avoid mounting front speakers in the corner angles of a room,
corners are acceptable locations for surround speakers, but you may need to adjust
the Low-frequency Equalization for best results.
• Always leave several inches clearance behind your airmotiv powered monitors to
avoid blocking the rear-positioned port and to allow the ampliers to dissipate heat
via the aluminum back plate ns, which will get warm in normal operation.
Positioning your monitors as computer speakers
The Emotiva airmotiv also makes an incredible computer speaker. When choosing
optimum locations for computer speakers, most people prefer to position them as they
would near-eld monitors. If your computer also provides music for your entire living
room or ofce, you may wish instead to position your airmotiv powered monitors as
you would for a small high-end home stereo system.
Positioning your monitors for use with a music
client or portable music player
The Emotiva airmotiv will deliver beautiful high-quality sound when connected to a
music client or portable music player. Depending on your specic requirements you
may choose to position them as you would near-eld monitors or as you would normal
stereo speakers. Please refer to the appropriate section for more details.

Page 17
Connections
Note: The level controls on the airmotiv are intended to be left
in the calibrated (fully clockwise) position in normal use. Level
should be controlled by your source equipment; therefore your
airmotiv monitors should always be connected to variable outputs
ratherthanxedoutputs.
Connecting your monitors to a studio console
Virtually all studio equipment offers balanced outputs, which are the preferred method
of connecting your airmotiv powered monitors. Connect your airmotiv monitors to a
variable-level output on your console - or whatever equipment you plan to use them
with.
Connecting your monitors to a home stereo
or surround sound system
Connect your airmotiv speakers to the same type of variable line-level output to
which you would normally connect a power amplier, such as the output of a console,
preamp, or surround-sound processor.
DO NOT connect your airmotiv monitors to the speaker outputs
ofanamplierorreceiverordamagetoyourAirmotiv 6 speakers
and your equipment may result.
Balanced (XLR) outputs offer several benets, and are the preferred method for
connecting your airmotiv monitors; connect a high quality balanced cable between
each airmotiv and your signal source. If your source equipment offers only unbalanced
(RCA) outputs; connect a high quality unbalanced cable between each airmotiv and
your signal source. (If your source equipment offers only unbalanced outputs, there
is no sonic benet to using converters to connect them to the balanced inputs on the
airmotiv speakers unless you are experiencing hum or line noise problems.)
When used as satellites or surrounds in a home-theater or stereo system with a sub-
woofer, your airmotiv speakers should be set as “small” speakers in your surround-
processor or preamp’s conguration.
Connecting your monitors to a music client
Connect your airmotiv speakers to the same type of variable line-level output to which
you would normally connect a power amplier. Some music clients offer both variable
and xed outputs, and some require that you enable variable control of the output from
a menu setting.
Note: DO NOT connect your airmotiv monitors to any digital
outputs on your music client or damage to your airmotiv speakers
and your music client may result.

Page 18
Connecting your monitors to a portable player
Most portable music players offer only unbalanced outputs, usually via a 1/8” jack.
Connect your airmotiv speakers to a variable output (which is often also the headphone
output). Use a high quality, well shielded adapter cable to connect the output to the
unbalanced (RCA) inputs of your airmotiv speakers. A single “long Y-cable” is preferable
to multiple separate adapters and extension cables. If you have an iPod® dock or other
similar device, connect your airmotiv speakers to the same output you would connect
to the input of an amplier or receiver; if the line output on the dock doesn’t offer level
control, then connect the cable to the headphone output of the device.
Connecting your monitors to a computer
Connect your airmotiv speakers to the same line-level output intended for powered
computer speakers. Depending on your computer or sound card, this may be labeled
as “line out” or “speaker out”. Make sure to choose outputs whose volume is controlled
by your computer’s operating system. Try to avoid outputs intended to drive small
unpowered speakers directly as these often have unacceptable sound quality. If no
other options are available, headphone outputs should be OK. Most computers offer
only unbalanced outputs, usually via one or more 1/8” jacks. Use a high quality, well
shielded adapter to connect the output to the unbalanced (RCA) inputs of your airmotiv
speakers. A single “long Y-cable” is preferable to multiple separate adapters and
extension cables.
Balanced and unbalanced connections
The airmotiv powered monitor offers both unbalanced (RCA) and balanced (XLR)
input connections. The main reason balanced connections are favored on professional
equipment is that they are very resistant to outside noise and interference, especially
with low-level signal sources (like microphones), and in difcult situations (a need to
run signal cables near power cables or in otherwise noisy environments). Balanced
connections also offer a slight improvement in the S/N ratio of the signal itself under
certain conditions (but only if the equipment at both ends is designed to do so). In
general, using a balanced connection and cables is the best option if the equipment
at both ends offers it. If that option isn’t available, however, good quality unbalanced
cables usually work quite satisfactorily. To correct a common misunderstanding, if no
hum or noise is audible with an unbalanced connection, there is no specic technical
reason to expect a balanced connection to sound better. (However, in a given piece
of equipment, one or the other output may sound audibly better because of how the
output circuitry was designed. In that case, however, it isn’t necessarily the balanced
output that will be superior.)
This manual suits for next models
1
Table of contents
Other Emotiva Speakers manuals

Emotiva
Emotiva Airmotiv 4s User manual

Emotiva
Emotiva airmotiv vaulta AVL-6.5 User manual

Emotiva
Emotiva Airmotiv 4 User manual

Emotiva
Emotiva X-Ref Series User manual

Emotiva
Emotiva airmotiv vaulta User manual

Emotiva
Emotiva Airmotiv3B User manual

Emotiva
Emotiva airmotiv + User manual

Emotiva
Emotiva UOM-6.2 User manual

Emotiva
Emotiva AIRMOTIV User manual

Emotiva
Emotiva VAC User manual


