Energy Storm ESI-1000i User manual

1
ENERGY STORM
Inverter Generator
Owner’s Manual
Model #’s
ESI-1000i
ESI-1000i-CA
ESI-2000iE
ESI-2000iE-CA
ESI-2600iE
ESI-2600Ie-CA
For product support and services please visit us at
www.lifanpowerusa.com or by calling toll free at 1-866-471-7464.
™

2
For your safety read this manual carefully. Become familiar with the proper operation, care, and maintenance
your Energy Storm generator.
The safety and alert symbol ( ) i
s used with a signal word (
hazards. CAUTION
indicates a hazard which, if not avoided, might result in minor o
avoided, will result in death or serious injury.
WARNING
Running generator emits carbon monoxide an odo
Breathing carbon monoxide can cause nausea or death!
ONLY operate generator outdoors.
Exhaust gas must be prevented from entering confined areas.
Direct exhaust gas away from windows, doors, ventilation and other openings.
Do
not operate generator inside or under any buildings.
Operating this generator inside the compartment of a recreational vehicle will likely result in death!
The engine exhaust from this generator contains chemicals known to the state of Califor
and cancer.
Do not use this generator within the generator compartment of a recreational vehicle!
This generator does not meet U.S. Coast Guard Regulation 33CFR
Use of this generator on marine applications could result in injury or death.
This is the safety alert symbol. It is used to alert you to potential personal injury hazards.
Obey all safety messages that follow this symbol to avoid possible injury or death.
Explosion Fire Electric Shock
SAFETY ISSUES
For your safety read this manual carefully. Become familiar with the proper operation, care, and maintenance
s used with a signal word (
CAUTION, DANGER, WARNING
), a pictorial and/or safety message to alert you to
indicates a hazard which, if not avoided, might result in minor o
r moderate injury.
DANGER
WARNING
indicates a hazard which, if not avoided, could result in death or serious injury.
WARNING!
Running generator emits carbon monoxide an odo
rless, colorless, poison gas.
Breathing carbon monoxide can cause nausea or death!
Exhaust gas must be prevented from entering confined areas.
Direct exhaust gas away from windows, doors, ventilation and other openings.
not operate generator inside or under any buildings.
Operating this generator inside the compartment of a recreational vehicle will likely result in death!
WARNING!
The engine exhaust from this generator contains chemicals known to the state of Califor
nia to cause birth defects, reproductive harm,
Do not use this generator within the generator compartment of a recreational vehicle!
This generator does not meet U.S. Coast Guard Regulation 33CFR
-
183 and should not be used on marine applic
Use of this generator on marine applications could result in injury or death.
Hazard Symbols and Meanings
This is the safety alert symbol. It is used to alert you to potential personal injury hazards.
Obey all safety messages that follow this symbol to avoid possible injury or death.
Explosion Fire Electric Shock
Toxic Fumes Hot Surface or Gas Kickback
SAFETY ISSUES
For your safety read this manual carefully. Become familiar with the proper operation, care, and maintenance
of
), a pictorial and/or safety message to alert you to
DANGER
indicates a hazard which, if not
indicates a hazard which, if not avoided, could result in death or serious injury.
nia to cause birth defects, reproductive harm,
183 and should not be used on marine applic
ations.
Toxic Fumes Hot Surface or Gas Kickback

3
Fuel and its vapors are extremely flammable and explosive.
Fire or explosion can cause severe burns or death.
Generator produces powerful voltage!
Only a licensed electrician can safely connect generator to existing ut
generator from electrical grid can result in death to utility workers as well as others.
When using generator as backup power, notify utility company. Use approved transfer equipment to
isolate generator from electric uti
Do Not operate generator while exposed to rain or other wet conditions.
Do Not handle generator when in contact with water.
Do Not contact bare wires or receptacles.
Inspect all electrical cords for damage and discontinue from use any damaged or exce
cords.
Do Not allow unqualified persons to operate or service generator.
W
hile engine is running temperature may exceed 150°F (65°).
Server burns may occur.
Exhaust heat/gasses can ignite combustibles, structures or damage fuel tank causing a fire.
Do not touch hot surfaces and avoid exhaust gasses.
Allow generator to cool before touching.
Keep at least 6 ft. (183cm) clearance on a
ll sides of generator including overhead.
Reflective exhaust heat may damage fuel tank causing fire.
Code of Federal Regulation(CFR) Title 36 Parks, Forests, and Public Property require equipment powered by an internal combust
spark arr
ester, maintained in working order, complying to USDA Forest service standard 5100
arrester is required under section 4442 of the California Public resources code.
Unintentional sparkin
WHEN TESTING FOR ENGINE SPARK
Do not check for spark with the spark plug removed.
Use approved spark plug tester.
WHEN REPAIRNG OR ADJUSTING GENERATOR
Disconnect the spark plug wire from the spark plug and pla
WARNING!
Fuel and its vapors are extremely flammable and explosive.
Fire or explosion can cause severe burns or death.
WARNING!
Generator produces powerful voltage!
Only a licensed electrician can safely connect generator to existing ut
ility hookups. Failure to isolate
generator from electrical grid can result in death to utility workers as well as others.
When using generator as backup power, notify utility company. Use approved transfer equipment to
isolate generator from electric uti
lity.
Do Not operate generator while exposed to rain or other wet conditions.
Do Not handle generator when in contact with water.
Do Not contact bare wires or receptacles.
Inspect all electrical cords for damage and discontinue from use any damaged or exce
Do Not allow unqualified persons to operate or service generator.
WARNING!
hile engine is running temperature may exceed 150°F (65°).
Exhaust heat/gasses can ignite combustibles, structures or damage fuel tank causing a fire.
Do not touch hot surfaces and avoid exhaust gasses.
ll sides of generator including overhead.
Reflective exhaust heat may damage fuel tank causing fire.
Code of Federal Regulation(CFR) Title 36 Parks, Forests, and Public Property require equipment powered by an internal combust
ester, maintained in working order, complying to USDA Forest service standard 5100
-
1c or later revision. In the state of California a spark
arrester is required under section 4442 of the California Public resources code.
WARNING!
Unintentional sparkin
g can result in fire or electrical shock.
Do not check for spark with the spark plug removed.
WHEN REPAIRNG OR ADJUSTING GENERATOR
Disconnect the spark plug wire from the spark plug and pla
ce the wire where it cannot contact spark plug.
Fuel and its vapors are extremely flammable and explosive.
ility hookups. Failure to isolate
generator from electrical grid can result in death to utility workers as well as others.
When using generator as backup power, notify utility company. Use approved transfer equipment to
Inspect all electrical cords for damage and discontinue from use any damaged or exce
ssively worn
Exhaust heat/gasses can ignite combustibles, structures or damage fuel tank causing a fire.
Code of Federal Regulation(CFR) Title 36 Parks, Forests, and Public Property require equipment powered by an internal combust
ion engine to have a
1c or later revision. In the state of California a spark
g can result in fire or electrical shock.
ce the wire where it cannot contact spark plug.

4
WHEN ADDING OR DRAINING FUEL
Turn generator off and let it cool for at least three minutes before removing fuel cap. Loosen cap slowly in order to relieve pressure in
the fuel tank.
Fill or drain fuel tank outdoors. Do not excessively inhale fuel vapors.
Keep away from open flames or sparks and other sources of ignition.
Do not smoke while filling fuel tank.
Do not overfill tank. Allow space for fuel expansion.
WHEN TRANSPORTING OR REPAIRING EQUIPMENT
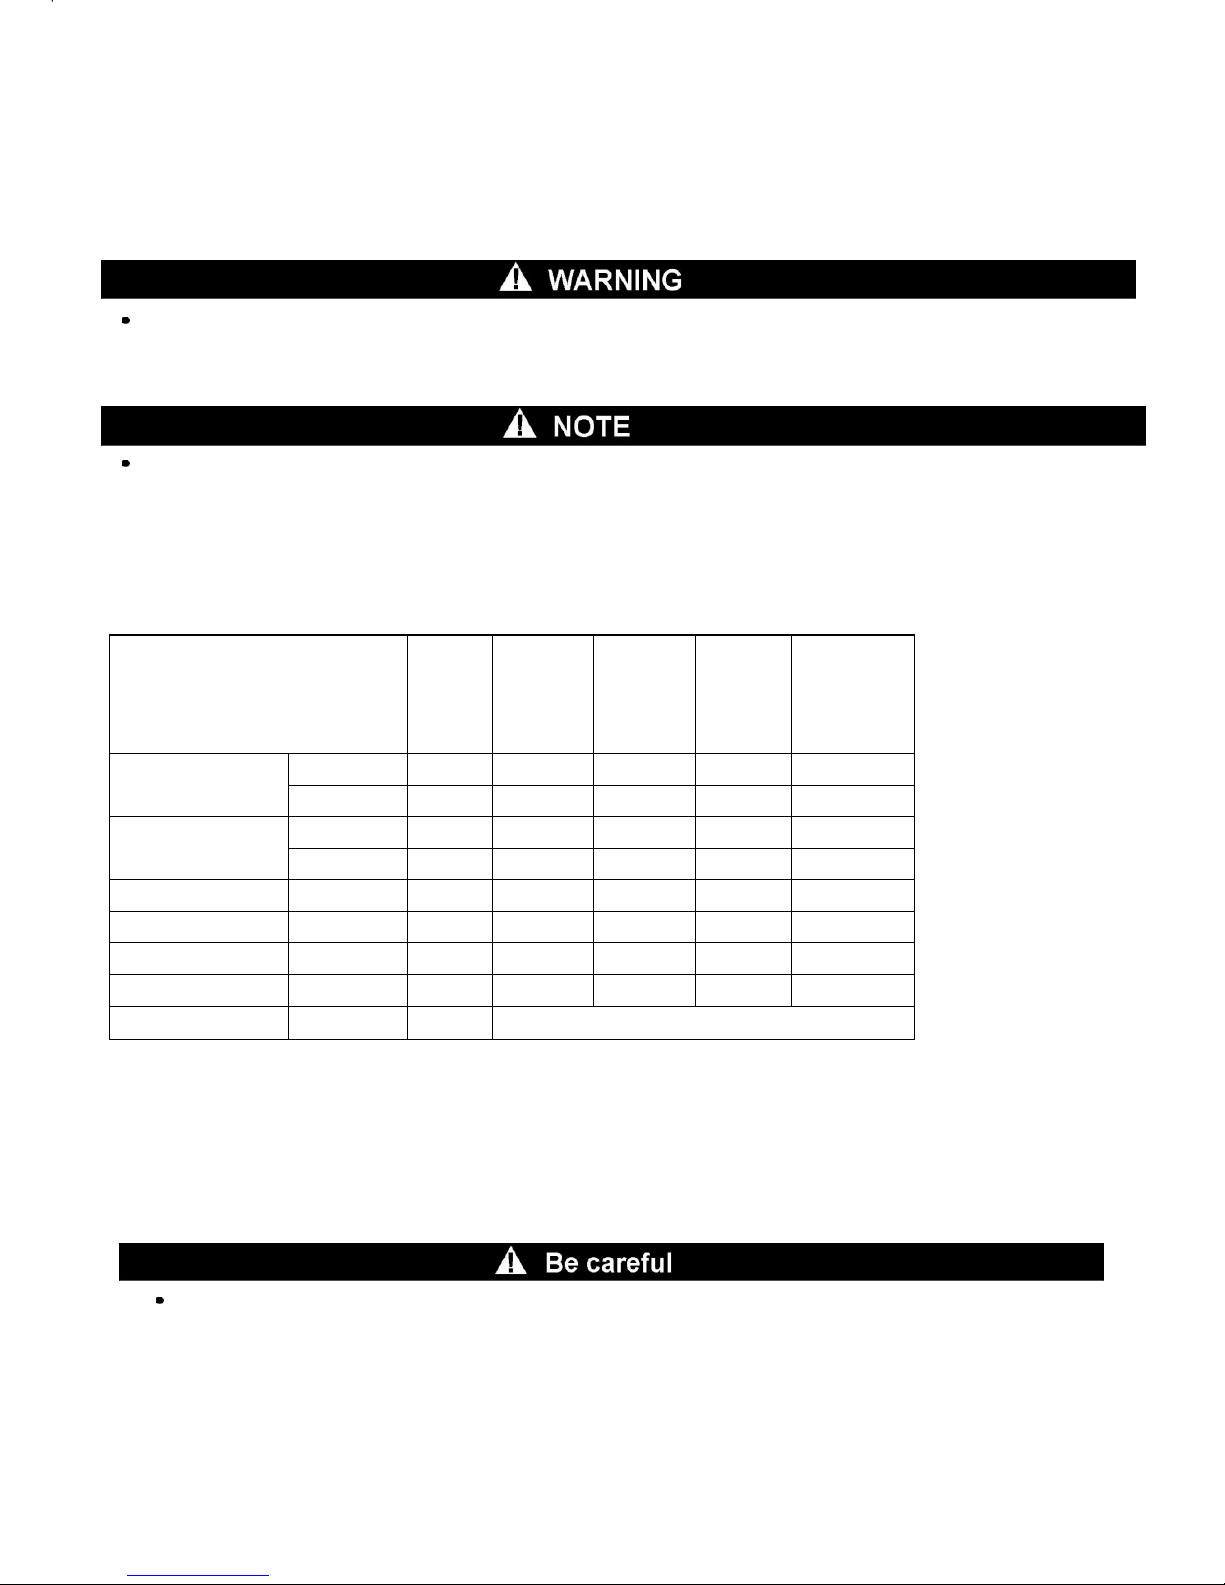
Transport generator with the fuel valve in the off position.
Repair generator with the fuel tank empty or the fuel valve in the off position.
Disconnect spark plug wire before transport or service.
WHEN STORING FUEL OR EQUIPMENT CONTAINING FUEL
Store away from furnaces, stoves, water heaters, clothes dryers or other appliances that have pilot light or other ignition source
because they can ignite fuel vapors.
WHEN STARTING EQUIPMENT
Ensure spark plug, muffler, air cleaner, and fuel cap are in place.
Do not crank engine with spark plug removed.
If fuels spills, wait until it evaporates before starting engine.
WHEN OPERATING EQUIPMENT
Do not choke carburetor to stop engine.
Do not tip engine or equipment at an angle which causes fuel to spill.
This generator is not for use in marine applications.
5
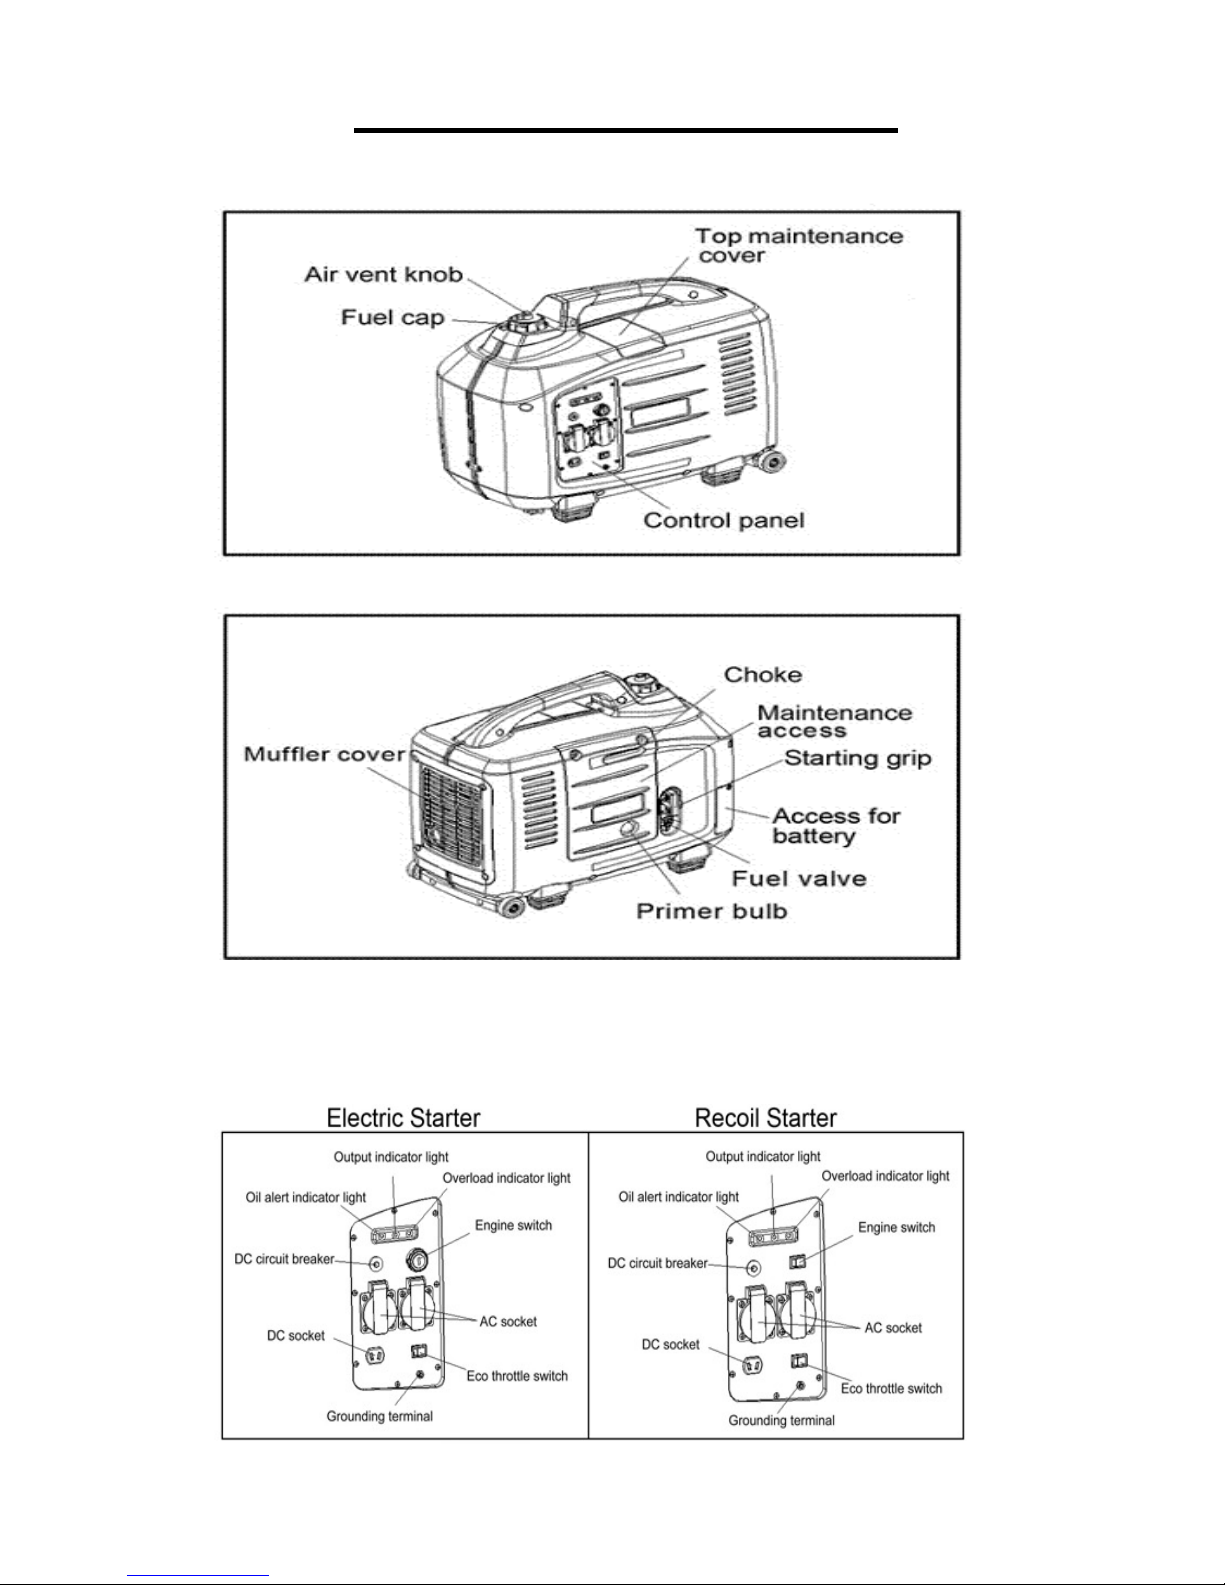
1.
Component Identification
Control Panel
Component Identification
Control Panel
6
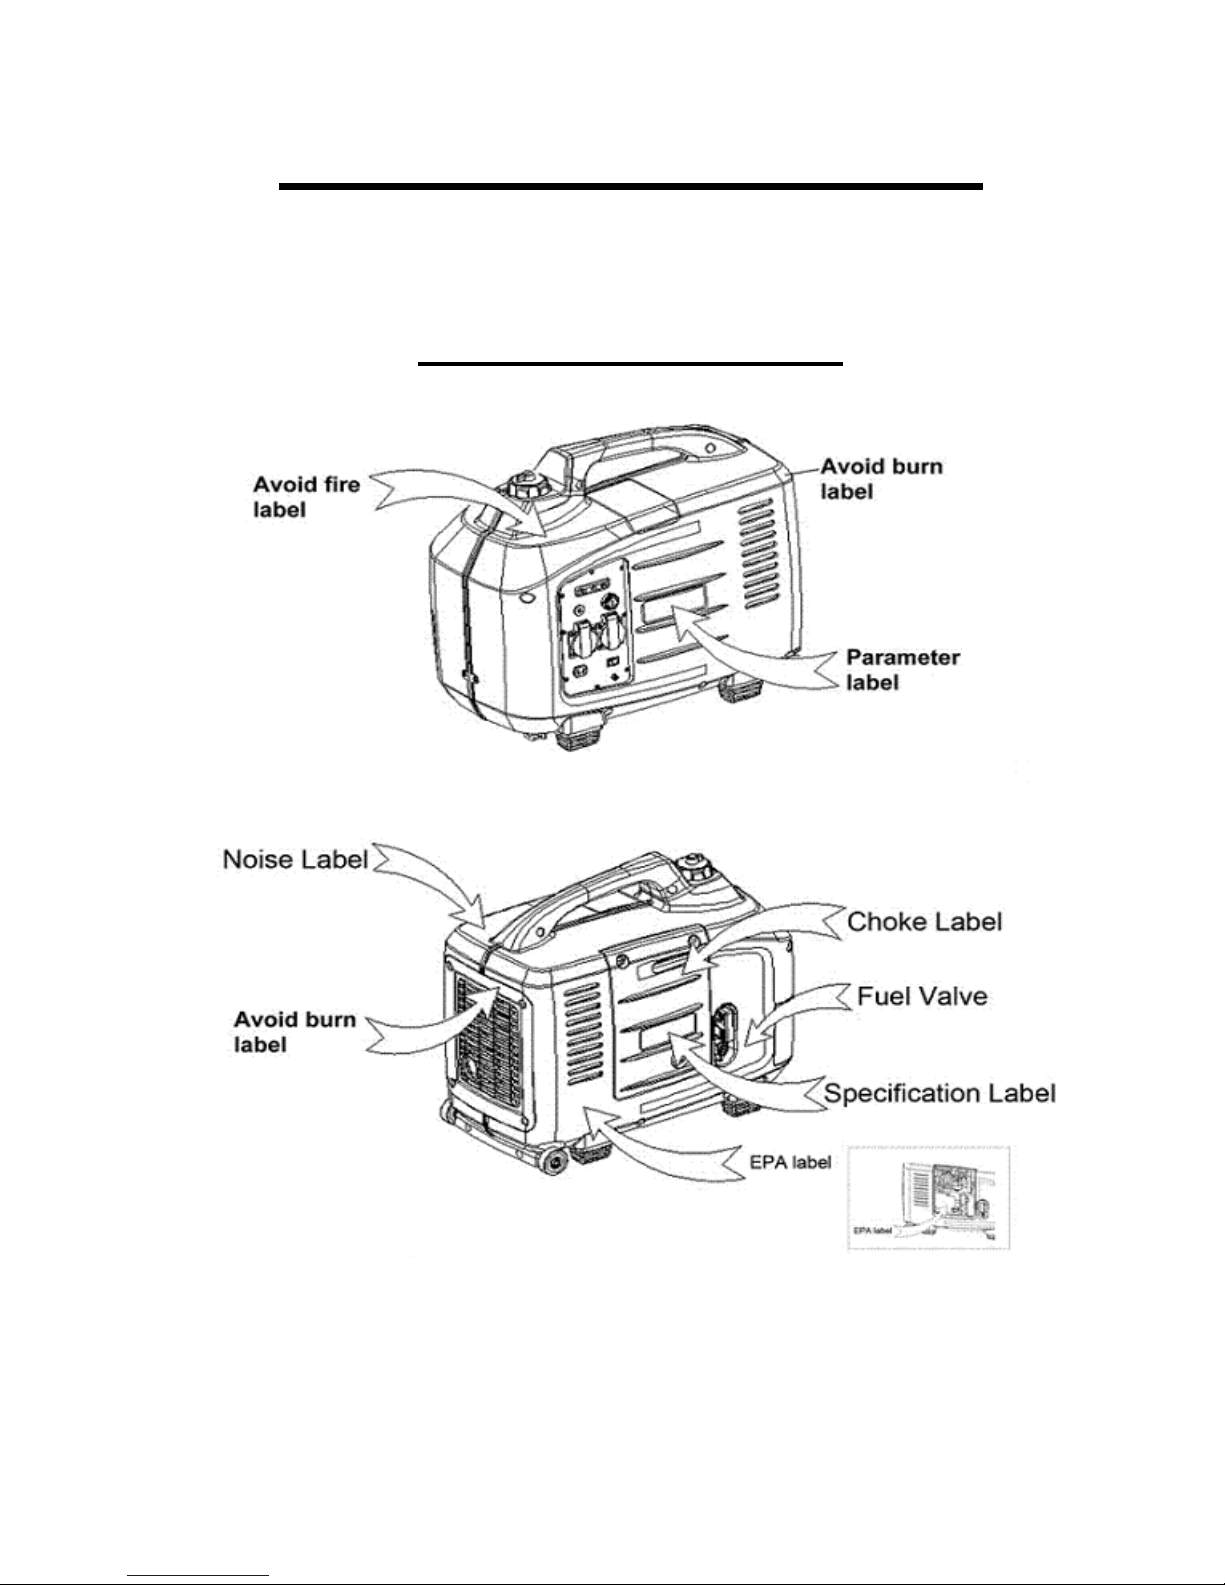
2. Safety Label Diagram
These labels warn you of potential hazards that can cause
Read Them Carefully!
ON OFF
Receptacle Reset
2. Safety Label Diagram
These labels warn you of potential hazards that can cause
serious injury.
Read Them Carefully!
Ignition
Receptacle Reset
Ground Stud
2. Safety Label Diagram
These labels warn you of potential hazards that can cause

7
IDLE CONTROL SWITCH
When there is no power requirement or load on the generators, generators go to gas-saving mode; upon demand, it will turn to correct
speed automatically in order to supply the correct power that device needs which minimizes fuel consumption and reduces noise levels
when no load is applied to the generator.
If high electrical loads are connected simultaneously, turn the Auto Idle switch to the OFF position to reduce voltage changes.
Turn the AUTO IDLE feature off when the equipment you are running requires full power at startup (ex. power tools and other
equipment with electric motors).
When generators are working at constant rated power output mode, turn off the AUTO IDLE SWITCH
Pre-Operation Check
1. Engine Oil Requirements
Operating generators with insufficient oil may damage the engine and void your warranty.
Engine oil is a major factor affecting engine performance and service life. Non-detergent and 2-stroke engine oil will damage
the engine and must not be used in your Energy Storm Generator.
Use 4-stroke motor oil that meets or exceeds the requirements for API service classification SJ. Always check the API SERVICE
label on the oil container to be sure it includes the letter SJ.
SAE 10W-30 is recommended for general, all-temperature use. Other viscosities shown in the chart may be used when
the average temperature in your area is within the indicated range.
Note:
The Oil Alert system is designed to prevent engine damage caused by an insufficient amount of oil in the crankcase. Before the oil level
in the crankcase falls below a safe limit, the oil alert indicator light comes on and the Oil Alert system will automatically stop the engine
(the engine switch will remain in the ON position, turn it to the OFF position in this occurrence). If the engine stops or the Oil Alert
indicator light comes on when you pull the starter grip, check the engine oil level before troubleshooting in other areas.
CAUTION
!
8
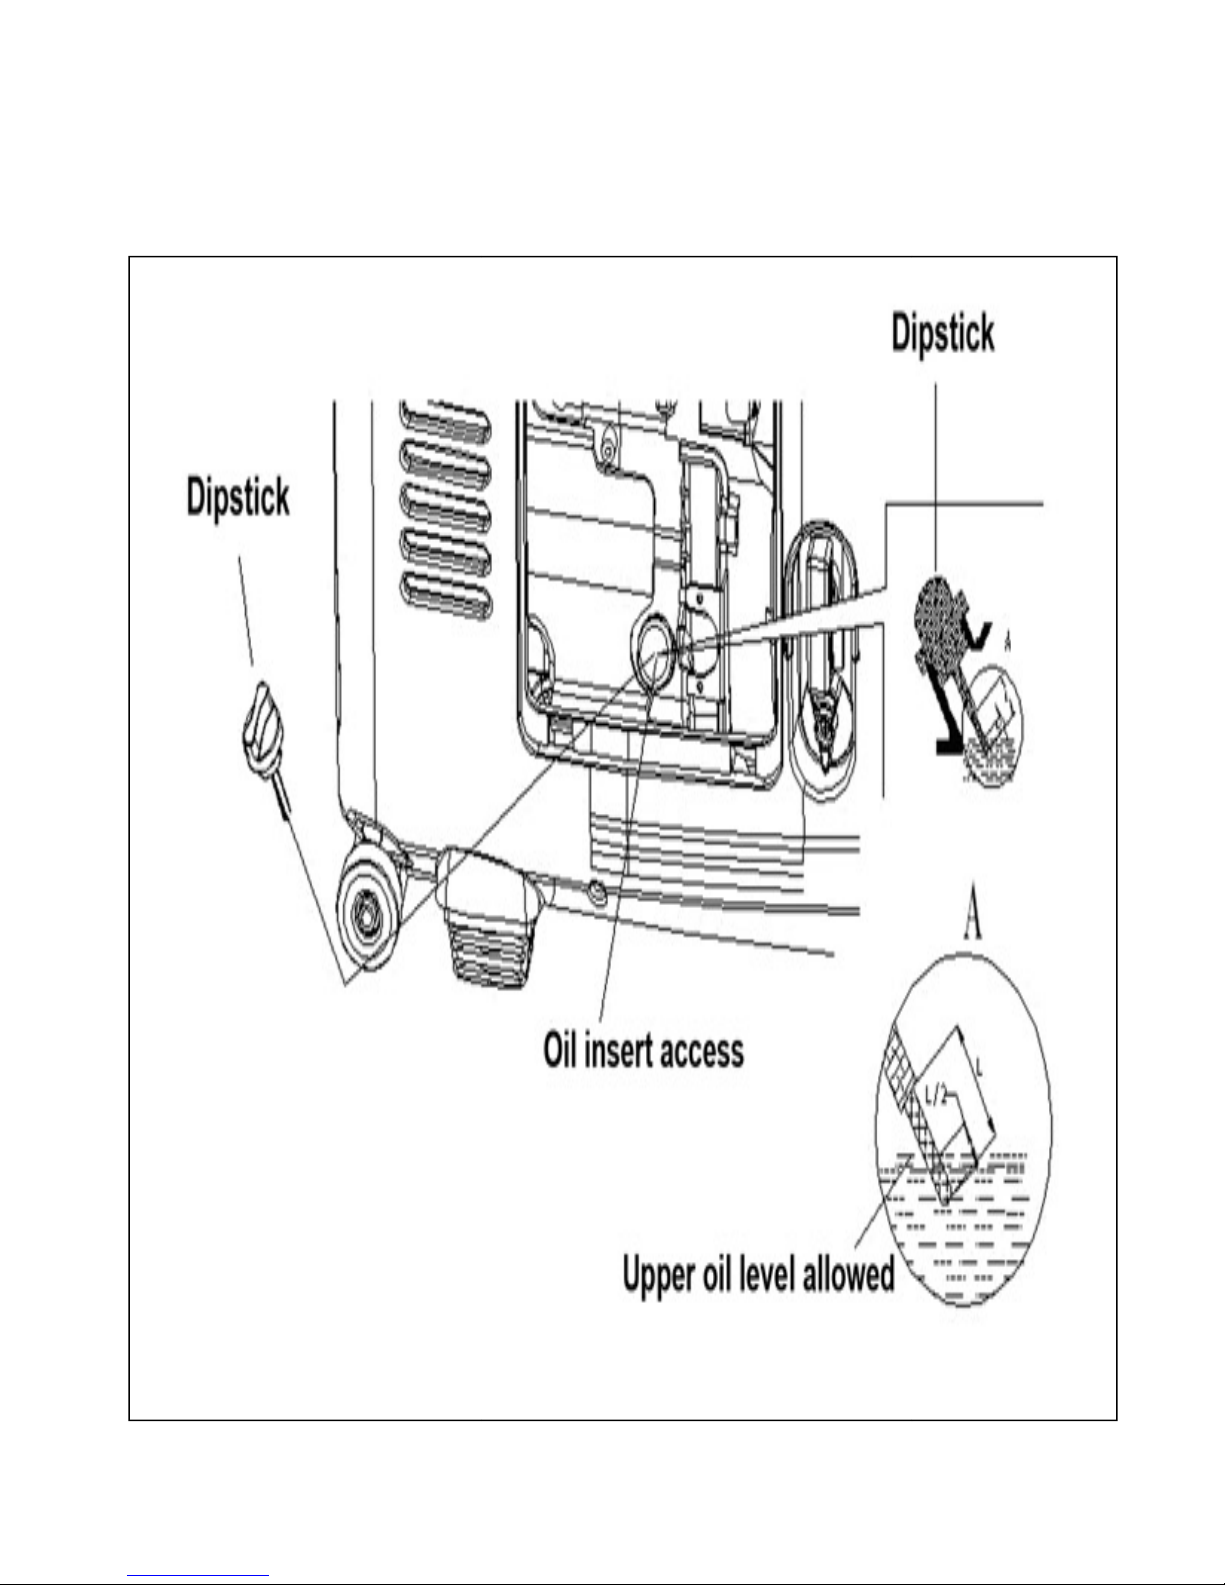
2. Engine Oil Filling
Take off the right access cover
(refer to diagram #56004).
the dipstick into the oil tank, and check the level of
recommended oil using the oil fill bottle
(in
Diagram #10001
(refer to diagram #56004).
Unscrew the oil dipstick, wipe
the dipstick
the dipstick into the oil tank, and check the level of
the oil. If the
oil level is low or lower than recommended
(in
cluded in tool package)
the dipstick
with a clean cloth, then insert
oil level is low or lower than recommended
, fill with the

9
3. Check the Gas Level
Do not smoke or allow flames or sparks where the generator is refueled or where gasoline is stored. Refuel in a well
area with the engine stopped.
DO NOT overfill f
uel tank. Tighten fuel cap after adding fuel.
Be careful and avoid gas spillage when adding fuel, spilled fuel or gas fumes can catch on fire. In the case of any fuel spil
be sure that all fuel has vaporized or has been cleaned up before start
Avoid contact with fuel or breathing gas fumes. Always wash hands or areas exposed to fuel.
Check the gasoline level ; prior to
starting the generator.
gasoline .Always fill with fresh and
clean gasoline. Avoid allowing dirt or water into the fuel tank.
fuel.
4. Check the Air Cleaner
Element
1. Remove the screws on the
left access cover, open it.
2. Remove the three screws on
the air cleaner case.
3. Pull out the air cleaner cartridge follow
ing the direction of
4. Check the air cleaner element, clean
or change
5. Re-
install the air cleaner, air cleaner cover, and
Gasoline is extremely flammable and is explosive under certain Conditions.
K
eep the element clea
Diagram #10002
Do not smoke or allow flames or sparks where the generator is refueled or where gasoline is stored. Refuel in a well
uel tank. Tighten fuel cap after adding fuel.
Be careful and avoid gas spillage when adding fuel, spilled fuel or gas fumes can catch on fire. In the case of any fuel spil
be sure that all fuel has vaporized or has been cleaned up before start
ing engine.
Avoid contact with fuel or breathing gas fumes. Always wash hands or areas exposed to fuel.
starting the generator.
, Fill the gasoline tank to proper levels
( 2/3 full)
clean gasoline. Avoid allowing dirt or water into the fuel tank.
Tight
en
Element
left access cover, open it.
the air cleaner case.
ing the direction of
the arrow point.
or change
with a new one if necessary.
install the air cleaner, air cleaner cover, and
access cover.
Gasoline is extremely flammable and is explosive under certain Conditions.
eep the element clea
n
and
free of contaminants
at all times
Diagram#10003
Do not smoke or allow flames or sparks where the generator is refueled or where gasoline is stored. Refuel in a well
-ventilated
Be careful and avoid gas spillage when adding fuel, spilled fuel or gas fumes can catch on fire. In the case of any fuel spil
lage,
( 2/3 full)
with 87 octane
en
the fuel tank cap after adding
Gasoline is extremely flammable and is explosive under certain Conditions.
at all times
.
Diagram#10003

10
5. Grounding the Generator
Using copper electrical wire with a minimum diameter of 16gauge, connect the ground terminal on the
generator to an acceptable source of electrical ground
Contro
l Panel
Using copper electrical wire with a minimum diameter of 16gauge, connect the ground terminal on the
generator to an acceptable source of electrical ground
, such as a copper grounding st
Diagram#56013
l Panel
Using copper electrical wire with a minimum diameter of 16gauge, connect the ground terminal on the
, such as a copper grounding st
ake.

11
6. Staring the Engine
Electric start(only for electric
start model
1. Open gasoline switch
and air inflow knob.
2.. When 1
st
starting the unit or after the unit has been allowed to run out of fuel or stored for an extended period of time it
will be necess
ary to prime the fuel system by depressing the “Primer Bulb” multiple times to ensure the fuel system is filled
and there is no air in this system. You may have to depress the primer bulb from 20 to 50 times or until it becomes hard
press before attempting to start. It is also
sometimes necessary to depress the primer bulb prior to each start and
normal. To start a cold engine,
move the choke lever
halfway between the start and run positions
.
NOTE: Some models may be equipped with a knob style push/pull choke. On these units pull the choke knob for the starting
position and push the knob in for the running position.
Make sure that all appliances are disc
start model
s)
and air inflow knob.
starting the unit or after the unit has been allowed to run out of fuel or stored for an extended period of time it
ary to prime the fuel system by depressing the “Primer Bulb” multiple times to ensure the fuel system is filled
and there is no air in this system. You may have to depress the primer bulb from 20 to 50 times or until it becomes hard
sometimes necessary to depress the primer bulb prior to each start and
move the choke lever
to the start position. To restart a warm
.
To restart a hot engine place the choke in the run position.
NOTE: Some models may be equipped with a knob style push/pull choke. On these units pull the choke knob for the starting
position and push the knob in for the running position.
Make sure that all appliances are disc
onnected from the AC Receptacle.
Choke Lever Indicator
starting the unit or after the unit has been allowed to run out of fuel or stored for an extended period of time it
ary to prime the fuel system by depressing the “Primer Bulb” multiple times to ensure the fuel system is filled
and there is no air in this system. You may have to depress the primer bulb from 20 to 50 times or until it becomes hard
to
sometimes necessary to depress the primer bulb prior to each start and
which is
engine set the choke lever
To restart a hot engine place the choke in the run position.
NOTE: Some models may be equipped with a knob style push/pull choke. On these units pull the choke knob for the starting
onnected from the AC Receptacle.
Choke Lever Indicator

12
3. For electric/recoil start models, p
ut the key into
4.
Turn the electric start key to “START” position and release when engine starts
5. Let the engine run for at least 5 seconds t
Recoil Pull Starting (
only for electric/recoil
1. Open gasoline switch
2. Place the key into the ignition
switch, and turn the key to ‘ON’ position.
r
ocker style ignition in the on position.
3.
Pull the starting rope until feel the resistance, then pull briskly to start the engine.
Do not allow the starter grip to snap back against the engine. Return it gently to prevent damage to the starter
Diagram #56009
NOTE: If the engine will not start, chec
necessary and then re
ut the key into
the ignition
switch, and turn the key to
Turn the electric start key to “START” position and release when engine starts
5. Let the engine run for at least 5 seconds t
hen move the choke switch to the run
position
only for electric/recoil
and recoil start only models)
switch, and turn the key to ‘ON’ position.
For pull start only models place
ocker style ignition in the on position.
Pull the starting rope until feel the resistance, then pull briskly to start the engine.
Do not allow the starter grip to snap back against the engine. Return it gently to prevent damage to the starter
NOTE: If the engine will not start, chec
k the oil level, fill the engine with oil if
necessary and then re
-try starting the unit.
switch, and turn the key to
‘ON’ position.
position
For pull start only models place
Pull the starting rope until feel the resistance, then pull briskly to start the engine.
Do not allow the starter grip to snap back against the engine. Return it gently to prevent damage to the starter
or housing.
k the oil level, fill the engine with oil if

13
High altitude area operation
At high altitude, the standard carburetor air/fuel mixture will be too rich. Performance will decrease, and fuel consumption will increase.
High altitude performance can be improved by specific modifications to the carburetor. If you always operate your generator at altitudes
above 5,000 feet (1,500 meters), please ask your Authorized EnergyStorm Service Center to properly jet the carburetor for High Altitude
use. Even with carburetor modifications, the engine horsepower will decrease about 3.5% for each 1,000-feet increase in altitude. The
effect of altitude on horsepower will be greater than this if no carburetor modification is made.
7. Applications
Connections for standby power to a building electrical system must be made by a qualified electrician. The connection must isolate the
generator power from utility power, and must comply with all applicable laws and electrical codes. Improper connections to a building
electrical system can allow electrical current from the generator to back feed into the utility lines. Such back feed can cause injury or
may electrocute utility company workers or others who contact the lines during a power outage, and the generator could explode, burn,
or cause fires when utility power is restored.
8. Using Your Generator
When the generator operates constantly, do not overload its rated power capacity. Consider total power for all the equipment
and appliances being powered.
DO NOT overload its rated current.
DO NOT connect the generator to household panel circuit; it may damage the generator or home electric equipment.
DO NOT use the generator for other than the intended purpose and comply with the following rules:
1. DO NOT parallel connect this model generator. Generators cannot be combined with other electric wires or extension cords o
r
multiple socket boxes.
2. DO NOT lengthen the exhaust pipe or vent it with any extensions.
3. Please use SJ or SJO type extension cords if you need additional length from the appliance cord.
4. Extension wire length limit: 16gauge cord 200feett maximum; 10 gauge cord 330 feet maximum.
You can use DC power at the same time that you are using AC power.
Please do not exceed the power or wattage total of DC & AC
Pay attention to the start-up wattage and running wattage requirements in determining the items to be powered by your
generator. Consult the Wattage Use Chart located on the back page of this manual.
When the carburetor has been modified for high altitude operation, this modified
Carburetor may cause the engine to overheat and result in serious engine damage.
In order to avoid getting an electric shock, always ground
the
generator from the
Ground Lug to the Earth for proper grounding.
14
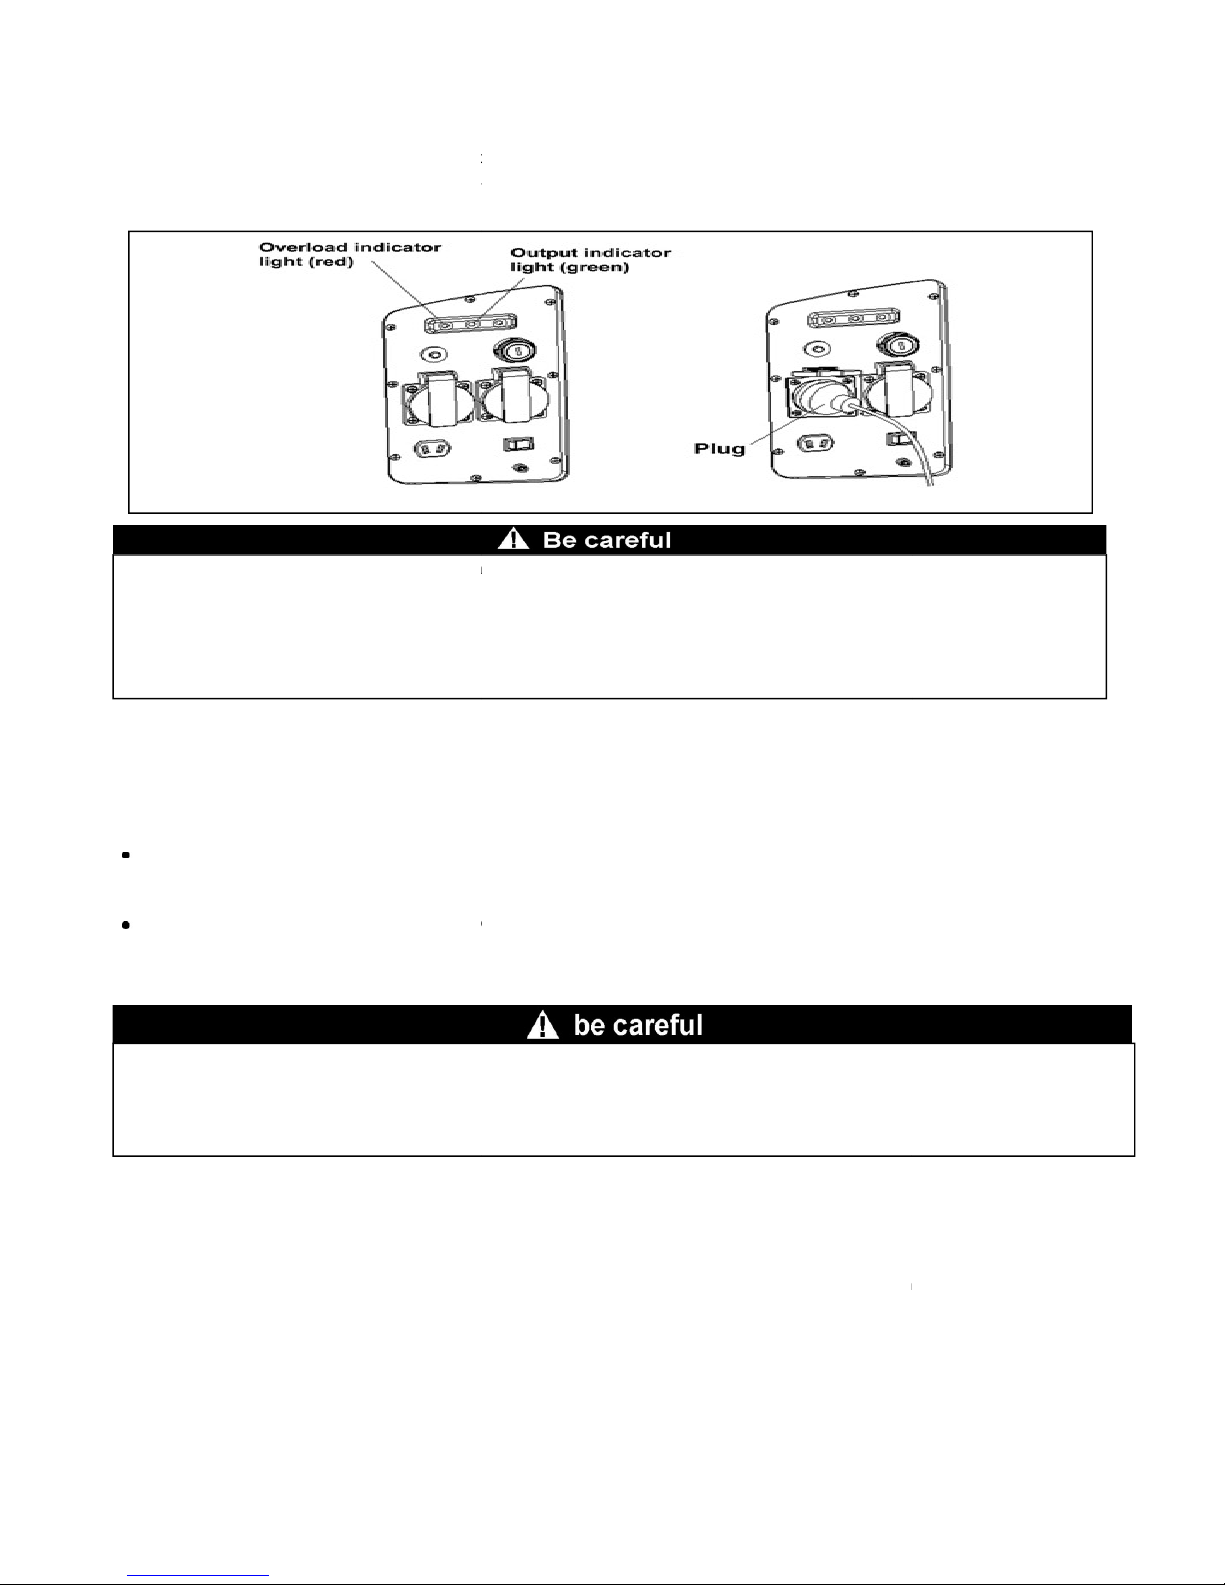
How to Use AC Power
1. Start the engine with no electrically
powered items
2. After unit starts and the green
output indicator light
powered devices.
Substantial overloading will illuminate the red overload indictor light and damage the generator.
Marginal overloading that temporarily lights the overload indicator light (red) may shorten the serv
If an appliance begins to operate abnormally
Disconnect the appliance, and determine whether the problem is the appliance, or if the rated load capacity
of the generator has been exceeded.
Output and overload indicator
At normal condition, output i
ndicator (green light) will stay lit
appliance, the overload indicator light (red) will
illuminate. Then
off, and the output indicator light (green) will go OFF.
If the red indicator light activates,
please stop
Check your
equipment for proper operation, electrical
desired equipment does not exceed the power available from the generator.
Be sure all equipment is in the off position upon starting the generator
is illuminated and the
generator is providing the necessary power to run your equipment.
1. Start Engine
(refer to section 6 for instructions)
2. Wait five seconds for green power light to illuminate.
If the green output indicator light is off,
and the red
section 6 start engine requirements and
restart.
3. Make
sure your tools or appliances on in the
socket.
If
the red overload light and the green
overload indicator light stays on after the green output indicator light goes off please turn off the generator and
consult your
closest authorized service center or EquipSource,
powered items
plugged into the generator.
output indicator light
(see diagram #56011) illuminates
you may know plug in and o
Substantial overloading will illuminate the red overload indictor light and damage the generator.
Marginal overloading that temporarily lights the overload indicator light (red) may shorten the serv
If an appliance begins to operate abnormally
, becomes sluggish,
or stops suddenly, turn it off immediately.
Disconnect the appliance, and determine whether the problem is the appliance, or if the rated load capacity
ndicator (green light) will stay lit
.
If the generator is overloaded or if there is a short circuit in a connected
illuminate. Then
after about four seconds, current to
the connected
off, and the output indicator light (green) will go OFF.
please stop
the engine and find out the reason for
the
equipment for proper operation, electrical
shorts, malfunctions
, and make sure that the power required to operate the
desired equipment does not exceed the power available from the generator.
Only
then put the plug in the socket, an
Be sure all equipment is in the off position upon starting the generator
. Onl
y start your equipment when the
generator is providing the necessary power to run your equipment.
(refer to section 6 for instructions)
2. Wait five seconds for green power light to illuminate.
and the red
overload indicator light is on, stop the engine using
the
restart.
sure your tools or appliances on in the
off
position, and then you may
the red overload light and the green
output
light activate at the same time after starting engine and the red
overload indicator light stays on after the green output indicator light goes off please turn off the generator and
closest authorized service center or EquipSource,
LLC. @ 866-471-7464.
you may know plug in and o
perate electrically
Substantial overloading will illuminate the red overload indictor light and damage the generator.
Marginal overloading that temporarily lights the overload indicator light (red) may shorten the serv
ice life of the generator.
or stops suddenly, turn it off immediately.
Disconnect the appliance, and determine whether the problem is the appliance, or if the rated load capacity
If the generator is overloaded or if there is a short circuit in a connected
the connected
appliance(s) will shut
the
overload.
, and make sure that the power required to operate the
then put the plug in the socket, an
d start the engine.
y start your equipment when the
green power indicator light
the
ignition switch, then follow
position, and then you may
plug them in the
light activate at the same time after starting engine and the red
overload indicator light stays on after the green output indicator light goes off please turn off the generator and

15
If connected equipment is in the ON position
4. Turn on equipment.
If the generator is overloaded or if there is a malfunction in your equipment, green output indicator light will turn off and
indicator light will turn on and
power output from the generator w
the ignition switch to stop engine
in order to reset the power circuit of the generator.
If
the equipment power requirement meets the system capability for initial start
turn on at the same time for a s
hort period, that's normal. The
equipments start.
How to Use 12 Volt DC Output
When using the
DC output, turn the Auto Idle
You can use DC power and AC power at the same time.
DC overload circuit may disconnect, reset circuit protector by pressing reset button.
Special Instructions for Charging 12Volt Batteries
When charging, put the charging plug in the DC socket, and then connect to the terminals of the battery. After charging remov
battery terminals first then un-plug charging
plug.
If connected equipment is in the ON position
before connecting, it will start suddenly, and ca
use injury
If the generator is overloaded or if there is a malfunction in your equipment, green output indicator light will turn off and
power output from the generator w
ill not continue. If
this occurs the engine will not stop, you must turn off
in order to reset the power circuit of the generator.
the equipment power requirement meets the system capability for initial start
-up, the
overload indicator and output indicator will
hort period, that's normal. The
red indicator
light will turn off and the green light stays
DC output, turn the Auto Idle
switch to the OFF position (see diagram #56361 for switch location)
You can use DC power and AC power at the same time.
DC overload circuit may disconnect, reset circuit protector by pressing reset button.
Special Instructions for Charging 12Volt Batteries
(diagram #56013)
When charging, put the charging plug in the DC socket, and then connect to the terminals of the battery. After charging remov
plug.
This procedure will reduce the chances of sparking.
use injury
or damage.
If the generator is overloaded or if there is a malfunction in your equipment, green output indicator light will turn off and
the red overload
this occurs the engine will not stop, you must turn off
overload indicator and output indicator will
light will turn off and the green light stays
on after the
switch to the OFF position (see diagram #56361 for switch location)
When charging, put the charging plug in the DC socket, and then connect to the terminals of the battery. After charging remov
e

16
When charging car batteries, please remove the ground wire of the battery first, reconnect it after charging in order to avoi
circuit or spark.
Do not start cars when generators are connect
may cause damage to the generator.
Always be sure to match the positive and negative cables of the DC power cord with the Batteries’ Positive and Negative Posts
Always char
ge in a well ventilated area and keep away from flames as batteries generate flammable gases during
charging.
Batteries contain vitriol (electrolyte) which can burn skin and eyes when we touched, please wear safety clothes
and goggles. If electrolytes s
plash on skin, use fresh water to wash at once.
If electrolytes splash in eyes, immerse in fresh water wash for 15 minutes and seek medical attention immediately.
If electrolytes are swallowed by mistake, drink a massive dose of water or milk at once, t
magnesia milk or vegetable oil, seek immediate medical attention.
Keep Batteries and electrolytes away from children.
When charging car batteries, please remove the ground wire of the battery first, reconnect it after charging in order to avoi
Do not start cars when generators are connect
ed to batteries or use the DC power of the generator to start a car, this
Always be sure to match the positive and negative cables of the DC power cord with the Batteries’ Positive and Negative Posts
ge in a well ventilated area and keep away from flames as batteries generate flammable gases during
Batteries contain vitriol (electrolyte) which can burn skin and eyes when we touched, please wear safety clothes
plash on skin, use fresh water to wash at once.
If electrolytes splash in eyes, immerse in fresh water wash for 15 minutes and seek medical attention immediately.
If electrolytes are swallowed by mistake, drink a massive dose of water or milk at once, t
hen consume some
magnesia milk or vegetable oil, seek immediate medical attention.
Keep Batteries and electrolytes away from children.
When charging car batteries, please remove the ground wire of the battery first, reconnect it after charging in order to avoi
d short
ed to batteries or use the DC power of the generator to start a car, this
Always be sure to match the positive and negative cables of the DC power cord with the Batteries’ Positive and Negative Posts
.
ge in a well ventilated area and keep away from flames as batteries generate flammable gases during
Batteries contain vitriol (electrolyte) which can burn skin and eyes when we touched, please wear safety clothes
If electrolytes splash in eyes, immerse in fresh water wash for 15 minutes and seek medical attention immediately.
hen consume some

17
Parallel Cord Capable
All EnergyStorm ES1000i, ESI2000i(E), and ESI2600i(E) generators are Parallel Cord Ready and
come with the Parallel Cord Jack and Digital Panel installed and are ready for use with the “Duo-Power”
Parallel Cords and Box which is available from your Energy Storm dealer or you can call EquipSource,
LLC toll free at 866-471-7464 to find your closest dealer (Model #ESIPPC).
This “Duo-Power” Connection allows you to combine the electrical power of any two (2) equipped
EnergyStorm Digital Inverter Generators to achieve the combined power of both units through the
Parallel Box and receptacles. This function is useful when you require additional power to operate your
equipment and appliances. (Example: Parallel Connect an ESI2600i(E) with an ESI2000i(E) to
receive the combined wattage of 4600 watts.
Before starting either generator always completely connect the Digital Control circuit and the AC circuit
cords of the “Duo-Power” Box to both generators. Do not plug-in any electrical loads until the green
power indicator light, located on the Duo Power receptacle box, is illuminated.
Never use the outlets on the individual generators while
units are operating in Parallel Connection Mode.
18
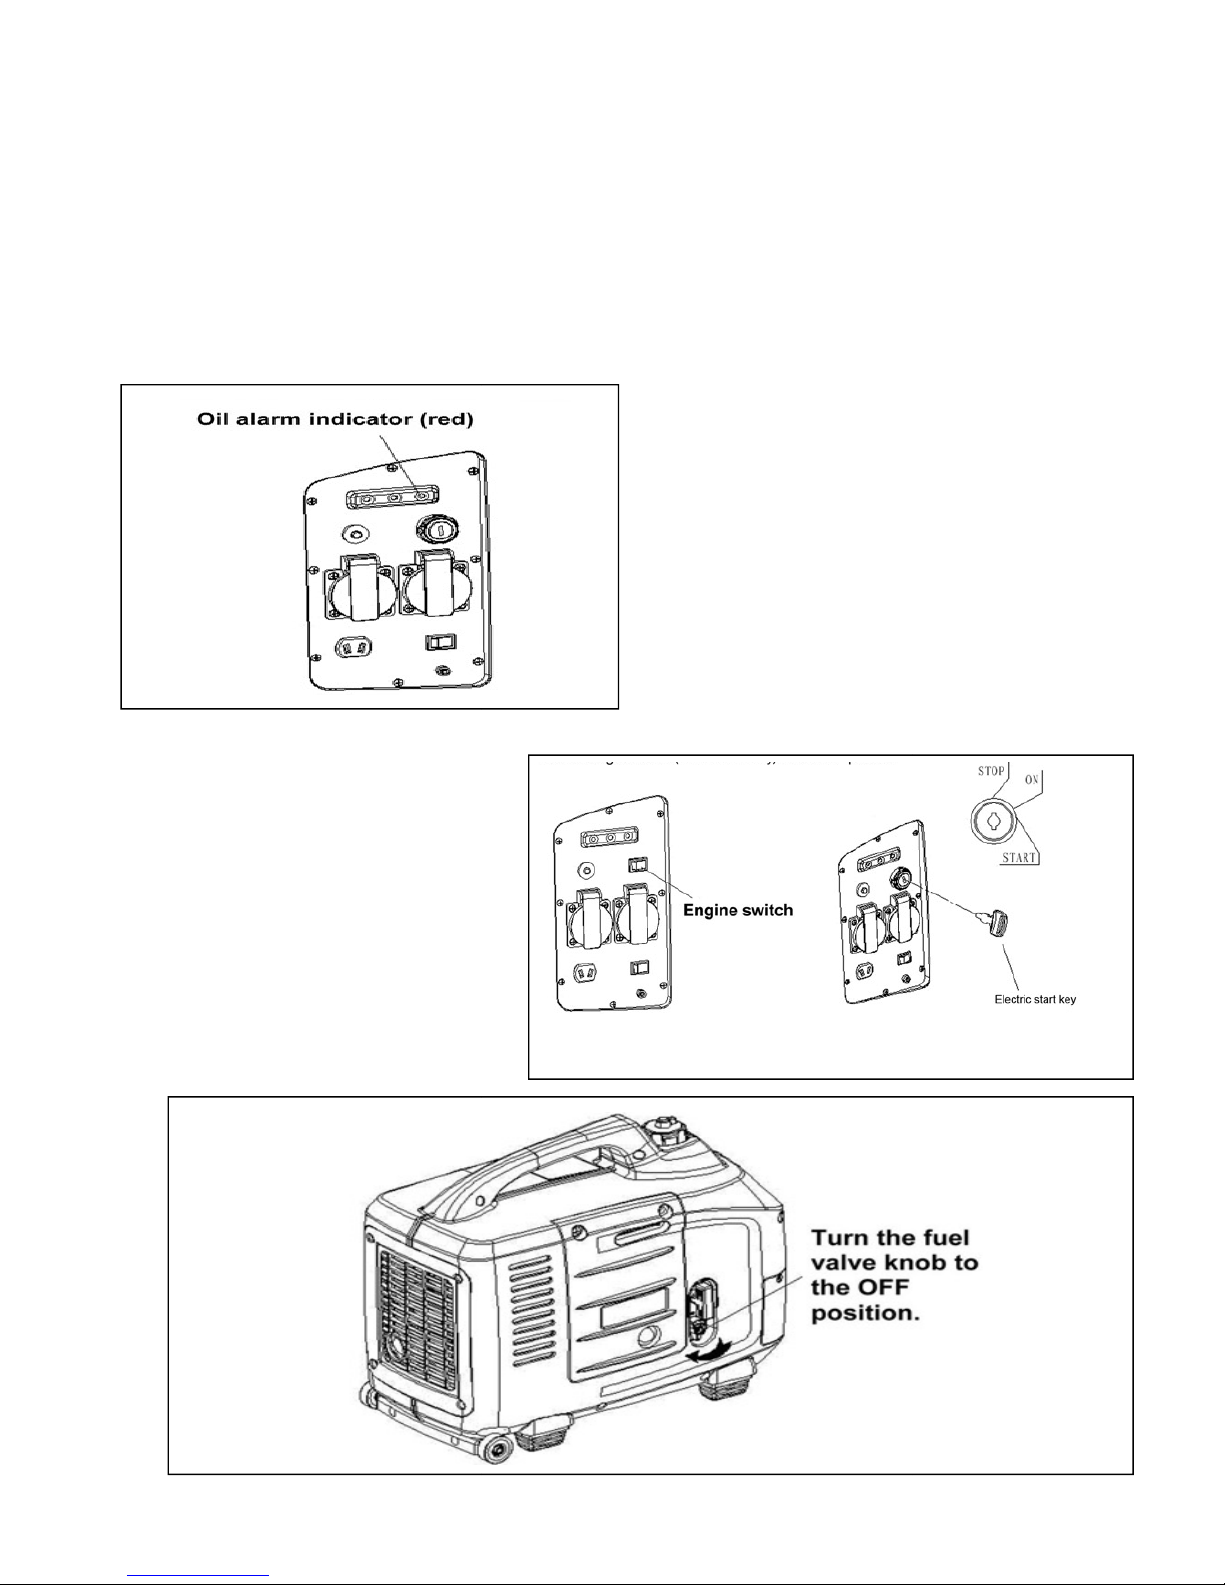
9. Low Oil Alarm System
(diagram#56014)
Oil alert system is designed to avo
id engine damage from insufficient oil in the
engine
automatically before the oil level in the crankcase gets below safe operating levels (ignition switch
10. Stopping the Engine
Emergency Shutdown
:
Turn key to stop position
Turn off Fuel Valve (diagram 56016)
Normal Shutdown:
Un-plug all electrical loads
Turn key to stop position
Turn off Fuel Valve (diagram #56016)
(diagram#56014)
id engine damage from insufficient oil in the
crankcase, the
oil alarm system will stop
automatically before the oil level in the crankcase gets below safe operating levels (ignition switch
will stay on, Turn OFF
oil alarm system will stop
the
will stay on, Turn OFF
)
19
11. MAINTENANCE
Good maintenance is essential for safe, economical, and trouble-free operation. It also helps reduce air pollution.
Stop engine before servicing. If service performance requires operating generator, BE SURE to operate generator in a well
ventilated environment, Exhaust contains poisonous gas -carbon monoxide which can result in death.
Always use Genuine Energy Storm parts or equal quality parts for repairs and maintenance, aftermarket parts can damage the
unit and void the warranty.
Maintenance calendar
Regular service period perform at every
indicated month or operating hour interval
whichever comes first. item
Every
time use
it
Every
month or
every 20
hours
Every 3
months or
every 50
hours
Every 6
months or
every 100
hours
Every year or
every 300
hours
engine oil
check
replace
Air cleaner
check
clean
Spark plug Clean -adjust
spark arrester Clean
Valve clearance Check-adjust
gas tank and air cleaner clean
fuel line Check Every two years (change it If necessary)
Note: Calendar above is the maintenance schedule for typical use areas, service more
frequently when used in dusty areas.
1. ENGINE OIL CHANGE
Drain the used oil while the engine is warm. Warm oil drains more quickly and completely.
Turn the engine switch and vent lever to the OFF position to reduce the possibility of fuel leakage.
1. Insert the Oil tube in the filler neck of the oil tank (oil tube is provided in tool kit)
2. Tilt the generator, drain the oil completely
3. Fill with the recommended oil (see 4.1) check the level of oil.
4. Shake the generator to make sure the float in the Oil Alert System is free after filling with new oil.

20
Oil tank capacity: Varies with Model s
ee specification sticker on generator
Improper disposal of engine oil can be harmful to the environment. If you change your own oil, please dispose of it properly.
sealed container, and take it to a recycling center.
2. Air Cleaner Servicing
A dirty air cleaner will restrict air flow to the carburetor. To prevent carburetor malfunction, service the air cleaner
regularly. Service more f
requently when operating the generator in extremely dusty areas.
Using gasoline or flammable solvent to clean the air filter can cause a fire or explosion. Use only soapy water or nonflammab
solvent.
Check the air cleaner element;
keep the element c
ee specification sticker on generator
Improper disposal of engine oil can be harmful to the environment. If you change your own oil, please dispose of it properly.
sealed container, and take it to a recycling center.
Do not discard it in a trash bin, dump it on the ground, or pour it down a drain.
A dirty air cleaner will restrict air flow to the carburetor. To prevent carburetor malfunction, service the air cleaner
requently when operating the generator in extremely dusty areas.
Using gasoline or flammable solvent to clean the air filter can cause a fire or explosion. Use only soapy water or nonflammab
keep the element c
lear and free of dirt.
Improper disposal of engine oil can be harmful to the environment. If you change your own oil, please dispose of it properly.
Put it in a
Do not discard it in a trash bin, dump it on the ground, or pour it down a drain.
A dirty air cleaner will restrict air flow to the carburetor. To prevent carburetor malfunction, service the air cleaner
Using gasoline or flammable solvent to clean the air filter can cause a fire or explosion. Use only soapy water or nonflammab
le
This manual suits for next models
5
Table of contents
Popular Portable Generator manuals by other brands

HP
HP 70341A user guide

DeVilbiss Air Power Company
DeVilbiss Air Power Company D26968 Operator's manual

Powermate
Powermate PM0497000 user manual
 owner's manual")
Generac Power Systems
Generac Power Systems 005796-0 (XG6500) owner's manual

MULTIQUIP
MULTIQUIP GAC-6HZR Operation and parts manual

East Tester
East Tester ET3320C user manual

KUMATSUGEN
KUMATSUGEN GP17000MAT user manual

Champion Global Power Equipment
Champion Global Power Equipment 73001I-DF Owner's manual & operating instructions

MSTRONIC
MSTRONIC PSE-904R user manual

Generac Portable Products
Generac Portable Products 4000EXL owner's manual

Craftsman
Craftsman DELUXE 580.327071 owner's manual

Firman
Firman WH03042 owner's manual


