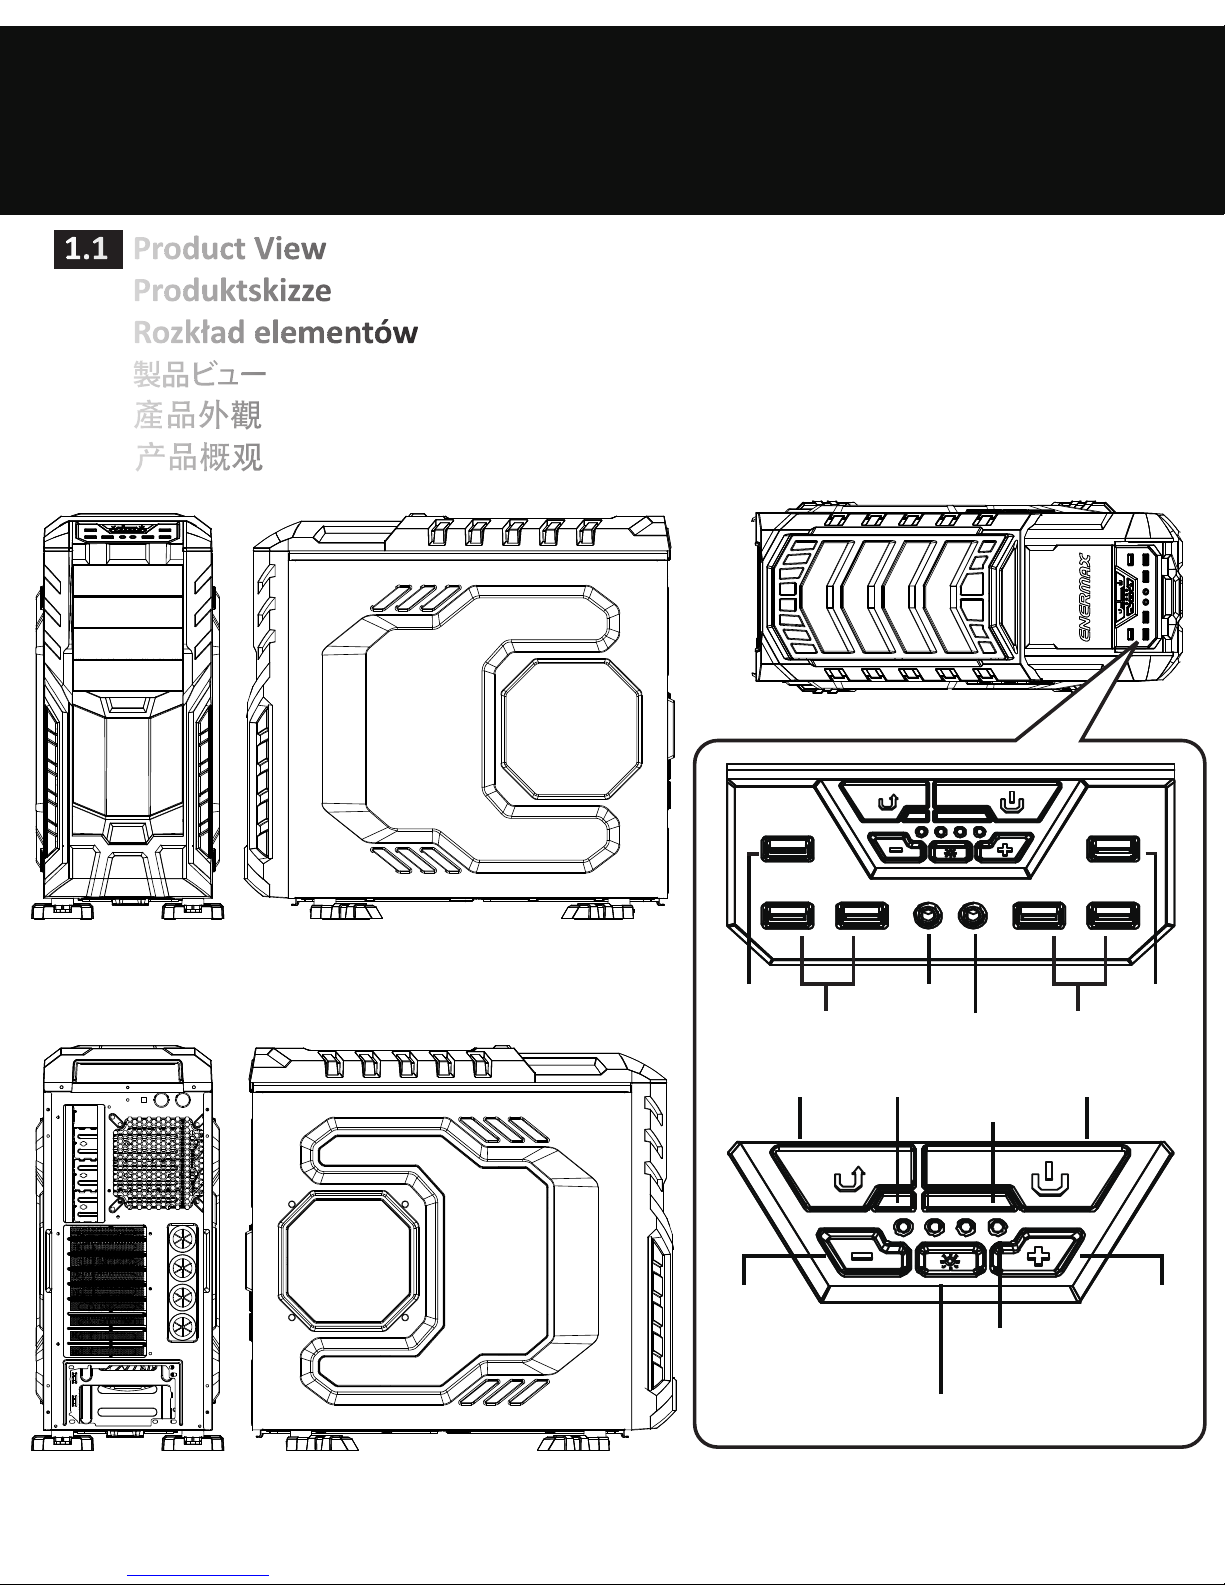
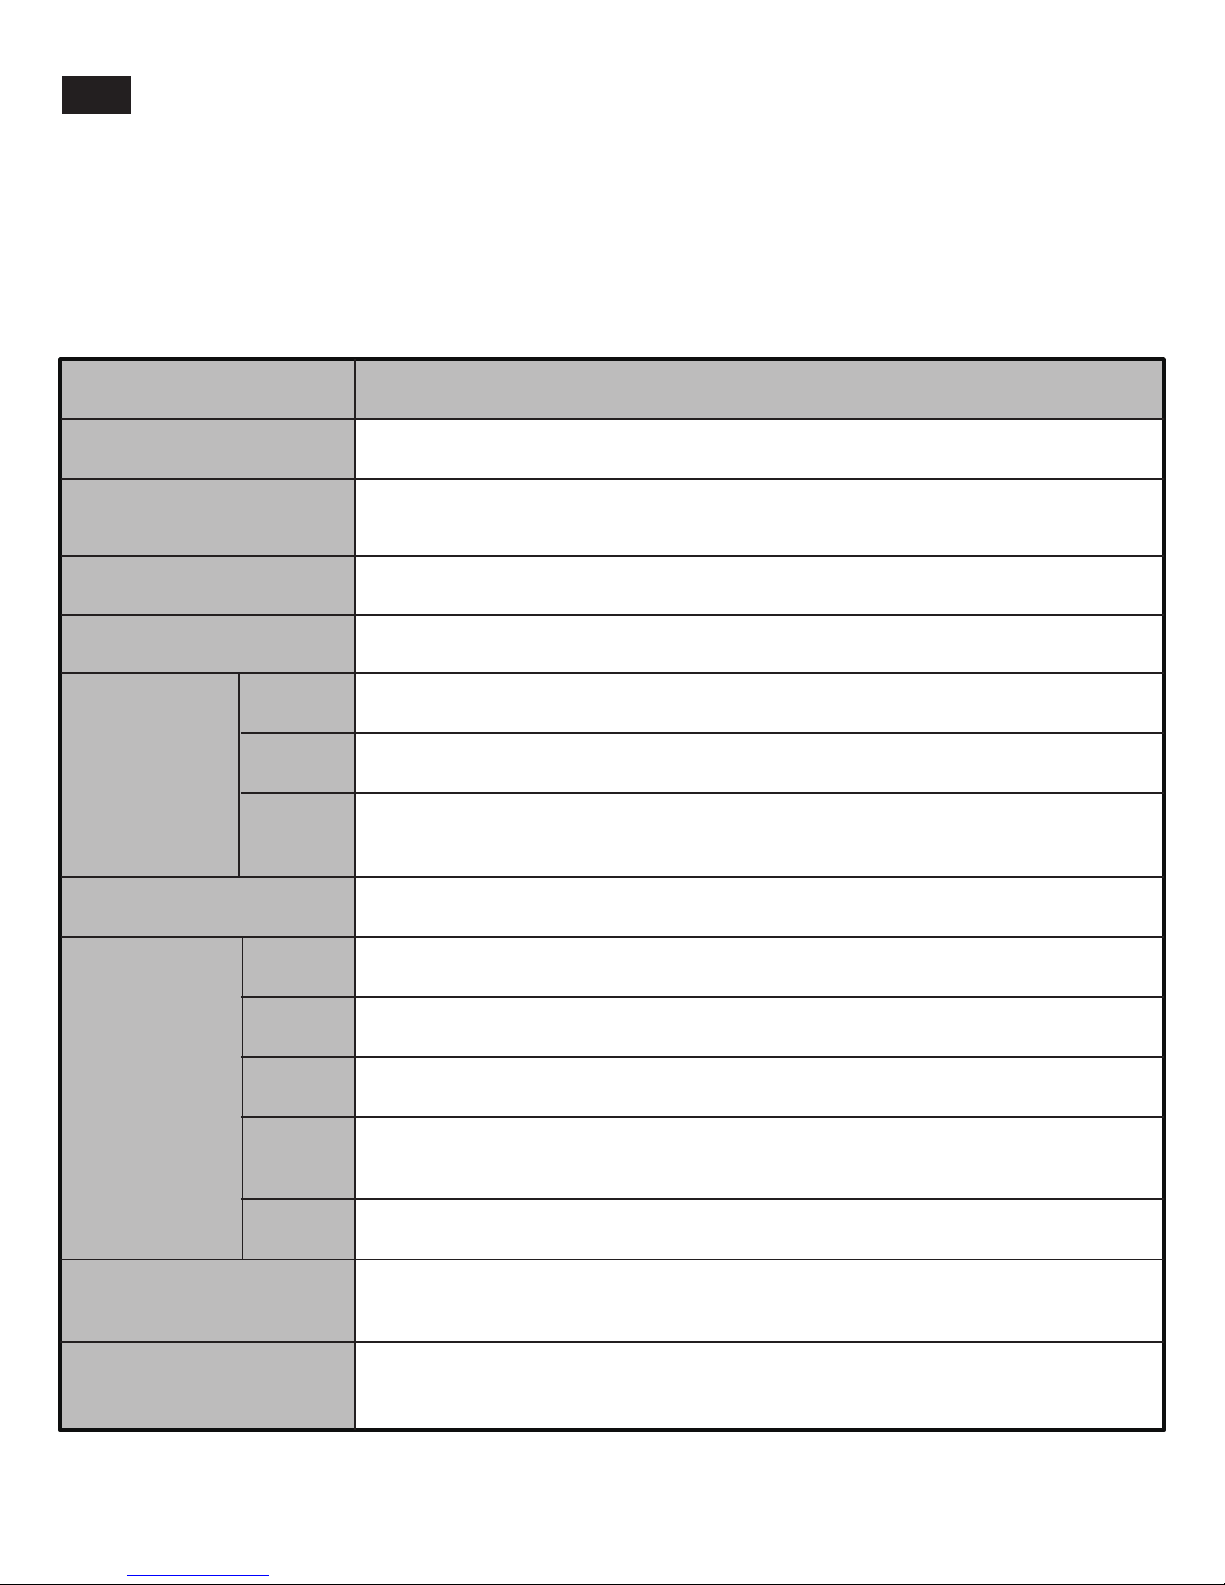
ENERMAX ECA5030 series User manual

User’s Manual
Handbuch
Instrukcja obsługi
ユーザ マニュアル
使用手冊
使用手册
English
Deutsch
Polski
日本語
繁中
简中
ECA5030
series

Contents
1.1 Product View
1.2 Specs
1.3 Accessories
2.1 How to Remove Both Side Panels
2.2 How to Install the Motherboard
2.3 How to Install Power Supply
2.4 How to Install Add-on Cards
2.5 How to Install Optical Drive
2.6 How to Install Internal 2.5” & 3.5” Device
2.7 How to Install the Radiators
2.8 How to Install System Fans
2.9 360 Degree Rotatable Foot Stands
2.10 How to Clean the Dust Filter
1
2
3
4
5
5
6
7
8
9-10
11-14
15
15
Chapter 1 :
Product Overview
Chapter 2 :
Installation Guide
Chapter 3 :
Suggested Height of CPU Cooler and length of VGA card -16
Chapter 4 :
Cable Connection Description -17

Chapter 1
•Product Overview
•製品の説明
1.1 Product View
Produktskizze
Rozkład elementów
製品ビュー
產品外觀
产品概观
USB3.0 MIC
Fan LED light controller
Headset
Fan Speed - Fan Speed +
Reset HDD LED
Power LED
Power
USB2.0 USB2.0
USB3.0
Fan speed indicator light
(4 lights on means full speed)
•Produkteinführung
•產品槪觀
•Opis produktu
•产品概观
Top
Front Right
Rear Le
1

1.2 Specs
Technische Daten
Dane techniczne
スペック
產品規格
产品规格
Model Number
Dimensions (mm)
D546 x W264 x H557mm
M/B
Power Supply
Front
Rear
Top
Side
Bottom
Liquid cooler
Support
Maximum CPU
cooler height
5.25”
3.5”
2.5”
I/O
Drive Bays
Expansion Slots
Fan Slots
ECA5030 series
2 x USB3.0 + 4 x USB2.0, HD Audio,
4 fans 4 steps speed controller & 4 fans LED light controller
8 (5 from the 3.5” HDD trays; 2 converted from 5.25” adapter;
1 behind M/B plate)
Acrylic window + 1 x 180 / 200mm
(1 x 180mm VEGAS Blue LED fan pre-installed)
194mm
Top: 120 / 240 / 280 / 360mm liquid cooler
Bottom: 120 / 240mm liquid cooler
E-ATX, ATX, Micro-ATX
ATX12V (Optional)
4
6 (1 x 3.5” converted from 5.25” adapter)
9
1 x 180 / 200mm (1 x 180mm VEGAS Blue LED fan pre-installed)
1 x 120 / 140mm (1 x 120mm Twister Bearing fan pre-installed)
3 x 120mm / 2 x 140mm / 1 x 180mm / 1 x 200mm (optional)
2 x 120mm (optional)
2

1.3 Accessories
Zubehör
Wyposażenie
アクセサリ
零件盒
零件盒
Figure Parts Name Q’ty Purpose
3.5“ / 2.5” Adapter
Speaker
Cable tie
Stand-off M3
Screw M3 x 5 mm
Screw #6-32 x 5 mm
Screw M3 x 5 mm
Screw ψ5 x 10 mm
Screw M3 x 0.5P x 29 mm
Screw #6-32 x 6L
1
1
10
7
28
10
30
20
1
8
3.5" HDD / 2.5" SSD expansion
Motherboard Alarm
Settle Cable
Motherboard
Motherboard / 5.25” ODD
3.5" HDD (HDD Tray)
Fan Screws
Front Fan(4 are pre-installed )
Power Supply / 3.5” HDD
(5.25” to 3.5” cage)
2.5” SSD(HDD Tray, 3.5” /
2.5” Cage / 2.5” slots behind M/B )
3

Chapter 2
•Installaon Guide
•取り付けの説明
•Montageanleitung
•組裝說明
•Instrukcja montażu
•组装说明
2.1 How to Remove Both Side Panels
Enernen der Seitenwände
Demontaż panelów bocznych
両サイドパネルの取り外し
兩側側板拆卸
两侧侧板拆卸
B
A
4

2.2 How to Install the Motherboard
So installieren Sie das Motherboard
Jak zamontować płytę główną
マザーボードの取り付け方法
安裝主機板
安装主机板
2.3 How to Install Power Supply
Netzteileinbau
Jak zainstalować zasilacz komputerowy
電源取り付け方法
安裝電源供應器
安装电源供应器
5

2.4 How to Install Add-on Cards
Installaon von Erweiterungskarten
Instalacja kart rozszerzenia
アドオンカードの取り付け
安裝擴充卡
安装扩充卡
AB
Removable upper HDD cage to fit longer Add-on cards
6

2.5 How to Install Opcal Drive
Installaon von opschen Laufwerken
Instalacja napędów optycznych
光学ドライブの取り付け
光碟機安裝
光盘安装
Unlock
Lock
AB
CD
7

2.6 How to Install Internal 2.5“ & 3.5“ Device
Installaon von internen 2,5“- und 3,5“-Laufwerken
Instalacja wewnętrznych napędów 2.5“/3.5“
内部2.5インチと3.5インチデバイスの取り付け
安裝隱藏之3.5”/2.5”裝置
安装隐藏之3.5”/2.5”装置
5.25” to 3.5”/2.5” adapter
2.5” SSD slot
behind M/B tray
5.25" to 1 x 3.5”
+ 2 x 2.5” 5.25" to 3 x 2.5”
3.5” HDD 2.5” SSD
HDD
SSD
SSD SSD
SSD
SSD
SSD
8

How to Install the Radiators
Installaon eines Radiators
Instalacja radiatora
ラジエーターの取付方法
2.7
Radiator (Top)
240mm radiator 360mm radiator
A
D E F
BC
9

Radiator (Boom)
Radiator (Rear)
240mm radiator
120mm radiator
*Top and boom radiator clearance: 60mm thickness
*240mm radiator at boom PSU length suggeson≦180mm
*240mm radiator at boom tube length suggeson≧500mm
When installing 120mm radiator at rear,
it may conflict with 180 / 200mm fan at the side
10

2.8 How to Install System Fans
Installaon der Systemlüfer
Instalacja wentylatorów systemu
ケースファンの取り付け
11

Noce:
Fan thickness under 20mm is suggested. However, the actual clearance may differ due to
the height of heat sink or back plate on the backside of motherboard. Please confirm
possible thickness for fan aer compleng installaon.
Es wird eine Lüerefe von unter 20 mm empfohlen.
Der tatsächliche Abstand kann je nach Höhe des CPU-Kühlkörpers oder der Rückenplae
des Mainboards unterschiedlich ausfallen. Bie überprüfen Sie die Lüerefe nach der
fergen Installaon.
Sugerowana grubość wentylatora to 20mm. Jednakże wartość końcowa może być nieco
inna, ze względu na wysokość schładzacza procesora, podkładki mocującej na spodzie
płyty głównej.
Wyboru odpowiedniej grubości wentylatora należy dokonać po zmontowaniu pozostałych
komponentów komputera.
厚さ20mm未満のファン推奨ですが、マザーボード背面のヒートシンクやバックプレートの高さにより
若干異なります。CPUクーラーなどを設置した後、クリアランスを確認し設置可能なファンをお選びく
ださい。
20mm。
,,。
20mm。
。,。
12

Fan (Front)
1 x 180/ 200 mm fan
Fan (Rear)
1 x 140 mm 1 x 120 mm
Fan (Side)
1 x 180/ 200 mm
13

Fan (Top)
3 x 120 mm
Fan (Boom)
1 x 200/180 mm 2 x 120 mm
2 x 140 mm
14

2.9 360 Degree Rotatable Foot Stands
Um 360° drehbare Standfüße
Nóżki obrotowe 360°
360度回転可能なフットスタンド
2.10 How to Clean the Dust Filter
Staubfilter reinigen
Jak czyścić filtr przeciwpyłowy
ダストフィルターの洗浄について
A B
15

Chapter 3
•Suggested Height of CPU Cooler and Length of VGA card
•Empfohlene Höhe des CPU-Kühlers und Länge der Grafikkarte
•Polecana wysokokość coolerów CPU oraz długość kart graficznych
•CPUクーラーの高さとVGAカードの長さについて
•CPU
•CPU
490mm / 19.29 inch
360mm / 14.17inch
194mm / 7.64”
16

Chapter 4
•Cable Connecon Descripon
•Anschlussübersichtg
•Przewody w obudowie
•ケーブル接続の説明
•
•
If you have any question or need support, please contact your reseller or nearest ENERMAX
subsidiary/agent or ENERMAX headquarter service center.
Falls Sie Fragen haben oder Support benötigen, wenden Sie sich bitte an Ihren Händler, Ihre nächste
ENERMAX-Niederlassung, deren Agenten oder an das ENERMAX Headquarter Service Center!
Schnelle Hilfe bei allen Fragen zu ENERMAX-Produkten erhalten Sie auch online unter www.enermax.de/warranty.
W przypadku pytań lub potrzeby skorzystania z serwisu należy skontaktować się ze sprzedawcą ENERMAX albo z siedzibą
główną centrum serwisowego ENERMAX. Bezpośrednią pomóc techniczną można uzyskać również online na
www.enermax.pl/warranty.
ご質問やサポートが必要な場合、ご購入元またはENERMAX販売代理店、当社サポートにお問い合わせください。
[email protected]
[email protected]
Noce:
•On some motherboards, the connectors might not be exactly the same as the drawings above, please check with your motherboard manual
before installing
•Bei einigen Mainboards ist der Stecker unter Umständen nicht identisch mit dem auf der Zeichnung oben.
•Wtyczki niektórych płyt głównych mogą odróżniać się od tych na rysunku powyżej. Proszę również przeczytać instrukcję obsługi płyty
głównej przed instalacją.
•マザーボードによってはコネクタ類の形状が上の図面と異なる場合がございます。詳しくはマザーボードの取扱説明書をご参照ください
•
•
USB 3.0 Connector
USB 3.0 Connector
MotherboardCable
Panel Connector
Panel Connector
High Definion Audio (Azalia)
HD Audio Connector
USB 2.0 Connector
USB 2.0 Connector
17

©2014 ENERMAX Technology Corporation. All rights reserved. Specifications
are subject to change without prior notice. Actual product and accessories
may differ from illustrations. Omissions and printing errors excepted. Content
of delivery might differ in different countries or areas. Some trademarks may
be claimed as the property of others.
Table of contents