Engel LE3290ATV User manual
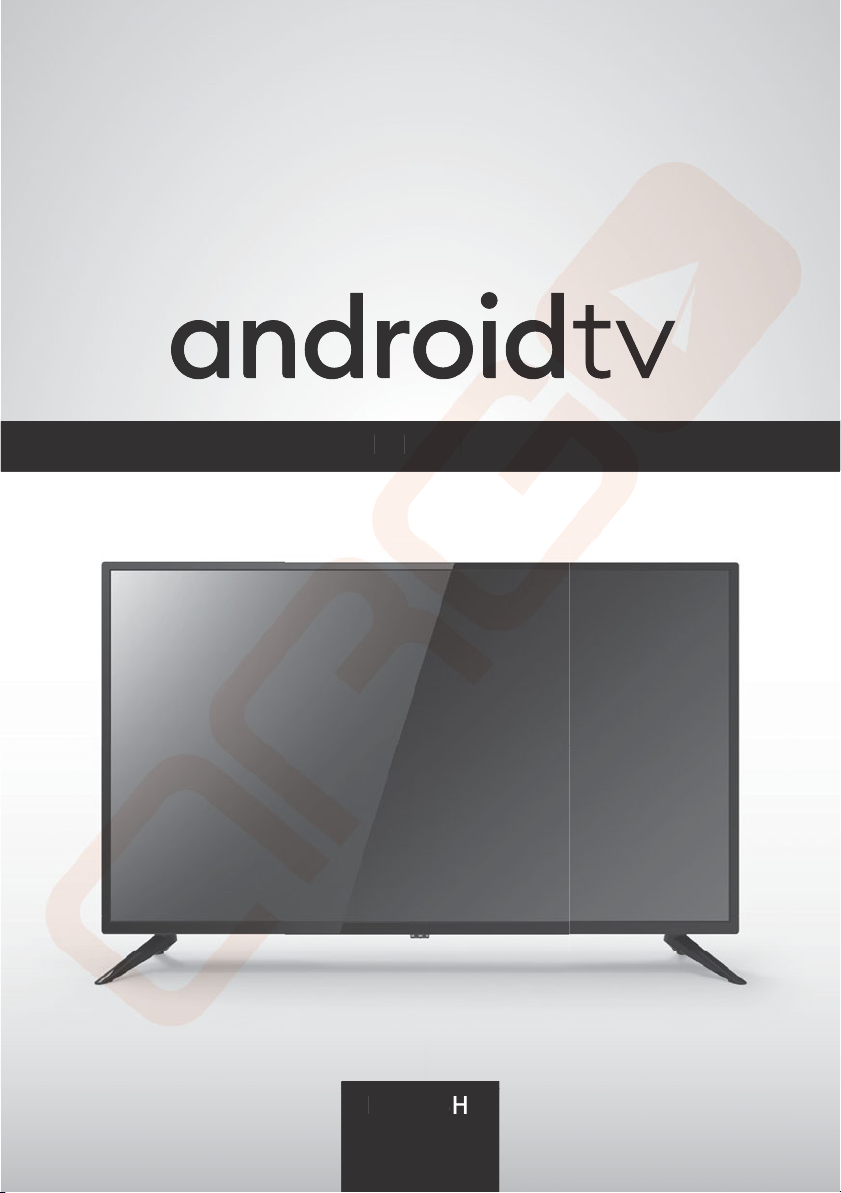
LED TV
ENGLISH
L
E
D
D
T
V
V
ENGLI
S
H
ϸ
• IMPORTANT SAFETY INSTRUCTIONS . . . . . . . . . . . . . . . . . . . . . . . . . . . . . . . . . . . . . Ϸϸ
• PRECAUTIONS AND REMINDERS . . . . . . . . . . . . . . . . . . . . . . . . . . . . . . . . . . . . . . . . . ϷϺ
• BUTTON CONTROL AND PERIPHERAL CONNECTION . . . . . . . . . . . . . . . . . . . . . . Ϸϼ
• OPERATING INSTRUCTIONS . . . . . . . . . . . . . . . . . . . . . . . . . . . . . . . . . . . . . . . . . . . . . . ϷϽ
• SPECIFICATIONS . . . . . . . . . . . . . . . . . . . . . . . . . . . . . . . . . . . . . . . . . . . . . . . . . . . . . . . . . ϸЀ
• TROUBLESHOOTING . . . . . . . . . . . . . . . . . . . . . . . . . . . . . . . . . . . . . . . . . . . . . . . . . . . . . ϹϷ
1) Read these instrucions.
2) Keep these instrucions.
3) Heed all warnings.
4) Follow all instrucions.
5) Do not use this apparatus near water.
6) Clean only with dry cloth.
7) Do not block any venilaion openings, install in accordance with the instrucions.
8) Do not install near any heat sources such as radiaions, heat registers, stoves, or other appara-
tus (including ampliiers) that produce heat.
9) Do not defeat the safety purpose of the polarized plug. If the provided plug does not it into your
outlet, consult an electrician for replacement of the obsolete outlet.
10) Protected the power cord from being walked on or pinched paricularly at plugs, convenience
receptacles, and the point where they exit from the apparatus.
11) Only use atachments/accessories speciied by the manufacturer.
12) Unplug this apparatus during lighing storms or when unused for long periods of ime.
13) Refer all servicing to qualiied service personnel. Servicing is required when the apparatus has
been damaged in any way, such as power-supply cord or plug is damaged, liquid has been spilled
or objects have fallen into the apparatus, the apparatus has been exposed to rain or moisture, does
not operate normally, or has been dropped.
14) Mains plug is used as the disconnect device, the disconnect device shall remain readily opera-
ble.
15) The venilaion should not be impeded by covering the venilaion openings with items, such
as newspapers, table-cloth, curtains, etc.
16) No naked lame sources, such as lighted candles, should be placed on the apparatus.
1 7) Atenion should be drawn to the environmental aspects of batery disposal.
18) The use of apparatus in moderate climate.
19) The apparatus shall not be exposed to dripping or splashing and that no objects illed with
liquids, such as vases, shall be placed on the apparatus.
TABLE OF CONTENTS
IMPORTANT SAFETY INSTRUCTIONS
ϸ
•
IM
PO
RT
ANT
T
T
SA
FE
TY
I
NS
TR
UC
TI
ON
S
.
.
.
.
.
.
.
.
.
.
.
.
.
.
.
.
.
.
.
.
.
.
.
.
.
.
.
.
.
.
.
.
.
.
.
.
.
Ϸϸ
•
PR
EC
AU
TI
ON
S
AN
D
RE
MI
ND
ER
S
.
.
.
.
.
.
.
.
.
.
.
.
.
.
.
.
.
.
.
.
.
.
.
.
.
.
.
.
.
.
.
.
.
.
.
.
.
.
.
.
.
.
ϷϺ
•
BU
TT
ON
C
ON
TR
OL
A
ND
P
ER
IP
HE
RA
L
CO
NN
EC
TI
ON
. .
.
.
.
. . . . . . . . . .
. . . . . . . .
Ϸϼ
Ϸϼ
•
O
PERATIN
G
IN
S
TRU
C
TI
O
N
S
. . . . . . . . . . . . . . . . . . . .
.
.
.
.
. . . . . . . . .
.
.
.
.
. . . . . . . . .
.
. .
ϷϽ
•
SP
EC
IF
IC
AT
IO
NS
.
.
.
.
.
.
.
.
.
.
.
.
.
.
.
.
.
.
.
.
.
.
.
.
.
.
.
.
.
.
.
.
.
.
.
.
.
.
.
.
.
.
.
.
.
.
.
.
.
.
.
.
.
.
.
.
.
.
.
ϸЀ
Ѐ
•
TR
OU
BL
ES
HO
OT
IN
G
.
.
.
.
.
.
.
.
.
.
.
.
.
.
.
.
.
.
.
.
.
.
.
.
.
.
.
.
.
.
.
.
.
.
.
.
.
.
.
.
.
.
.
.
.
.
.
.
.
.
.
.
.
.
.
.
.
.
ϹϷ
1)
Read these instrucions
.
2
)
Keep these instrucions.
3
)
Heed all warnin
gs
.
4)
Follow all instrucions
.
5
)
Do not use this a
pp
aratus near
w
wa
ter.
6) Clean only with dry cloth.
7
)
Do not block any venila
io
o
n
n
op
en
en
in
g
s,
in
n
stall in
a
a
cc
c
or
or
da
d
nce
wi
wi
th
the instrucions
.
8) Do not install near a
ny
h
e
ea
t
so
o
ur
ces
su
u
c
ch
as
ra
ra
di
d
a
io
o
ns
ns
, heat r
eg
isters, stoves, or other a
pp
ara
-
tus
(
includin
g
ampliier
s)
s)
t
t
ha
t
t
p
pr
oduc
e
h
he
at.
9) Do not defeat the s
af
af
et
y
p
pu
rpose
of
f
t
t
he
he
p
p
olarized p
lu
u
g.
g.
I
I
f the provided plu
g
does not it into your
outlet, consult an ele
c
ct
ri
ci
i
a
an
f
or replacement o
f
the obsolete outle
t.
1
0
)
Protected the po
w
we
r
c
co
rd from bein
g
walked on or pinched paricularly at plu
g
s, convenience
receptacles, and the
p
p
oi
nt
w
w
he
h
re they exit
f
rom the apparatus
.
1
1) Onl
y
use a
t
t
ac
ac
hm
hm
en
e
ts
ts
/a
/
cc
es
es
so
s
ries s
p
eciied b
y
the manufacturer
.
1
2
)
Unplu
g
t
t
h
hi
s appara
tu
tu
s
du
du
rin
g
l
l
ig
ig
hin
g
storms or when unused for lon
g
periods of ime
.
1
3
)
Refe
r
a
al
l
se
e
r
rv
ic
in
in
g
g
to
q
ua
ua
li
i
i
i
ed
e
s
er
r
vi
v
ce
p
ersonnel. Servicin
g
is r
eq
uired when the a
pp
aratus has
been d
a
am
ag
g
e
ed
i
n any
wa
wa
y,
y
s
uc
c
h
h
as
s
p
p
ow
er
er
-supply cord or plu
g
i
s dama
g
ed, l
i
qu
i
d has been sp
i
lled
or o
bj
bj
ec
ts
s
h
h
ave fallen into
th
th
e ap
pa
pa
ra
a
tu
tu
s
s,
the apparatus has been exposed to rain or moisture, doe
s
no
o
t
t
op
er
er
at
e norma
l
ly
, or
h
as
b
b
ee
e
n
dr
r
o
op
pe
d.
14
14
)
Ma
Ma
ins plu
g
is used as the di
sc
c
on
on
nect device, the disconnect device shall remain readily opera-
bl
e.
.
1
5)
Th
e venilaion shou
ld
ld
n
ot
ot
b
e impeded by coverin
g
the venilaion openin
g
s with items, such
as n
ew
ew
sp
ap
ers, table
-c
c
l
lo
th
,
,
c
cu
rta
i
ns, etc.
16
6
)
)
No n
ak
ak
ed lame
s
s
o
ou
rc
e
es
, such as li
g
hted candles, should be placed on the apparatus.
1
7)
A
A
t
en
i
on
on
sho
ul
ul
d
be
e
d
d
rawn to the environmental as
p
ects of bater
y
dis
p
osal
.
1
8) The
us
us
e of appar
at
at
us in moderate climate.
1
9) The ap
pa
pa
ra
ra
tu
s
s
sh
sh
all not be exposed to dripping or splashing and that no objects illed wit
h
l
i
qu
i
ds, such as vases, shall be
p
laced on the a
pp
aratus
.
TABLE
O
F
CO
NTENT
S
IMP
O
RTANT
S
AFETY IN
S
TR
UC
TI
ON
ON
S
S
EN
Ϲ
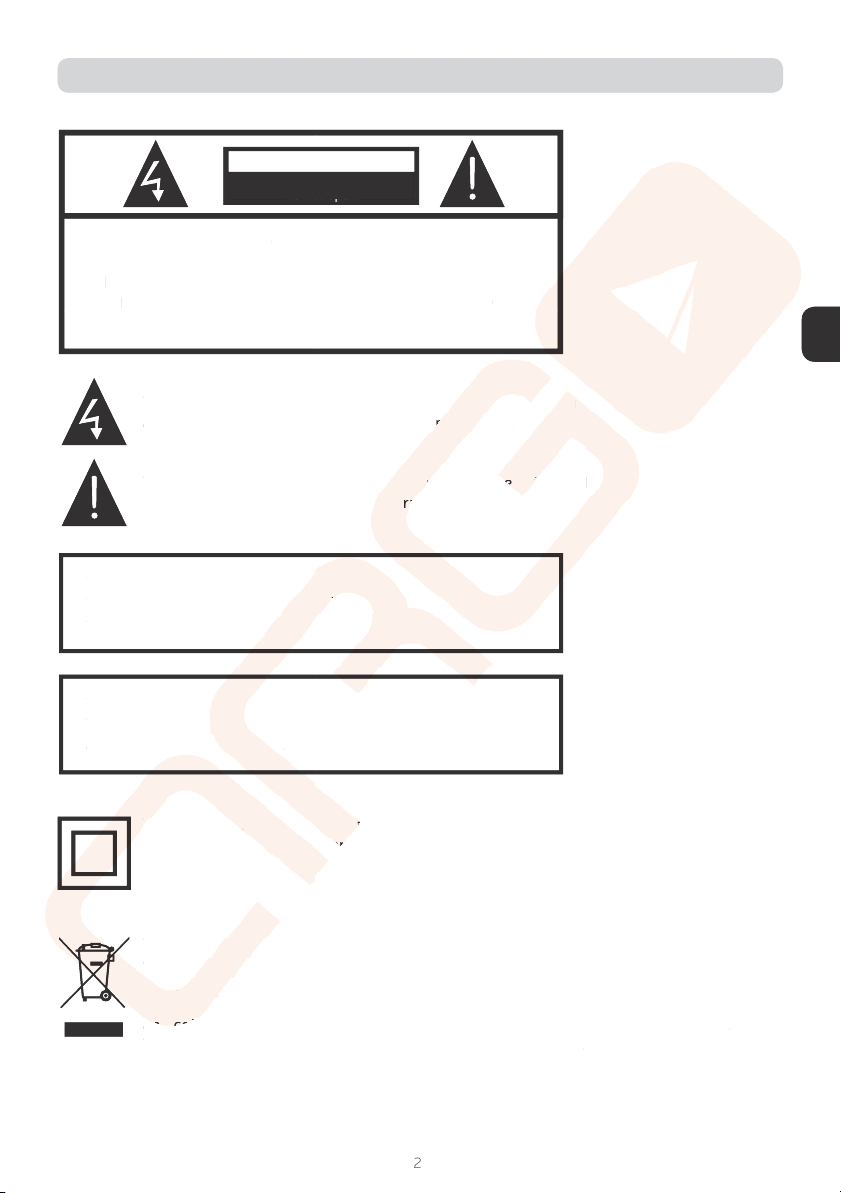
CAUTION
TO REDUCE THE RISK OF ELECTRIC SHOCK, DO NOT
REMOVE COVER (OR BACK). NO USER SERVICEABLE
PARTS INSIDE. REFER SERVICING TO QUALIFIED
SERVICE PERSONNEL.
The symbol indicates that dangerous voltages consituing
a risk of electric shock are present within this unit.
The symbol indicates that there are important operaing and
maintenance instrucions in the literature accompanying this unit.
WARNING:
To reduce the risk of ire or electric shock, do not expose
this apparatus to rain or moisture.
WARNING:
The bateries shall not be exposed to excessive heat such
as sunshine, ire or the like.
This symbol indicates that this product incorporates double insulaion between
hazardous mains voltage and user accessible parts. When servicing use only idenical
replacement parts.
This marking indicates that this product should not be disposed with other household
wastes throughout the EU. To prevent possible harm to the environment or human
health from uncontrolled waste disposal, recycle it responsibly to promote the sustai-
nable reuse of material resources. To return your used device, please use the return
and collecion systems or contact the retailer where the product was purchased.
They can take this product for environmental safe recycling.
IMPORTANT SAFETY INSTRUCTIONS
CAUTION
Risk of electric shock
Do not open!
EN
Ϲ
C
A
U
TI
O
N
TO REDUCE THE RISK OF ELECTRIC SHOCK
,
DO N
OT
REMOVE COVER
(
OR BAC
K)
. NO USER SERVICEABLE
PARTS INSIDE. REFER SERVICING TO
Q
UALIFIED
S
ERVI
C
E PER
SO
NNEL
.
The symbol indicates that dan
g
erous volt
a
ag
es
c
c
on
s
it
it
u
in
in
g
a risk o
f
electric shock are
p
resent wit
hi
i
n
n
th
is
s
u
nit
.
The symbol
i
nd
i
cates that there
a
ar
e
im
m
p
po
rtant op
er
er
a
a
i
in
g
an
d
m
a
i
ntenance
i
nstruc
i
ons
i
n th
e
e
l
i
te
ra
ra
ture accompany
i
n
g
th
is
is
u
ni
t.
t.
WARNIN
G
:
To reduce the risk o
f
ire o
r
r
e
el
ec
tr
tr
i
ic
s
ho
o
ck,
do
do
n
n
ot
t
e
e
xp
x
os
e
this a
pp
aratus to rain or
m
mo
is
tu
tu
re
.
WA
RN
IN
G:
The bater
i
es sh
a
al
l
no
o
t
t
be exposed to excess
i
ve heat suc
h
as sunshine,
ire
or
or
t
he
l
l
ik
ik
e.
T
Th
is s
y
m
bo
l
l
in
in
dica
te
te
s
th
th
at t
hi
hi
s
p
roduct incor
p
orates double insulaion betwe
en
hazardous ma
in
n
s
s
volt
ag
g
e
an
an
d user accessible parts. When servicin
g
use only idenical
re
pl
acement
pa
rts
.
Th
i
s mar
ki
ki
ng
i
nd
nd
i
cates that th
i
s product should not be d
i
sposed w
i
th other household
wastes
t
t
h
hr
ou
u
g
gh
out the EU. To prevent poss
i
ble harm to the env
i
ronment or hum
an
he
he
al
al
th
th
f
ro
m
m
uncontrolled waste disposal, recycle it responsibly to promote the susta
i-
nable re
u
us
e o
f
material resources. To return your used device, please use the return
an
n
d
d
co
co
l
ll
ec
i
on s
ys
tems or contact the reta
i
ler where the
p
roduct was
p
urchased
.
They can take this product
f
or environmental sa
f
e recycling.
IMP
O
RTANT
S
AFETY IN
S
TR
UC
TI
O
N
S
C
A
U
TI
ON
Risk of electric shock
Do not open!
p
Do
not
op
en!
Ϻ
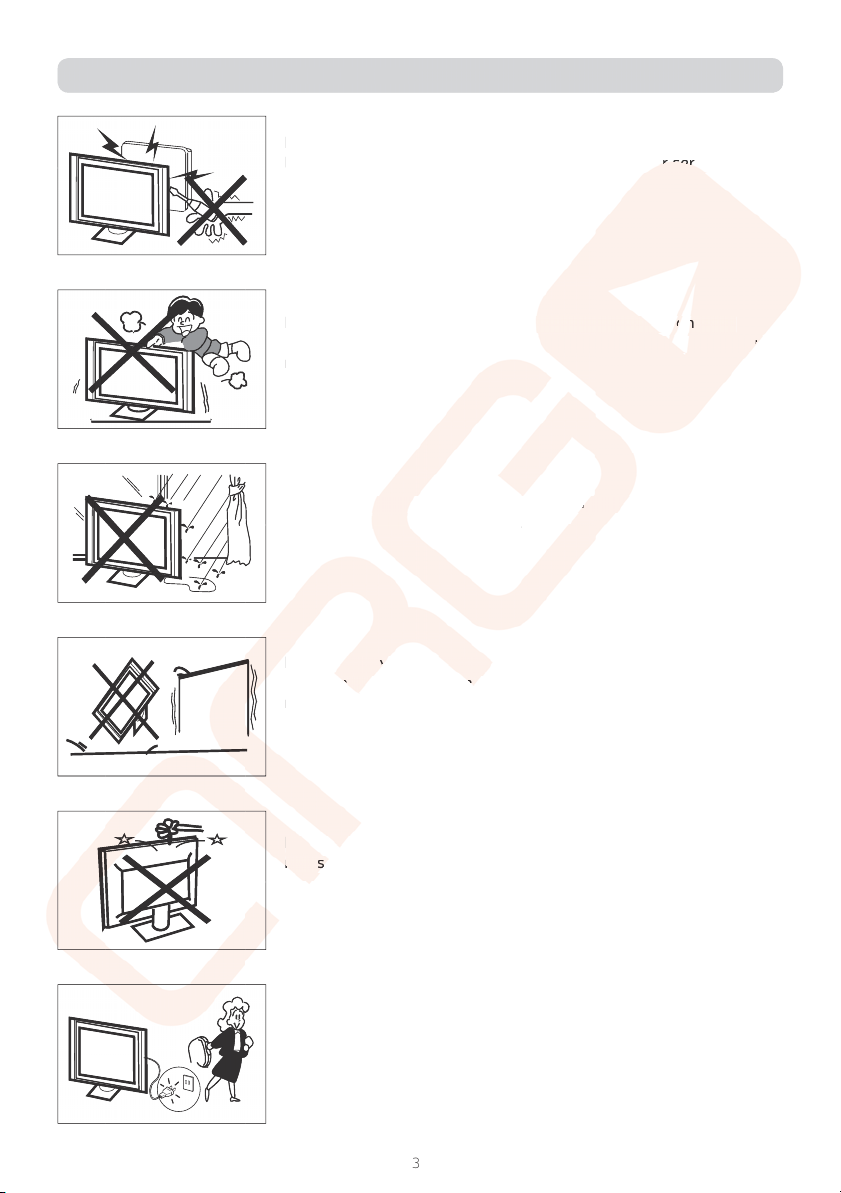
High voltages are used in the operaion of this television receiver.
Do not remove the cabinet back from your set. Refer servicing to
qualiied service personnel.
Never stand on, lean on, or suddenly push the television or its
stand. You should pay special atenion to children. Serious injury
may result if it falls.
To prevent ire or electrical shock hazard, do not expose the televi-
sion receiver to rain or moisture.
Do not place your television on an unstable cart, stand, shelf or
table. Serious injury to an individual , and damage to the television,
may result if it falls.
Do not drop or push objects into the television cabinet slots or ope-
nings. Never spill any kind of liquid on the television receiver.
When the television receiver is not used for an extended period of
ime, it is advisable to disconnect the AC power cord from the AC
outlet.
PRECAUTIONS AND REMINDERS
Ϻ
High voltages are used in the operaion o
f
this television receiver.
Do not remove the cabinet back
f
rom
yo
ur set. Re
fe
fe
r
r
se
se
rv
rv
icin
g
to
q
uali
ied service personnel.
Never stand on, lean on, or sudd
en
n
l
y
p
ush the te
le
le
vi
v
si
i
on
on
or it
s
s
tand. You should pay special at
en
n
ion to children.
Se
Se
r
ri
ous in
ju
u
r
ry
m
a
y
result i
f
it
f
alls
.
To prevent
i
ir
e
or
r
electrical shock haza
rd
d
, do
n
n
o
ot
expose the televi
-
sio
n r
ecei
v
e
r
to
r
r
ai
a
n
o
r m
oistu
r
e.
Do not
p
p
la
ce
y
y
our te
le
e
vi
vi
si
on
n
o
n an unstable cart, stand, shelf or
t
able.
S
er
er
io
io
us
i
nj
ur
y
to a
n
n
i
in
dividual , and dam
ag
e to the television,
m
a
y
result i
f
it
f
alls
.
Do
o
n
n
ot
t
d
d
ro
p
or
p
ush ob
je
cts
i
nto the telev
i
s
i
on cab
i
net slots or o
pe
-
ni
n
ng
s.
s.
N
ever spill any kind o
f
liquid on the television receiver.
W
hen the television receiver is not used
f
or an extended period
of
ime, it is advisable to disconnect the AC
p
ower cord
f
rom the AC
ou
tl
et
.
PRE
C
A
U
TI
O
N
S
AND REMINDER
S
EN
ϻ
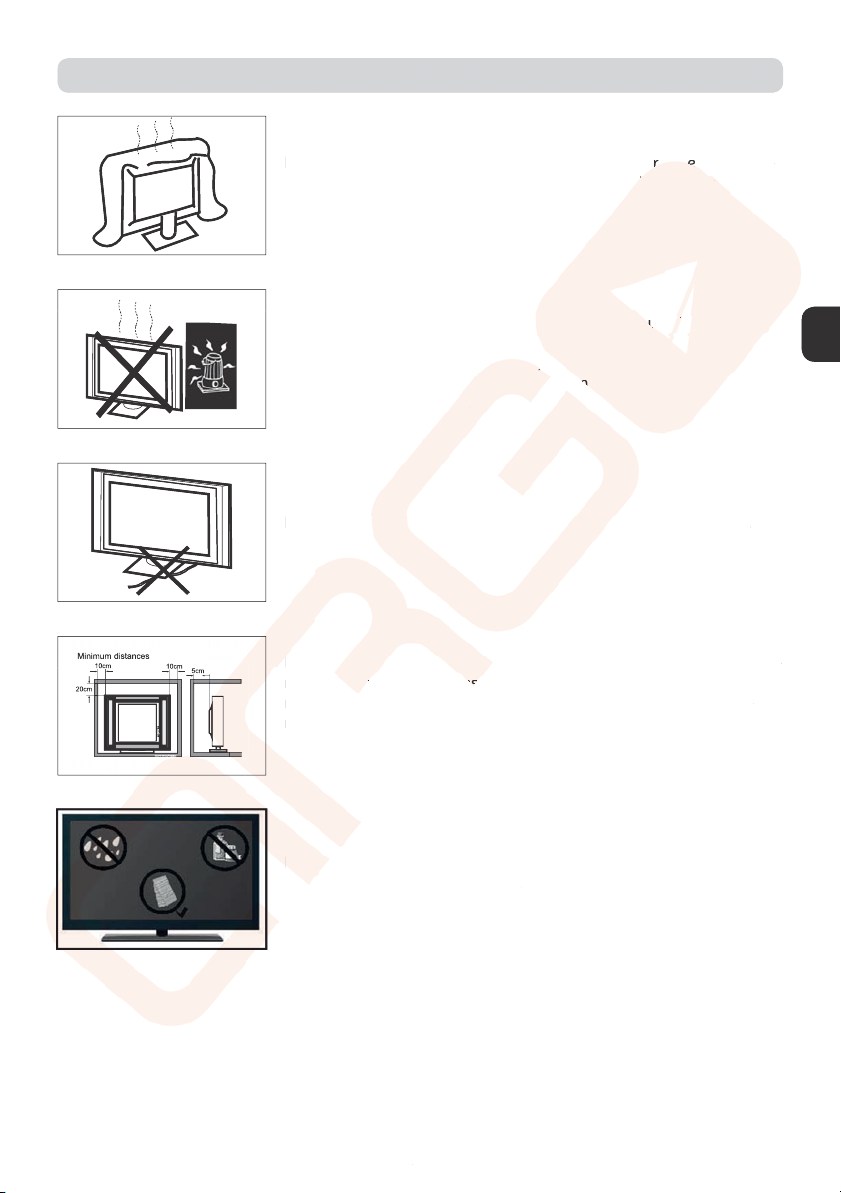
Do not block the venilaion holes in the back cover. Adequate ven-
ilaion is essenial to prevent failure of electrical components.
Avoid exposing the television receiver to direct sunlight and other
sources of heat. Do not stand the television receiver directly on
other products which give of heat, e.g. video cassete players and
audio ampliiers. Do not place naked lame sources, such as lighted
candles on the television.
Do not trap the power supply cord under the television receiver.
If the television is to be built into a compartment or similar enclosu-
re, the minimum distances must be maintained. Heat build-up can
reduce the service life of your television, and can also be dange-
rous. Note:the use of apparatus in moderate climates.
If you are going to clean the product,Unplug the TV,use sot
fabric,no water,never chemicals.
PRECAUTIONS AND REMINDERS
EN
ϻ
Do not block the venilaion holes in the back cov
er
er
.
Ad
Ad
eq
eq
uate ven-
ilaion is essenial to prevent
f
ailure o
f
electr
ic
c
al
al
compo
ne
e
nt
n
s.
A
vo
i
d expos
i
n
g
the telev
i
s
i
on re
ce
e
i
ver to d
i
rect s
un
un
l
i
gh
gh
t
t
and othe
r
r
s
ources of heat. Do not stand the
te
e
le
l
vision receiver
di
di
r
re
ctly on
o
ther products which
g
ive
o
o
f
f
he
he
at
at
,
,
e.
g.
g.
video cassete player
s
s
and
a
udio ampli
iers. Do not
p
p
l
la
ce nak
ed
ed
la
me
me
sources, such a
s
s
l
li
g
hted
ca
n
dles
o
n
t
h
e
tele
v
is
io
o
n
.
Do not tra
p
t
th
e
po
po
wer su
pp
ly
cord un
de
de
r
th
e
e
telev
i
s
i
on rece
i
ve
r.
If the t
el
el
ev
is
io
io
n is to
be
be
b
ui
lt
lt
into a com
p
artment or similar enclosu
-
r
e, the
mi
mi
ni
ni
m
mu
m d
i
stan
ce
e
s
s
must be ma
i
nta
i
ned. Heat bu
i
ld-u
p
can
r
educe the service life of your television, and can also be dan
g
e-
r
ous. Note:the use o
f
ap
pa
ratus in moderate climates.
If
If
y
ou
u
a
re going to clean the product,Unplug the TV,use so
t
f
a
br
br
ic
,n
o wate
r,
never chemicals
.
PRE
C
A
U
TI
O
N
S
AND REMINDER
S
Other Engel LED TV manuals


