Englefield Studio 1500 User manual

1249063-A02-A 20/04/2015
INSTALLATION
INSTRUCTIONS
BATH
Englefield
STUDIO Freestanding 2589A-0
2590A-0
Note: Towel not included
Englefield has a history of
making superb baths and
their popularity is testament to
their quality and affordability.
It’s the details that Englefield
cares about - from pioneering
the latest technology, to
innovative design, it’s all to
make your bathing
experience the very best it
can be.

Page 1
Before installing the bath please read these instructions carefully to familiarise yourself with
the required tools, materials and installation sequences. This will help you avoid costly
mistakes. The installation documents included assume that walls are plumb and floors are
level. Slight adjustments to the installation procedure may be required for out-of-square
surfaces.
In addition to proper installation, read all operating and safety instructions and refer to the
Homeowner’s Guide for important care and cleaning information. Ensure that all local
building and plumbing codes are observed.
These instructions contain important care, cleaning and warranty information.
Please leave these instructions for the consumer after installation.
INSTALLATION INSTRUCTIONSSTUDIO Freestanding Bath
BEFORE YOU BEGIN
GENERAL INFORMATION
TOOLS AND MATERIALS REQUIRED
ENGLEFIELD
Studio Freestanding Baths ordering information:
Note: Instructions, drawings, and diagrams contained in this manual present information available at the time
of printing. Although every attempt has been made to keep them up-to-date, Englefield reserves the right to
implement product changes without further notice.
Product Part Number
2589A-0
2590A-0
Studio 1500
Studio 1800

Acrylic bath
Mounting brackets x4
Installation template
Outer edge of bath (1500 & 1800) Outer edge of bath (1500 & 1800)
Studio 1800 bath
located foot position
Studio 1800 bath
located foot position
Studio 1800 bath
located foot position
Studio 1800 bath
located foot position
This side up
Studio 1500 bath
located foot position
Studio 1500 bath
located foot position
Studio 1500 bath
located foot position
Studio 1500 bath
located foot position
Engleeld Studio Freestanding Bath
1500 & 1800 Installation Template
PN 1249068-A April 2015
Engleeld Studio Freestanding Bath
1500: 2589A-0 1800: 2590A-0
Direction of push to lock
bath feet intobrackets
Please ensure this templateis printed at 100% size (i.e: no scaling).
Forreference:
1500 feet centres:590mm x 210mm
1800 feet centres:700mm x 360mm
Page 2
INSTALLATION INSTRUCTIONSSTUDIO Freestanding Bath
INCLUDED COMPONENTS
ENGLEFIELD
Adjustable feet x4
Page 3
INSTALLATION INSTRUCTIONSSTUDIO Freestanding Bath
INSTALLATION
ENGLEFIELD
1) Unpack the bath and check for any transit damage prior to installation.
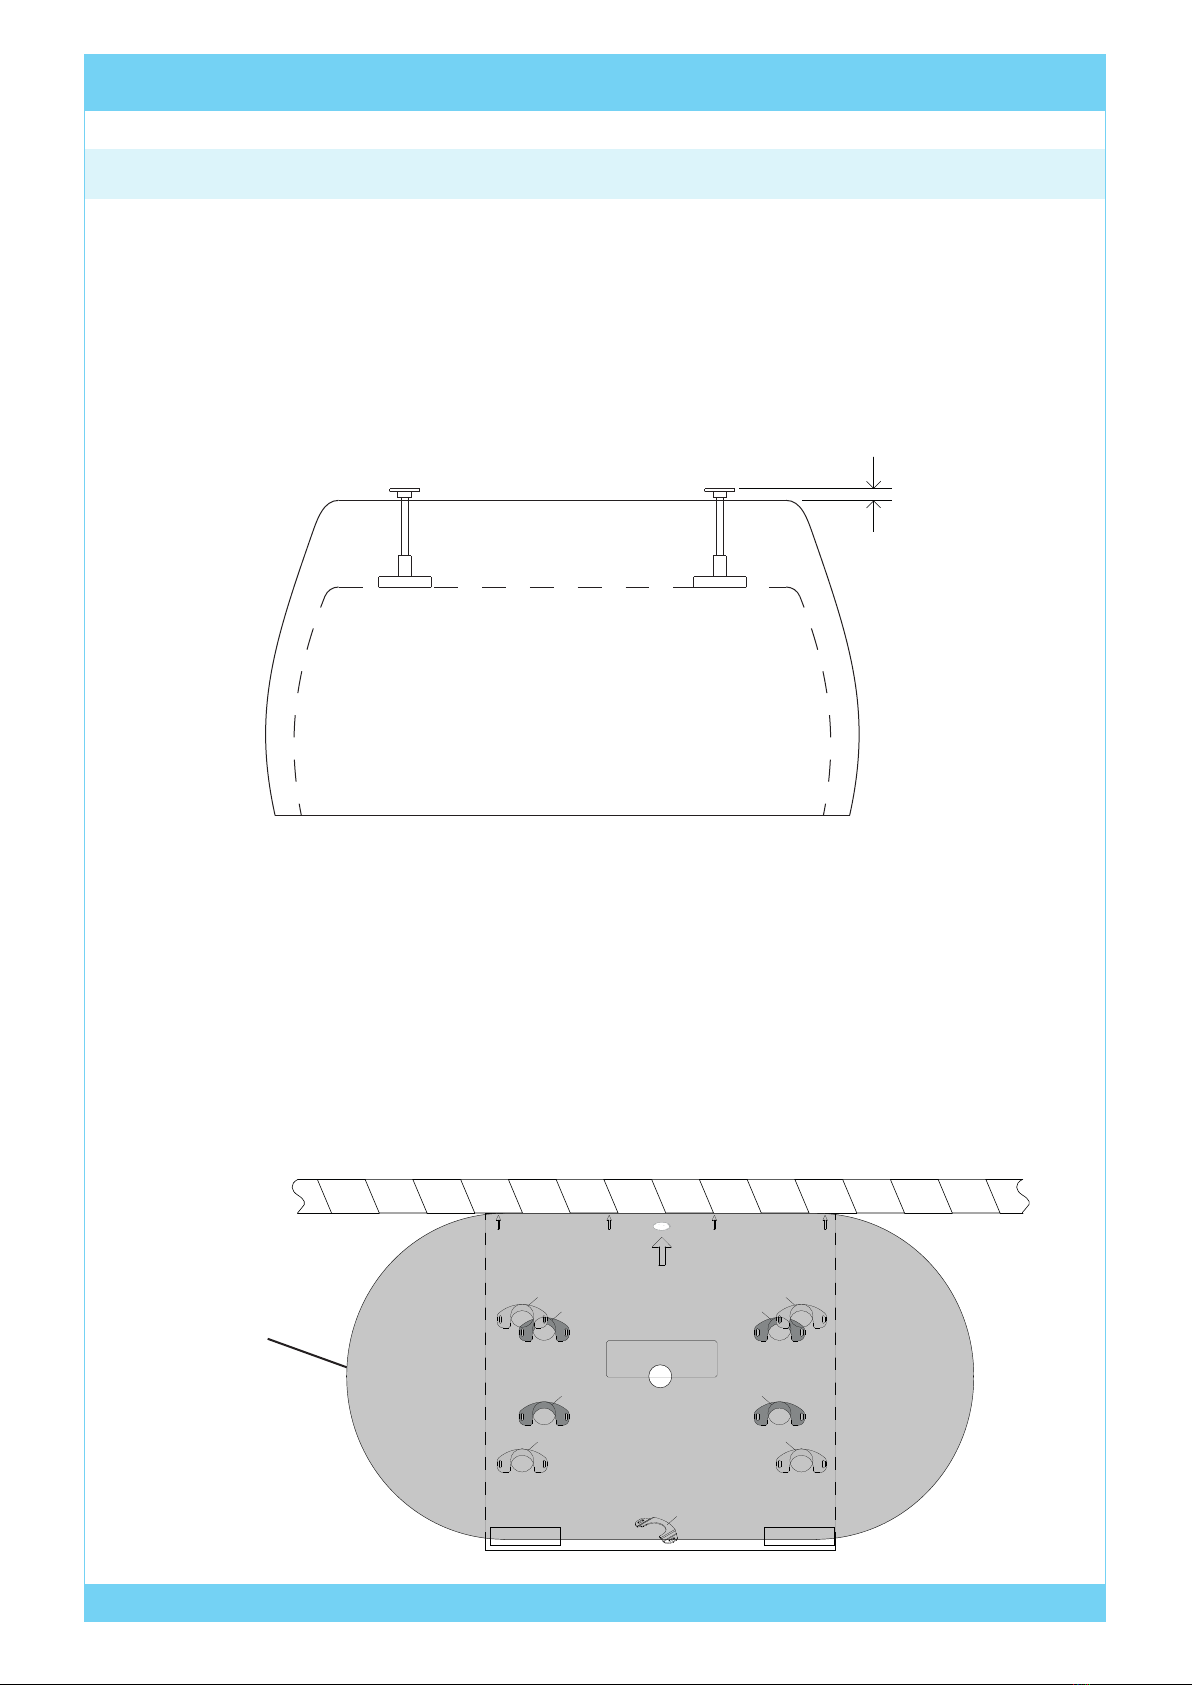
2) Carefully place the bath upside down on a soft surface, ensuring no damage to the rim
or surfaces. Loosen off and screw the adjustable feet so that the bottom of each foot is
protruding approximately 25mm from the underside of the bath. Tighten the nuts with an
adjustable wrench or spanner. Next, overturn the bath and place a spirit level across the
rim. Adjust the feet until the bath is level with the floor.
3) Position the bath in the desired location in the bathroom. If the bath is to be placed
against a wall, orient it so that the long side with logo badge is adjacent to the wall.
4) Check that the plumbing can be connected to the bath when in the desired location and
that the positioning of the bath does not interfere with other bathroom fixtures.
5) Carefully place the installation template on the floor directly underneath the bath.
The bath feet should roughly align with the “located foot position” on the template. If the
bath is to be installed against a wall, position the template so that the edge with logo
and arrows is touching the wall.
25mm
Outer edge of bath (1500 & 1800) Outer edge of bath (1500 & 1800)
Studio 1800 bath
located foot position
Studio 1800 bath
located foot position
Studio 1800 bath
located foot position
Studio 1800 bath
located foot position
This side up
Studio 1500 bath
located foot position
Studio 1500 bath
located foot position
Studio 1500 bath
located foot position
Studio 1500 bath
located foot position
Engleeld Studio Freestanding Bath
1500 & 1800 Installation Template
PN 1249068-A April 2015
Engleeld Studio Freestanding Bath
1500: 2589A-0 1800: 2590A-0
Direction of push to lock
bath feet into brackets
Please ensure this template is printed at 100% size (i.e: no scaling).
For reference:
1500 feet centres: 590mm x 210mm
1800 feet centres: 700mm x 360mm
Bath outline
over template

Page 4
INSTALLATION INSTRUCTIONSSTUDIO Freestanding Bath
ENGLEFIELD
6) Tape the template down to the floor and carefully remove the bath.
7) Mark the screw hole centres onto the floor for the appropriate bath model (1500 / 1800).
Marking the centre of the slot will give adjustment both in and out. Remove the template.
8) If present, remove the protective film from the mounting brackets.
9) Attach the mounting brackets to the floor using appropriate fixing screws. 12g screws
with flat washers are recommended. Make sure the brackets are fixed in the positions
marked on the template so that the bath can be slid in and out in one direction. Do not
fully secure the brackets at this stage.
Outer edge of bath (1500 & 1800) Outer edge of bath (1500 & 1800)
Studio 1800 bath
located foot position
Studio 1800 bath
located foot position
Studio 1800 bath
located foot position
Studio 1800 bath
located foot position
This side up
Studio 1500 bath
located foot position
Studio 1500 bath
located foot position
Studio 1500 bath
located foot position
Studio 1500 bath
located foot position
Engleeld Studio Freestanding Bath
1500 & 1800 Installation Template
PN 1249068-A April 2015
Engleeld Studio Freestanding Bath
1500: 2589A-0 1800: 2590A-0
Direction of push to lock
bath feet into brackets
Please ensure this template is printed at 100% size (i.e: no scaling).
For reference:
1500 feet centres: 590mm x 210mm
1800 feet centres: 700mm x 360mm
Page 5
INSTALLATION INSTRUCTIONSSTUDIO Freestanding Bath
ENGLEFIELD
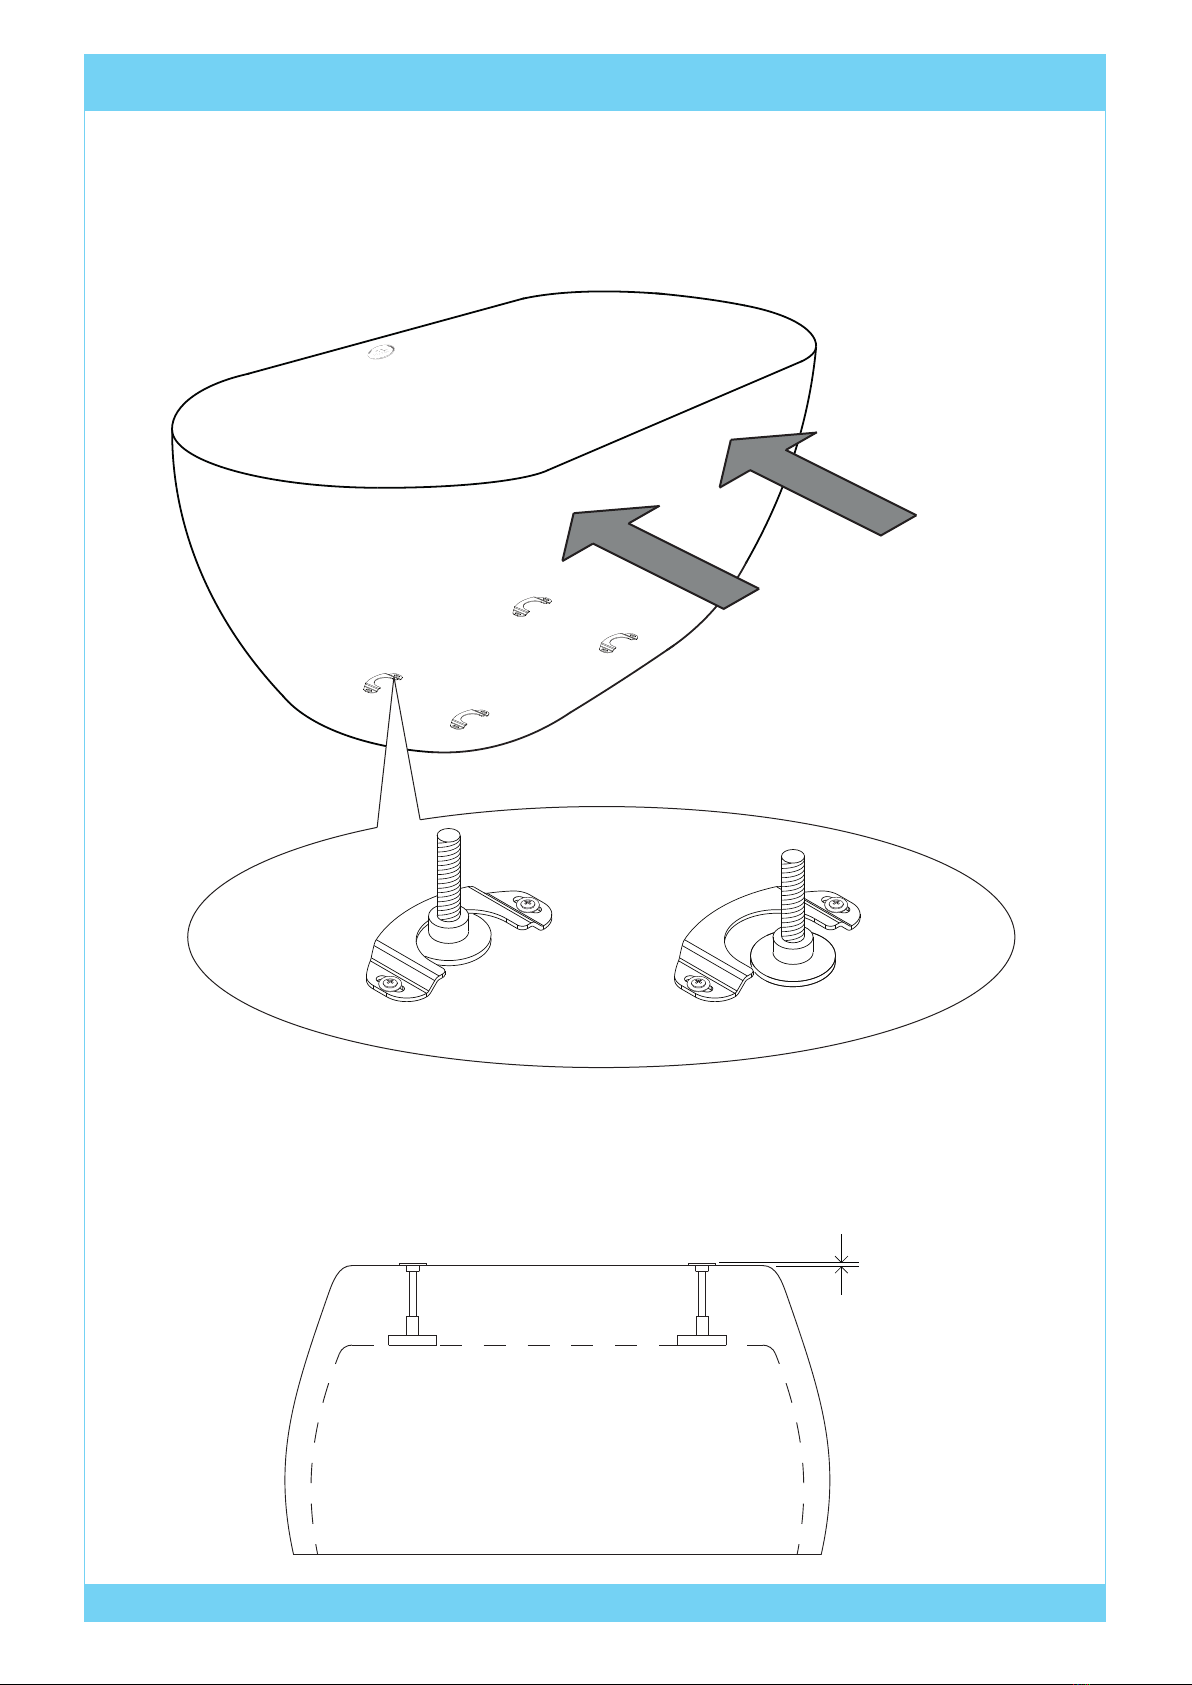
9) Reinstall the bath by placing it straight down so that the feet are directly in front of the
bracket openings, then sliding the bath away from you until it locks in place. Adjust the
mounting bracket positioning as necessary. Once the feet locate and lock in position
as desired, remove the bath and fully tighten the bracket fixing screws.
10) Adjust the feet so that the bottom of each foot is protruding approximately 5mm from the
underside of the bath. Tighten the nuts with a crescent or spanner. Overturn the bath
and place a spirit level across the rim. Adjust the feet until the bath is level with the
floor. Ensure the feet always extend below the bath shell to take the weight of the bath.
5mm
Foot in locked position Foot in unlocked position

Page 6
INSTALLATION INSTRUCTIONSSTUDIO Freestanding Bath
ENGLEFIELD
11) Once the mounting brackets are correctly installed and secured, slide the bath towards
you and lift straight up to remove. Install the waste system (not supplied) to the
manufacturer’s instructions. Please adhere to the relevant sections of NZS 3500
plumbing standard.
The recommended products are:
12) Fill the bath with water before it is securely positioned as to check the supply
connections for leaks. Kohler Co. shall not be liable under its warranty or otherwise for
damage caused by negligence.
13) Reinstall the bath so that it clips into the mounting brackets. Take care not to disrupt
the plumbing connections or damage the underside of the bath. Fill the bath with water
and test for leaks. Repair and repeat steps 11-13 as required.
14) Apply an appropriate silicone sealant, ensuring a watertight seal between the bath and
adjacent surfaces.
Installation complete.
Product Part Number
99329A-CP
80144A-NA
Pop-up bath waste
Self-sealing trap with
flexible waste pipe

Outer edge of bath (1500 & 1800) Outer edge of bath (1500 & 1800)
Studio 1800 bath
located foot position
Studio 1800 bath
located foot position
Studio 1800 bath
located foot position
Studio 1800 bath
located foot position
This side up
Studio 1500 bath
located foot position
Studio 1500 bath
located foot position
Studio 1500 bath
located foot position
Studio 1500 bath
located foot position
Engleeld Studio Freestanding Bath
1500 & 1800 Installation Template
PN 1249068-A April 2015
Engleeld Studio Freestanding Bath
1500: 2589A-0 1800: 2590A-0
Direction of push to lock
bath feet into brackets
Please ensure this template is printed at 100% size (i.e: no scaling).
For reference:
1500 feet centres: 590mm x 210mm
1800 feet centres: 700mm x 360mm
CONTACT AND WARRANTY INFORMATION
NEW ZEALAND
KOHLER NZ LTD
Free Ph: 0800 100 382
Free Fax: 0800 664 488
www.englefield.co.nz
AUSTRALIA
KOHLER CO.
Free Ph: 1 800 ENGLEFIELD
(1 800 364 533)
www.englefield.com
Englefield
INSTALLATION INSTRUCTIONS
CLEANING AND MAINTENANCE INSTRUCTIONS
Please refer to the Homeowner’s Guide for cleaning instructions.
1262424 - Freestanding Bath Foot
1249068 - Installation Template
1249069 - Bath Mounting Bracket
For warranty information, please visit our website.
STUDIO Freestanding Bath
SPARE PARTS
This manual suits for next models
3
Table of contents
Other Englefield Bathtub manuals

Popular Bathtub manuals by other brands


Apollo
Apollo SERENITY Whirlpool owner's manual

Senior Bad
Senior Bad F01 Assembly instructions

HoMedics
HoMedics ParaSpa Deluxe PAR-250 Instruction manual and warranty information

Porcelanosa
Porcelanosa Noken CONIC 100080457 N710000262 manual

Jacuzzi
Jacuzzi J.Touch Use & maintenance

Kohler
Kohler K-1112-GLF Roughing-In Guide