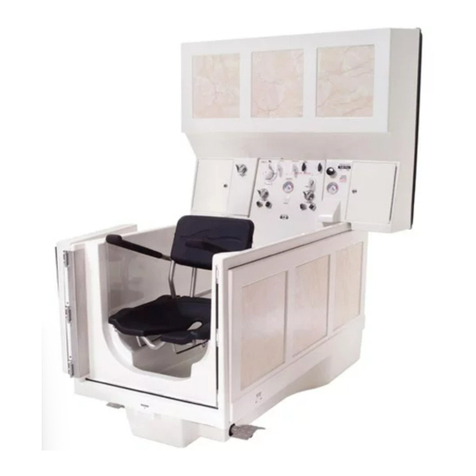
Apollo SERENITY Whirlpool User manual

APOLLO
BATHING SYSTEM
SERENITY™
Owners Manual and Operators Guide
PO Box 219 450 Main St
Somerset, WI 54025
800-247-5490 or [email protected]

2
System Operating Guide The Serenity™
FORWARD
Thank You
Thank you for purchasing the Serenity™ Whirlpool tub from the
Apollo Corporation. The Serenity™ is designed and built to
provide you with the innovation and dignity.
System Operating Guide Objectives
The primary purpose of this operating guide is to introduce the
key information and features of the Serenity™ Whirlpool tub,
present the benefits of this system, explain and define the critical
warnings and precautions that are required to be taken with the
bathing system, and finally, define the pre-bath, bathing, and
post-bath procedures.
Read the System Operating Guide Thoroughly!
To realize the maximum benefits from your bathing system, it
must be properly operated and maintained. This System Oper-
ating Guide provides you with the information required for
normal day-to-day bathing.
The information in this System Operating Guide is important
to your safety and must be read and understood to help prevent
possible injury.
It is important that all personnel operating the Serenity™ Whirl-
pool tub read this guide completely. Any questions should be
directed to the Apollo Corporation or an authorized service
representative.

3
The Serenity™ System Operating Guide
Table of Contents
Table of Contents ………………………………………...3
Introducing the Serenity™………………………………..4
Key Features……………………………………….5
Critical Warnings…………………………………………6
Warning/Caution…………………………………..6
Electrical current warning…………………………6
Hot water warning…………………………………6
Wet floor warning………………………………….6
Infection/Disease warning…………………………6
Watch for legs and fingers………………………....6
Important Note……………………………………..6
Prior to Operating the Serenity™………………………....7
Understanding the Bathing Process………………………8
The Bathing Process……………………………….8
The Showering Process……………………………8
Cleaning & Disinfecting Background……………………9
How does this happen? ............................................9
Cleaning & Disinfecting Procedures……………………..10
Clean & Disinfect between each bath……………..10
After last bath of the day…………………………..10
Cleaning and Disinfecting with “The Remedy™”...11

4

4
System Operating Guide The Serenity™
Introducing the Serenity™

5
The Serenity™ System Operating Guide
With the combination of innovative engineering, unsurpassed attention to
detail, and a distinctive, team-oriented work environment, the Serenity™
Whirlpool tub is a cut above the typical assisted living whirlpool tubs on
the market. The Apollo Corporation is confident that once you’ve used
the Serenity™ Whirlpool tub, you will agree that it is not only the top
choice, but the only choice which includes all the features and benefits
only available with the Serenity™.
Key Features
■ Whirlpool motor
Soft, calming motion or rapid, massaging whirlpool action
is available.
■ Three whirlpool jets
Adjustable jets allow for control of the speed and direction
of water.
■ Power Door
■ The power door relieves any straining or lifting
■ Oversized Drain
■ A 1.5 inch oversized drain provides rapid elimination of
bathwater
■ Molded in-shelf for holding all of your bath aids
■ High contour back includes lumbar support and a built-in
spill ledge
■ Non-slip floor surfaces provide extra protection against
slipping
■ Optional Control Panel includes:
■ Mixing valve
■ Hand held shower wand
■ Adjustable shower head

6
Critical Warnings
This Systems Operating Guide provides you with the information required
for normal day-to-day bathing. To realize the maximum benefits from your
bathing system, it is important that you read and understand all of the infor-
mation in this manual. If you do not understand or require additional infor-
mation, please contact the Apollo Corporation at (800) 247-5490.

7
The Serenity™ System Operating Guide
Prior to Operating the Serenity™
Prior to operating the Serenity™ Whirlpool tub, it is critical that the
following items be performed:
■ Proper training
Proper training in the use of the equipment is required and will
enhance the pleasure of the whirlpool bathing experience. It will
also provide the required safety awareness that must be observed
with this and all whirlpool bathing equipment.
■ Ensure water temperature is reached and maintained
If a comfortable bathing temperature cannot be reached or
maintained, immediately contact qualified maintenance personnel,
the manufacturer of the mixing valve, or the Apollo Corporation.
■ Check proper operation of the mixing valve
Open the drain, turn on the water to the tub, and adjust the mixing
valve control knob until the desired temperature has been reached
and maintained.
Check any provided temperature gauges. When a safe bathing
temperature has been achieved, usually between 99˚F and 104˚F,
double check this by carefully feeling the water with your hand.
If a comfortable bathing temperature can not be reached or main-
tained, immediately contact a qualified maintenance person, the
manufacturer of the mixing valve, or if it is Apollo’s valve, the
Apollo Corporation.
■ Be aware of water leakage to prevent slippage
To prevent possible water damage or personal injury from slip-
page, be sure the floor around the bathing area is dry and a non-
slip mat or towel is available to step on when exiting the bath.
Water on the floor from a previous bath or a plumbing leak could
indicate the need for maintenance.
NOTE

8
Understanding the Bathing Process
Apollo Serenity™ Whirlpool tub is meant to be a relaxing,
pleasurable experience. By following these steps, you will receive the
most possible enjoyment out of the bathing process.
The Bathing Process
1. With the door open, sit on the built-in seat, then pivot your body
until you are completely inside the tub.
2. Ensure that your body is clear of the door closure area, then push
the door Close button.
3. Turn on the water and adjust it to a comfortable water
temperature.
4. Close the drain by turning the drain control know counter clock-
wise.
You may open the drain by turning the knob clockwise.
5. When the water level in the tub is above the highest whirlpool jet,
the whirlpool motor may be operated.
Caution: The Whirlpool pump can be damaged if it is run with-
out water.
The whirlpool jets are multi-directional and the pressure may be turned
up or down by turning the jet nozzle to the desired pressure.
The Showering Process
1. Use the shower selector to select the hand held shower wand or
flexible shower head.
2. Turn the water on and adjust the temperature.
3. Pull out the shower control button (on the faucet) to produce flow
through the shower.
Be sure to point hand-held wand into the tub.
4. When you have finished showering, simply turn off the water
supply valve.
In case of emergency, pull the emergency stop button. This will cut
the power to the door, allowing it to be manually pushed down to the
open position.

9
The Serenity™ System Operating Guide
Cleaning & Disinfecting Background
Cleaning and disinfecting are important elements in preventing
infection and disease. Manufacturers of disinfectants are required,
by the FDA, to provide on the product label, the required disinfecting
procedures in order to be effective. Disinfecting will fail if the
directions for use are not followed exactly.
The most important step in the disinfecting procedure is that heavily
soiled surfaces must be pre-cleaned before disinfecting can be
successful. Refer to your disinfectant’s labeling.
For this reason, the bath and shower areas require the most careful
adherence to these directions in order to achieve disinfection. This is
due to the residue left behind as bath scum interferes with the
disinfecting action of the disinfectant.
How does this happen?
Science has identified that all objects in our environment carry either
positive or negative electrical charges. Skin, hair, body oil, body
soaps, shampoos, etc. carry a negative charge. Disinfectants, on the
other hand, carry a positive charge. After bathing, the bath scum
(negatively charged), must be thoroughly washed off so that the
disinfectants’ active ingredients (positively charged) are not
neutralized; making the disinfectant ineffective.
Power Clean™ is a heavy duty cleaner formulated to be compatible
and enhance all disinfectants. Apollo’s Power Clean™ is recom-
mended and safe for pre-cleaning soiled (bath scum) surfaces on
all whirlpool bath tubs and shower walls.
Cid-A-L™ II is recommended for disinfecting all tub and shower
surfaces.
NOTE
Items listed are some
of just the many
items that carry a
negative charge.

11
System Operating Guide The Serenity™
Cleaning & Disinfecting Procedures
Without Automatic Disinfecting Option
Clean & Disinfect between each bath
1. Close door and thoroughly wash all inside surfaces of the tub
and door with Power Clean™ to remove all bath scum residue.
2. Inject approximately ½ oz of Power Clean™ into whirlpool
suction inlet and jets.
3. Separate shower wand from jet adapter on end of hose.
4. Insert adapter end of hose into jet nozzle that is located under the seat
and turn on the shower valve. Leave shower valve on until clean
water flows from the jet openings.
5. Turn off shower valve, re-attach adapter to shower wand, and rinse
all inside areas of the tub.
To Disinfect
1. Repeat steps 1 and 2 above, using a hospital grade disinfectant.
Be sure to follow all manufacturer’s disinfecting label instructions.
2. After the required contact time. Rinse by following steps 3,4 and 5
above.
CAUTION
Disinfectants are
hazardous and can be
harmful to your health.
Be sure to carefully
NOTE
Use this procedure
after bathing anyone
with open sores or
lesions.

11
The Serenity™ System Operating Guide
Sanitizing/Disinfecting Procedures for the
Automatic Clean and Disinfect Option
Including “The Remedy™”
1. Close the drain and door, set the selector knob to “Tub Cleaner” and
turn on/off valve to on.
2. When cleaning solution has begun to flow out of whirlpool intake and
into the tub, turn on the whirlpool pump. The flow will momentarily
disappear.
3. When solution once again starts to enter tub, brush cleaning solution on
and around all inside tub and door surfaces.
4. When solution starts to flow from uppermost jet and all surfaces have
have been cleaned, turn the selector knob to disinfect.
5. Open tub drain. As disinfectant solution enters the tub, (takes about
45 seconds) coat all tub and door surfaces with disinfecting solution.
When all surfaces have been coated, shut off whirlpool and turn the
Cleaner/Disinfecting Valve to off. Wait the required contact time.
(Disinfectants need to be left on a moist surface for at least 10 minutes
to be effective.)
6. To rinse, turn selector knob to “Rinse”, the Cleaner/Disinfecting valve
to on. When water begins to flow into tub, turn on the whirlpool to
flush system with clean water. Use the shower wand to rinse the inside
surfaces of the tub and door. When finished, turn the dispensing system
knob to off.
Remedy™ Note
With a Remedy™ System follow steps 1 through 4 completely. Under normal
circumstances with the Remedy™ it is not necessary to apply chemical
disinfectants (step 5) between baths. Step 5 (i.e. application of chemical
disinfectants) should always be followed after the last bath of the day.
NOTE
Be sure to
familiarize
yourself with all of
the controls on the
panel before
operating.

The
Serenity™
Parts Manual
APOLLO Corporation
P.O. Box 219
Somerset, WI 54025
(715) 247-5625 / (800) 247-5490
Fax: (715) 247-3424

Table of Contents
Tub Section: Page
Outer Panels ......................................................................................... 1
Tub Shell Inner .................................................................................... 2
Whirlpool ............................................................................................. 3
Controls and Drain ............................................................................... 4
Door ..................................................................................................... 5
Air Section:
Air System ........................................................................................... 6
Single Solenoid .................................................................................... 7
Double Solenoid................................................................................... 8
Electrical Section:
Electrical Box Location ....................................................................... 9
24VDC Diagram ................................................................................ 10
110VAC Diagram .............................................................................. 11
Magnetic Sensor ................................................................................. 12
Control Panel:
Thermoscopic Control Panel.............................................................. 13
Control Panel with “The Remedy™” ................................................ 14

Tub Section

1

2

3

4

4
Table of contents
Other Apollo Bathtub manuals
Popular Bathtub manuals by other brands

BAGNODESIGN
BAGNODESIGN BDB-MAL-53175-A-WH installation guide

Signature Hardware
Signature Hardware Arabella 930798 manual

Reliance
Reliance R6636OFSXVS Owner's manual & installation guide

A&E
A&E Italia Owner's manual and installation guide

CAHABA
CAHABA SACHA CA401006 installation instructions

Rohl
Rohl Victoria+Albert Lussari 1700 Instruction guide