enLighten Rustic 2 User manual

User Manual
Rustic - 2
Thank you for choosing our infrared sauna!
Congratulations on the purchase of your brand new infrared sauna. Please
carefully review and read through this material. Keep this manual and your
proof of purchase for future reference and service calls.

WELCOME FRIENDS!
We are so delighted that you have decided to take control of your life and invest in the most
important thing – your health. Soon you will discover there is more to sauna then just “sweating”. But
first, allow us to introduce our company, what we do, why we do it and what you can expect from us.
We began our journey a decade ago with one goal in mind… To create and Optimal Health Product.
We knew that general surface health treatments combined with inner cleansing could benefit many
and provide many positive health results.
However, through thorough cleansing methods we have tested, many of us have experienced
headaches during a detox diet as well as lacking the ability to properly detoxify our system. There it
hit us…What if we can increase our ability to sweat to detoxify the system faster and more efficiently
without the unwelcome side effects? And how can we go about it?
Saunas have been in wide use for centuries, but the true breakthrough happened when the power of
Infrared Light was introduced into the unique health industry, specializing in detoxification and
cleansing. After much research and testing, we realized the benefits of infrared light are far more
reaching than just on the surface, or slightly underneath the skin. This was truly an extraordinary
discovery for us and we have devoted our primal business focus on exclusive manufacturing of
infrared sauna that would maximize healing potential and maintain an optimal healthy physique. The
understanding became a connection of dot-to-dot and we fell in love with our product so much, our
team uses infrared saunas daily.
We wish to share this technology and to show our passion for what we sell and believe in. It is truly
part of our personal journey, healing and inner belief that infrared saunas are safe and incredibly
effective sources for personal detoxification and more.
Please let us know if there is anything you need. We are here to help.
Happy Detox!
Enlighten Sauna Team
2
Electrical Components/Requirements
Please Read Carefully!
Each sauna will require a dedicated circuit when plugged into an outlet according to the chart below.
A “dedicated circuit” requires that no other appliance should share the outlet/circuit with the sauna.
Failure to comply with this requirement may cause an electrical interruption and/or a diminished
performance. To avoid any potential electrical hazards, it is recommended that only a qualified
electrician installs your dedicated electrical wiring for a proper sauna functionality. Please make sure
that the sauna is properly grounded. Serious injury may result if the proper electrical requirements
are not met.
WARNING! Keep the sauna away from any potential hazards including any water source or liquids.
Select a dry, suitable location for sauna installation. Do not expose the heater elements to any water
source or liquids as it may cause electrical shock. Should you have any questions, please do not
hesitate to contact the supplier.
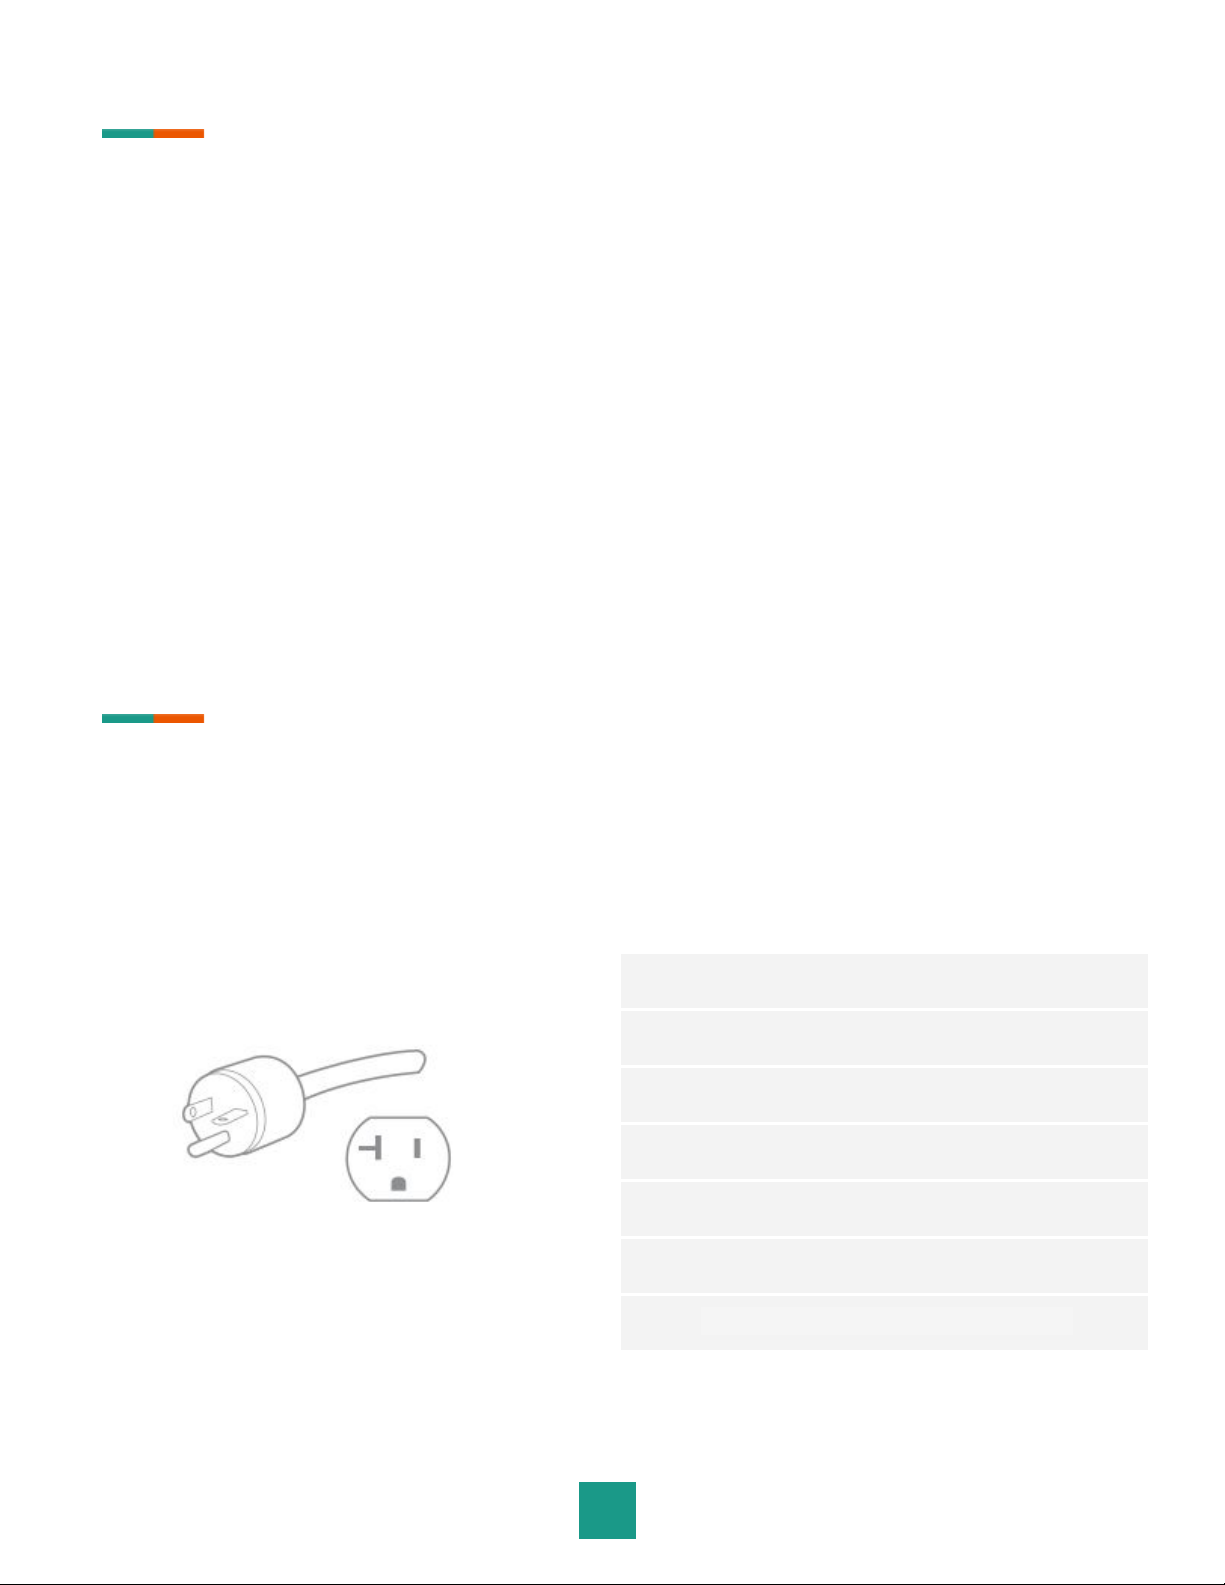
Power Plugs
Please read the following directions carefully.
Power Usage/AMPS
Wattage: 2250 w
Voltage: 110/120 V
Near/Mid IR Wavelengths: 0 to 5
Far IR Wavelengths: 6 to 12
Amperage: 20 Amp
Plug: NEMA 5-20p
3

Sauna Installation Instructions
Please read the following directions carefully.
The sauna installation requires a minimum of 2 people. You should not try to install the sauna on your
own as damage may easily occur.
Caution
1. No plumbing or plumbing fixtures should be placed in the sauna.
2. Keep all liquids away from the heating panels.
3. Install the sauna on a completely leveled surface.
4. Flammable objects and corrosive chemical substances should be kept far away from the sauna.
Your infrared sauna will come packaged in five boxes (seven boxes for peak roof saunas). Please
make sure that you open the boxes FACE-UP. Please be very careful when opening the boxes!
BOXES CONTAIN FRAGILE PARTS AND GLASS!
Connecting the Panels:
Each sauna offers two types of panel-locking systems to connect the different sides of the sauna.
Please use the instructions below as a reference guide on how to connect the sauna panels.
Inner-Locking System:
The inner-locking system is designed to be completely invisible when the sauna is installed. The locks
are built on the side of each panel and they connect by sliding one over the other (Figure G-2).
To connect two panels, follow these few steps:
4
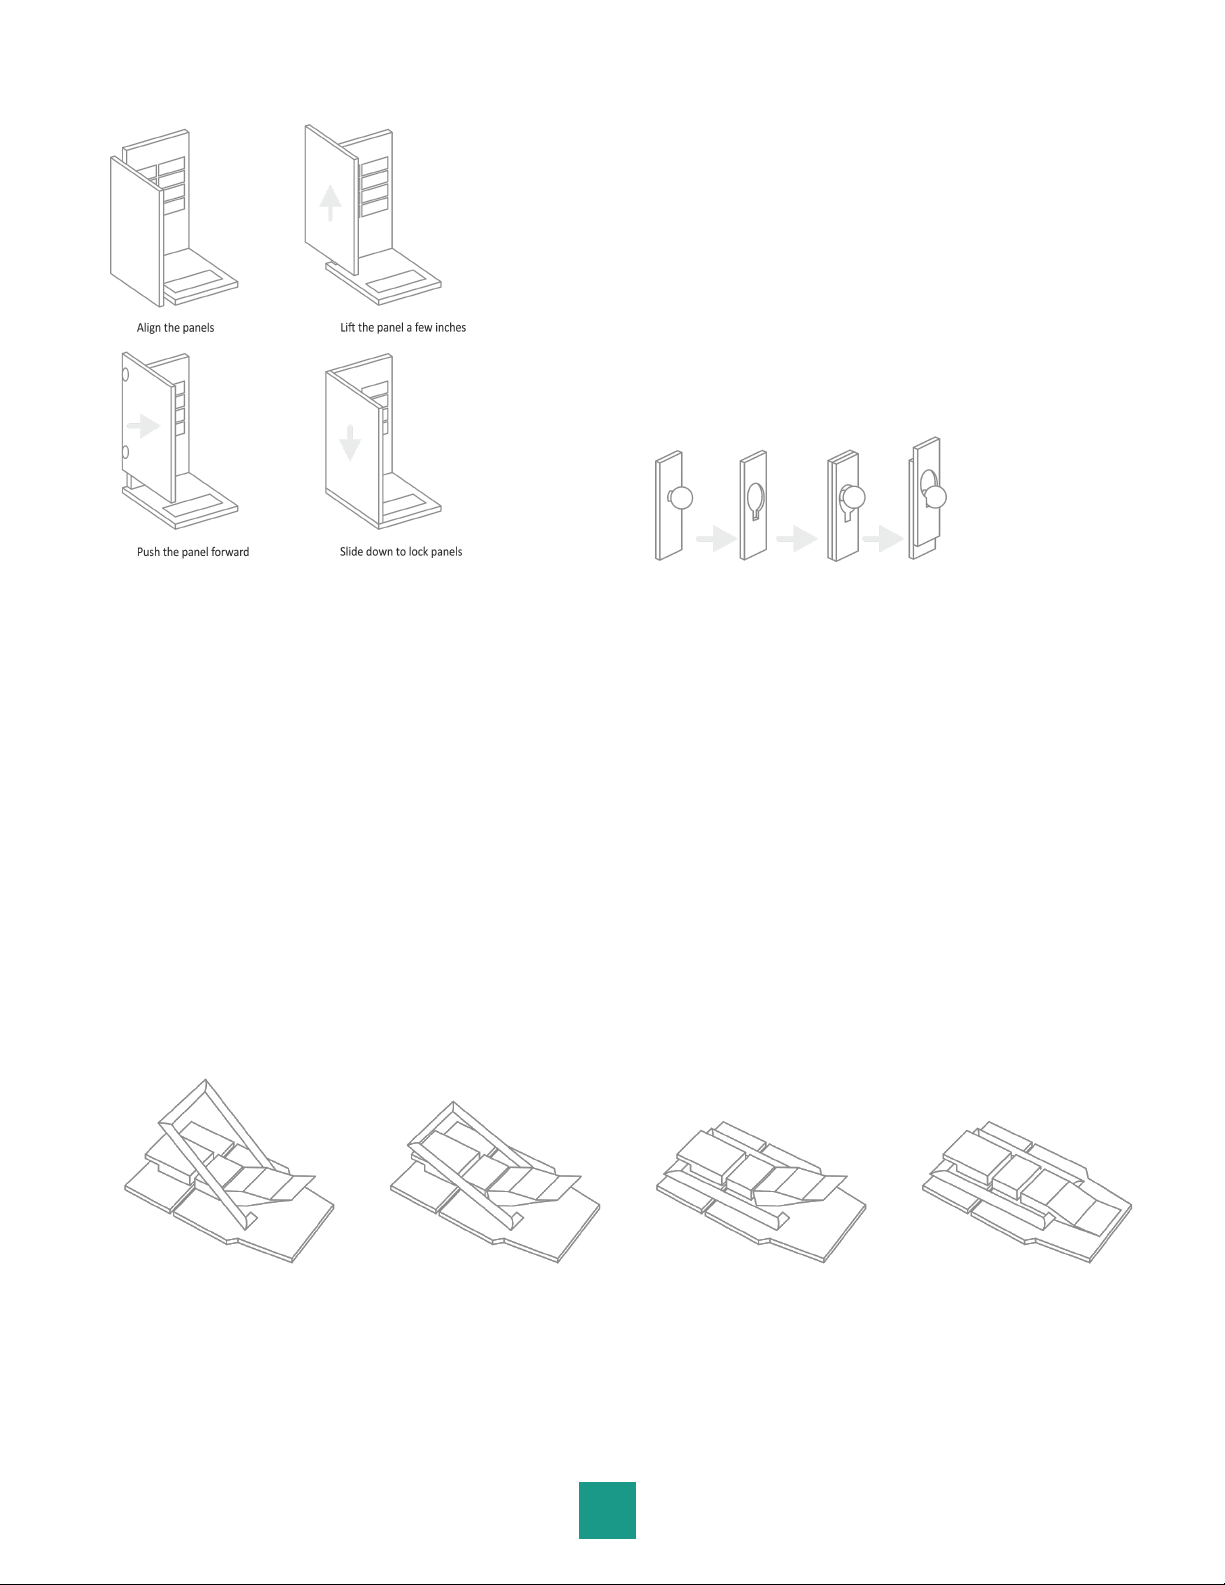
Figure G-1: Connect panels, inner
lock system
1. Lift the panel with the male locks a few inches.
2. Push it against the opposite panel; make sure to
apply pressure around the top and bottom
corners.
3. Slide the panel down to lock it in place. Make sure
all the locks are connected (top and bottom).
4. Inspect the panels and make sure they are leveled
(the panel’s top is flat and matching).
Figure G-2: Inner-Locking System
Latch System:
The Latch Locking System is two brackets that lock together bypassing the main loop over the
opposite side and locking latch (Figure G-3).
Figure G-3: Latch Locking System
5

Where to Start:
Lay the boxes flat on the ground and open them carefully. The accessories, user manual, and smaller
parts are located in the box that includes the top and bottom panels (Figure G-4).
Figure G-4: Open the Box
6

ASSEMBLY INSTRUCTIONS – General Guide for:
Begin with the FLOOR PANEL Placement:
Place the floor panel flat on the desired location. Make sure to leave a space around the sidewalls,
where one person can stand and install the side panels (Figure A-1). Once completed, you can slide
the sauna next to a wall.
Tips:
An “X” mark will point to the back of the sauna and the floor heater (on some models) point to the
front of the sauna.
Figure A-1: Floor Panel
7
REAR PANEL Placement:
Place the rear panel on the back end of the floor panel (Figure A-2). At this point, someone should
hold the rear panel until the next connection is made.
LEFT PANEL Placement:
Install the left panel (the left panel has 2-4 sockets on the lower end) as the image below. Make sure
the top of both panels is flat and leveled.
Refer to “Connecting the Panels” section (page5) on how to lock the panels together.
Figure A-2: Rear and left panels
8
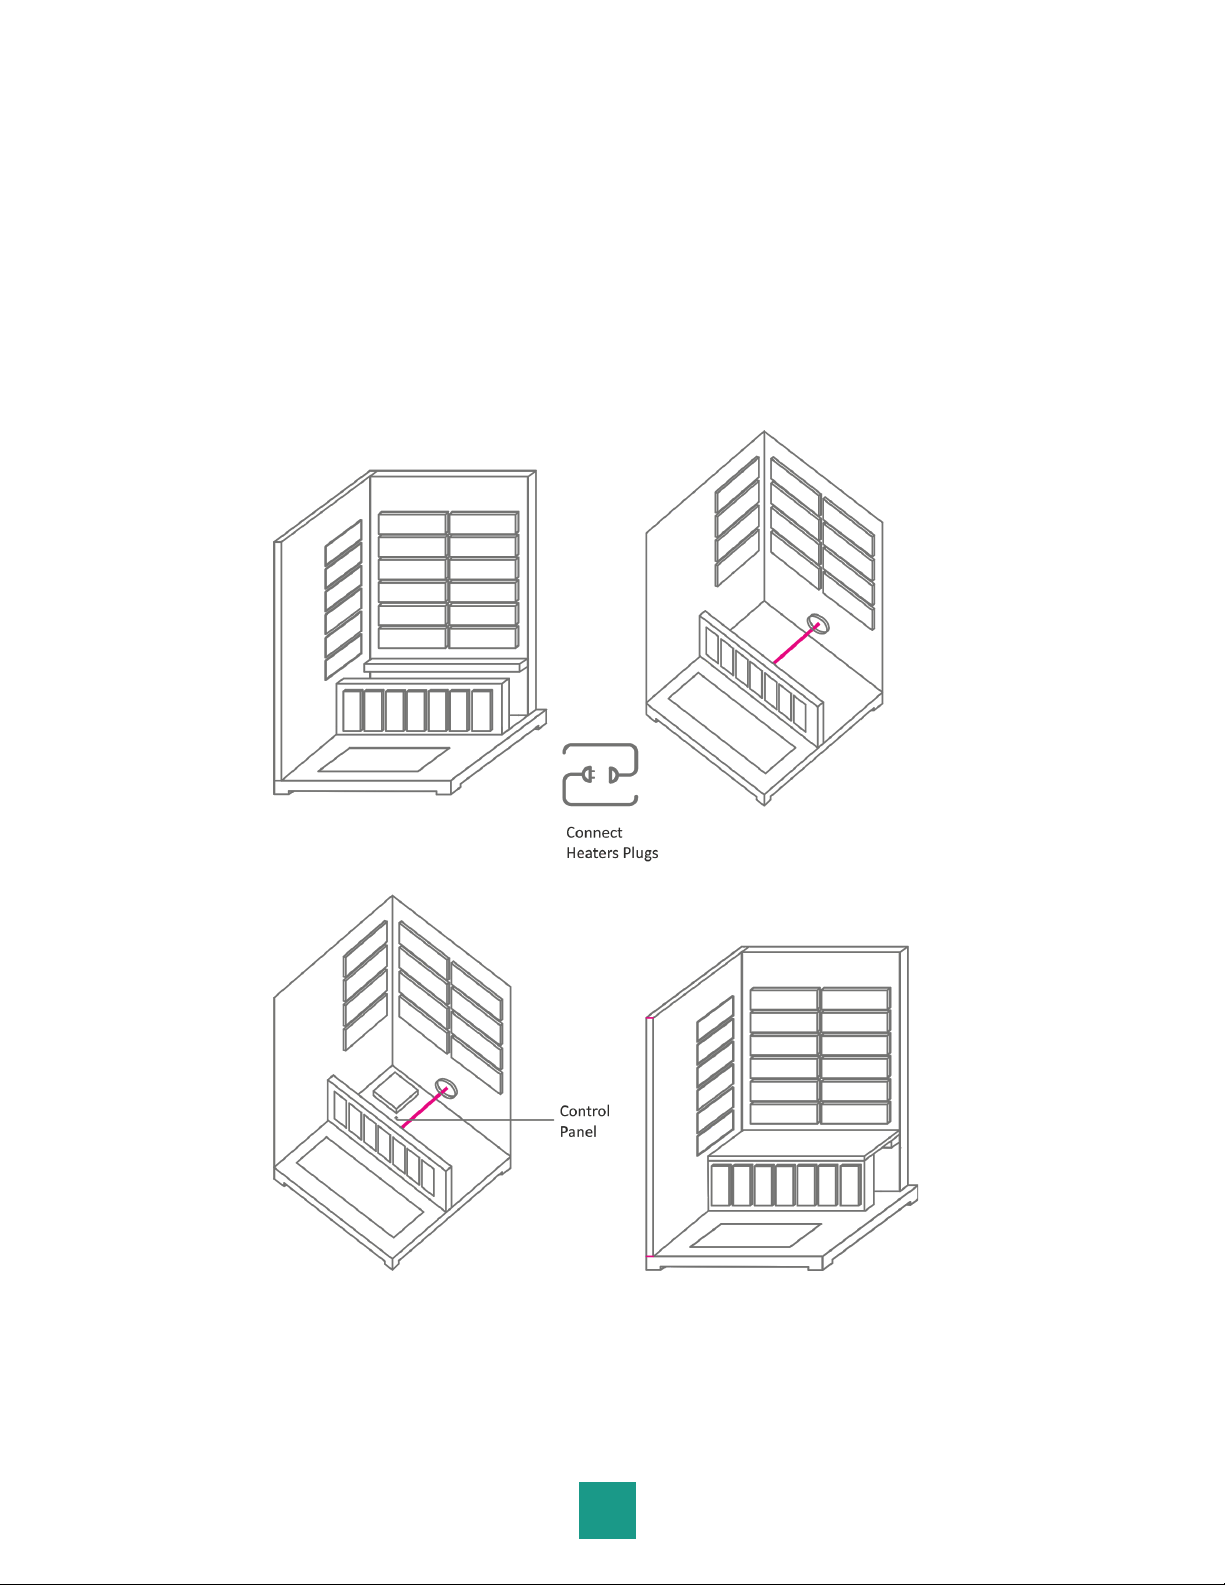
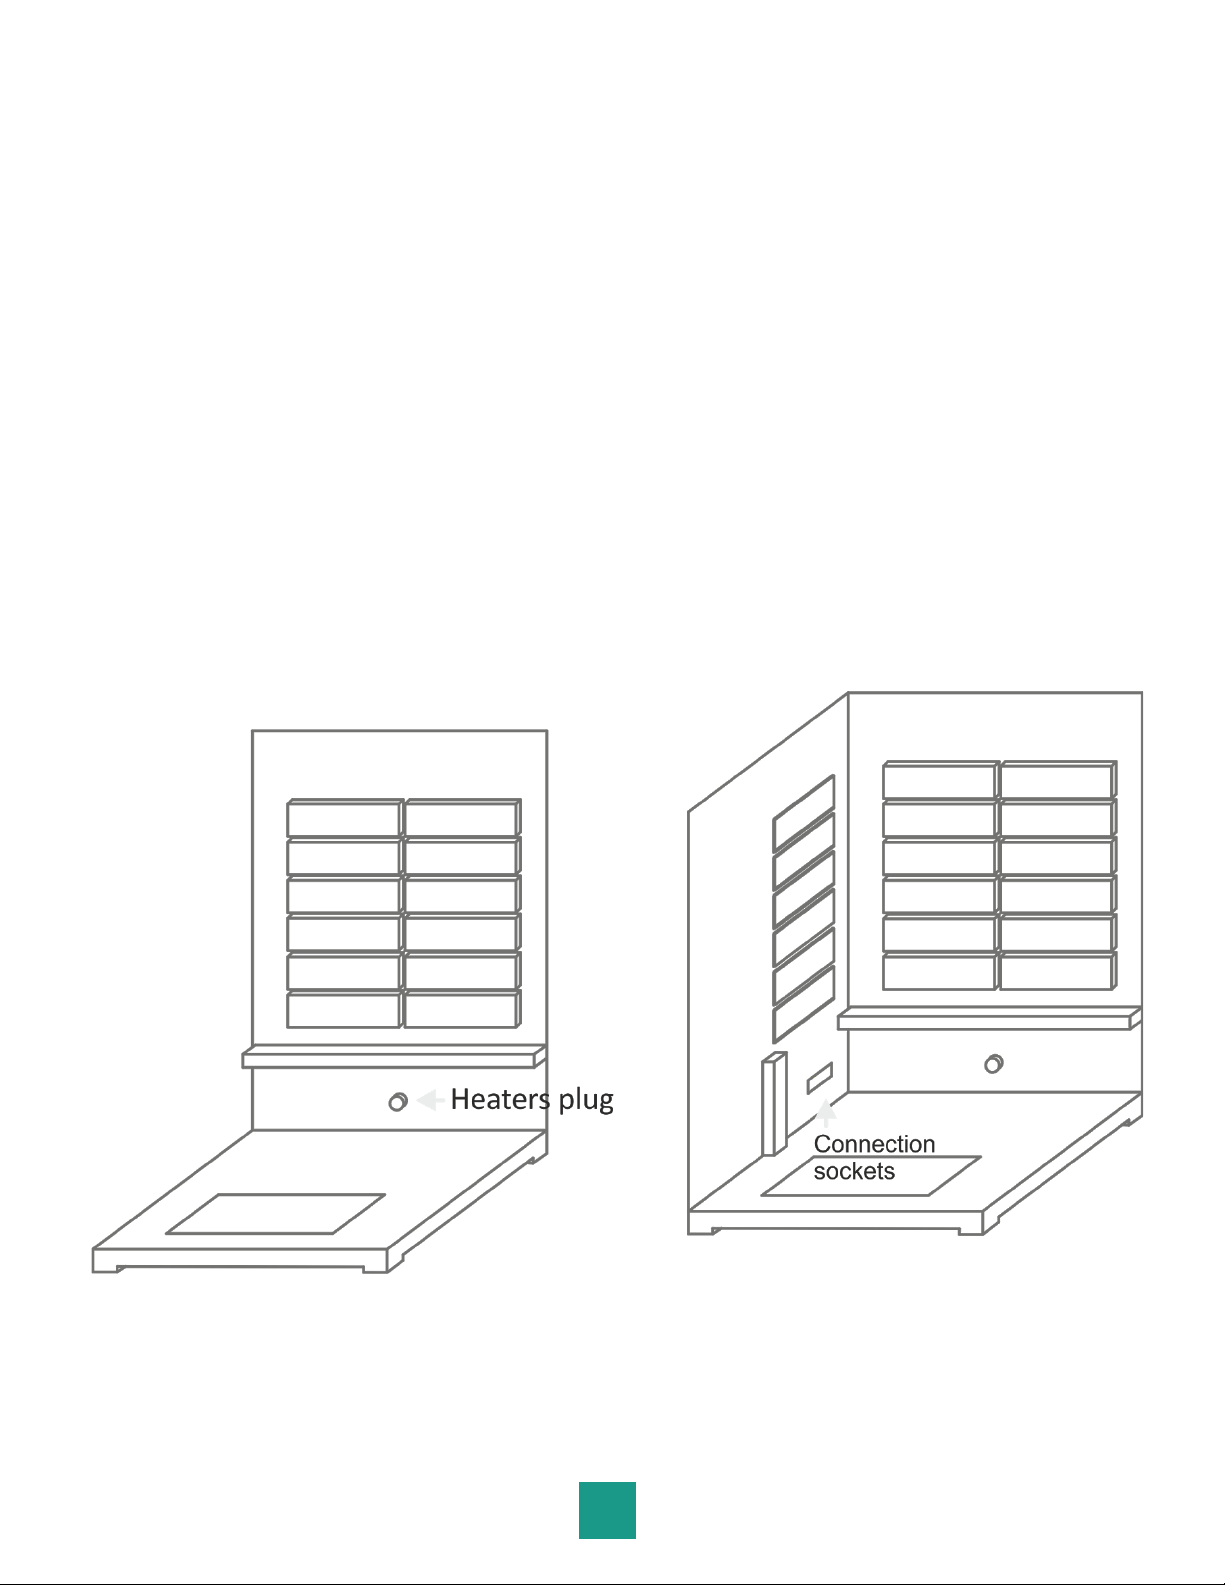
Installing the BENCH:
Slide the bench stand panel between the two vertical guides on the side panels. Connect the heaters’
plugs under the bench to the appropriate sockets. The matching plugs and sockets are labeled
alphabetically – e.g. connect “A” plug into the “A” socket.
Install the benchtop by placing it on top of the bench stand and the horizontal guide on the rear panel.
Make sure the smooth and finished side is facing up and forward (Figure A-3).
Figure A-3: Installing the Bench
9

RIGHT PANEL Placement:
Install the right panel as the image below (Figure A-4). Make sure the top of all the panels is flat and
leveled. Refer to “Connecting the Panels” section (page 5) on how to lock the panels together.
Tip:
●Someone can stand inside the sauna to match the bench stand with the vertical guide on the right
panel and level the corners for easy installation. If the lower lock is not connecting, make sure the
bench stand is not blocking the panel by aligning it with the vertical guide.
Figure A-4: Right Panel
IMPORTANT:
Install the DOOR HANDLE at this point (before installing the FRONT PANEL).
10

FRONT PANEL Placement:
Connect the front panel to both side panels as in the following image on the next page (Figure A-5).
Refer to “Connecting the Panels” section (page 5) on how to lock the panels together.
Tips:
●Make sure to align the corners of the two side panels and the edges of the front panel.
●The front panel is heavy because of the glass door. At least two people are needed to lift it.
●For the inner locking system, a person can stand inside the sauna to align the edges and corners of
the panels.
●For the inner locking system, make sure to put pressure on the top and bottom corners of each
side to ensure the locks are connecting.
Figure A-5: Front Panel
11

TOP PANEL Placement:
Step 1. Raise the top panel over the sauna body. Insert the wires for the control panel, temperature
sensor, and heaters through the openings in the ceiling.
Step 2. Connect the control panel wire (white ribbon) and the heat sensor (2-pin wire) on top of the
sauna.
Step 3. Connect the heaters’ plugs into the control box. Even though the heaters’ plugs might be
labeled, they can connect into any sockets on the control box.
Figure A-6: Top Panels and Connections
Note: Accessories installation instructions continue below the outdoor models.
12

OUTDOOR SAUNAS ASSEMBLY INSTRUCTIONS:
Installation steps start at the section “Assembly Instructions – General Guide”. Then continue
after placing the top panel.
Main Support
Place the roof bottom section on top of the sauna and screw the center support beam (Figure D-1).
The illustration below will not include the sauna’s body, but the roof should be installed on top of the
sauna.
Figure D-1: Roof bottom section and center support beam
13

Roofing Shingles Support
Install the roofing shingles support beams around the top. Each beam is labeled alphabetically to a
matching corner or side (Figure D-2, Page 25). For example, the beam marked with “A” should be
screwed into the “A” corner. Repeat for all the corners and sides (based on the model, you might have
eight or six supporting beams).
Figure D-2: Shingles Support Beams
Screw the triangular roofing shingles on the supporting beams (Figure D-3). Repeat for all sides.
Figure D-3: Roofing Shingles
14

Roof Sealing
Screw the corner roof shingles around all corners. Each corner will have two shingles curved upward
to easily identify the position of the screws (Figure D-4).
Figure D-4: Corner Roof Shingles
After screwing in the corners, flatten the curved shingles and place the pyramid roof shingles on top
(Figure D-5).
Figure D-5: Pyramid Roof Shingles
15

Slope Roof
CAUTION!
BEFORE PLACING THE SLOPE ROOF, MAKE SURE THAT EVERYTHING IS WORKING AND
CONNECTED PROPERLY ON THE CEILING.
If you had something damaged or had any issues, please call our technical department and wait till
you get everything resolved and working properly before placing the roof. The roof is heavy and it
will be hard to remove it in order to install parts.
16
ACCESSORIES
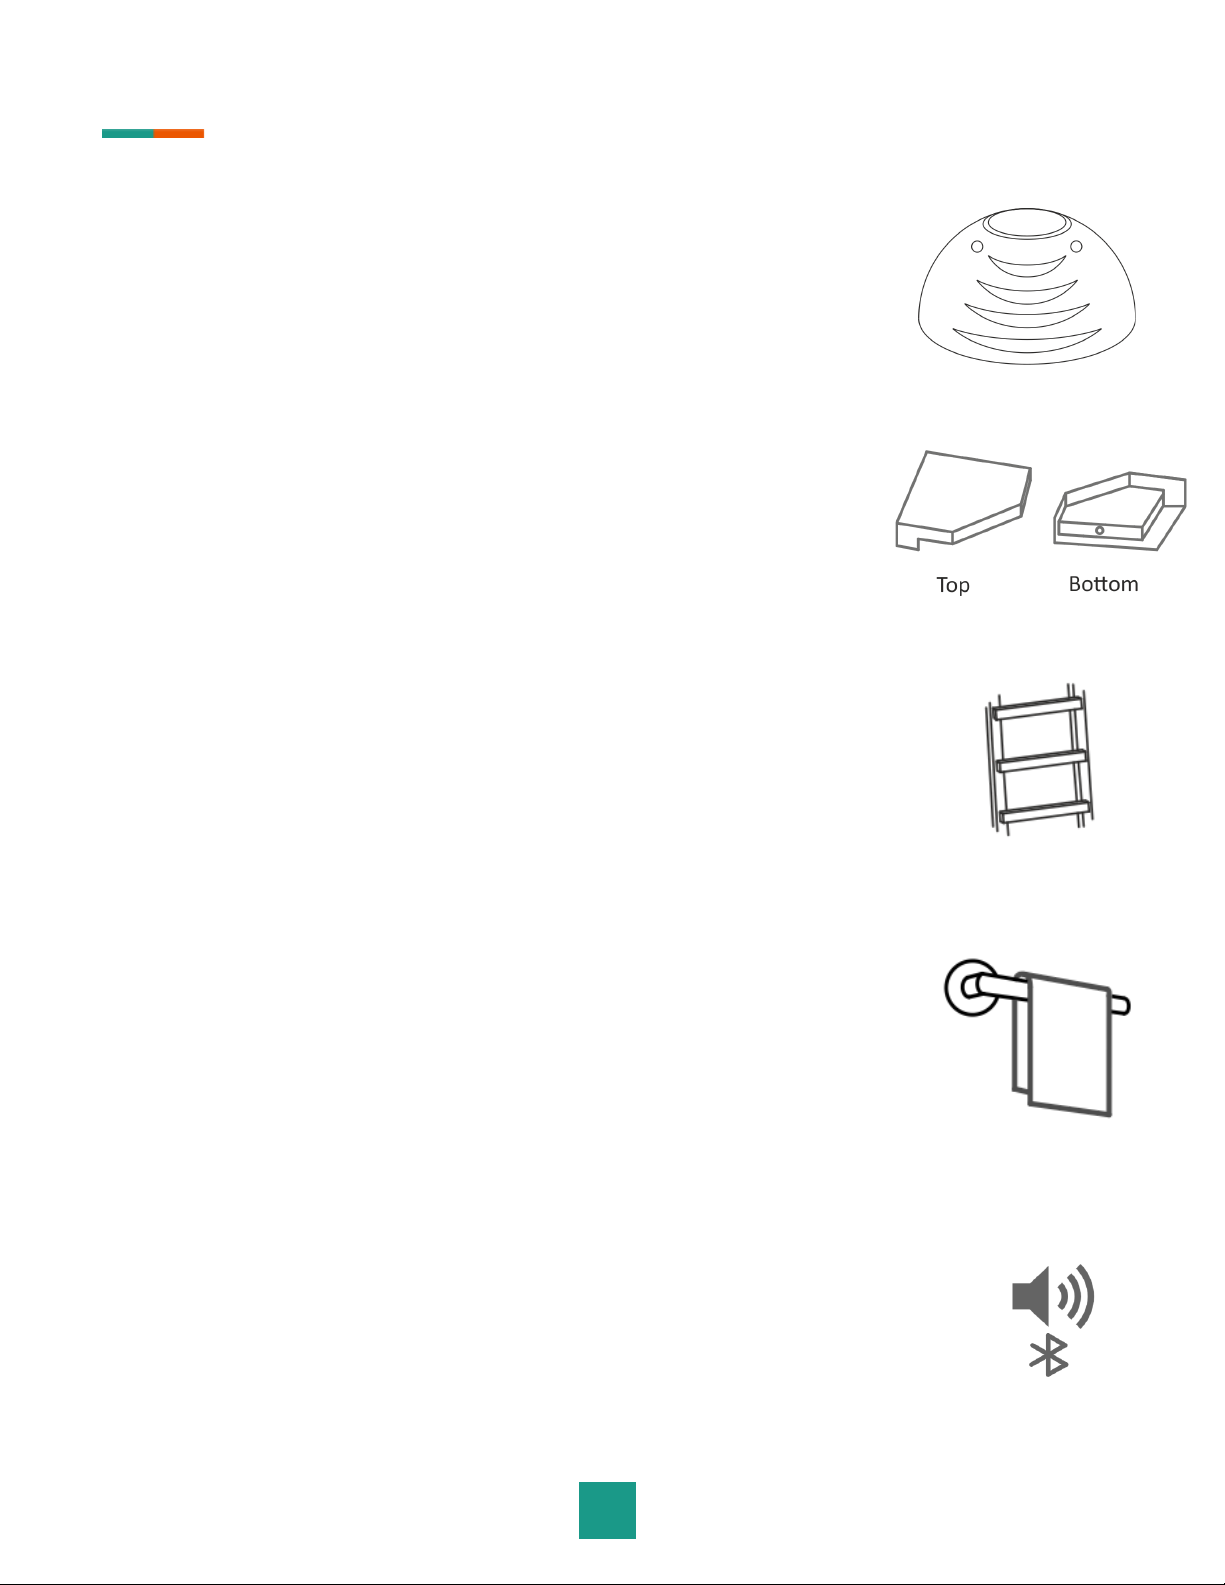
Oxygen Ionizer (Recommended)
Locate the ionizer plug which is extended out of the sauna ceiling (1-pin
plug). Connect the oxygen ionizer and screw it into the back panel.
Cup Holder (Optional)
The cup holder is a small wooden table that can be screwed in one of the
front corners (either right or left, based on the user preferences). Make
sure not to install the cup holders on or in front of the heater. Some
models with a glass front or corner saunas will not include the cup
holder.
Magazine Holder (Optional)
The magazine holder can be installed either on the front wall (in front of
the window) or in the sidewall (next to the legs) (the placement of the
magazine holder is optional based on the user preferences). Do NOT
install the magazine holder in front of the heater. The magazine holder
size might vary based on the model.
Towel Rack (Optional)
For models with full glass doors, the towel rack can be installed either
on the front wall or on the sidewall (the placement of the towel rack is
optional based on the user preferences). Do NOT install the towel rack
in front of the heater.
For models with glass and wooden frame doors or wooden doors, install
the towel rack in the middle of the door frame and use it as a door
handle.
AM/FM RADIO/MP3 player, BLUETOOTH The MP3 player will be
pre-installed on the sauna. There are two parts to help to remove the MP3 player if
needed (2 L-shaped metallic pieces – image on the right).
17

Color Therapy Lights (Recommended)
Some models will include color therapy lights (or chromo lights aka
chromotherapy). Color therapy lights function as light therapy for
physical and mental health. Scientists have determined that each color
emits a frequency.
Our body consists of Seven Layers of the Auric Field and the Seven
Chakras (energy centers of the body). Each layer looks different and
each has its own particular function. Each layer of our Aura is associated
with a chakra (1st layer with 1st chakra, and so on). See a chart below:
Chakra – Root Chakra (RED)
Location: The end of the spine, between the anus
and the sexual organs
Function/Qualities: Security/Safety, Stability
Function when disturbed/unhealthy: Fear, insecurity. Life feels like a burden. Feeling of not
belonging. Physical Health: Weak constitution, elimination problems. Reduced
physical and mental resistance.
2nd Chakra – Sacral Chakra (ORANGE)
Location: The Sexual Organs
Function: patience, Healthy/Positive Emotions towards Sexuality, Creativity, Responsible Relations
Function when disturbed/unhealthy: Rigid emotions, frigidity, guilt, no boundaries.
Physical Health: Problems with reproductive organs, kidneys.
3rd Chakra – Navel (YELLOW)
Location: Navel Point – Solar Plexus
Function/Qualities: Center of personal power and commitment;
Self-esteem, dignity, identity, judgment.
Place of inner balance and inspiration. Function when disturbed/unhealthy: Anger, greed, shame,
despair;
No strength or spontaneity. Conforming in order to be recognized;
Suppressing one's own wishes/emotions to please others.
Physical Health: Problems with digestion, the liver, gallbladder, the pancreas.
4th Chakra – Heart Chakra (GREEN)
Location: The middle of the chest on the breast bone.
Function/Qualities: Compassion, kindness, forgiveness, service, love
18

Function when disturbed/unhealthy: Grief, Attachment, Easily Hurt. Emotional dependence on
others. Heartlessness.
Physical Health: Heart problems, lung problems, blood pressure problems.
5th Chakra – Throat Chakra (LIGHT BLUE)
Location: The throat
Function/Qualities: Language; Ability to communicate effectively; Authenticity; Inspiring, teaching.
Function when disturbed/unhealthy: Lethargy, weakness in expressive abilities; Shyness, voice
problems, insecurity, fear of others’ judgments/opinions.
Physical Health: Throat, neck, thyroid problems.
6th Chakra – Third Eye (INDIGO BLUE)
Location: Between the eyebrows.
Function/Qualities: High Intuition; Clairvoyance; Visualizing; Fantasizing; Concentration and
determination; Self-Initiation; Power of projection; Understanding your purpose.
Function when disturbed/unhealthy: Confusion, Depression. Rejection of spirituality;
Over-intellectualizing.
Physical Health: Depression, Panic, Mental Disorders.
7th Chakra – Crown Chakra (VIOLET)
Location: Crown of the head.
Function/Qualities: Spiritual Connection; Connection to the Higher Self; Unity; Enlightenment;
Universal Awareness
Function when disturbed/unhealthy: Grief; Feeling of being separated from existence/abundance.
Fear of death. Mental Health: Complete separation and dis-illusion from oneself; grief, sadness,
false/limiting beliefs.
8th Chakra – Aura (WHITE)
Location: The electromagnetic field (contains all colors above)
Function/Qualities: Aura combines all the effects of the chakras and offers their projection. Aura
projects and protects.
Function when disturbed/unhealthy: Shy, withdrawn, vulnerable.
Physical/Mental Health: Overall weakness in mind and body.
Operating Instructions:
The color lights are operated by remote control only. Press any color on the remote control to turn
the lights on and select a color. You may then press the “Cycle” button (lower right button) to cycle
through the colors randomly. Press the “Power” button to turn the lights off.
19
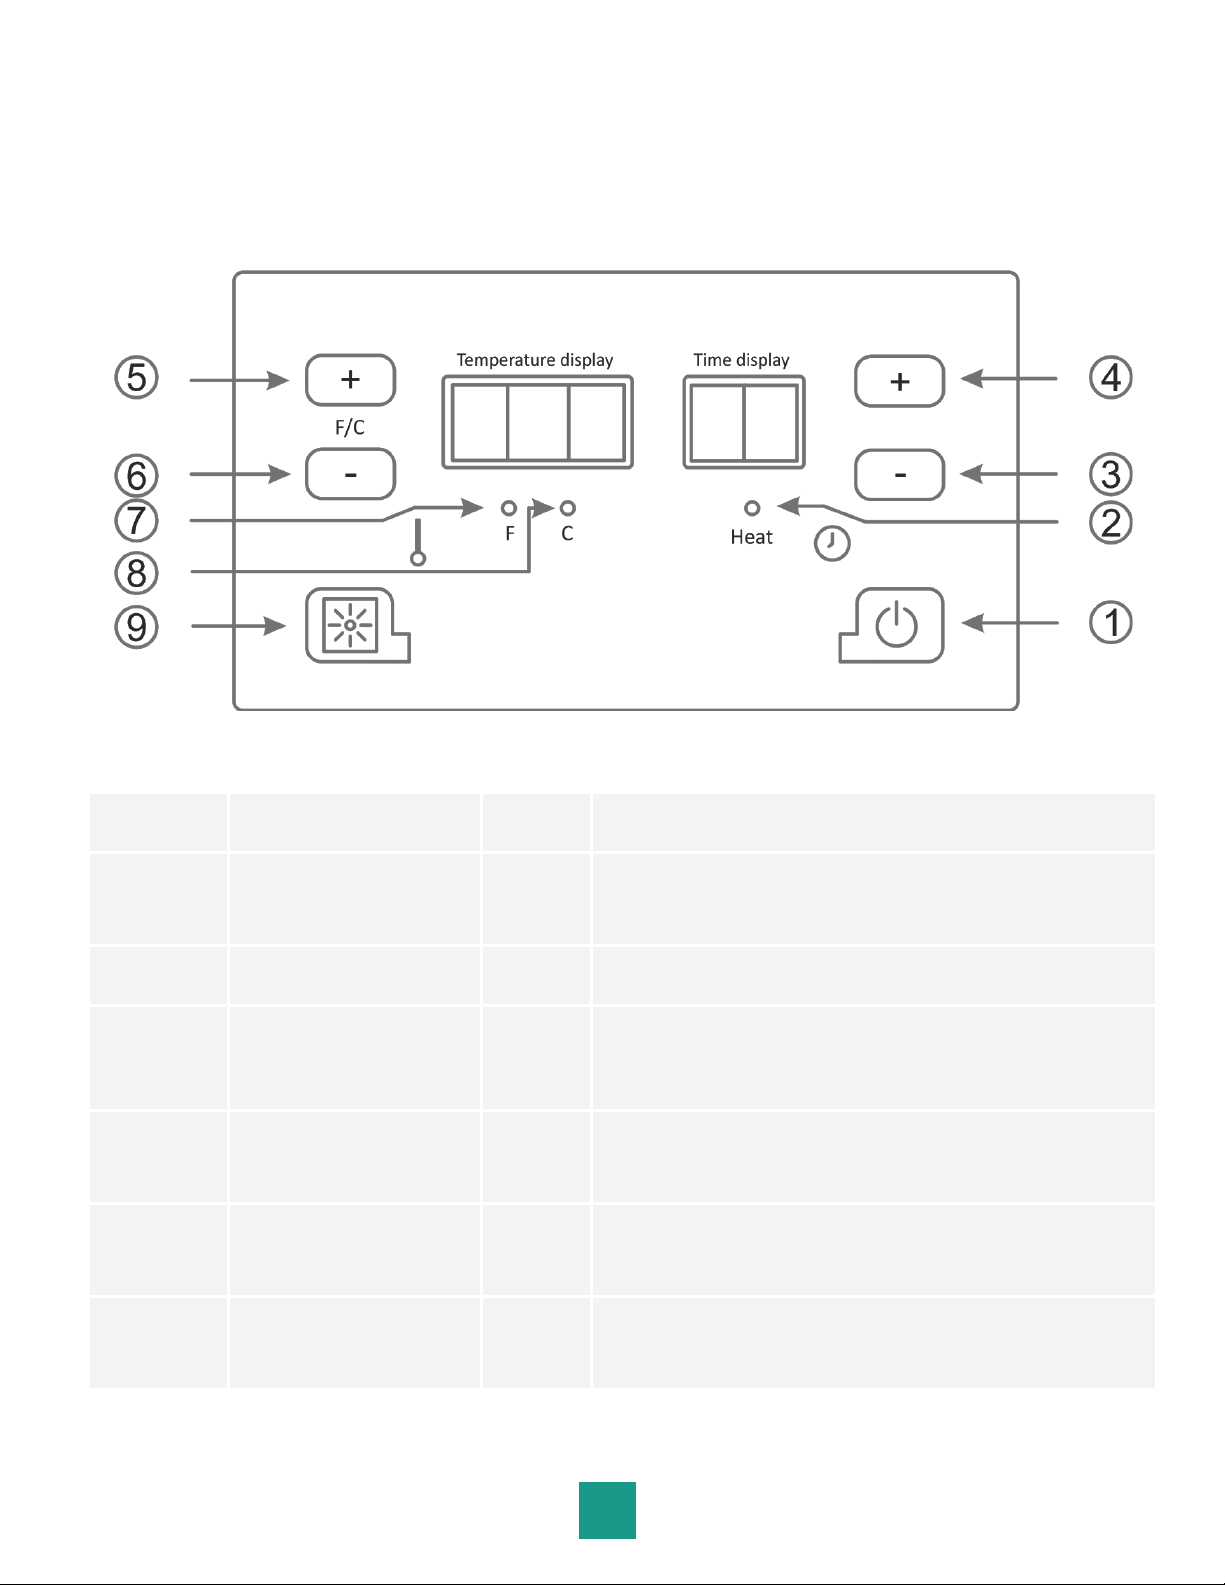
Control Panel Operating Instructions
V.1
#
Function
#
Function
1
Power Button
(On/Off)
6
Temperature Control (reduce)
2
Heat Light
7
Fahrenheit Light
3
Timer Control
(reduce time)
8
Celsius Light
4
Timer Control
(increase)
9
Lights Button/Pause
5
Temperature Control
(increase)
10
Bluetooth connected light
11
USB connect
interface
12
Settings control
20
Table of contents
Popular Plumbing Product manuals by other brands

GoodHome
GoodHome havel 5059340081403 installation instructions

ProFlo
ProFlo PFBKIT03 installation instructions

Roca
Roca ATAI 5A2734 manual

American Standard
American Standard Cadet Oval 0419.111 Features & dimensions

Almost Heaven Saunas
Almost Heaven Saunas Hampton Installation & owner's manual

Toto
Toto REI - R quick start guide

Clou
Clou Kaldur CL/06.05.001.20 installation instructions

Pressalit
Pressalit MATRIX R2122 Operation and maintenance manual

Clou
Clou mini wash me 45 left basalt CL/03.07134 installation instructions

Gessi
Gessi 54018 manual

Toto
Toto PO TL380SDL Installation and owner's manual

Sanela
Sanela SLU 15B Instructions for use


