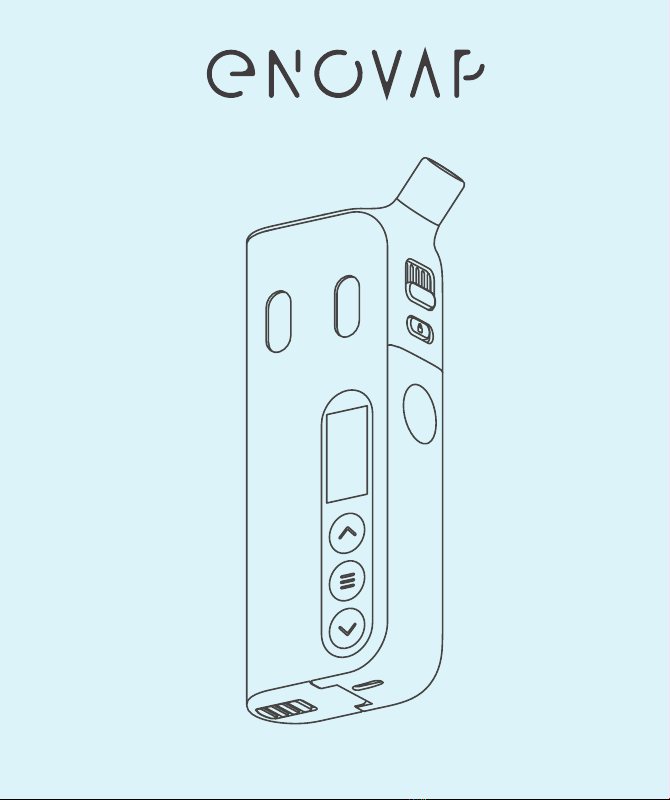
Enovap EN1 User manual

2 3
THANK YOU FOR CHOOSING
ENOVAP!
Enovap helps you manage your
nicone intake
Thanks to its patented technology
‘Hit Control’, Enovap allows you to
adjust your nicone concentraon
throughout the day to ensure maxi-
mum sasfacon.
If you have already quit smoking and
want to decrease your nicone intake
in the long term, you can use the auto-
mac reducon mode ‘Auto’ together
with the Enovap mobile app.
Enovap lets you create your own
avor cocktail
If you want to create your own avor
cocktails, you can use Enovap with the
‘Flavor Mix’ concept.
Please read this instrucon manual
carefully before using your product. To
nd out more, you can visit our web-
site www.enovap.com.
This starter kit includes:
1 Enovap personal vaporizer
2 Enovap pods with integrated coils
2 dripps
1500 mAh charger cable
1 Enovap instrucon manual
1 so touch cover
Technical characteriscs:
Volume of each Enovap pod: 2 ml
Power: up to 55 W
Charging cable:
Input voltage: DC 5V.
Output voltage: DC 4.2V.
500mA.
Passthrough:
A protecon feature means you can
vape while the product is charging.
English
4 5
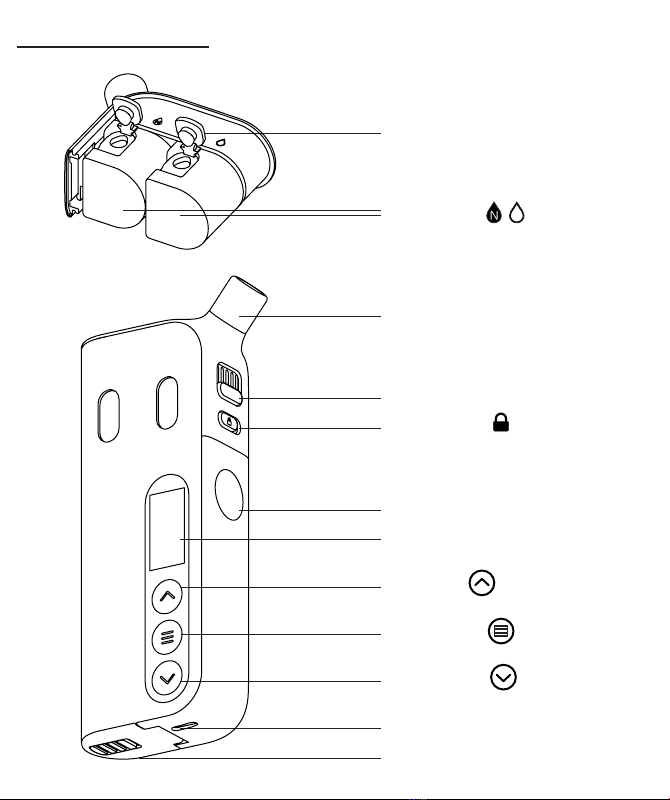
Drawing of components
Drip p
Rell holes
Enovap pods
Airow
Lock / Unlock
Fire buon
Screen
Up buon
Menu buon
Down buon
USB port
Baery hatch
6 7
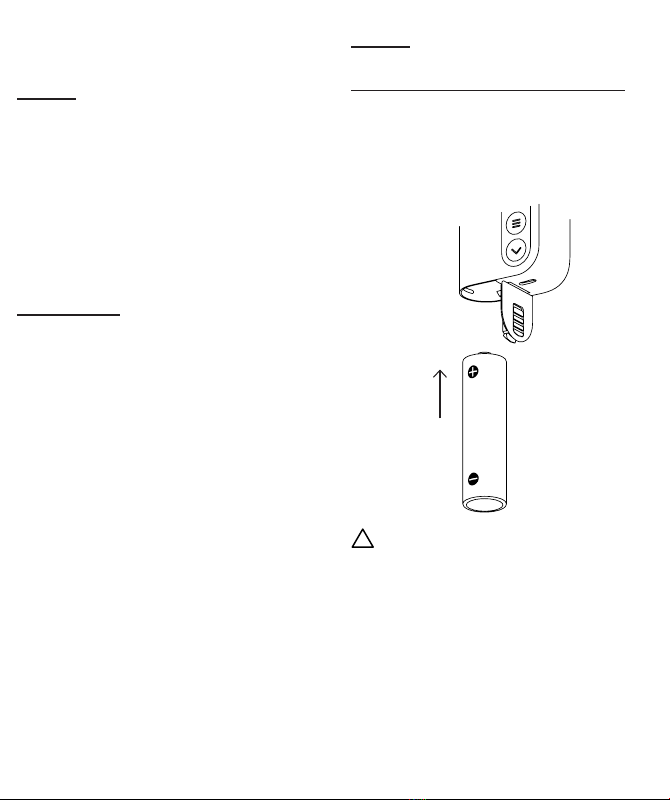
SET UP
Inserng the baery in your Enovap
Slide the black buon of the hatch
located under the device and release
it to insert the baery (negave side
downwards).
SUMMARY
SET UP
Inserng the baery
in your Enovap 7
Charging your Enovap 8
Turning your Enovap on or o 8
OPERATION
Filling your pods 9
Operang modes 12
Adjusng the airow 16
Adjusng the vapor volume 17
Changing the pods 17
Maintaining your Enovap 18
Screens and messages 19
Interfaces 22
Important informaon 24
!The device has been tested with
Molicel batteries. Enovap recommends
using these batteries (on sale on the
website enovap.com) for an optimal
performance.

8 9
Charging your Enovap
Plug the charging cable into the mi-
cro-USB port of your Enovap and
connect the other end of the cable to
a computer USB port or a wall charger.
When your Enovap is fully charged, the
charging cable will automacally stop
charging the device.
The baery level is displayed on the
screen at all mes.
If you want, you can also charge the
baery using a 18650 baery charger.
Turning your Enovap on or o
When you insert the baery, the de-
vice will turn on automacally.
Whenever you want to turn your
device on or o, press the ‘Fire buon’
5 mes in a row.
When you turn your
Enovap on, the adjacent
screen will appear and re-
quest that you update the
me by connecng to the
mobile applicaon.
Updang the me is only necessary if
you want to use the automac nicone
reducon mode or if you want to track
your consumpon data.
This window disappears automacally
aer 10 seconds or if you press any
buon.
Start up:
OPERATION
Filling your pods
!Please read the section ‘Operating
modes’ on page 12 to fill your Enovap
with the suitable e-Liquids depending on
your operating mode.

10 11
According to the adjacent drawing:
1. Move the buon to the right (a)
and slide the upper part o the device.
(b).
2. Remove the grey silicone caps on
each pod and insert your pipee into
the lling hole(s) to ll up each pod. (c).
Place the silicone caps back on.
3. Reset the upper and lower parts
and lock them together by moving the
buon to the le.
We recommend using Enovap with
Enovap e-Liquids with 50% PG and
50% VG as all cercaon tests were
performed on this range of e-Liquids.
a. unlock c. rell
b. remove
12 13
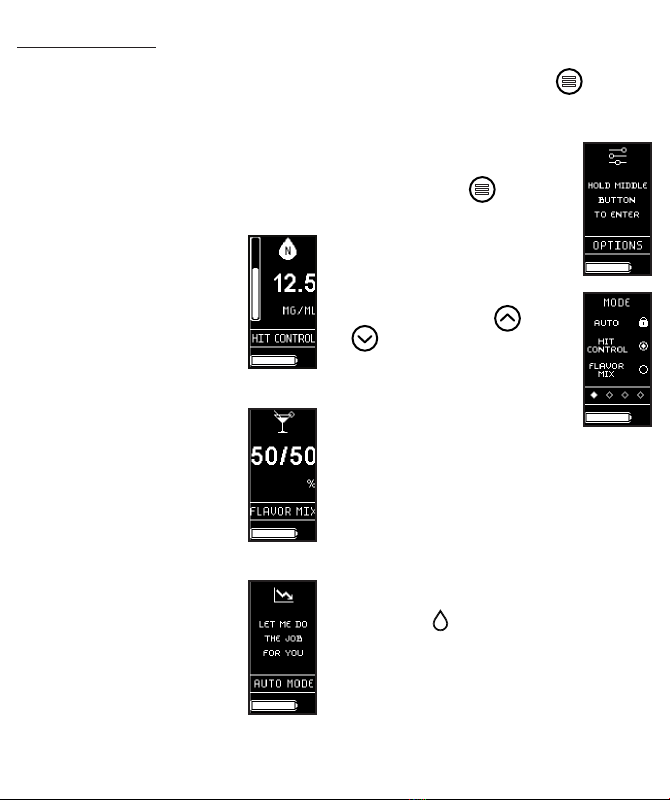
Your Enovap has 3 operang modes.
The ‘Hit Control’ mode is acvated
by default. The main screen displayed
shows the mode of operaon you have
chosen.
Operang modes To choose your operang mode,
go to the ‘Sengs’ screen shown
below by pressing on the buon
twice on the main screen.
‘Hit Control’:
manual nicone concen-
traon management mode
‘Flavor Mix’:
avor management mode
‘Auto’:
automac nicone reduc-
on mode
Once you are on the ‘Set-
ngs’ screen, press and
hold on the buon
to choose your operang
mode on the interface
shown below.
Choose your operang
mode using the and
buons.
The ‘Hit Control’ mode allows you to
adjust your nicone concentraon at
each pu.
1. Fill the pod located under
the icon with the e-Liquid with
the lowest level of nicone concentra-
on (or without nicone) that you wish
to vape. The nicone concentraon is
wrien on your e-Liquid vials.
‘Hit Control’ mode

14 15
2. Fill the pod located under the icon
with the e-Liquid with the highest le-
vel of nicone concentraon that you
wish to vape.
3. Once you have chosen the ‘Hit
Control’ mode, press on the buon
to go to the screens shown below and
specify the nicone concentraons of
the e-Liquid in each pod using the
and buons.
4. Finally, exit the ‘Sengs’ menu by
pressing and holding the buon.
5. On the main screen, you can now
choose the nicone concentraon that
you wish to vape at any moment using
the and buons.
The ‘Flavor Mix’ mode allows you to
easily create your own avor cocktails
throughout the day.
1. Fill one of the pods with an e-Li-
quid of a avor (e.g. red berries).
‘Flavor Mix’ mode
2. Fill the other pod with an e-Liquid
of a dierent avor (e.g. mint).
3. Once you have chosen the ‘Flavor
Mix’ mode, exit the ‘Sengs’ menu by
pressing and holding the buon.
4. You can now create your own a-
vor cocktail at any moment by adjus-
ng the proporon of each avor on
the main screen using the and
buons.
‘Auto’ mode
For more informaon on this mode of
use, please download the Enovap mo-
bile applicaon (nd more details on
how to download the applicaon on
www.enovap.com)

16 17
You can adjust the airow in your de-
vice to make the draw ght or open.
For an open draw, posion the ‘airow’
buon downwards. For a ght draw,
posion the ‘airow’ buon upwards,
as shown in the diagram below.
You should make sure that you are not
covering the air inlet with your ngers
when you vape.
Adjusng the airow
It allows you to adjust the amount of
vapor generated by your Enovap using
the and buons.
Adjusng the vapor volume
You can access the ‘Vapor’
screen by pressing the
buon once on the main
menu.
Changing the pods
1. Move the buon to the right
and slide the upper part of the device
to separate it from the lower part.
2. Remove the pod(s) from the upper
part by pulling them downwards.
3. Aer lling the pod(s), plug the
new pod(s) into the upper part.
4. Reinsert the upper part in the
lower part and lock your device by mo-
ving the buon to the le.
airow

18 19
!To avoid any burnt taste when using
new pods, wait 3 minutes before you start
vaping so that the pods have me to soak
up the e-Liquid.
The pods must be replaced as soon as
the taste or quality of the vapor dete-
riorates. You can order new pods on
www.enovap.com.
Maintaining your Enovap
To clean your Enovap, move the
buon to the right and slide the upper
part of the device to separate it from
the lower part.
To wash the upper part, remove the
drip p. Remove each pod and wash
the upper part and the drip p with
plenty of water.
!The pods cannot be washed; they
must be replaced. Before reusing your
vaporizer, wipe the parts with a clean
and dry cloth.
Screens and messages
This screen shows the
coil value of your pods.
This screen appears in the
‘Settings’ menu (see
inter-face diagram p.22).
This screen appears eve-
ry me you take a pu. It
shows the duraon of the
pu.
This screen appears auto-
macally during the rst
connecon of your de-
vice with a smartphone.
The code allows you to
connect your device to
the mobile applicaon
using Bluetooth. You can nd more
informaon about the connecon to
the mobile applicaon on www.eno-
vap.com.

20 21
Coils too dierent
This message appears if you used two
dierent types of pods. To resolve this
problem, please use 2 pods with simi-
lar resistances (e.g. 2 pods in 0.6 ohm).
Le / right pod not detected
This message appears if there is no
connecon with one or both pods. To
resolve this problem, check that the
upper and lower parts of your device
are properly connected and that both
pods are inserted correctly in the up-
per part.
Updang
This message appears when the r-
mware is being updated by Bluetooth.
Please do not turn o or disconnect
the Bluetooth connecon unl the up-
date is complete.
Temperature is too high
This message appears if the tempe-
rature inside the product is too high.
Please wait for the temperature to go
down before using your Enovap again.
Bluetooth
A Bluetooth icon appears when the
me is no longer up-to-date. Updang
the me is necessary if you use the
automac mode or if you track your
data. The me is automacally reset
by connecng your device to the mo-
bile applicaon.
Reboot
In the event of a soware pro-
blem, press and hold the and
buon at the same me for
10 seconds to reboot your Enovap.

22 23
Main menu
Interfaces
Sengs menu
1
1 2
Press 3 seconds on
Press 3 seconds on
briey press on the buon
2 3
34
The main screen changes
according to the selected
mode of operaon
displayed if the
modes are selected
Screens 2 and 3 are
‘Auto’ or ‘Hit Control’
to go back to the main menu
to access the ‘Sengs’ menu

24 25
Important informaon
Do not use the device if you or
someone near you uses oxygen.
Input voltage of the charging cable:
DC 5V 500mA.
Your charging cable has a funcon that
protects against overvoltages, over-
currents, and short circuits.
If a fault occurs during charging, the
baery will stop charging the device
automacally.
The baery management system has
a funcon that protects against short
circuits; if the baery is short-cir-
cuited, the system turns o comple-
tely.
Reverse polarity protecon protects
the product if you insert the baery
the wrong way.
If the ‘Fire’ buon is pressed
and held down for more than
10 seconds, your Enovap will stop au-
tomacally.
The use of your Enovap is foreseen for
temperatures between 0 and 40°C.
If you use your Enovap outside of
these temperatures, it could become
damaged or stop working.
The recommended storing tempe-
rature for the device and Enovap
e-Liquids is between 0 and 25°C.
Store your device in a dry place. Rain,
moisture, or condensaon may cor-
rode the electric circuits.
The protecon provided by the equip-
ment may be aected if the product is
used in a way that goes against the ma-
nufacturer’s instrucons.
If you have quesons about your
Enovap or any other Enovap product,
please contact the Enovap Care Team.
26 27
This product was designed to be used
with e-Liquids that may contain nico-
ne. Nicone is highly addicve. Its
consumpon by non-smokers is not
recommended.
This product should not be used by:
- people under the age of 18.
This product is not recommended for:
- people allergic or sensive to ni-
cone;
- pregnant or breaseeding
women;
- people who should avoid
consuming tobacco or nicone
products on medical grounds;
- people suering from cardiovas-
cular disorders, severe hypertension,
or diabetes.
Keep out of reach of children and pets.
This product can be harmful to health.
ENOVAP CARE
Enovap Care Team
2, rue Gustave Eiel
10430 Rosières Près Troyes
+33 (0)1 82 83 03 63
Device designed in Paris.
Device and charging cable assembled
by Kangertech / Shenzen.
Model number: EN1
Table of contents


