EOOKE ELECTRON EO60022G User manual

Network Advertising Display
EOOKE
V3
www.digitalframe0.com
Copyright ©EOOKE ELECTRON. All RIGHTS RESERVED.

- 2 -
Catalog
Introduction ------------------------------------------------------------- 3
Screen Installation ---------------------------------------------------- 4
Work Mode: Work via USB or network ---------------------------4
1 Connect the display to your account --------------------------- 6
2 Create a program --------------------------------------------------- 7
3 Schedule a scrolling message --------------------------------- 12
4 Plan multiple programs in one time --------------------------- 13
5 Mange the display in APM ---------------------------------------14
6 Display settings -----------------------------------------------------14
6.1 Change Time & Date on the Display ------------------------15
6.2 General settings --------------------------------------------------15
6.3 Power Timer -------------------------------------------------------16
7 Stand-alone Mode (Play via USB only)----------------------- 16
8 Installing APM on Window 7/10 computer-------------------- 17
8.1 Installing APM on cloud Window Server System ---------19
9 Login and active the APM ---------------------------------------- 21
10 APM system settings -------------------------------------------- 23
10.1 Organization ID ------------------------------------------------- 24
10.2 Create sub-organization -------------------------------------- 24
10.3 Add new users and grant roles ----------------------------- 25
11 System verification and migration ---------------------------- 26
12 Verification code and account detail ------------------------- 27
Trouble Shootings ---------------------------------------------------- 28
Appendix: Remote Control------------------------------------------ 29

- 3 -
Introduction
EOOKE network digital signage displays allow you to create & distribute
media rich content easily across unlimited location from any internet or Local
Area Network connected computer. You can remote scheduling your
presentations to be displayed on unlimited screens and turn them ON and OFF
from central admin device with a simple web login.
Features:
• 1080P FHD or 4K LED IPS panel.
• B/S Structure, powerful signage hardware embedded.
• Smart and easy to use APM software system.
• Deliver media rich programs to any EOOKE screens via Wi-Fi/Lan.
• Support standalone mode and network mode.
• Power timer & Volume scheduler.
• Easily position in either landscape or portrait.
• Light metal housing, aluminum brushed round bezel, super slim profile.
Please note:
This manual provides common information for all EOOKE network models, some
features described in the manual may not be supported in certain models, and the
contents in the manual is subject to change without prior notice to improve the
performance. Please read this manual carefully before operating display and retain
it for future reference.
Caution:
1. Don’t blend/pull cable with force, insert it all the way so it’s not loose.
2. When installing the product, fix it firmly so that it doesn’t fall.
3. During thunderstorm, power off and disconnect the product.
4. Do not damage the power cords, keep it away from heat.
5. Do not block the openings, ensure the unit is not overheating.
6. Never disassemble modify the product yourself, contact
support@digitalframe0 if you have any question.

- 4 -
Wall mounted display
Floor standing display

- 5 -
Note: Wi-Fi Floor Standing Display: The Wi-Fi antennas is packed in a EPE,
please screw it directly into the Wi-Fi port on the back.
Work Mode: Network Mode or USB Mode
By default, the display is in [Network Mode], which only play programs from
your web-based account or self-installed management software system (APM).
If you would like to simply play videos/photos from USB disk, please change
the default Network Mode to USB (Stand-alone) mode first, for detail please
check page16 [Stand-alone Mode].

- 6 -
1. Connect the display to your account.
To play programs you create on web-based account or sell-installing APM, you
need to link the display to your account or APM first.
Fig.1
1.1 Setup up wired or wireless network for the display.
1.1.1 Wi-Fi Network: "System Setting" > "Network Setting" > turn on Wi-
Fi and connect to your Wi-Fi (2.4G).
Wired Network: Insert LAN cable to LAN slot which inside the
bottom door or door on the back (Floor-standing display).
1.2 Navigate to "Server Config", input name, Org ID and Server IP. (Fig.2)
Fig.2
Terminal Name: Any name (No space/character).

- 7 -
Server Address: Your PC static IP or cloud server’s public IP address.
Account/Organization ID & Sever Address: See note 2 below.
Storage path: Internal storage by default. External memory option is available
when a Fat32 formatted TF card is inserted. (Optional feature)
Fig.3 Fig.4 Fig.5
Note:
1. Once network is set up correctly, the Earth icon will turn blue (Fig.3).
Triangle icon turning blue mean account info is correctly input and the
display have successfully been connected to your account (Fig.4). It
will also live in APM system > Terminal management (Fig.5).
2. Free web-based account info (If have) please see Page27, readme.txt
and order shipping confirmation email.
3. For connecting to your own installed APM, please check Page 17 for
how to install APM and Page24 for Organization ID in APM.
2. Make a program.
Fig.6
2.1.1 Type server url in your browser and input your user name/password to
login. (Check page27, readme.txt, email for url/username/password.)

- 8 -
Fig.7
2.1.2 Navigate to "Content Management" > "Program Production" (Fig.8).
Fig.8
2.1.3 Select "Single screen program" to go to next step (Fig.9).

- 9 -
(Fig.9)
2.1.4 Horizonal display please select 16:9, vertical mounted display and
floor-standing display please select 9:16 (Fig.10).
Fig.10
2.1.5 Design and make your presentation (Fig.11).
- 10 -
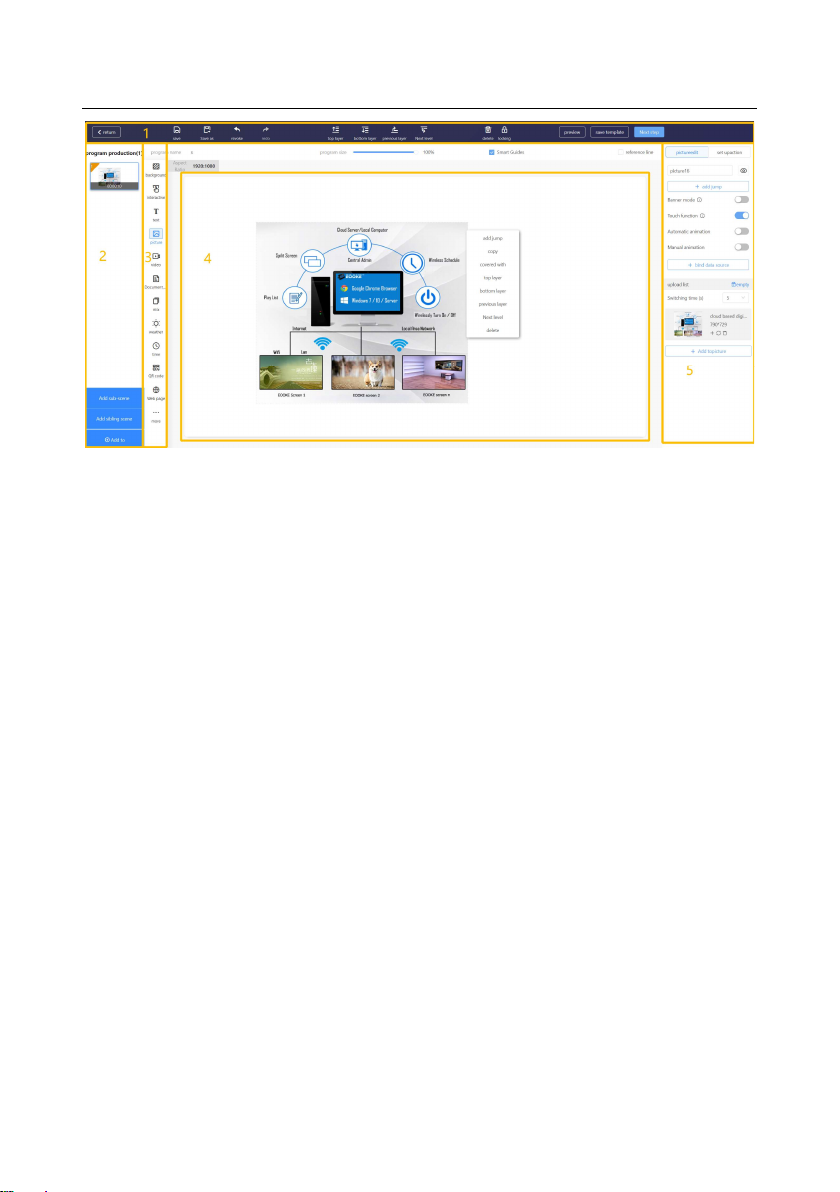
Fig.11
(1) Tools bar. Move layer up/down/to top/to bottom. Lock/delete
elements. Redo/Undo. Save/Save as template. Preview / Next step.
(2) Scene zone: Thumbnail views; Change scene time; Add sub-scene;
(3) Element box: Add background images / Pictures / Videos / Texts
Please Note:
(1) Word / Excel / PPT / Weather / Exchange Rate / Stock / Location
/ Port/ APK / Maps work in China only.
(2) For .doc/.ppt/. excel files please covert it to PDF before upload.
(4) Working zone. Right click the content to pop-up quick tool.
[Add jump]: For touch screen.
[Covered with]: Full screen.
[Top/Bottom Layer]: Move the layer to the top or bottom.
[Previous Layer / Next level]: Move the layer up/down.
(5) Element features edit zone: Edit features for current element.
[Blind date source] [Add jump] and its sub option: For touch screen.
[Add to picture/video]: Add more pictures/videos to current layer.
[Set up action]: Set up transition effects.
2.1.6 Click "Next Step" to specify a date/time and playing type (Fig.12).
- 11 -
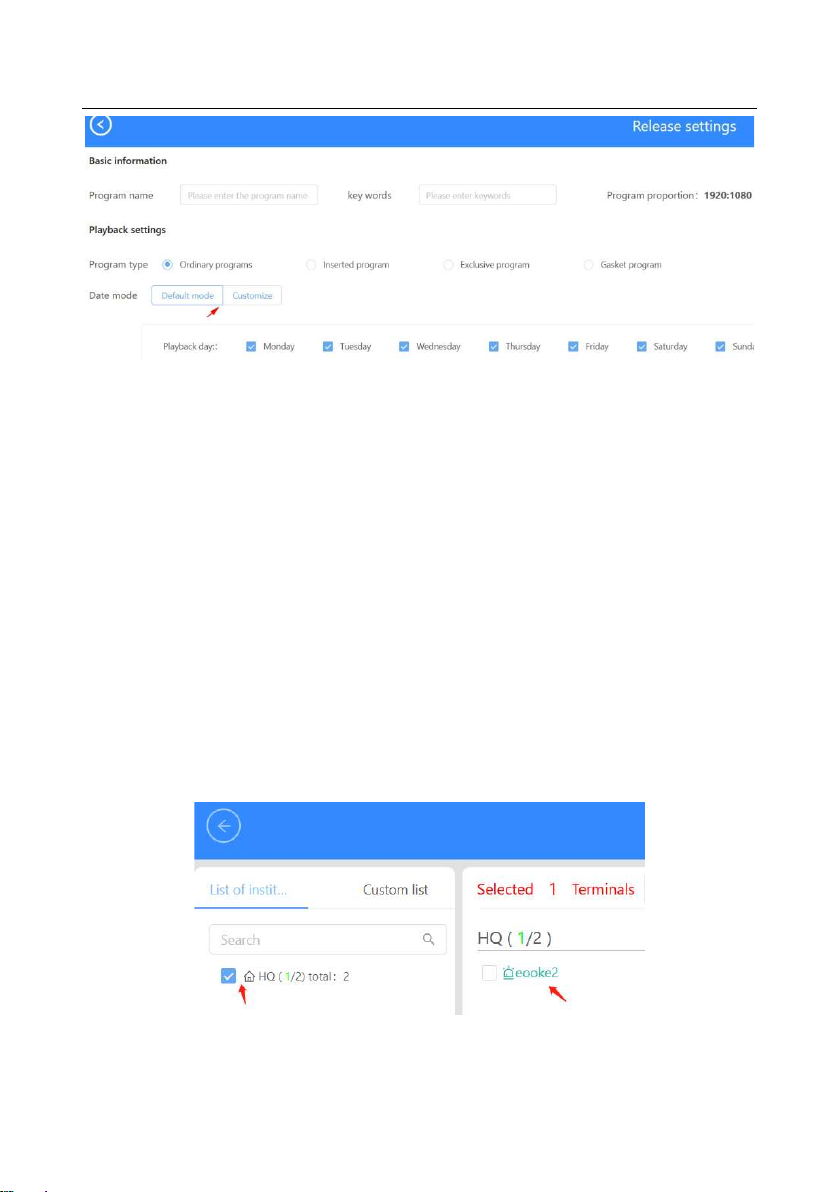
Fig.12
Program Type:Priority [ Inserted] > [ Exclusive] > [Ordinary] > [ Gasket]
[Ordinary program] Play programs in chronological order.
[Inserted program] Play when time is up, then play all one by one.
[Exclusive program] Play this program only except for [Inserted program].
[Gasket program] Play when no other programs are being played.
Date Mode: Here you can set schedule for every week day or specific day.
[Default mode] The programs will be played in the chosen day.
[Custom] Set up specific date/period for the program.
Please note:
(1) The Date Mode may not work if display system time is not correct.
(2) Turn on the display > System Settings > (Sub) system settings >
System > Date & Time > Setup correct Time zone and time here.
2.1.7 Click "Next Step" to select the display (Fig.13).
Fig.13

- 12 -
2.1.8 Click "Next Step". You will be redirected program management page.
Click "Check" to view progress (Fig.14).
Fig.14
Note: Want to update programs without network? Please navigate to "Content
management" > "export" > unzip and copy the folder to "Lprogram" folder of
USB drive > insert it in > remove the drive after copy is completed (Fig.15).
Fig.15
3. Create a scrolling message. ↓
Schedule rolling messages on screen Top/Central/Bottom directly.
Steps: Top menu > Content management > Message Production (Fig.16)

- 13 -
Fig.16
4. Schedule multiple programs in one time.
It allows you to plan multiple programs for any displays at one time.
4.1 Navigate to "Content Management"> "Play Plan" > add (Fig.17)
Fig.17

- 14 -
Drag or input to change time, add more times and date periods per your need.
10-time segments max allowed.
5. Manage the displays.
Navigate to "Terminal management", all your displays live here (Fig.18).
Fig.18
[Detail]: Full display detail. [Setting]: All settings on the display.
[Program]: View screenshot and manage current programes.
6. Display setting.
Fig.19
QR code / User Manual /APP: N/A (Only available in China);
- 15 -
Server Config: Set up Org ID / Server IP to connect to the APM. Top-right
cycle goes blue mean the connection is successfully.
4K Program (4K version only): N/A;
Crytuguard Guide (4K version only): Set up password to protect USB.
System Settings: General settings & set up timer, time & date, language.
6.1 Change Time & Date on the display.
Please navigate to "System Settings" > "System Settings" > "System" > Set
up correct Time zone / Time.
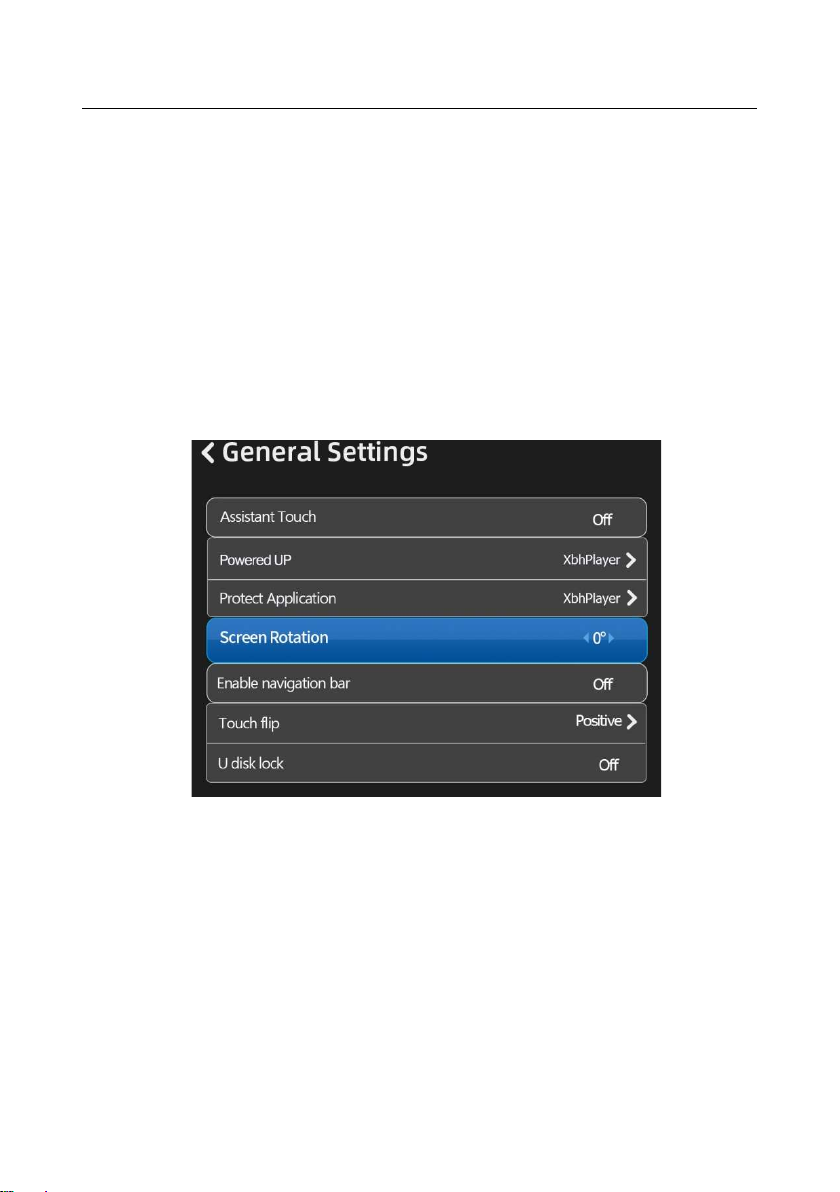
6.2 General setting.
Navigate to "System setting" > "General setting" (Fig.20).
Fig20
Assistant Touch: N/A
Powered UP: Set up default start-up application.
[xbh player]: Default app, it functions as Network Mode.
[single player]: It functions as Standalone Mode.
Protect Application: Set up the default app after 30 seconds of inactivity.
Screen Rotation: Rotate the screen by ±90°/ 180°.
Enable Navigation bar: N/A; Touch flip: N/A
- 16 -
U disk lock: Set up 4 digits password to protect USB ports.
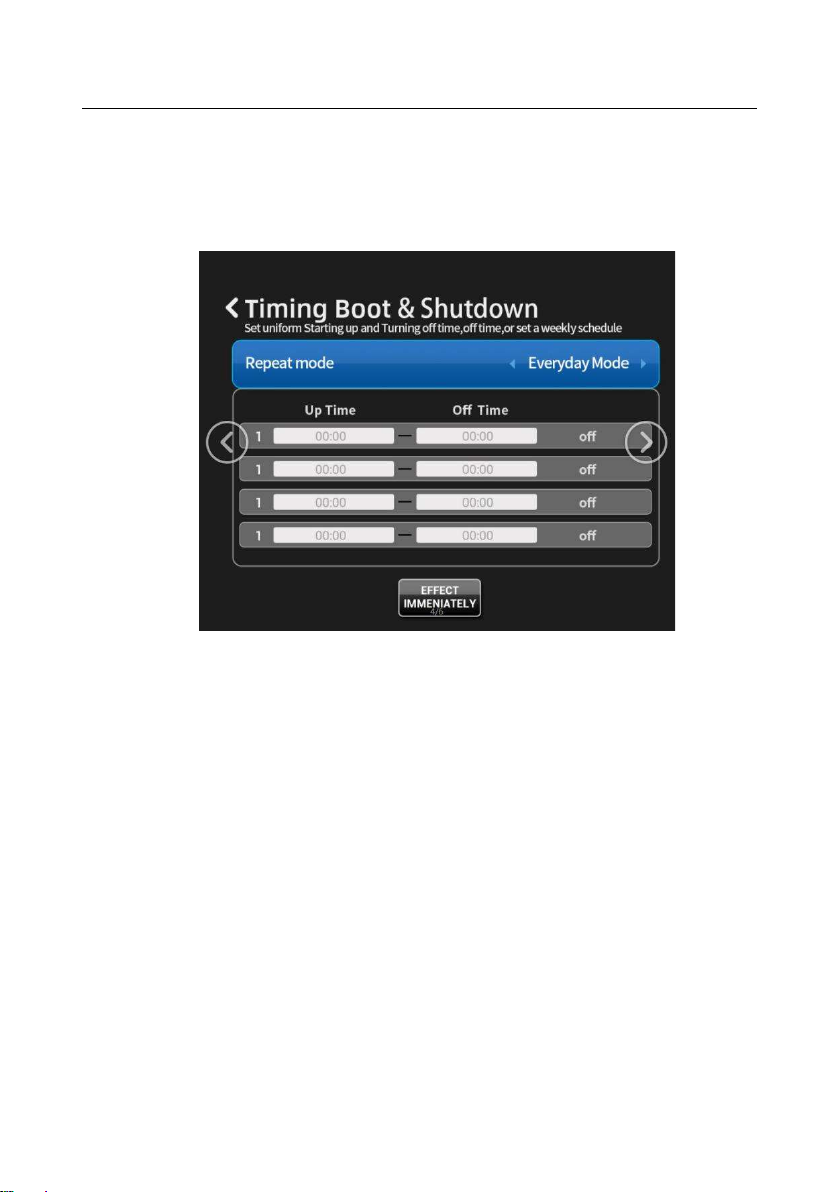
6.3 Power Timer settings.
System Setting > Schedule Task setting
Every day: 4 different timers/day. Weekday: 4 different timers/weekday.
Fig21
Please note: Most display setting can be set up in APM too.
7. Stand-alone Mode.
Work independently without network and APM. Plug and play
photo/video/subtitle with selected split-zone template (Fig.22).
7.1.1 Change the display working mode from "Network" to "Standalone".
Power on > "System Settings" > "General Settings" > "Powered UP" >
Change "xbh Player" to "Single Player" > Reboot
7.1.2 Create a new folder on USB drive named "SProgram".
7.1.3 Copy the images and videos into "SProgram" folder. Insert the USB
drive to the terminal display. Unplug the disk after copy is completed.
7.1.4 Play & loop should start.

- 17 -
Fig.22
Note: To enter main menu, please press "Back" button or navigate to "Back" on
home. To add scrolling text, please create a text file save it with UTF-8 encoding.
8. Install EOOKE APM on Windows 7/10 computer:
Get the source zip file from:
1. digitalframe0.com/faq/ Software ) or digitalframe0.com/software/.
2. USB drive (if have.)
3. support@digitalframe0.com
Note:
1. Please uninstall earlier versions (if have, navigate to installation folder
to uninstall) before installing new version to your computer.
2. A static IP is required before the installation, please follow steps below
to assign a static IP for your Window 10 computer.
a. Click "Start" at the bottom left, then click "Setting" .
b. Click "Network & Internet".
- 18 -
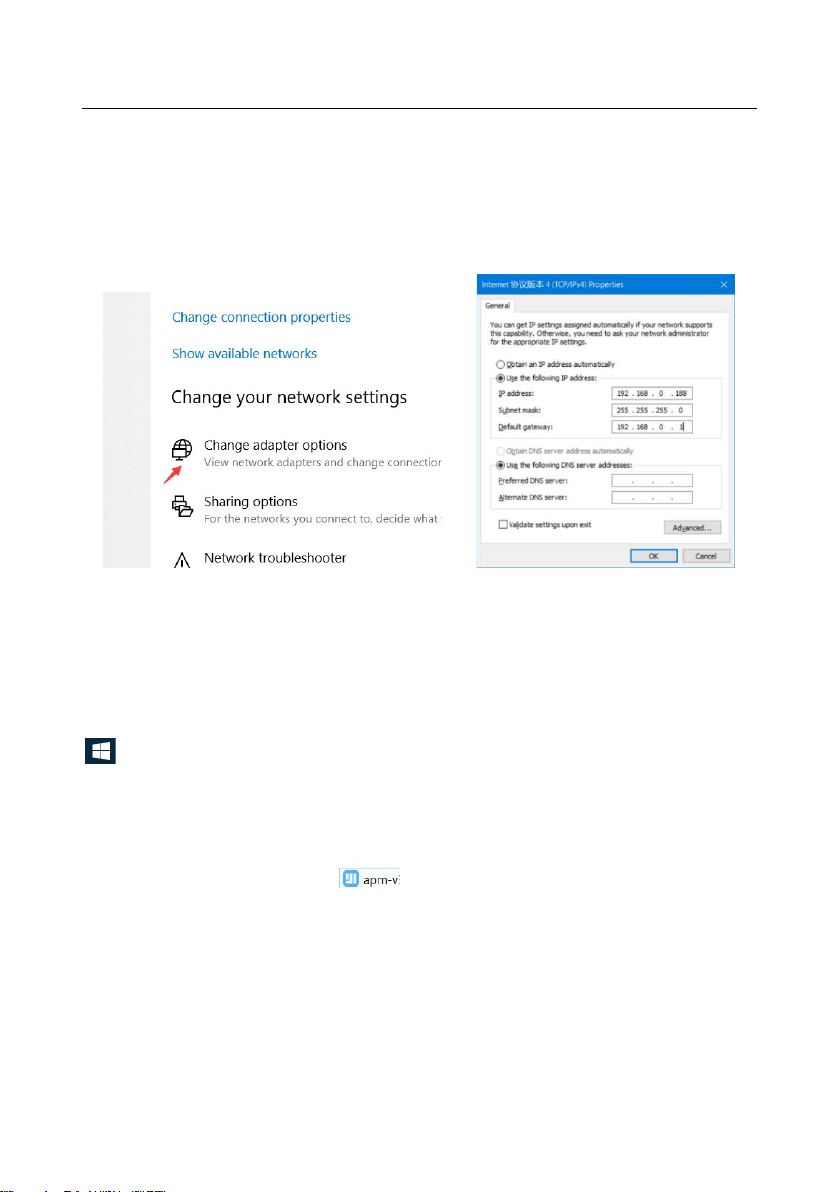
c. Click "Change adapter option" on the right (Fig.23).
d. Double click the desired network connection then click "Properties", Fig.4.
e. Double click "Internet Protocol Version 4 (TCP/IPv4) ".
f. Tick "Use the following IP address" (Fig.24).
g. Enter IP address and DNS. (See samples below)
.
Fig.23 Fig.24
IP address: 192.168.0. X (x = any number between 2-254);
Subnet: 255.255.255.0; Gateway: 192.168.0.1;
Local DNS Server: You can use Google DNS: 8.8.8.8 and 8.8. 4.4.
Note: Your actual gateway and subnet may be different, please right-click
> Run > Type "cmd" > Type "ipconfig /all" to find out your subnet mask,
default gateway, DNS Servers and then assign appropriate IP for your computer.
8.1 Steps to install APM on your Windows 7/10 computer:
8.1.1 Unzip "APM" to root path of your PC.
8.1.2 Double click exe file to start the installation.
8.1.3 Click "Yes" if any system warning pop-up (Fig25).
8.1.4 Select language click "OK".
8.1.5 Choose installation path (See note below).
Please note: Installation path must not contain any spaces / special characters,
don’t install it to "x:/program file", "x:/program files (x86)", "x:/program".

- 19 -
Fig.25 Fig.26
Fig.27 Fig.28
8.1.6 Wait a few seconds before all service being installed (Fig.27)
8.1.7 Restart to complete the installation (Fig.28).
8.2 Installing APM on cloud Windows Server System.
Please open the necessary ports (see below) manually before the installation.
Requirements:
• Windows server 2012 or newer version.
• 2 CPU / 4G ram
• A Public IP address
• Ports: 8235, 8283, 8239, 80, 3317, 19527, 19520, 9999, 1935, 1883, 8883
(Windows Server blocks ports by default, please open them manually.)

- 20 -
8.2.1 Steps to open the ports for APM:
Start > Control Panel > Windows Firewall > Advanced setting> Inbound
Rules > New Rule > Port > Specific local ports > Enter ports here > Allow the
connection > Domain/Private/Public > Name it APM (Fig.29 / Fig.30 / Fig.31).
Fig.29
Fig.30 Fig. 31
8.2.1.1 Upload APM application file to your cloud server and install.
8.2.1.2 The installation steps are pretty much the same as installing in
Windows 10 system, please refer to page18.
Note: Pls ensure Firewall, anti-virus software aren’t blocking the installation.
Table of contents


