EP Equipment EP-21F User manual

EP-21F
Manual Letter Folder
Operation Manual
EP Equipment


2
Introduction
Thank you for selecting EP folder. This machine is designed for
efficiently folding paper up to legal size (216×356mm).
To ensure correct operation and avoid damage & injury, please
read this operation manual thoroughly and familiarize yourself
with its content, especially the section entitled “Safety
Introductions”
This operation manual is produced to ensure safe and proper
operation of this machine. So do not attempt to remodel or
modify any parts by yourself unless it is approved by the
manufacturer literally.
Please keep this operation manual available referring future need.

3 20
Contents
Safety Introductions.......................................................................4
Cautions Before Installation..........................................................6
Specifications.................................................................................7
Main Parts list...............................................................................8
Control Panel.................................................................................9
Installation....................................................................................10
Operation......................................................................................12
Maintenance.................................................................................18
Troubleshooting...........................................................................20
Troubleshooting
Trouble Possible Cause Solutio
n
Machine
does not
work
(
count
dis
p
la
y
does
not li
g
ht u
p)
No
p
ower at
p
resent Check
p
ower.
Power cord not wel
l
p
lu
gg
ed Plu
g
firml
y
Blown fuse Re
p
lace with fuse of the same
t
yp
e and ratin
g
Machine
does not
work
(
count
dis
p
la
y
li
g
hts
u
p)
Pa
p
er
j
a
m
inside
machine Clear
j
a
m
and
p
ress RESET
U
pp
er and lower
p
lates not
p
laced
p
ro
p
erl
y
Re
p
ositio
n
p
lates
Machine
sto
p
s durin
g
runnin
g
Pa
p
er deliver
y
sensor
p
ressed Remove
p
a
p
er over
p
a
p
er
deliver
y
sensor
Pa
p
er
j
a
m
Clear
j
a
m
and
p
ress RESET
Pa
p
er not fed
or e
j
ected /
p
a
p
er
wrinkle
Pa
p
er
b
ind to
g
ether Se
p
arate
p
a
p
er
Dirt o
n
feed and
e
j
ectio
n
rollers Clean rollers
Pa
p
er not
folded
p
ro
p
erl
y
Ja
m
i
n
table 1 and 2 Detach table 1 and 2, e
j
ect
p
a
p
er
Not standard
p
a
p
er
len
g
th Measure len
g
th and ad
j
ust
Art
p
a
p
er not
folded
(
125
g
s
m
or
li
g
hter
)
Dirt
y
o
n
an
y
of
rollers Clean al
l
rollers
Low roo
m
tem
p
erature Kee
p
p
a
p
er at 20℃-2
5
℃for 4
hours
19 4
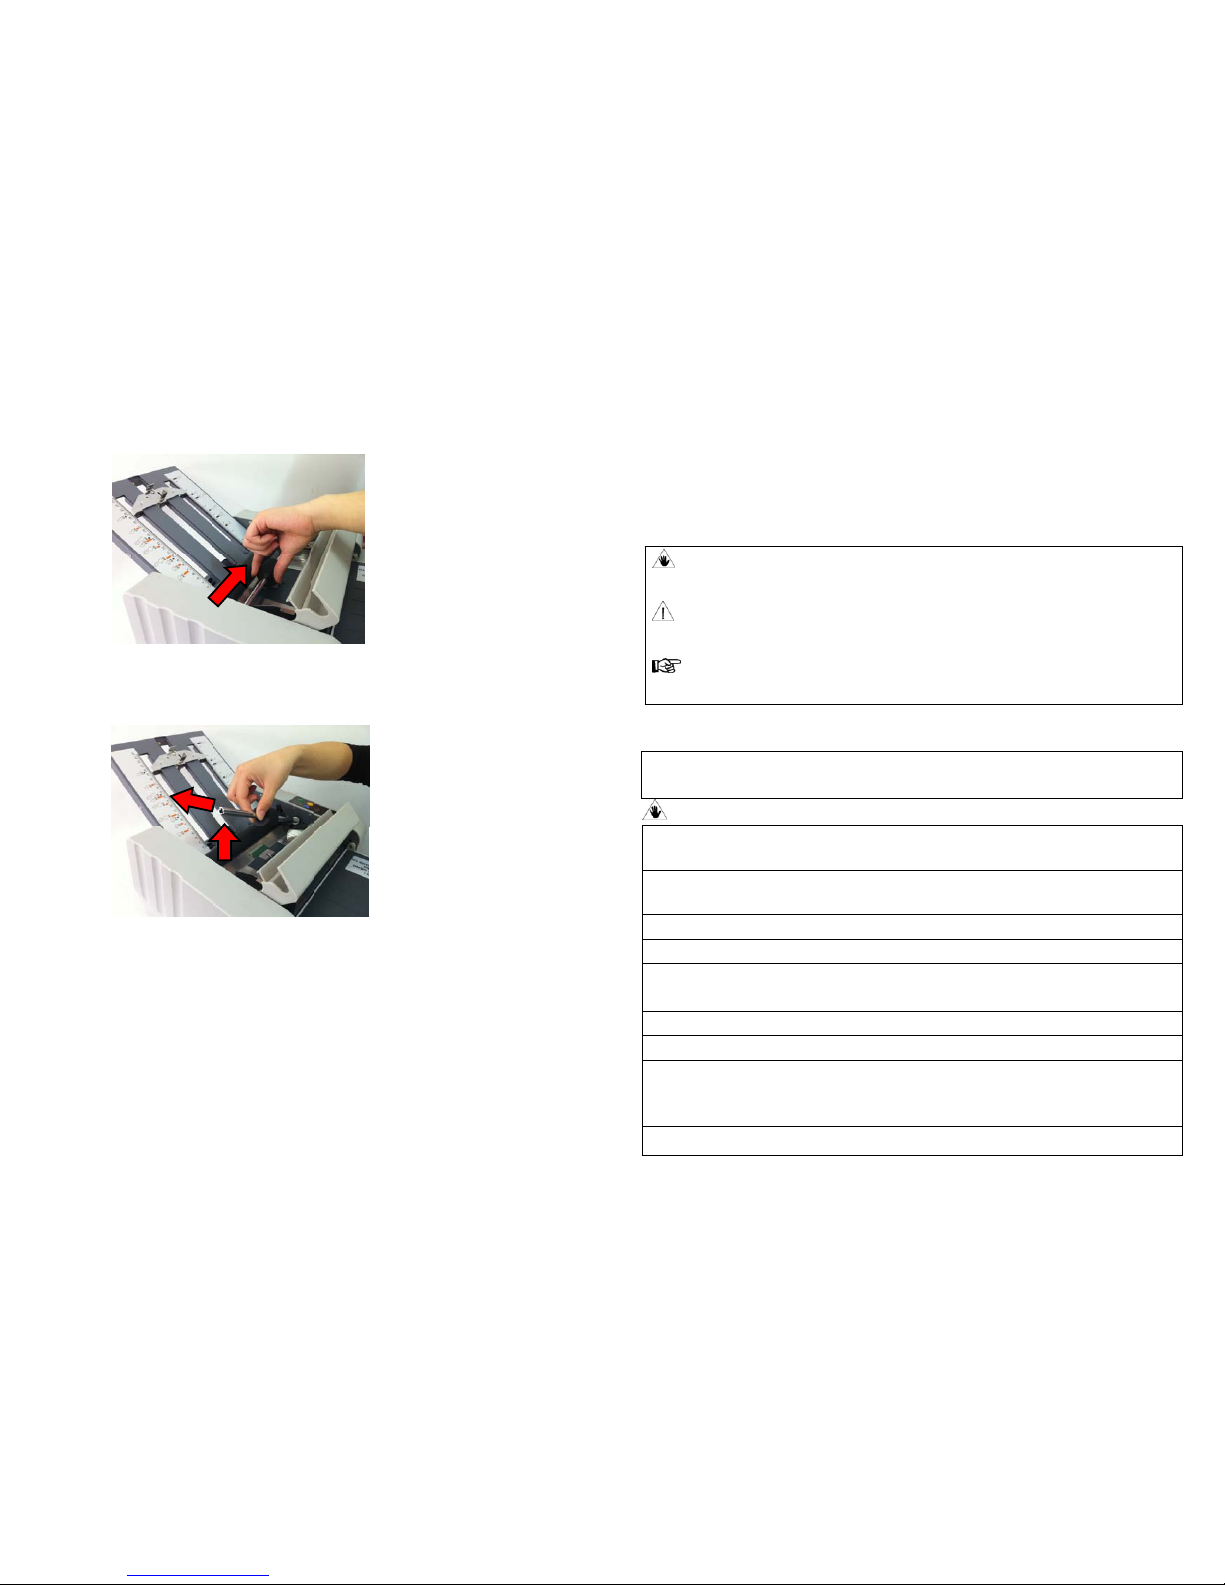
2.2 Push the fed roller shaft towards the right cover (near the control
panel).
2.3 Push till one end is disengaged with the machine, lift the other side and
remove the feed roller shaft.
2.4 After replacement, repeat the procedure in the opposite sequence.
For other parts worn out, please contact your dealer.
Safety Introductions
Always pay attention to the warnings and cautions displayed below to avoid
human injury and property damage.
◆The degree of danger and damage that may occur is indicated on three
levels by the following marks.
◆The following symbols indicate two types of action to be performed or
avoided.
╳This symbol indicates a Forbidden action.
●This symbol indicates actions should be performed.
Warning:
╳Do not place any metal objects or vessels containing liquid on this
machine.
╳Do not insert any metal or easily-combustible objects into this
machine.
╳Do not touch any moving parts during operation.
╳Do not remove any cover.
╳Do not disassemble, modify or repair this machine by yourself,
Contact your dealer if necessary.
●Use ONLY the power supply voltage specified on the main nameplate,
●Keep this machine far away from heaters.
●Make sure the combined power consumption of the appliances to be
connected does not exceed the capacity rating of the power outlet or
plug receptacle..
●Keep the power plug prong clean and dry.
Warning : Ignoring this mark may result in possibility of serious
injury or damage.
Caution : Ignoring this mark may result in possibility of injury or
damage
Note: Ignoring this mark may not result in damage, while following
the introduction will help operate this machine more smoothly.

518
●If any foreign objects such as metal or liquid enter this machine,
immediately turn off the power switch and disconnect the power
plug from the power outlet, then contact your dealer.
╳Do not damage the power cord or power plug.
●Always grip the power plug while disconnecting the power plug
from the power outlet. Forcibly pulling the power cord could cause
damage.
╳Do not handle the power plug with wet hand.
●Before cleaning the machine, do turn off the power switch and
disconnect the power plug from the power outlet.
╳Do not operate this machine with wet hand.
╳Do not use flammable sprays inside or near this machine.
Caution:
●Keep long hair, necktie etc. away from this machine.
╳Do not use solvent inside or near this machine.
●Always disconnect the power plug from power outlet if this machine
to be idle for a period.
●Install this machine on a level, stable surface, with sufficient space
around it.
●Install this machine in a clean and dry room.
●Disconnect the power plug from power outlet before moving this
machine.
Maintenance
Turn off the power and cover the machine if left idle for a
long period.
1. Regular Clean
Paper dust and ink accumulate on some parts along your use,
which may result in dirty paper and misfunction.
Make sure you have turned off the power before cleaning.
1.1 Clean the paper separator.
1.2 Remove upper & lower plate, open manual feed cover.
1.3 Remove the feed roller by pushing is aside and disengaging the
other end.
1.4 Clean all the rollers with a cloth.
2. Replacement of worn parts
For the replacement of feed roller and paper separator, please follow the
procedure.
2.1 Open the manual feed cover.
.
17 6
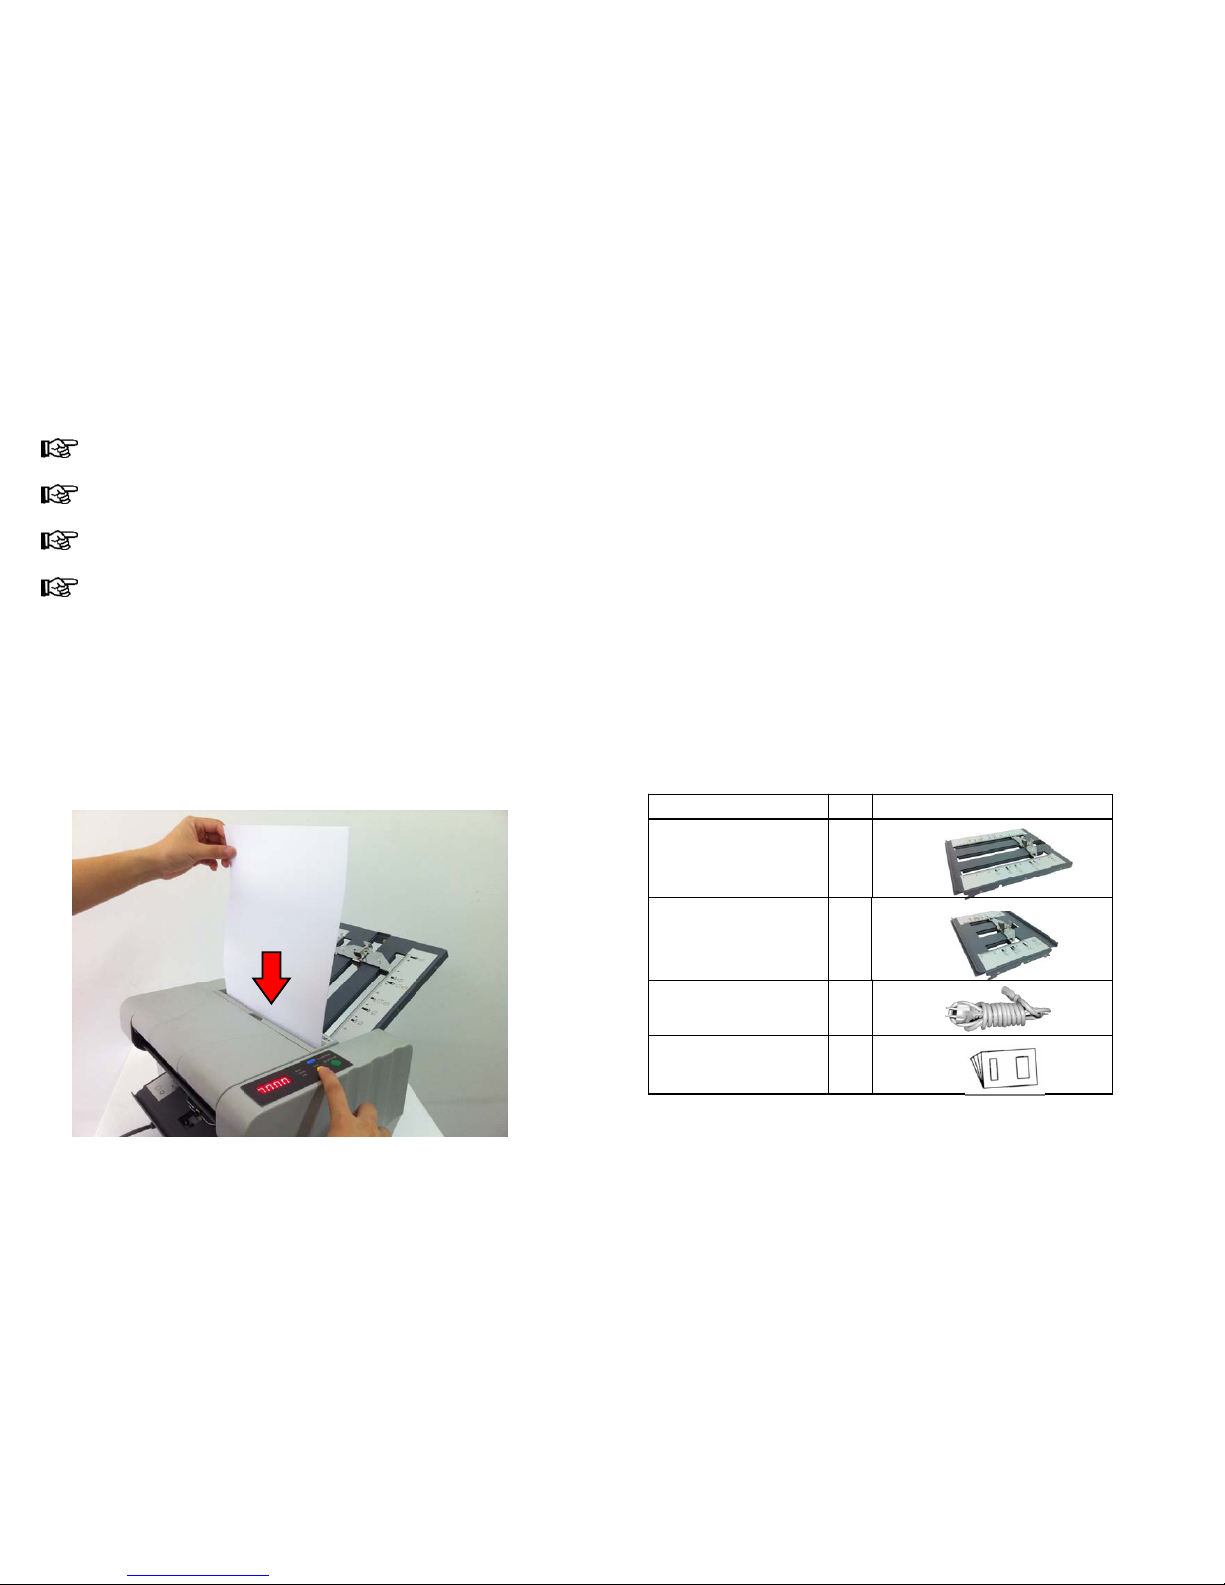
4. Manual mode
Close the auxiliary fold table before use manual mode.
DO NOT insert paper more than 3 sheets at a time.
DO NOT insert paper weighter than 60 lbs.
DO NOT insert paper with a clip.
4.1 Turn on the power switch.
4.2 Position the fold stop as desired.
4.3 Pull ejection tray out.
4.4 Insert paper along the guide into the manual feed. Keep paper
vertical.
4.5 Press TEST button.
Cautions Before Installation
1. Power Supply
◆Make sure the power supply used is always within the following range:
●110V~120VAC 60HZ or 220V~240VAC 50HZ.
◆When powering other appliances from the same outlet, make sure the
combined power consumption does not exceed the power supply
capacity.
●Rated power consumption of this machine is 30W.
◆Replace only with the same type and rating of fuse.
2. Operation Environment
Please operate this machine in the following situation.
◆Temperature between 5℃~35℃.
◆Humidity between 10~80% RH (no dew condensation).
◆No subject to direct sunshine.
3. Accessories
Name Qty Illustration
Upper Plate 1
Lower Plate 1
Power Cord 1
Operation Manual 1

7 16
Specifications
★Due to quality improvement, these specifications are subject
to changes without notice.
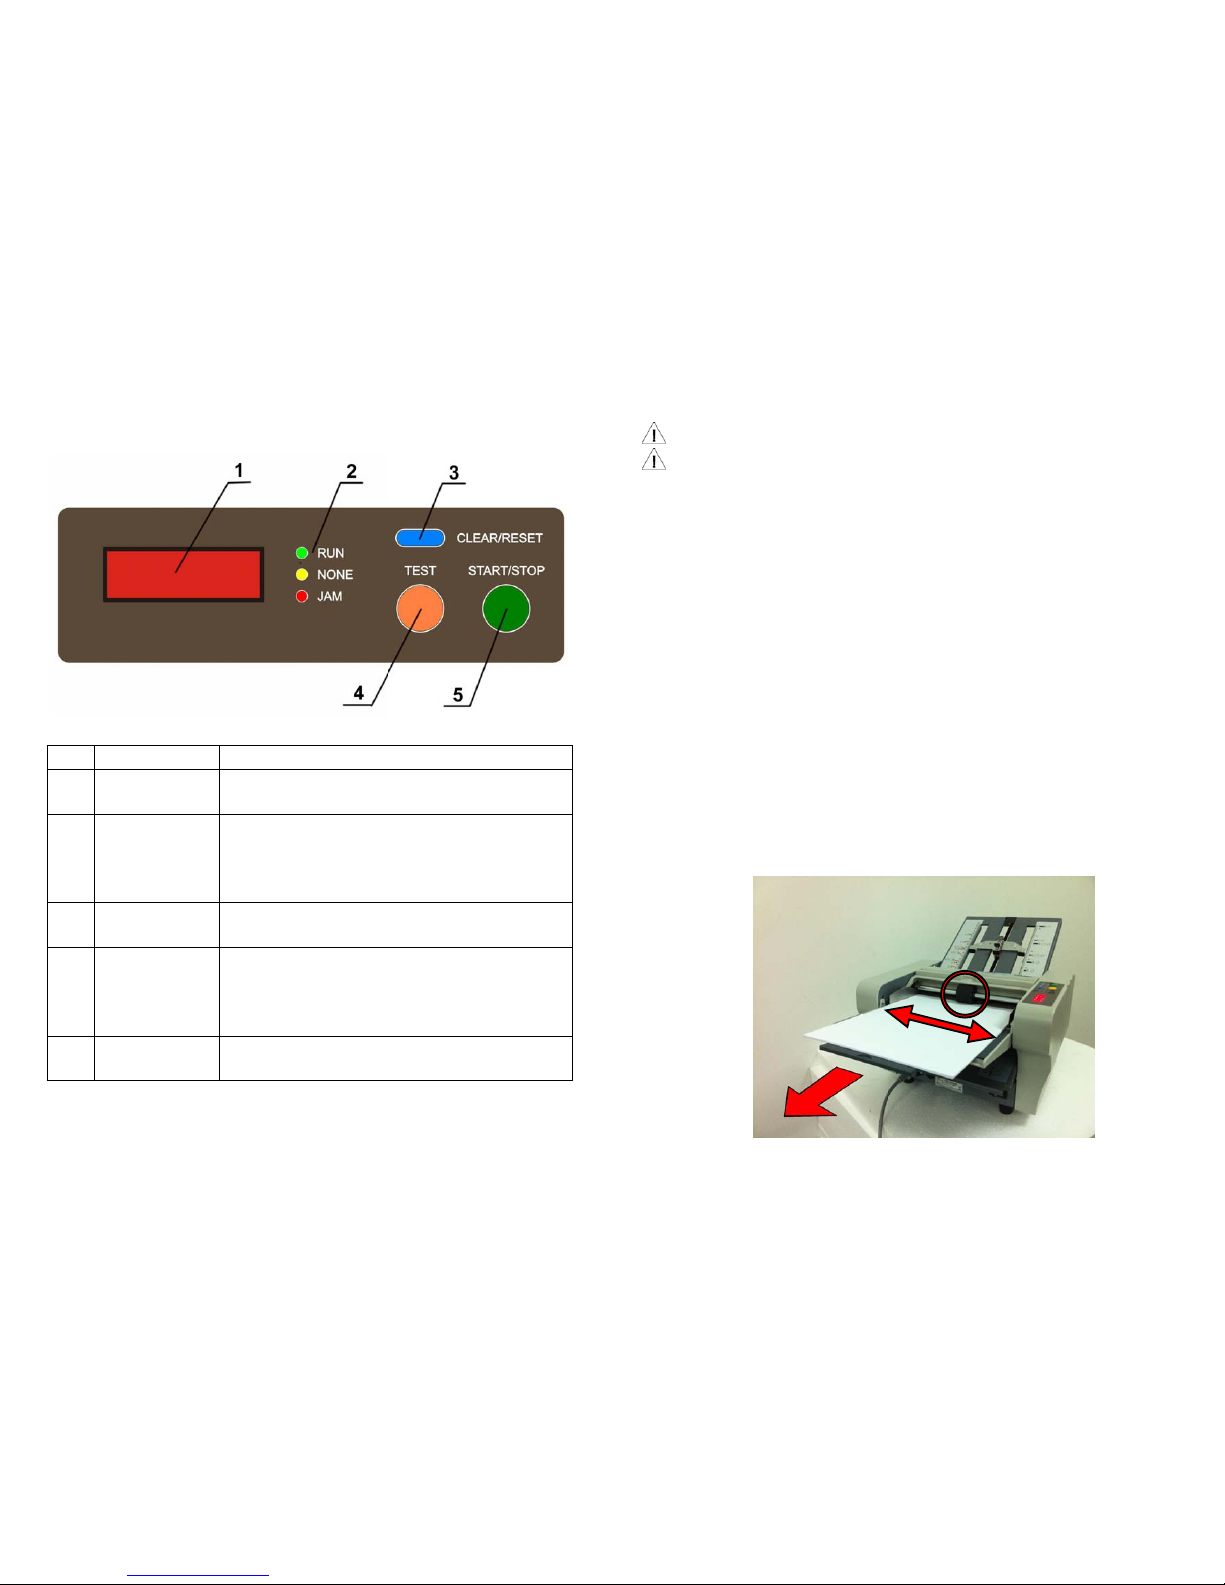
Pull out the ejection stack the length a little longer than that
of sheets folded. Take the sheets out of the ejection stack in time,
so the stacked sheets won’t exceed the max line, which may cause
jam.
Model EP-21F Manual Letter Folder
Sheet size 4"x5"to81/2"x14"
(102mm x 127mm to 216mm x 356mm)
Paper weight 16lbs to 80lbs (40-200gsm)
Paper quality Fine quality paper, recycled paper
Fold types Single fold, Letter fold, Z fold, Double Parallel fold
Fold speed 50 sheets per minute
Feed mode Automatic & Manual
Max sheets
fed manually Up to three sheets of 20lbs
Functions Indicator of no paper, paper jam, paper counter
Input capacity 250 Sheets
Output capacity 250 Sheets (50 letter folded sheets stacked)
Dimension
in use 610*340*310mm
Dimension
in storage 260*340*220mm (without folding plates)
420*340*310mm (with folding plates)
Net weight 12KG
Power
requirements 220V,50Hz / 110V 60Hz AC
Power
consumption 30W
Certifications CE

15 8
3.6 Press START/STOP button to run the machine. Machine will stop
automatically if sheets run out. You can also press START/STOP button
again to stop the machine at any time.
When folding very thin paper, it is suggested that the inside
edge of paper is slightly curled up for better feed.
Do not let folded paper exceed the max stack line.
Do not fold paper with wet ink in case the feed roller,
paper separator, fold rollers etc. Parts will be dirty and cause
damage.
Make sure the paper to be fed are clean wet and easily to be
folded.
Main Parts list
1. Manual feed cover
2. Right cover (near control panel)
3. Control panel
4. Side guide
5. Auxiliary feed table
6. Extension feed table
7. Lower plate
8. Upper plate
9. Fold stop
10. Fine adjustment
knob
11. Feed roller
12. Left cover
13. Power inlet
14. Fuse holder
15. Power switch
16. Fine adjustment knob
17. Fold stop
18. Ejection tray
9 14
Control Panel DO NOT touch any moving parts during operation.
DO NOT let long hair, necktie etc. hang above the machine or near to
moving Parts.
3. Automatic mode
3.1 Turn on the power switch.
3.2 Position the fold stop referring to the folding instruction.
3.3 Pull the ejection tray out.
3.4 Open the auxiliary feed table and pull out extension feed table.
3.5 Feed paper.
①. Hold down the feed table,
②. Load sheets on the feed table and keep printed side upward,
③. Make sure inside edge of paper flush with the front plate of the feed
tray.
④. Make sure paper is well connected to the feed tray.
⑤. Move the side guide to the edge of sheets without any clearance
while keeping sheets flat.
No. Name Function
1 Count display Display numbers of folded sheets
Lights up when power is on.
2 Indicator,lights
“RUN” lights up means machine is running.
“NONE” lights up means sheets run out or
plates are not well positioned.
“JAM” lights up means there is a jam inside.
3 Test button Press this button, machine will fold one sheet
and stop.
4Start/Stop
button
Press this button, machine will continuously
fold till sheets run out.
Press this button when running, machine will
stop immediately.
5Clear/ Reset
button Press this button to clear the numbers displayed
and reset the machine.
13 10
Correct Fold Misalignment.
Move the Fold stop if misalignment is serious:
move inside if A or B is longer, move outside ifA or B is shorter.
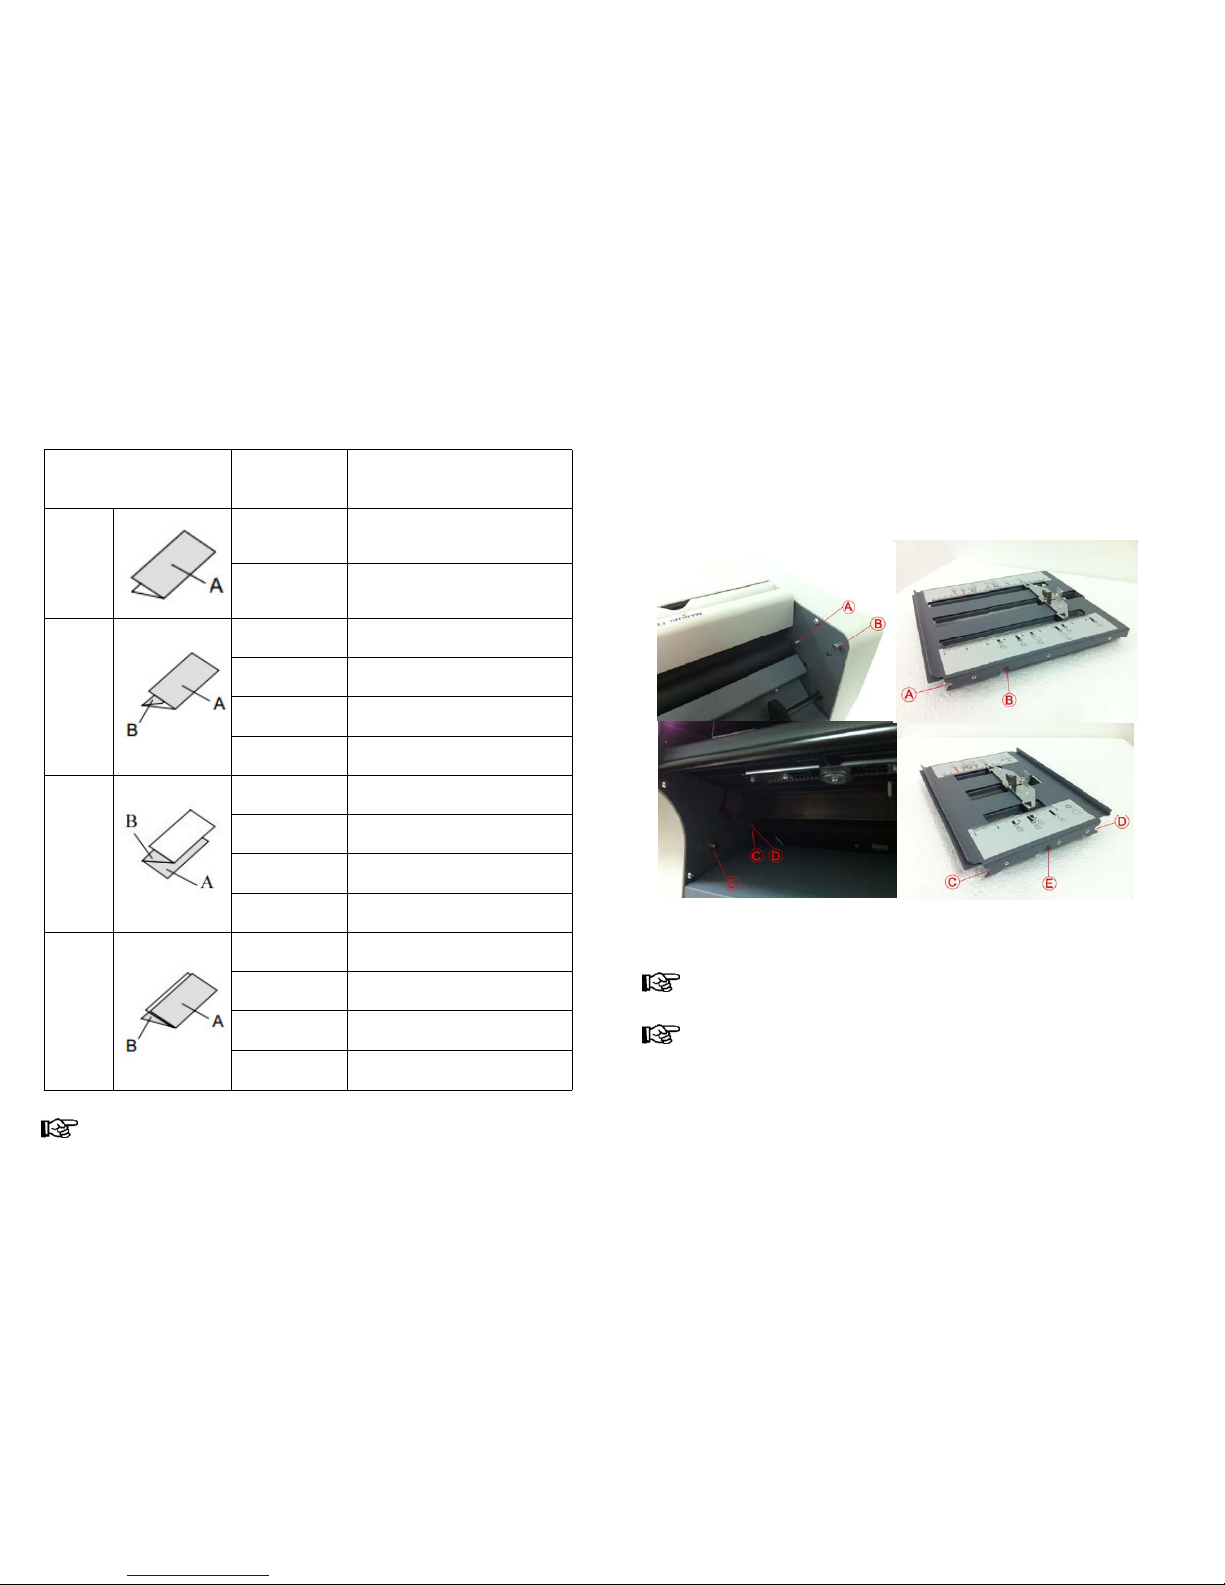
Installation
1. Install the upper plate
Insert the upper plate along the guide line as far as possible, and seats
on the the support pins A B at the cutout.
The lower plate is inserted in different directions for single fold and
other folds.
Make sure both upper and lower plate are seated firmly in position. If
improperly installed, this machine will not start.
Fold type Misalignment Solution
(face the knob)
Single
fold
A is longer CCW Upper knob
A is shorter C.W. Upper knob
Letter
fold
A is longer CCW Upper knob
A is shorter C.W. Upper knob
B is longer CCW Lower knob
B is shorter C.W. Lower knob
Z fold
A is longer CCW Upper knob
A is shorter C.W. Upper knob
B is longer CCW Lower knob
B is shorter C.W. Lower knob
Double
parallel
fold
A is longer CCW Upper knob
A is shorter C.W. Upper knob
B is longer CCW Lower knob
B is shorter C.W. Lower knob
11 12
21
1
2
1
2
1
2
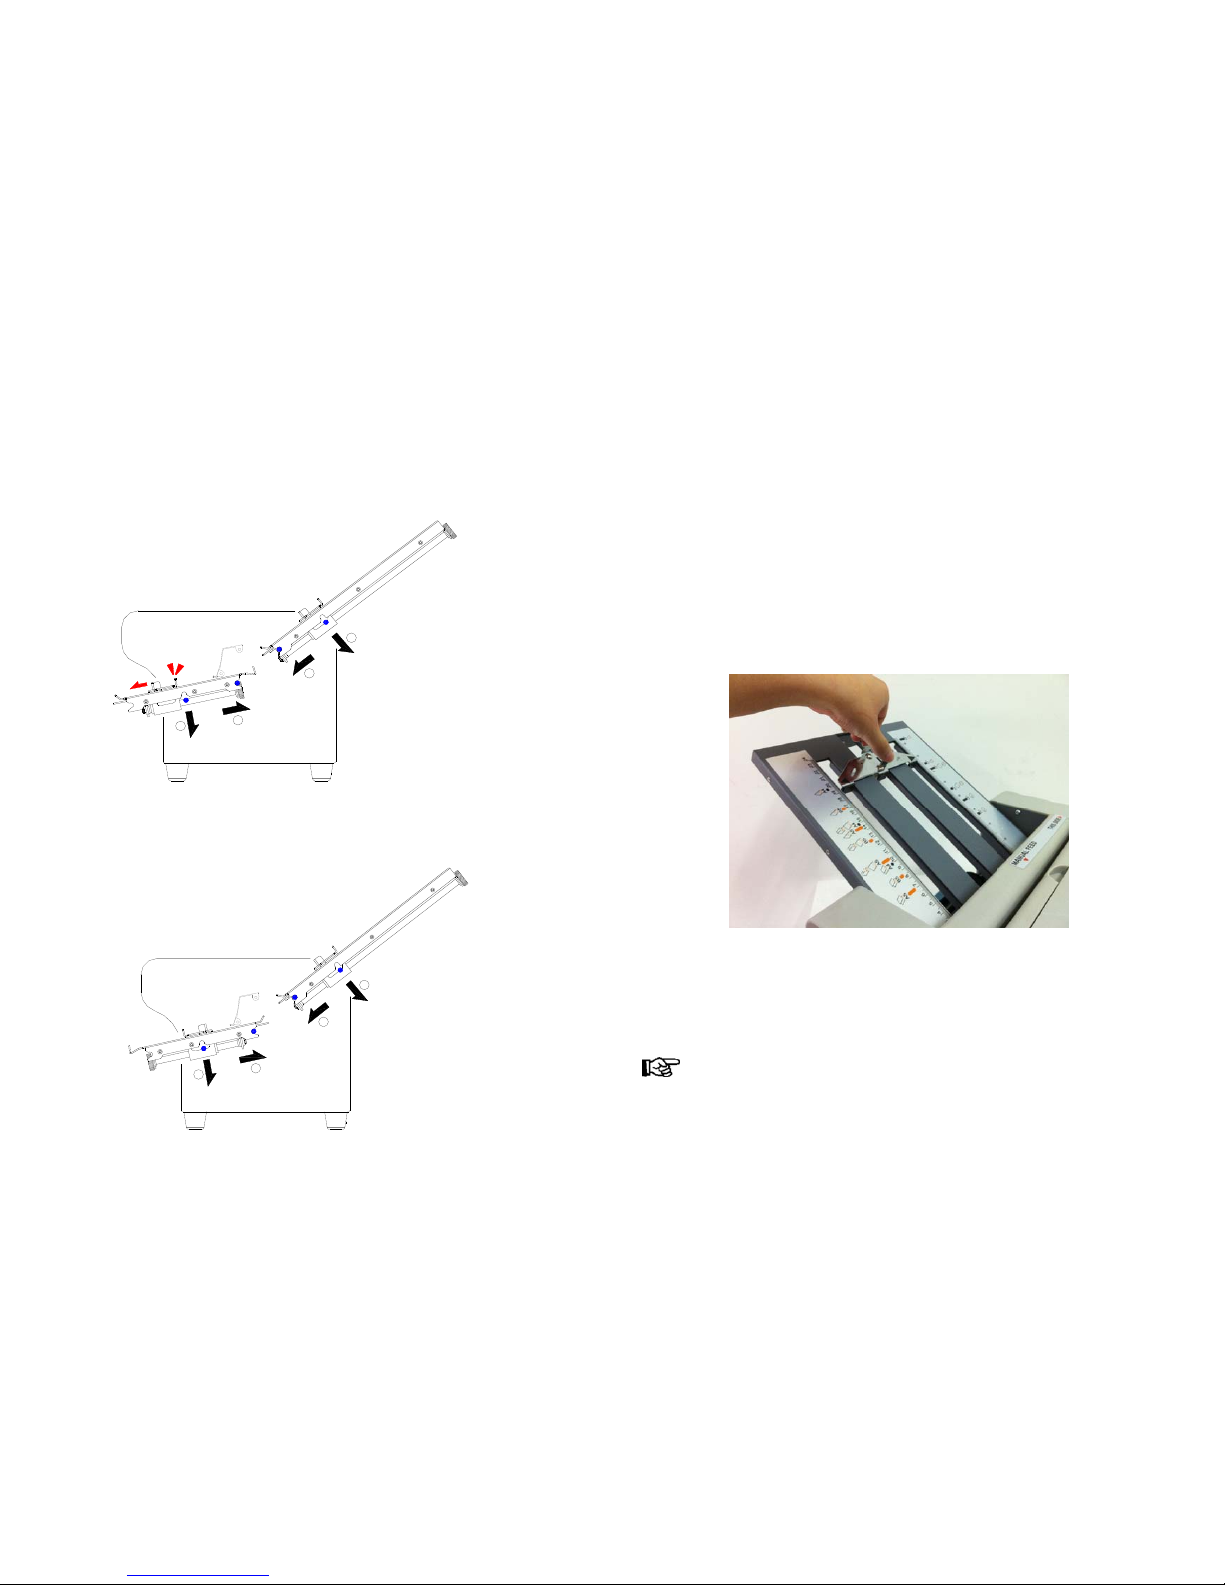
1. Install the lower plate
2.1 For single fold.
Push fold stop to the end of C direction. Then insert the lower plate along
the guide line as far as possible, and seats on the support pins D E at the
cutout.
2.2 For Letter fold, Z fold, and double fold.
Insert the lower plate long the guide line as far as possible and seats on
the support pins C E at the cutout.
Operation
1
.
Connect the power suppl
y.
Connect the power cord to the inlet and outlet. Turn on the power
switch.
2
.
Settin
g
the fold stops
.
2.1 Position the fold stop according to the desired fold type.
Push the half-nut level to loosen and move the fold stop to the
demanded position referring to the color folding instruction on the
plates. Loosen your grip and the fold stop will be locked there by the
level.
2.2 Fine adjustment.
Feed on sheet, press TEST button. Rotate the fine adjustment knob to
move the fold stop to the proper position according to the instructions
below.
Move the fold stop by half of the distance to be corrected. For
example, move the fold stop by 0.5mm if 1mm of correction is
required.
Other manuals for EP-21F
1
Table of contents
Other EP Equipment Folding Machine manuals


