Epcom XMRT3S User manual

1
XMRT3S
User manual

2
Content
1.
Introduction..........................................................................................................................................1
Package Contents...............................................................................................................................1
2.
Structure design................................................................................................................................... 2
2.1
Structure introduce...................................................................................................................... 2
3.
Basic Operations.................................................................................................................................. 4
3.1
Menu introduction....................................................................................................................... 4
4.
Device using.......................................................................................................................................... 7
4.1
Turning on the Camera................................................................................................................ 7
4.2
Turning off the Camera............................................................................................................... 7
4.3
Recording Video..........................................................................................................................7
4.4
F button operation........................................................................................................................7
4.5
Charging the Battery....................................................................................................................7

3
1.
Introduction
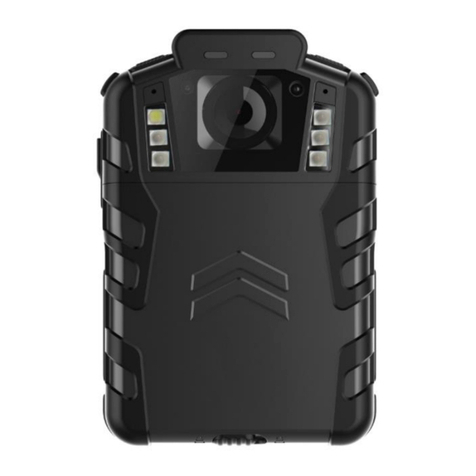
XMRT3S is a full featured body worn camera specifically designed for Law Enforcement. The
camera features real time HD video, 1080P recording, with wide angle; The rugged design is
resilient to withstand demanding work environments faced by law enforcement officers,
corrections, military and security detail.
Package Contents
*Body worn camera
*USB cable
*USB power adapter
*CD with manual and software
*Universal metal clip

4
2.
Structure design
2.1
Structure introduce
Item
Name
Description
1
Lens
The wide angle HD camera lens
2
REC button
Press the button to start the audio recording only.
3
IR light
Record clear image in HD in low light situations. 10 meters
visible.
4
IR sensor
The sensor will detect the brightness of the environment, and
then activate the IR light and switch to night vision mode.
5
Intercom Mic
Capture the environment voice during using the intercom.
6
Mult-function button
Long press it to turn off screen and LED
Double press it to turn off the microphone
Short press it to turn off the screen only
7
ON/OFF button
Slid it on to turn on, slid it down to turn off.
8
USB port
Connect USB cable for charging or connection to PC.
9
External camera port
Connects to external camera, when it is connected, it will
show an icon in the screen. T3S not support external camera.
10
Speaker
The speaker for playback and voice report.

5
11
Display screen
Display all the status information of the camera.
12
Charging light
Red means camera is recharging, solid green means the
battery full charged.
13
Status light
Red blinking means video recording, solid green means
standby.
14
Speaker
The speaker for playback and voice report.
15
Data interface
The interface for docking, walkie-talkie and external battery
connection.
The body worn camera LCD screen is a small monitor to display various camera information
and operation status.
Item
Icon
Name
Description
1
Time
The real time of the camera
2
Time
AM or PM time
3
Week
It will display the first three words of
the each day of week.
4
Capacity
The remain capacity of the SD card
5
Status
Red icon means camera is recording
6
External camera
Display this icon means external is
connected success, otherwise not.
7
Mute
Display this icon means the
microphone is turned off
8
Battery
It display the battery status

6
3.
Basic Operations
3.1
Menu introduction
Connect the body camera to the BWC-Tool, you can setup all the parameter setting of the
camera, as follow:
1.
Video resolution
The body worn camera offers five different recording resolutions. Resolution and frame rate
options feature a proper balance between video quality and maximizing amount of video stored.
2.
Video quality
Select video quality based on the need of video recording. High means the best quality, which will
Options
Display resolution
Images per second
720P30
1280*720
30
848P60
848*480
60
848P30
848*480
30
1080P30
1920*1080
30
720P60
1280*720
60

7
encode with big bit rate.
3.
Video clip
Video clip selection defines the length of each video segment, and this option only is used for
video recording, invalid for audio recording.
Sub-option: Auto, 10 minutes, 20 minutes, 30 minutes; auto means it will create a file in almost
2GB size, and the time is about one hour, depends on the video resolution.
4.
Pre-recording
Pre-recording saves an additional seconds of video before the video recording button is pressed,
and the additional seconds is about 30 seconds. After the option of pre-recording is enabled, the
camera cannot snapshot, but the snapshot will work during the video recording.
For example, we set the value(between setting the pre-recording and pressing the video recording
button) as X, if X <30s, the camera will store an additional video for X seconds before the video
recording button is pressed, if X>=30s, the camera will store an additional video for 30 seconds
before the video recording button is pressed.
5.
Video loop
When you create one new video recording file, if the file size is more than the remaining storage
of camera, the camera will delete the most original file, so that the new file can be saved.
Here if the video file is tagged as imp file, the imp file cannot be deleted.
6.
Indicate sound
This option means when the user operates camera, it will give the corresponding response, OFF,
beep or voice, and it will applied to the operations as follows:
1.
Start video recording;
2.
Stop video recording;
3.
Power on the camera;
4.
Power off the camera;
5.
Low battery;
6.
Inadequate storage space;
7.
Indicate light
Select to turn all the LED ON or OFF, including the status LED and power LED.
8.
Vibration

8
It will be used in the situations:
1.
press the video recording button;
2.
press the audio recording button;
3.
Power off the camera;
4.
Power on the camera.
It will remind the users that the function is in use.
9.
Auto IR switch
If the option is on, during video recording (not preview mode), the IR will work when the
environment is dark, similarly, when the environment is bright, the IR will be closed
automatically.
10.
Language
The language will be applied to the screen display and all the voice notice, and the users can
choose English, 日本語, Español, русский and so on.
11.
Microphone
Select to turn the built-in microphone ON or OFF, when start audio recording, even the
microphone is OFF, it will be active automatically.
When microphone is OFF, video recording will have not any voice.
12.
IR Sensitive
It will help the camera to detect the brightness of environment, and check if the camera will
activate or inactivate the IR.
13.
Pre-recording audio
This option is for the audio microphone switch during the recording, when it’s ON, the recording
will have audio, if it’s OFF, and there is no audio during the recording.
4.
Device using
4.1
Turning on the Camera
In power off status, Slid the “power on/off” button to up status, the camera will be turn on.
Meanwhile, the status indicator will turn green.

9
4.2
Turning off the Camera
In preview mode, Slid the “power on/off” button to down status, the camera will save the
current status and power off. Meanwhile, the status indicator will turn off.
4.3
Recording Video
In preview mode, short press the front button to start recording. Meanwhile, the status
indicator will turn red and flash. Short press again to stop recording and the video will
be saved in MP4 format automatically.
4.4
F button operation
Long press it to turn off screen and LED
Double press it to turn off the microphone
Short press it to turn on/off the screen only
4.5
Charging the Battery
This camera has a chargeable battery built in. In case of low battery, please connect this
camera to power supply for battery charging.
Connect this camera and adaptor via USB cable, and connect adaptor to power supply to
charge the battery. In charging status, the status indicator will turn red. Once the battery is
fully charged, the status indicator will turn green.
Remark: When you recharge the body camera, please make sure it is OFF. Also, even you don’t use the
camera for a long time; please recharge it every 3 months.
Table of contents
Other Epcom Digital Camera manuals
Popular Digital Camera manuals by other brands
Teledyne
Teledyne Princeton Instruments Quad-RO System manual
Samsung
Samsung SCC-B1391 user manual
Samsung
Samsung L210 - Digital Camera - Compact quick start guide

Nikon
Nikon D7000 Guide
Nikon
Nikon COOLPIX S2550 user manual

United Vision Solutions
United Vision Solutions Eagle Vision EV-VS quick start guide
