Epic HD User manual

User’s Manual

2
OVERVIEW
| 4
LCD Menu Icons | 5
INITIAL SET UP | 6
Installing SD Memory Card | 6
Installing Batteries
| 8
“HOW TO” - INSTRUCTIONS | 9
Power ON/OFF | 9
Set the Video Resolution | 9
Shoot a Video | 9
Set the Camera Resolution | 10
Take Still Pictures
| 10
Delete Videos/Pictures | 10
SETTINGS | 11
Zooming In | 11
Adjusting Self-Timer | 11
SUB-SETTINGS
Adjusting Burst Mode | 11
Switch Viewpoints - Upside Down Camera Angle (180’)
| 12
Beep Tone | 12
TV-Out Mode | 12
Auto Power-Off Timer | 13

3
DOWNLOADING | 13
USB Connection | 13
Card Reader | 13
VIEWING LIVE VIDEO | 14
PC Live Mode | 14
TV Live Mode | 14
EPIC Viewer | 14
PLAYBACK MODE | 14
Playing back your videos and pictures | 14
MOUNTING OPTIONS | 15 - 16
WARRANTY / CONTACT INFO | 17
FCC COMPLIANCE | 18
*** IMPORTANT ***
Go to www.epicstealthcam.com to register your new camera. By doing this you will be kept up to date on all
the latest news as well as product updates and giveaways. Visit EPIC on Facebook, Twitter and Youtube.

4
OVERVIEW

5
LCD MENU ICONS
(Counter Display) (Video Mode / Resolution)
(Still Image / Resolution) (Burst Mode)
(View Point Mode) (Zoom/Battery)

6
INITIAL SET UP
INSTALLING SD MEMORY CARD
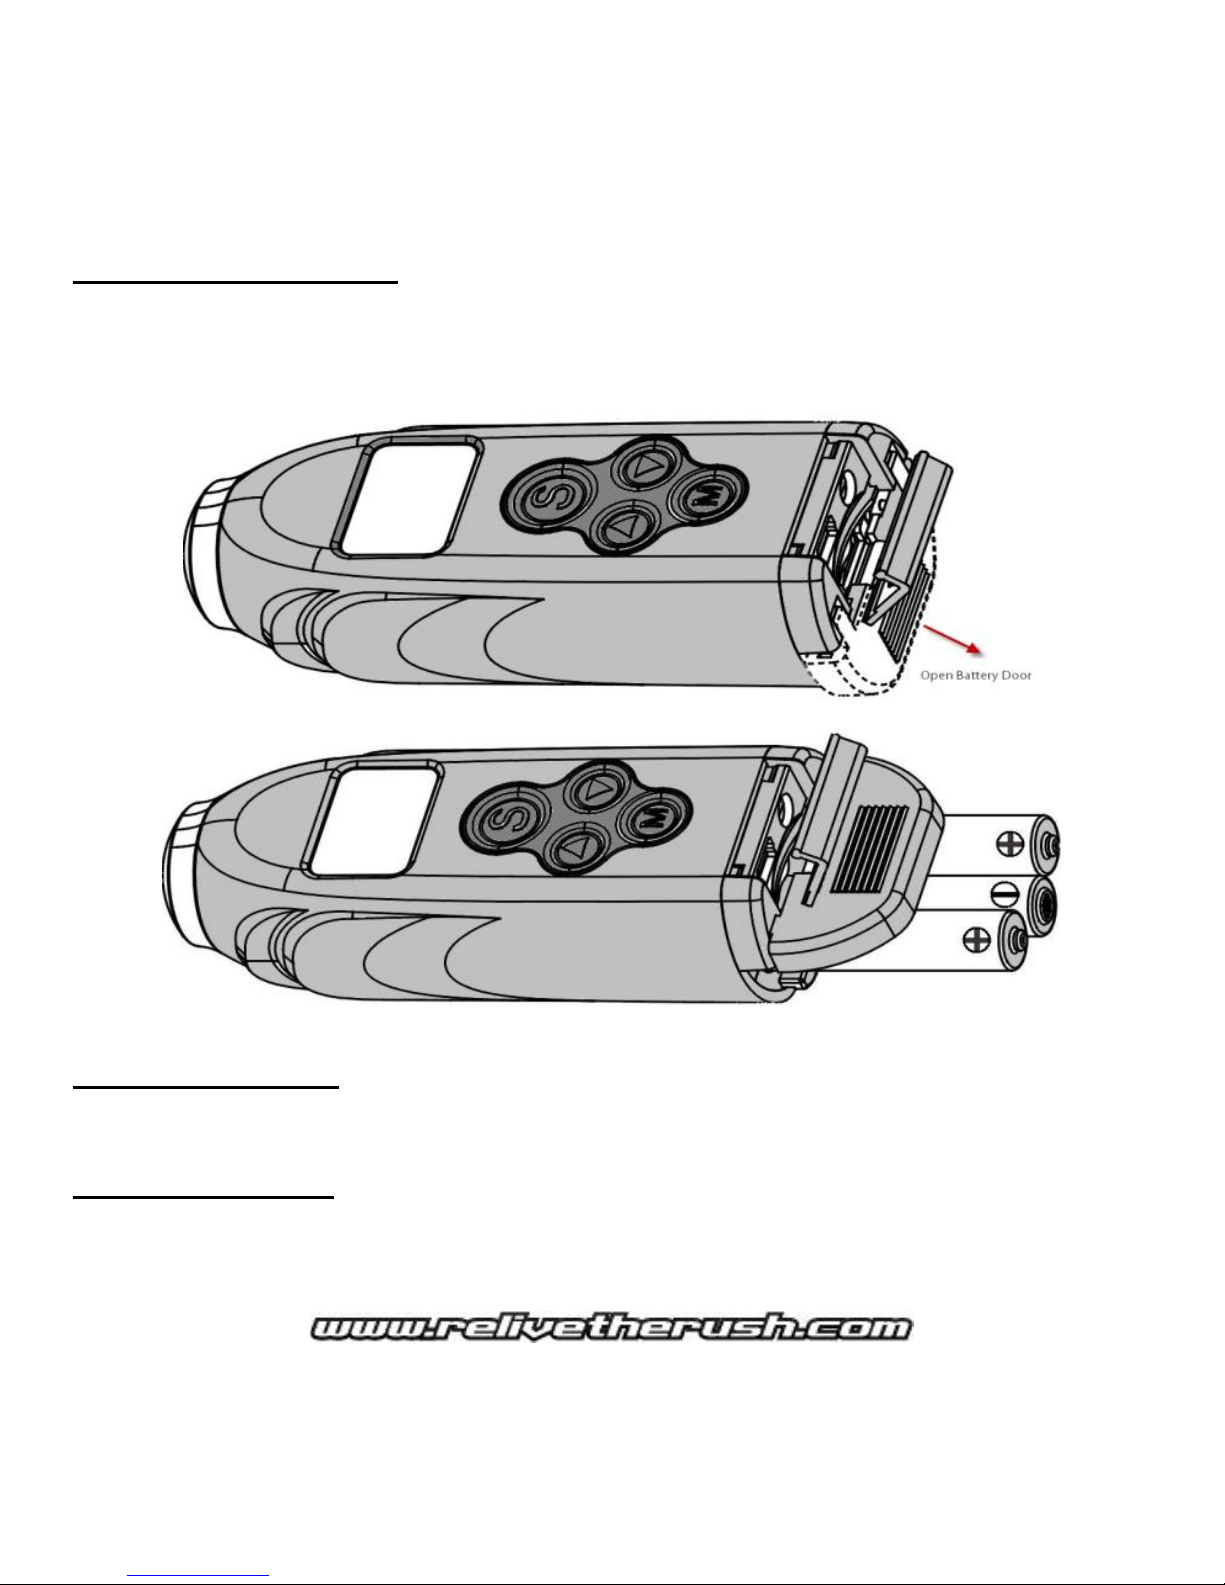
1. Make sure the camera is in the OFF position before adding or removing memory!
2. Push open the USB/TV/SD door located at the rear of the camera. (Figure 1.1)
3. Install a 2, 4, 8 or 16 GB SD memory card into the rear slot. Make sure memory card is firmly
seated into the camera by pushing the card until you hear a slight click. Then close the rear door.
(Figure 1.2)
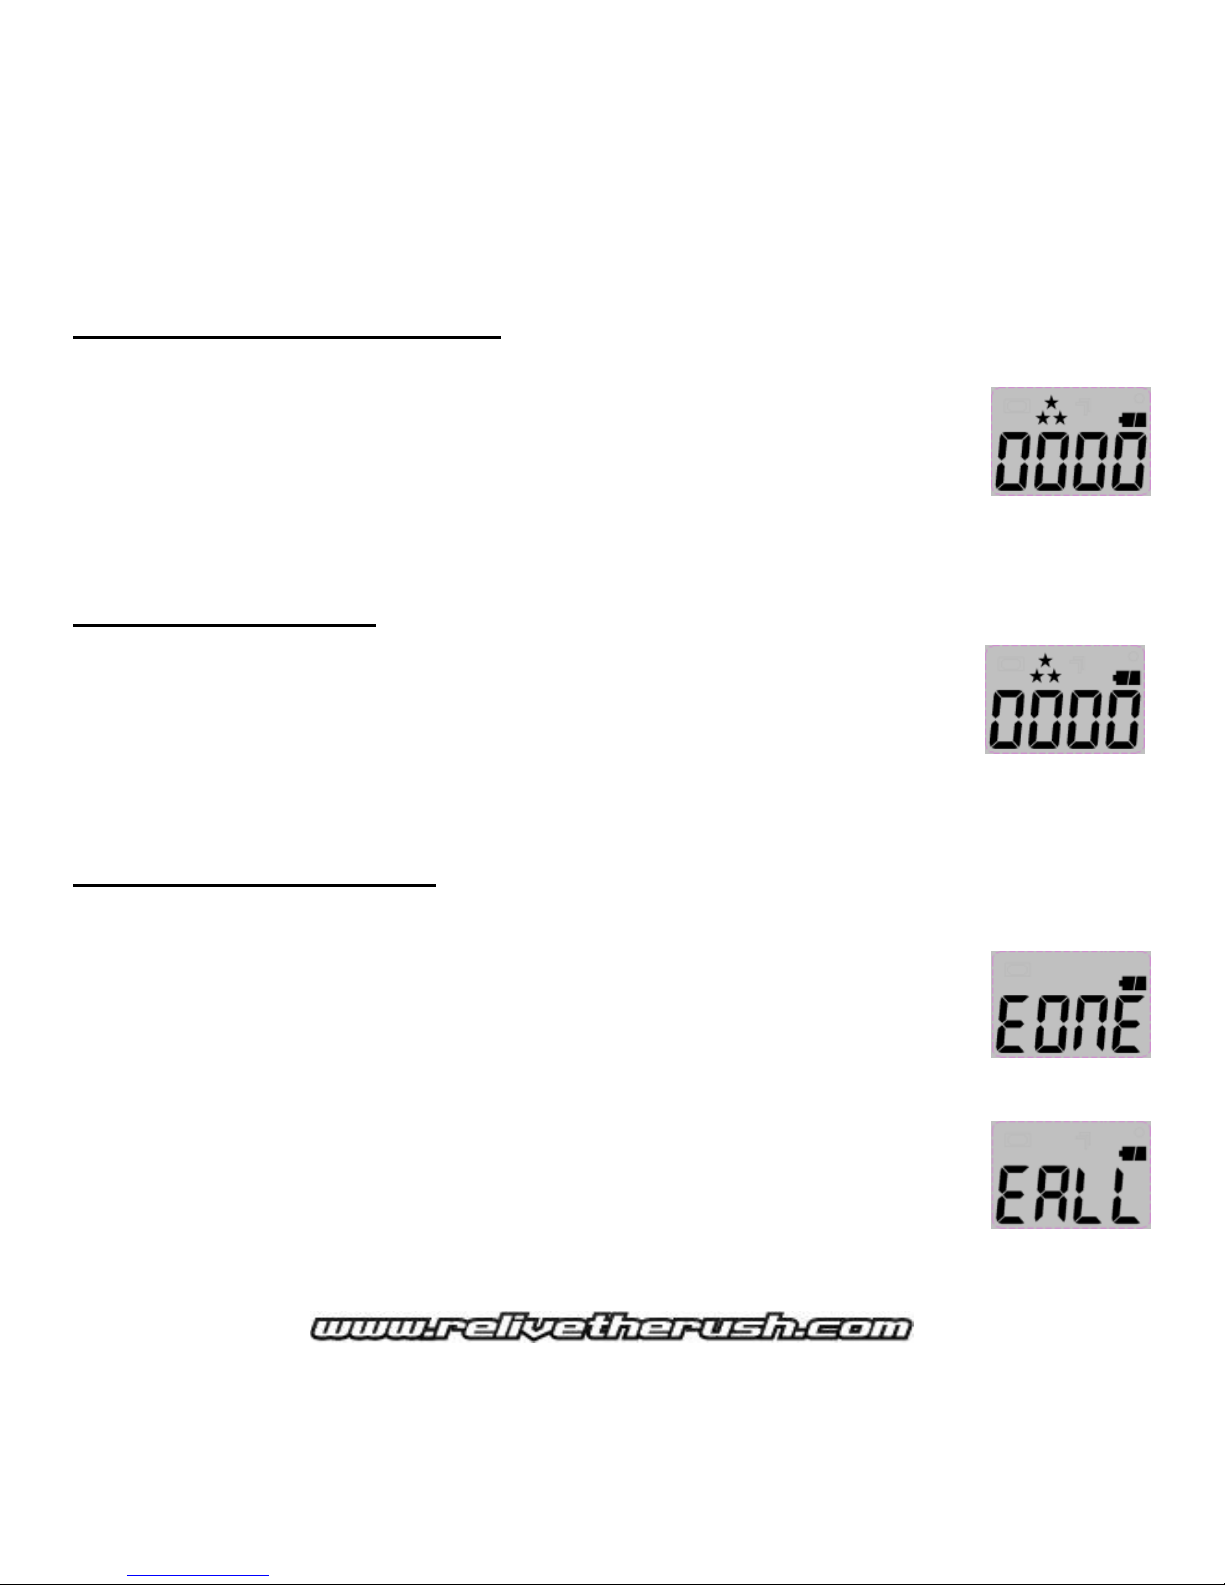
4. If “no” SD Memory card is inserted into the camera, the screen will show “NoSd” when you turn
on the camera.
In VIDEO MODE, press (S),the camera will take a video and save it to the built in Flash memory,
and the camera display will show the recording time from 0001 up. Pressing (S) again, the
camera will stop video capturing and the display will show the last QTY in .5 secs then back to
“NoSd”.
In STILL IMAGE MODE, press (S) to capture a still image that is also saved to the built in Flash
memory. Once capturing is done, the camera display will show the last captured QTY then back
to “NoSd.
5. SD memory cards must be clean (no images from other sources). If you are using the SD
memory card from other cameras, please make sure to format the SD memory card in your
computer prior to use in the camera. New cards are good to use straight from the package.
SD Memory card reads full: When memory card is full, the LCD screen will
display the word “FULL”. If you have the Beep tone set to ON, you will hear short
consecutive beeps for 30 seconds. At this point you can decide to either choice to
delete or download your files.

7
Figure 1.1
Figure 1.2

8
INSTALLING BATTERIES
1. Open the USB/TV/SD door located at the rear of the camera.
2. Push the BATTERY door down and outward. (Figure 2.1)
3. Insert batteries, then close the battery door first then close top door second. (Figure 2.2)
Figure 2.1
Figure 2.2
Helpful tip on batteries: To extend your recording time, EPIC highly recommends Energizer™
Lithium batteries for optimum performance.
NOTE: To save battery life, the camera will automatically shut down after 5 minutes of inactivity.
Low battery indication: When the batteries are low, the half battery icon will begin to flash
continuously along with a beep sound for 60 seconds. This is a warning to replace the batteries with
fresh ones, or the camera will power down automatically.

9
“HOW TO” - INSTRUCTIONS
POWER ON/OFF
To turn the EPIC ON, press the (M) button once.
To turn the EPIC OFF, press and hold the (M) button for 2 seconds.
NOTE: After the camera is turned off, you will need to wait 5 seconds before turning the EPIC back
on.
SET THE VIDEO RESOLUTION
Videos can be captured in three different resolutions. The default setting is HD
resolution.
1. Turn on the EPIC by pressing the (M) button once.
By default, the camera will be in the Video mode when it’s turned on.
2. Press the UP or DOWN arrow to change resolution.
Three stars for HI (HD-1280x720) / Two stars for MID (D1-720x480) / One star for LO (VGA-
640x480).
SHOOT A VIDEO
1. Turn on the EPIC by pressing the (M) button once.
2. Press (S) to start recording a video.
3. Press (S) again to stop recording.
During video recording, the LCD screen will show recording length in
seconds.
NOTE: The camera’s LCD display will show four dashes and the battery
(as shown) for a few seconds as you toggle between some Menus and
Settings.

10
SET THE CAMERA RESOLUTION
Images can be captured in three different resolutions. The default setting is HI resolution.
1. Turn on the EPIC by pressing the (M) button once.
2. Press (M) once again to enter Still Image mode.
The video icon will disappear from the top left of the LCD screen (as
shown).
3. Press the UP or DOWN arrow to change resolution.
Three stars for HI (8Mp) / Two Stars for MID (5Mp) / One star for LO (1.3Mp).
TAKE STILL PICTURES
1. Turn on the EPIC by pressing the (M) button once.
2. Press (M) again to enter Still Image mode (as shown).
The video icon will disappear in the top left of the LCD screen.
3. Press (S) to capture still image(s).
Number count will go up incrementally depending on your Burst Mode
settings.
DELETE VIDEOS/PICTURES
The EPIC allows you to delete some or all your videos or images on the camera.
(ERASE ONE)
1. Turn on the EPIC by pressing the (M) button once.
2. Press (M) until you see the word EONE (Erase One) on the screen.
3. Press (S) to delete only the last image or video recorded in memory.
4. Press (M) four times to return to VIDEO mode.
(ERASE ALL)
1. Press (M) until EONE appears on the screen.
2. Press the UP or DOWN arrow to select EALL (Erase All).
3. Press (S) to confirm and delete all images & videos out of memory.
4. Press (M) four times; wait a few seconds to exit back to VIDEO mode.

11
SETTINGS
ZOOMING IN
The EPIC also has the ability for 1X, 2X & 4X Zooming.
1. Turn on the EPIC by pressing the (M) button once.
2. Press (M) until the “Counter & Zoom/Battery” icons are on the far right (as
shown).
3. Press the UP or DOWN arrow to select which magnification you prefer.
4. Press (S) once to make your selection.
5. Press (M) twice; wait a few seconds to return to VIDEO mode.
ADJUSTING SELF-TIMER
This feature allows the delay and the tripping of a camera shutter so that the
photographer can be included in either the video or the photograph.
1. Turn on the EPIC by pressing the (M) button once.
2. Press (M) until you see “St #” (as shown).
3. Press the UP or DOWN arrow to select OFF, (St 10) 10 secs, (St 30) 30 secs.
4. Press (S) once to make your selection.
5. Press (M) once; wait a few seconds to return to VIDEO mode.
SUB-SETTINGS
ADJUSTING BURST MODE
This feature allows you to take multiple still image exposures.
1. Turn on the EPIC by pressing the (M) button once.
2. Press (M) until you see the word “SEt” then press (S).
3. Press (S) again to enter the Burst mode (as shown).
4. Press the UP or DOWN arrow to select the resolution.
5. Select the number of images (1-9) for sequential action shots.
6. Press (S) to save your setting.
7. Press (M) twice; wait a few seconds to exit back to VIDEO mode.
To start shooting pictures, simply press the (S) button and the camera will shoot images based on
your programmed setting.

12
SWITCH VIEW POINTS - UPSIDE DOWN CAMERA ANGLE (180’)
This feature allows you to rotate the camera angle 180’ degrees in case you require
mounting the camera upside down.
1. Turn on the EPIC by pressing the (M) button once.
2. Press (M) until you see the word “SEt” then press (S).
3. Press the DOWN arrow until you see “FLIP” (as shown).
4. Press (S) to enter the FLIP mode.
5. Press the UP or DOWN arrow to select ON or OFF.
6. Press (S) to save your setting. Once saved, you will see the View Point icon.
7. Press (M) twice; wait a few seconds to return to VIDEO mode.
BEEP TONE
Beep (on/off) setting allows the user the option of turning on or off the beep sound when pressing
buttons.
1. Turn on the EPIC by pressing the (M) button once.
2. Press (M) until you see the word “SEt” then press (S).
3. Press the DOWN arrow until you see “bEEP” (as shown).
4. Press (S) to enter the BEEP mode.
5. Press the UP or DOWN arrow to select ON or OFF.
6. Press (S) to save your setting.
7. Press (M) twice; wait a few seconds to exit back to VIDEO mode.
NOTE: If beep tone is set to OFF, you will only hear the tone when entering beep tone setting, or
when the battery is low.
TV-OUT MODE - (Default mode –NTSC)
This feature allows you to choose either NTSC or PAL television/video output.
NTSC - is the analog television system used in most of the Americas. PAL-is the
analogue television encoding system used in large parts of the world outside the
Americas.
1. Turn on the EPIC by pressing the (M) button once.
2. Press (M) until you see the word “SEt” then press (S).
3. Press the DOWN arrow until you see “tu” (as shown).
4. Press (S) to enter the TV mode.
5. Press the UP or DOWN arrow to select (tv-P) PAL or (tv-N)
NTSC.
6. Press (S) to save your setting.

13
7. Press (M) twice; wait a few seconds to exit back to VIDEO mode.
AUTO POWER-OFF TIMER
This feature allows you to either turn off the auto power or set the time the camera turns itself off.
1. Turn on the EPIC by pressing the (M) button once.
2. Press (M) until you see the word “SEt” then press (S).
3. Press the DOWN arrow until you see “AoFF”(as shown).
4. Press (S) to enter the AUTO POWER-OFF mode.
5. Press the UP or DOWN arrow to select OFF, (oFF3) 3 minutes, (oFF5) 5
minutes.
6. Press (S) to save your setting.
7. Press (M) twice; wait a few seconds to exit back to VIDEO mode.
DOWNLOADING
There are two simple ways to download your video or images to your personal computer.
USB Connection
MSDC mode: When EPIC is powered OFF, connect the camera to PC/Mac via USB
cable; the camera will go into MSDC mode for the PC/Mac to access the captured
image/video from the SD memory card inside the camera. The camera display will
show USb.
Your computer should recognize the EPIC as a USB mass storage device. Simply drag & drop the
images or videos to the desired destination folder on your computer.
Note to MAC users: iPhoto™ will launch when the EPIC is plugged in. You may download the
images and video directly into iPhoto™.
Card Reader
Another option for downloading is to remove the SD memory card from the camera and insert into a
USB SD card reader.
Your computer should recognize the SD memory card as a USB mass storage device. Simply drag &
drop the images or videos to the desired destination folder on your computer.

14
VIEWING LIVE VIDEO
The EPIC has the unique ability for you to view live video. There are several ways to actually
accomplish this, either through your PC, TV or EPIC Viewer (Coming Soon).
PC LIVE MODE
Power ON the EPIC, connect the camera to the PC by the supplied USB cable. The
camera will automatically enter PC Live mode to display live viewing on PC. The
camera display will show PCC (as shown).
TV LIVE MODE
Power ON the EPIC, connect the camera to the TV via an AV cable (sold separately). The camera will
automatically enter TV Live mode to display live viewing on TV. The camera display will show TV-P or
TV-N depending on the user setting. (Default mode –NTSC)
NTSC - is the analog television encoding system used in most of the Americas.
PAL –is the analogue television encoding system used in large parts of the world outside the
Americas.
EPIC VIEWER –SOLD SEPERATELY
The new EPIC viewer will allow customers to both view live video or playback videos and images right
in the palm of your hand.
For more information on the EPIC Viewer, please visit our website at www.relivetherush.com.
PLAYBACK VIEWING MODE
The EPIC allows you to playback either the videos you’ve captured or the still images you’ve taken
and display them onto your TV or optional EPIC Viewer (Coming Soon).
1. Power OFF the EPIC, connect the camera to the TV via an AV Cable (sold separately). Then
power ON the camera to enter playback mode. The camera display will show TV-P or TV-N per
user setting.
2. Press UP or DOWN arrow to play back the captured still image. For video file, press (S) to start
playing the video. Press (S) again to stop playing.

15
MOUNTING OPTIONS
The EPIC’s ultra light weight and compact size makes it ideal for all kinds of action. We have provided
you with some basic mounts to help get you started.
All the EPIC mounting accessories utilize a quick clip device that allows the camera to be easily
changed between mounting accessories.
Depending on the kit you purchased, your EPIC may or may not include the following mounts.
Strap Mount –perfect for mounting to helmets with vents, wear on your wrist or just about anywhere
you can think of, strap on the EPIC and catch all the action.
Waterproof Housing –while EPIC is splash resistant, the Waterproof case is a must for any extreme
wet applications. This housing makes the EPIC completely waterproof down to 20 feet! Note: You
must remove the protective film on both side of the lens cover inside the waterproof housing
prior to using under water.
Clip Mount –easily clip to the brim of a hat or the visor of your vehicle.
Bar Mount –whether it’s the cross bars of your ATV, or the handle bars of your mountain bike, this
tube mount will accommodate bars between ½” to 2” in diameter.
Tree Screw –while high in a tree stand or low in a blind, simply screw into any tree branch or trunk at
the desired height to capture your line of view.
Shock resistant saddle –want a little extra padding or just don’t want to use any of the provided
mounting accessories? This dense foam pad used with a simple strap will help you mount the EPIC
and absorb vibrations.
Elbow Joint –With three adjustable wheel hinges, you can capture almost any point of view angle
without any obstruction.
Suction cup –Heavy duty RAM Suction Cup design offers a secure lock mount for contoured or flat
surfaces such as moto helmets and fuel tanks.

16
Curve mount –Permanent 3MTM VHBTM adhesive labels adhere to the underside base of our
universal quick clip. Ideal for helmets of any size or material finish.
Surface Preparation for Curve Mount:
1. Use rubbing alcohol to clean the mounting surface.
2. Wipe dry the surface.
3. Remove adhesive protective label.
4. Apply your mount to surface.
5. Press and hold for sixty seconds to allow adhesive to bond to the surface.
6. Bond strength will increase through time. At room temperature, wait for at least 24 hours
to achieve 90% bonding strength, and 72 hours for 100% bonding strength.
For more details, please visit 3MTM website, under 3MTM VHBTM tapes technical data section or follow
this link: http://solutions.3m.com/wps/portal/3M/en_US/VHB/Tapes/Document-Center/Technical-Data/
and down load PDF file: Surface Preparation for 3M™ VHB™ Tape Applications.
NOTE: To see how to properly install all mounts, please click on www.epicstealthcam.com/mountings.
To purchase additional mounts, go to www.epicstealthcam.com or call toll free: 877-269-8490

17
WARRANTY / CONTACT INFO
The EPIC is covered by a one year limited warranty on parts and labor
from the date of original purchase and purchases must be made
through an authorized dealer. The warranty covers defects in
workmanship and materials. The warranty does not apply to cameras
which have been damaged or abused intentionally or unintentionally. A
purchase from individuals or unauthorized internet sites such as eBay
voids the warranty.
Tampering with or altering the camera will also void the warranty. Any
unauthorized service will void the warranty. Original sales receipt must
be produced for any warranty service, and a Return Authorization (RA)
number must be obtained from customer service at 877-269-8490 prior
to returning product.
Contact Info:
By email
info@epicstealthcam.com
www.epicstealthcam.com
By phone
Toll Free 877-269-8490
By mail
Stealth Cam, LLC
P.O. Box 539504
Grand Prairie, TX 75053-9504
US Patent D592, 231
Caution:
Modification not approved by the party responsible for compliance could void
user’s warranty agreement.

18
FCC COMPLIANCE
This equipment has been tested and found to comply with the limits for
Class B digital device, pursuant to part 15 of the FCC Rules. These
limits are designed to provide reasonable protection against harmful
interference in a residential installation. This equipment generates
uses and can radiate radio frequency energy and, if not installed and
used in accordance with the instructions, may cause harmful
interference to radio or television receptions, which can be determined
by turning the equipment off and on, the user is encouraged to try to
correct the interference by one or more of the following measure:
Reorient or relocate the receiving antenna.
Increase the separation between the equipment and the receiver.
Connect the equipment into an outlet on a circuit different from that
to which the receiver is connected.
Consult the dealer or an experienced radio/TV technician for help.
Product Specifications are subject to change. Stealth Cam is not responsible for any photographic or typographical
errors. You Tube is a registered trademark of Google, Inc.

19
Quick Start Guide
STEP 1: Install Batteries & SD Memory Card.
STEP 2: Press the (M) button to power on your EPIC.
STEP 3: Once the LCD screen turns on, press the (S)
button to begin recording video. Press (S) again to stop
recording.
STEP 4: Press and hold the (M) button to power off your
EPIC.
For more details on additional EPIC features please consult the complete User’s
Manual.
Need Help? Call toll free at 877-269-5490
Table of contents
Other Epic Action Camera manuals