Equip 128573 User manual

Manual
www.equip-info.net
USB 2.0 VGA LAN DOCK
english

Manual_Page 2
www.equip-info.net
Contents
1.0 INTRODUCTION ________________________________________________________________________________3
2.0 FEATURES AND SPECIFICATIONS ____________________________________________________3
3.0 SYSTEM REQUIREMENTS _____________________________________________________
___________3
4.0 PACKAGE CONTENTS ____________________________________________________________________4
5.0 CONNECTORS ________________________________________________________________________________4
6.0 AVAILABLE FUNCTIONS ____________________________________________________________________5
7.0 LED INDICATOR ________________________________________________________________________________5
8.0 INSTALLING USB 2.0 VGA LAN DOCK ____________________________________________6
9.0 DRIVER INSTALLATION _____________
_______________________________________________________6
9.1 Win98/98SE Driver Installation ____________________________________________________________6
9.2 WinME Driver Installation ________________________________________________________________15
9.3 Win2000 Driver Installation ____________________________________________________________18
9.4 WinXP Driver Installation ________________________________________________________________21
9.5 WinVista Driver Installation ____________________________________________________________23
10.0 THINGS YOU NEED TO KNOW ________________________________________________________27
11.0 SET UP THE PRINTER DEVICE ________________________________________________________29
11.1 For Windows 98/SE/ME ________________________________________________________________29
11.2 For Windows 2000/XP/Vista ____________________________________________________________31
12.0 SET UP THE HYPERTERMINAL WITH USB TO SERIAL PORT ________32
13.0 UNINSTALLING USB 2.0 VGA LAN DOCK ________________________________________33
13.1 REMOVE THE DEVICE ____________________________________________________________________33
14.0 UNINSTALL THE DRIVER ________________________________________________________________33
14.1 For Windows 98/SE/ME ________________________________________________________________34
14.2 For Windows 2000/XP ____________________________________________________________________35
14.3 For Windows Vista ________________________________________________________________________35
15.0 TROUBLE SHOOTING ____________________________________________________________________37
16.0 APPLICATION NOTE ________________________________________________________________________38

Manual_Page 3
www.equip-info.net
1. Instruction
Thank you for ordering the USB 2.0 VGA LAN DOCK. The USB 2.0 VGA LAN DOCK is an
intelligent expansion module, which connects to a PC or notebook via Universal Serial Bus
(USB) port and VGA output port, providing one high-speed RS-232 serial port, one printer
port, one PS/2 keyboard & mouse, 3 downstream USB 2.0 ports and one Ethernet access
and one extending VGA display output port. The USB 2.0 VGA LAN DOCK features easy
connectivity for traditional serial devices, keyboard, mouse and other USB devices and
provides up to 480Mbps USB 2.0 High Speed capability. Also add one extra USB Ethernet
adapter and extra VGA display to your PC or notebook in seconds.
2.0 Features and Specifications
• One high-speed serial port, one printer port, one PS/2 keyboard & mouse, three USB
2.0 High Speed downstream ports, one USB Ethernet adapter and one VGA port to your
PC or notebook.
• Improve the inconvenience of configuring old PC solutions like card extension solutions,
which require adjusting IRQ or jumper settings and the incompatibility of various
brands of docking solutions or bus repeaters.
• Avoid the hassle of removing your PC case, or rebooting the operating system during
installation.
• Built-in 10/100Mbps Fast-Ethernet and IEEE802.3x flow control function for 100BASE-
TX and 10BASE-T.
• Complies with USB specifications 2.0 (and under), with IEEE802.3u 100BASE-TX and
with IEEE802.3 10BASE-T standards.
• Complies an extra VGA output, can easily connect a larger monitor to your notebook
and give you a comfortable working environment.
• Supports bus power or external power.
• Supports Windows 98/98SE/ME/2000/XP/Vista
3.0 System Requirements
1. A PC with Pentium series, equivalent, or above.
2. A minimum of 16M bytes of RAM.
3. One available USB type A downstream port (UHCI, OHCI, or EHCI).
4. Windows 98 or later.

Manual_Page 4
www.equip-info.net
4.0 Package Contents
The product you purchased should contain the equipment and accessories shown as fol-
lows:
1. USB 2.0 VGA LAN DOCK.
2. One 6” VGA/USB combo Y cable.
3. One 2A-5V switching power adapter.
4. One CD with driver and user’s manual.
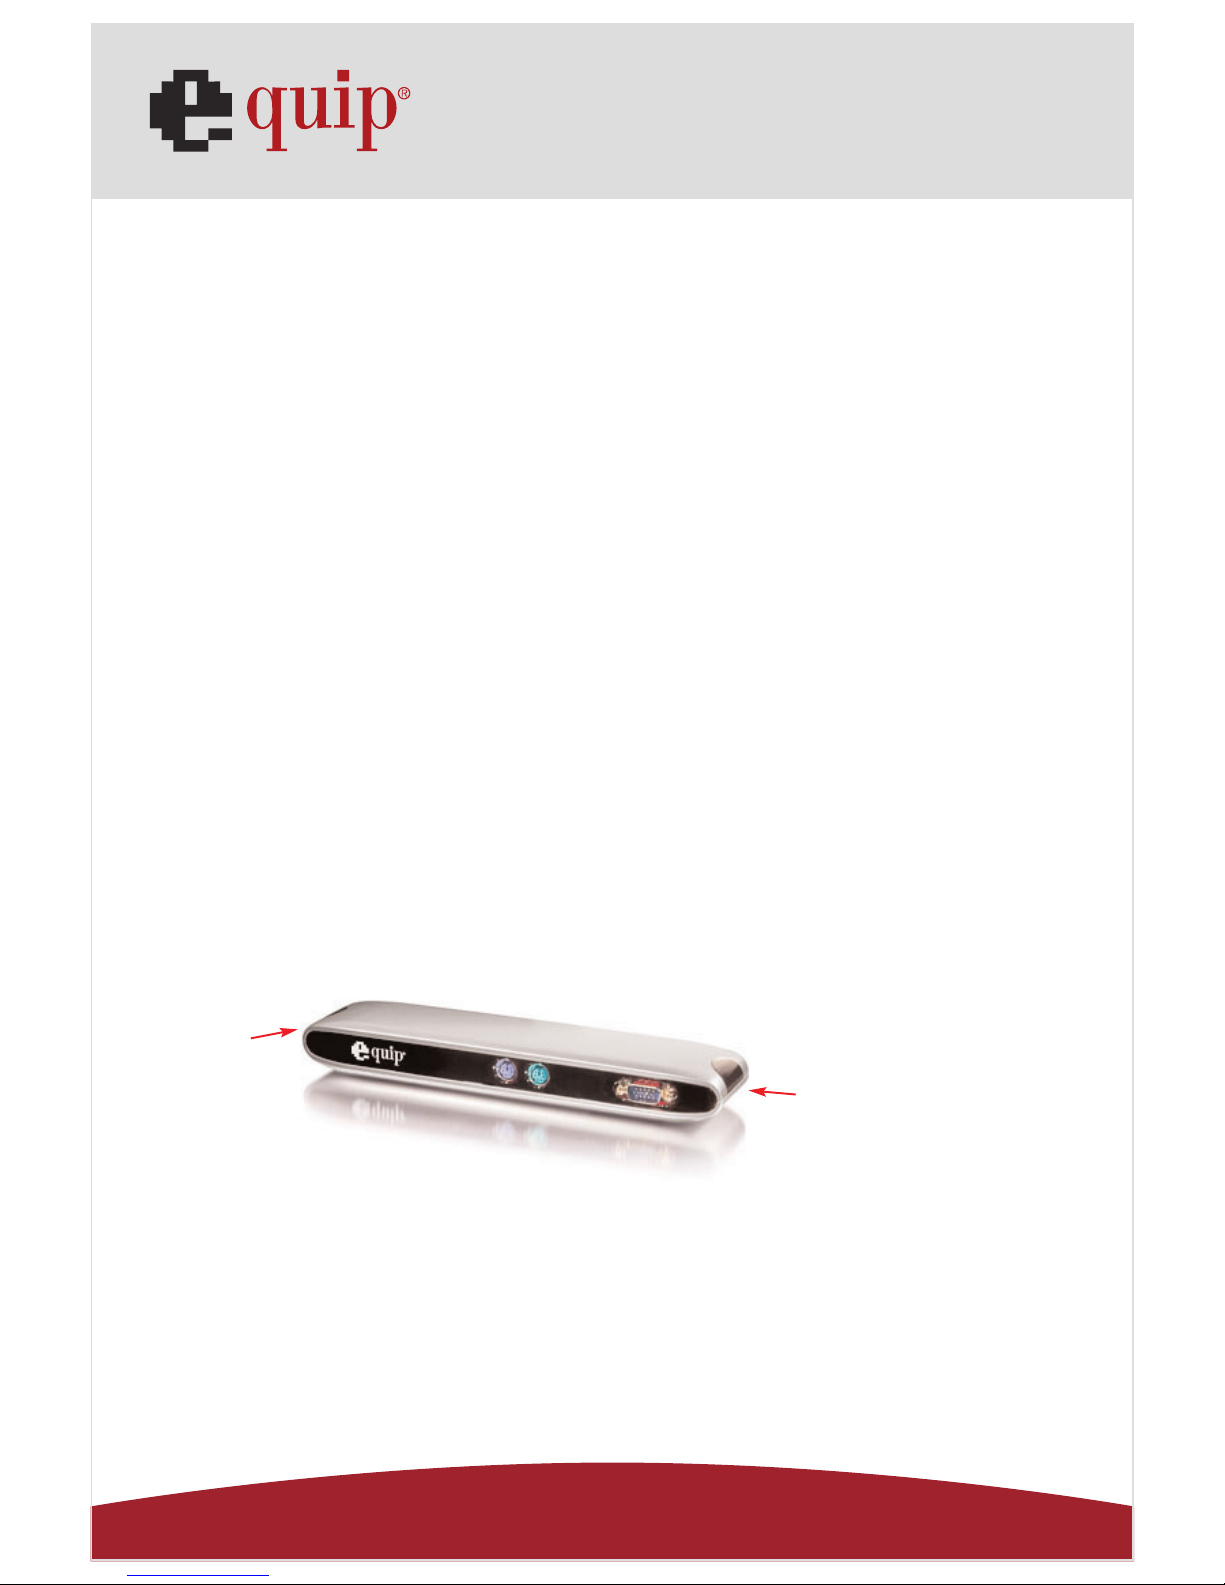
5.0 Connectors (Ref. Fig.1.1 , Fig.1.2)
1. One DB-9 RS-232 serial interface connector supports baud rates from 4800 to 115.2K.
2. One DB-25 parallel connector supports IEEE-1284 bi-directional printer port.
3. Two mini-din PS/2 ports for keyboard, mouse.
4. Three USB receptacles type A downstream ports.
5. One male and one female DB-15 VGA connectors.
6. One RJ45 10/100T base Ethernet connector.
7. One power connector
Fig. 1.1
PS/2 Keyboard PS/2 Mouse VGA in
Fig. 1.2
USB 2.0 Downstream Printer Port Serial Port RJ45 Ethernet
VGA out
Power Connector
Manual_Page 5
www.equip-info.net
6.0 Available functions.
The available functions of USB 2.0 VGA LAN DOCK depend on the status of power sup-
plied:
• Bus powered
1. Connect the USB/VGA combo Y cable to your PC to provide bus power.
2. When you provide bus power only, the PS/2 mouse & keyboard, RS232, printer and
USB Ethernet adapter will be enabled. However, the USB2.0 Downstream Ports can
also work under low power mode. So used of external power adaptor is recommen-
ded. (For the use of all functions)
• Externally powered
1. Connect the power adapter to provide external power.
2. When you provide external power, the USB Downstream Ports can support all USB
devices, and you can use all the functions of USB 2.0 VGA LAN DOCK.
7.0 LED Indicator (Ref. Fig.2)
• Power Indicator
The Power Indicator will turn RED as either bus power or external power is supplied,
even both of them supplied.
• LAN Indicator
1. Link/Act (RED): This LED turns on if the 10/100Mbps (100BASE-TX)
Ethernet is connected.
2.Transmission (RED): Blinking to indicate that the data is being received or transmitted
through the RJ-45 port.
LAN Indicator
Power Indicator
Fig. 2

Manual_Page 6
www.equip-info.net
8.0 Installing USB 2.0 VGA LAN DOCK
1. This installation guide is written in accordance with different operation systems,
including Windows 98/98SE/ME, Windows 2000/XP/Vista.
2. Power on your computer and make sure that the USB & VGA ports are enabled and
working properly.
3. Put CD into CD-ROM drive of PC or Notebook.
4. Connect the power adapter into USB 2.0 VGA LAN DOCK. (For full functions)
5. Connect USB 2.0 VGA LAN DOCK to the USB and VGA port on your computer with the
VGA/USB combo Y cable provided. ( as Fig.3)
6. Windows will start detecting USB devices. Please follow the related section to install
your USB 2.0 VGA LAN DOCK.
Fig. 3
9.0 Driver Installation
9.1 Win98/98SE Driver Installation
The driver installation is divided into A to F six-steps. Please install USB 2.0 VGA LAN
DOCK under Win98/SE step by step by the following instructions:
A. USB Hub Installation
Fig. Win98-A1
A1. Please insert the “Windows
98” CD into your CD-ROM drive
and press “Next” to continue.
(Ref. Fig. Win98-A1)
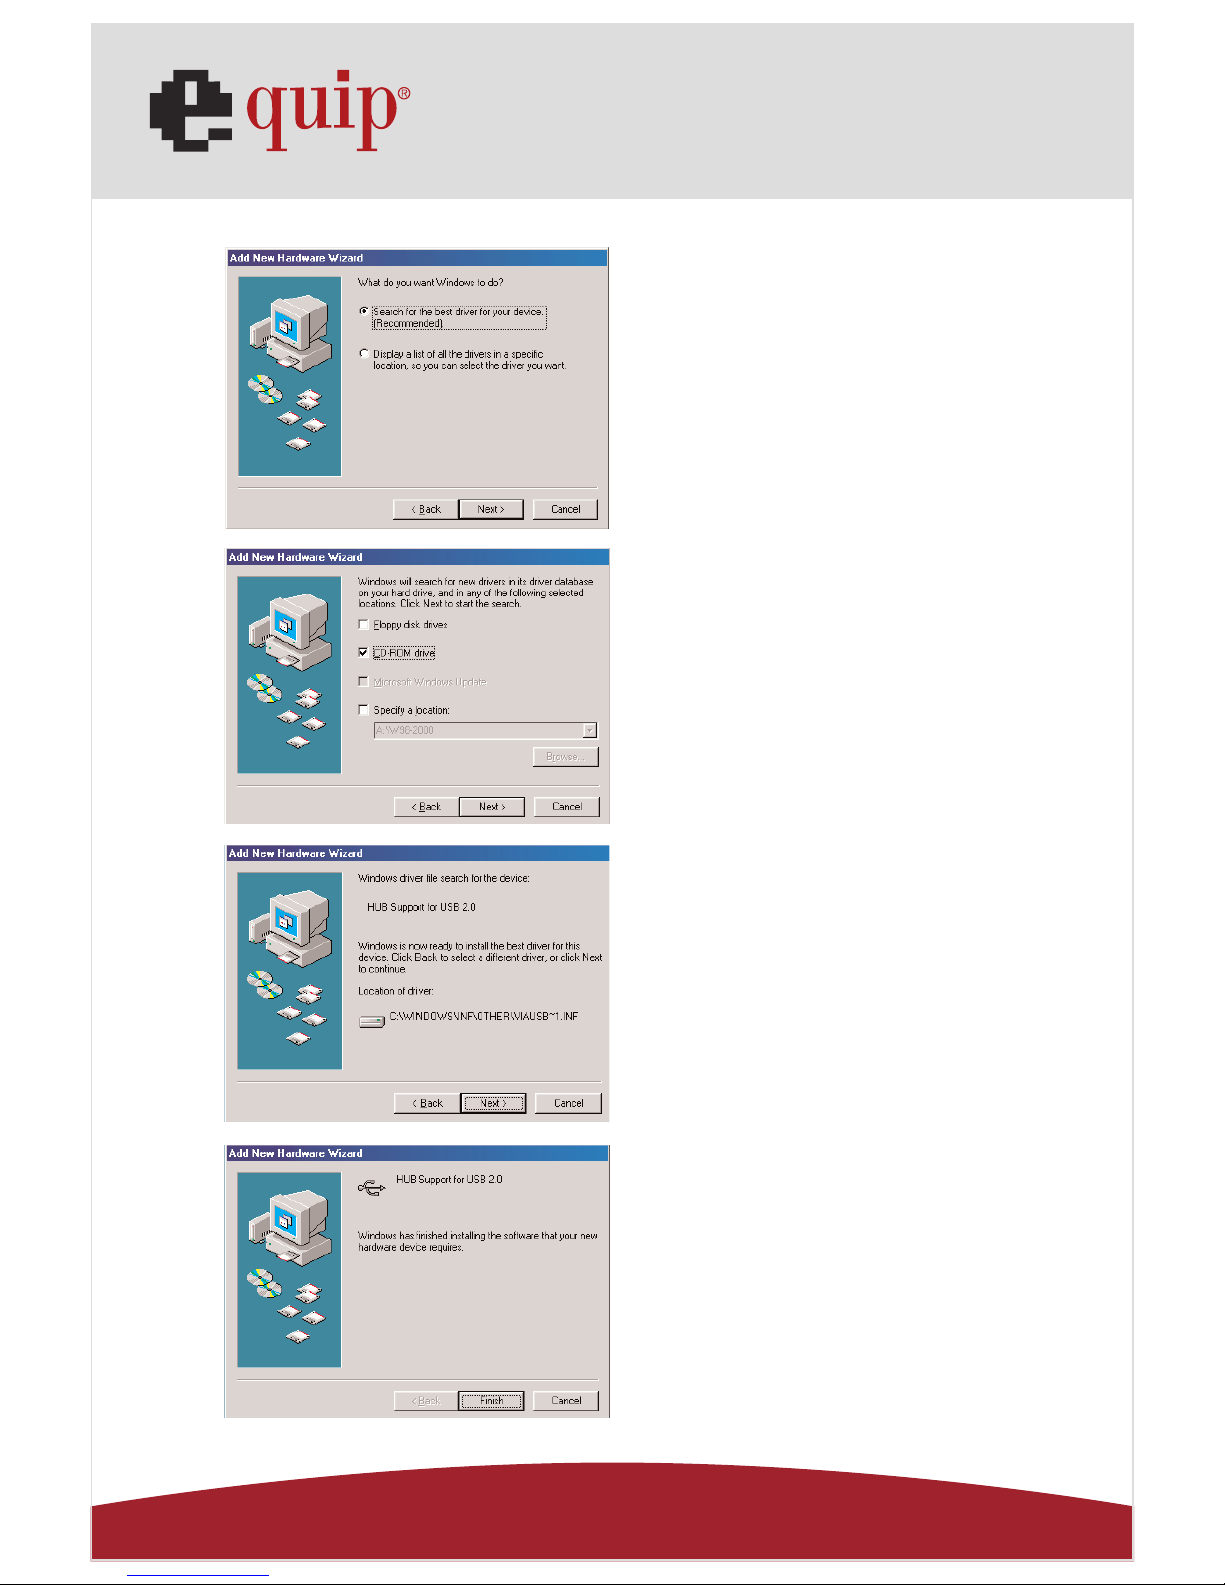
Manual_Page 7
www.equip-info.net
Fig. Win98-A2
Fig. Win98-A3
Fig. Win98-A4
Fig. Win98-A5
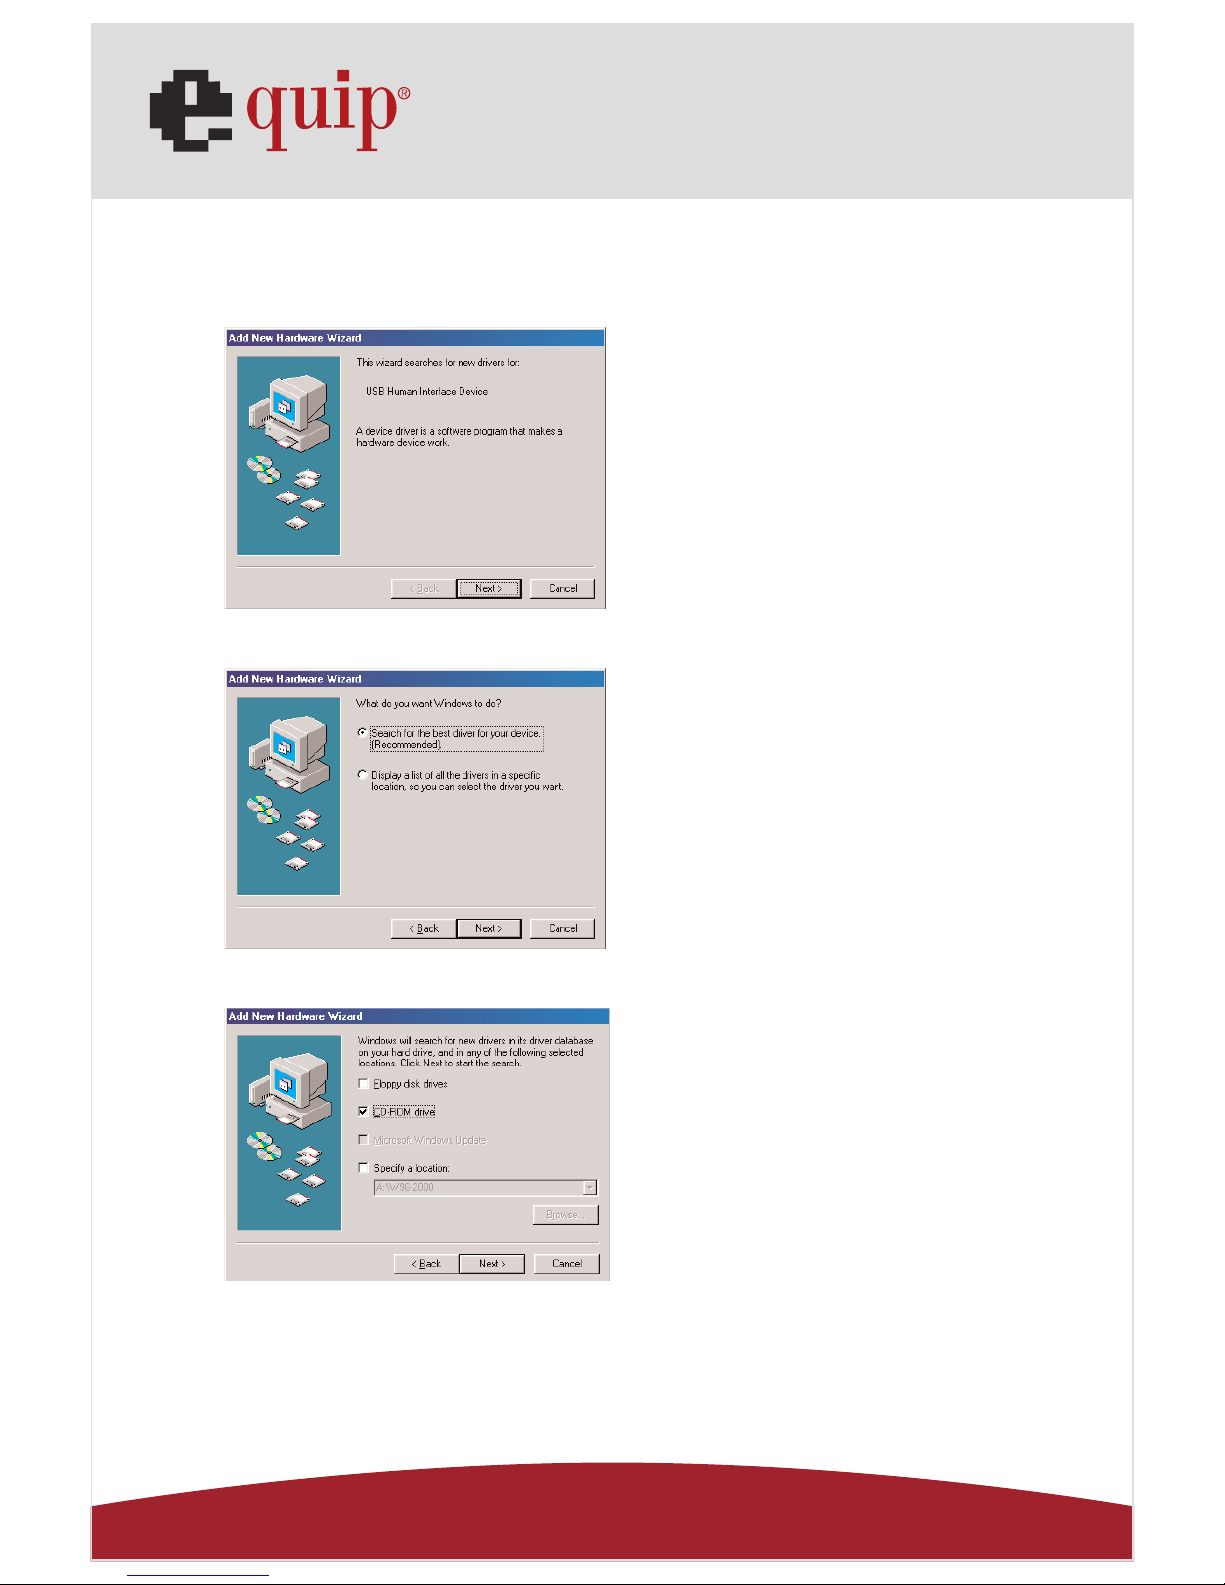
A2. Tick “Search for the best
driver for your device” and press
“Next” to continue.
(Ref. Fig. Win98-A2)
A3. Tick “CD-ROM drive” and
press “Next” to start the sear-
ching process.
(Ref. Fig. Win98-A3)
A4. Press “Next” to start the
installation process.
(Ref Fig. Win98-A4)
A5. Press “Finish” to complete the
installation of USB HUB.
(Ref Fig. Win98-A5)
Manual_Page 8
www.equip-info.net
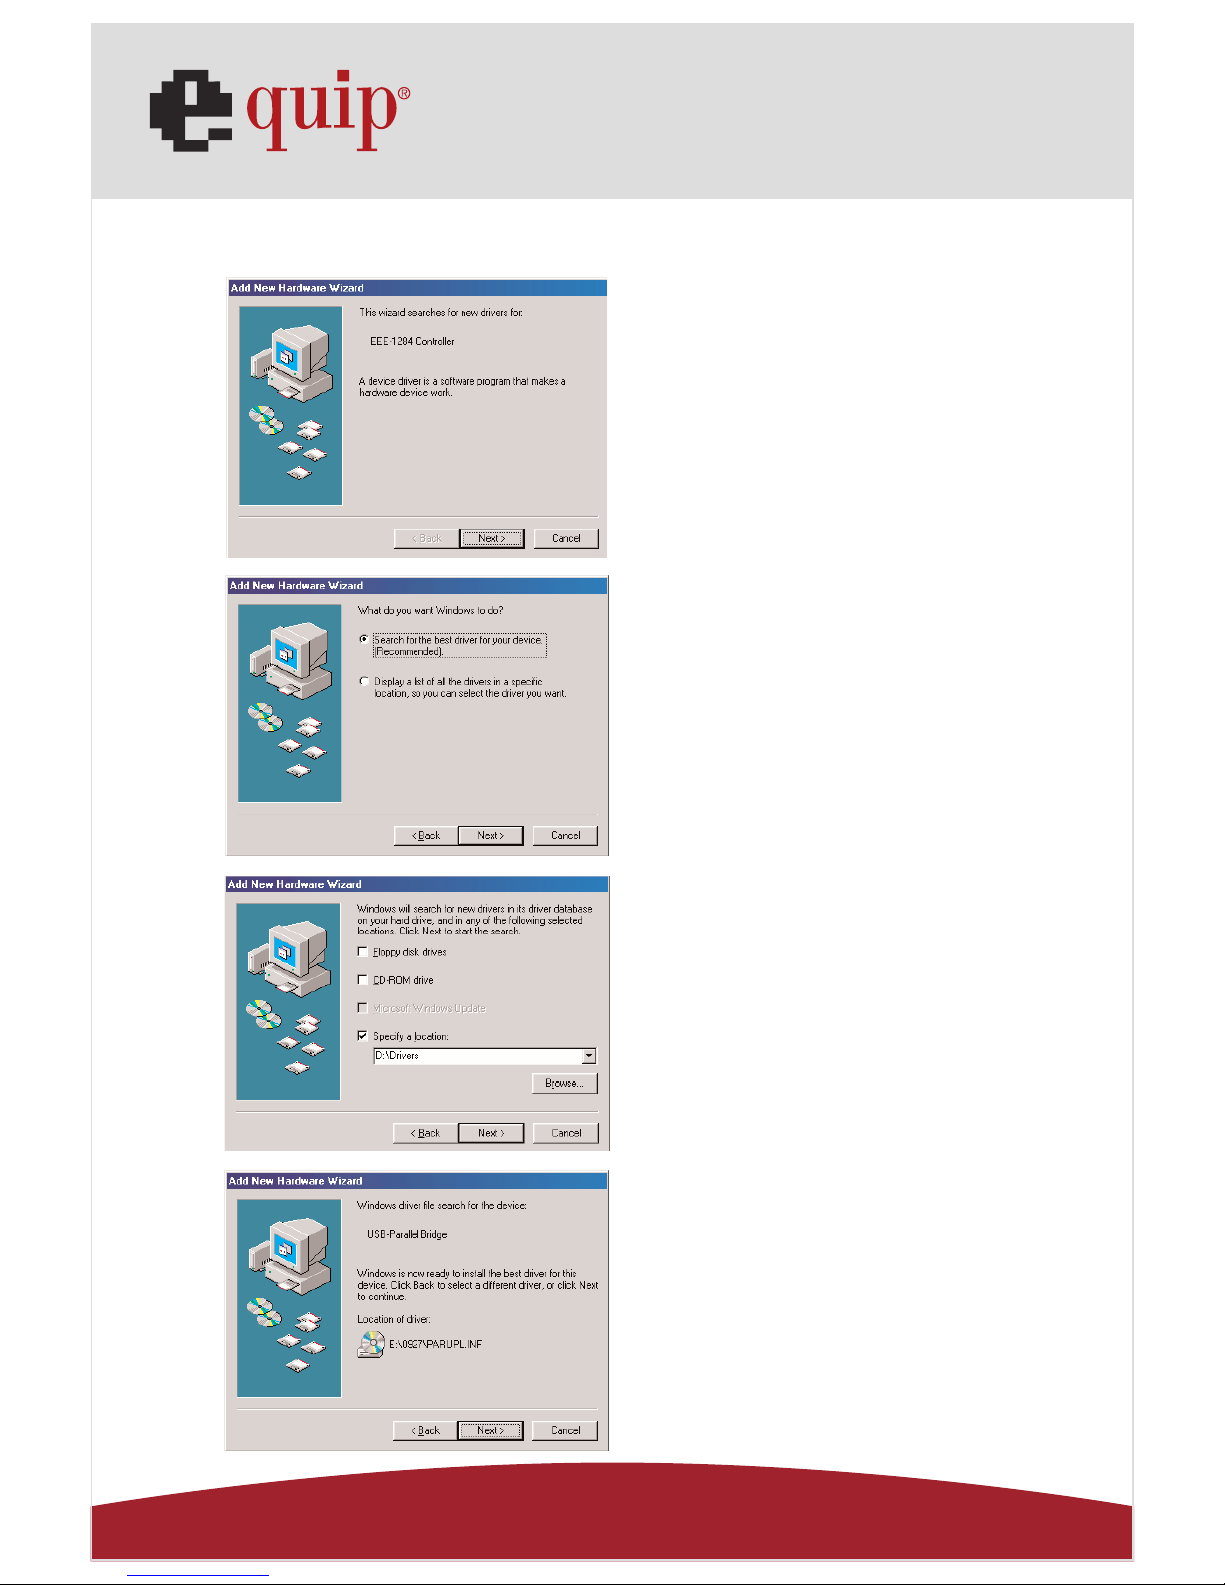
B. IEEE-1284 Controller Installation
Fig. Win98-B1
Fig. Win98-B2
Fig. Win98-B3
Fig. Win98-B4
B1. Please insert the “USB 2.0
VGA LAN DOCK” CD into your CD-
ROM drive and press “Next” to
continue.
(Ref. Fig. Win98-B1)
B2. Tick “Search for the best
driver for your device” and press
“Next” to continue.
(Ref. Fig. Win98-B2).
B4. Press “Next” to start the
installation process.
(Ref. Fig. Win98-B4)
B3. Tick “Specify a location” and
click “Browse” to select the loca-
tion of the driver folder in the
“USB 2.0 VGA LAN DOCK” CD.
Press “Next” to start the sear-
ching process.
(Ref. Fig. Win98-B3).

Manual_Page 9
www.equip-info.net
Fig. Win98-B5
C. USB to Serial Port Installation
Fig. Win98-C1
Fig. Win98-C2
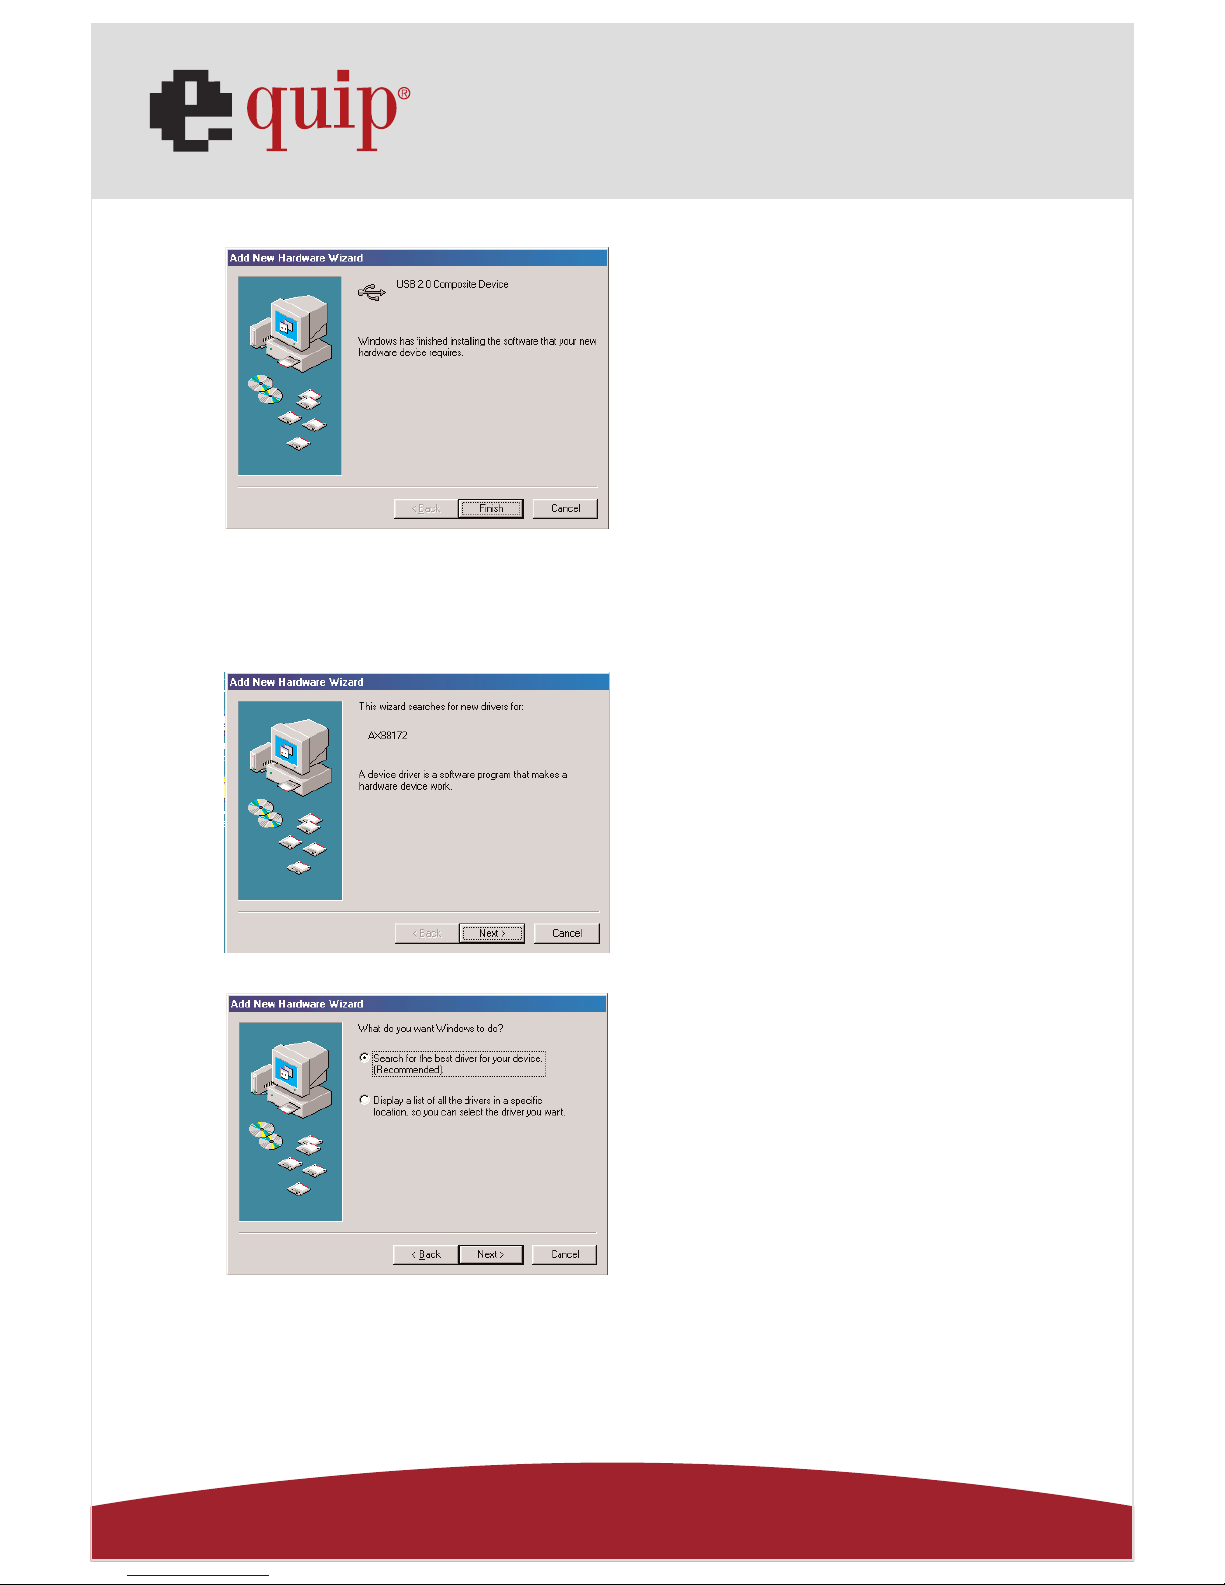
B5. Press “Finish” to complete the
installation of USB-to-Parallel
Port.
(Ref. Fig. Win98-B5)
C1. Please insert the “USB 2.0
VGA LAN DOCK” CD into your CD-
ROM drive and press “Next” to
continue.
(Ref. Fig. Win98-C1)
C2. Tick “Search for the best
driver for your device” and press
“Next” to continue.
(Ref. Fig. Win98-C2)

Manual_Page 10
www.equip-info.net
Fig. Win98-C3
Fig. Win98-C4
Fig. Win98-C5
C3. Tick “Specify a location” and
click “Browse” to select the loca-
tion of the driver folder in the
“USB 2.0 VGA LAN DOCK” CD.
Click “Next” to start the searching
process.
(Ref. Fig. Win98-C3)
C4. Press “Next” to start the
installation process.
(Ref. Fig. Win98-C4)
C5. Press “Finish” to complete the
installation of USB-to-Serial Port.
(Ref. Fig. Win98-C5)

Manual_Page 11
www.equip-info.net
D. USB Composite Device Installation
Fig. Win98-D1
Fig. Win98-D2
Fig. Win98-D3
Fig. Win98-D4
D1. Please insert the “Windows
98” CD into your CD-ROM drive
and press “Next” to continue
(Ref. Fig. Win98-D1)
D2. Tick “Search for the best
driver for your device” and press
“Next” to continue.
(Ref. Fig. Win98-D2)
D3. Tick “CD-ROM drive” and
press “Next” to start the sear-
ching process.
(Ref. Fig. Win98-D3)
D4. Press “Next” to start the
installation process.
(Ref. Fig. Win98-D4)
Manual_Page 12
www.equip-info.net
Fig. Win98-D5
E. Ethernet Port Installation
Fig. Win98-E1
Fig. Win98-E2
D5. Press “Finish” to complete the
installation of Composite Device.
(Ref. Fig. Win98-D5)
E1. Please insert the “USB 2.0
VGA LAN DOCK” CD into your CD-
ROM drive and press “Next” to
continue.
(Ref. Fig. Win98-E1)
E2. Tick “Search for the best
driver for your device” and press
“Next” to continue.
(Ref. Fig. Win98-E2)

Manual_Page 13
www.equip-info.net
Fig. Win98-E3
Fig. Win98-E4
Fig. Win98-E5
E3. Tick “Specify a location” and
click “Browse” to select the loca-
tion of the driver folder in the
“USB 2.0 VGA LAN DOCK” CD.
Press “Next” to start the sear-
ching process.
(Ref. Fig. Win98-E3)
E4. Press “Next” to start the
installation process. (Windows
might ask you to insert the
“Windows 98” CD during the
installation process).
(Ref. Fig. Win98-E4)
E5. Press “Finish” to complete the
installation of USB Ethernet adap-
ter. (Restart Windows might
necessary).
(Ref Fig. Win98-E5)
Manual_Page 14
www.equip-info.net
F. USB HID Device for PS/2 keyboard & mouse Installation
(This step might repeat once due to two different devices,
mouse and keyboard)
Fig. Win98-F1
Fig. Win98-F2
Fig. Win98-F3
F1. Please insert the “Windows
98” CD into your CD-ROM drive
and press “Next” to continue.
(Ref. Fig. Win98-F1)
F2. Tick “Search for the best driver
for your device” and press “Next”
to continue.
(Ref. Fig. Win98-F2)
F3. Tick “CD-ROM drive” and
press “Next” to start the sear-
ching process.
(Ref. Fig. Win98-F3)

Manual_Page 15
www.equip-info.net
Fig. Win98-F4
Fig. Win98-F5
9.2 WinME Driver Installation
The driver installation for WinME is divided into A to C three-steps.
Please install USB 2.0 VGA LAN DOCK under WinME step by step by the
following instructions:
A. USB-to-Parallel Port Installation
Fig. WinME-A1
F4. Press “Next” to start the
installation process.
(Ref. Fig. Win98-F4)
F5. Press “Finish” to complete the
installation of HID.
(Ref. Fig. Win98-F5)
A1 Please insert the “USB 2.0
VGA LAN DOCK” CD into your CD-
ROM drive. Tick “Automatic
search for a better driver” and
press “Next” to continue.
(Ref. Fig. WinME-A1)

Manual_Page 16
www.equip-info.net
Fig. WinME-A2
B. USB-to-Serial Port Installation
Fig. WinME-B1
Fig. WinME-B2
A2. Press “Finish” to complete the
installation USB-to-Parallel Port.
(Ref. Fig. WinME-A2)
B1. Tick “Automatic search for a
better driver” and press “Next” to
continue.
(Ref. Fig. WinME-B1)
B2. Press “Finish” to complete the
installation of USB-to-Serial Port.
(Ref. Fig. WinME-B2)

Manual_Page 17
www.equip-info.net
C. USB Ethernet adapter Installation
Fig. WinME-C1
Fig. WinME-C2
Fig. WinME-C3
Fig. WinME-C4
C1. Tick “Specify the location for a
better driver” and press “Next” to
continue.
(Ref. Fig. WinME-C1)
C3. Press “Next” to start the
installation process.
(Ref. Fig. WinME-C3)
C4. Press “Finish” to complete
the installation of USB Ethernet
adapter.
(Ref. Fig. WinME-C4)
C2. Tick “Search for the best driver for your
device” and then choose “Specify a locati-
on”. Click “Browse” to select the location
of the driver folder in the “USB 2.0 VGA
LAN DOCK” CD. Press “Next” to continue.
(Ref. Fig. WinME-C2)

Manual_Page 18
www.equip-info.net
9.3 Win2000 Driver Installation
The driver installation for Win2000 is divided into A, B two-steps.
Please install USB 2.0 VGA LAN DOCK under Win2000 step by step by the
following instructions:
A. USB-to-Serial Port Installation
Fig. Win2k-A1
Fig. Win2k-A2
Fig. Win2k-A3
A1. Please insert the “USB 2.0
VGA LAN DOCK” CD into your CD-
ROM drive and press “Next” to
continue.
(Ref Fig. Win2k-A1)
A2. Tick “Search for a suitable
driver for my device” and press
“Next” to continue.
(Ref Fig. Win2k-A2)
A3. Please insert “USB 2.0 VGA
LAN DOCK” CD into your CD-ROM
drive and press “Next” to start the
searching process.
(Ref Fig. Win2k-A3)

Manual_Page 19
www.equip-info.net
Fig. Win2k-A4
Fig. Win2k-A5
B. USB Ethernet adapter Installation
Fig. Win2k-B1
A4. Press “Next” to start the
installation process.
(Ref Fig. Win2k-A4)
A5. Press “Finish” to complete the
installation of USB-to-Serial Port.
(Ref Fig. Win2k-A5)
B1. Press “ Next” to continue.
(Ref Fig. Win2k-B1)

Manual_Page 20
www.equip-info.net
Fig. Win2k-B2
Fig. Win2k-B3
Fig. Win2k-B4
Fig. Win2k-B5
B2. Tick “Search for a suitable
driver for my device” and press
“Next” to continue.
(Ref Fig. Win2k-B2)
B3. Tick “CD-ROM drives” and
press “Next” to start the sear-
ching process.
(Ref Fig. Win2k-B3)
B4. Press “Next” to start the
installation process.
(Ref Fig. Win2k-B4)
B5. You will receive a message
stating that the software you are
installing has not passed
Windows Logo testing. But this
driver is fully compatible with
Windows 2000, so just press
“Yes” to continue.
(Ref. Fig. Win2k-B5)
Table of contents
Other Equip Docking Station manuals


