Ergo Audrey-Sunshine User manual

AUDREY
This is all you need
™
9/11 pdf 9/11/00 7:53 PM Page 1

Thank you for buying Audrey.™
Audrey is the first of 3Com’s Ergo®line
of Internet appliances. The idea behind
Ergo (which means “therefore,” by the
way) is to start by asking people what
they really want technology to do for
them, then to invent appliances that
do exactly that, without the burden of
complicated and unnecessary functions.
You want it, therefore, we invent it.
Simple really.
Hello
™
9/11 pdf 9/11/00 7:53 PM Page 2

contents
set up 1
learn the basics 1
plug in 3
get started 5
sync with Palm™
compatible devices 47
“How do I sync with
the Datebook?” 49
“How do I sync with
the Address Book?” 50
connect to the Internet 7
“I already have a dial-up
Internet access account.”9
“I already have a broadband
Internet access account.”13
“I need a new dial-up Internet access
account with AT&T WorldNet Service.”15
controls 17
datebook 19
browser 25
address book 29
mail 35
channels 39
actions palette 41
accessories 57
troubleshooting 51
support resources 53
regulatory information 54
limited warranty 55
3Com Corporation
3800 Golf Rd.
Rolling Meadows, IL
60008
No part of this documentation may be reproduced in any form or by any means or used
to make any derivative work (such as translation, transformation, or adaptation) without
written permission from 3Com Corporation.
3Com Corporation reserves the right to revise this documentation and to make changes
in content from time to time without obligation on the part of 3Com Corporation to pro-
vide notification of such revision or change.
3Com Corporation provides this documentation without warranty of any kind, either
express or implied, including, but not limited to, implied warranties of merchantability,
and fitness for a particular purpose. 3Com may make improvements or changes in the
product(s) and/or the program(s) described in this documentation at any time.
UNITED STATES GOVERNMENT LEGEND
If you are a United States government agency, then this documentation and the software
described herein are provided to you subject to the following:
All technical data and computer software are commercial in nature and developed solely
at private expense. Software is delivered as "Commercial Computer Software" as defined
in DFARS 252.227-7014 (June 1995) or as a "commercial item" as defined in FAR
2.101(a) and as such is provided with only such rights as are provided in 3Com’s stan-
dard commercial license for the Software. Technical data is provided with limited rights
only as provided in DFAR 252.227-7015 (Nov. 1995) or FAR 52.227-14 (June 1987),
whichever is applicable. You agree not to remove or deface any portion of any legend
provided on any licensed program or documentation contained in, or delivered to you in
conjunction with, this user guide.
Copyright © 2000 3Com Corporation. All rights reserved.
3Com and Ergo are registered trademarks, and the Ergo logo, the 3Com logo, and
Audrey are trademarks of 3Com Corporation. HotSync is a registered trademark and
Palm and the HotSync icon are trademarks of Palm, Inc. America Online is a registered
trademark of America Online, Inc. CompuServe is a registered trademark of CompuServe,
Inc. AT&T WorldNet is a registered trademark of AT&T. Microsoft is a registered trade-
mark of Microsoft Corporation. Netscape Navigator is a registered trademark of Netscape
Communications Corporation.
All other company and product names may be trademarks of theirective companies.
9/11 pdf 9/11/00 7:53 PM Page 4
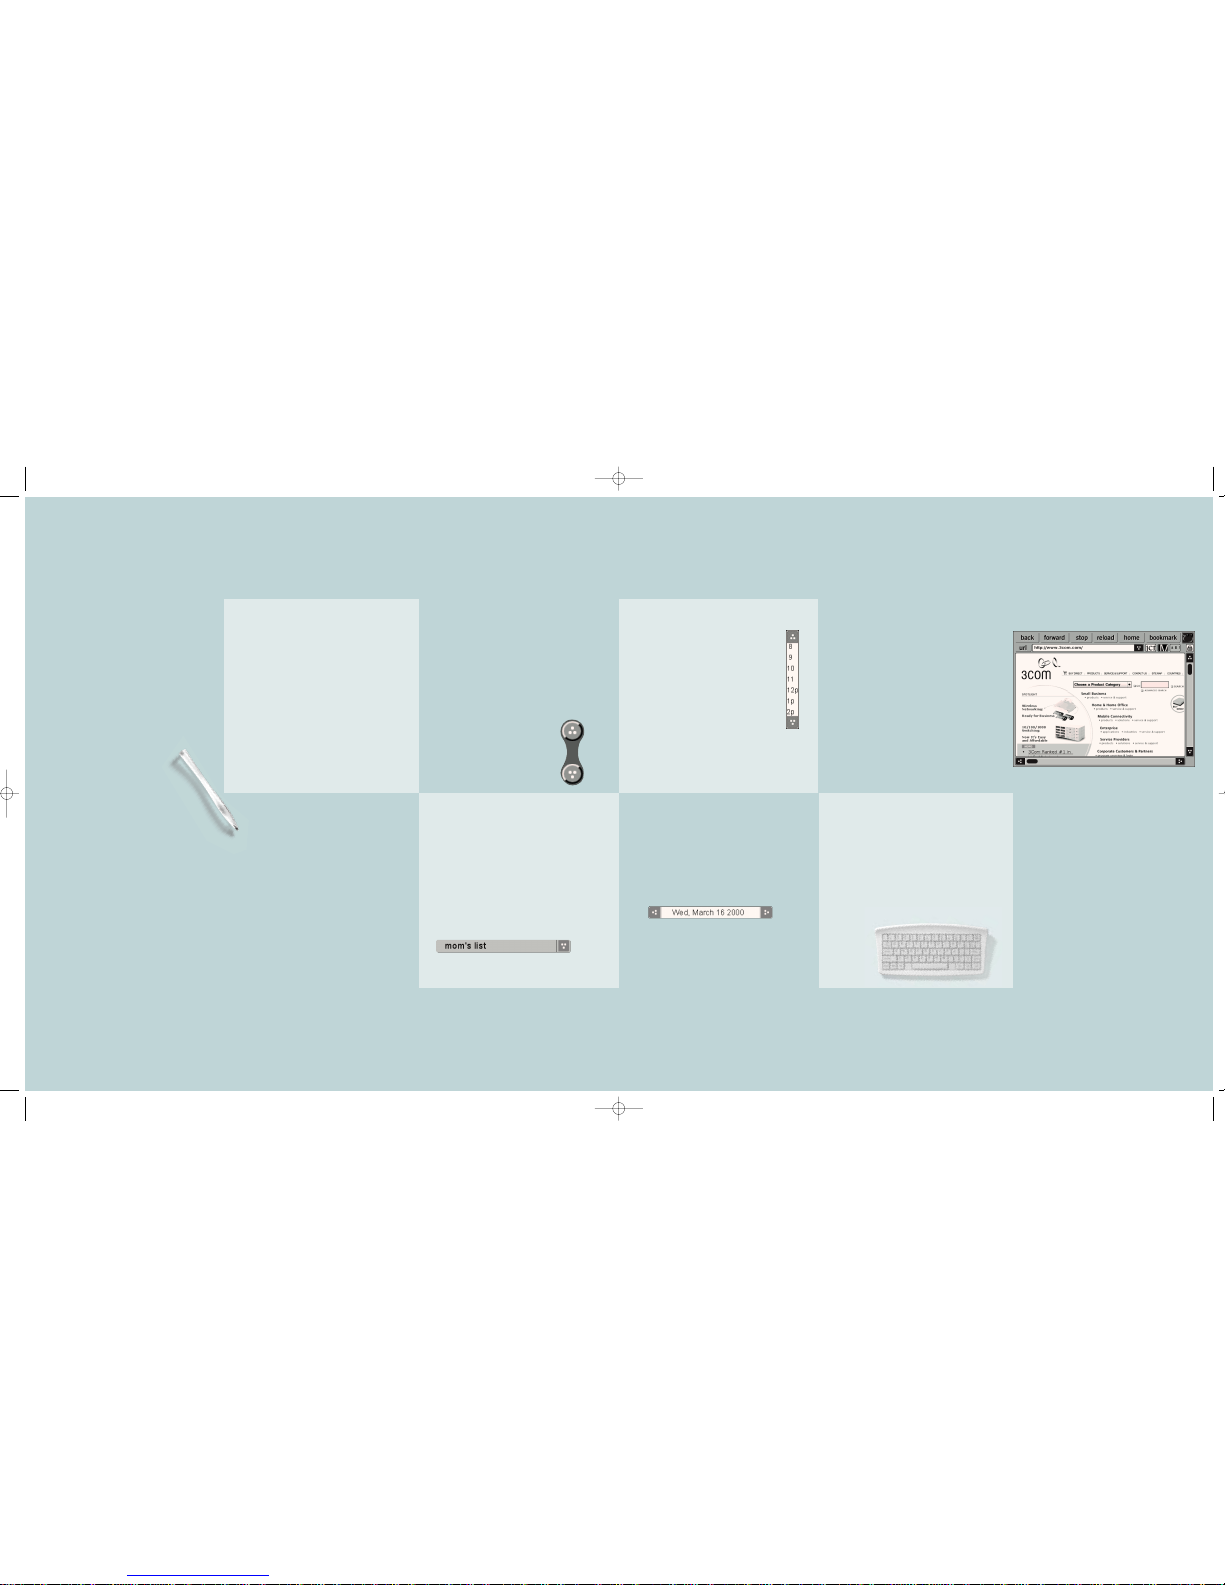
2set up
horizontal selection menus
Horizontal selection arrows allow you to
increase or decrease the value contained
in the text box between them. Tap the left
arrow to decrease the value or tap the right
arrow to increase the value.
vertical selection menus
Vertical selection menus allow you
to scroll through a range of values
included in the text box between
them. Tap the top arrow to scroll
up or tap the bottom arrow to
scroll down.
scroll bars
You will see scroll bars to the right and
bottom of certain windows (as in the window
shown to the right) that allow you to scroll to
view information that will not fit completely
inside a window. These scroll bars can be
moved left and right or up and down. To move
a scroll bar, either tap on the scroll bar and
then drag the stylus in the direction you wish
to scroll or tap on the arrows at the top and
bottom or left and right of the scroll bar to
scroll in the direction indicated by the arrow.
typing
Use the keyboard to enter information
into text boxes and text windows.
Audrey’s keyboard is wireless. The
keyboard should be used within reading
range of the screen to operate properly.
There should be no objects between the
keyboard and Audrey.
1
scroll controls
Scroll controls allow you to scroll up
or down through a list of items too long
to fit on a screen or in a window at one
time. Tap the top part of the control to
scroll items up or tap the bottom part
of the control to scroll the items down.
tapping
Hold Audrey’s stylus as you would a
pen. Lightly tap the screen element you
wish to select with the point of the stylus.
You do not need to tap the screen very
hard. Tapping or pressing down too hard
can damage the screen or degrade
screen image quality.
drop-down menus
Audrey’s drop-down menus have a down
arrow to the right of the menu display. Tap
directly into the text box or on the down
arrow to show the options available within
the menu. The item displayed in the text
window when the menu is collapsed is the
selected item.
learn the basics
set up
scribbling
Some text windows allow you to scribble
on the screen using the stylus, just as you
would with a pen on paper. Take care not
to press down too hard when writing to
avoid damaging the screen.
9/11 pdf 9/11/00 7:53 PM Page 6

4set up
Connect the phone cord and power supply.
If you have a dial-up (analog phone line) Internet
connection or plan to enroll in one for use with
Audrey, plug one end of the included phone cable
into either of the telephone jacks on Audrey’s back
and the other end into your telephone wall jack.
Plug your telephone’s cord into the second phone
jack. Your phone will operate normally when
plugged into Audrey: you will hear it ring and be
able to make and receive calls without interruption.
Place the stylus into the receptacle on top.
3
4
*
Note: If you have a broadband (cable or DSL)
Internet connection,you will need the following:
• a 3Com USB Ethernet adapter (only 3Com
USB Ethernet adapters are supported)
• a USB cable (included with 3Com USB
Ethernet adapters)
• an Ethernet cable (not included)
The Ethernet cable connects your cable modem,
DSL modem,or Ethernet hub to the adapter and
the USB cable connects the adapter to one of
Audrey's two USB ports.
*
Note: If placed in the receptacle,the stylus
glows when you have new e-mail.
3
Put the batteries into the back of the keyboard.
Retract Audrey’s stand, pulling it completely
away from the body of the unit.
plug in
Find an installation location for Audrey.
Audrey should be placed near a power
outlet and a phone jack (or near your
Ethernet hub, cable modem, or DSL
modem if you have a broadband
connection). You’ll probably use Audrey
more if you put it in the kitchen, family
room, or the room that is the nerve center
of your home. Audrey can also be mounted
on the wall using the wall-mount bracket
(not included).
1
2
*
Note: Audrey was not meant for outdoor
use.Using Audrey outdoors risks damage
to its circuitry.Additionally,Audrey should not
be placed where it will be in direct sunlight for
extended periods of time or near sources of
heat (appliances,large light bulbs,heaters,etc.).
9/11 pdf 9/11/00 8:14 PM Page 8

6set up
2
Adjust screen contrast.
After screen calibration is complete,
a slider controlling screen contrast
appears. Tap the slider with the
stylus and then drag it until you are
satisfied with the contrast. Tap “done”
when finished. 3
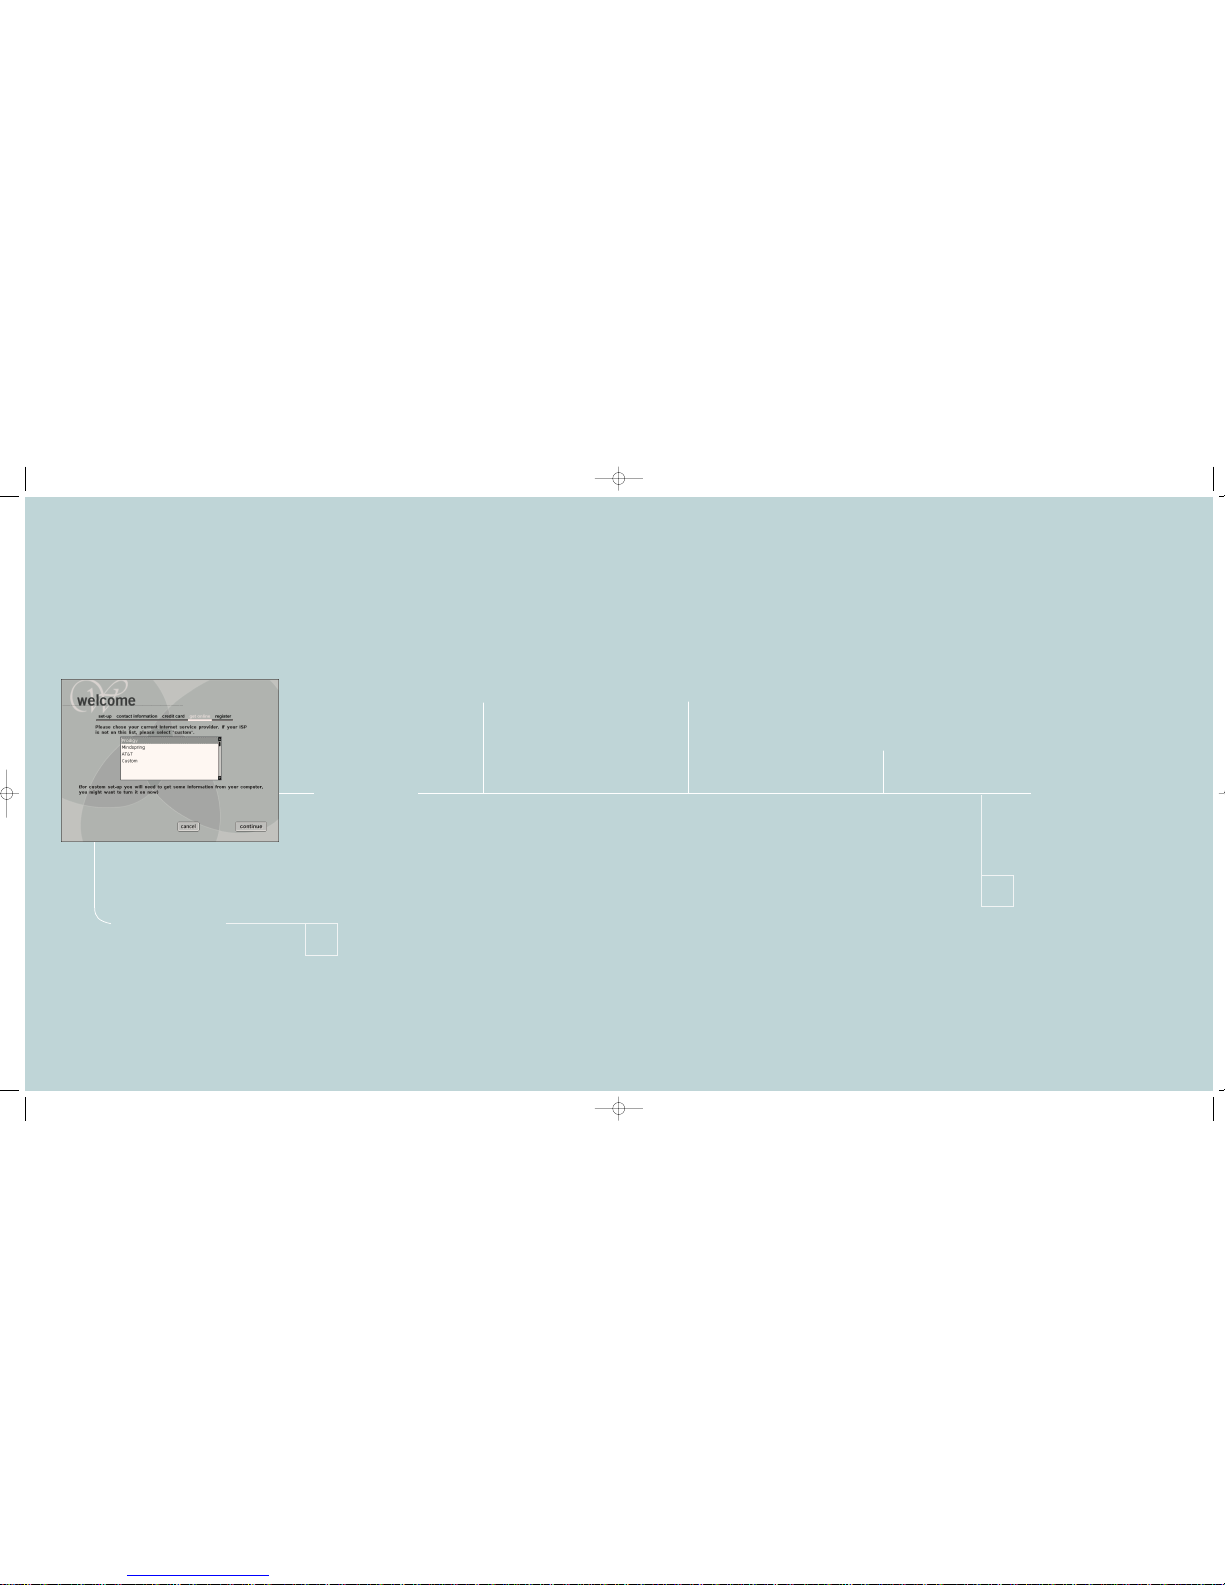
Enter your user information.
This information will be used to register
Audrey. Additionally, Audrey can use this
data to automatically fill in online forms,
speeding up tedious data entry at
Internet sites. 4
Enter your credit
card information.
You have the option of entering your
credit card information to help speed
up online transactions. However, if
you have concerns about the security
of your credit card information, you
can leave this screen blank and sim-
ply tap “continue” to move on.
5
1
Calibrate the screen.
Screen calibration ensures that
when you tap on a specific screen
item, Audrey understands which
item you are attempting to tap. A tar-
get appears in the upper left-hand
corner of the screen. Tap the center
of the target. Continue this process
as the target travels around all four
corners of the screen and, finally, to
the middle of the screen. After you
tap the center of the target when it
is in the middle of the screen, you
will see a button labeled “tap here
to save calibration.” Tap this button.
get started
Welcome!
Audrey starts up as soon as you con-
nect the power supply. Soon after
powering on, you will see a welcome
screen. Tap anywhere on the screen
to move on to screen calibration.
*If you miss the center of a target,
it will remain in the same position
until you have tapped its center.
9/11 pdf 9/11/00 8:14 PM Page 10

*A DSL(Digital Subscriber Line) can
carry both voice and data information
over your existing phone line.A cable
modemprovides Internet access via
your cable TV line,and therefore this
may not tie up your phone line.DSL
can remain connected all of the time
so you never have to “dial up.”
8connect to the Internet
“I already have a
dial-up Internet
access account.”
Tap this button if you already have
a dial-up Internet access account
using an analog modem. Then tap
“continue.” To configure Audrey to
your current ISP, turn to page 9.
*A modem(short for modulator/
demodulator) translates the digital
signals from your computer into
analog signals that can travel over
the phone line.
“I already have a
broadband Internet
access account.”
Tap this button if you already have a
broadband Internet access account
using a DSL or cable modem. Then tap
“continue.” To configure Audrey to access
your DSL or cable connection, you will
need a 3Com USB Ethernet adapter. For
more information, turn to page 13.
*To connect to the Internet,
you will need an Internet Service
Provider (or ISP).Just as you pay
the electric company to provide
your power,you pay an ISP to
bring the Internet into your home.
7
“I already have
Internet access
for my PC.”
“I don’t have
Internet access.”
“I would like a new
dial-up Internet access
account with AT&T
WorldNet Service.”
Tap this button if you DONOThave Internet access
and want to set up and account with AT&T WorldNet
Service. Tap “continue” and turn to page 15.
connect to the Internet
5
Do you have
Internet access?
In order to use Audrey, you need
Internet access. If you already have
Internet access, select the type of
Internet connection you have here.
If you already have a dial-up (analog
modem) or broadband (cable or DSL)
Internet access account, you can
probably set up that account for use
with Audrey. However, not all ISPs are
compatible with Audrey. For instance,
America Online®and CompuServe®
are not compatible. For a list of
compatible ISPs visit 3Com.com/ergo
before continuing.
If you do not currently have Internet
access or your current ISP is not
compatible with Audrey, you may
want to choose the option here to
enroll in a new account with AT&T
WorldNet®Service, our preferred ISP.
If you want to start a new account
with an ISP other than AT&T WorldNet
Service, you should contact them now
to order service before continuing.
*If you want to set up an account
with an ISP other than AT&T
WorldNet Service,contact that ISP
to order service.When you have your
new account information,press the
Actions Palette button,tap "Internet
Setup," and follow the instructions
on this page to set up that account.
9/11 pdf 9/11/00 8:14 PM Page 12
3
Do you need to dial
any extra numbers?
Your phone service may require you
to dial extra digits before dialing out
to your ISP. Buttons are provided for
“9”, to access outside lines, and “*70”,
to disable call waiting. These are com-
monly required digits for Internet dial-
ing. Tap either button if it applies.
If you need to enter additional digits,
tap inside the text field, type the digits,
and then tap “continue” to move on.
10connect to the Internet
If Audrey could not connect
to your ISP,an error screen
will appear with information
about how to resolve your
connection issue.
*
2
Enter your home
phone number.
Tap inside the first of the three fields
to insert the cursor and then enter
your phone number with the keyboard,
using the TAB key to move between the
fields. Tap “continue” when finished. 4
Audrey will attempt to
dial out to your ISP.
If Audrey has successfully connected
to your ISP, you will see the “set date
and time” screen. Audrey will down-
load the correct time from the Internet.
However, this time may not
be correct for your time zone. Make
any necessary changes on this screen.
Tap “done” to continue. Next, a dialog
box announcing that your Channels
are being updated appears. (Audrey
sets up a default download schedule
to update your Channels, check for
e-mail, and update the time. You can
learn how to modify this schedule
using the Actions Palette on page 41).
Although there is a “cancel” button on
this dialog box, we recommend that
you allow Audrey to update your
Channels now so that they work faster
when you access them later. To learn
more about how to use Audrey’s con-
trols and personalize them for
your family, turn to page 17.
9
“Ialready have a dial-up Internet access account.”
1
Enter your username
and password.
Tap inside the first text field to
insert the cursor and then type the
username and password you use
to access your ISP. Tap “continue”
when finished.
“Yes,my ISP
is listed here.”
If your ISP is listed here,
tap it in the drop-down
menu. Tap “continue,”
and continue on tostep 1.
“No,my ISP isn’t
listed here.”
If you have Internet access
through a provider that is
not in the list, tap “custom”
at the bottom of the drop-
down menu. Then tap
“continue.” To configure
Audrey to use your custom
ISP, turn to page 11.
Do you have one of
these standard ISPs?
This menu lists some of the most
popular ISPs. Scroll through the
list to see if your ISP is on the list.
*At this point in the setup
process,you should have
already determined whether
or not your ISP is compatible
with Audrey.If you are still
uncertain whether or not your
ISP is compatible,please visit
3Com.com/ergofor a list of
compatible ISPs.
9/11 pdf 9/11/00 8:16 PM Page 14

12connect to the Internet
4
Enter your username
and password.
Enter the username and
password you use to gain
access to your ISP. After you
have entered this information,
tap “continue.” 5
Enter your account’s
mail server information.
Enter your account’s incoming
mail server name (POP3) and outgo-
ing mail server name (SMTP).
If your e-mail account uses a differ-
ent username and password than
your Internet access account, tap the
check box and then enter them in
the blanks at the bottom
of the screen.
If Audrey could not connect to your
ISP,an error screen will appear with
information about how to resolve
your connection issue.
*
6
Audrey will attempt
to dial out to your ISP.
If Audrey has successfully connected
to your ISP, you will see the “set date
and time” screen. Audrey will
download the correct time from the
Internet. However, this time may not
be correct for your time zone. Make
any necessary changes on this screen.
Tap “done” to continue. Next, a dialog
box announcing that your Channels are
being updated appears. (Audrey sets
up a default download schedule to
update your Channels, check for
e-mail, and update the time. You can
learn how to modify this schedule
using the Actions Palette onpage 41.)
Although there is a “cancel” button on
this dialog box, we recommend that
you allow Audrey to update your
Channels now so that they work faster
when you access them later. To learn
more about how to use Audrey’s con-
trols and personalize them for your
family, turn to page 17.
3
Do you need to dial
any extra numbers?
Your phone service may require you
to dial extra digits before dialing out
to your ISP. Buttons are provided for
“9,” to access outside lines, and
“*70,” to disable call waiting. These
are commonly required digits for
Internet dialing. Tap either button
if it applies. If you need to enter
additional digits, tap inside the text
field, type the digits, and then tap
“continue” to move on.
11
1
Enter the dial-up
number for your ISP.
Tap inside the first of three text fields
to make the cursor appear, then type
the phone number you use to dial
your ISP, using the TAB key to move
between fields. Next, tap one of the
two buttons under “ISP account
type:,” “PPP” or “assigned/static IP”.
This tells Audrey what type of Internet
access account you have.
*
2
If you have an “assigned/
Static IP”account,
enter your assigned IP address,
ISP subnet mask, gateway, primary
DNSand secondary DNS settings.
If youhave a
“PPP” account,
skip to step 3.
“Ialready have a dial-up Internet access account.”
ISPs that use “PPP”accounts
assign random and unique
IP addresses to your computer
with every connection.
However,some ISPs assign
a static IP address to your
computer that never changes.
You will need the following
information in order to connect
to an Audrey-compatible
custom ISP. You can obtain this
information by either calling your
ISP or copying it from the TCP/IP
settings used by the computer that
you normally use to connect to the
Internet. Write this information in
the blanks provided below. You will
need it later.
the dial-up number for your ISP
your assigned IP address
If you have an assigned/static IP, you
will need the following information:
your ISP’s subnet mask
your ISP’s gateway
incoming mail server name (POP3)
outgoing mail server name (SMTP)
primary DNS setting
secondary DNS setting
custom ISP
9/11 pdf 9/11/00 8:16 PM Page 16
5
Audrey is now configured
to access your ISP.
If Audrey has successfully connected
to your ISP, you will see the “set date
and time” screen. Audrey will down-
load the correct time from the Internet.
However, this time may not
be correct for your time zone. Make
any necessary changes on this screen.
Tap “done” to continue. Next, a dialog
box announcing that your Channels
are being updated appears. (Audrey
sets up a default download schedule
to update your Channels, check for
e-mail, and update the time. You can
learn how to modify this schedule
using the Actions Palette onpage 41.)
Although there is a “cancel” button on
this dialog box, we recommend that
you allow Audrey to update your
Channels now so that they work faster
when you access them later. To learn
more about how to use Audrey’s con-
trols and personalize them for your
family, turn to page 17.
14connect to the Internet
4
Enter your account’s
e-mail access information.
Enter your account’s incoming mail
server name (POP3) and outgoing mail
server name (SMTP). If your e-mail
account uses a different username and
password than your Internet access
account, tap the check box and then
enter the username and password in
the blanks at the bottom of the screen.
When you are finished, tap “continue.”
If Audrey could not connect to your
ISP,an error screen will appear with
information about how to resolve
your connection issue.
*
3
You have an “assigned/
static IP” account.
Enter your assigned IP address and
your ISP’s subnet mask, gateway, and
primary and secondary DNS settings.
When you are finished, tap “continue.”
1
Is your 3Com USB Ethernet
adapter connected?
Audrey is only compatible with 3Com
USB Ethernet adapters. Audrey will
remind you to connect your 3Com
USB Ethernet adapter (not included)
to the USB port on its back before con-
tinuing. If you have not made this con-
nection, do so by plugging an Ethernet
cable (not included) into an available
Ethernet jack on your cable modem, DSL
modem, or home network Ethernet hub
and into your 3Com USB Ethernet
adapter’s Ethernet jack. Then plug a
USB cable (included with your 3Com
USB Ethernet adapter) into the USB jack
on the adapter and one of Audrey’s two
USB ports. Audrey’s
USB ports are located on its back
and are marked with a USB symbol
(shown below). When these connections
are made, tap “continue.”
13
“My ISP assigned a static IP.”
If your ISP assigned you a static IP,
tap this button. If your ISP requires
a hostname, enter it into the field on
the right-hand side of the screen.
Then tap “continue” and continue
on to step 3.
“My ISP uses DHCP.”
If your ISP uses DHCP, tap this but-
ton. If your ISP also requires
a hostname, enter it into the text
field on the right-hand side of the
screen. Then tap “continue” and
skip tostep 4.
2
Do you have a “DHCP”
or an “assigned/static
IP” account?
Tap the button that applies.
*
“I already have a broadband Internet access account.”
“DHCP”accounts dynamically allocate
an IP address to your computer on a
local area network.“assigned/static
IP”accounts assign an IP address to
your computer that never changes.
You will need the following information
in order to configure Audrey to use
your DSL or cable modem. You can
obtain this information by either calling
your ISP or copying it from the TCP/IP
settings used by the computer that you
normally use to connect to the Internet.
Write this information in the blanks
provided below. You will need it later.
your assigned IP address
If you have an assigned/static IP, you
will need the following information:
your ISP’s subnet mask
your ISP’s gateway
your ISP’s host name (if required)
outgoing mail server name (POP3)
primary DNS setting
secondary DNS setting
incoming mail server name (SMTP)
9/11 pdf 9/11/00 8:16 PM Page 18

216
ready?...
4
Audrey will connect
to your new ISP.
If Audrey has successfully connected
to your ISP, you will see the “set date
and time” screen. Audrey will down-
load the correct time from the
Internet. However, this time may not
be correct for your time zone. Make
any necessary changes on this
screen. Tap “done” to continue. Next,
a dialog box announcing that your
Channels are being updated appears.
(Audrey sets up a default download
schedule to update your Channels,
check for e-mail, and update the
time. You can learn how to modify
this schedule using the Actions
Palette onpage 41.) Although there
is a “cancel” button on this dialog
box, we recommend that you allow
Audrey to update your Channels now
so that they work faster when you
access them later. To learn more
about how to use Audrey’s controls
and personalize then for your family,
turn to page 17.
15
1
Enroll with AT&T
WorldNet®Service
If you do not currently have an ISP,
you can sign up with AT&T WorldNet
Service, Audrey’s preferred ISP, and
configure that account for use with
Audrey. A screen will appear
announcing the AT&T WorldNet
Service special rate for Audrey users.
Make sure you have your billing
information handy and when you
are ready, tap “continue.”
If Audrey cannot connect to AT&T WorldNet Service,
an error screen will appear with information about
how to resolve your connection issue.
*
3
Setup your new account.
Audrey will dial out to AT&T WorldNet
to download their setup information.
Once you see their forms, fill them
out, following the on-screen directions
to proceed. Audrey will connect to the
Internet when this setup is complete.
2
Do you need to dial
any extra numbers?
Your phone service may require you
to dial extra digits before dialing out
to an ISP. Buttons are provided for
“9”, to access outside lines, and “*70”,
to disable call waiting. These are com-
monly required digits for Internet dial-
ing. Tap either button if it applies.
If you need to enter additional digits,
tap inside the text field, type the digits,
and then tap “continue” to move on.
“Ineed a new dial-up Internet access
account with AT&T WorldNet Service.”
9/11 pdf 9/11/00 8:17 PM Page 20
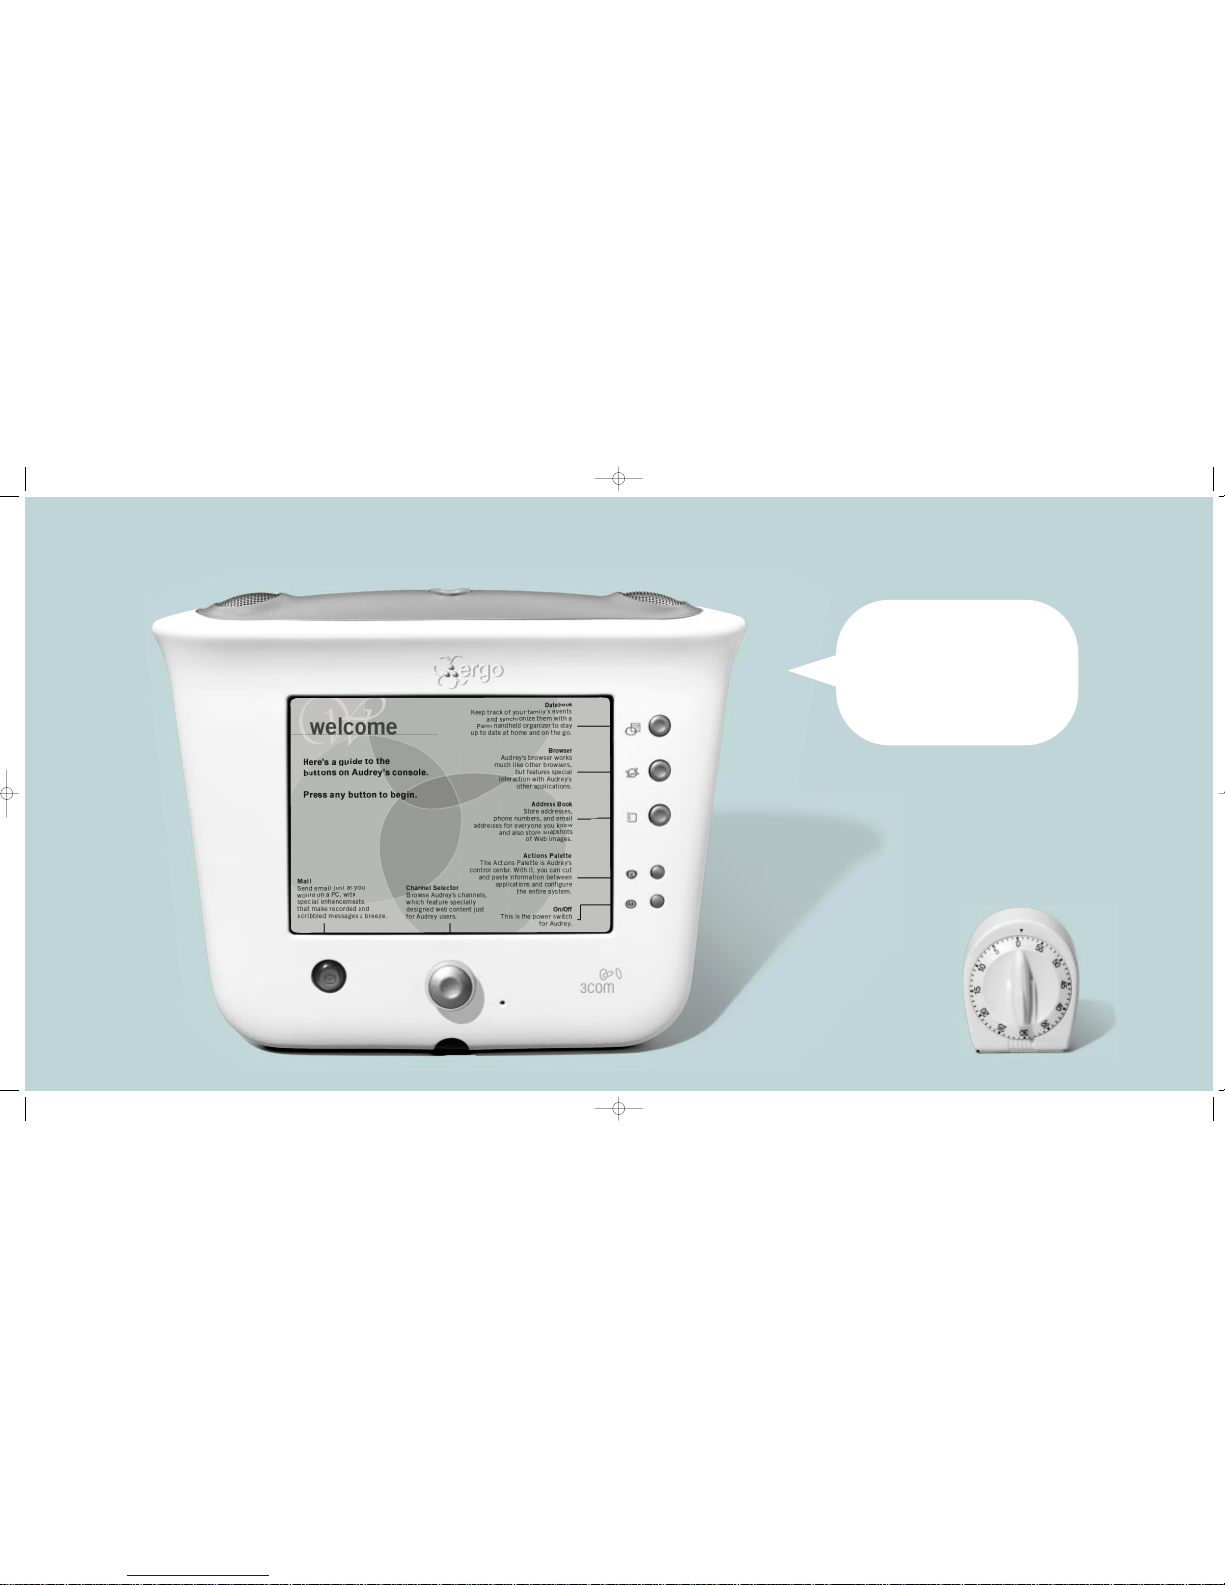
controls 182
The following pages give a button
by button account of everything
Audrey can do. To learn how to use
the Datebook, Address Book, Browser,
Mail, Channels, and Actions Palette,
read on!
17
control
9/11 pdf 9/11/00 8:17 PM Page 22
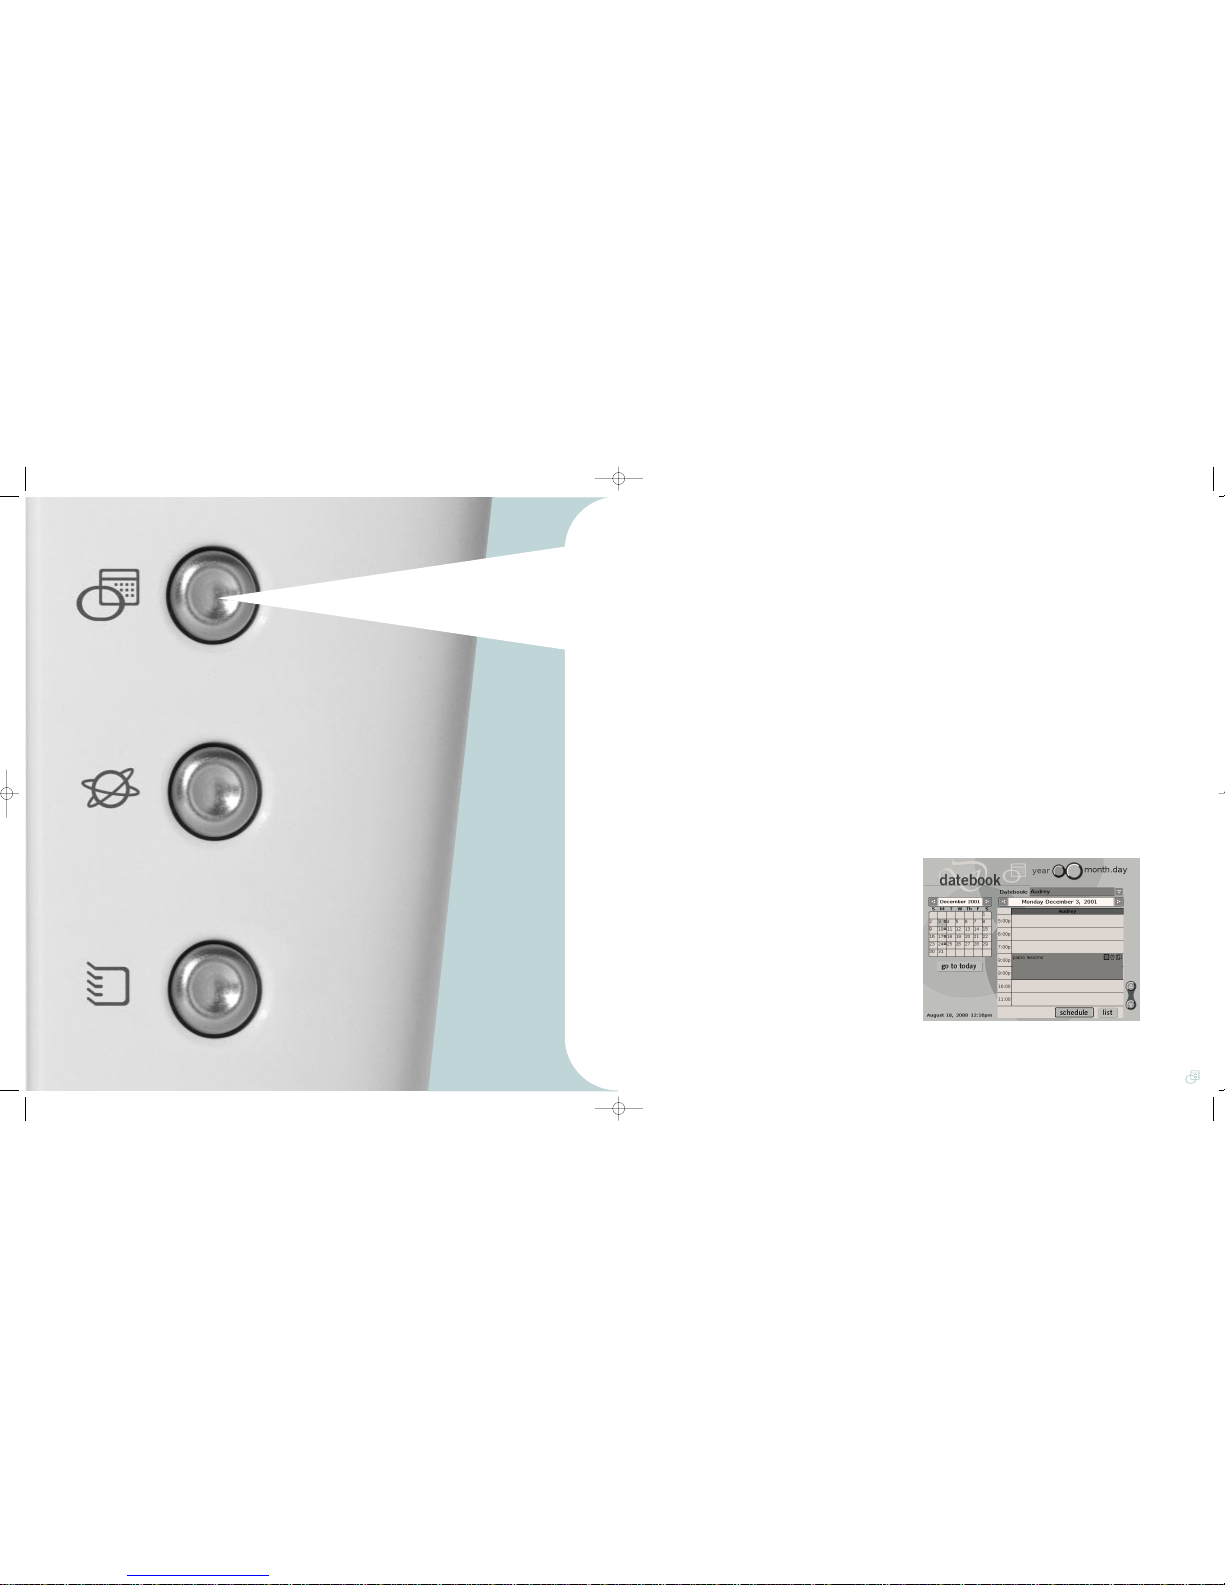
20
datebook
3
Unless your current month happens
to be December 2001, you will
need to change the displayed date.
The fastest way to do this is to
switch to the Datebook’s “year” win-
dow by tapping the “year”
button at the top of the Datebook
screen. This brings up a 12-month
calendar view. You can move for-
ward or backward in groups of four
months using the arrow buttons in
the lower right-hand corner of the
screen. Once you see December
2001, tap on the date of the first
Monday (December 3rd, 2001).
4
The Datebook returns to the
“month.day” window and displays
December 2001 in the monthly cal-
endar and December 3, 2001
in the hourly schedule. You are
now ready to enter the start and
end times for your event. By default,
the hourly schedule shows events
from 8:00AM through 12:30PM in
half hour increments. Since your
event begins at 8:00PM, you will
need to use the scroll control (to the
right of the hourly schedule) to scroll
down to 8:00PM. Once 8:00PM is
in view, tap inside the blank field to
the right of that hour with the stylus.
5
The “create event” screen appears.
By default, your event is scheduled
for the hour between 8:00PM and
9:00PM. However, the event you
want to enter begins at 8:00PM
and continues until 10:00PM.
Therefore, you need to change the
end time of your event. To do so,
tap inside the “time” text field in
the upper right-hand corner of the
“create event” screen.
Audrey’s Datebook is an easy and convenient tool for
keeping track of your plans. And since Audrey can sync
with your Palm™compatible device’s Date Book, you can be
sure that you are in sync both at home and on the go.
19
1
Launch the Datebook by pressing
the Datebook button.
entering events
2
When the “month.day” window
appears, you will see the monthly
calendar(set to the current month
and year) and an hourly schedule
for the current date. For the purpose
of this tutorial, assume that you are
entering an event that takes place
between 8pm and 10pm every
Monday in December, 2001.
datebook
9/11 pdf 9/11/00 8:18 PM Page 24

22datebook
9
You want to enter this event
for the first four Monday nights
in December 2001, but you’d
rather not enter each of those events
individually. To set up the repeating
options for your event, tap the
“details” button in the lower left-hand
corner of the “create event” screen.
The “event details” screen appears.
The “repeat event” drop-down menu
on this screen has options to set an
event to repeat daily, weekly, month-
ly, or annually. Tap the arrow to the
right of the “repeat event” drop-
down menu.
10
The “create repeat event” screen
appears. You want your event to
repeat weekly, so tap the “week”
button. A series of options appears.
Your event occurs every week, so
in the “Every: _ Week(s)” field,
enter “1”. To do so, tap inside the
“Every: _ Week(s)” field with the sty-
lus and then type “1” using the
Audrey keyboard. You want your
event to always occur on a Monday,
so tap the box labeled “M” under
“Repeat on:”. If any other days are
highlighted orange, tap them to
un-highlight them.
11
The default entry for the “End On:”
field is “No End Date”.At this set-
ting, your event would be entered
into every Monday night beginning
with December 3, 2001 onward. You
want your event to be entered every
Monday night from December 3,
2001 until December 24, 2001. To
enter December 24, 2001 as the
“End on:” date, tap inside the “End
On:” field. The “set date” screen
appears. It shows a calendar with
two horizontal scroll bars above it.
The top-most horizontal scroll bar is
used for selecting the year for your
end date and the one below it is
used to select the month for your
end date. Tap the arrows on either
side of the year-selection horizontal
scroll bar to choose “2001.” Then
use the arrows on either side of the
month-selection horizontal scroll bar
to choose “December 2001.” Next
tap the square on the calendar cor-
responding to December 24, 2001.
You are returned to the “edit repeat
event” screen. The text box at the
bottom of the “edit repeat event”
screen should now read
“Every week on Monday” and
“12/24/2001” should appear in
the “End On” field. Your event’s
repeating schedule is now config-
ured. Tap “okay.”
12
You can also set an alarm
which will sound at varying inter-
vals before the event.
The default setting for the alarm is
to sound 5 minutes before the
event. You can change the number
of minutes or change from minutes
to hours or even days before the
event. After you leave the “edit
repeat event” screen, the “event
details” screen re-appears. Tap the
box to the right of “alarm” on the
“event details” screen. You will see
a text field reading “5” and a drop-
down menu to the right of the text
field reading “minutes prior.” To
change the number of minutes
before the event you would like the
alarm to sound, drag the stylus
across the “5” in the text field to
highlight it and then type the new
number using Audrey’s keyboard.
To change from minutes to hours
or days, tap the down arrow next
to “minutes prior” and then tap your
selection. Then tap “okay.” When
the “create event” screen appears,
tap “okay” again.
*
Note:If you want your event to
appear every other week,enter “2”
in the “Every: _ Week(s)”field.If
you want your event to appear
every third week,enter “3”in the
“Every: _Week(s)”field,and so on.
21
datebook
7
You are returned to the “create
event” screen. The time span and
date of your event should appear
in the “time” and “date” fields,
respectively. Below these fields is
a large, blank field. Here you can
enter details about your event, either
by typing or scribbling event details.
To type information, tap the “type”
button at the top of the screen and
then begin typing using the key-
board. To scribble information, tap
the “scribble” button at the top of
the screen and then scribble into
the text field using the stylus.
For the purposes of this tutorial,
tap “scribble” and use the stylus
to write “don’t forget sheet music”
inside the text box. If you make a
mistake while scribbling and need
to start over, tap the “eraser” icon
in the upper right-hand corner of
the scribble area to clear the white
text box.
8
The “shortcuts” drop-down menu
is another element of the “create
event” screen. Shortcuts provide a
way to access frequently occurring
event description (“pick up the
kids,” “buy groceries,” “after
work...,” etc.). You can retrieve that
description from the “shortcuts”
drop-down menu instead of having
to retype it. Tap inside this menu.
You will see only one item, “edit
shortcuts.” Tap this item and the
“edit shortcuts” screen appears.
At this point you don’t have any
shortcuts to edit, but you can add
one. Assume that piano lessons are
a commonly occurring event in your
life. Tap the “add” button. The “add
a shortcut” screen appears. Enter
the text “piano lessons” and then
tap “okay”. The “edit shortcuts”
screen re-appears, this time with
“piano lessons” listed as your only
shortcut. Tap “okay” again. When
you see the “create event” screen
again, tap inside the “shortcuts”
drop-down menu. Tap the “piano
lessons” shortcut you just created.
Now the text “scribble event: piano
lessons” appears above the text box
in which you scribbled your note
about remembering sheet music.
6
The “set time” menu appears
(see the image below). There are
two fields here: one for the start
time of your event and one for the
end time. The time in these fields
ranges from 12:00AM (midnight)
to 11:55PM (five minutes before
midnight). The “start time” for
your event is already set to
8:00PM, since you tapped that
hour in the hourly schedule view
to enter the “create event” screen
in the first place. To set the end time
for your event to 10:00PM, tap the
“end time” field to highlight it (it turns
orange), then tap “10” in the hours
vertical selection menu to the right
of the “start time” field (make sure
to tap the “10p” not “10a”). This
sets the hour portion of your event’s
end time to 10PM. Then
tap “00” in the minutes vertical
selection menu to the right of the
hours menu. This sets the minute
portion of your end time to “:00”.
If you do not see either of these
entries in the hours or minutes
scrolling menus, you can use the
arrows at the top or bottom of each
menu to scroll through the available
entries. When you have finished
entering the end time for your
event, tap “okay”.
*
Note: If at any time in this process
you make a mistake and want to
start from scratch,tap the “clear
time”button to erase the entries
in both the “start time”and “end
time”fields.
If you want to change the start time
for your event.Tap inside the “start
time”text field to highlight it and
then follow the same process out-
lined in the preceding paragraph.
If you set your event without start
and end times (i.e.an all day event),
you can tap the “no time”button and
then tap “okay.”
9/11 pdf 9/11/00 8:19 PM Page 26

24datebook
1
From the main “month.day” view,
tap “December 3, 2001”in the
monthly calendar on the left-hand
side of the screen.
deleting events
2
Scroll down to 8:00PM in the
daily schedule and then tap inside
the dark blue shading for the “piano
lessons” event.
4
The “delete repeat event” screen
appearsasking whether you want to
delete the “current” event or “all”
events. If this were a solitary event,
you would only be asked to confirm
that you want to delete the current
event. For the purposes of this exer-
cise, tap “current.” 7
Scroll down to 8:00PM in the daily
schedule and then tap inside the
dark blue shading for the “piano les-
sons” event.
3
The “read event” screen appears.
Tap “edit” and the “edit event”
screen will appear. Tap “delete
event” at the bottom of the screen. 8
The “read event” screen appears.
Tap “edit” and the “edit event”
screen will appear. Tap “delete
event” at the bottom of the screen.
9
This time when the menu appears
asking whether you want to delete
the current “event” or “all” events,
tap the “all” selection.
10
You will be returned to the main
schedule view.Notice the month
view (left-hand side of the main
Datebook screen). You can see that
the event and all of the repeating
events that followed it have been
removed from the schedule.
5
You will be returned to the main
schedule view. Notice the first of the
repeating events has been removed
from the schedule.
6
To delete the remaining events,
tap “December 10, 2001” in the
monthly calendar on the left side
of the screen.
23
datebook
13
You will see the “month.day”
screen of the Datebook.
Notice a dot inside the block
corresponding to every Monday
in the monthly calendar for
December 2001 on the left of the
screen. This indicates that there
is a scheduled event the first four
Mondays during this month. If you
tap any of the Mondays, the date in
the daily schedule changes to that
date. Using the scroll control to the
right of the daily schedule, scroll
down to 8:00PM. The text fields to
the right of the hours between
8:00PM and 10:00PM are shaded
dark blue. You will also see a text
description (your shortcut, “piano
lessons”) in this blue shading.
14
Tap the dark blue shading
to view the “read event” screen
and view the event details, read
any scribbled notes, or make
changes. Tap “done” to return to
the daily schedule view. Tap “list”
in the lower right-hand corner of
the screen. The daily schedule will
be replaced with a list of only the
events scheduled for the currently
selected date. Tap “schedule” to
return to the daily schedule view.
15
When the daily schedule view
re-appears, look closely at the icons
in the upper right-hand corner of the
dark blue shading for your event. You
should see three icons. These icons
can tell you a lot about your event at
a glance.
This indicates that there
is a note (typed or scribbled)
attached to your event.
This indicates that the event
is a repeating event.
This indicates that there is an
alarm set for this event.
You have successfully completed
your first Datebook entry! Since
it isn’t likely that you are actually
scheduling piano lessons in
December of 2001, you should
delete these events from the
Datebook. The next section will walk
you through the process of deleting
an event and will help to familiarize
you with the editing options of the
Datebook application.
*
Note:If you type a note instead of
scribbling,the text inside this dark
blue shading will still read “piano les-
sons”if you selected that shortcut to
be applied to your entry.However,if
you type a note but don’t specify the
“piano lessons”shortcut,the text in
the shading would be the same text
you typed as a note.
9/11 pdf 9/11/00 8:19 PM Page 28

26browser
2
Drag the stylus across
“http:// www.go.com” in the URL
text field in the Browser control
panel to highlight it. Using the
Audrey keyboard, type “www.
3Com.com”, the URL (Universal
Resource Locator) for the 3Com
Web site. Then press ENTER on
the keyboard.
3
Once the 3Com home page has
loaded, tap the “back” button in the
Browser control panel. This returns
you to the previously loaded URL,
www.go.com. If you attempt to tap
the “back” button before visiting the
3Com Web page, you will discover
that the button is grayed-out and
inaccessible, indicating that there
is no previously loaded page to go
back to.
4
Tap “forward.”You return to
the 3Com Web page. The
“forward” button is grayed-out
and inaccessible again, since
the 3Com Web page is the most
recently accessed page, and
there is no page to go forward to.
The Audrey Browser application works much the way other
Internet browsers do (such as Netscape Navigator®or
Microsoft®Internet Explorer). However, the way the Browser
interacts with other Audrey applications is unlike any other
browser. Once you are familiar with the Browser’s features,
you will find that it is a powerful tool for Web access.
25
Browser control panel
1
Launch the Browser by pressing
the Browser button. As Audrey
dials out to your provider to down-
load the default home page,
www.go.com, the Ergo®logo in the
upper right-hand corner of the
Browser window becomes animated.
This is an indication that Audrey is
in the process of sending and
receiving data. Once Audrey has
connected to your ISP, it will load
and display the default home page
in the Browser window.
*
Note: Some pages are secure,meaning
that they use encryption technology
to scramble sensitive data (credit card
numbers,phone numbers,names,
addresses) so that it is nearly impossible
for someone to monitor your data while
it is in transit over the Internet.
If the currently loaded page is secure,
the lock icon just below the Ergo logo
will be closed.If the page is not secure,
it will be open.
If the page is too long or wide to be fully
displayed in Audrey’s screen,you can use
the scroll bars to the right and at the
bottom of the screen to adjust your view.
browser
9/11 pdf 9/11/00 8:19 PM Page 30

28browser
2
Notice the drop-down menu
above the “site” text field. This
is the “category” menu, where you
can choose the category into which
your new bookmark fits. The default
setting in this menu is “unfiled.” Tap
the down arrow to the right of this
menu. The selections that appear are
“favorites,” “unfiled,” and “edit
categories...”. Tap “edit categories...”.
4
You are returned to the “websites”
state of the Address Book
application. This screen has a
category drop-down menu as well.
The default setting for this menu
is “all,” meaning that it is displaying
all bookmarks in all categories.
Since your only bookmark is the
Yahoo bookmark you just added,
that is the only one displayed below
the category drop-down. If you tap
on the category drop-down menu
and select “search engines,” you
will also see your Yahoo bookmark,
but selecting any other category
will display no bookmarks.
3
The “Edit Categories” screen
appears,where you can add a
category in addition to the “favorites”
and “unfiled” categories already in
existence. Add your new Yahoo
bookmark to a new category called
“search engines” by simply tapping
“add,” then typing “search engines,”
and then tapping “okay.” When the
“edit categories” menu re-appears tap
“okay.” Now when you tap in the cat-
egories drop-down menu, you will
see a “search engines” category.
Tap this category so that it fills the
category text field. The only URL
that appears in this category is the
one for Yahoo that you just entered,
but you can add more search engine
URLs to this category in the future.
Tap “done.”
5
Tap the text “Yahoo!”in the book-
mark display. This launches
a new menu. In this menu, you
can tap “edit” to change any of the
bookmark’s properties. You can also
tap “attach to email” to launch the
Mail application. This opens to a
blank e-mail with the corresponding
URL attached, ready to send to a
recipient (see the Mail section on
page 33for more information).
Tap “done” when finished to
return to the “websites” state of
the Address Book.
6
When you return to the “websites”
state of the Address Book,tap the
thumbnail image of the Yahoo home
page visible in the main bookmark
view. This launches the Browser
application and loads the Yahoo
home page. This is how you should
launch all bookmarked URLs from
the “websites” state of the Address
Book application.
As you can see, the Browser is a
powerful tool for surfing the Web.
Its interaction with the Address
Book’s “websites” state simplifies
the work of bookmarking your
favorite pages and attaching URLs
to e-mail messages. For more
information about customizing the
Browser application, see the Actions
Palette section on page 41.
27
browser
1
Drag the stylus over the “URL” text
field to highlight the current text.
Type “www.yahoo.com” and press
ENTER. The Browser loads the
home page of this popular search
engine. Next, tap the “bookmark”
button in the Browser control panel.
The Address Book application
launches, opening in its “websites”
state. You’ll notice that “Yahoo!” is
automatically entered into the “site”
text field and the site’s URL,
“http://www.yahoo.com”, is entered
into the “URL” field. To the right of
the “site” text field is a small snap-
shot of the Yahoo home page.
If you wish to add a note to your
bookmark, tap inside the “note”
text field and type your note using
the Audrey keyboard.
creating bookmarks
5
Tap “home.”The Web page set as
Audrey’s home page, www.go.com,
loads again. See the Actions Palette
section on page 41for more
information about changing the
default home page to a different URL.
6
Tap the down arrow tothe right
of the “url” text field. A list of
the URLs you’ve visited appears.
Tap “www.3Com.com” in this list.
The 3Com Corporation home page
loads again. You can use this drop-
down menu to quickly re-load any
recently-visited URL.
7
The “stop” and “reload” buttons
are more difficult to demonstrate,
as they have very specific uses.
You can tap the “stop” button
to cancel any current download
activity (for example, if you are in
the middle of a download that is
taking longer than you’d like to
wait). The “reload” function is handy
for refreshing pages that feature
frequently-updated information,
such as stock prices, weather
maps, or opinion polls.
*
Note: A search engine is a Web site
that allows you to search for key
words and phrases used on other
Web sites.For instance,you could
find a site about vacationing
in Hawaii by entering the terms
“cruises Hawaii travel.”
9/11 pdf 9/11/00 8:21 PM Page 32

30address book
Though each of the states has its
own distinct features, there are
some features which are universal
to all four states:
Entries in the Address Book
states are syncable with Palm
compatible devices with the
exception of the entries that
are in the “websites” and
“snapshots” states.
Address Book states
Audrey’s Address Book application allows multiple users
to store the mailing addresses, phone numbers, Web site
addresses (or URLs), and e-mail addresses of friends, family
members, and business associates. The Address Book is
designed to work with the “Address List” application included
with Palm compatible devices. Multiple users can sync their
Address Lists to Audrey and retrieve that information at the
touch of a button.
The alphanumeric tabs along the
right edge of the main Address
Book panel provide quick, pinpoint
access to specific alphabetical or
numeric sections of the currently
open state. For instance, if you are
in the “email” state and want to see
the e-mail address for John Smith,
you could tap the “s-z” tab, then tap
“s.” Audrey will display all e-mail
addresses beginning with the letter
“s.” You can use the scroll control
to the right of the main e-mail
address display to scroll through
the “s” entries and find John Smith’s
e-mail address.
The Address Book application is
also the only Audrey application
which you can exit by pressing
its button while it is open. Like
the other Audrey applications,
you can also exit by launching
any other application.
29
To launch the Address Book,
press the Address Book button.
The Address Book automatically
opens to a state corresponding
to the current application.
• If the Datebook application is
open, the Address Book opens to
the “phone” state.
• If the Browser application is open,
the Address Book opens to the
“websites” state.
• If the Mail application is open,
the Address Book opens to the
“email” state.
• If no applications are open
(as when booting up after power-
ing off), the Address Book opens
to its “websites” state.
address book
9/11 pdf 9/11/00 8:21 PM Page 34

32address book
9
When you reach the “work,”
“home,” “email,” and “fax” entries,
you will notice that each field has a
drop-down menu to the left of the
text field. These are variable fields. If
you tap in these drop-down menus,
you can select different categories
for the information in the text fields
to the right of that drop-down menu.
For example, if the person you have
in mind does not have a work phone
number but does have a pager
number, you can tap in the
drop-down menu that currently
reads “work” and select “pager”
instead. These four fields differ in
one other significant way. There
are check boxes to the right of each
text field. Only one of these four
check boxes can be selected. The
information in the field with a
marked check box is the information
which will be displayed by default in
the main phone number view in the
“phone” state. For example, if you
enter a person’s work phone num-
ber into the “work” field,
their home phone number into the
“home” field, and tap the check
box next to the “work” field, that
person’s work phone number will
be the one visible from the main
phone number view in the “phone”
state (see the next section for more
information). For the purposes of
this tutorial, tap the check box to
the right of “home,” so that the per-
son’s home phone number will
appear in the “phone” state.
10
If you would like this entry to
be kept secret (i.e. not displayed
in the main e-mail address or phone
number views of the “email” and
“phone” states), tap the check box
next to “Keep as secret”, near the
end of the text fields. For the pur-
poses of this tutorial, do not check
this box. You can also add typed
notes about this entry by tapping
inside the “Note” text field and
entering information with
the keyboard.
11
When you are finished entering
the information for your entry, you
can either tap “cancel” to cancel
adding this person to your Address
Book, or you can tap “done” to add
the person to your Address Book.
For the purposes of this tutorial,
tap “done” to add the entry to your
Address Book.
12
In the main e-mail address view
of the “email” state, you will see
the entry you just created. The
only information that you entered
that will be visible in this view is
the person’s name and their
e-mail address.
13
Tap the person’s name.
A screen appears showing all of
the information you entered into
the variable fields for this person.
From this menu, you can tap “edit”
to launch an edit window (just like
the “add” window you used when
adding this person to your Address
Book) and make changes to the
person’s information. You can also
tap “attach to email” to launch the
Mail application. This opens to a
new composition with the person’s
information attached as a file which
other Audrey users can use to add
that person to their Address Book
and that PC users can view as a
note. If you tap inside the “sync to:”
drop-down menu, you can choose
any connected Palm compatible
devices with which you would like to
sync this information. Tap “done”
when finished exploring this menu.
14
Tap the person’s e-mail address.
A “send email” dialog box appears
asking if you wish to send an e-mail
to this person. If you tap “okay,”
the Mail application launches with
the person’s e-mail address
automatically inserted into the “to:”
field. Now you’re ready to compose
an e-mail to this individual. For more
information see the Mail section on
page 35.
31
8
Tap in the “Last” text field.
Using Audrey’s keyboard, type the
last name of one of your relatives.
Continue entering information for the
person you have in mind, using the
TAB key to move forward one field
and holding down the SHIFT key
simultaneously with the TAB key to
move backward one field.
6
A new screen appears with
an empty text field. Using the
Audrey keyboard, type “Relatives.”
Then tap “okay.” You will then
be returned to the original “Edit
Categories” screen, where you
should see “Relatives” added as
a category after “Business” and
“Personal.” Tap “okay.”
address book
7
When you return to the text fields
for your new e-mail address,tap
in the Category drop-down menu
again. Tap on the entry for
“Relatives” that you just added.
The drop-down menu collapses
and you see “Relatives” displayed
in the menu.
1
Tap the “email” buttonin the
main Address Book view to open
the “email” state.
2
Immediately below the “email” but-
ton are two drop-down menus:
The Catalog drop-down menu is
automatically set to “Audrey.” If
you tap inside this drop-down
menu, you will notice that there
are no other entries. This indicates
that you have no Palm™compatible
devices synced to your Audrey unit.
If you had one or more devices
synced to Audrey, you would see
the user names for those devices
in this drop-down menu. If you
were to choose one of the Palm
device users in this menu, the
e-mail addresses in the main e-mail
address view would correspond to
the e-mail addresses on file in that
user’s Palm compatible device.
The Category drop-down menu is
below the Catalog drop-down menu.
This menu allows you to choose
which categories you wish to display
in the main e-mail address view.
The default setting is “All,” meaning
that Audrey is showing all e-mail
addresses on file in all categories.
For now, leave this menu set to“All”.
You will create a new category a little
later on in this tutorial.
“email” state 3
To add an e-mail address,
tap the “add” button at the
bottom of the screen.
4
A series of text fields appears.
As you shall soon see, these
fields allow you to add a great deal
of information about a person far
beyond just their e-mail address.
Additionally, some of the information
entered here will also be visible
from within the “phone” state.
Audrey will show the Catalog that
the e-mail address you are about
to add will be added to in the blue
shaded field directly below the
“email” button. Below that field
is the Category drop-down menu.
If you tap this menu, you will see
the categories currently available:
“Business,” “Personal,” “Unfiled,”
and “Edit Categories...”. You will
be adding an e-mail address that
fits into a new category called
“Relatives,” so tap the “Edit
Categories...” entry.
5
The “Edit Categories” screen
appears. Tap “Add.”
9/11 pdf 9/11/00 8:21 PM Page 36

address book 34
1
Press the Address Book button
on Audrey’s console and then tap
the “phone” button on the main
Address Book screen.
2
Like the “email” state, the
“phone” state has Catalog and
Category drop-down menus,
both of which function identically
to those described in the preceding
“email” state section. In the main
phone number view, you will see
the name and home phone number
of the person whose information you
previously entered in the “email” state.
“phone” state
3
Tap the person’s name. A screen
appears showing all of the informa-
tion you entered into the variable
fields for this person. From this
menu, you can tap “edit” to launch
an edit window (just like the
“add” window in the “email” state)
and make changes to the person’s
information. You can also tap
“attach to email” to launch the
Mail application. This opens a new
composition with the person’s
information attached as a file which
other Audrey users can use to add
that person to their Address Book,
and that PC users can view as a
note. If you tap inside the “Sync To:”
drop-down menu, you can choose
any connected Palm compatible
devices with which you would like
to sync this information. Tap “done”
when finished exploring this menu.
1
Snapshots are pictures of all or
part of Audrey's screen that you
can capture and save. You can cre-
ate snapshots from the Actions
Palette. When you go to the
“snapshots” state of the Address
Book for the first time, you won’t
see any snapshots. You will need
to create some before any appear
in this state. Snapshots that you
create cannot be synced with Palm
compatible devices, though they
can be attached to outgoing e-mail
messages. For more information
about creating snapshots and
adding them to the Address Book’s
“snapshots” state, see the Actions
Palette section on page 41.
“snapshot” state
33
1
Tap the “websites” button
on the main Address Book screen.
Like the “email” and “phone” states,
the “websites” state has a Category
drop-down menu, but it does not
have a Catalog drop-down menu.
This is because URLs cannot be
synced with Palm™compatible
device. The default setting for the
Category drop-down menu in
the main URL view is “All,” so
you should see all (if any) URLs
in the main websites view in the win-
dow below the Category drop-down
menu.
“websites” state
2
To add a URL to the “websites”
state, tap “add.”
3
The default setting for the Category
drop-down menu in the “add URL”
view is “Unfiled.”Change the cate-
gory to “Favorites” by tapping inside
the Category drop-down menu and
then tapping “Favorites.”
4
Next, tap inside the “Site” text
field and type “3Com Corporation.”
Press the TAB key to move the cur-
sor into the “URL” field and type
“http://www.3Com.com”. Press the
TAB key on the keyboard again to
move the cursor into the “Note” field
and type “The home page for 3Com
Corporation.” Then tap “done.”
5
You are returned to the main URL
view. You will notice that the URL
described as “3Com Corporation” is
now visible. You will also notice that
there is a white box to the right of
this URL description. Tap inside this
white box. The Browser application
launches and begins to download
the 3Com home page.
6
There are three boxes to the right
of the “URL” field. These display the
contents of the “Favorites” category
in the Address Book’s “websites”
state. In your case, only one of the
boxes contains a thumbnail of its
associated site (the one you just cre-
ated for 3Com Corporation). There
can only be 3 URLs entered into the
“favorites” category, so all three are
visible from the Browser application
at once. This way, you can access
any of the 3 URLs in the
“favorites” category from the Browser
by simply tapping each page’s
thumbnail, instead of launching the
Address Book.
7
Additionally, you can tap any
of the empty “favorites” boxes
(empty boxes contain the Ergo®
logo and the word “favorites”) to
launch the “websites” state of the
Address Book. This opens to a new
entry corresponding to the currently
loaded Web site in the Browser
application. Drag the stylus over the
address currently in the “URL” field
to highlight it. Then type the
following URL: “www.palm.com”
then press ENTER on the keyboard.
The home page for Palm, Inc. loads
into the Browser window. Once the
page is fully loaded, tap either of the
two empty “favorites” boxes to the
right of the “URL” field in the
Browser. The Address Book opens
to its “websites” state. A description
of the site, a thumbnail of the home
page, and the site’s URL are all pre-
loaded into the fields of a new entry
into the “favorites” category. Tap
“done.” The Address Book returns to
the main “websites” state view,
showing the “All” categories view.
You should see the entry for Palm,
Inc. in the main window.
address book
9/11 pdf 9/11/00 8:22 PM Page 38
This manual suits for next models
1
Table of contents


