Erisin ES810 User manual

02
Trouble Shooting
PROBLEM CAUSE SOLUTION
Cannot power on
Check whether power fuse
melt or not Change fuse same as the old one
Some factors cause MPU
wrong operation
Press RES button on the panel by
penpoint, then, power on
After ignition switch
off, setting information
all lose
Change battery or fuse Reset information and save
Poor performance of
radio station Weak signal Move the car to another place,then
research
Cannot load disc There is a disc inside. Eject disc,then,slot in new disc
Cannot play disc
Disc is scratched Change new disc
Put wrong side of disc into the
unit Slot in the disk with sign side up
Lens has dirty Clean lens by lens clean disc
Cannot switch
language/subtitle
There is only one language/
subtitle in disc
If disc is not with multi-language/
subtitle, it cannot switch language/
subtitle
No image Other factors cause MPU
wrong operation
Press [RES] button on the panel by
penpoint, then ,power on
Cannot watch image
during driving
It's not allowed to watch
image during driving
Park the car in a safe place, Put
the car stall in “P” postion, pull
upthe hand brake
23
CONTENTS
To use this product safely and properly, be sure to read this maual carefully before use and
keep it safe for future reference. As we constantly keep improving our products, function and
appearance are subject to updates without prior notice.
Precautions
Safety……………………….. 3
Cleaning Device……………. .3
Lens Mist……..…………….. 3
World Area Codes…………..
Basic Operaion
5
8
Reset Device………………….. 10
Volume Control……………….
Sound Effect Setup……………
…..
EQ Setup………………………
Setup Operation………………..
Function Operation
Radio Function Operation……… 13
RDS Function Operation………… 14
Multifunction Operation…………. 15
DVD/VCD/CD Function Operation….. 16
MP3 Function Operation………………. 18
Bluetooth Function Operation................…20
Other Functions Operation……………….. 22
Additional Information
Trouble Shooting………………………..
TV touch Operation........................
19
………. 10
………
……..
………
……
. . .
...
. . .
…...
. . . . .
………
…
…
………
………
…
.
……
…
……
……
……
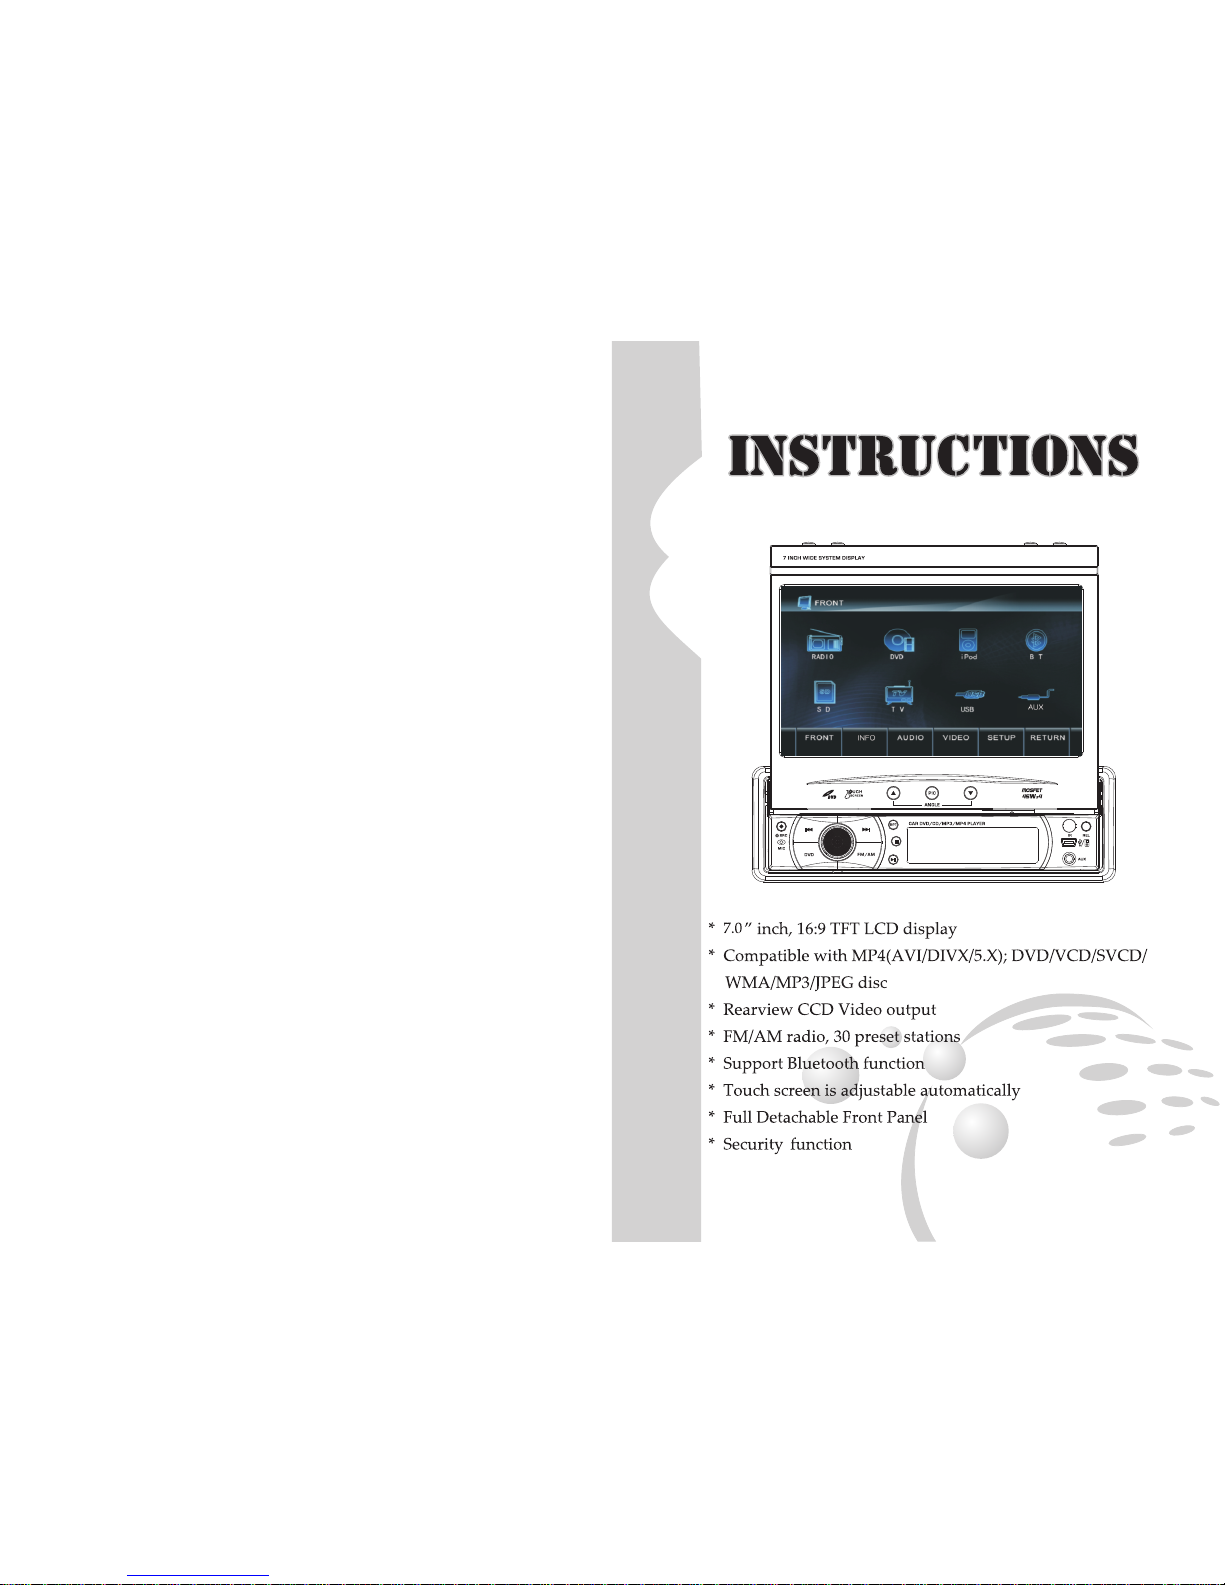
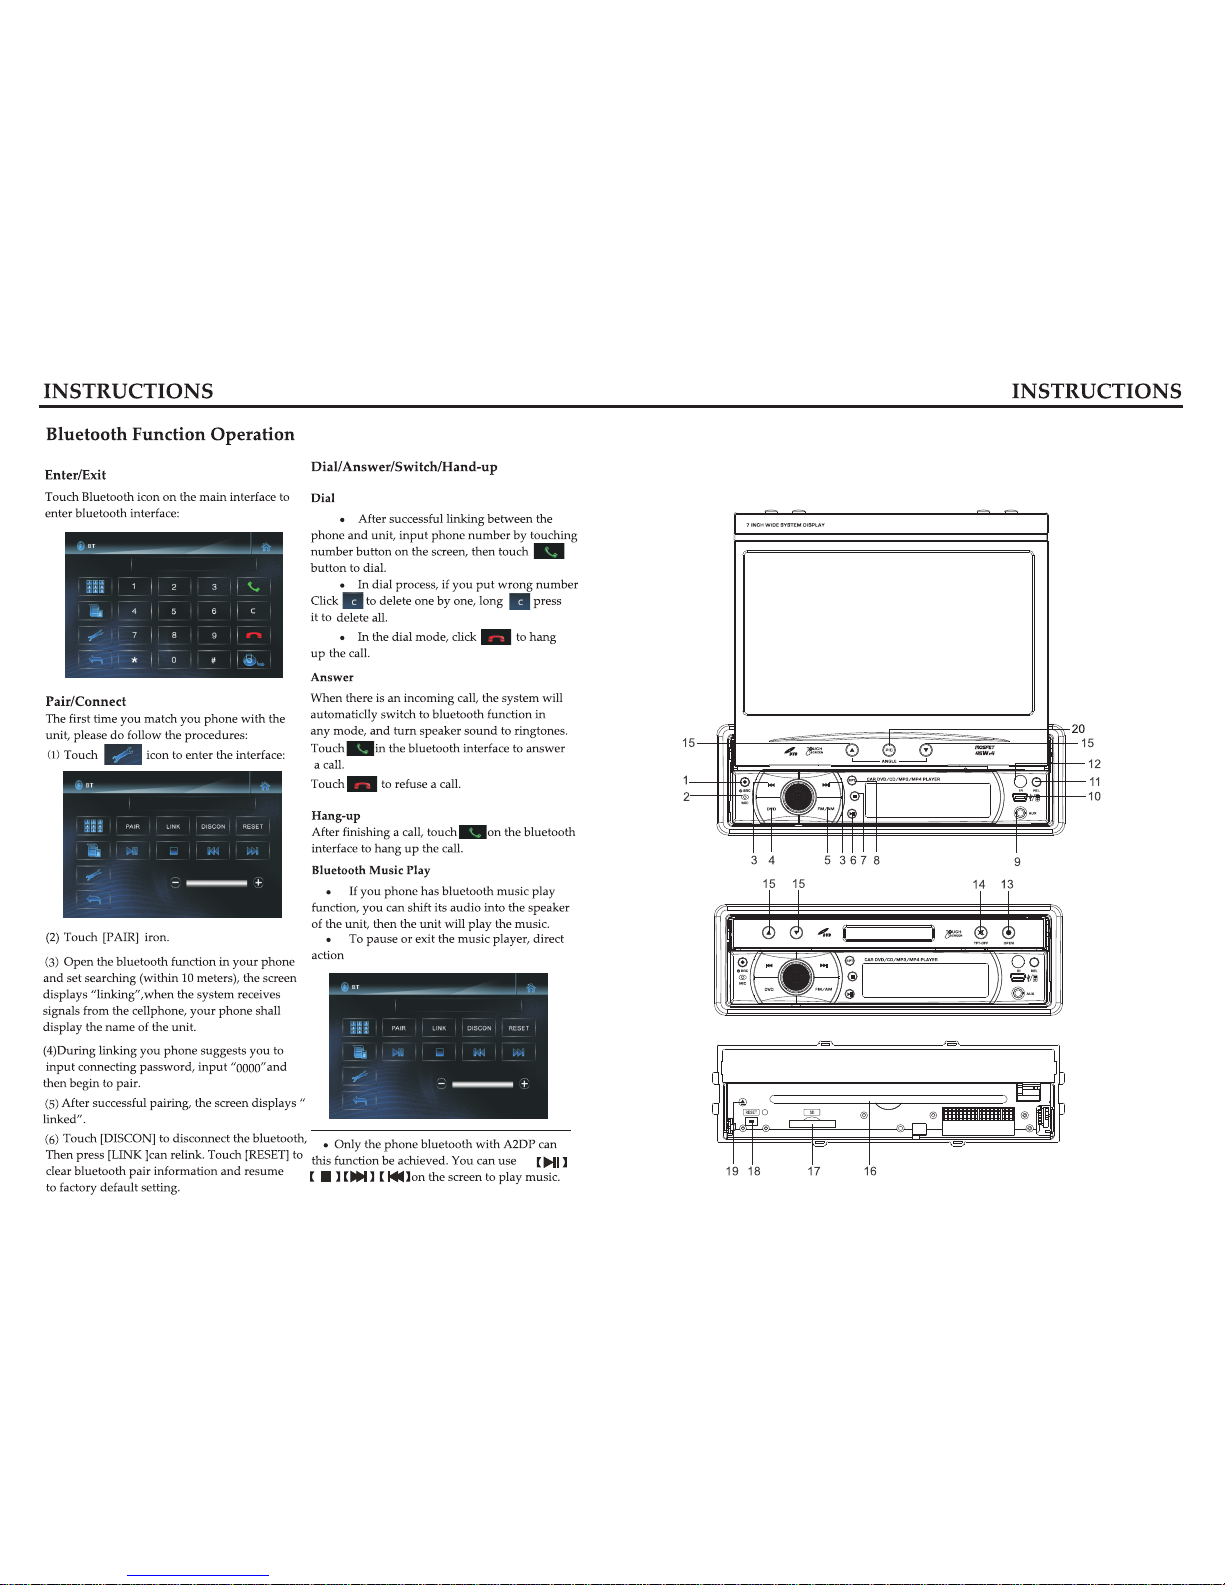
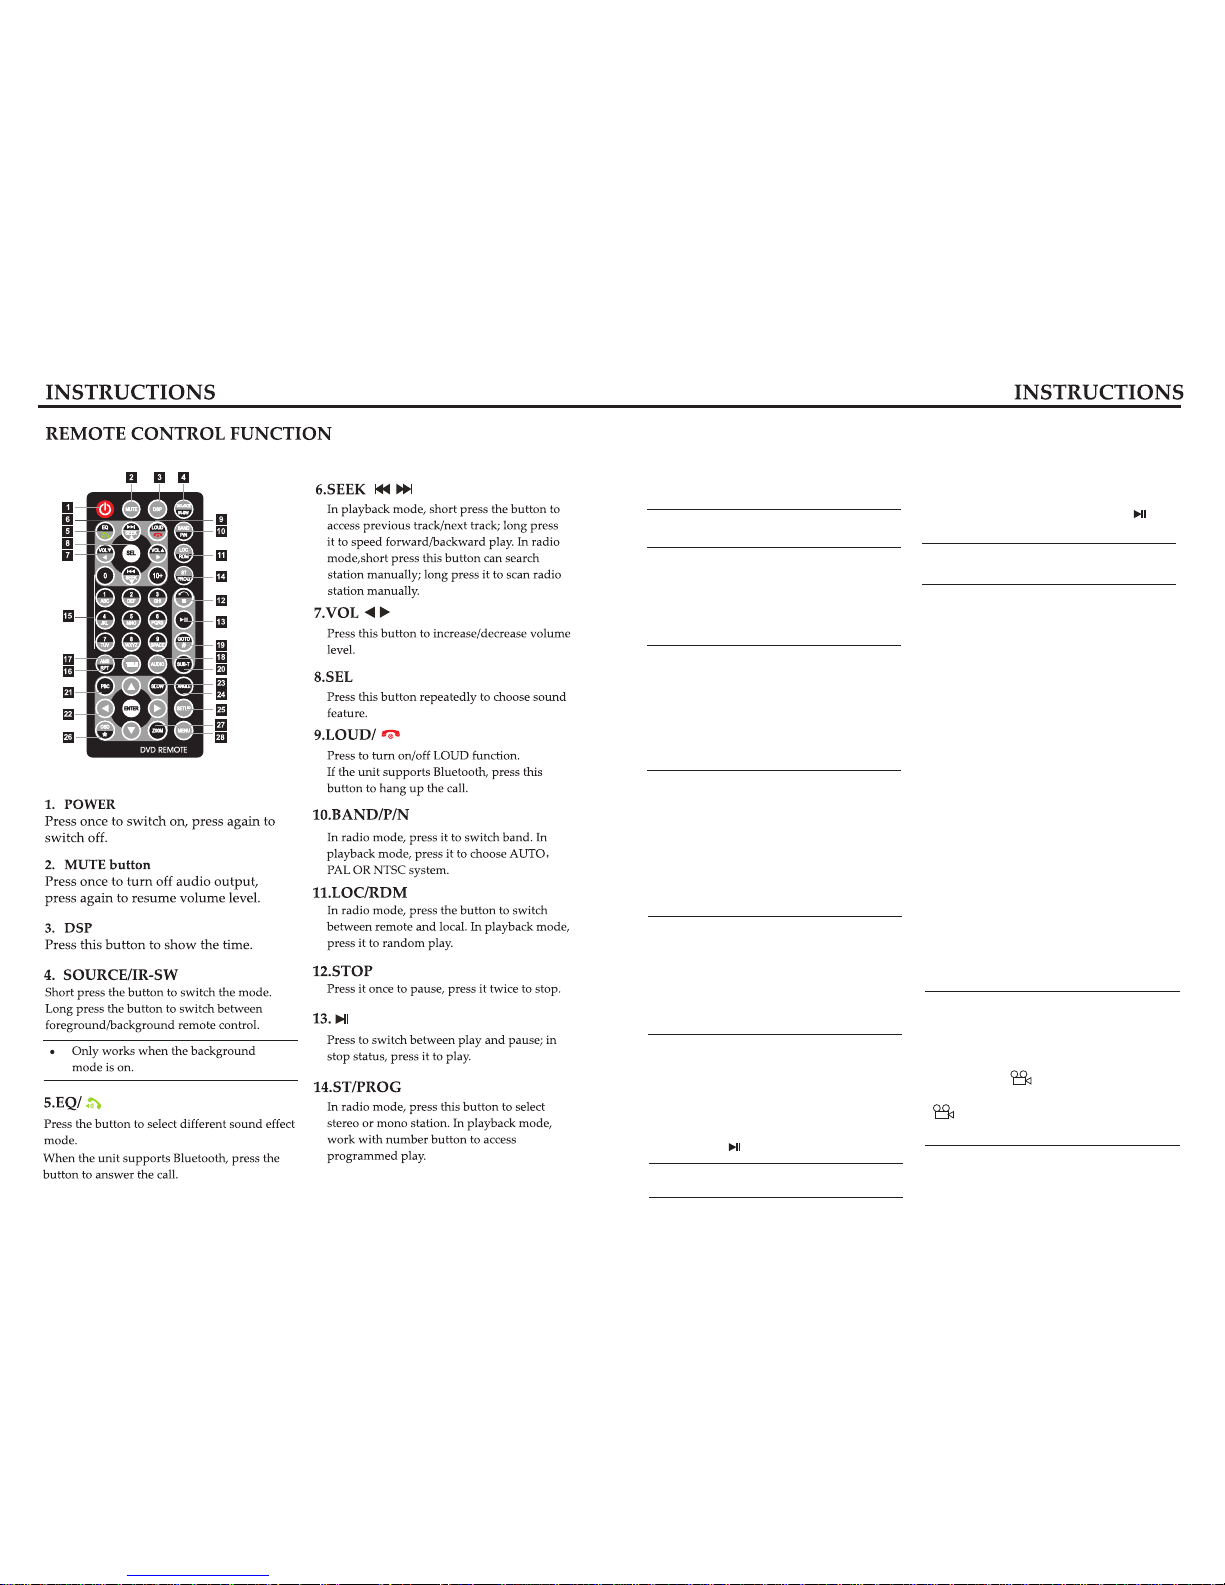
Panel Introduction
On/Off Host
Turn
On/Off Equal Loudnes
Turn
Analog
4
10
10
10
10
10
..
23

Precaution
Safety
To ensure driving safety, please follow the guide given below:
1.The unit is installed in car with 12V power supply.
2.Connect each wire as the manual suggests, any wrong connection may cause dysfunction
or damage to the electical system.
3.Be sure the speaker(-) lead is connected to the speaker(-) terminal instead of the body
of car. Speakers are not allowed to interconnected.
4.Make sure all the wires are correctly connected befor turning on the unit.
5.When you change a blown fuse, replace it with a new one of same speci facation.
6.Do not block the blowhole or heat sink to avoid fire hazard caused by overheating inside
the unit.
7.After completing installation you can use the product(including changing the car battery);
Press (RESET) button on the panel with penpoint (sharp,prong objects not allowed) to set the
system in initial status.
8.To ensure driving safety and avoid breaking traffic regulation, drivers should not watch
program or operate this device while driving.
Cleaning Device
If any stains are found on the front panel, use clean soft cloth (such as cleaning cloth)to wipe
them off.
If the front panel is too much dirty, use neutral cleaning fluid to wipe it, then clean the left fluid
with clean soft cloth.
Directly spray the cleaning fluid onto the device may effect mechanical parts. Use rough
cloth or volatile fluid(such as thinner or alchhol) may scratch the surface or remove the chara
cters.
Lens Mist
In cold weather, mist occurs on the lens of disc player when heat is open. This is called lens
mist which may effect the disc play. In that case, dject the disc and wait until the condensate
fully evaporates, then you can play it again.
!
03
Other Functions Operation
Analog on-site backup Backup rearview
CCD
In any running mode, the video signal will switch to CCD status when backing the car, after
backing it resumes to its previous status
Warm:
Do not rely entirely on CCD, plese confirm safety of the environment with naked eyes
while you are driving. CCD only assists the drive to park the car. Due to the limits in CCD
range and distance, it may cause traffic accident if the drive relys entirely on CCD.
!
22
04
World's Area Codes
As the below map shows, we set area codes for DVD player according to various countries and
regions.
1
1
4
2
2
5
4
1
2
6
3
6
21
05
Panel Introduction
20

06
Panel Function introduction Analog TV Function Operation
Touch [ TV ]icon in main interface to open analog TV mode.
1. CH-/CH+
Page down/up to select channels and play.
2. AMS
Search channel automatically.
3. SEEK-/SEEK+
Search channel manually.
4. SETUP
Access setup interface.
5. Sound System Switch
Press to switch sound system.
Auto Search/Store Channel
You may need to search station before using
TV. Press [AMS] button on remote control, or
touch [AMS] button on TV interface to search
for TV channel automatically in the whole
TV channel range. Effective TV channels that
searched will be automatically memorized in
preset channel in ascending order.
During the search, retouch [ AMS ] button can
stop searching.
Manual Search
Short press[ SEEK+] [SEEK-] button on remote
control, or touch [SEEK+ ][SEEK-] button on
the display screen to single-step search.
Long press [SEEK+][ SEEK- ]button on remote
control, or hold SEEK+ SEEK- button on the
display screen for 2 seconds or more will
automatically search effective station in direction
of frequency increasing/decreasing. During the
search, repress SEEK+ SEE- can stop searching.
Select/Play Channel
Touch [CH+][ CH-] button on display screen to
select previous/next stored channel and play.
Press number button on remote control or
directly press number button in TV mode, the
unit skips to selected channel and play. For
example: press button 6 on remote control or
directly touch number[ 6] in TV mode can switch
to channel [6]. Press [GOTO] button on remote
control “- -” appears in the upper left corner on
screen, then press button “3” and “9” can switch
to channel 39.
Sound System Switch
Touch the area of sound system switch on display
screen to switch TV sound system in the sequence
shown below:
The sound of a certain channel may sound
abnormal, probably because sound system
is wrongly set and need to be reset. (sound
systems adopted in China: Mainland areas
except for few cities such as Shenzhen use “1”;
other areas generally use “DK”; Hongkong uses
“1”. Users should pay special attention to this).
After the unit searching TV signals and enters
into TV play status, touch middle area on the
screen to pop up function menu as shown below.
0:44.25
2:62.25
4:91.25
1:55.75
3:76.25
5:109.25
SECAM-D K
CH:0
19

07
MP3 Function Operation
After inserting SD card, U disc or the Mp3
disc playing MP3 files, you will enter the
interface as below:
You need to press REL button on the
front panel to release the panel, insert SD
card on the base.
.
In MP3 play, if it contains file folder, press
button on the screen and use
to access preferred folder, then press
[ENTER] button on the remote control to
confirm. Touch button on the screen
to access previous/next track. Touch to
play.
【 】 【 】
【 】
【 】【 】
【 】
Skip/Speed forward/backward
In playback mode, short press SEEK-/SEEK+
on the remote control to skip play, long press
it to speed forward/backward play. The speed
changes as below: X2 X4 X8 X16 X32
→ →→→
This function can also be achieved by
screen operation or pressing relative buttons
on the panel.
.
Repeat Play
In MP3 play, press [RPT] button on the remote
control to choose repeat mode: single repeat.
After you select single repeat, the unit will
play the current song repeatedly.
Select Song
In playback mode, directly press number
buttons 1-9 on the remote control to input the
serial number of the song, the unit will play
the corresponding program automaticlly.
For the discs have more then 10 songs, use
number button 10+ and 0-9 on the remote
control to choose.
This function can also be achieved by
screen operation.
Press number button 10+ once to get
10+, press it twice to get 20+, the rest may be
deduced by analogy.
.
.
Stop
Touch button on the remote control to
stop playing MP3 files.
【 】
Pause
In the mp3 file.
remote control to switch betwon play and
pause.
Touch button on the
【 】
.
This function can also be achieved by
screen operation
.
This function can also be achieved by
screen operation.
18
08
Then insert the serial number of title and
chapter by using number button on the remote
control and up/down/left/right button, move
the cursor to PLAY, press ENTER button on
the contro to complete programmed play.
This function can only be achieved with
remote control
.
Change Subtitle Language (multi subtitles)
For DVD disc recorded with multi subtitles,
you can change subtitle language during play.
Press [SUB-T] button repeatedly can change
subtitle language during play.
This function can only be achieved by
remote control.
This function is only for DVD discs
recorded with multi subtitles.
The number in the “2” sign on the DVD
disc cover indicates how many languages
the subtitle is recorded with.
.
.
.
Change Dialogue Language (multi-tone)
Audio play can has various dialogue languages
and audio systems. If the disc is recorded
with multi tones, you can change dialogue
language and audio system during play.
In play mode, press [AUDIO] button on the
remote control repeatedly can change dialogue
language.
.
This function can only be achieved by
remote control.
This function is only for DVD disc
with multi tones.
recorded
.
.
The number in the “2” sign on the
cover indicates how many languages the subtitle
is recorded with.
DVD disc
Title Select
In DVD mode, press [TITLE] button on the
remote control can return to the title menue.
All titles in the disc are displayed. Use up/down
/left/right button or number button on the
control to choose prefered chapter, then press
[ENTER] or button to play the chapter.
【 】
This function can only be achieved by
remote control.
.
Menu Select
In playback mode, press PBC button on the
remote control to back to the main menu, all
chapters are displayed on the screen. Use
direction button or number button on the control
to select preferred chapter, then press
or ENTER button to play selected chapter.
【 】
This function can only be achieved by
remote control
.
Video Play
When you are driving, the screen displays “
You cannot watch video files during driving”
Please park your car in a safe area and pull up
the hand brake before watching.
Back rearview switch
When you are backing the car, the unit will
automaticlly switch to back mode; after backing
the system will switch to its previous running
status.
Select Sound Output Mode
In VCD mode, repeatedly press [AUDIO] button
on the remote control to switch the sound track
in the following sequenc:
Change the Angle (multi-angle)
For DVD discs recorded from multi angles,
you can press ANGLE button on the remote
control to change the visual angle. Switch is
done in the following sequence:
Left track right track stereo
→ →
ANGLE 1 (visual angle 1) ANGLE 2
(visual angle 2) ANGLE 3 (visual angle 3)
→
→
This function can only be achieved by
remote control.
This function is only for DVD discs recorded
with multi angles.
The symbol on the disc cover
indicates multi-angle scene. The number in
Sign indicates number of the angles.
You cannot switch visual angle in slow play.
.
.
.3
3
.
17

09
DVD/VCD/CD Founction Operation
DVD Play
(1) Insert DVD disc into disc loader then it
plays automaticlly. If there is a disc in the unit,
directly touch the DVD icon on the main menu
to access play mode.
(2) Press [VOL-/+] on the screen to adjust the
volume level.
Rotate[ VOL] knob or touch [VOL+/-] button on
the screen can also adjust the volume.
Skip /Speed forward/backward
In play mode, short press SEEK button on the
remote control to skip to previous track/next
track; long press it to access speed forward/
backward play. Each time you press the button,
the speed changes in the flowing sequence:
X2 X4 X8 X16 X32 play
→ → → → →
This function can also be achieved by
operating on the screen or using relative
button on the panel.
.
Stop
In DVD mode, press button once on the
control to access prestop status, when press
button on the control can continue to
play; press twice to completely stop,
then press the disc is played from the
first song.
【 】
【 】
/
【 】
/
【 】
This function can also be achieved by
screen operation or pressing relative button
on the front panel.
.
Random Play
In VCD/DVD mode, press [RDM] on the remote
control to random play, repress [RDM] to return
to the normal play mode.
.
In VCD mode, this function can only
be achieved when PBC is off.
Repeat Playback
In DVD mode, press[ RPT] button on the
remote control to start repeating function
of the following contents:
In VCD/CD mode, press [RPT] to start repeat
function of the following contents:
Single repeat off
→
Chapter title off
→ →
Slow Play
In VCD mode, press [SLOW] button on the
remote control to access slow play. The speed
changes as below:
Slow ½ slow 1/3 slow 1/4 play
→→ →
In DVD mode, press SLOW to slow frontward
/backward, the speed changes as below:
Slow frontward ½ slow frontward 1/4 slow
frontward 1/8 slow frontward 1/16
Slow backward slow backward 1/4 slow
backward 1/8 slow backward 1/16 play
½
→
→
→→
→→
→→
This function can only be achived by
remote control
.
Image Zoom In/Out
During play, press ZOOM on the remote control
to zoom in/out image in the following sequence:
2 3 4 ½ 1/3 1/4 off
→ → → → → →
This function can only be achieved with
remote control.
Reduced image cannot be moved on the
screen.
.
.
Display
In playback mode, press[ OSD] button on the
remote control to display all information about
the currently played disc.
Only use remote control can this function
be achieved.
.
Programmed play
In DVD mode, you can set playing sequence
of your favorate songs by progremmed play.
Press [PROG] button on the remote control
and the screen displays program-edit menu
as below:
16

Press this button to
Reset Device
If the unit or its connected device does not
work normally, use prong tool to press the
reset button, after it restarts, the unit resumes
to its initial setup.
Turn on/off Host
On
[ ]
When the ignition switch is put in ACC or
ON position, press button on the front
panel to turn on the unit.
Off
After the host starts, hold button for 3
seconds or longer, the host will turn off.
[ ]
After turning the unit on, put ignition switch
in LOCK or take out the key, then the host
will turn off automaticlly. Next time put
ignition switch in ACC or ON place, the unit
will turn on automaticlly.
.
.
.
Volume Control
.
Press [VOL] button on the remote control can
increase/decrease volume level. Rotate VOL
knob on the front panel, or touch [VOL+/-]
on the panel also can adjust the volume.
Sound Effect Setup
.
Press [SEL] button on the remote control or
[SEL]button on the front panel to switch sound
effect as below shows:
Bass Trebel Balance Fader Bright
Hue Contrast Shart Volume
→ → → → →
→ → →
After choose the mode, you can use [VOL]
button on the remote control to adjust the
parameters.
If you do not adjust the mode within 3 seconds,
the system will return to it previous status.
.
.
Turn on/off Equal Loudness
Short press the [LOUD ]button on the remote
control to turn on equal loudness, repress it
to turn off.
.
EQ Setup
When listening music, you can choose preset
mode (POP, CLASSIC, ROCK). By pressing
EQ on the remote control to switch as blow :
POP CLASSIC ROCK OFF
→→→
Setup Operation
The unit will resume to it previous running
status if none operation is performed with
5 seconds.
3
1 2
4
Multifunction Operation
In DVD mode, touch the top center of the screen
will display the following menu.
1.
Play/Pause
2.
Stop play
3.
Next track/Previous track
4.
To enter DVD setup interface, refer to
“System Setup”below for detailed information.
5.Number Button
Touch [TA ]area on the screen and the number
button pops up, touch the button to choose
song and play.
6.Exit
Touch the top right corner on the screen to exit
DVD play mode.
10 15
1. Audio
Touch the [AUDIO] icon to enter the
Interface below.
You can adjust the following sound effect on
the interface: volume, bass, treble, balance,
FAD.
Touch to switch among these sound
effects.
Touch[ -/+] to adjust selected sound effect.
INFO
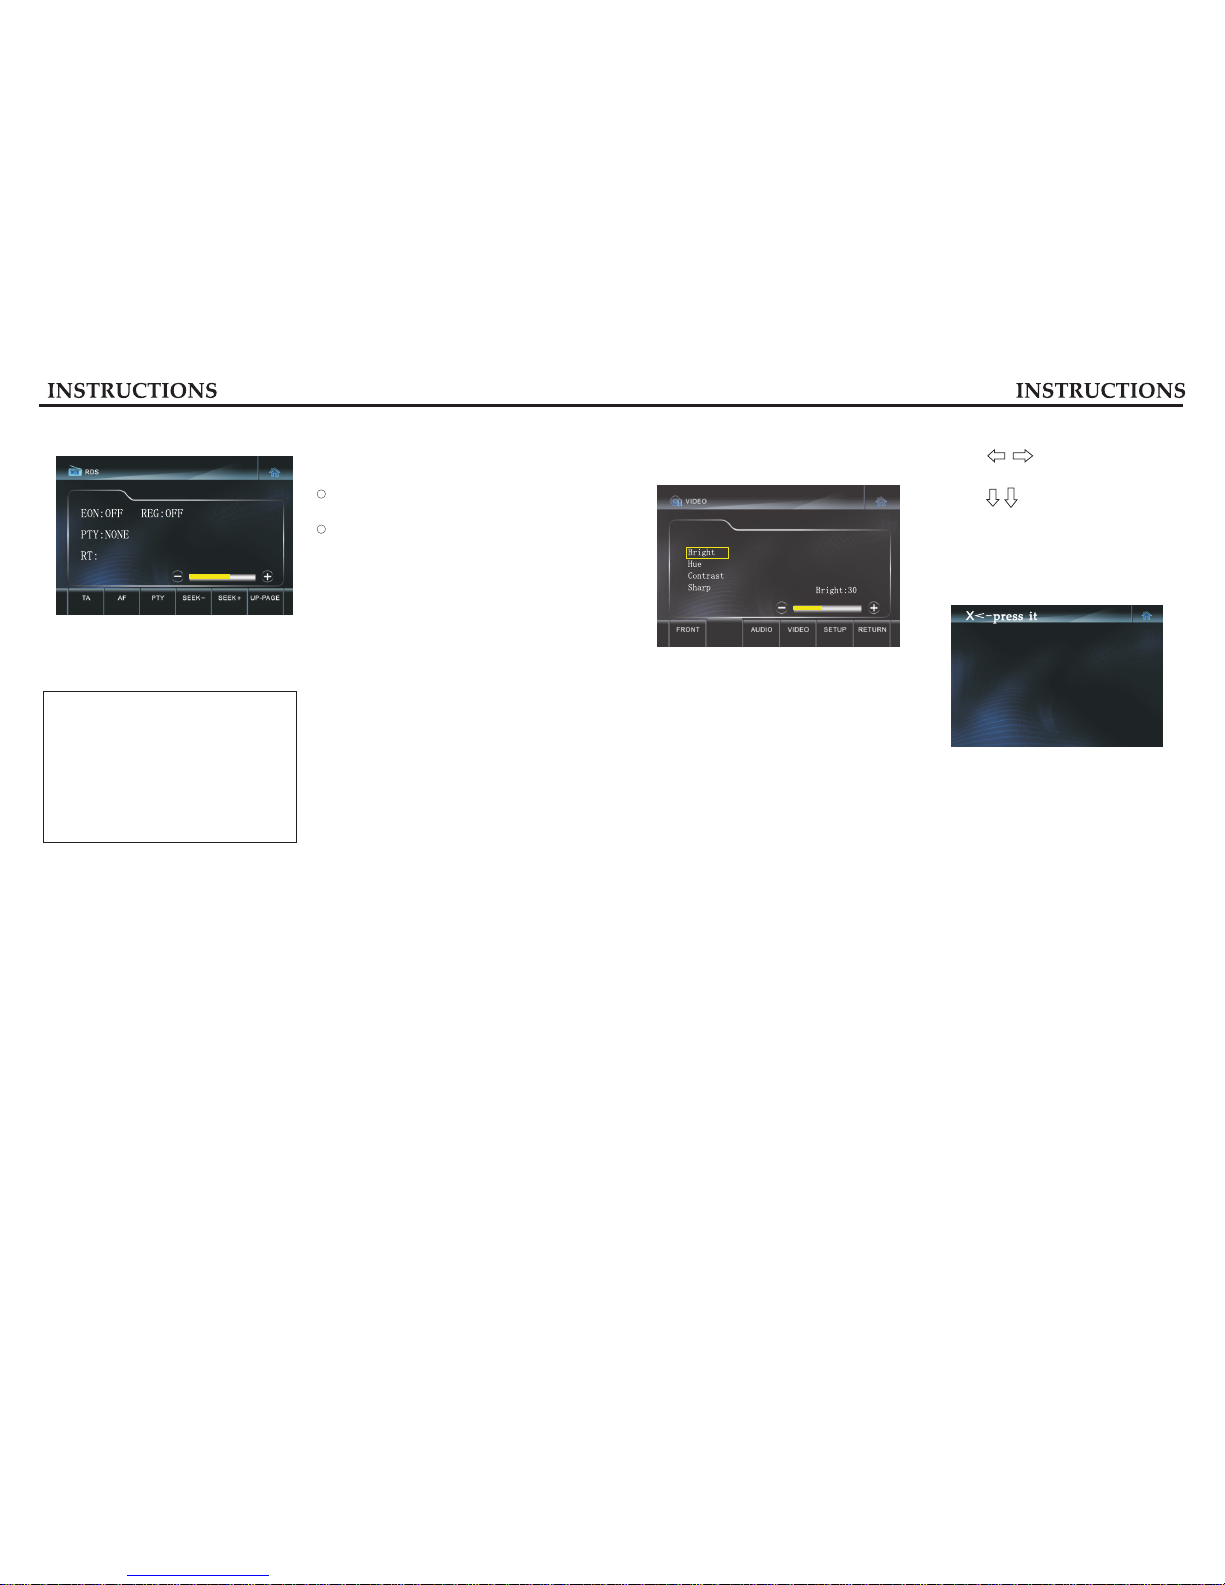
2. Video Setup
Touch [VIDEO ]icon to enter the interface
below.
You can adjust the following video effect on
the interface: Bright, Hue, Contrast, Sharp.
3. System Setup
Touch[ SETUP] icon to enter the system
setup interface.
Clock sys
Choose time display mode(24h/12h system)
Key Beep
To open/close touch tone.
BEEP ON: open touch tone.
BEEP OFF: close touch tone.
Radio Area Select
To select radio area of your country
on the interface.
Back Bright
To select screen brightness: 100%, 75%,
50%, 25%
Backlight
To set the highlighting time of backlight:
off, 15s, 30s, 60s
RDS Function Operation
RDS provides series information(traffic
information, name of station), and can auto
maticlly switch to the station with stronger
signal of the same program.
Additional Information
RDS datas contain the following contents:
P1---program identify code
PS---program name
AF---switch frequency list
TP---traffic program
TA---traffic announcement
PTY---program type
EON---strengthen other networks
1.AF
Touch the button to turn on/off AF function
When the receiving station signal becomes
weak, it will automaticlly switch to other
frequencies.
When receiving urgent program, the screen
will display “ALARM”.
.
.
.
Receiving Traffic Radio:
1. Press [TA] button to open TA mode.
2. The radio will automaticlly search traffic
stations when the traffic station is On. The
screen will display “TP”character after searching
is completed. Only when the traffic information
is radioed can it be received, after the traffic
radio is completed, it automaticlly switches
to the previous mode.
3. Repress TA button to close TA function. In
other modes, the traffic announcement can
automaticlly swich to radio mode. After it is
completed, it will switch to the previous mode
and then play.
2. PTY
PTY allows searching for a given program type.
Touch PTY button to select searched program
type.
3 seconds after the selecting program type,
the radio will automaticlly search the radio
of set program type.
1
2
3. EON
ON: Open EON functon and the radio will
receive another AF chart.
OFF: Close REG function.
ON: Open REG function can only receive local
RDS stations.
OFF: Close REG function.
5.SEEK-\SEEK+
FM P1 MONO
87.5MHZ
EQ:OFF
LOUD:OFF
4.REG
Short press the button to manually search a
station up forward/down forward; long press
it to automaticlly search station up forward/
down forward.
1114
Clock Adjust
Touch and move the cursor to
hour, minute, second.
Touch to adjust hour, minute and
second.
Touch Adust
If deviation occurs in touch, or if it's the
first time to use the unit, you need to
calculate thescreen.
Use touch pen to click the center of “x”for
2s or longer until the screen displays
“successful calculation”.
INFO

INFO
INFO
INFO
4. Return
Touch [RETURN] Iicon can return to the previous working mode.
Radio Function Operation
Touch [RADIO] icon to enter the radio interface
as below.
1. Preset Station Button
To display preset station list (long press the
button to store the current frequency onto the
prestored list).
2. BAND
Touch the button to swich band.
3.LOC
Ttouch the button to switch between remote
and local.
4.AMS
Short press to browse the stations in sequence
for 6 seconds each, long press to search
stationau tomaticlly.
5.EQ
Press the button to select preset balance mode.
6.LOUD
Press the button to turn on/off equal loudness.
7.SEEK-\SEEK+
Short press it toadjust station frequency
manually, long press it to browse station
upforward/downforward automaticlly.
8.DN-PAGE
Touch the button to switch to RDS operation
interface.
(For detailed information please refer to “RDS
Function Operation”)
Band Switch
Touch the BAND button on the screen to swich
band in the following sequence.
Fm1 Fm2 Fm3 Nw1 Nw2
Press remote control or [BAND] button on the
panel also achieves this function.
→→ → →
Manually/Automaticlly Search Station
1.Manual Search
Short press SEEK button on the screen to adjust
frequency and search stations up forward/
down forward.
2.Automatic Search
Long press SEEK button on the screen to seach
station up forward/down forward. While
searching, Retouch it to stop.
press the remote control or SEEK button on
the front panel also achieves this function.
.
Manual Preset Station
30 stations can be stored in the radio(18 FM
bands, 12 AM bands).
Search a station by manual searching.
Long press any number button in 1-6 on the
radio main interface, the station will be
stored in the appointed position in radio
(such as: 6 87.5M).
.
.
If the prestored position has been stored,
after executing store operation, the original
station will be replaced by the new.
.
Browse Station/Select Station
Browse Station
After searching and storing station, short press
[AMS] icon to browse, 6s for each. During
browsing ,repress [AMS] if you find favorate
program and need to stop browsing.
.
Select Station
After searching and storing station, short press
[AMS] icon to browse, 6s for each station. During
browsing ,repress [AMS ]if you find favorate
program and need to stop browsing.
Directly touch number button 1-6 on the screen
to play.
.
Press the remote contro or [AMS ]button on
the panel can also achieve this function.
.
12 13
Table of contents
Other Erisin Car Video System manuals


Popular Car Video System manuals by other brands


Metra Electronics
Metra Electronics 107-GM5B installation instructions

Boss Audio Systems
Boss Audio Systems bv8970b user manual

CNProVision
CNProVision CAR MONITOR operating instructions

Panasonic
Panasonic CQ-VD7200U operating instructions

Audiovox
Audiovox HR7012 owner's manual

Pioneer
Pioneer AVH-P7500DVD installation manual


