Ermator S13 User manual

OPERATING INSTRUCTIONS
Dust Extractor
S13
READ ALL INSTRUCTIONS BEFORE
USING

Introduction
Dear Customer,
Thank you for choosing Ermator as your supplier.
We hope that the Ermator S13 dust extractor will be to your satisfaction and meet your expectations.
Ermator has been manufacturing professional dust extractors since 1967 and has over the years
acquired a genuine technical knowledge in this area. We are continuously striving to improve our
products in our product segment and will continue to supply the market with new equipment.
Notice!
These instructions are only for dust extractor type Ermator S13.
The Ermator S13 dust extractor can only be used with dry, non-explosive material.
The Ermator S13 dust extractor has been designed to clean construction areas and be connected
to small electrical machines such as drills etc.
Ermator will not be held responsible if the dust extractor is used for other applications or been
used in ways other than those outlined in this instruction manual.
Please pay particular attention to the safety regulations.
Read the complete instruction manual before using the Ermator S13.
All spare parts used with the Ermator S13 must be those specified by Ermator.
Revision 0 1

Unpacking
When unpacking the machine, please check that the following accessories are included:
•The hose with end fittings.
•Handle.
•Floor nozzle.
•Extra bags.
If any of the above-mentioned parts are missing, please contact your local distributor or our sales
representative.
Assemble the front wheels using the using bolt, washer and nut that are included in the package.
Safety Instructions
Handling
Warning
•Cables damaged through crushing or splitting can be dangerous if used and should be replaced
immediately. Risk of personal injury.
Warning
•Do not connect the machine to an unearthed socket. Risk of personal injury.
Warning
•Make sure the assembly area is firm, so the dust extractor does not tip over. Risk of personal
and material injury.
•
Warning
•Risk of pinching when handling the toggle fastener.
Warning
•The machine must not be used in environments where explosive gases may be present. Serious
risk of explosion.
Service
Warning
•Remove the plug from the wall socket when carrying out maintenance work. Risk of personal
injury.
Warning
•Dust can be spread when the coarse filter and the absolute filter are replaced that can be
hazardous to health. Accordingly, the user should wear protective glasses, protective gloves,
and a breathing mask conforming to protection class FFP3.
Warning
•Do not puncture the absolute filter. Risk of dust dispersion.
Revision 0 2

Function
The machine is designed for sucking and separating dry, non-combustible dust with an explosion
limit value of >0.1mg/m3.
The motor is started by the switch.
The switch has three positions: 0: Motor off
1: Motor on
2: Autostart function, only 230V version (When you use the dust
extractor together with another machine, there is an electrical outlet on the dust extractor. Connect the machine
to this outlet. Then when you start it up the dust extractor will also start. When you turn in off the dust extractor
will continue to run for approximately 20 seconds. To empty the hose.)
Dust-laden air is then sucked through the inlet valve at high speed via the suction hose. The air is
slowed down by the cyclone and coarse dust particles are separated out, partly by centrifugal force and
partly by gravity. Air and finer particles then pass through the double filter system where separation is
made. The machine is designed for filter cleaning by reverse air pulse.
The separated dust accumulates in the cyclone until the machine is switched off, when it drops through
the bottom flap into the plastic bag.
Use
Before use, the user must be trained in handling the machine and the hazardous dust.
Connect the electric plug to an outlet with the correct voltage (see the designation plate).
The filter must be cleaned from time to time. This must be done before changing the plastic bag and
can also be done when the work is complete or when there is poor suction.
Procedure: Cover the inlet, use attached cover, let the machine build up vacuum for a few seconds
then quickly push down on the key and release it. Repeat the procedure 4-5 times.
Turn of the motor and wait until it stops completely, then uncover the inlet.
If suction remains poor, the filter should be replaced.
The plastic bag may only be replaced after cleaning the filter.
The plastic bag must be tied up after removal.
Only use original parts.
Filter change
Risk of dust dispersion - Use of personal safety equipment
Unhealthy dust can be spread during filter change. Accordingly, the user should wear protective
glasses, protective gloves, and a breathing mask conforming to protection class FFP3.
Main filter
Loosen the 3 clamps and remove the top. Lift out the filter, remove the gasket and place the filter
gently in a plastic bag. This bag must be properly disposed of.
Insert a new filter.
Only original filters may be used.
Hepa Filter
Loosen the two nuts on the filter cap carefully lift the filter into a clean plastic bag. This bag must be
properly disposed of. Insert a new filter in reverse order.
Check the seal when changing filters and change defective seals.
WARNING
Connect the electric plug to a power outlet with the correct voltage, see the nameplate.
WARNING
Switch off the machine and pull the plug out of the socket.
Revision 0 3

Change of dust bag/ reload Longopac
When changing dust bag do as follow:
Loosen the belt holding the dust bag. Start the dust extractor. Remove the dust bag and
dispose it. Attach a new bag, tighten the belt end then start use the machine or turn it off.
Use the same procedure when reloading Longopac (optional).
Service
•When cleaning and servicing the machine, you must switch off the machine and remove the
plug from the socket.
•Avoid cleaning with a high pressure cleaner. If necessary, do not direct at the openings on the
machine, especially the opening for cooling air.
•Before moving the machine from the work area, the machine must be cleaned.
•All other equipment must be regarded as contaminated and be treated thereafter.
•If possible, use a special suitable room.
•Proper personnel protective equipment must be used.
•All parts which are contaminated after service must be properly disposed of in plastic bags
according to all regulations.
•If the machine has to be used for other purposes, it is extremely important that the machine is
cleaned, to avoid the spread of hazardous dust.
Accessories
Part.no. Description No./machine
1276008 Bag (25-pcs) 1 pcs
1376013 Longopac (4-pcs)(option) 1 pcs
201000016 Main filter 1 pcs
200700070a HEPA 13 filter 1 pcs
For other spare parts, see the enclosed spare parts list.
Warranty
All Ermator devices and accessories have a 12-month factory warranty for material and manufacturing
defects. The warranty extends to 36 months when returning the attached warranty slip. Do not attempt
to repair the suction apparatus without the consent of the manufacturer.
The warranty does not cover defects which are the result of normal wear and tear, negligence,
defective use, unauthorised repair or the suction apparatus being connected to the incorrect voltage.
In the event of any complaint, the suction apparatus or an agreed part of it must be returned to us or
our authorised representative for warranty examination and for any warranty repair or replacement.
WARNING
Before cleaning and servicing the machine, you must switch the machine off and pull out the
plug from the outlet.
Revision 0 4

Problem solving
The S13 is designed and manufactured for a severe environment and tasks, but the user must note that
the machine must be protected from knocks and blows. Filter, seals, attachments, and connections are
carefully adapted and selected with regard to the operator’s work environment. Therefore, the operator
and service personnel must treat the machine with care in order to work correctly for many years.
Problem Cause Procedure
Motor does not start No power Connect the machine
Cable defective Change
Switch defective Change
Motor stops immediately Wrong fuse Connect to correct fuse
after starting
Motor runs but there is no Hose not connected Connect hose
suction Hose blocked Clean hose
No plastic bag Fit plastic bag
Motor runs but suction Hole in the hose Change hose
Poor Filter blocked Change filter
Top cover loose Adjust
Sealing defective Change current seal
Dust blows from motor Filter loose or defective Adjust or change
Abnormal noise Order service
SAVE THESE INSTRUCTIONS!
Revision 0 5

TECHNICAL DATA
S13
120V
VOLTAGE (120VAC, 1-phase)
POWER 1200 W max
MAX AIRFLOW 200 m³/h
129 cfm
MAX VACUUM 26 kPa
HOSE 4m x ∅38mm
13’x ∅1,5”
INLET ∅50mm
∅2”
MAIN FILTER >99.5%
1.5m2/16,6ft2
HEPA 13 FILTER >99.95% 1st
1.2m2/13,32ft2
SOUND LEVEL 70 dB(A)
DUST COLLTECTION SYSTEM Plastic bag
440x600 mm
DIMENSION LxWxH 840x400x1100 mm
WEIGHT 28 kg
62 lbs
Revision 0 6

OM ÖVERENSSTÄMMELSE DECLARATION OF
CONFORMITY
DECLARATION DE CONFORMITÉ
ERKLÄRUNG DER ÜBERSTIMMUNG
SAMSVARSERKL∅RING
Pullman Ermator AB
Industrivägen 10
S-777 34 SMEDJEBACKEN
Försäkrar under eget ansvar att maskinen
Declare under our sole responsibility that the machine
Certifie sous sa propre responsabilité que le produit ciaprès
Versichern auf eigener verantwortung, dass das Produkt
Forsikrer under eget ansvar at maskinen
S13 120V No: 0900058a0001-xxxx
Tillv.år/Manufact.year/Baujahr: 2010-
som omfattas av denna försäkring är i överensstämmelse med standarder:
included in this declaration, follows the provisions of the:
est conforme aux aux normes suivantes:
den folgenden Normen entspricht:
er i overensstemmelse med standarder:
SS-EN 292-1, SS-EN 60 204-1 (1993.11.30)
SS-EN 55011:1989
SS-EN 50082-1
SS-EN 60335-1, SS-EN 60335-2-69 & A1
enligt villkoren i/according to/selon/laut/i henhold til vilkårene i
Machine Directive 98/37/EEG
Low Voltage Directive 73/23/EEG
EMC Directive 89/336/EEG
SMEDJEBACKEN 2010.01.01 Torbjörn Bengtsson
VD
General Manager
Revision 0 7
S13 120V
Number
200900249a
Model
S13 120V
Rev.
01
Revision 0 8

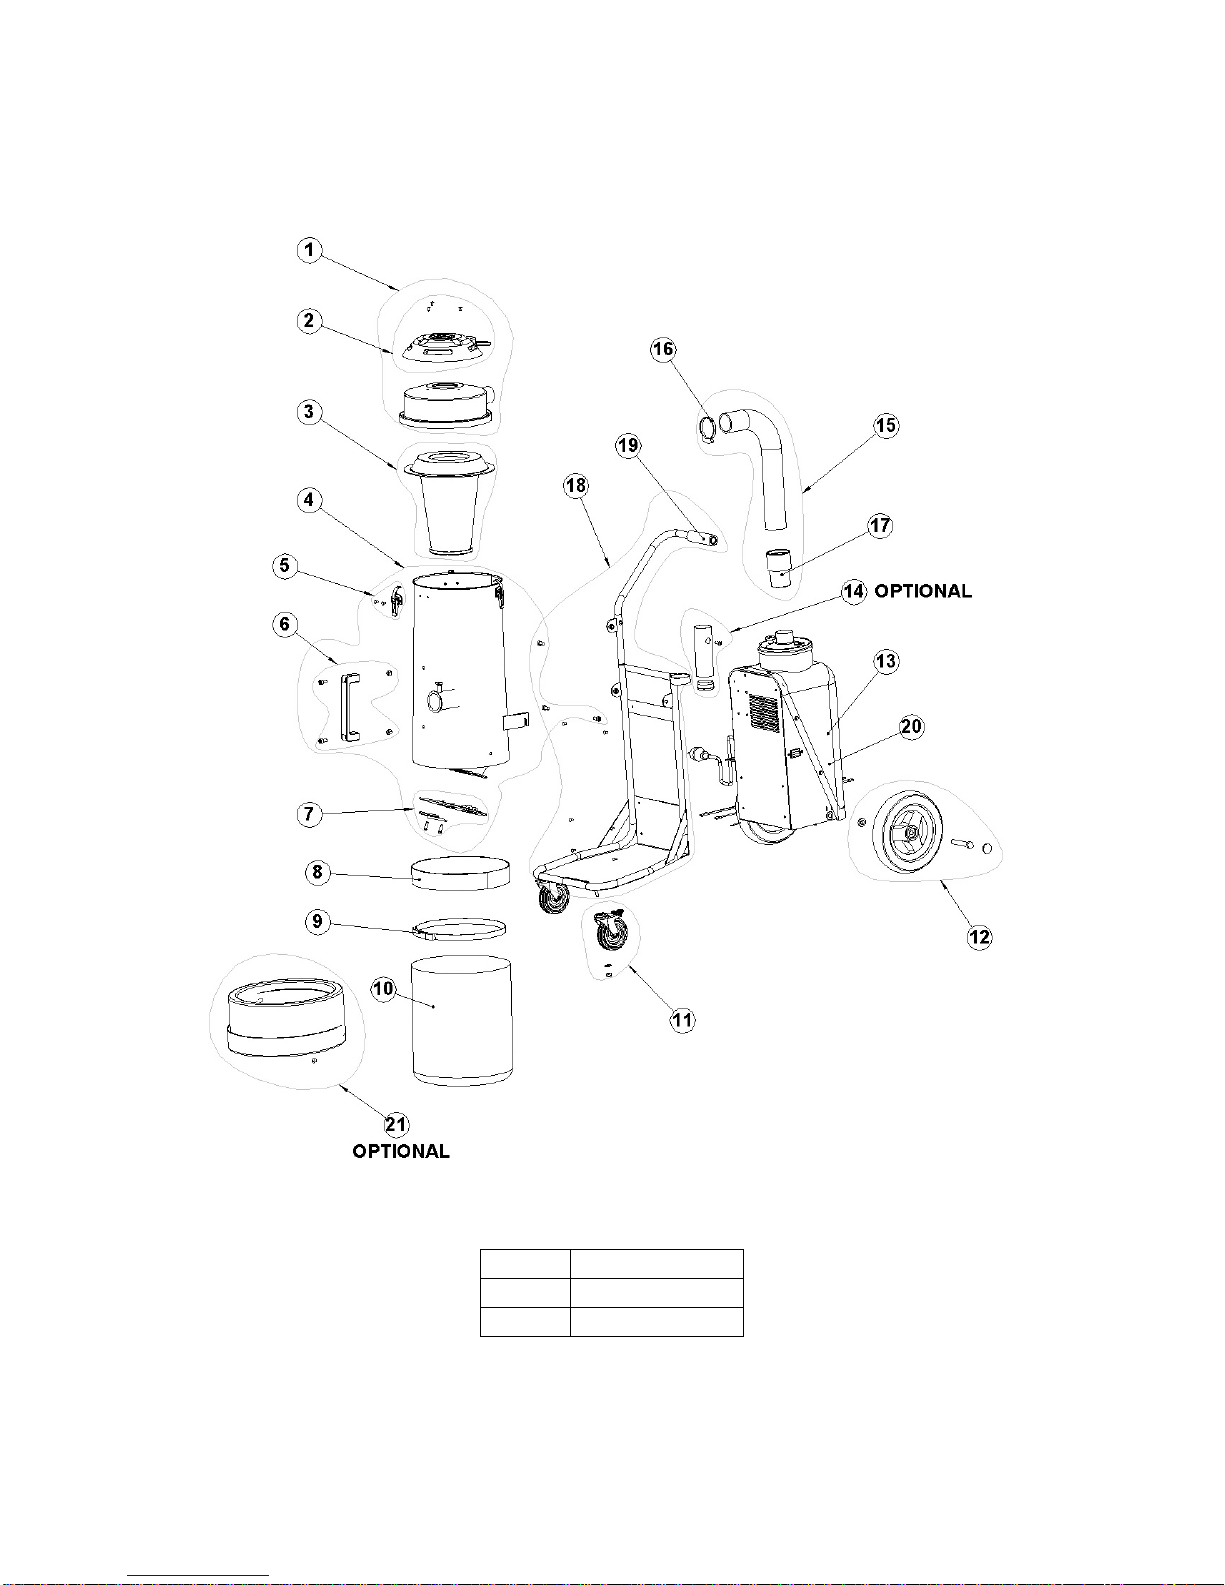
S13 120V
POS.
QTY.
NUMBER
DESCRIPTION
1
1
201000117
TOP COVER ASSEMBLY (ex.S13)
2
1
201000118
CLEANING UNIT KIT
3
1
201000016
MAIN FILTER (ex. S13)
4
1
201000119a
TANK COMPLETE (ex. S13 US)
5
3
200600799
HOLDER KIT
6
1
201000120
HANDLE KIT
7
1
201000116
FLAP KIT
8
1
1351145
ANTI-SKID
9
1
1371001
BELT
10
1
1276008
PLASTIC BAG
11
2
200800152
FRONT WHEEL KIT
12
2
200800151
REAR WHEEL KIT
13
1
N/A
ENGINE PACK 230V
14
1
201000122
CLIP HOLDER KIT
15
1
201000123
HOSE KIT S13
16
1
200800158
HOSE CLAMP PLASTIC 60-65MM
17
1
1335011
HOSE END
18
1
201000124
WAGON COMPLETE
19
1
1345012
HANDLE
20
1
200600398a
ENGINE PACK 120V
21
1
201000115
LONGOPAC SET
Number
200900249a
Model
S13 120V
Rev.
01
ENIGINE PACKAGE 120 V
Revision 0 9
Revision 0 10

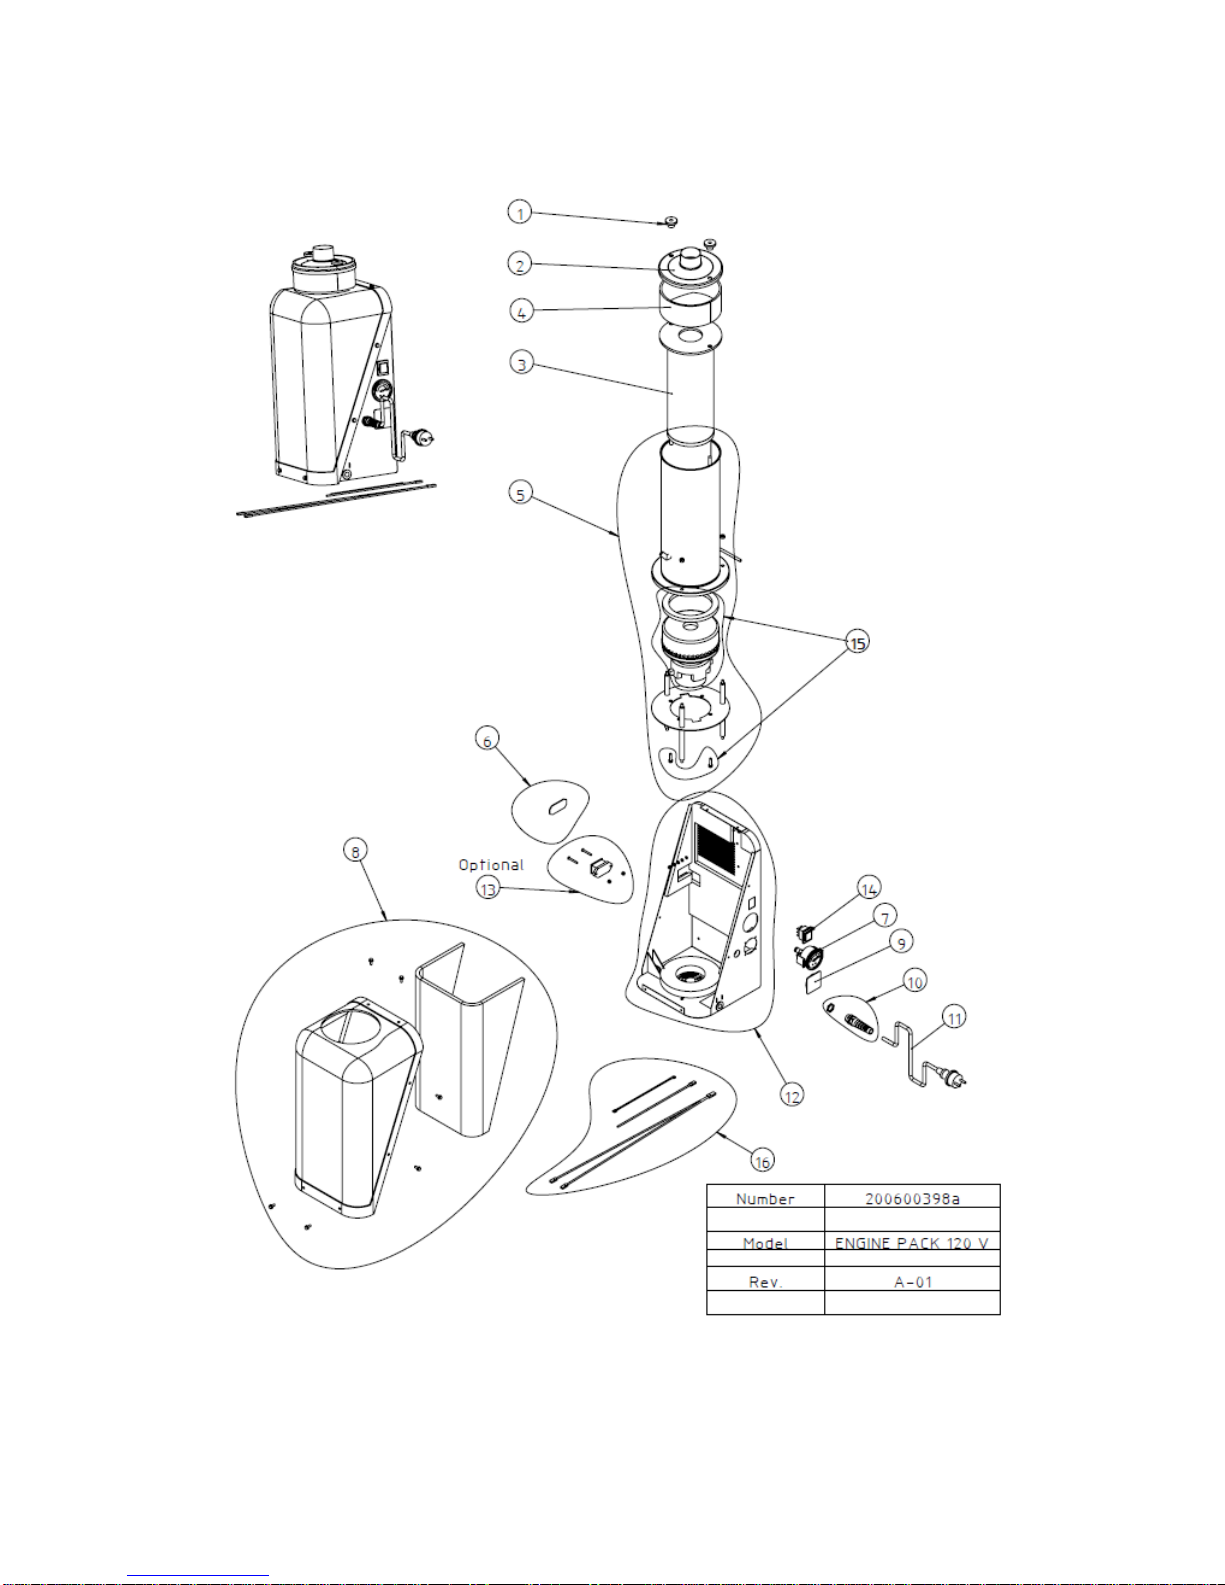
ENGINE PACKAGE 120 V
POS. QTY NUMBER DESCRIPTION
1
2
200700289
LETTER NUT
2
1
200700147
FILTER COVER
3
1
200700070
MICRO FILTER
4
1
200600080
SEALING
5
1
200600084h
ENGINE TUBE
6
1
201000148
COUNTER COVER
7
1
200700413
MANOMETER KIT
8
1
200600482
ENGINE COVER, KIT
9
1
1370019
COVER
10
1
1362184
CABLE FIX
11
1
1361025
CORD SET
12
1
201000134
CHASSI, COMPLETE
13
1
201000133
COUNTER KIT
14
1
6362109
SWITCH
15
1
201000138
S13 120V MOTOR KIT
16 1 200700396 CABLE KIT
Number
200600398a
Model
ENGINE PACK 120V
Rev.
01
Revision 0 11

ACCESSORIES S13 120 V
POS.
QTY
NUMBER
DESCRIPTION
1
1
200900281
HOSE 38mm x 4m
2
1
6324034
KC004 SUCTION PIPE
3
1
1326054
GRD370 FLOOR TOOL
4
1
1340011
D370A RUBBER BLADES
Revision 0 12

Notes
______________________
______________________
______________________
______________________
______________________
______________________
______________________
______________________
______________________
______________________
______________________
______________________
______________________
Revision 0 13

Revision 0
14

Revision 0
15

Revision 0 16
Table of contents
Other Ermator Vacuum Cleaner manuals


