manuals.online logo
Brands
  1. Home
  2. •
  3. Brands
  4. •
  5. ESA
  6. •
  7. Adapter
  8. •
  9. ESA XB300 User manual

ESA XB300 User manual

Rev. 2 Date: 07/10/2011 405.1300.191.0
XB BOX PC INDUSTRIALI
XB INDUSTRIAL BOX PC
XB BOX PC INDUSTRIEL
XB INDUSTRIE BOX PC
XB PC BOX INDUSTRIAL
Dimensioni / Dimensions / Dimensions / Abmessungen / Dimensiones
XB300 – 0 Slot
XB300 – 2 Slot
XB300 – 3 Slot
Posteriore / Rear side / Face arriéres / Rückseiten / Posterior
XB300SF1
Keyboard
Mouse COM 1
COM 2 VGA
DVI
USB
LAN 1 LAN 2
USB
MIC
Line-In
Line-Out
FG
+
DC 11~32V
AB
XB300SF3 - XB300SF4
Mouse
Keyboard
COM 2
COM 1 DVI
VGA
USB USB
LAN LAN
MIC
Line-In
Line-Out
FG
+
DC 11~32V
AB
A Alimentazione
Power supply
Alimentation
Spannungsversorgung
Alimentación
B Vedi manuale utente
See user manual
Voir mode d’emploi
Siehe Bedienungsanleitung
Ver el manual de usario
XB300SFx
C
Reset HDD PowerAPO
ATX
On/Off
CF
C Vedi manuale utente
See user manual
Voir mode d’emploi
Siehe Bedienungsanleitung
Ver el manual de usario
Inserimento di una scheda PCI / Inserting the PCI board / Introduction d’une carte
PCI / Einfügung einer PCI-Karte / Inserción de una tarjeta PCI
Vedi manuale utente / See user manual / Voir mode d’emploi / Siehe
Bedienungsanleitung / Ver el manual de usario
Sostituzione della batteria / Substituting the battery / Substitution de la pile /
Austauschen der Batterie / Sustitución de la batería
1. Spegnere il XB300 / Switch off XB300 / Éteindre le XB300 / Das XB300 ausschalten
/ Apague el XB300
2. Rimuovere la copertura (vedi manuale utente) / Remove back cover (see user
manual) / Enlever le couvercle (voir mode d’emploi) / Das Gehäuse abnehmen
(siehe Bedienungsanleitung ) / Quite la cubierta (ver el manual de usario)
3. Sostituire la batteria della scheda madre (manuale utente) / Replace the battery on
the motherboard (see user manual) / Remplacer la pile sur la carte mère (voir mode
d’emploi) / Ersetzen Sie der Batterie auf Hauptplatine (siehe Bedienungsanleitung) /
Reemplazar la batería en la placa base (ver el manual de usario)
ATTENZIONE: Batteria al Litio 3V CR2032 - Inserire la batteria nuova rispettando il
tipo e le polarità. Non disperdere le batterie nell’ambiente. / ATTENTION: Lithium
battery 3V CR2032 - Insert the new battery checking that the polarities are correct.
Discarded batteries should be placed in appropriate containers. / ATTENTION: Pile
au Lithium 3V CR2032 - Introduire la nouvelle pile en respectant les polarités. Ne
pas jeter les piles dans la nature. / ACHTUNG: Lithium-Batterie CR2032 - Die neue
Batterie einsetzen, dabei auf korrekte und Polung achten. Die Batterien müssen
entsprechend entsorgt werden. / ATENCIÓN: Pila de litio 3V CR2032 - Introduzca la
nueva batería observando las polaridades. Tire las baterías descargadas a los
contenedores apropiados.
4. Rimontare la copertura / Replace back cover / Remonter le couvercle / Das Gehäuse
wieder aufsetzen / Vuelva a montar la cubierta
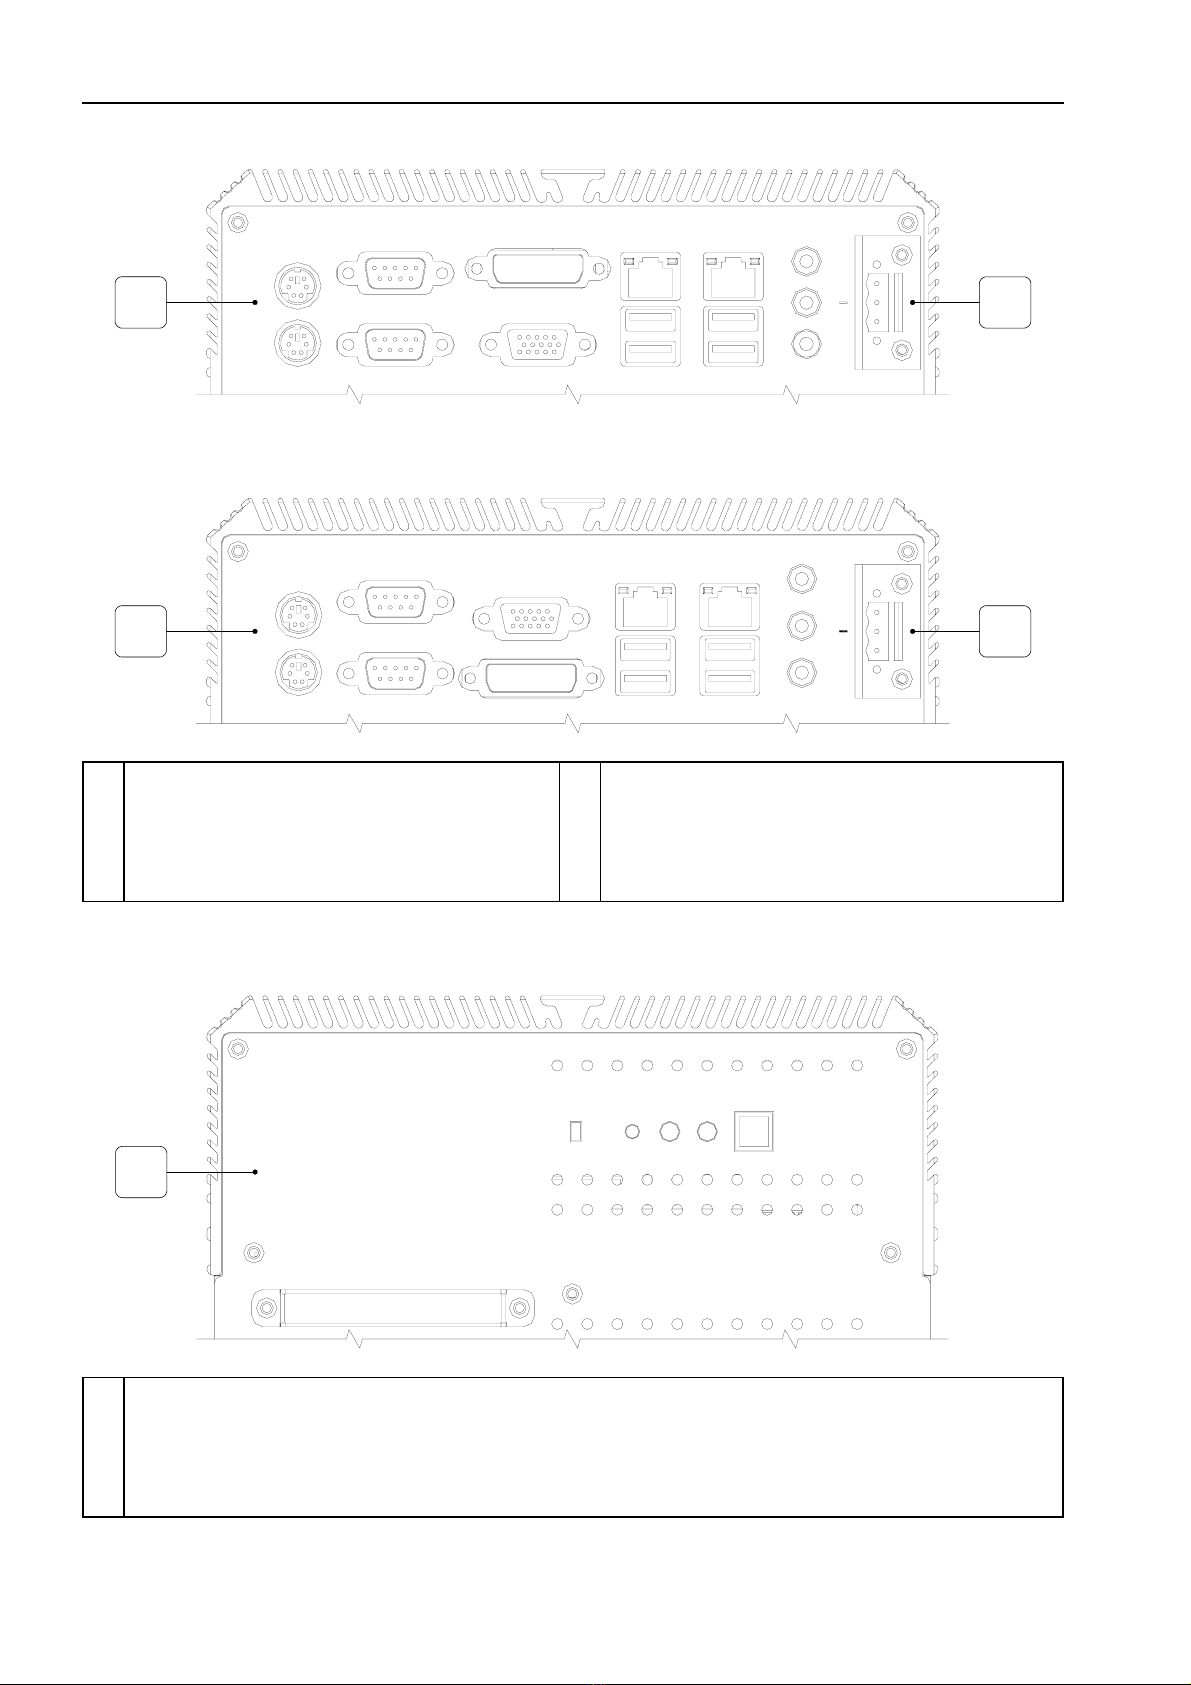
Porte di comunicazione / Communication ports / Portes de comunication /
Schnittstellen-Anschlüsse / Puertos de comunicación
Per il collegamento ai connettori delle periferiche fare riferimento alla documentazione
della scheda madre / Refer to motherboard documentation for connection of link to
peripheral devices / Se référer à la documentation de la carte mère pour les connexions
avec les périphériques / Siehe Dokumentation der Hauptplatine für Verbindungen mit
Peripheriegeräten / Mirar en la documentación de la placa base para el link de la
conexión a los dispositivos periféricos.
Compatibilità elettromagnetica / Electromagnetic compatibility / Compatibilité
électromagnétique / Elektromagnetische Verträglichkeit / Compatibilidad Electromagnética
Restrizioni d’uso: i requisiti di protezione non sono assicurati in zone residenziali /
Restriction of use: protection requirements are not ensured in residential areas /
Restriction d'emploi: les protection n'est pas assurée dans les zones résidentielles /
Nutzungsbeschränkung: den Schutzanforderungen in Wohngebieten nicht gewährleistet
ist / Restricción de uso: los requisitos de protección no esté garantizado en zonas
residenciales
Alimentazione / Power supply / Alimentation / Spannungsversorgung / Alimentación
Power supply 3 pins connector
1 + 24VDC
2 - 0V
3 FG
~
+- 24V
2
1
3
+24V
PE
0V
XB300
PLC
PE
N
L
~
+-
24V
PE
N
L1
~
-
24V
+
PE
N
L1
Attenzione: Queste due configurazioni danneggiano
gravemente il XB300.
Warning: These two configuration will seriously
damage components.
Attention: Ces deux configurations peuvent
endommager certains composants.
Warnung: Diese beiden Anschlussarten führen zu
Schäden am XB300 Gerät.
Atencion: Las dos configuraciones de arriba dañan
gravemente el XB300.
IMPORTANTE
La massa dei dispositivi collegati alle porte di comunicazione seriali e/o parallele deve essere tassativamente allo
stesso potenziale dello 0V di alimentazione del XB300. La circolazione di una corrente tra lo 0V di alimentazione e
la massa delle porte di comunicazione potrebbe causare il danneggiamento di alcuni componenti del XB300 o dei
dispositivi ad esso collegati.
IMPORTANT
The earth of the devices connected to the serial and/or parallel communication ports MUST have the same
potential as the 0V supply of the XB300. The circulation of current between the 0V supply and the earth of the
communication ports could cause damage to certain components of the XB300 or of the devices connected to it.
IMPORTANT
La masse des dispositifs connectés aux ports de communication parallèls ou sériels doit formellement être au
même potentiel qu’il 0V d’alimentation du XB300. La circuòation d’un courant entre il 0V d’alimentation et la masse
des ports de communication pouvait causer des dommages aux composants du XB300 ou des dispositifs connés.
WICHTIG
Die Erde der Parallelen und/order Seriellen Datenleitung müssen das gleiche Potential haben wie die Erde der
Spannungsversorgung vom Bediengerät. Eine nicht korrekte Erdung der Spannungsversorgung und der
Datenleitungen können schwere Schäden an den Bediengeräten sowie an den angeschlossene Komponenten
hervor rufen.
ATENCION
La masa de los dispositivos conectados en los puertos de comunicación serie y/o paralelo tiene que estar
conectada imprescindiblemente al mismo potencial del 0V de alimentación del XB300.La circulación de una
corriente entre el 0V de alimentación y la masa de los puertos de comunicación podría causar daños a algunos
componentes del XB300 o bien a algunos dispositivos conectados.
Comportamento uscite video / Video output behavior / Comportement sorties video /
Video output verhalten / Comportamiento de salidas video
ESA elettronica S.p.A.
Via Padre Masciadri, 4/A
I – 22066 Mariano Comense (CO)
Tel. ++39-031757400 Fax ++39-031751777
web: http://www.esahmi.com e-mail: [email protected]
XB300SF1
BIOS impostato su CRT+DVI - Scegliere e collegare il cavo all’uscita VGA o DVI.
Collegare una tastiera e abilitare l’uscita con; CTRL+ALT+F1 uscita VGA o
CTRL+ALT+F4 uscita DVI. / BIOS setting CRT+DVI - Choose and connect VGA or DVI
cable. Connect external keyboard to enable video port; CTRL+ALT+F1 VGA port or
CTRL+ALT+F4 DVI port. / Configuration du BIOS CRT+DVI - Choisir et connecter un
câble VGA ou DVI. Connecter le clavier externe pour choisir la porte vidéo :
CTRL+ALT+F1 pour la porte VGA et CTRL+ALT+F4 pour la porte DVI. / BIOS
Einstellung CRT+DVI: Verwendung von VGA oder DVI Kabeln. Schließen Sie eine
externe Tastatur an um den Video-Anschluss zu aktivieren. Für VGA-Anschluss:
CTRL+ALT+F1. Für DVI-Anschluss: CTRL+ALT+F4 / Configuración del BIOS CRT +
DVI - Elegir VGA o DVI y conectar el cable. Conectar un teclado externo para activar el
puerto de video; CTRL+ALT+F1 para la modalidad VGA, CTRL+ALT+F4 para la
modalidad DVI.
XB300SF3 - XB300SF4
BIOS impostato CRT+DVI - Uscita VGA sempre attiva. Uscita DVI ; collegare il cavo DVI
prima dell’accensione (XB300+Monitor). / BIOS setting CRT+DVI - VGA port always
enabled. DVI port ; connect DVI cable before switch on the XB300+Monitor. /
Configuration du BIOS CRT+DVI - La porte VGA est toujours active. Porte DVI :
connecter le câble DVI avant d’allumer le XB300 et l’écran. / BIOS Einstellung
CRT+DVI: Der VGA-Port ist immer aktiviert. Um den DVI-Anschluss zu verwenden,
schließen Sie das DVI Kabel vor dem Einschalten des XB300 und des Monitors an. /
Configuración del BIOS CRT + DVI - El puerto VGA siempre se queda activado. Puerto
DVI: conectar el cable DVI antes de encender el XB300 + Monitor.

Popular Adapter manuals by other brands

Renkforce PL1200D Installation

Renkforce

Renkforce PL1200D Installation

Philips SWA4550S/10 user manual

Philips

Philips SWA4550S/10 user manual

CyberData 11233 Installation quick reference

CyberData

CyberData 11233 Installation quick reference

StarTech.com FCREADMICRO instruction manual

StarTech.com

StarTech.com FCREADMICRO instruction manual

NETGEAR A6210 installation guide

NETGEAR

NETGEAR A6210 installation guide

Parvus DURAVIS 3400 user manual

Parvus

Parvus DURAVIS 3400 user manual

AudioShare ASA468 user guide

AudioShare

AudioShare ASA468 user guide

Lenovo Mellanox ConnectX-3 Product guide

Lenovo

Lenovo Mellanox ConnectX-3 Product guide

NETGEAR RANGEMAX WPN111 user manual

NETGEAR

NETGEAR RANGEMAX WPN111 user manual

RCA AH56R user manual

RCA

RCA AH56R user manual

Crypto WU300N user manual

Crypto

Crypto WU300N user manual

Oracle 7101682 installation guide

Oracle

Oracle 7101682 installation guide

NDC Instant Wave High Speed user guide

NDC

NDC Instant Wave High Speed user guide

DeepCoolClear TraqFi user manual

DeepCoolClear

DeepCoolClear TraqFi user manual

Hawking HWUG1A user manual

Hawking

Hawking HWUG1A user manual

International Receiver Company DAB and FM DIGITAL ADAPTER instruction manual

International Receiver Company

International Receiver Company DAB and FM DIGITAL ADAPTER instruction manual

Linksys WPC200 user guide

Linksys

Linksys WPC200 user guide

SciCan DrainHub Series manual

SciCan

SciCan DrainHub Series manual

manuals.online logo
manuals.online logoBrands
  • About & Mission
  • Contact us
  • Privacy Policy
  • Terms and Conditions

Copyright 2025 Manuals.Online. All Rights Reserved.