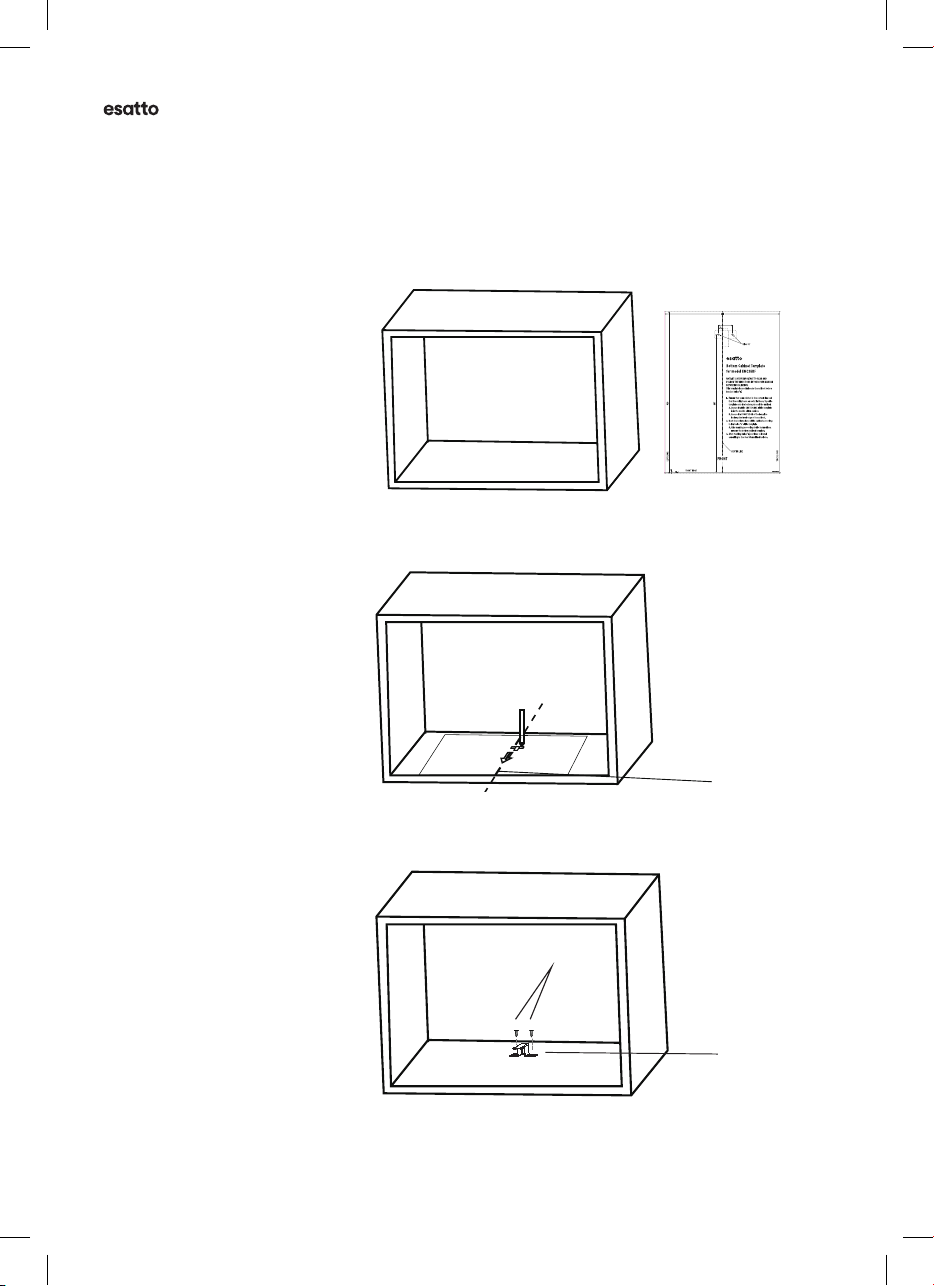
Esatto EMC25BF User manual

Version
V1.0 | 0123
Everything you need
for your 28L Built-in
Microwave is in this
User Manual
Model/s
EMC25BF

User Manual
2
Welcome
Congratulations on purchasing your new 28L Built-in Microwave. The Esatto
brand is proudly distributed within Australia by Residentia Group Pty Ltd.
Please refer to the warranty card at the rear of this manual for information
regarding your product’s parts and labour warranty, or visit us online at:
www.residentia.group
At Residentia Group, we are customer obsessed and our Support Team are
there to ensure you get the most out of your appliance. Should you want to l
earn more about your new microwave, it's features or importantly taking care
of the appliance, our Support Team are here to help.
You can use our online Support Centre at anytime by visiting:
http://support.residentiagroup.com.au
Or you can contact us via phone by dialing: 1300 11 HELP (4357).
It is important that you read through the following use and care manual
thoroughly to familiarise yourself with the installation and operation
requirements of your appliance to ensure optimum performance.
Again, thank you for choosing an Esatto appliance and we look forward
to being of service to you.
Kind Regards,
The Residentia Team
Residenti roup
—
Head Office
165 Barkly Avenue
Burnley, Victoria
Australia 3121
—
ACN
600 546 656
—
Online
residentia.group
www.esatto.house
@esatto.house
—
Postage
PO Box 5177
Burnley, Victoria
Australia 3121
—
Telephone
1300 11 4357
www.esatto.house

esatto.house
3
Pge 2
Welcome
Pge 4
Sfety Wrnings
Pge 7
Your Estto
Microwve
Pge 8
Instlltion
Instructions
Pge 12
Operting
Instructions
Pge 17
Clening
Mintennce
Pge 18
Troubleshooting
Pge 19
Your Receipt
Contents
Pge 19
Purchse Detils
Pge 20
Wrrnty

User Manual
4
Sfety Wrnings
This microwve must only be instlled in
ccordnce with the instructions provided.
Incorrect instlltion my cuse hrm to persons,
dmge property nd void the product’s wrrnty.
IMPORTANT: Please ensure that you read the
entire instructions carefully before beginning the
installation of your microwave oven. Always retain
this instruction user manual.
WARNING:
Always abide by the following precautions to avoid
possible exposure to excessive microwave energy.
• Do not attempt to operate this microwave oven
with the door open, as this can result in harmful
exposure to microwave energy. It is important
not to break or tamper with the safety interlocks.
• Do not place any objects between the
microwave oven face and the door, or allow food
residue to accumulate on sealing surfaces.
• If the door or door seals are damaged, the
microwave oven must not be operated until it
has been repaired by an authorised repair agent.
Addendum
If the appliance is not maintained in a good state
of cleanliness, its surface could be degraded and
aect the lifespan of the appliance. This could in
turn lead to a dangers and hazards.
IMPORTANT: To reduce the risk of re, electric
shock, injury to persons or exposure to excessive
microwave oven energy when using your appliance,
follow these basic precautions:
• Liquids and other foods must not be heated in
sealed containers, as they are liable to explode.
• It is hazardous for anyone other than a
competent person to carry out any service or
repair operation that involves the removal of the
cover providing protection against exposure to
microwave energy.
• This appliance should only be used by
competent persons. Children above the age
of 8 can use the appliance under strict adult
supervision and instruction.
• This microwave is not intended for use by
persons (including children) with reduced
physical, sensory or mental capabilities.
• Cleaning of the microwave oven should only
be undertaken by competent adults and
not children.
• Keep the appliance and its cord out of reach
of children, less than 8 years old.
• Only use utensils that are suitable for use
within microwaves.
• The microwave should be cleaned after each
use and any food deposits removed.
• When heating food in plastic or paper
containers, always keep an eye on the
microwave due to the possibility of ignition.
• If smoke is emitted, immediately switch o or
unplug the microwave and keep the door closed
in order to stie any ames.
• Never overcook food.
• Do not use the microwave cavity for storage
purposes.
• Always remove any wire twist-ties and metallic
handles from paper, or plastic containers/bags
before placing them within the microwave.

esatto.house
5
• Install or locate this microwave in accordance
to the installation instructions provided. It is of
great importance to positing with the required
ventilation for the microwave.
• Eggs within their shell or hand-boiled eggs
should not be heated within microwave,
as they may explode (even after microwave
heating has ended).
• This appliance is intended to be used indoors
only and within domestic environments only,
including residential homes, sta kitchens, bed
& breakfasts, etc. It is not intended for use within
a commercial kitchen.
• If the supply cord is damaged it must be
replaced by the manufacturer, its authorised
service agent or a similarly qualied person.
• Never use or install this appliance near water.
• The temperature of accessible surfaces may be
high when the appliance is operating. The
surfaces are liable to get hot during use,
meaning it’s important to keep the power supply
cord away from these heated surfaces and away
from any vents on the microwave.
• The contents of feeding bottles and baby food
jars should be stirred/shaken and the
temperature must be checked before
consumption in order avoid risk of burns.
• Microwave heating of beverages can result in
delayed eruptive boiling, therefore care must be
taken when handling containers.
• WARNING: Liquids and other foods must not be
heated in sealed containers since they are liable
to explode.
• The microwave is not intended to be operated by
means of an external timer or separate remote
control system.
• Steam cleaner is not to be used on this
appliance.
• During operation, the internal components will
become hot and care should always be taken to
avoid making contact with the inside of
the microwave.
• The microwave is only intended for heating food
and beverages only.
• WARNING: Ensure that the appliance is
switched o before replacing the light globe
to avoid the possibility of electric shock.
• WARNING: It is hazardous for anyone other than
a authorise person to carry out any service or
repair operation that involves the removal of a
cover which gives protection against exposure to
microwave energy.
• When heating food in plastic or paper
containers, keep an eye on the microwave due to
the possibility of ignition.
• The microwave is intended for heating food
and beverages. Drying of food or clothing and
heating of warming pads, slippers, sponges,
damp cloth and similar may lead to risk of injury,
ignition or re.
• The microwave oven is intended to be
used built-in.
• Care should be taken not to displace the
turntable when removing containers from the
appliance (for built-in appliances being used
equal or higher than 900mm above the oor
and having detachable turntables).
• Metallic containers for food and beverages are
not allowed during microwave cooking.
• Be sure to unplug the appliance from the power
supply before any cleaning mainteance.

User Manual
6
Sfety Wrnings (Continued)
TO REDUCE THE RISK OF INJURY TO PERSONS,
GROUNDING INSTALLATION.
DANGER! Electric Shock Hzrd:
Touching some of the internal components can
cause serious personal injury or death. Do not
disassemble this appliance.
WARNING: Electric Shock Hzrd:
• Improper use of the grounding can result in
electric shock.
• Do not plug into an outlet until appliance is
properly installed and grounded.
• This appliance must be grounded. In the event
of an electrical short circuit, grounding reduces
the risk of electric shock by providing an escape
wire for the electric current.
• This appliance is equipped with a cord having a
grounding wire with a grounding plug. The plug
must be plugged into an outlet that is properly
installed and grounded.
• Consult a qualied electrician or serviceman if
the grounding instructions are not completely
understood or if doubt exists as to whether the
appliance is properly grounded.
• If it is necessary to use an extension cord, use
only a 3-wire extension cord.
1. A short power-supply cord is provided to reduce
the risks resulting from becoming entangled in or
tripping over a longer cord.
2. If a long cord set or extension cord is used:
• The marked electrical rating of the cord set
or extension cord should be at least as great as
the electrical rating of the appliance.
• The extension cord must be a grounding-type
3-wire cord.
• The long cord should be arranged so that it
will not drape over the counter top or tabletop
where it can be pulled on by children or tripped
over unintentionally.
Unpcking
During transportation, protective packaging was
used to protect the appliance against any damage.
After unpacking, please dispose of all elements of
packaging in a way that will not cause damage to
the environment. All materials used for packaging
the appliance are environmentally friendly; they
are 100% recyclable and are marked with the
appropriate symbol.
CAUTION: During unpacking, the packaging
materials (polythene bags, polystyrene pieces, etc.)
should be kept out of reach of children.
Disposl of the pplince
Old appliances should not simply be disposed
of with normal household waste, but should be
delivered to a collection and recycling centre for
electric and electronic equipment. A symbol shown
on the product, the instruction manual or the
packaging shows that it is suitable for recycling.
Materials used inside the appliance are recyclable
and are labelled with information concerning this.
By recycling materials or other parts from used
devices you are making a signicant contribution to
the protection of our environment.
Information on appropriate disposal centres
for used devices can be provided by your local
authority.

esatto.house
7
Parts and Accessories
Your Estto Microwve
A. Control panel
B. Turntable shaft
C. Turntable assembly ring
D. Glass turntable
E. Observation window
F. Door assembly
G. Safety interlock system
Hub (underside)
Glass tray
Model EMC25BF
Rated Voltage 230-240V~ 50Hz
Rated Input Power (microwave) 1450W
Rated Output Power (microwave) 900W
Microwave oven capacity 28L
Turntable diameter Ø315mm (please conrm)
External dimensions 595mm × 410mm × 388mm
Microwve components
Your Esatto Microwave is supplied with:
• 1 ×Microwave
• 1 ×Glass turntable
• 1 ×Turntable assembly ring
• 1 ×Bottom Cabinet Installation Template
• 1 ×Mounting plate and 3 ×screws
• 1 ×User Manual
• 1 ×Quick Start Guide
Turntble instlltion
• Never place the glass tray upside down.
The glass tray should never be restricted.
• Both glass tray and turntable ring assembly
must always be used during cooking.
• All food and containers of food are always
placed on the glass tray for cooking.
• If glass tray or turntable ring assembly cracks
or breaks, contact your nearest authorised
service center
A) Control panel
B) Turntable shaft
C) Turntable ring assembly
D) Glass tray
E) Observation window
F) Door assembly
G) Safety interlock system
F
G
A
C B
ED
SETTING UP YOUR OVEN
Names of Oven Parts and Accessories
Remove the oven and all materials from the carton and oven cavity.
Your oven comes with the following accessories:
Glass tray 1
Turntable ring assembly 1
Instruction Manual 1
Hub (underside)
Glass tray
Turntable ring assembly
a. Never place the
glass tray
upside down. The glass
tray should never be restricted.
b. Both
glass tray
and
turntable ring assembly
must
always be used during cooking.
c. All food and containers of food are always placed
on the
glass tray
for cooking.
d. If
glass tray
or
turntable ring assembly
cracks or
breaks, contact your nearest authorized service
center.
Turntable Installation
Turntable shaft
10
Turntable shaft
Turntable ring assembly

User Manual
8
Instlltion Instructions
INSTALLATION CONNECTION
• This appliance is only intended for domestic use.
• This oven is intended for built-in use only.
It is not intended for counter-top use or for use
inside a cupboard.
• Please observe the installation instructions
within this User Manual.
• The appliance can be installed in a 60cm wide
wall-mounted cupboard.
• The appliance is tted with a plug and must only
be connected to a properly installed earthed
socket.
• The mains voltage must correspond to the
voltage specied on the rating plate.
• The socket must be installed and connecting
cable must only be replaced by a qualied
electrician. If the plug is no longer to accessible
following installation, an all-pole disconnecting
device must be present on the installation side
with a contact gap of at least 3mm.
• Adapters, multi-way strips and extension leads
must not be used. Overloading can result in a
risk of re.
THE ACCESSIBLE SURFACE MAY
BE HOT DURING OPERATION.
Plese red the User Mnul crefully
before instlltion
ELECTRICAL CONNECTION
WARNING: Electric Shock Hzrd
The oven is tted with a plug and must only
be connected to a properly installed earthed
socket. The socket must only be installed and
the connecting cable must only be replaced by a
qualied electrician, and in accordance with the
appropriate regulations. If the plug is no longer
accessible following installation, an all-pole
isolating switch must be present on the Installation
side with a contact gap of at least 3 mm.
The tted cabinet must not have a back wall behind
the appliance.
A gap must be maintained between the wall and
the base of the unit above. Specic gap size could
be referenced by the diagrams.
Do not cover ventilation slots and suction holes.
Note: Do not trap or bend the power cable.
Installation and connection
1.This appliance is only intended for domestic use.
2.This oven is intended for built-in use only. It is not intended
for counter-top use or for use inside a cupboard.
3. Please observe the special installation instructions.
4.The appliance can be installed in a 60cm wide wall-
mounted cupboard.
5.The appliance is fitted with a plug and must only be
connected to a properly installed earthed socket.
6.The mains voltage must correspond to the voltage
specified on the rating plate.
7.The socket must be installed and connecting cable must
only be replaced by a qualified electrician. If the plug is no
longer to accessible following installation, an all-pole
disconnecting device must be present on the installation
side with a contact gap of at least 3mm.
8.Adapters, multi-way strips and extension leads must not
be used. Overloading can result in a risk of fire.
The accessible surface may
be hot during operation.
11
Installation Instructions
Please Read the Manual Carefully Before Installation
A gap must be maintained between
the wall andthe base of the
unit above.
Specific gap size could be referenced by the diagrams.
Screw
Mounting Plate
12
Installation Instructions
Please Read the Manual Carefully Before Installation
A gap must be maintained between
the wall andthe base of the
unit above.
Specific gap size could be referenced by the diagrams.
Screw
Mounting Plate
12
Installation Instructions
Please Read the Manual Carefully Before Installation
A gap must be maintained between
the wall andthe base of the
unit above.
Specific gap size could be referenced by the diagrams.
Screw
Mounting Plate
12
Screws
Mounting Plate

esatto.house
9
Typicl instlltion tools required.
You’ll most likely require the following tools /
equipment (not supplied) for the installation
of your microwave.
• Electrical drill
• Tape Measure
• Screw-driver
It’s important to carefully read the following
installation instructions before beginning the
installation of your microwave.
IMPORTANT: Please observe the installation
instructions provided and note that this appliance
should only be installed by a qualied technician.
• Do not attempt to operate this microwave oven
with the door open, as this can result in harmful
exposure to microwave energy. It is important
not to break or tamper with the safety interlocks.
• Do not place any objects between the
microwave oven face and the door, or allow food
residue to accumulate on sealing surfaces.
• If the door or door seals are damaged, the
microwave oven must not be operated until it
has been repaired by an authorised repair agent.
Note:
The mounting plate and bottom cabinet installation
template is required for both installation method.
Built-in cbinetry methods
1)
13
380+2
500
45
45
380+2
5 00
The and bottom ca net template are needed when installing
in installation .both s
mounting plate bi
600
45
45
45
380+2
380+2
min
500
560+8
560+8
600
45
min
500
2)

User Manual
10
2. PREPARE THE CABINET A) Read the instructions on the Bottom Cabinet Installation
Template and position the template on to the base panel
of your cabinet.
B) Make the marks on the bottom plane of the cabinet according
to the “a” marks on the template.
C) Remove the bottom cabinet template and x the mounting plate
with screws.
teniibacehteraperP.B
"a""seloH
PN:261800316968
3. Remove the bottom cabinet template and fix the mounting plate with screw.
2. Make the marks on the bottom plane of cabinet according to marks"a" of
the template
put the template on the bottom plane of cabinet.
1. Read the instruction on the BOTTOM CABINET TEMPLATE ,
Screw
Mounting Plate
14
Centre line
Mounting Plate
Screw
Instlltion Instructions (Continued)

esatto.house
11
3. INSTALL THE MICROWAVE
5. BEFORE THE FIRST USE
4. FIX THE MICROWAVE
IN TO PLACE
Install the microwave in to the cabinet.
• Make sure that the back of the microwaves is locked by the
mounting plate.
• When installing the microwave, ensure that the power cord isn’t
kinked or trapped under the microwave.
• Remove all packaging and clean the interior of the oven.
• Take out and wash the oven ttings with warm soapy water.
Note: There may be strong odour during the rst use, which is the
burning o of any chemical residues from its construction. This is
normal for all microwaves.
IMPORTANT: The inside of the microwave should only be cleaned
with a damp soft cloth and a small amount of washing liquid.
Open the door and x the microwave into place using a screw,
through the installation hole (indicated in the diagram below).
esatto.house9
3. INSTALL THE MICROWAVE
5. BEFORE THE FIRST USE
4. FIX THE MICROWAVE
IN TO PLACE
Install the microwave in to the cabinet.
• Make sure that the back of the oven locks in to the bracket.
• When installing the microwave, ensure that the power cord isn’t
kinked or trapped under the microwave.
• Remove all packaging and clean the interior of the oven.
• Take out and wash the oven ttings with warm soapy water.
Note: There may be strong odour during the rst use, which is the
burning o of any chemical residues from its construction. This is
normal for all microwaves.
IMPORTANT: The inside of the microwave should only be cleaned
with a damp soft cloth and a small amount of washing liquid.
Open the door and x the microwave into place using Screw,
through the installation hole (indicated in the diagram below). Then
x the trim-kit to cover the installation hole.
Screw
Installation Hole
C.Install the oven
4. Install the oven to the cabinet
- Make sure the back of the oven is locked by mounting plate .
- Do not trap or kink the power cord.
Mounting
Plate
5. Open the door, fix the oven to the cabinet with Screw , at the installation hole.
Installation Hole
Screw
15
Mounting
Plate

User Manual
12
Operting Instructions
2
7
1
5
8
3
6
4
KEY
1. LED Timer
2. Microwave button
3. Defrost button
4. Time button
5. Selector knob
6. Pause/Cancel button
7. Start/+30 Sec./Conrm
8. Open button

esatto.house
13
SETTING THE CLOCK
When the microwave is rst powered, the LED clock
will display “0:00” and the alert will sound once.
• Press the Time button twice to select the clock
function, the hour gures will ash.
• Turn the dial to adjust the hour gures (note that
the time is set in 24 hour time, 0-23 hours).
• Press the Time button once again and the minute
gures will ash.
• Using the dial again, adjust the minute gures
to your desired time (i.e. 0-59 minutes).
• To nish setting the time, press the Time button
once again. “:” will ash once and the time will
be set.
Note: During setting the time, if you press the Time
button the microwave will return to its previous
status automatically.
MICROWAVE COOKING
To use your microwave to heat your food or
beverage, follow the process below:
• Start by pressing the Microwave button once.
The LED display will show “P100” as a default
power.
• Use the dial or press the Microwave button to
select your desired power level, where “P100”
indicates a 100% power level (maximum).
• Then press the Start/+30 Sec./Conrm button to
conrm your selected power setting.
• Now use the dial to set your cooking time, from
0:05 (5 seconds) through to 95:00 (95 minutes).
Then press the Start/+30 Sec./Conrm button to
start cooking.
Note: When selecting your desired microwave
power setting, you can select from the following
microwave power levels: P100= 100%, P80= 80%,
P50= 50%, P30= 30%, P10= 10%.
QUICK START COOKING
Your microwave has a default “quick start” cooking
option, without requiring the cooking function or
power level to be set.
• Insert your food or beverage into the microwave
and close the door.
• From your microwaves idle state, simply press
the Start/+30 Sec./Conrm button to start your
microwave cooking at 100% Power level. Each
press of the button will increase the cooking
duration by 30 seconds, up to a maximum of
95 minutes. You can also use the dial to set your
desired time.
DEFROST BY WEIGHT OR TIME
Your microwave has the ability to defrost your food
or liquids by either weight or time. The microwave’s
defrost power level cannot be changed.
To use the Defrost by Weight function:
• Press the Defrost button once. Your microwave
will display “dEF1”, indicated Defrost by Weight.
• Use the dial to select your weight of food from
100 to 1000 grams.
• Press the Start/+30 Sec./Conrm button to
start defrosting.
To use the Defrost by Time function:
• Press the Defrost button twice. Your microwave
will display “dEF2”, indicated Defrost by Time.
• Use the dial to select your desired defrost time,
where 95 minutes is the maximum.
• Press the Start/+30 Sec./Conrm button to
start defrosting.
The defrost power is P30 (30% power level)
KITCHEN TIMER
Your microwave has a built in reminder
kitchen timer that can be set up to a maximum
of 95 minutes.
• Press the Time button once and the LED display
will show 00:00.
• Use the dial to select your desired time in
minutes. I.e. 34:00 indicates 34 minutes.
• Press the Start/+30 Sec./Conrm button once
to conrm the timer.
• Once your kitchen timer is reached, the
microwave buzzer will sound 5 times and return
to displaying the clock (if set)

User Manual
14
TIME OR POWER ENQUIRY
During cooking, you can view your selected power
level or the time at any time.
• To view the current power level being used, press
the Microwave button, and the power level will
be displayed for 3 seconds.
• To view the current time, press the Time button,
and the time will be displayed in 24 hour format
for 3 seconds.
CHILD-LOCK FUNCTION
For safety reasons, your microwave includes a
Child-lock function.
To activate:
• Simply press and hold the “Stop | Clear” button
for 3 seconds. There will be a long beep and a
key light will appear.
To de-activate:
• Simply press and hold the “Stop | Clear” button
for 3 seconds. There will be a long beep and the
key symbol will disappear.
MULTI-SELECTION COOKING
Your microwave allows you to select up to 2 cooking
functions to be used consecutively. For example
you may wish to defrost food prior to using a
cooking function.
• Start by setting your desired Defrost function
(using the method outlined above in the ‘Defrost
by Weight or Time’ section, although don’t press
the Start/+30 Sec./Conrm button at this stage.
• Now press the Microwave button, the screen will
display “P100”.
• Press Microwave again or turn the dial to select
your desired microwave power level.
• Press the Start/+30 Sec./Conrm button to
conrm and then use the dial to select your
cooking time.
• Press the Start/+30 Sec./Conrm button, the
buzzer will sound once and the defrosting time
will begin to countdown.
The buzzer will sound once again when the
microwave enters the second cooking phase.
Upon nishing both functions, the microwave
buzzer will sound ve times.
Operting Instructions (Continued)

esatto.house
15
PRESET AUTO MENU
Your microwave includes a variety of default cooking pre-sets to suit various food types.
• From the idle state, turn the dial to the right to choose your preset cooking option. “A-1” through to “A-8”
will be displayed. Refer to the table below.
• Press the Start/+30 Sec./Conrm button to conrm your selection.
• Now use the dial to set your weight in grams, as per the options in the table below.
• To nalise your selection and to begin cooking, simply press the Start/+30 Sec./Conrm button.
Menu Item: Preset/Food Type: Weight (Disply):
A-1 Pizza • 200g (200)
• 400g (400)
A-2 Meat • 250g (250)
• 350g (350)
• 450g (450)
A-3 Vegetable • 200g (200)
• 300g (300)
• 400g (400)
A-4 Pasta • 50g, with 450ml of cold water (50)
• 100g, with 800ml of cold water (100)
A-5 Potato • 200g (200)
• 400g (400)
• 600g (600)
A-6 Fish • 250g (250)
• 350g (350)
• 450g (450)
A-7 Beverage • 1 cup ~120ml (1)
• 2 cups ~240ml (2)
• 3 cups ~360ml (3)
A-8 Popcorn • 50g (50)
• 85g (85)
• 100g (100)

User Manual
16
MATERIALS YOU CAN USE IN YOUR MICROWAVE
The following list is a quick guide for items that can be used within your microwave. If you are unsure,
always refer to the manufacturer’s guidelines as to whether the item is microwave safe.
Item: Notes:
Browning dish Ensure that the dish is microwave safe and always follow the manufacturer’s
instructions. The bottom of the dish must be at least 5mm above the glass
turntable. Incorrect usage may cause the turntable to break.
Dinnerware Only ever use microwave safe dinnerware and follow the manufacturer’s
instructions. Never used cracked or chipped dishes.
Glass jars Always remove the lid as the heat will cause expansion of any contents
(including air). Ensure there is no metal trim. Note: Most glass jars are no heat
resistant and may break.
Glassware Only use heat-resistant, oven-safe glassware. Ensure there is no metal trim and
never use cracked or chipped glassware.
Oven cooking bags Check the manufacturer’s instructions to ensure they are microwave safe.
Do not close with a “bread tie” as these contain metal. Make small incisions in
the bag to allow steam to escape.
Paper plates and cups Only ever use for short term re-heating/warming. Never leave unattended
while cooking.
Paper towel Use to cover food for reheating and absorbing fat. Use with supervision
for a short-term cooking only.
Plastic Ensure that your plastic item is microwave safe and these items typically state
“microwave-safe” on the underside. Avoid using plastic where you are unsure.
Parchment paper Use as a cover to prevent splattering or a wrap for steaming.
Plastic wrap
(cling-wrap)
Only use microwave safe cling-wrap. Can be used during cooking to retain
moisture. Do not allow the plastic wrap to touch the food.
Thermometers Only use microwave safe thermometers only. If you are unsure, do not use.
Wax Paper
(baking paper)
Can be used as a cover to prevent splattering and to retain moisture.
Always maintain supervision.
MATERIALS THAT SHOULD BE AVOIDED
The following list is a quick guide for items that must be avoided be used within your microwave.
Item: Notes:
Aluminium Tray
or Aluminium Foil
May cause arcing within the microwave.
Transfer the food into a microwave-safe dish.
Food Carton with
metallic lining
May cause arcing within the microwave.
Transfer the food into a microwave-safe dish.
Metal or metal trimmed
utensils
May cause arcing within the microwave.
The metal shields the food from the microwave energy.
Paper bags May cause a re within the microwave.
Plastic foam cup May melt or contaminate the liquid inside when exposed
to a high temperature.
Wood Wood will dry out when used within a microwave and may split or crack.
Operting Instructions (Continued)

esatto.house
17
Clening Mintennce
By ensuring proper cleaning and maintenance of
your microwave, you can ensure that it will have a
long and fault free operation.
WARNING: Do not start cleaning the microwave
until it has completely cooled.
WARNING: Be sure to unplug the appliance from
the power supply
• Typically you should only ever need to clean your
microwave with a small amount of warm soapy
water, or light cleaning products to assist with
the removal of fat or oil emulsions. This is the
same for the microwave components, such as
the turntable and turntable support ring.
• Your microwave should be cleaned after
every use.
• After cleaning your microwave cavity,
you should wipe it dry.
1. Clean the cavity of the oven after using with a
slightly damp cloth.
2. Clean the accessories in the usual way in soapy
water.
3. The door frame and seal and neighbouring parts
must be cleaned carefully with a damp cloth
when they are dirty.
4. Do not use harsh abrasive cleaners or sharp
metal scrapers to clean the oven door glass
since they can scratch the surface, which may
result in shattering of the glass.
Clening Tip
For easier cleaning of the cavity walls that the food
cooked can touch: Place half a lemon in a bowl, add
300ml (1/2 pint) water and heat on 100% microwave
power for 10 minutes. Wipe the oven clean using a
soft, dry cloth
IMPORTANT: Never dismantle your microwave.
Any maintenance work should only ever be
undertaken by a suitably qualied and licenced
person. For any questions, please contact the
Residentia Group support team on
1300 11 HELP (4357).

User Manual
18
Troubleshooting
OPERATION IN CASE OF EMERGENCY
In the event of an emergency you should:
• Switch o all microwave controls (i.e. Press the “Stop | Clear” button).
• Switch the microwave o at the isolation switch or at the fuse box.
• Call the Residentia Support Team on 1300 11 HELP (4357).
Some minor faults can be xed by referring to the instructions given in the Troubleshooting section below.
There is also a self-help section online at http://www.residentiagroup.com.au.
TROUBLESHOOTING
Fult Possible Cuse Solution
The microwave is
interfering with the
TV reception
This is normal. Radio and TV reception may be interfered with when any
microwave is operating. It is similar to the interference
that small electrical appliances may cause.
Dim microwave light This is normal. In low power cooking, such as P10-P50, the microwave
light may also be dimmer.
Steam accumulating on
the door and hot air is
coming out of the vents
This is normal. When cooking, steam may release from the food.
Most will expel from the vents, however some may
accumulate on the door or cavity walls.
The microwave was
started accidentally with
no food inside.
Always avoid! It is forbidden to operate the microwave without any
food inside. This is very dangerous.
The microwave cannot
be started, or isn’t
powered.
The power code isn’t
plugged in or lose?
The fuse has blown?
The power outlet
is faulty?
Unplug and after 10 seconds re-plug in the microwave.
Replace the fuse or reset the circuit breaker.
Test the outlet with another electrical appliance.
The microwave
doesn’t heat.
Door isn’t closed
properly.
Close the door completely. Ensure that nothing
is blocking the door’s safety latch.
The glass turntable
makes noise
when the microwave
oven operates.
The turntable
support/rollers is
being interfered with
by dirt/food residue.
Refer to the cleaning and maintenance section of this
user manual.

esatto.house
19
Attch your receipt to this pge
Purchse Detils
For your records, please record details of
your purchase below and staple your receipt
on this page.
Your serial number can be found on the rating plate
of your microwave.
STORE DETAILS
STORE NAME
|
ADDRESS
|
TELEPHONE
|
PURCHASE DATE
|
PRODUCT DETAILS
MODEL NO.
|
SERIAL NO.*
|

User Manual
20
WARRANTY TERMS AND CONDITIONS
MICROWAVE APPLIANCES
This document sets out the terms and conditions of the
product warranties for Residentia Group Appliances. It is
an important document. Please keep it with your proof of
purchase documents in a safe place for future reference
should you require service for your Appliance.
Please be aware that the service of your appliance is
subject to the following warranty terms and conditions,
our goods come with guarantees that cannot be excluded
under Australian Consumer Law. Should the concern with
your appliance be a non-manufacturing issue (user error,
installation issue, misuse, improper care and maintenance
or no fault found) you will be liable for the cost of the
technician visit.
1. IN THIS WARRANTY
(a) ‘acceptable quality’ as referred to in clause 10 of
this warranty has the same meaning referred to in
the ACL;
(b) ‘ACL’ means Trade Practices Amendment (Australian
Consumer Law) Act (No.2) 2010;
(c) ‘Appliance’ means any Residentia Group product
purchased by you accompanied by this document;
(d) ‘ASR’ means Residentia Group authorised service
representative;
(e) ‘Residentia Group’ means Residentia Group Pty Ltd
of 165 Barkly Ave, Burnley VIC 3121, ACN 600 546
656 in respect of Appliances purchased in Australia;
(f ) ‘major failure’ as referred to in clause 10 of this
warranty has the same meaning referred to in the
ACL and includes a situation when an Appliance
cannot be repaired or it is uneconomic for Residentia
Group, at its discretion, to repair an Appliance during
the Warranty Period;
(g) ‘Warranty Period’ means:
(i) where the Appliance is used for personal,
domestic or household use (i.e. normal
single family use) as set out in the instruction
manual, the Appliance is warranted against
manufacturing defects for 24 months, following
the date of original purchase of the Appliance;
(h) ‘you’ means the purchaser of the Appliance not
having purchased the Appliance for re-sale, and
‘your’ has a corresponding meaning.
2. This warranty only applies to Appliances purchased
and used in Australia and is in addition to (and does
not exclude, restrict, or modify in any way) any
non-excludable statutory warranties in Australia.
3. During the Warranty Period Residentia Group or
its ASR will, at no extra charge if your Appliance
is readily accessible for service, without special
equipment and subject to these terms and conditions,
repair or replace any parts which it considers to
be defective. Residentia Group or its ASR may use
remanufactured parts to repair your Appliance. You
agree that any replaced Appliances or parts become
the property of Residentia Group. This warranty does
not apply to light globes, batteries, lters, seals or
similar perishable parts.
4. Parts and Appliances not supplied by Residentia
Group are not covered by this warranty.
Wrrnty
— THIS WARRANTY IS VALID IN AUSTRALIA ONLY —
Other manuals for EMC25BF
2
Table of contents
Other Esatto Microwave Oven manuals
Popular Microwave Oven manuals by other brands

NEFF
NEFF H56G20N3GB instruction manual

Orbegozo
Orbegozo MIG 2030 instruction manual

DiGiQuest
DiGiQuest EASYWAVE HOME0048 user manual

Samsung
Samsung MC455TBRC SERIES Owner's instructions & cooking guide

DAEWOO ELECTRONICS
DAEWOO ELECTRONICS KOG-3667OS Service manual

Maytag
Maytag MMV1163D installation instructions