Esbit BBQ300S User manual
Vielen Dank
Wir freuen uns, dass Sie sich für den Kohlegrill „BBQ300S“ von Esbit®
entschieden haben. Der Kohlegrill ist ideal für das Grillen unterwegs.
Er lässt sich schnell zusammenklappen und komfortabel in der Trage-
tasche transportieren. Ihre Grillkohle können Sie in dem praktischen
Kohlebeutel im Grill verstauen und mitnehmen. So transportieren Sie
auf kleinem Raum alles für den Grillspaß unterwegs.
Wir wünschen Ihnen viel Freude mit dem Kohlegrill.
Kohlegrill auspacken
WARNUNG
Erstickungsgefahr!
• Kinder können Teile des Verpackungsmaterials verschlucken oder
sich über den Kopf ziehen. Dies kann zum Ersticken des Kindes führen.
• Entsorgen Sie das Verpackungsmaterial direkt nach dem Auspacken.
Packen Sie das Gerät aus. Heben Sie die beiden Schutzfolien (s. Liefer-
umfang I + J) für die spätere Verwendung auf.
Überprüfen Sie den Inhalt anhand des Lieferumfangs.
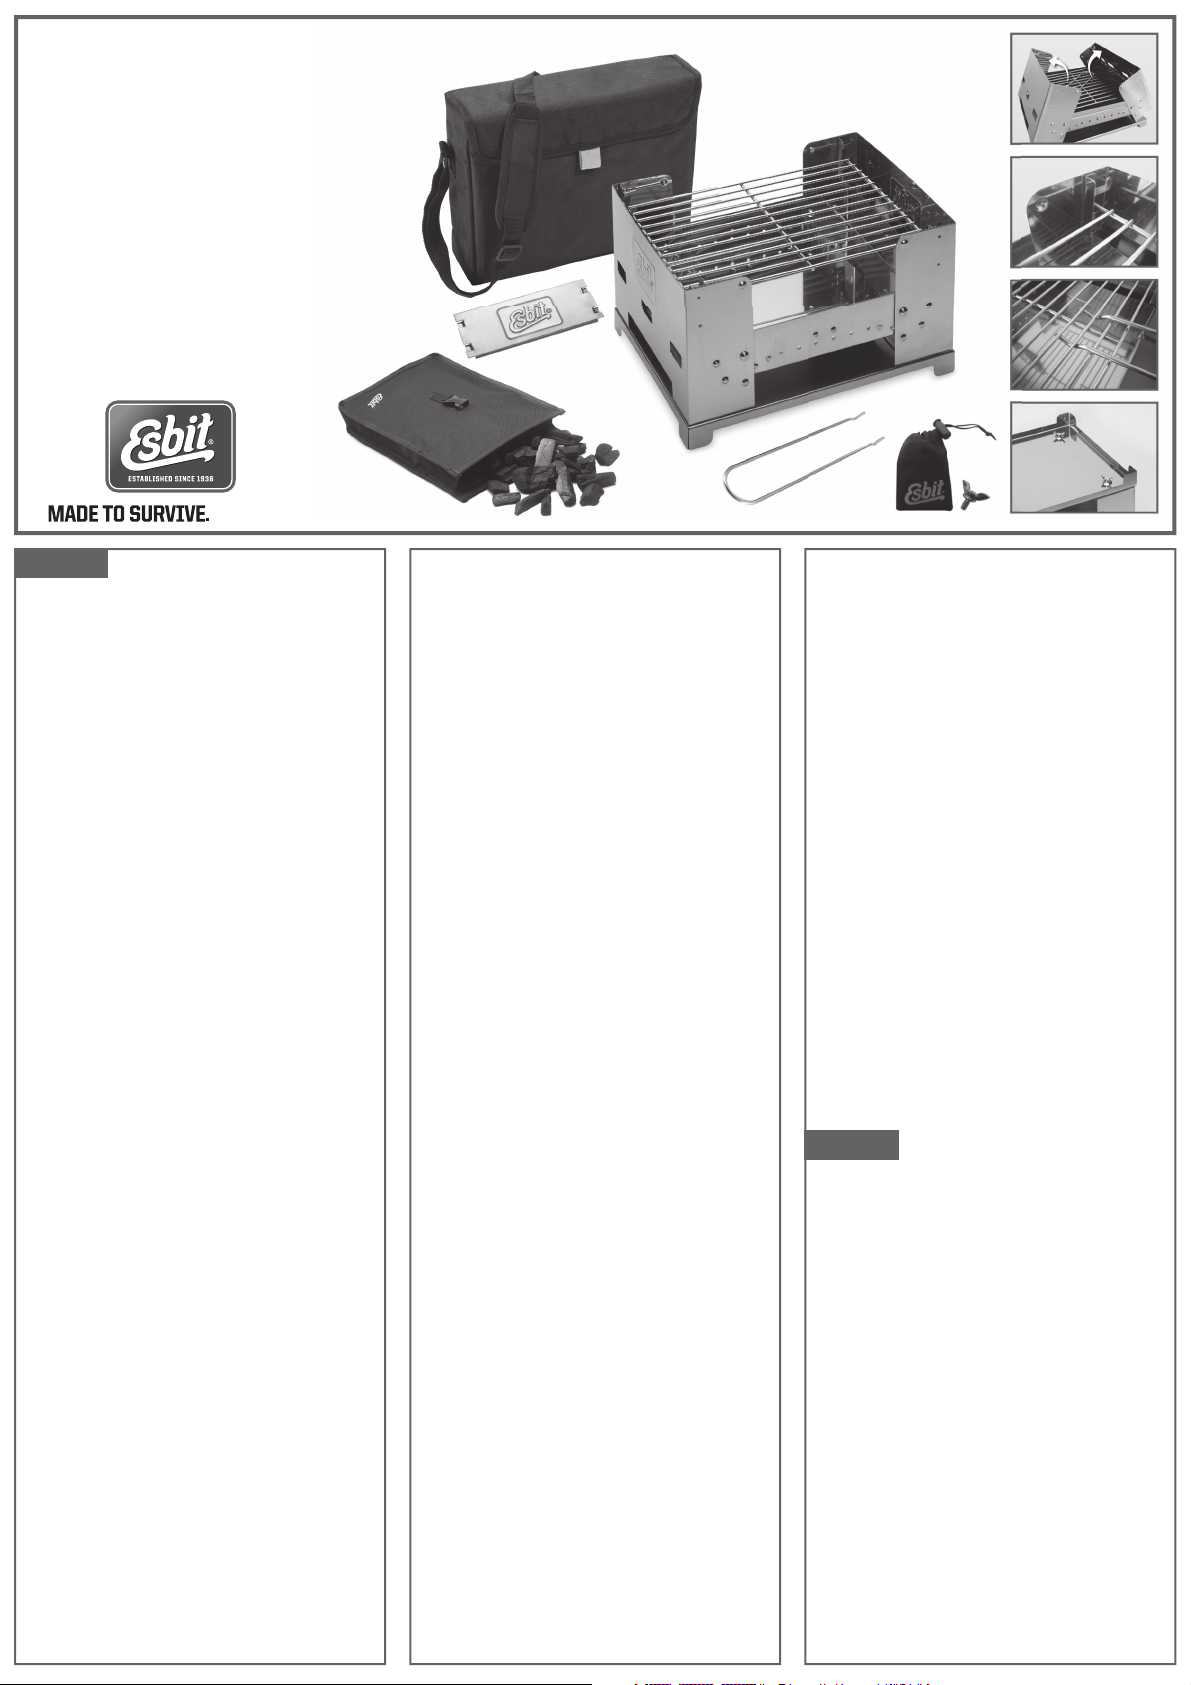
Lieferumfang
(A) Faltbarer Kohlegrill
(B) Stand
(C) Grillrost
(D) Abnehmbarer Griff
(E) Kohlebeutel (Grillkohle nicht im Lieferumfang enthalten.)
(F) Tragetasche
(G) Verschließbarer Beutel mit 5 Schrauben
(4 zum Gebrauch, eine als Ersatz)
(H) Windschutz
(Abbildung)
(I) Schutzfolie zwischen Grill und Stand
(J) Schutzfolie für den Grillrost
Sicherheit
Bestimmungsgemäße Verwendung
Der Kohlegrill darf nur im Freien verwendet werden. Der Kohlegrill ist
ausschließlich zum Grillen geeigneter Lebensmittel mit Holzkohle be-
stimmt. Er darf nicht als Feuerstelle verwendet werden.
Jede weitere Verwendung gilt als nicht bestimmungsgemäß. Für Schä-
den aufgrund nicht bestimmungsgemäßer Verwendung übernimmt der
Hersteller keine Haftung.
Bedienungsanleitung
Lesen Sie vor dem Gebrauch des Kohlegrills diese Bedienungsanlei-
tung sorgfältig durch. Beachten und befolgen Sie insbesondere die
Sicherheitshinweise.
Bewahren Sie die Bedienungsanleitung auf. Falls Sie den Kohlegrill wei-
tergeben, geben Sie die Bedienungsanleitung mit.
Grundlegende Sicherheitshinweise
Beim Grillen besteht erhöhte Brandgefahr. Beachten Sie unbedingt die
folgenden Sicherheitshinweise, sonst kann es zu schweren Personen-
und Sachschäden kommen!
Lassen Sie den heißen Grill niemals unbeaufsichtigt, und halten Sie
Kinder und Haustiere fern.
Alle Teile des Grills werden bei der Benutzung sehr heiß. Berühren Sie
den Grill nicht, und bewegen Sie den Grill nicht, solange dieser heiß ist.
Schützen Sie sich vor Funken und heißen Fettspritzern: Tragen Sie beim
Grillen stets Grillhandschuhe und verwenden Sie eine Grillzange. Eine
Grillschürze schützt Ihre Kleidung zusätzlich.
Umgebungsbedingungen
Ein geeigneter Grillplatz ist sehr wichtig für den sicheren Betrieb des
Grills. Beachten Sie dazu die folgenden Sicherheitshinweise:
• Verwenden Sie den Kohlegrill nur auf einem ebenen, festen und nicht
entflammbaren Untergrund.
• Benutzen Sie den Kohlegrill nicht in geschlossenen Räumen oder auf
überdachten Flächen.
• Benutzen Sie den Kohlegrill nur dort, wo sich keine hitzeempfind-
lichen oder brennbaren Gegenstände in der unmittelbaren Umge-
bung befinden.
Den Kohlegrill möglichst nicht Regen oder Feuchtigkeit aussetzen.
Trocknen Sie den Kohlegrill ggfs. gründlich ab und lagern diesen an-
schließend trocken.
Bedienung
Kohlegrill aufbauen
1. Wählen Sie einen festen und ebenen Aufstellplatz im Freien mit gu-
tem Abstand zu allen brennbaren Materialien.
2. Öffnen Sie die Tragetasche und entnehmen Sie den Inhalt.
3. Nehmen Sie den Stand vom Kohlegrill und entfernen Sie die Schutz-
folie.
4. Klappen Sie den Kohlegrill auf, indem Sie die beiden Seitenteile zu
den Seiten hin wegklappen. (Abbildung A.1)
5. Entnehmen Sie den Grillrost mit der Schutzfolie, den Griff und den
Kohlebeutel.
6. Schrauben Sie den Stand mit vier Schrauben an die Unterseite des
Kohlegrills. (Abbildung G.1).
7. Stellen Sie den Kohlegrill auf den gewählten Aufstellplatz.
Kohle einfüllen und anzünden
WARNUNG
• Verbrennungsgefahr durch Stichflammen!
• Beim Anzünden der Kohle können explosionsartige Verpuffungen
entstehen, die zu lebensgefährlichen Verletzungen führen können.
• Verwenden Sie niemals Benzin, Spiritus (Alkohol) oder ähnliche Flüs-
sigkeiten zum Anzünden oder Wiederanzünden des Grills.
• Geben Sie niemals Grillanzünder auf den heißen Grill. Kontrollieren
Sie vor Zugabe von Grillanzünder stets, ob der Grill noch heiß ist.
• Verwenden Sie zum Anzünden der Kohle ausschließlich handels-
übliche Grillanzünder und beachten Sie die Angaben der Hersteller.
1. Schichten Sie die Holzkohle pyramidenförmig im Grill auf.
2. Stecken Sie einen Würfel vom Grillanzünder unten in die Holzkohle.
3. Zünden Sie den Grillanzünder an.
4. Lassen Sie die Kohle brennen, bis sie gleichmäßig glüht und sich eine
weiße Schicht Asche auf ihr bildet. Beginnen Sie dann erst mit dem
Grillen.
5. Verteilen Sie die heiße Kohle mit einem geeigneten Werkzeug im Grill.
Lassen Sie zur Schonung des Grills etwas Abstand zwischen Kohle
und Seitenwänden.
Grillen
VORSICHT
Gefahren durch heißes Fett!
• Heiße Fettspritzer sind sehr schmerzhaft. Wenn Fett verbrennt, kön-
nen sich außerdem gesundheitsschädliche Stoffe bilden.
• Für das Grillen von stark fettigem oder mariniertem Grillgut empfeh-
len wir, eine Grillschale aus Aluminium oder Stahlblech zu benutzen.
1. Entfernen Sie die Schutzfolie vom Grillrost.
2. Haken Sie den Griff an einer Seite des Grillrosts in den zweiten und
dritten Gitterstab ein. (Abbildung D.1)
3. Der Grill bietet drei Stufen für den Grillrost. Legen Sie den Grillrost
auf die gewünschte Stufe, indem Sie die Seitenstreben des Grillrosts
in die Auflagen am Grill einlegen. Achten Sie darauf, dass der Grillrost
waagerecht positioniert ist und sicher aufliegt. (Abbildung C.1)
4. Nehmen Sie den Griff ab.
5. Legen Sie das Grillgut auf und beginnen Sie mit dem Grillen. Lassen
Sie das Grillgut bräunen, aber nicht schwarz verbrennen: Ange-
brannte und verkohlte Fleischstücke können gesundheitsschädliche
Stoffe enthalten.
6. Lassen Sie nach dem Grillen die Kohle ausglühen und den Grill voll-
ständig auskühlen. Löschen Sie zur Schonung des Grills die Glut
nicht mit Wasser.
Kohlegrill verpacken und transportieren
VORSICHT
• Verbrennungsgefahr durch heiße Oberflächen!
• Lassen Sie den Grill vollständig abkühlen, bevor Sie ihn reinigen und
verpacken.
1. Entfernen Sie die kalte Asche.
2. Schrauben Sie den Stand vom Grill ab und verstauen Sie die Schrau-
ben im verschließbaren Beutel.
3. Säubern Sie den Grill. Benutzen Sie dabei keine scharfen Gegenstän-
de oder aggressiven Reinigungsmittel.
4. Trocknen Sie den Grill.
5. Schlagen Sie den Grillrost in die Schutzfolie ein und legen Sie Grill-
rost, Griff und Schrauben in den Grill.
6. Füllen Sie den Kohlebeutel mit Kohle für Ihr nächstes Grillen,
schließen Sie ihn und legen Sie ihn in den Grill.
7. Klappen Sie die Seitenteile des Grills nach innen, bis sie eine gerade
Fläche bilden.
8. Legen Sie die Schutzfolie auf diese Fläche und legen Sie den Stand
mit den Füßen nach unten auf.
9. Verstauen Sie den zusammengeklappten Kohlegrill in der Trage-
tasche. (Abbildung F)
HINWEIS
Edelstahl verfärbt sich bei hohen Temperaturen. Das Verfärben ist kein
Mangel, sondern ein Qualitätsmerkmal!
Technische Daten
Gesamtgewicht: ~ 2785 g
Packmaß eingeklappt: Breite 305 mm, Tiefe 230 mm, Höhe 90 mm
Maße aufgestellt: Breite 305 mm, Tiefe 230 mm, Höhe 180 mm
Many thanks
We are pleased that you chose to purchase the charcoal grill “BBQ300S”
from Esbit®. The charcoal grill is ideal for grilling on the go. It can be
quickly folded and comfortably transported in its carrying bag. You can
store and carry your charcoal in the practical charcoal bag in the grill.
This lets you transport everything compactly for grill fun on the go.
We wish you a very enjoyable time with the charcoal grill.
Unpacking the charcoal grill
WARNING
Danger of suffocation!
• Children can swallow parts of the packaging material or pull it over
their head. This can cause the child to suffocate.
• Dispose of the packaging material directly after unpacking the grill.
Unpack the device. Save both protective foils (see scope of delivery
I + J) for later use. Compare the contents to the scope of delivery.
Scope of delivery
(A) Foldable charcoal grill
(B) Stand
(C) Grill rack
(D) Removable handle
(E) Charcoal bag (Charcoal not included.)
(F) Carrying bag
(G) Sealable bag with 5 screws (4 for use, one for replacement)
(H) Wind deflector
(Figure)
(I) Protective foil between the grill and stand
(J) Protective foil for the grill rack
DEUTSCH
(F)
(C) (A)
(H)
(E)
(B)
(D)
(G)
(G.1)
(D.1)
(C.1)
(A.1)
ENGLISH
BEDIENUNGSANLEITUNG
INSTRUCTIONS FOR USE
MODE D‘EMPLOI
KOHLEGRILL BBQ300S
EDELSTAHL · KLAPPBAR
CHARCOAL GRILL BBQ300S
STAINLESS STEEL · FOLD-AWAY
BARBECUE CHARBON BBQ300S
EN ACIER INOXYDABLE · PLIABLE
Safety
Proper use
The charcoal grill may only be used outdoors. The charcoal grill is solely
intended for grilling suitable food with charcoal. It may not be used
as a fireplace.
Any other form of use is considered improper. The manufacturer does
not accept liability for damage due to improper use.
Instruction manual
Please read this instruction manual carefully before using the charcoal
grill. Heed and follow the safety information in particular.
Save the instruction manual. If you give the charcoal grill to somebody,
give them the instruction manual, too.
Basic safety information
There is a heightened danger of fire when grilling. Be sure to heed
the following safety instructions, since serious personal injuries and
damage to property can result otherwise!
Never leave the hot grill unsupervised, and keep children and pets
away from it.
Every part of the grill will be very hot during use. Do not touch the grill
and do not move the grill as long as it is hot.
Protect yourself against sparks and hot spitting fat: Always wear grill
gloves at the grill and use grill tongs. A grill apron will also protect
your clothing.
Environmental conditions
A suitable grill area is very important for the safe operation of the grill.
• Use the charcoal grill only on a flat, firm and inflammable surface.
• Do not use the charcoal grill in closed rooms or under roofs.
• Only use the charcoal grill in places where there are no heat-sensitive
or flammable objects in the immediate vicinity.
Do not expose charcoal grill to rain or humidity if possible. If required,
dry charcoal grill thoroughly and store following at dry place.
Operation
Setting up the charcoal grill
1. Choose a firm and flat location outdoors far away from any flammable
materials.
2. Open the carrying bag and remove its contents.
3. Take the stand from the charcoal grill and remove the protective foil.
4. Open the charcoal grill by folding back the two lateral parts on the
sides. (Figure A.1)
5. Remove the grill rack with the protective foil, the handle and the
charcoal bag.
6. Screw the stand with four screws to the bottom of the charcoal grill.
(Figure G.1)
7. Stand the charcoal grill on the location selected for using it.
Fill with charcoal and light
WARNING
• Danger of burning from spurts of flame! ·When lighting the charcoal,
explosive-like deflagrations can occur and lead to life-threatening
injuries.
• Never use fuel, alcohol or similar fluids for lighting or relighting the
grill.
• Never throw charcoal lighters onto the hot grill. Always check
whether the grill is still hot before throwing on charcoal lighters
• Only use conventional charcoal lighters to light the charcoal and
heed the information from the manufacturer.
1. Stack the charcoal like a pyramid in the grill.
2. Insert a tablet of charcoal lighter at the bottom of the charcoal.
3. Light the charcoal lighter.
4. Let the charcoal burn until it glows evenly and develops a white layer
of ash on it. Then begin grilling.
5. Distribute the hot coals with a suitable tool in the grill. To protect
the grill, leave some space between the charcoal and the side walls.
Grilling
CAUTION
Danger from hot fat!
• Hot spitting fat is very painful. When fat burns, substances hazar-
dous to your health can also form.
• To grill very fatty or marinated food, we recommend you use a grilling
tray made of aluminium or steel sheet.
1. Remove the protective foil from the grill rack.
2. Hook the handle on one side of the grill rack in the second and third
grate bar. (Figure D.1)
3. The grill offers three levels for the grill rack. Lay the grill rack on the
desired level by inserting the side struts of the grill rack in the rests
on the grill. Be sure that the grill rack is positioned horizontally and
lies securely. (Figure C.1)
4. Remove the handle.
5. Lay the food on the grill rack and begin to grill. Let the food turn
brown, but not burn black: burnt and charred meat can cause
damage to your health.
6. Let the coals die after grilling and be sure the grill cools down com-
pletely. Do not douse the coals with water in order to protect the
grill.
Packaging and transporting charcoal grill
CAUTION
• Danger of burning from hot surfaces!
• Let the grill cool down completely before you clean and package it.
1. Remove the cold ash.
2. Unscrew the stand from the grill and store the screws in a sealable
bag.
3. Clean the grill. Do not use any sharp objects or aggressive cleaning
agents.
4. Dry the grill.
5. Wrap the grill rack in the protective foil and lay the grill rack, handle
and screws (stored in the bag) in the grill.
6. Fill the charcoal bag with charcoal for your next grilling occasion,
close it and lay it in the grill.
7. Fold in the side parts of the grill until they make a flat surface.
8. Lay the protective foil on this surface and lay the stand with its feet
facing down.
9. Store the folded-up charcoal grill in the carrying bag. (Figure F)
REMINDER
Stainless steel changes colours at high temperatures. The discolouring
is not a defect, but rather a sign of its quality!
Technical data
Total weight: ~ 2785g / 98.2 oz
Size in packaging, folded: width 305 mm / 12“, depth 230 mm / 9.1“,
height 90 mm / 3.5“
Size in use: width 305 mm / 12“, depth 230 mm / 9.1“, height 180 mm / 7.1“
Merci
d’avoir acheté notre barbecue charbon « BBQ300S » d’Esbit®. Ce barbe-
cue en charbon est parfait pour les pique-niques. Il se plie rapidement
et peut être rangé sans problème dans le sac. Vous pouvez ranger et
emporter votre charbon à barbecue dans le sac à charbon pratique à
l’intérieur du barbecue. Ainsi, vous pouvez transporter de façon confor-
table tout ce qu’il faut pour une soirée barbecue.
Bon barbecue !
Déballer le barbecue à charbon
AVERTISSEMENT
Risque d’étouffement !
• Les enfants peuvent avaler des parties du matériel d’emballage ou
se les mettre sur le visage. Cela peut entraîner l’étouffement de
l’enfant.
• Veuillez jeter le matériel d’emballage après avoir déballé le bar-
becue.
Déballer l’appareil. Veuillez garder les deux bâches de protection (voir
contenu de la livraison I + J) pour une utilisation ultérieure.
Vérifiez le contenu à l’aide de la liste énumérant le contenu de la
livraison.
Contenu de la livraison
(A) Barbecue à charbon pliable
(B) Monture
(C) Grille
(D) Poignée amovible
(E) Sac à charbon (Charbon pour barbecue n’est pas contenu
dans la livraison.)
(F) Sac
(G) Sac avec 5 vis (4 pour utilisation, 1 vis de rechange)
(H) Protection contre le vent
(Schéma)
(I) Bâche de protection entre barbecue et monture
(J) Bâche de protection pour la grille
Sécurité
Utilisation conforme
Le barbecue à charbon est uniquement destiné à une utilisation à
l’extérieur. Le barbecue à charbon est prévu uniquement pour faire cuire
les aliments adaptés au charbon. Il ne doit pas être utilisé comme
foyer. Toute autre utilisation est considérée comme non conforme. Le
fabricant décline toute responsabilité pour des dommages résultants
d’une utilisa-tion non conforme.
Mode d’emploi
Veuillez lire attentivement cette notice avant toute utilisation du
barbecue à charbon. Veuillez respecter les consignes de sécurité
suivantes.
Veuillez conserver la notice. Si vous donnez le barbecue à quelqu’un
d’autre, veuillez également lui transmettre cette notice.
Consignes de sécurité
Lors d’un barbecue, le risque d’incendie est élevé. Veuillez impérati-
vement respecter les consignes de sécurité suivantes, sinon vous ris-
quer d’occasionner de graves accidents et dégâts matériels !
Ne laissez jamais le barbecue allumé sans surveillance et le tenir hors
de la portée des enfants et des animaux domestiques.
Toutes les pièces du barbecue se réchauffent lors de son utilisation.
Ne touchez pas le barbecue et ne le changez pas d’endroit lorsqu’il est
chaud.
Protégez-vous des étincelles et des giclées de graisse brûlante : por-
tez des gants pour barbecue pendant la préparation des aliments et
utilisez une pince à barbecue. Un tablier protègera en plus vos vête-
ments.
Environnement
Le choix d’un endroit adapté est très important pour assurer une uti-
lisation sécurisée du barbecue. Veuillez respecter les consignes de
sécurité suivantes :
• Utilisez le barbecue uniquement sur un sol plat, droit et non inflam-
mable.
• Ne pas utiliser le barbecue à charbon dans des endroits fermés ou
couverts.
• Ne pas utiliser le barbecue à charbon à proximité d’objets sensibles
à la chaleur ou combustibles.
FRANÇAIS
Si possible, ne pas exposer le barbecue à la pluie ou l’humidité. Le
cas échéant, séchez soigneusement le barbecue et rangez-le dans un
endroit sec.
Utilisation
Montage du barbecue à charbon
1. Choisissez un endroit de montage ferme et plat à l’extérieur et à une
distance suffisante de tout matériel combustible.
2. Ouvrez le sac et retirez-en le contenu.
3. Enlever la bâche de protection de la monture du barbecue à charbon.
4. Dépliez le barbecue à charbon en pliant les deux parties latérales
vers les côtés. (Schéma A.1)
5. Déballez la grille avec la bâche de protection, la poignée et le sac
à charbon.
6. Vissez la monture sous le barbecue à charbon à l’aide des quatre
vis. (Schéma G.1).
7. Placez le barbecue à charbon à l’endroit souhaité.
Verser le charbon et allumer le barbecue
ATTENTION
• Risque de brûlure occasionné par des jets de flamme !
• L’allumage du charbon peut provoquer des déflagrations explosives
pouvant causer des brûlures mortelles.
• Ne jamais utiliser d’essence, d’alcool à brûler ou des liquides simi-
laires pour allumer ou rallumer le barbecue.
• Ne jamais poser des allume-barbecue sur le barbecue encore chaud.
Vérifiez si celui-ci est encore chaud avant d’ajouter les allume-
barbecue.
• Utilisez uniquement des allume-barbecue disponibles dans le com-
merce et respectez les instructions du fabricant.
1. Empilez le charbon de bois de façon pyramidale sur le barbecue.
2. Placez un cube allume-barbecue dans le charbon.
3. Allumez le cube.
4. Laissez brûler le charbon pendant de façon à obtenir une braise
homogène et attendez qu’une couche de cendre blanche se soit
formée. Vous pouvez commencer les grillades.
5. Répartissez le charbon brûlant dans le barbecue avec un outil adap-
té. Pour éviter d’abîmer le barbecue, laissez un petit espace entre le
char-bon et les panneaux latéraux.
Grillades
ATTENTION
Risque de brûlure à cause de la graisse brûlante !
• Des giclées de graisse brûlante sont très douloureuses. Des
substances toxiques peuvent se former lorsque la graisse brûle.
• Pour faire cuire des aliments très gras ou marinés, veuillez utiliser
une poêle en aluminium ou en tôle d’acier.
1. Enlevez la bâche de protection de la grille.
2. Fixez la poignée sur un côté de la grille au niveau de la deuxième ou
de la troisième barre. (Schéma D.1)
3. Le barbecue a trois niveaux pour poser la grille. Placez la grille sur le
niveau souhaité en insérant les croisillons latéraux de la grille dans
les supports du barbecue. Veillez à ce que la grille soit positionnée
de façon horizontale et qu’elle soit bien fixée. (Schéma C.1)
4. Retirez la poignée.
5. Posez les aliments et commencer la cuisson. Laissez cuire les ali-
ments sans qu’ils ne deviennent noirs : des morceaux de viande brû-
lés et carbonisés peuvent contenir des substances nocives.
6. Laissez refroidir le charbon et le barbecue après la cuisson. Pour
éviter d’abîmer le barbecue, ne pas éteindre la braise avec de l’eau.
Remballage et transport du barbecue à charbon
ATTENTION
• Risque de brûlure dû aux surfaces brûlantes !
• Laissez entièrement refroidir le barbecue avant de le nettoyer et de
le remballer.
1. Enlevez la cendre froide.
2. Dévissez la monture du barbecue et rangez les vis dans leur sac re-
fermable.
3. Nettoyez le barbecue. Ne pas utiliser d’outils pointus ou de produits
nettoyants agressifs.
4. Séchez le barbecue.
5. Replacez le barbecue dans la bâche de protection et posez la grille,
la poignée et les vis (dans le sac) dans le barbecue.
6. Versez le charbon dans le sac à charbon pour une prochaine utilisa-
tion, fermez-le et placez-le dans le barbecue.
7. Repliez les parties latérales du barbecue vers le bas jusqu’à ce qu’il
forme une surface droite.
8. Placez la bâche de protection sur cette surface et posez-y la
monture les pieds vers le haut.
9. Rangez le barbecue à charbon dans le sac. (Schéma F)
REMARQUE
L’acier inoxydable déteint lors de températures élevées. Ceci n’est pas
un défaut, mais un signe de qualité !
Données techniques
Poids total : ~ 2785g / 98.2 oz.
Dimensions barbecue plié : largeur 305 mm / 12“, profondeur 230 mm /
9.1“, hauteur 90 mm / 3.5“
Dimensions barbecue monté : largeur 305 mm / 12“, profondeur
230 mm / 9.1“, hauteur 180 mm / 7.1“
Esbit Compagnie GmbH
Zippelhaus 3
20457 Hamburg · Germany
www.esbit.de
Other Esbit Grill manuals


Popular Grill manuals by other brands


Landmann
Landmann Avalon PTS Plus 5.1 Plus 12122 Assembly and operating manual

Kenyon
Kenyon B70200 owner's manual

Better Homes and Gardens
Better Homes and Gardens GBC1486W owner's manual

Orbegozo
Orbegozo GR 2300 instruction manual

bora
bora PT11 Operating and installation instructions

Klarstein
Klarstein 10031664 manual

Garland
Garland MWE3W Installation and operation manual

Char-Broil
Char-Broil 463722714 Product guide

MPM
MPM MOP-03 user manual

Kenmore
Kenmore 415.16123800 Use and care guide

Tucker Barbecues
Tucker Barbecues GTR Series Assembly, installation and operating instructions

Monogram
Monogram ZGG540NCP1SS owner's manual