ESD SYSTEMS Eliminator Plus Installation and operating instructions

settings being tampered with by
unauthorized personnel.
The unit is normally mounted
approximately 24" directly over the
area that is to be neutralized. Its decay
time (neutralization efficiency) will be
best approximately 12" away from the
bottom of the unit and will drop off as
the distance from the unit increases.
Figure 2. Area of optimum charge
neutralization
The Eliminator Plus has a switchable
power inlet which allows its use with
either 120 or 220 VAC. The unit also
PS-2063 7/00 Page 1 of 4
Overhead Ionizer
Installation, Operation, and Maintenance
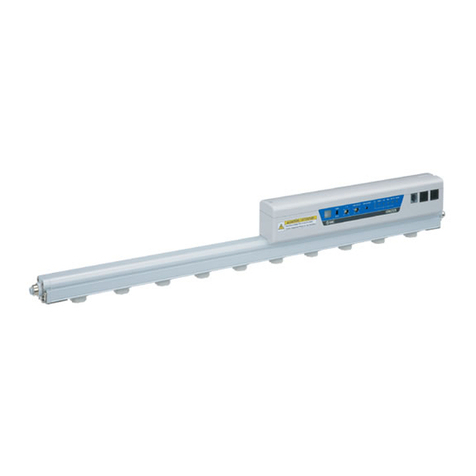
Figure 1. Model 43405 Eliminator Plus Overhead Ionizer
Description
The ESD Systems model 43405
Eliminator overhead ionizer is a self-
contained, ready-to-use unit designed
to neutralize electrostatic charges at
the workstation. The unique design of
this ionizer allows it to provide a more
consistent and wider coverage area
than most bench mounted ionizers.
The overhead ionizer utilizes 3
separate fans across its length, which
provide rapid neutralization without
causing solderability problems or
operator discomfort. Since the
overhead ionizer mounts above the
work area it does not consume
valuable work bench space. Emitter
needles are contained within the
ionizer’s housing, eliminating any
possibility of user shock.
The Eliminator Plus also includes a
unique operator lockout key that
eliminates the risk of the ionizer’s
incorporates a universal IEC-type
connector and cord set.
Installation
Before installing the overhead ionizer,
remove any packaging materials that
may have been used during shipping.
Figure 3 shows alternate mounting
positions relative to the bench top.
Mounting may be accomplished by
brackets from shelving, vertical
uprights, lights or with chains hung
from the ceiling. Ensure that air flow
is not impeded by the method used.
Figure 3. Mounting alternatives relative
to the bench top
Mounting Suggestions
Mounting the ionizer is facilitated by
five 1/4" - 20 threaded holes on each
end and universal brackets supplied
with the unit. To avoid a potential
shock hazard, be sure that fasteners do
not extend more than 1/2" into unit.
Figure 4. 1/4”-20 threaded mounting
holes
Tech Brief
ESD SSYSTEMS
PLASTIC SSYSTEMS
24 IN.
24 IN.
48 IN.
OPTIMUM
PERFORMANCE ZONE

4. Insert the fuse holder assembly
back into the IEC connector. The unit
is now ready to operate on 220 VAC.
To change back to 120 VAC operating
voltage, simply reverse the process.
Light for Ionizer (Optional)
Figure 7. 43404 Ionizer with light
The 43405 (120 volt model only) is
available with a light. Overhead
ionizers can block light from the
workbench making it difficult to see.
This new light feature will provide
additional lighting over the workbench
area, improving visibility. Ionizers can
be purchased with the light already
installed or the light can be installed
onto any existing unit. Call Customer
Service at (508) 485-7390 to receive
authorization to send existing units to
the factory and ESD Systems will
install the light.
Filter for Ionizer (Optional)
Figure 8. Item 43465 Filter for Ionizer
The 43405 is available with a filter.
Overhead ionizers operate more
effectively when the air is free of
contaminants. The filter will allow the
overhead ionizer to operate longer
between maintenance intervals. Install
the filter on the ionizer using two
screws. See Figure 8. For more
information on the filter call our
customer service department at (508)
485-7390.
PS-2063 Page 2 of 4
Voltage Selection
The 43405 has a switchable power
inlet which allows its use with either
120 or 220 VAC. All units are shipped
set up to operate on 120 VAC.
IMPORTANT NOTE: BEFORE
OPERATING ON 220 VAC IT IS
NECESSARY TO MODIFY THE
VOLTAGE SELECTOR CIRCUIT
INCORPORATED WITHIN THE
IEC CONNECTOR/FUSE
ASSEMBLY.
1. Disconnect the power cord at the
IEC connector from the unit.
2. Insert a small flat blade screw
driver into the slotted opening on the
IEC connector. Press down and gently
pry out the fuse holder from the IEC
connector. See figure 5.
Figure 5. Opening the fuse/voltage
selector assembly.
3. The proper operating voltage will
be indicated on the fuse holder
assembly. To change the operating
voltage to 220 VAC slide out the small
circuit board/voltage indicator. Flip
the circuit board assembly over and
re-insert it into the fuse holder so that
the voltage indicator now reads 220
VAC. See figure 6.
Figure 6. Changing the operating
voltage from 120 VAC to 220 VAC.
Operation
After the ionizer has been securely
mounted, connect the power cord to
the IEC connector on the back of the
unit and then to a convenient
grounded receptacle. It is
recommended that the AC outlet be
checked for proper wiring and
grounding, as the ionizer depends on a
good ground for balancing. All of the
ionizer's operating controls are located
on a highly visible, easy to operate,
central control panel located on the
face of the unit. (See figure 10 for
detailed illustration).
Operator Lockout Key
The model 43405 overhead ionizer
includes an operator lockout switch
that is designed to ensure optimum
performance. The operator lockout
key is located on the back side of the
unit. See figure 9 for a detailed
illustration. Once the unit has been
properly installed and is running, the
user may adjust the unit’s fan speed
and alarm to desired settings.
Adjustments to the unit can only be
made while the key is inserted. When
the key is removed from the unit the
control panel will be disengaged and
non-operational. This feature will
eliminate poor performance caused by
unauthorized tampering of the
ionizer's settings.
Figure 9. Operator lockout key
location
Control Panel Features
A brief description on each of the
control panel features is detailed
below:

PS-2063 Page 3 of 4
A. POWER ON/OFF: The power
switch turns the unit off and on when
pressed. The balance and airflow
displays illuminate when the unit is
on.
B. AUDIBLE ALARM: The audio
alarm switch allows the user to
activate or deactivate the unit's audio
alarm. A green LED will light when
the audio alarm is activated. In the
event that the unit’s ionization balance
exceeds the preset alarm limits, the
LED will turn red and begin to flash.
If the audio alarm is activated, the
visual alarm indication will be
augmented by an audible alarm. When
the unit is in the alarm mode the entire
unit will shut down with the exception
of the alarm status LED and the audio
alarm, if activated. To restart the unit,
press the POWER ON/OFF switch.
C. IONIZATION BALANCE:
During operation this LED display
provides the user with a visual
indication of the unit’s ionization
balance. When the unit is operating
within preset limits, a green LED will
be illuminated: The position of the
illuminated LED also indicates
relative balance and polarity in
relation to zero. Should the unit’s
balance shift excessively, the display
will shift to a yellow LED. Should this
condition persist continuously for
more than 20 seconds the unit will go
into the alarm mode.
D. AIRFLOW CONTROLS: The
airflow speed controls allow the user
to quickly and easily select the most
appropriate fan speed. Fan speed is
increased by pressing on the up arrow
button and is decreased by the down
arrow button.
E. AIRFLOW DISPLAY: The
airflow display provides a visual
indication of the relative fan speed
that has been selected.
Maintenance
Under normal conditions the ionizer
will attract dirt and dust (especially on
the emitters and fan guards). To
maintain optimum performance,
cleaning must be done on a regular
basis. The frequency of cleaning will
depend on the environment.
Figure 11. Cleaning the emitters and
fan guards
Emitter needle cleaning is very simple
and should be done frequently. TURN
THE IONIZER OFF. Blow off
contaminants on the emitter
assemblies and fan guards with clean
dry air. Reset the ionizer and check
the IONIZATION BALANCE display
to verify that the unit is operating
properly.
If the ionizer does not return to proper
balance, then you may need to clean
each emitter point more thoroughly.
TURN THE UNIT OFF AND
DISCONNECT THE POWER
CORD. With a non-linting swab or
small brush dipped in isopropyl
alcohol wipe each emitter needle
thoroughly.
Brush off emitters to assure that stray
filaments of cleaning material are
completely removed. A soft cloth and
alcohol may be used to clean each fan
guard.
Emitter Needle Replacement
The tri-metallic emitters should not
require replacement unless broken or
damaged. Replacement emitter
assemblies are available and are easy
to replace. Contact Desco for
replacement instructions and
assistance.
Neutralization Efficiency
(Decay Time)
Figure 12. Decay time in seconds from
1000 volts to 100 volts on a 6" x 6"
charged plate per ESD-S3.1
ESD
SYSTEMS
ITEM 43405
Figure 10. Control/Status Panel

PS-2063 Page 4 of 4
DESCO INDUSTRIES INC.
of emitters are located internally on
the unit, mounted above each of the
fan assemblies. Each set of emitters is
mounted over a fan which provides air
current to assist the mixing and speed
of the neutralization. The fan guards
also function as the sensor plate
monitoring the voltage balance of
each fan output. The balance signal is
sent to the control circuit which
modifies the pulse length of the
positive or negative output to maintain
a balanced output.
An automatic shutdown circuit is
included as a safeguard against the
failure of either the positive or
negative power supply or
contaminated or damaged emitter
needles. These conditions could lead
to an imbalanced output of ions which
could potentially damage sensitive
components. If an out of balance
condition is detected and persists for a
period of 20 seconds or more, the
automatic circuit will shut down the
unit, sound a 10 second alarm (if the
audio/alarm switch is activated), and
light the red alarm LED. When
automatic shutdown occurs, turn the
unit off and wait a few seconds before
trying to turn it on again. This is to
allow the timer circuitry to reset.
The Audio/Alarm indicator will be lit
by a green LED whenever the unit is
powered and the audio alarm is
activated. A flashing red LED will
turn on when the auto-shutdown
circuit has detected an unbalanced
condition and has shut down the
ionizer. When the red LED is on you
should turn off the power, clean the
emitters and then restart the unit. See
the section on maintenance for the
proper cleaning procedures.
Testing and Calibration
Ionizers are tested and calibrated
using a charged plate analyzer. For
proper testing we recommend a
charged plate analyzer and the
procedure outlined in ESD
Association Standard 3.1. This
standard may be obtained from the
19 BRIGHAM STREET, UNIT #9
MARLBORO, MA 01752-3004
http://www.esdsystems.com/
PHONE (508) 485-7390
FAX (508) 480-0257
The comparative efficiency of bench
ionizers is determined by a standard
test published by the ESD Association
Standard 3.1. The typical decay rates
measured using this standard for the
ionizer are shown in the following
diagram. The performance of the
ionizer was measured with a charged
plate analyzer positioned at varying
distances with the ionizer fan speed on
high.
Specifications
Input:
120/220 VAC 50-60 Hz-
400/200 mA
Fuse:
5x20mm - 1 Amp - 250V - Fast
Acting
Output:
6-8 KV - 5 microamps
Ozone:
Less than 0.05ppm
Air Flow:
50-150 CFM - adjustable
Size:
40" L x 4 1/2" W x 2 1/2" H
Weight:
10 pounds
Cord:
7' 6" cord set with IEC connector
Mounting:
Five each 1/4"-20 threaded holes
on each end.
Theory of Operation
Figure 13. Location of emitters and
sensors.
The system employs pulse-width-
modulated bipolar D.C. ionization,
with closed-loop monitoring on each
fan output, maintaining proper balance
under varying conditions. Three sets
CONTROL/STATUS
PANEL
SENSOR/FAN GRILL
2 SETS OF INTERNAL EMITTERS PER FAN
ESD Association, Norstar Building,
200 Liberty Plaza, Rome NY 13440,
(315) 339-6937. ESD Systems will be
happy to send you information on our
model 42630 charged plate analyzer.
ESD Systems ionizers can be
calibrated to NIST traceable standards.
Contact our customer service
department for details.
Adjustments
There are no user adjustable or
serviceable parts inside the ionizer.
Adjusting or dismantling your ionizer
may create dangerous conditions, and
unauthorized modifications will void
the product warranty. Servicing
should be performed only at the
factory, or by a technician trained in
high voltage circuits. See warranty
section for repair charges.
Limited Warranty
ESD Systems expressly warrants that for a period of one
(1) year from the date of purchase, ESD Systems
Overhead Ionizers will be free of defects in material
(parts) and workmanship (labor). Within the warranty
period, a unit will be tested, repaired or replaced at ESD
Systems’option, free of charge. Call Customer Service at
508-485-7390 for proper shipping instructions and
address. You should include a copy of your original
packing slip, invoice, or other proof of purchase date.
Warranty repairs will take approximately two weeks. Any
unit under warranty should be shipped prepaid to the ESD
Systems factory.
If your unit is out of warranty, ESD Systems will quote
repair charges necessary to bring your unit to factory
standards. Call Customer Service at 508-485-7390 for
proper shipping instructions and address. Units should be
shipped freight prepaid
Warranty Exclusions
THE FOREGOING EXPRESS WARRANTY IS MADE
IN LIEU OF ALL OTHER PRODUCT WARRANTIES,
EXPRESSED AND IMPLIED, INCLUDING
MERCHANTABILITY AND FITNESS FOR A
PARTICULAR PURPOSE WHICH ARE
SPECIFICALLY DISCLAIMED. The express warranty
will not apply to defects or damage due to accidents,
neglect, misuse, alterations, operator error, or failure to
properly maintain, clean or repair products.
Limit of Liability
Electronic ionizers use high voltage corona discharge and
should not be used in or near flammable or explosive
environments. In no event will ESD Systems or any seller
be responsible or liable for any injury, loss or damage,
direct or consequential, arising out of the use of or the
inability to use the product.
Before using, users shall
determine the suitability
of the product for their intended
use, and users assume all risk and liability whatsoever in
connection therewith.
This manual suits for next models
1
Other ESD SYSTEMS Air Ionizer manuals