esky C5900 User manual

IP Camera (C5900) User Manual
IP Camera
User Manual(H series)
Model: C5900
© 2011 Hisgadget Inc

IP Camera (C5900) User Manual
Preface
Thank you for purchasing eSky C5900 Wireless IP Camera, a powerful and high-quality wireless IP
camera. The camera can be installed as a standalone system within your wireless local network easily
and quickly, and supports remote management function so that you can access and control it using a web
browser on your PC/Mac. This User Manual provides you with the instructions and illustrations on how to
install and use your camera, which includes:
Chapter Ⅰ
Introduction describes the features of the camera. You will also know the components and functions of
the camera.
Chapter II
Installation walks you through the camera installation process according to your particular network
environment. You can use this camera at home, at work, anywhere you want.
Chapter III
Accessing the Camera leads you to view your camera through web browsers without hassle. The
camera can be set up easily and work within your network environment instantly.
Chapter IV
Extended Function guides you through the configuration of the camera using a web browser on your
PC/Mac.
Chapter V
Tips provide the instructions of the camera’s extended function and some useful tips for using your
camera.
Chapter VI
Super-client is a powerful Centralized Control Software which can run on PCs. This software can
manage up to 81 IP cameras on a screen.
Chapter VII
Precautions and Warranty elaborate the matters that need attention in future operations.

IP Camera (C5900) User Manual
CAUTION
The use of surveillance devices may be prohibited by law in your country. The IP camera is not only a
high-performance web-ready camera but also can be part of a flexible surveillance system. It is the user’s
responsibility to ensure that the operation of such devices is legal before installing this unit for its intended
use. The IP Camera is a network device and its use should be straightforward for those who have basic
network knowledge.
The IP Camera is designed for various applications including video sharing, general security/surveillance,
etc. The “Accessing the Camera” chapter suggests ways to best utilize the Camera and ensure proper
operations.
For paragraphs proceeded by the , reader should use caution to understand completely the
warnings. Ignoring the warnings may result in serious hazards.
This User Manual explains how to operate the C5900 IP Camera from a computer. As this section gives
tips on using the User Manual, read it before you operate the camera is necessary.
NOTE: The illustrations and configuration settings in this guide are for reference only. The actual settings
depend on your practical application of the camera.
Hisgadget Inc reserves the right to make any modification to this manual or the information contained
herein at any time without notice. The software described herein may also be governed by the terms of a
separate user license agreement.

IP Camera (C5900) User Manual
Table of Contents
Preface......................................................................................................................................................... 2
CAUTION..................................................................................................................................................... 3
Chapter I Introduction.............................................................................................................................. 7
1.1 Features................................................................................................................................ 7
1.2 System Requirements........................................................................................................ 8
1.3 Places of application.......................................................................................................... 9
1.4 Packing List ......................................................................................................................... 9
1.5 Product illustration........................................................................................................... 10
1.5.1 Front view........................................................................................................................... 10
1.5.2 Back view ........................................................................................................................... 11
1.5.3 Bottom View....................................................................................................................... 11
Chapter II Installation............................................................................................................................. 12
2.1 Hardware Installation ....................................................................................................... 12
2.2 Software Installation......................................................................................................... 12
Chapter III Accessing the Camera........................................................................................................... 14
3.1 Authentication................................................................................................................... 14
3.2 Installing plug-in ............................................................................................................... 17
3.3 Initial Access to the Network Camera in LAN.............................................................. 19
3.4 Capabilities of Administrator and User........................................................................ 20
3.5 Main View ........................................................................................................................... 21
3.6 WiFi Configuration............................................................................................................ 23
3.7 How to log in your camera remotely ............................................................................. 24
3.7.1 Configure DDNS................................................................................................................ 24
3.7.2 Port Forwarding ................................................................................................................ 26
3.8 log in your camera via mobile device........................................................................... 29
Chapter IV Extended Function................................................................................................................. 32
4.1 Camera info........................................................................................................................ 32
4.2 Alias settings..................................................................................................................... 32
4.3 Data & Time settings........................................................................................................ 33

IP Camera (C5900) User Manual
4.4 Users settings.................................................................................................................... 33
4.5 RTSP settings.................................................................................................................... 34
4.6 Multi-Camera settings...................................................................................................... 34
4.7 Basic network settings.................................................................................................... 36
4.8 Wireless LAN settings...................................................................................................... 37
4.9 PPPoE settings.................................................................................................................. 37
4.10 UPnP settings.................................................................................................................... 38
4.11 DDNS service settings..................................................................................................... 39
4.12 Video setting...................................................................................................................... 40
4.13 Mail service settings......................................................................................................... 41
4.14 FTP service settings......................................................................................................... 42
4.15 Alarm service settings..................................................................................................... 43
4.16 SD card record................................................................................................................... 44
4.17 SD card playback.............................................................................................................. 45
4.18 PTZ settings....................................................................................................................... 45
4.19 Log....................................................................................................................................... 46
Chapter V Tips.......................................................................................................................................... 47
5.1 Reset and restore.............................................................................................................. 47
Chapter VI Super Client......................................................................................................................... 48
6.1 Introduction........................................................................................................................ 48
6.2 Add devices ....................................................................................................................... 48
6.3 Main Windows ................................................................................................................... 51
6.4 PTZ Control........................................................................................................................ 52
6.5 Video Record ..................................................................................................................... 52
6.6 Alarm................................................................................................................................... 53
6.7 History Manage.................................................................................................................. 59
6.8 Operator Manage............................................................................................................... 60
6.9 Log Manage........................................................................................................................ 62
Chapter VII Precautions ........................................................................................................................... 64
7.1 Data and security.............................................................................................................. 64

IP Camera (C5900) User Manual
7.2 Operating or storage location ........................................................................................ 64
7.3 Warranty Card.................................................................................................................... 66

IP Camera (C5900) User Manual
Chapter I Introduction
1.1Features
High-quality monitoring via the network
You can monitor a high-quality live image from the camera using the Web browser on a computer
connected to a WiFi network. The maximum frame rate is 30 fps. Numbers of users can view live
videos from one camera at the same time are not limited. The camera supports H.264 video
compression formats (video codecs) making video footage clearer, smaller and smoother.
Remote-controllable high-speed pan/tilt mechanism
The camera is provided with a high-speed (200°rotation/second) pan/tilt mechanism, which allows
–150°to +150°panning and –90°to +30°tilting.
Wireless LAN & built-in DDNS
This IP camera is based on the TCP/IP standard and has a built-in WiFi module. Therefore the
management and maintenance of your device would be simple, because all the things you want to do
can be accomplished through network, such as remote configuration, start-up and upgrade firmware.
You can use this IP camera to monitor some special places such as your home and your office when
you are far away from there. In addition, the camera can be upgraded remotely when a new version of
firmware is available.
Image transmission using an e-mail or FTP
You can send still images from the camera via an e-mail or to a FTP server by setting off a trigger
using the built-in motion sensor. You can also send still images sequentially for a determined period
before and after the trigger to a FTP server, or send them periodically. TLS/STARTTLS SMTP server
is supported. So Gmail accounts can be used as sender.
Support WEP/WPA/WPA2 encryption
All the wireless routers on the market comply with these security protocols. That means this camera
is 100% compatible with your router.
Multiple protocols Supported
The camera supports multiple network protocols, including TCP/IP, SMTP e-mail, HTTP, and other
Internet related protocols.
Preset positions and rotation
You can save up to 15 preset positions (pan & tilt positions) of the camera, and up to 11 rotation speed
classes.
Intelligent object detection function
The camera is provided with an intelligent object detection function to watch images. This function

IP Camera (C5900) User Manual
combines “Moving object detection” that detects moving objects in camera images with “Unattended
object detection” that detects objects that do not move for a specified period in camera images.
Two-way audio
The camera is equipped with two-way audio that means you can use the camera as speaker and
microphone at the same time. Both speaker and microphone are built in and no extra external ones
are needed.
Local Micro SD card storage
Video and audio can be captured and saved in a Micro SD card if you install one in the card slot. You
don’t need a dedicated PC to capture videos.
Night vision
The camera features 10 infrared LEDs, which makes it a sophisticated all-time guardian. The range of
night vision is 8 meters.
Date-Superimpose function
Date/time can be superimposed on the image. You can also select the color of the time & date
displayed.
Multiple Applications Supported
Through the remote access technology, you can use the cameras to monitor various objects and
places for your own purposes. For example, pets/babies at home, patients in the hospital, offices,
shops, warehouses, and more. The camera can capture both still images and video clips, so that you
can keep the archives and review them at any time.
1.2System Requirements
Requirements for the computer that displays the image or controls the camera are as followed:
Processor: Intel Pentium 3, 1.5 GHz or higher (Pentium 4, 2.4 GHz or higher recommended)
RAM: 256 MB or more
OS: Microsoft Windows 2000, Windows XP, Windows Vista, Windows 7
Web browser: Internet Explorer/Mozilla Firefox/Google Chrome
NOTE: If you want to connect multiple cameras to monitor various places simultaneously, a computer
with higher performance would be recommended.
IP Camera (C5900) User Manual
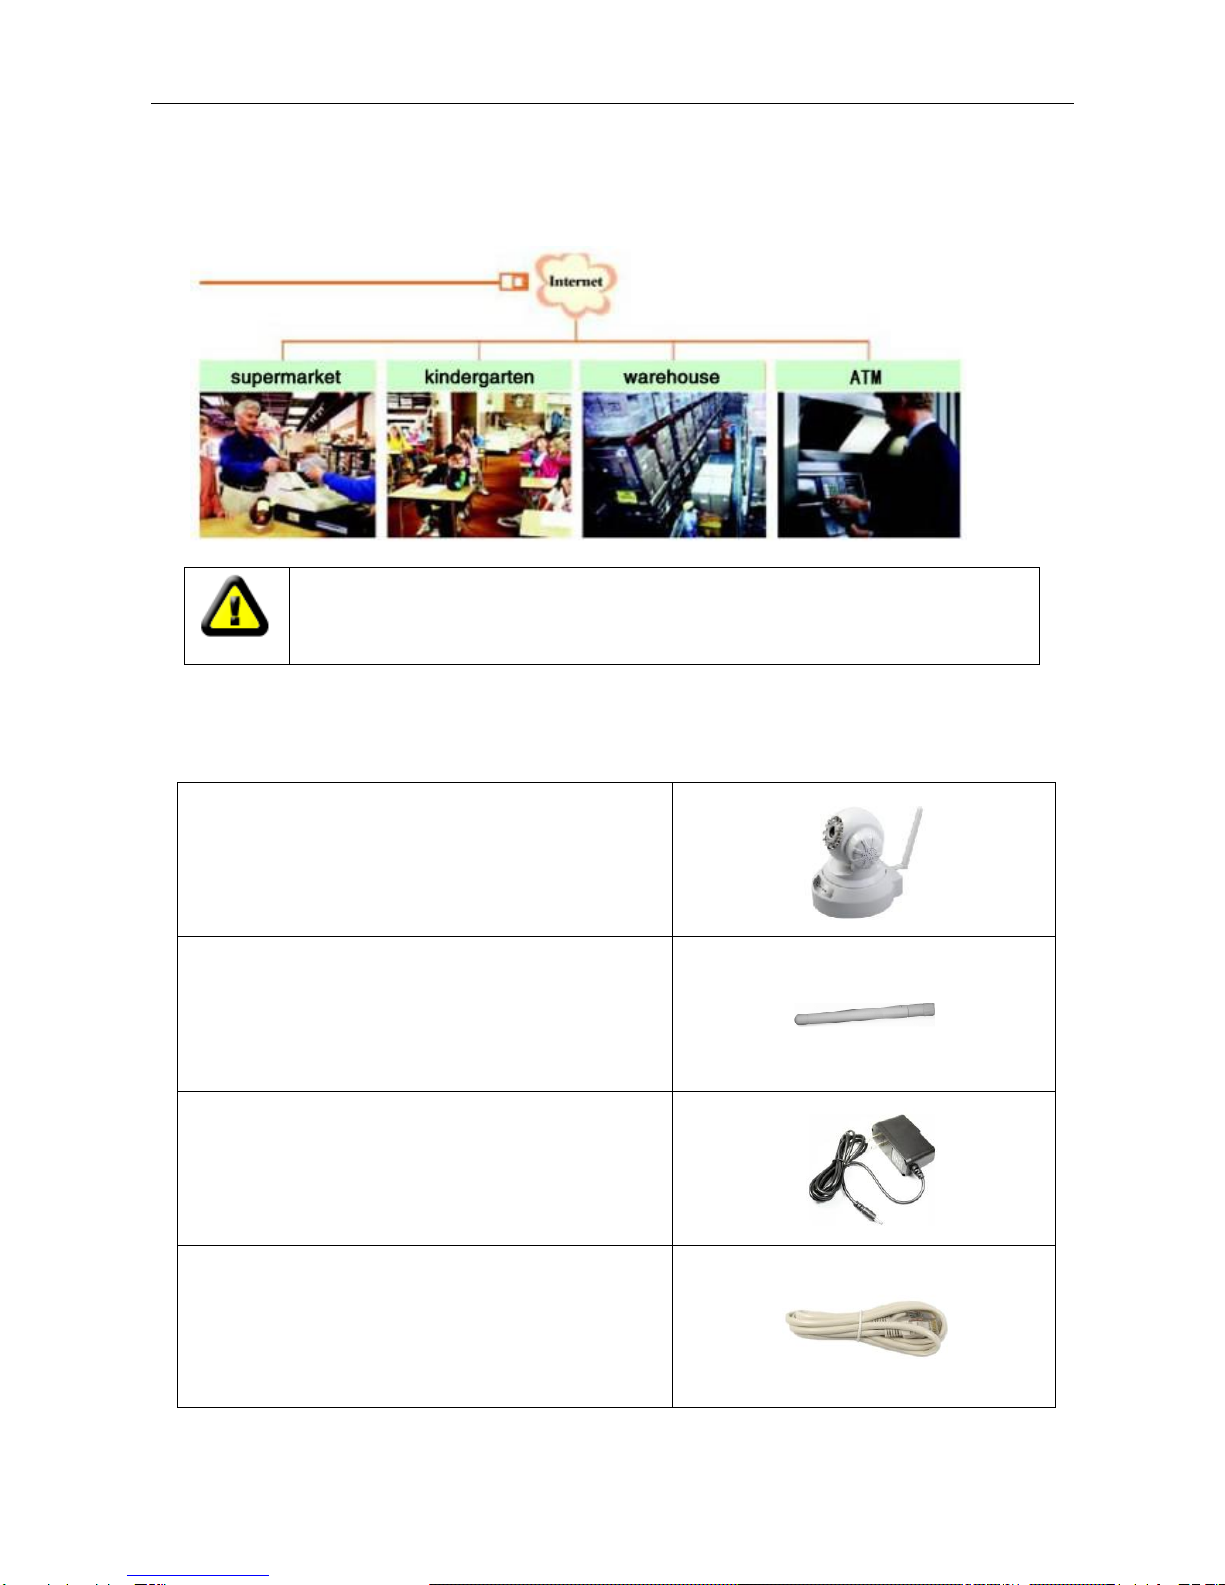
1.3Places of application
This camera is an ideal solution for big departments, schools, factories, workshops etc.
1.4Packing List
IP Camera X 1
WiFi Antenna X 1
DC Power Supply X 1
Ethernet cable (RJ-45 type) X 1
c
Please check out the integrity of the items in you package before installation,
contact the reseller as soon as possible if any parts missed at the very first place.

IP Camera (C5900) User Manual
Mounting Bracket X 1
CD X 1
Quick Install Guide For Windows X 1
1.5Product illustration
1.5.1 Front view
Infrared LED: 11 IR LEDs
LENS: CMOS sensor with fixed focus lens. (3.6mm)
WIFIAntenna: Wireless Antenna
Microphone: Build-in microphone
Speaker: Build-in speaker

IP Camera (C5900) User Manual
1.5.2 Back view
Ethernet Port: RJ-45/10-100
Power Jack: DC 5V/2A Power supply
T/F Card Slot: Micro SD Card Slot
Network Light: The LED will blink when plug the power
Power Light: If the power adapter works well, the light will turn on
Audio Output: The jack is designed for external speaker.
I/O Interface: alarming input, T1 and T2 .Output, T3 and T4
1.5.3 Bottom View

IP Camera (C5900) User Manual
How to reset your camera: Use a slim toothpick thrusting into the reset spot at the buttom of the
camera, and keep on pressing for 30 seconds. Please power on the camera before reset.
Chapter II Installation
2.1Hardware Installation
Follow the steps below to assemble your camera.
1) Attach the external antenna to the camera.
2) Connect your camera to your WiFi router using ethernet cable.
3) Plug your camera in power.
4) The green network light at the rear of the camera will blink and the power indicator will turn solid
yellow, mean while, the camera will pan & tilt automatically.
CAUTION: IP Camera terminal shall be used indoor only.
Warning: Please use the original power adapter, otherwise the IP camera
would be damaged.
Connect the power adapter jack to the Camera before plugging in to the
power socket. This will reduce the risk of accidental electric shock.
2.2 Software Installation
If the disc comes with your package is not readable or damaged, you can download all the contents
from our official website below: www.eskynow.com.
The camera comes with a powerful management software: Super Client, which is included in the
Installation CD-ROM, allowing you to manage cameras on your network easily.
a) Insert the Installation CD-ROM into your computer’s CD-ROM drive to initiate the installation
Warning: Please use the original power adapter, otherwise the IP camera would
be damaged.

IP Camera (C5900) User Manual
process.
b) Click “Install Super Client” to start the installation. The SETUP window will appear as below.
Hit "OK" to continue
Click "next" to continue
IP Camera (C5900) User Manual
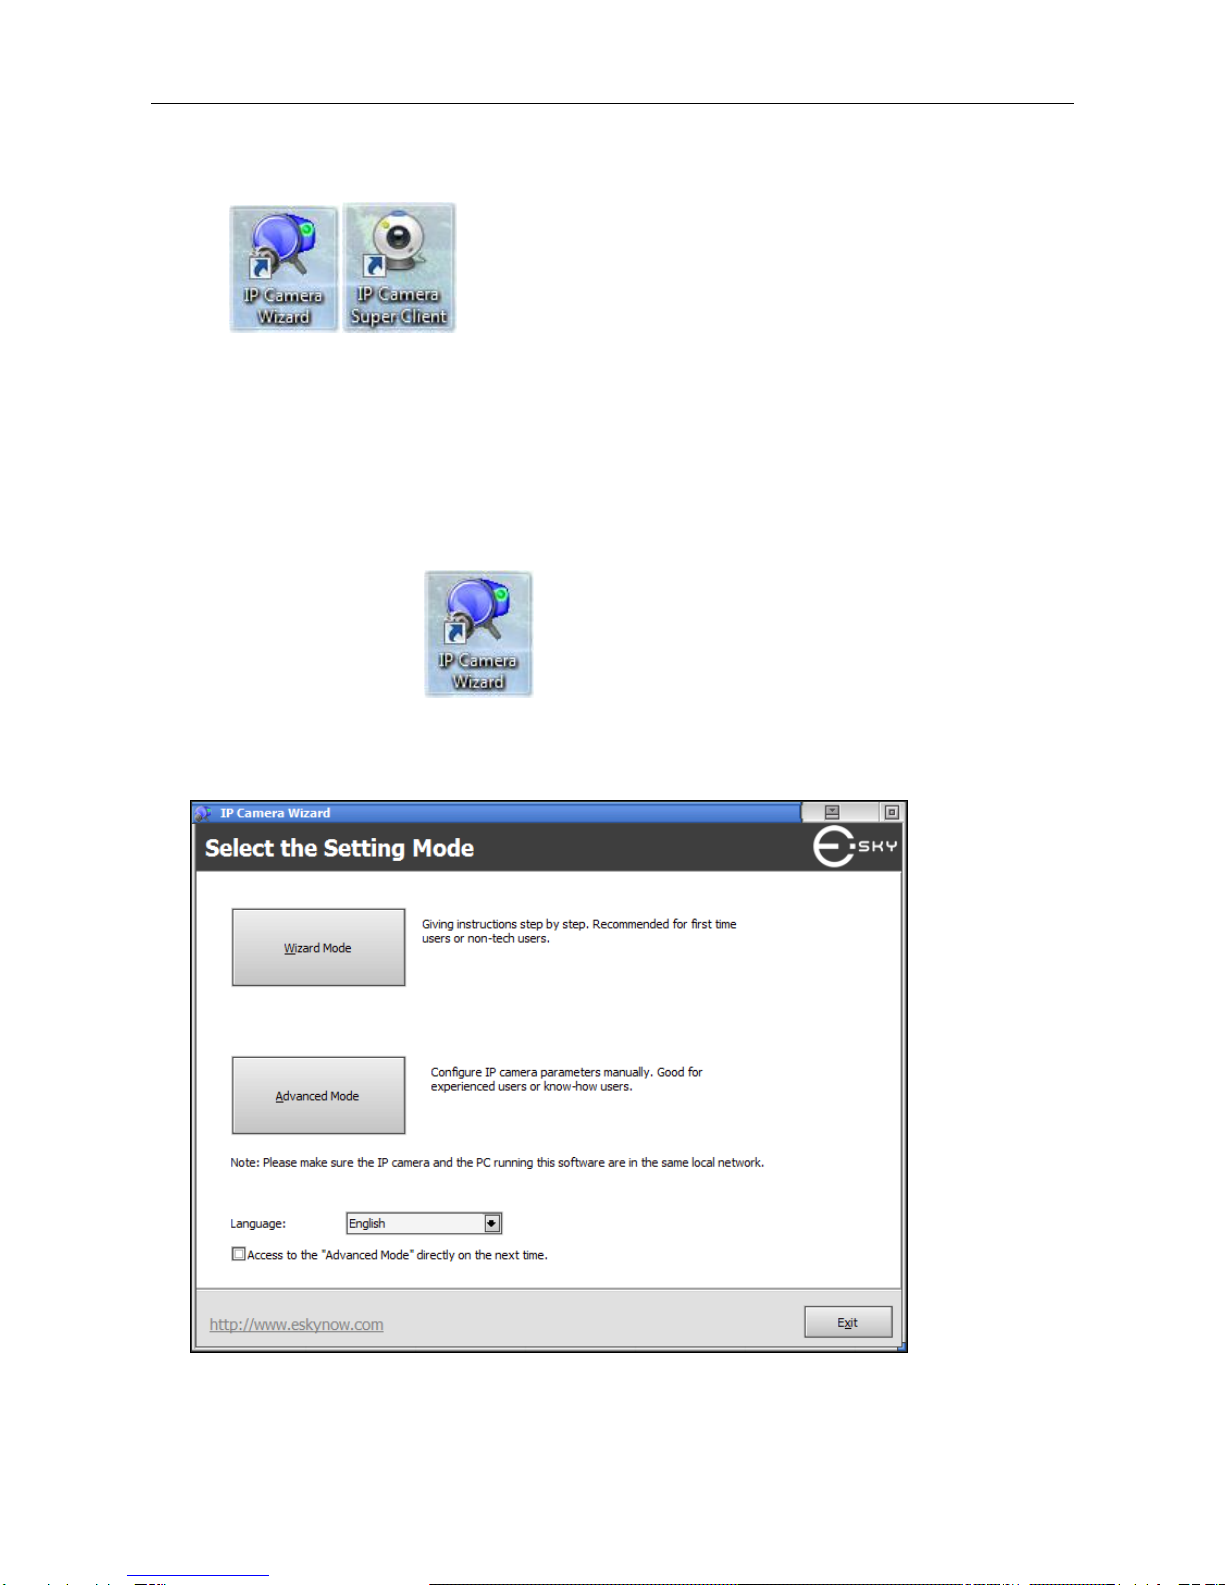
After installation there will be two icons on your desktop:
Chapter III Accessing the Camera
3.1 Authentication
a) Double click this icon to start your IP Camera installation.
b) Select the mode you want to proceed. If you are a new user, “Wizard Mode” is recommended.
Here, we choose "Wizard Mode" to illustrate.
Figure 3.1-1

IP Camera (C5900) User Manual
Figure 3.1-2
Figure 3.1-3
IP Camera (C5900) User Manual
Figure 3.1-4
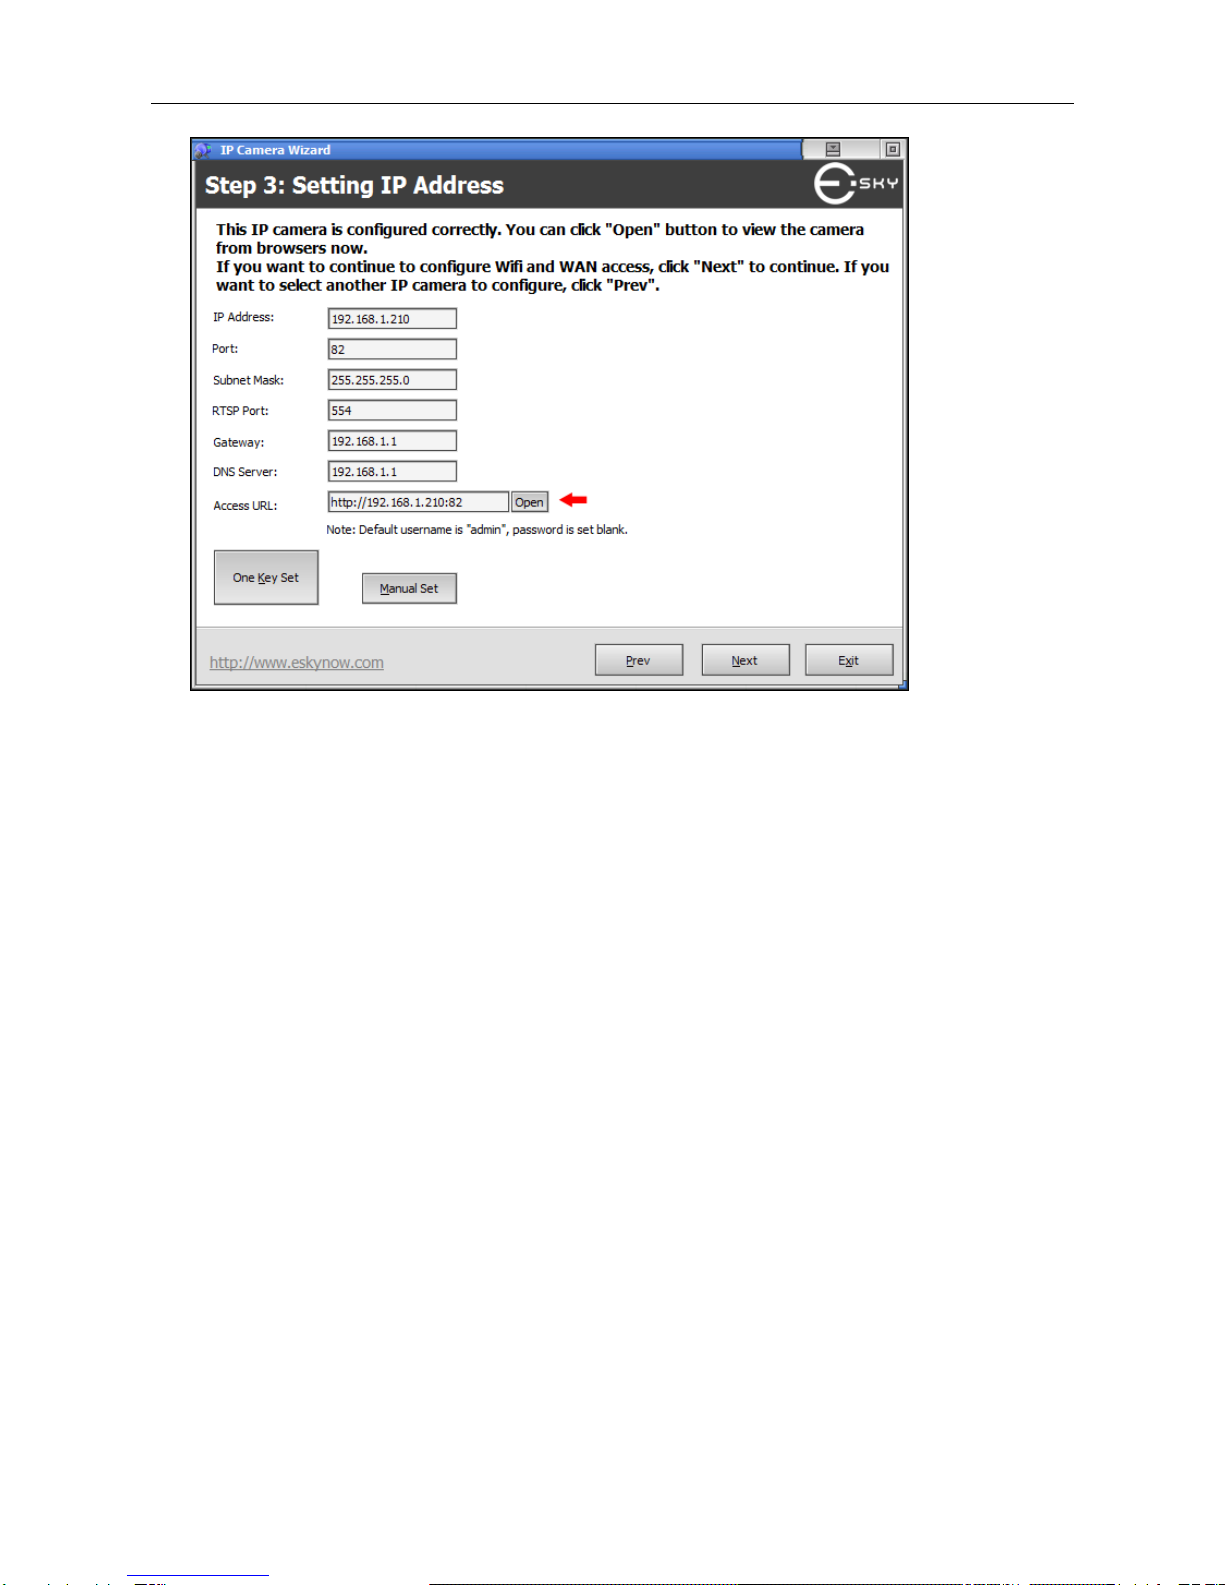
You can see the network parameters of your IP camera in this screen. You need to make sure they
are correct before you can view the camera from your PC.
If you see red words “The camera can not be accessed, please set with one key or manually set” on
your screen as shown in Figure3.1-3 it means that the IP address of your camera needs to be
configured. There are two ways to configure the parameters: One Key Set or Manually Set. The
software will configure the parameters automatically if you click One Key Set. You can also use
Manually Set if you understand what you are doing. The goal of this step, whether One Key Set or
Manually Set, is to configure the IP address of the camera to match your local network. For example,
if the IP address of your router is 192.168.1.1, usually the IP address of the camera should be
192.168.1.2-254, sub-mask should be 255.255.255.0, and Gateway and DNS server should be your
router, 192.168.1.1 in this case. You can leave the HTTP port as it is or choose whatever you want.
If the IP address is set correctly, you will see black words “The camera can be accessed, click ‘Open’
button to access immediately…” on your screen as shown in Figure 3.1-4. At this time, you can click
"open" to view the camera.
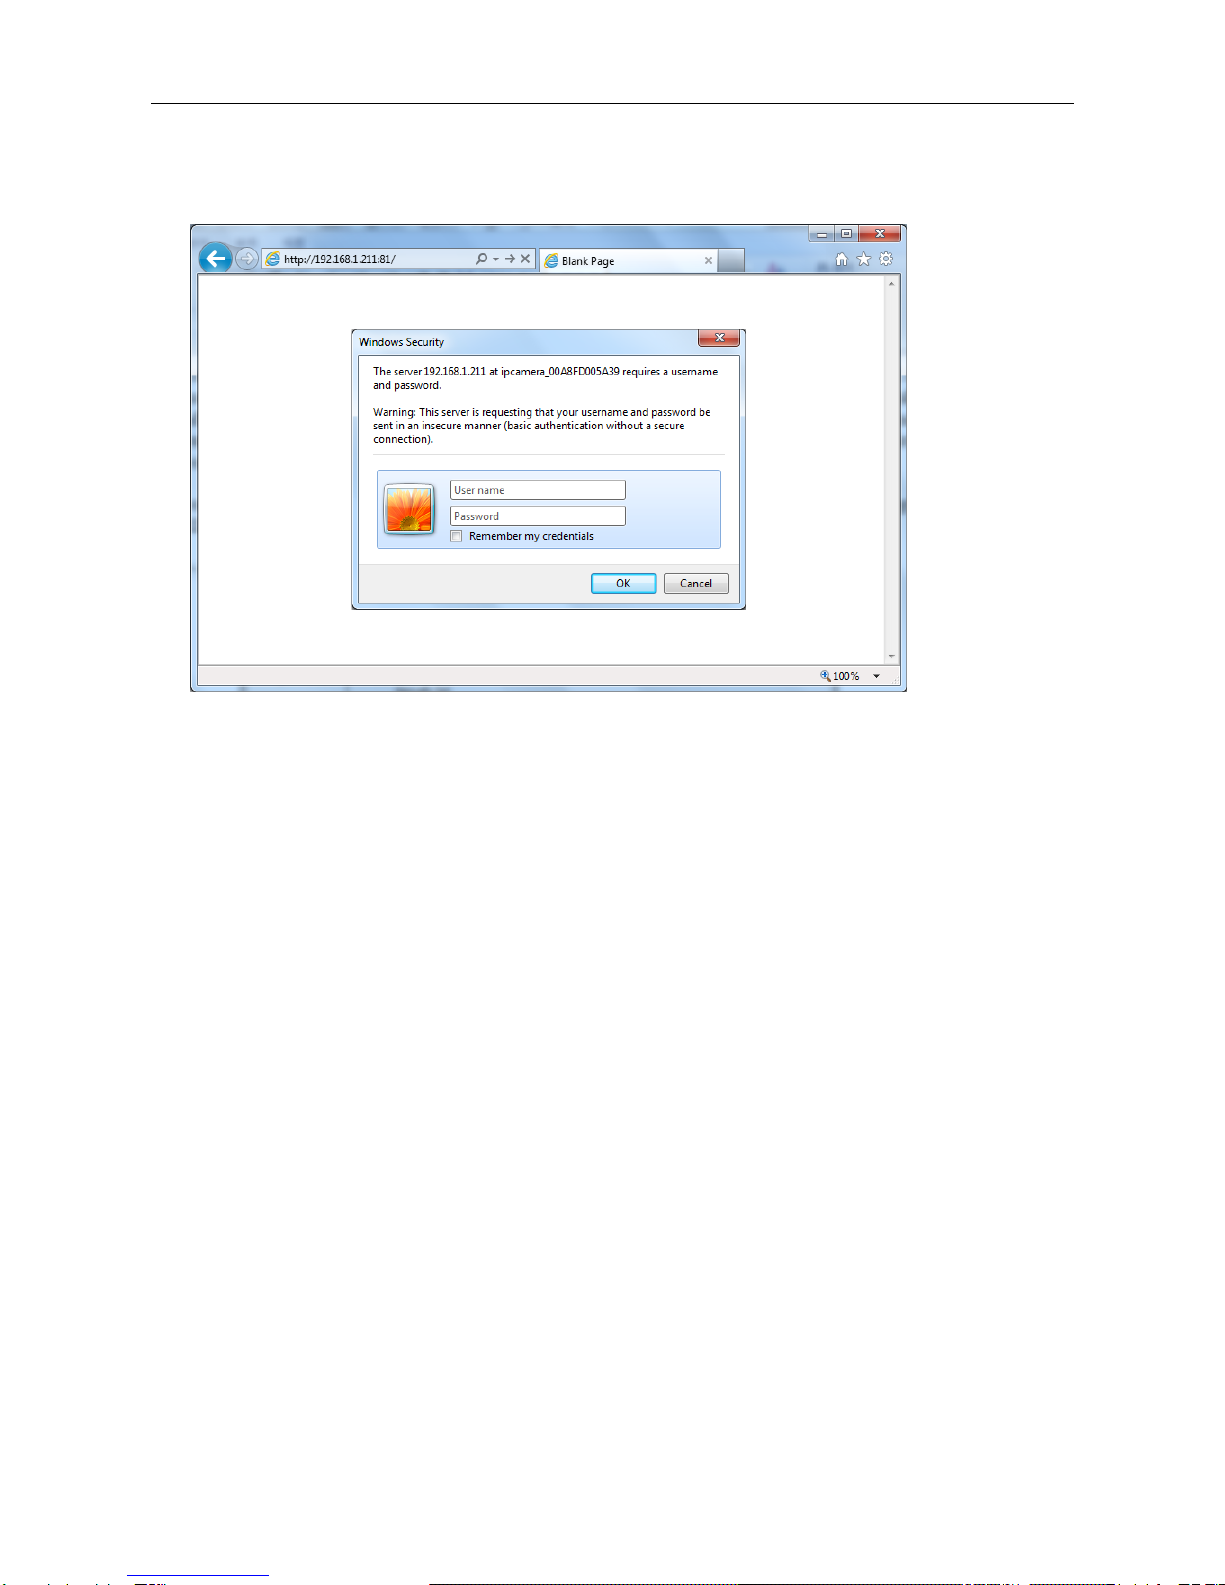
After opening the Web browser, a dialogue window pops up to request a username and password.
Upon successful authentication, the following figure is displayed.
The foreground in figure 3.1-5 is the login window. The user may check the option box to save the
password for future convenience.
IP Camera (C5900) User Manual
Enter the default User name (admin) and leave the password blank then press “OK” to access
the main screen of the camera’s Web Configuration.
The default username is ‘admin” and the camera initially will not ask for any password. The
administrator should immediately implement a new password as a matter of prudent security practice.
Once the administrator’s password is saved, the camera will ask for the user’s name and password
before each access. The administrator can set up a maximum of 8 user accounts. Each user can
access the camera at the same time. Some critical functions are exclusive for the administrator,
such as system configuration, user administration and software upgrades. The user name for the
administrator is permanently assigned as “root”. Once the password is changed, the browser will
display an authentication window to ask for the new password. Once the password is set, there is no
provision to recover the administrator’s password. The only option is to restore to the original factory
default settings by pressing the reset hole for 10 seconds.
Note: The username and password demonstrated in all the illustrative pictures below is shown as
default.
3.2 Installing plug-in
When you access to the camera at the first time, you will be asked to install a new plug-in for the
camera. Permission request depends on the Internet security settings of your computer. If the highest
security level is set, the computer may prohibit any installation and execution attempt. When the
plug-in has been registered for certificate and is used to display the video in the browser. Users may
click on “Yes” to proceed. If the web browser does not allow the user to continue to install, check the
Internet security option and lower the security levels or contact your IT or networking supervisor for
help.
IP Camera (C5900) User Manual
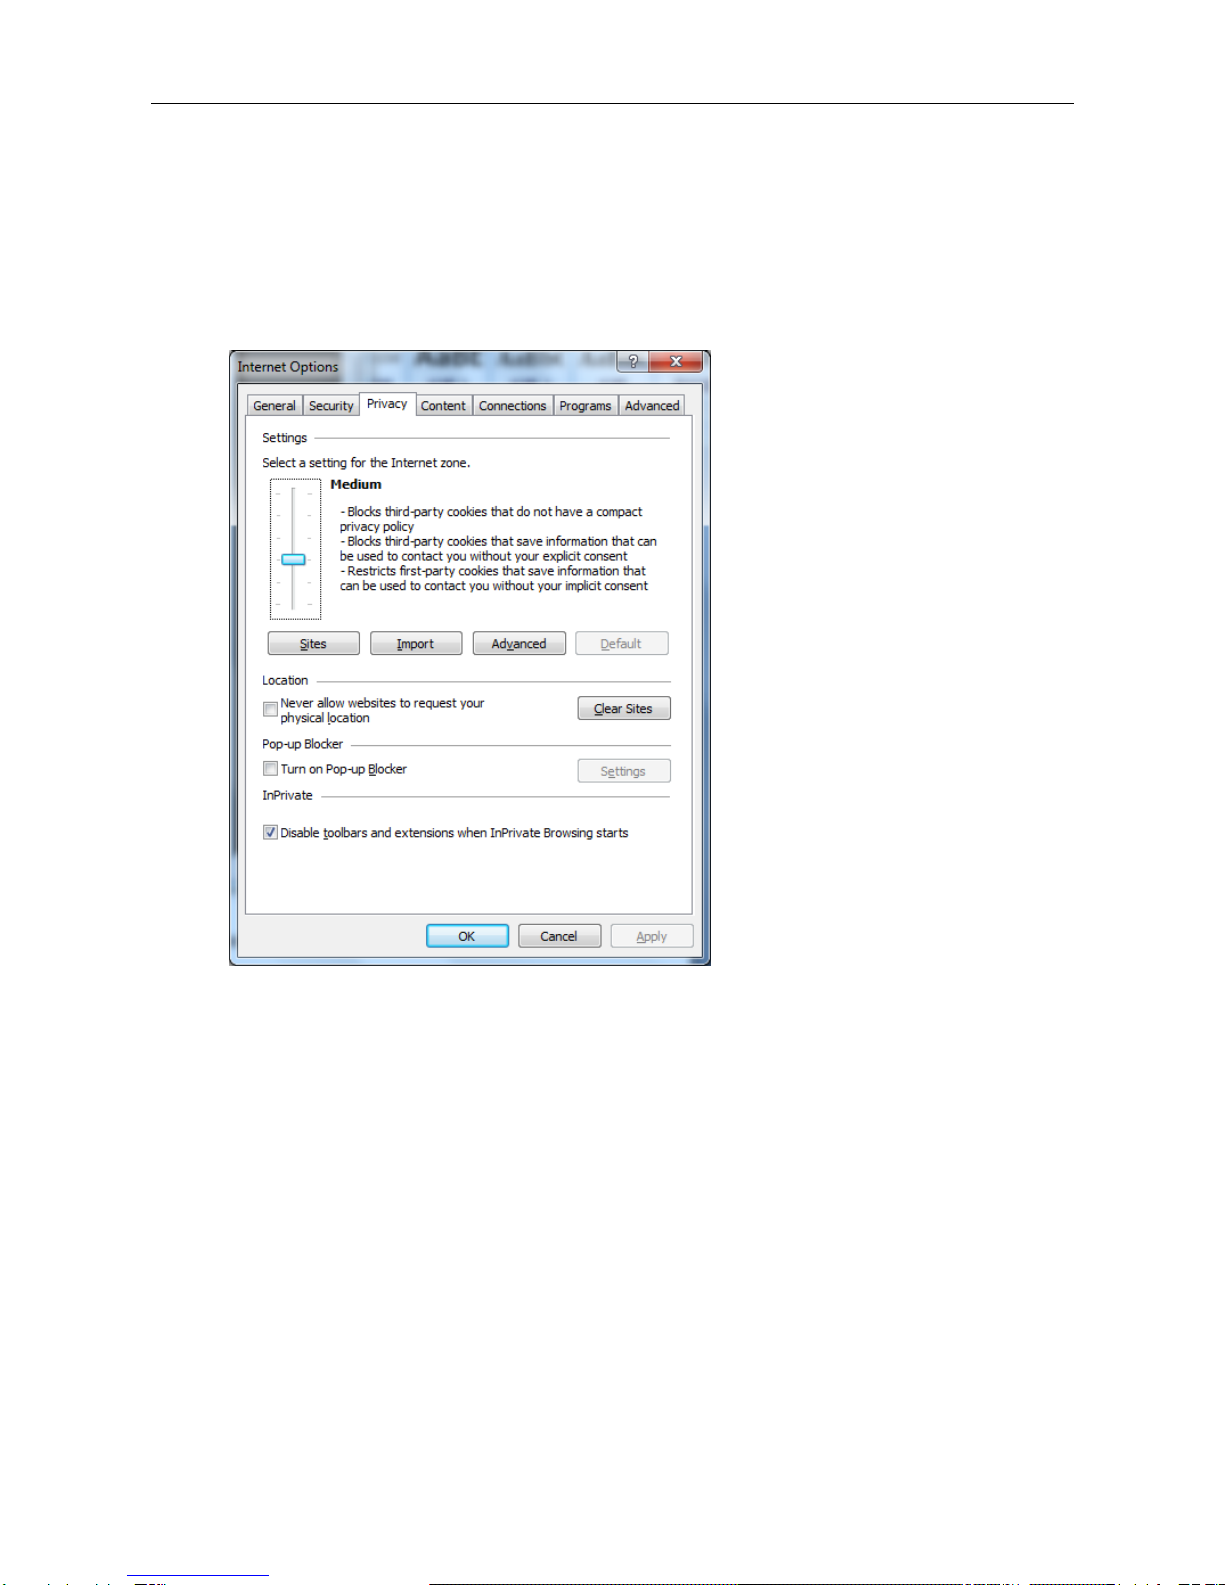
To operate the welcome page and the main viewer correctly, set the security level of the Internet
Explorer to Medium or lower, as follows:
1. Select Tools from the menu bar for Internet Explorer, then select Internet Options and click the
Security tab.
2. Click the Internet icon (when using the camera via the Internet) or Local intranet icon (when
using the camera via a local network).
3. Set the slider to Medium or lower. (If the slider is not displayed, click Default Level.)
When using antivirus software, etc. on the computer
When you use antivirus software, security software, personal firewall or pop-up blocker on your
computer, the camera performance may be reduced, for example, the frame rate for displaying
the image may be lower.
The web page displayed when you log in to the camera uses JavaScript. The display of the Web
page may be affected if you use antivirus software or other software described above on your
computer.
IP Camera (C5900) User Manual
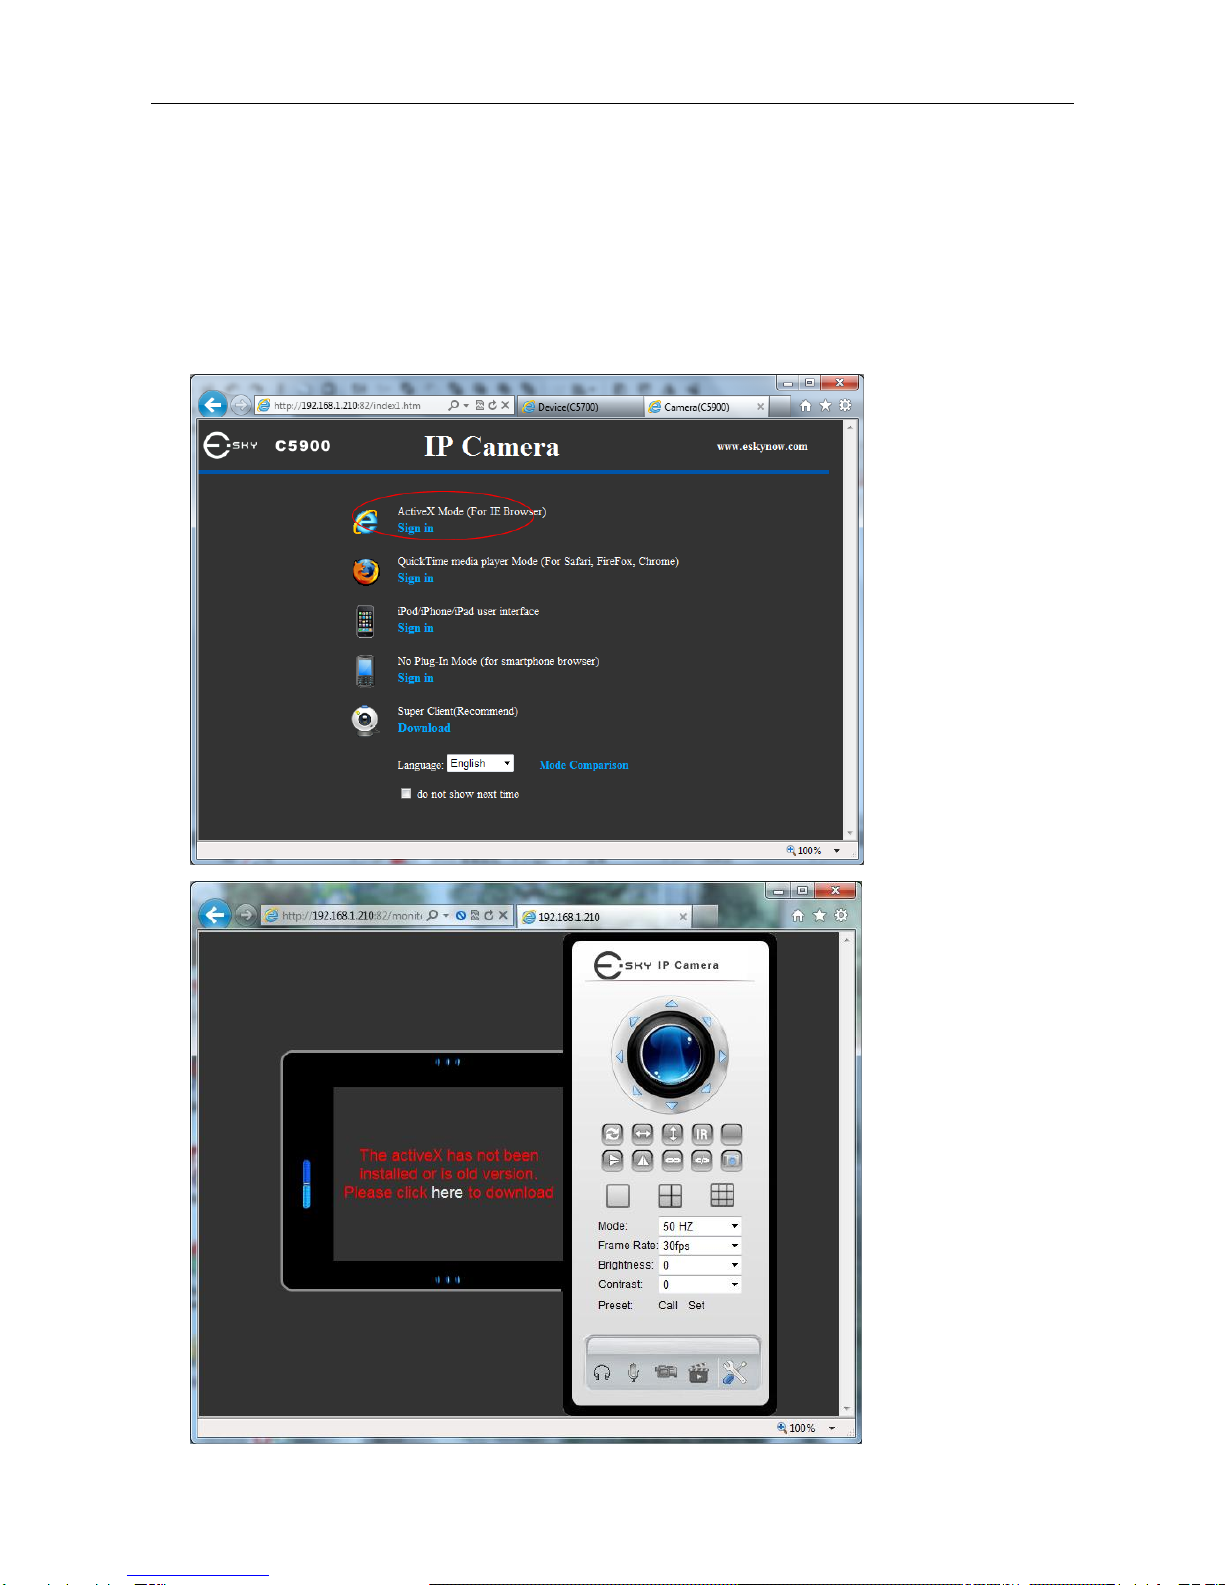
3.3 Initial Access to the Network Camera in LAN
We take Internet Explorer for example:
Click "here" to download activeX and install the activeX , then press "F5" to refresh the page.
Attention: Please do not neglect the browser type you are using.

IP Camera (C5900) User Manual
3.4 Capabilities of Administrator and User
This IP camera identifies the people who log in as the Administrator or User. The Administrator
can use all the functions of this network camera including camera settings. The User can use the
functions for monitoring the image and audio from the camera, and controlling the camera. The
Viewer mode setting is used to restrict the user's access rights. There are three types of users. Each
type of user can use the corresponding functions below.
Model :C5900
User
Function
Full
administrator
operator
visitor
Monitor a live image
√
√
√
√
View the date and time
√
√
√
√
Control the frame rate (FPS)
√
√
√
×
Control the image view size (resolution)
√
√
√
×
Zoom an image using the digital zoom
×
×
×
×
Save a still image in the computer
√
√
√
√
Send an image file to the FTP server
√
√
×
×
Send an image attached to an e-mail
√
√
×
×
Record an image in the memory
√
√
√
√
Control the alarm output of the I/O port on
the camera
√
√
×
×
Switch the Day/Night function mod(IR-LED)
√
√
√
×
Image reverse (flip & mirror)
√
√
√
×
Add date & time mark
√
√
√
√
Call the Preset position
√
√
√
×
Perform the pan/tilt/zoom operation
√
√
√
×
Receive the audio
√
√
√
√
Control the setting menu
√
√
×
×
Control the brightness and contrast
√
√
√
×
Table of contents


