Espedeo Supra-5000 User manual

Supra-5000 Digital Cinema and Secured Media Projection System Quick Start Guide
May 19th, 2021
Espedeo Supra-5000 Projector
1.28-1.92:1 Standard Lens
AES Audio Cable (10M)
GPIO Cable (10M)
RJ45 to 25PIN Male
CP750/JSD80
Audio Converter V2
Cat5e Cable (10M)
Power Cord
NOTE: User and Installation Manuals, Quick Start Guide and Red Dot Leaflet (A4) will also be provided as part of standard packaging.
② Packing List
①Important Safety Instructions
Supra-5000
Digital Cinema and Secured Media
Projection System
Quick Start Guide
May 19th, 2021
Supra-5000 Digital Cinema and Secured Media Projection System Quick Start Guide
May 19th, 2021
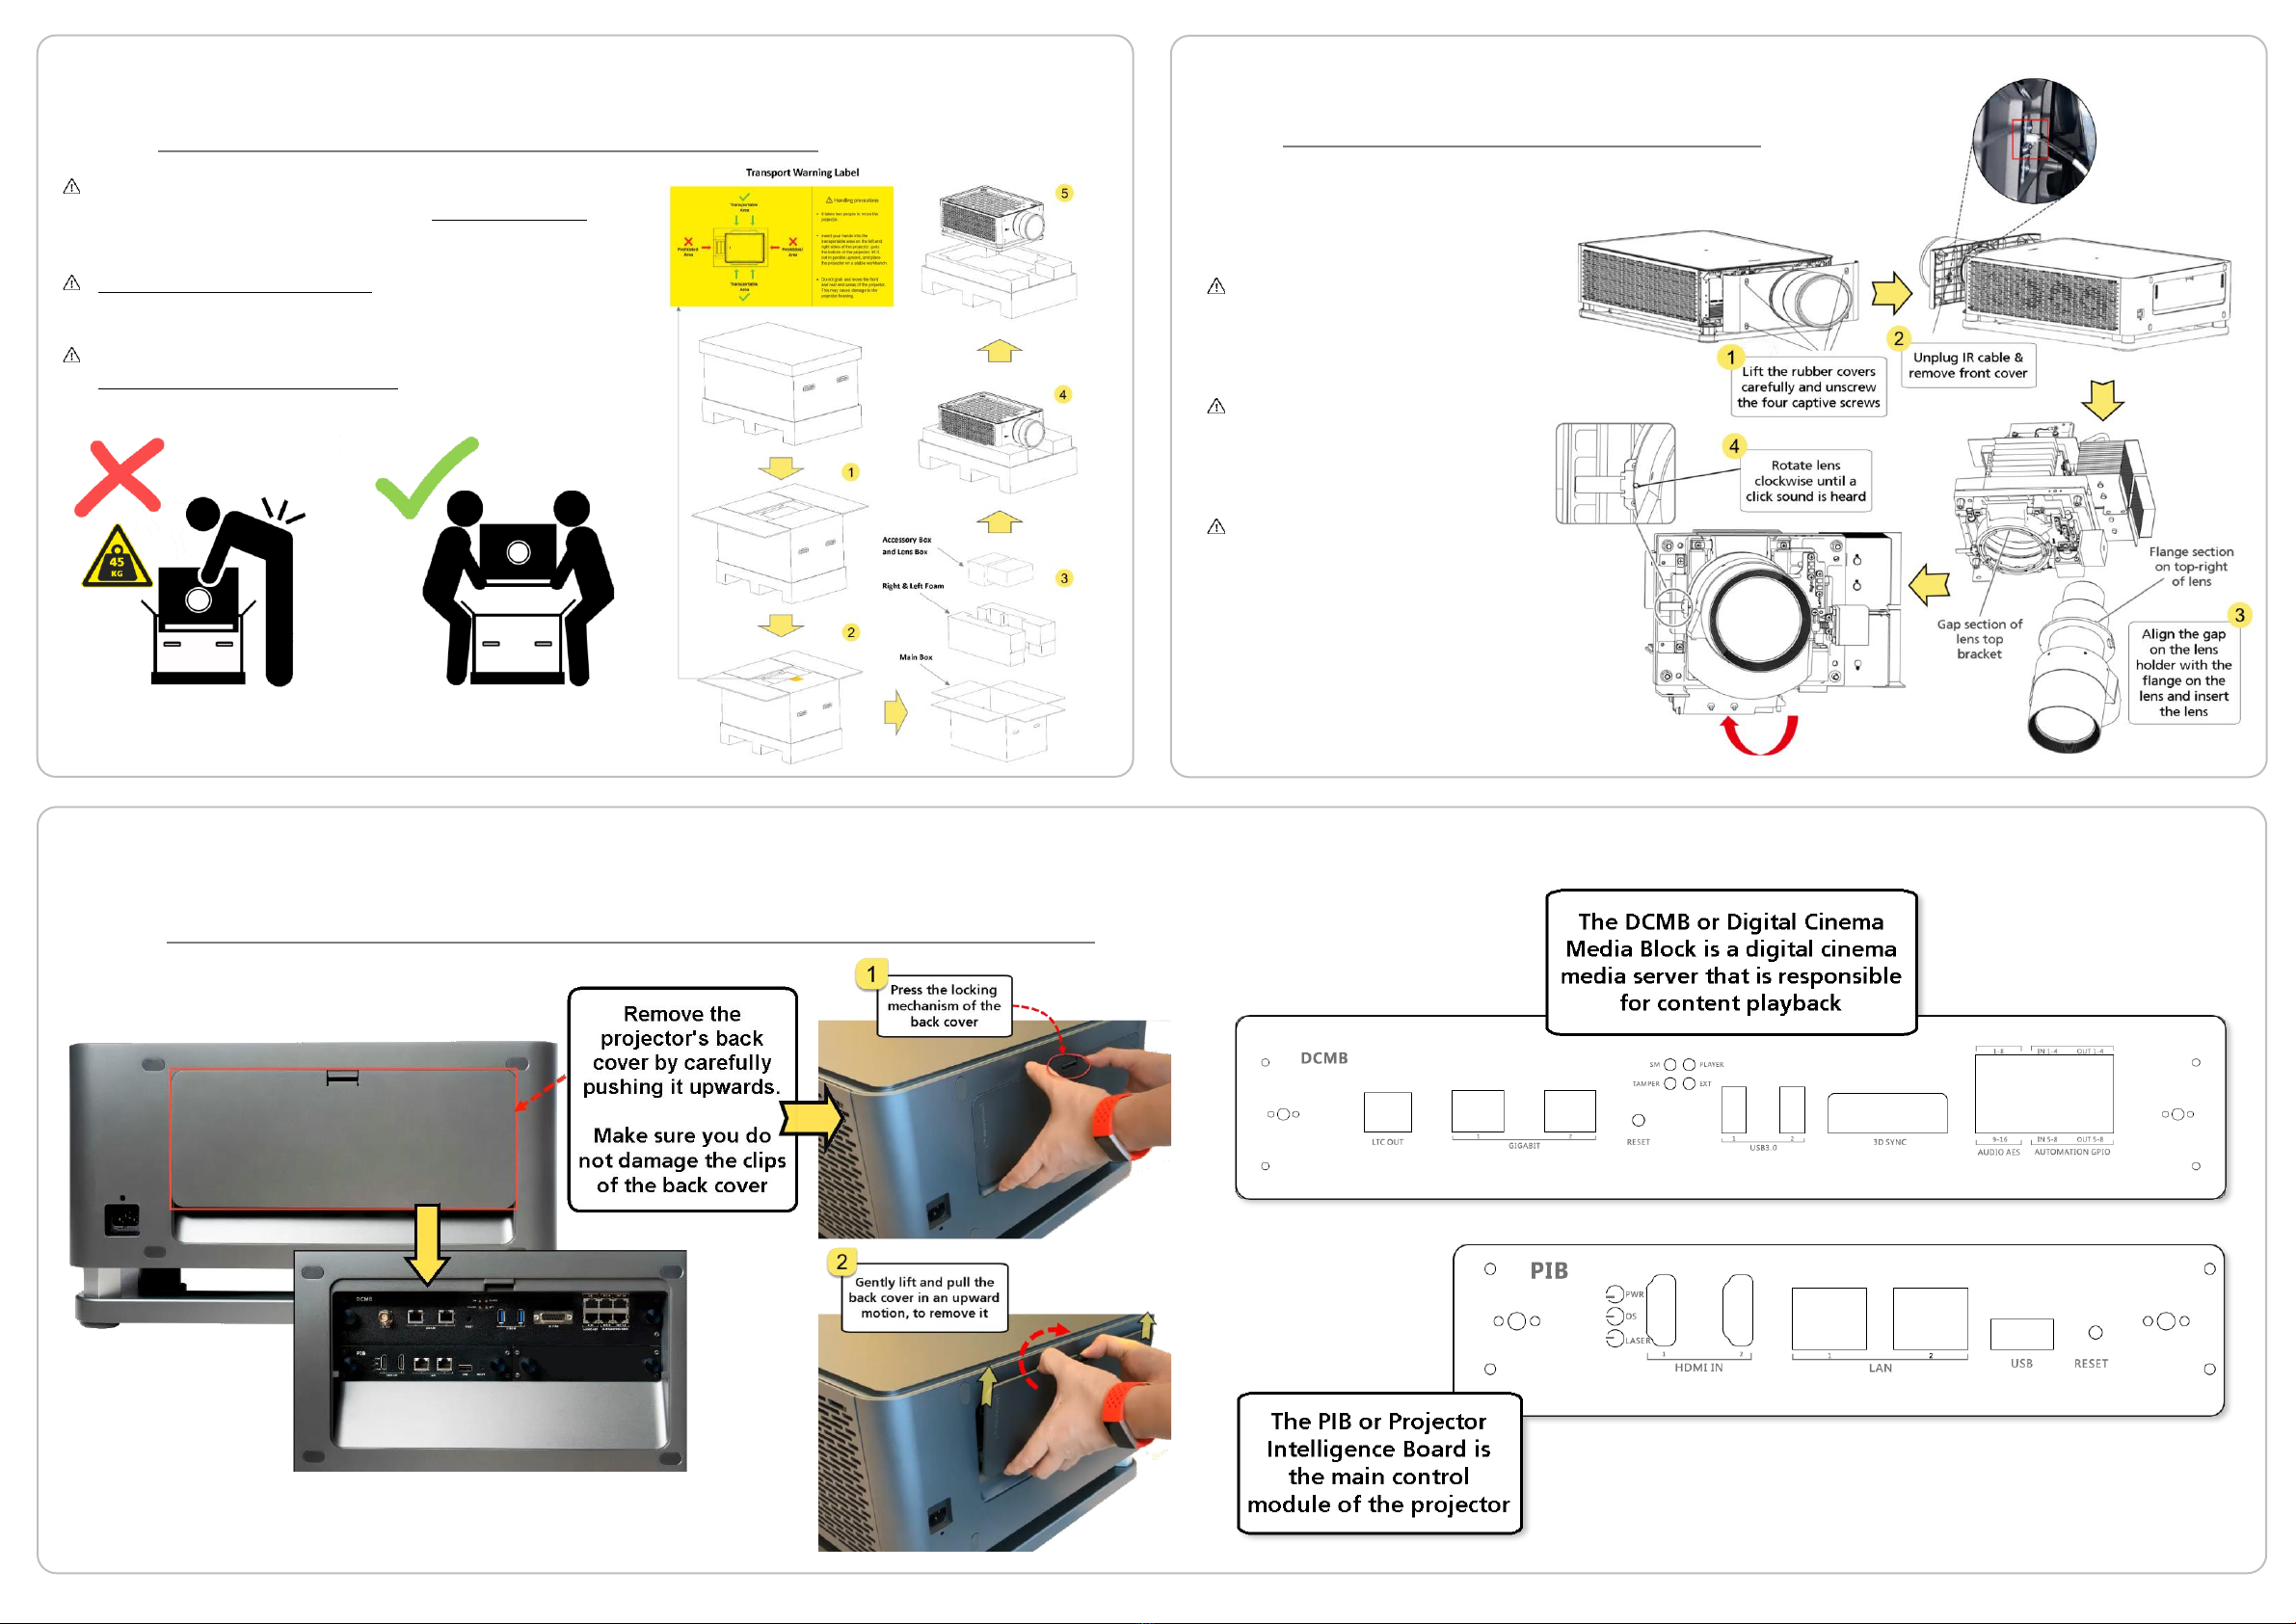
③Unboxing the Projector
DO NOT underestimate the weight of the projector.
The projector weighs approximately 45 kgs. (99.2 lbs.)
without the lens.
A minimum of 2 adult persons are needed to lift and
carry the projector, as illustrated below.
Open the container and read the content on the
Yellow ‘Transport Warning’ label on the carton
flap carefully.
DO NOT bump lens against
the internal parts of the
lens rack.
Remove the cover/cap on
both sides of the lens before
installing it.
After installing the lens,
plug-in the IR cable and re-
install the front cover of
the projector
⑤ Overview of the Projector boards
④ Lens Installation

Supra-5000 Digital Cinema and Secured Media Projection System Quick Start Guide
May 19th, 2021
⑥Powering Up the Projector
⑦Controlling the Projector
The Espedeo Supra-5000 projector is controlled and operated using a web interface.
The web interface has been organized into two sections:
The Espedeo Supra-5000 web interface can be wirelessly accessed
via Chrome™ browser on a recommended Android tablet
OR
via Chrome™ browser on a computer connected via a wired
(LAN) or wireless connection to the projector.
✓Espedeo Supra-5000 has an in-built Access Point
which makes it possible to connect wirelessly to
the projector without the need for an external
Wi-Fi router.
✓This Access Point name will be shown as “SMS-
XXXXXX”, where XXXXXX represents the unique
Serial Number of the projector’s DCMB.
Connect the laptop or tablet to this Access Point.
✓Connect the laptop to the LAN2 network port
of the projector’s PIB using a network cable.
✓Make sure that the laptop’s network interface
IP is in the range from 240 to 255 (except for
241 and 246). Additionally, the Subnet mask
value should be set to 255.255.255.240.
Access the DCMB Web UI using the URL:
http://192.168.254.246
We recommend that you refer to the Supra-5000 User Manual, for more details how to access and operate the above-mentioned web interfaces.
⑧Connecting to an Audio Processor
The Supra Command Center web interface can also be
accessed in a separate browser tab using the URL:
http://192.168.254.241
The Espedeo Supra-5000 features 16-channel AES-3 outputs on the Audio AES (A-top and A-bot) RJ45
connectors of projector’s DCMB. You can use AES cables to connect the A-top and A-bot connectors on
DCMB to the inputs of an AES-3 compatible Audio Processor.
Number of audio cables provided depends on the sound format specified while placing the order.
Before connecting the Supra-5000 projector to a power source,
make sure all the requirements for the installation environment
are met (Refer to the Supra-5000 Installation Manual for more
details).
Connect the power cord (included in the package) to the power
supply connector on the projector. Attach the strip part of the
cable holder into the slot provider above the connector. Wrap the
clamp part of the cable holder around the power cord. Insert the
strip into the clamp as shown, to secure the power cord in place.
Attach the power plug to a recommended AC Power outlet.
Turn ON the power source to start the projector.
Once the projector has booted-up completely, the Status Indicator
on the top panel of the projector should be steady Green.

Supra-5000 Digital Cinema and Secured Media Projection System Quick Start Guide
May 19th, 2021
From the Supra-5000 Command Center interface, click the Laser On toggle button on the top menu
bar to switch on/off the projector’s Laser Light Source.
The Laser power
adjustment can be done
from the ‘Light Source
Information’ section on the
Home screen, by clicking on
the icon shown below:
⑩Projector Alignment
⑪Creating a Custom Macro
From the Installation →Macro Settings menu, you can edit the settings for an existing macro OR create a
new custom macro by importing the relevant PCF, Screen, Color, Light Source and Lens files.
A. Projecting a Test
Pattern
⑨Switching On/Off the Laser
✓Physically adjust the position of the screen so that the projected image fits on the screen.
You can use to adjustable feet of the projector to raise or lower its height in order to align
the projected image on the screen.
✓You can also modify a lens file from the Supra Command Center and make adjustments to
the projected image on screen using the Lens Shift, Lens Zoom and Lens Focus functions.
The modified lens file can then be applied to a macro which corresponds to the format of
the content being played.
You can use the Test Pattern option to check the alignment of the projected image on the screen.
B. Performing Physical and Optical Adjustments
A Macro is a preset that recalls
appropriate projector settings so
that the source image is displayed
correctly on the screen.
Supra-5000 Digital Cinema and Secured Media Projection System Quick Start Guide
May 19th, 2021
The Content tab under the DCMB Web UI allows you to ingest and
manage the DCPs, KDMs and Licenses.
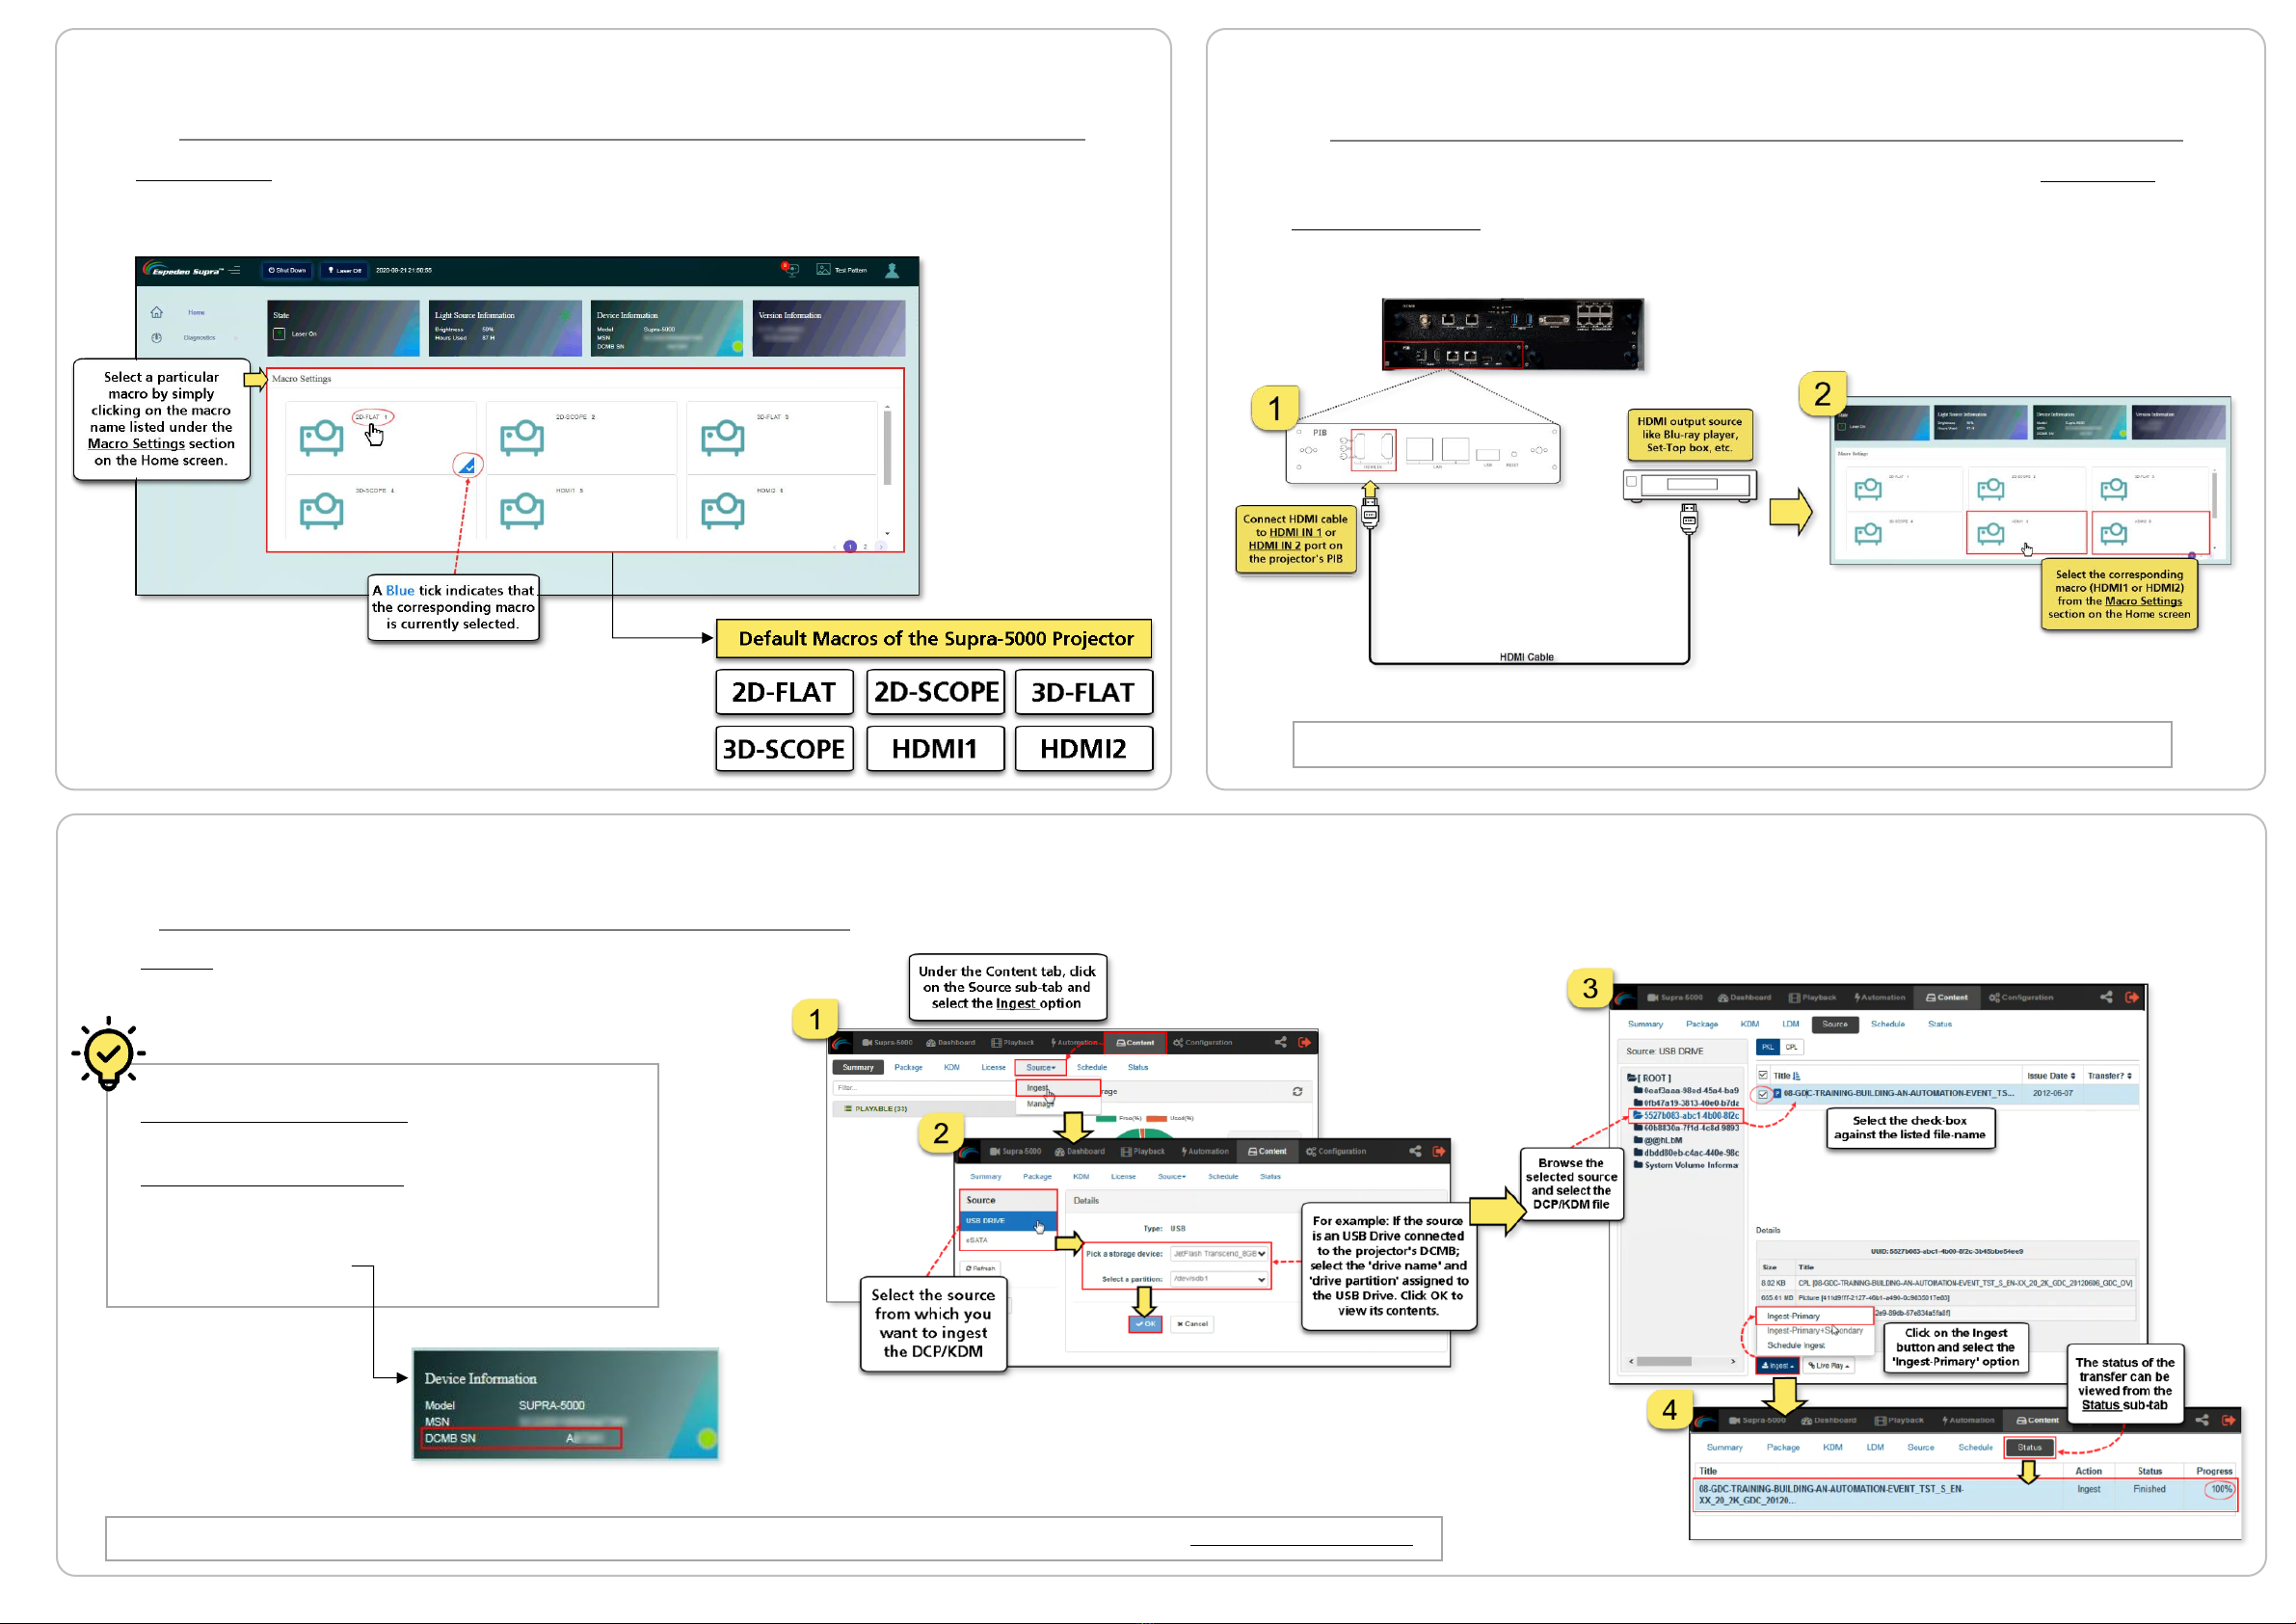
⑬Connecting to an HDMI Source
The Espedeo Supra-5000 projector can playback content from an HDMI output source (1080p@60Hz) such as
a Blu-Ray player, Set-Top Box, etc. Ensure that the HDMI cable from the HDMI output source is connected to
the HDMI IN port (1 or 2) on the projector’s PIB, prior to powering ON the projector.
Selecting an HDMI macro will automatically start playback from the connected HDMI source.
⑭Ingesting a DCP or KDM
⑫Selecting a Macro for Playback
The Macro Settings section on the Home screen of the Supra Command Center allows you to select the
appropriate macro for content playback. Select the required macro setting based on the type of source
and content that needs to be projected.
A DCP (Digital Cinema Package) is the format of content
that the Espedeo Supra-5000 is capable of playing.
A KDM (Key Delivery Message) is a key that allows
playback of a particular DCP on the Espedeo Supra-5000.
Please note that KDMs are specific to the serial number
of the projector’s DCMB.
For detailed information regarding creating/managing ingest sources, managing DCPs and KDMs; please refer to the Supra-5000 User Manual.
Supra-5000 Digital Cinema and Secured Media Projection System Quick Start Guide
May 19th, 2021
Step 1
•From the Supra Command Center, click the Laser Off toggle button on the top
menu bar to turn OFF the Laser Light Source.
Step 2
•Click the Shut Down button on the top menu bar of the Supra Command
Center. Wait for 30 seconds until the DCMB is completely shutdown.
•The projector will now be in Standby mode (the cooling fans on the side of
the projector should have stopped).
Step 3
•Disconnect the power plug from the projector and cut-off the mains supply
before removing the projector panels or performing any maintenance activity.
⑯Shutdown Procedure
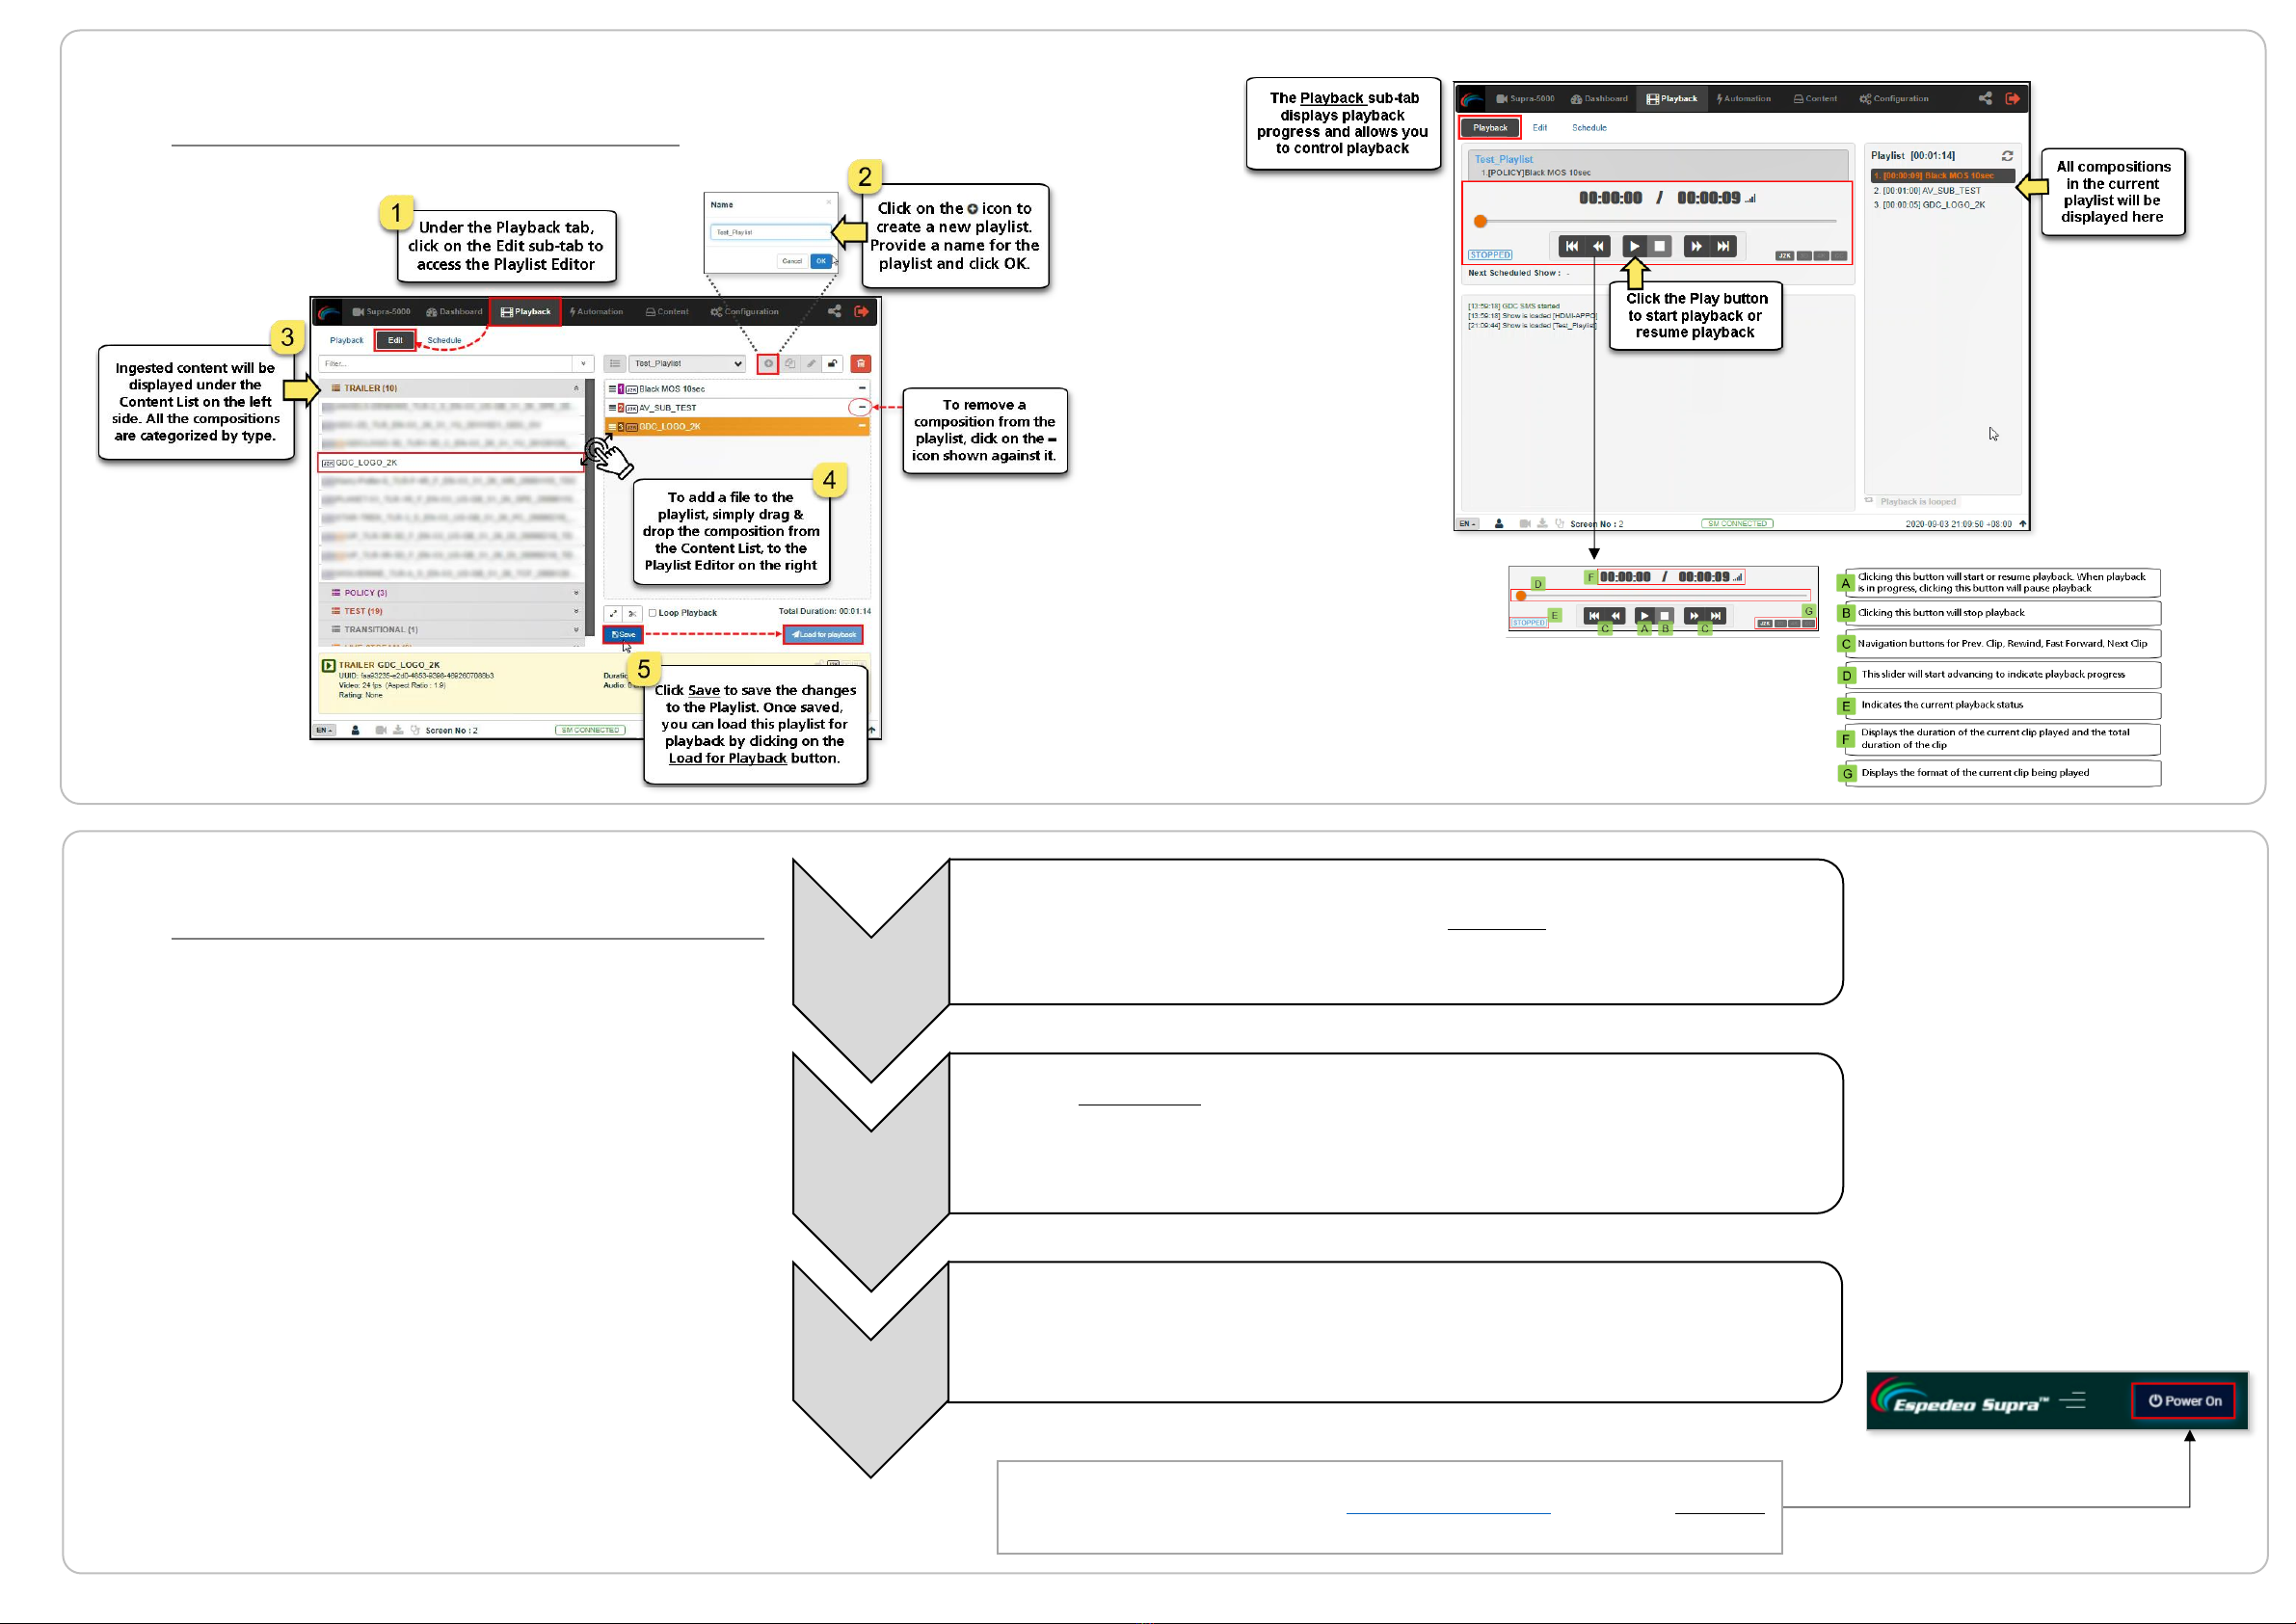
⑮Content Playback
In order to switch OFF the Espedeo Supra-5000, please follow the
power-down sequence depicted here:
𝐀. Creating a
Playlist
B. Controlling
Playback
When the Supra-5000 is in Standby mode, you can access the Supra Command
Center web interface using the URL: http://192.168.254.241 and click the Power On
toggle button on the top menu bar to boot-up the DCMB Web UI.
Other manuals for Supra-5000
1
Table of contents


