Essilor Mr Blue 2.0 User manual

User Manual


USER MANUAL > CONTENTS
CONTENTS
INTRODUCTION 7
I. FIRST STEPS WITH MR. BLUE 2.0 9
1. Descriptive diagrams 11
2. Using the edger 13
a. Turning on the edger 13
b. Switching off the edger 14
c. Using the touch screen and keypads 14
d. Edging screen 15
II. EDGING A LENS 17
1. Edger working environment 19
a. Menu screen 19
b. Calling up a shape 21
c. Lens set-up and feeling 21
2. Perform a Beveling 23
a. Automatic beveling 24
b. Legend screen for customized bevels 25
c. Customized beveling 26
d. Modifying the bevel curve 27
e. Modifying the bevel curve at a particular point 27
f. Displacing the bevel curve 28
3. High-base beveling 28
a. Captioned screens 29
b. High-base beveling 31
4. Perform a Step beveling (option) 35
a. Mounting of the step bevel tool 37
b. Captioned screens 40
c. Adjusting the Step bevel finish 41
d. Perform a Step bevel 46
5. Grooving 50
a. Automatic grooving 51
b. Customized groove legend screen 51
c. Customized grooving 53
d. Modifying the groove curve 54
e. Modifying a point in the groove curve 54
f. Displacement of the groove curve 55
6. Flat-edge finishing 55
7. Mixed job 56
a. Legend screens 56
b. Configuring the mixed finish 57
8. Drilled job 58
a. Automatic drilling 59
b. Legend screen for customized drilling 60
c. Customized drilling 61
9. Polishing 61
10. Chamfering 62
11. Perform a Retouching 63
III. CONFIGURING THE EDGER 65

USER MANUAL > CONTENTS
1. Configure the edger 67
a. Time, date and language 67
b. Connections 68
c. Screensaver 68
2. Adjusting the precision of the edger 68
a. Adjusting the diameter of the finished lenses 69
b. Adjusting the position of the bevel and groove 70
c. Adjusting the diameter of drill-holes 70
d. Adjusting the chamfer 71
e. Adjusting the groove 72
f. To adjust the engraving 72
g. Adjust the position of high-base bevel 73
h. Adjust the position of the step bevel 74
3. Restore the factory settings 75
IV. MAINTENANCE & SERVICING 77
1. Carrying out the autotests 79
2. Calibrating the touch screen 80
3. Consult the preventive maintenance screen of the “small tools” module 80
4. Changing or cleaning the edger tools 82
a. Changing or cleaning the mill bit 83
b. Changing or cleaning the drill bit 84
c. Changing the engraving tip 86
5. Statistics and technical log 88
a. Edger cycles 88
b. Technical history and errors 90
6. Maintaining and cleaning the edger 90
a. Precautions required 90
b. Clean the door, the GMD module and the wheels (high-base and step bevel) 91
c. Dressing the wheels 91
V. USING TO M’EYE SIGN 93
1. To activate to M’EYE Sign 95
2. To carry out an engraving 97
a. To prepare the engraving 97
b. Performing engraving 107
c. Setting up the favorites 111
3. To produce a creative shape 112
a. On Essibox 112
b. On the edger 119
TECHNICAL DATA 121
1. Edger 122
2. Environment 123
GENERAL INFORMATION 125
1. Symbols 126
2. Modifications 126
3. Declaration of conformity 126
4. Copyright 126
5. Materials and products 126
6. Safety instructions: 127
7. Electromagnetic waves 127
8. License agreement for M’EYE Sign™ (Engraving) software 127


USER MANUAL > CONTENTS

USER MANUAL > INTRODUCTION
Mr Blue 2.0 > v4 -07.16 7
INTRODUCTION
To benefit fully from the functions of your Mr Blue 2.0 edger, we advise you to consult the entirety of this document.
You have memory version: V9.0.0.
Addition of the Step Bevel function.
This function allows you to produce specific bevels adapted to the frames that have an asymmetrical groove.

USER MANUAL > INTRODUCTION
8Mr Blue 2.0 > v4 -07.16

I. FIRST STEPS WITH MR. BLUE 2.0

USER MANUAL > FIRST STEPS WITH MR. BLUE 2.0
10 Mr Blue 2.0 > v4 -07.16

USER MANUAL > FIRST STEPS WITH MR. BLUE 2.0
Mr Blue 2.0 > v4 -07.16 11
1.
2.
3.
4.
5.
6.
7.
8.
9.
10.
This chapter contains all the information relating to the first use of the edger:
Description of the edger (p.11)
Using the device (p.13)
1. Descriptive diagrams
This section consists of descriptions and lists of accessories.
Screen
ON/OFF button
Trough
Main switch
Service accessory/Connector hatch
Operating accessory hatch
Screen tilt buttons
Fans
Cable cover
Manufacturer plate

USER MANUAL > FIRST STEPS WITH MR. BLUE 2.0
12 Mr Blue 2.0 > v4 -07.16
1.
2.
3.
4.
5.
6.
7.
8.
Connectors
RFID port
USB port
Serial port
Barcode reader port
Ethernet port
Power socket
Solenoid valve socket
Pump socket (tank + pump) / Solenoid valve socket (town)
Accessories
Protective cover
Transport wedges to be kept
Operating accessory hatch
Stylus
22 mm posiblock holder
18 x 14 mm posiblock holder
22 mm stop
18 x 14 mm stop
Unblocking clamp
Mill/drill bit replacement tool
Ø 1.0 mm drill bit (mounted on the module)
Ø 0.8 mm drill bit
Ø 1.2 mm edging mill bit (quantity 2, including one mounted on the module)
Ø 20 mm grooving wheel (mounted on the module)
Tri-material chamfering wheel (mounted on the module)
Engraving tip
Posiblock handling goblets (quantity 2)
Service accessory hatch
Orange dressing stone for glass roughing wheel
USER MANUAL > FIRST STEPS WITH MR. BLUE 2.0
Mr Blue 2.0 > v4 -07.16 13
3
2
1
White dressing stone for finishing wheel
Square dressing stone for polishing wheel
Grooving wheel replacement tool
Allen key for tool change
Open-ended spanner for tool change
Drill-head tool for changing the engraving tip
Allen key for changing the engraving attachment
Options
Step bevel kit
Barcode reader
Roll of barcode labels
Open or closed circuit spraying kit
Milling chip recovery tray
Recovery tank
Connection accessories
220 V power cable
RJ45 cable for the tracer-edger connection
Essibox connection cable
Wastewater evacuation pipe with attachment ring
2. Using the edger
In this section, you will find all the information concerning the following:
Turning on (p.13) and the edger,off (p.14)
the use of the touch screen and the keyboards (p.14),
the description of the work screens of the .edger (p.15)
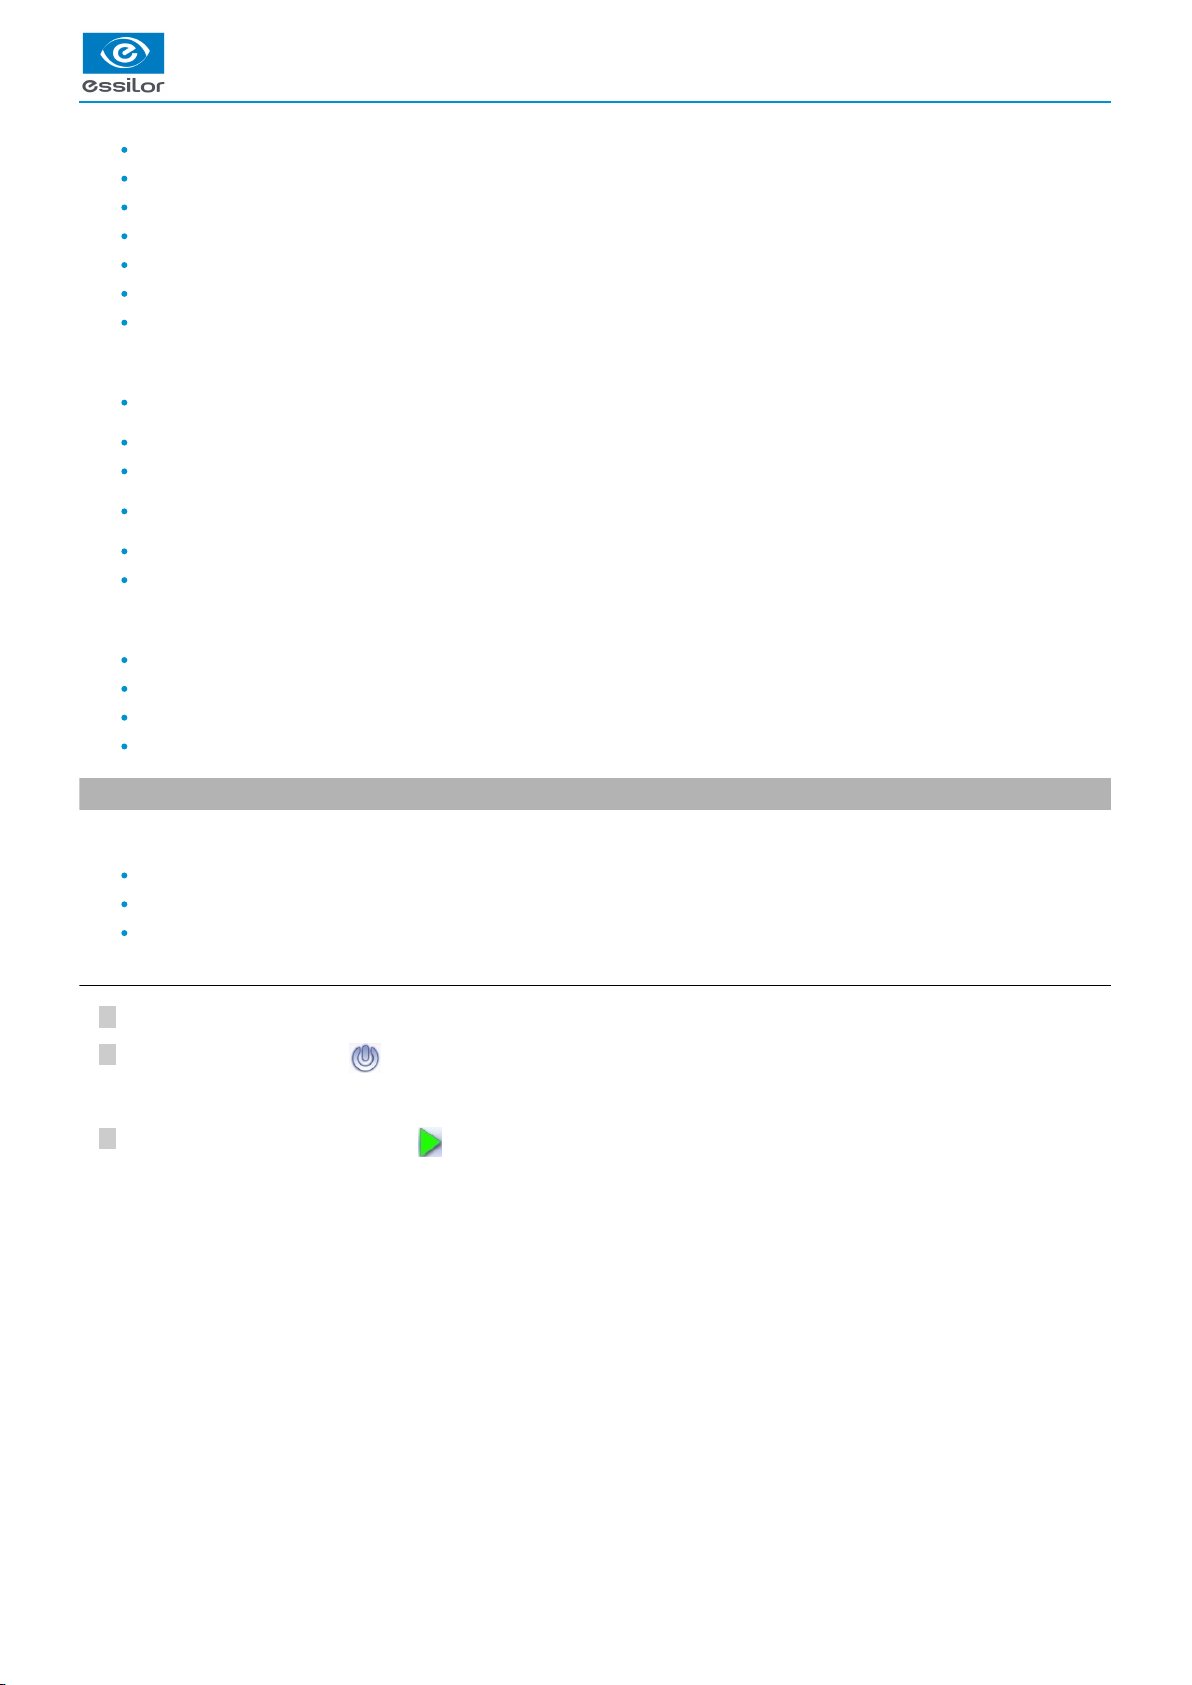
a. Turning on the edger
To switch on the edger, press the main switch located on the top of the machine.
Press the ON/OFF buttons located under the touch screen.
On the edger screen, press the icon to complete the initialisation phase.
The edger will initialise.>
A beep indicates that initialization was successful.
The edger is ready for use when the initial screen is displayed.
>
USER MANUAL > FIRST STEPS WITH MR. BLUE 2.0
14 Mr Blue 2.0 > v4 -07.16
3
2
1
3
2
1
b. Switching off the edger
Before switching off the edger:
Check that there is no glass in the trough
Check that the lens clamp shafts are loosened and that the trough door is open
Select the edging screen
Briefly press the ON/OFF button located under the touch screen or press , then .
Do not press the ON/OFF button for several seconds. This would result in a shut-down of the machine and an error
message would be displayed at the next switch-on.
Press to confirm.
Extended period of non-use
For a prolonged period of non-use (a few days), it is preferable to turn off the edger using the main switch.
c. Using the touch screen and keypads
Using the touch screen
Use the stylus supplied with the machine to use the touch screen.
After each use, place the stylus on the stylus rest, represented by an oval sticker.
You can also touch the screen with your finger.
If the screen is not sensitive enough to finger pressure, press lightly with a fingernail.
If the response area does not correspond to the position of the key, you need to calibrate the touch screen. For more
information, refer to the following section Maintenance and servicing > Checks and calibration > Calibrating the touch screen
.(p.80)
Never press hard on the screen as this could break it.
Never press on the screen with sharp objects such as pens, scissors, clamps, etc.
Screen breakage is not covered by the guarantee.
On the screen, press the icon-buttons to access the menus and job functions required.
Using the keypads
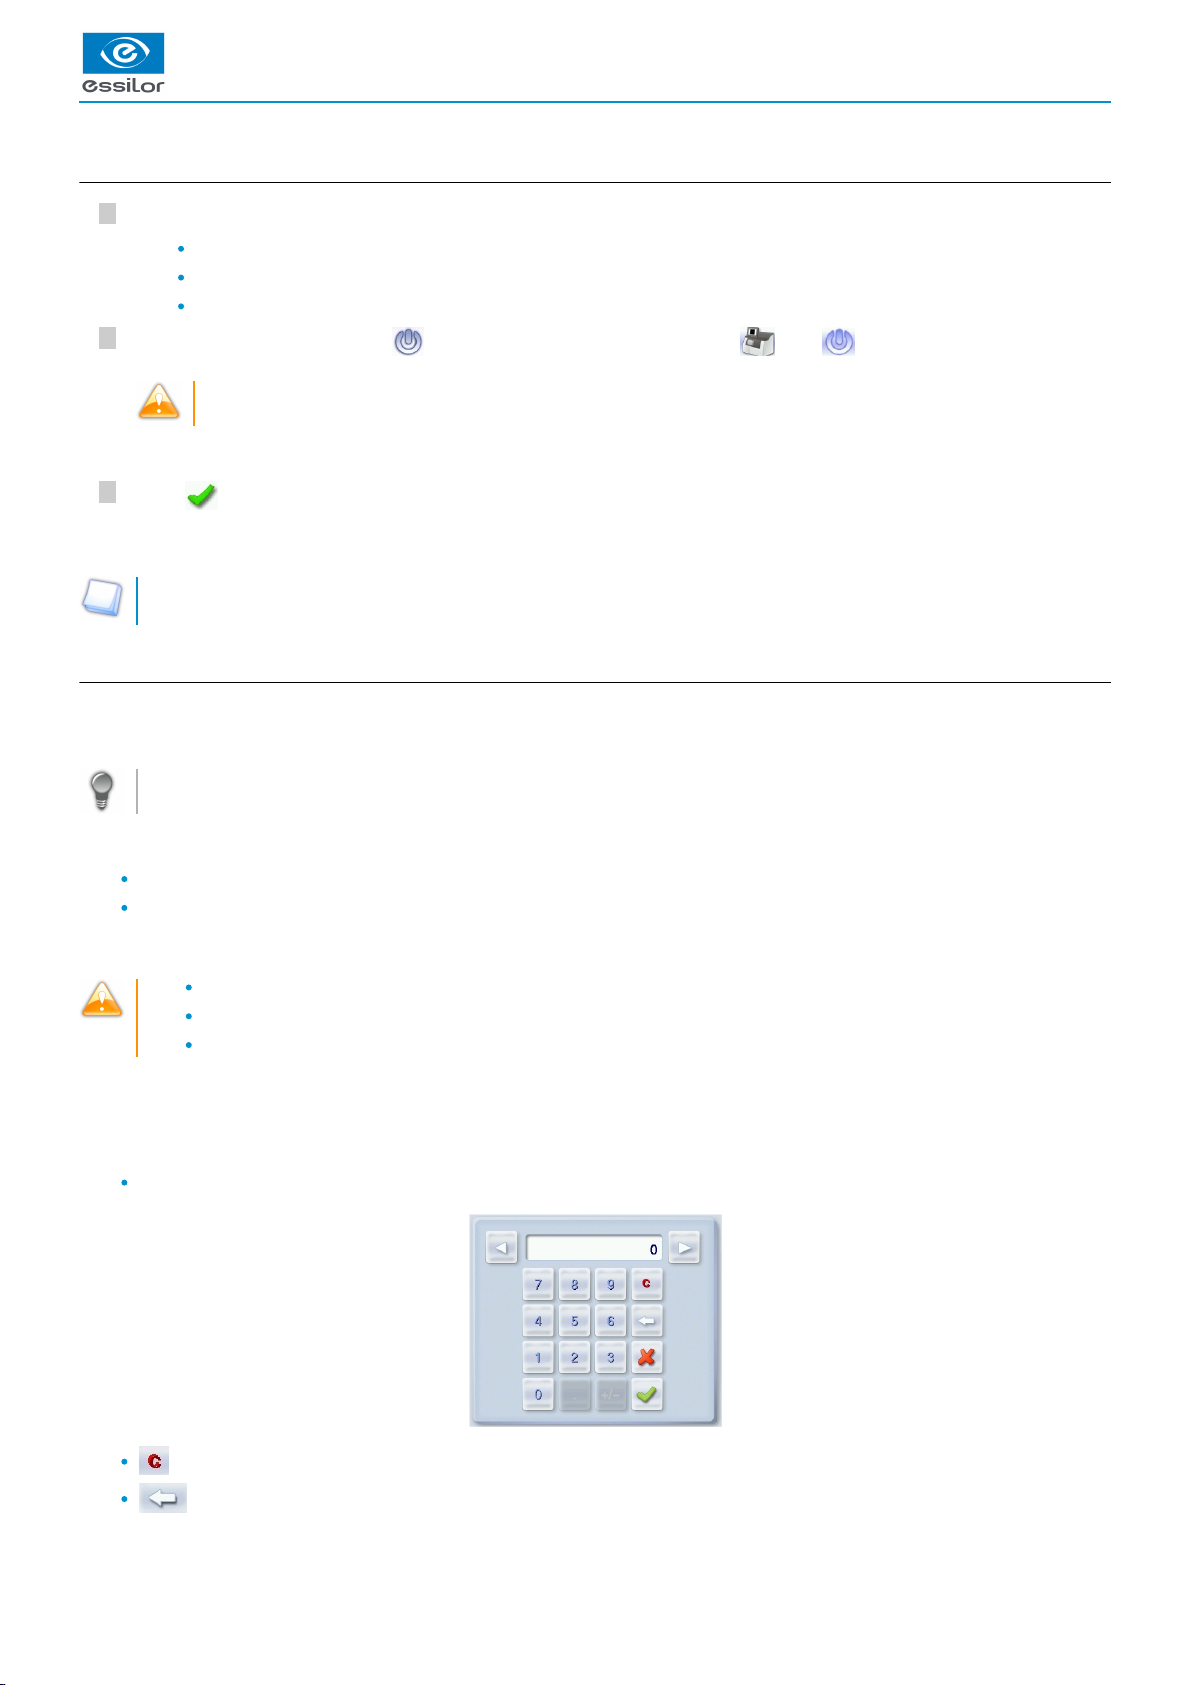
When you need to input or modify data, two types of keypads are automatically displayed, according to the information to be input.
The numeric keypad is displayed for the input of values.
Reset the fields
Back
A confirmation message is displayed on the screen.>
The edger will switch off.>

USER MANUAL > FIRST STEPS WITH MR. BLUE 2.0
Mr Blue 2.0 > v4 -07.16 15
1.
2.
3.
4.
5.
6.
7.
8.
9.
10.
11.
12.
Confirm
Cancel and go back to the work screen
The alphanumeric keypad is displayed to save or search for jobs.
Job ID
Job reference (alphanumeric characters)
list jobs(p.130)
Collection list
d. Edging screen
Work screen indicator
Tool wear indicators
Settings
Devices connected
Active eye
Information on the shape
Size increase/reduction
Work area
Turning off the product/edging screen/engraving screen
Job call: Tracer menu
Actions available for the current screen
Start the edging cycle


II. EDGING A LENS

USER MANUAL > EDGING A LENS
18 Mr Blue 2.0 > v4 -07.16

USER MANUAL > EDGING A LENS
Mr Blue 2.0 > v4 -07.16 19
1.
2.
This chapter describes the work environment of the edger and the procedures for edging any type of lens:
Edger working environment (p.19)
Perform a Beveling (p.23)
Beveling for a high-base frame (p.28)
Produce a step bevel for a high-base frame of a sporting type or a safety frame, (p.35)
Grooving (p.50)
Produce a Flat-edge finish (p.55)
Do a mixed job (p.56)
Do a drilled job (p.58)
Perform a Polishing (p.61)
Perform a Chamfering (p.62)
Perform a Retouching (p.63)
1. Edger working environment
This section describes the edger working environment and the initial stages of the edging of a lens.
Description of the edging screen (p.19)
Shape call-up procedure (p.21)
Putting the lens in place (p.21)
a. Menu screen
Lens material
Plastic lens - index 1.5(p.130)
Polycarbonate lens
Medium or high index plastic lens - index > 1.5
Trivex lensTM
Glass lens
Tribrid lensTM
The configuration of the edging cycles depends on the type of material. An incorrect choice may result in material damage.
Type of finish
Bevel

USER MANUAL > EDGING A LENS
20 Mr Blue 2.0 > v4 -07.16
2.
3.
4.
5.
6.
7.
8.
9.
10.
11.
High-base bevel
Step bevel
Groove
Flat-edge finish
Mixed job
Drilling
Drilling enabled
Drilling disabled
Edging mode
Automatic mode
The finish parameters are automatically calculated according to the information acquired when tracing the frame and
feeling the lens.
Customized mode
The finish settings can be fully customized.
Type of cycle
Milling cycle
This cycle is recommended for lenses with a hydrophobic coating. It is suited to all types of materials except glass
lenses. Milling involves a specific feeling cycle: the edger will feel the contour of the shape to be edged twice, then
four feeling operations will be required every 90° to define the segments to be cut.
2 stars Cycle
For all types of materials. This cycle offers a more sophisticated edging mode than the standard cycle, dedicated to
thin lenses or hydrophobic lenses.
Standard cycle
For all types of materials.
Polishing
Polished lens
Non-polished lens
Front surface chamfering
Small chamfer
Large chamfer
No chamfering
Rear surface chamfering
Small chamfer
Large chamfer
No chamfering
Size reduction/increase (mm)
Manual lens clamping
Press and hold to close the lens clamp shafts manually.
Start the edging cycle
The door closing and lens clamping are automatic.
Always browse from left to right: depending on your selection, certain menus will be available while others will not.
Other manuals for Mr Blue 2.0
1
Table of contents
Other Essilor Edger manuals


