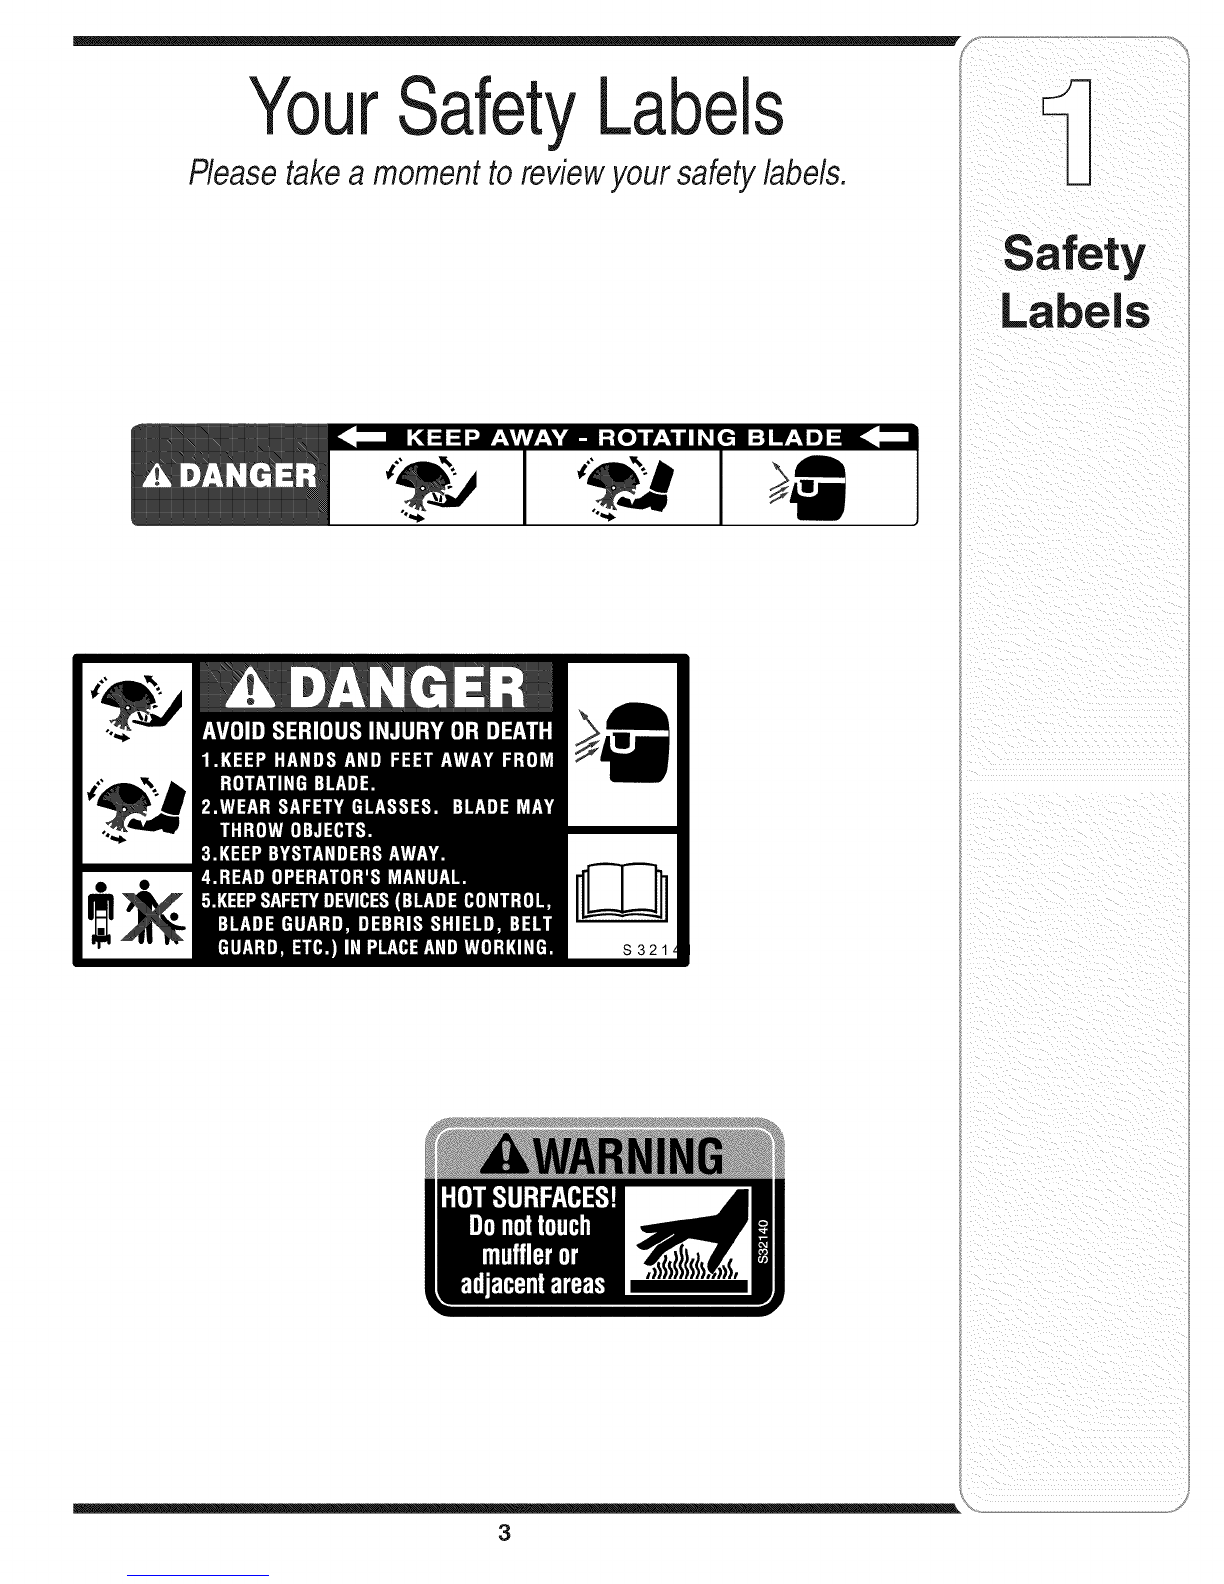
manuals.online logo
Brands
  1. Home
  2. •
  3. Brands
  4. •
  5. MTD
  6. •
  7. Edger
  8. •
  9. MTD 25B-520A700 User manual

MTD 25B-520A700 User manual

This manual suits for next models

3

Other MTD Edger manuals

MTD 246-604-000 User manual

MTD

MTD 246-604-000 User manual

MTD 24604-9 User manual

MTD

MTD 24604-9 User manual

MTD 24604B User manual

MTD

MTD 24604B User manual

MTD 550 Series User manual

MTD

MTD 550 Series User manual

MTD 244-600A Manual

MTD

MTD 244-600A Manual

MTD 550 Series User manual

MTD

MTD 550 Series User manual

MTD 520 Series User manual

MTD

MTD 520 Series User manual

MTD 551 User manual

MTD

MTD 551 User manual

MTD 586 User manual

MTD

MTD 586 User manual

MTD 550 Series User manual

MTD

MTD 550 Series User manual

MTD 520 Series User manual

MTD

MTD 520 Series User manual

MTD 240-600 User manual

MTD

MTD 240-600 User manual

MTD TBLE Manual

MTD

MTD TBLE Manual

MTD 520 Series User manual

MTD

MTD 520 Series User manual

MTD 520 Series User manual

MTD

MTD 520 Series User manual

MTD Edger 520 User manual

MTD

MTD Edger 520 User manual

MTD 244-595-000 User manual

MTD

MTD 244-595-000 User manual

MTD 245-604-000 User manual

MTD

MTD 245-604-000 User manual

MTD AC3 Series User manual

MTD

MTD AC3 Series User manual

MTD 550 Series User manual

MTD

MTD 550 Series User manual

MTD Series 580 User manual

MTD

MTD Series 580 User manual

MTD 243-600 Assembly instructions

MTD

MTD 243-600 Assembly instructions

MTD Series 521 User manual

MTD

MTD Series 521 User manual

MTD Yard Machines 580 Series User manual

MTD

MTD Yard Machines 580 Series User manual

Popular Edger manuals by other brands

Ryobi EXPAND-IT RYEDG12VNM Operator's manual

Ryobi

Ryobi EXPAND-IT RYEDG12VNM Operator's manual

VEVOR ASYTM02230 manual

VEVOR

VEVOR ASYTM02230 manual

CRL SM5C user manual

CRL

CRL SM5C user manual

Kunzle & Tasin SILVER BACK Instruction handbook

Kunzle & Tasin

Kunzle & Tasin SILVER BACK Instruction handbook

Husqvarna LE475 Operator's manual

Husqvarna

Husqvarna LE475 Operator's manual

Ryobi RED1220 Original instructions

Ryobi

Ryobi RED1220 Original instructions

Echo PE-230 Operator's manual

Echo

Echo PE-230 Operator's manual

Echo PAS-260 PRO - PARTS CATALOG SERIAL NUMBER... parts catalog

Echo

Echo PAS-260 PRO - PARTS CATALOG SERIAL NUMBER... parts catalog

Echo PE-225 Operator's manual

Echo

Echo PE-225 Operator's manual

Huvitz HPE-410 user manual

Huvitz

Huvitz HPE-410 user manual

Zenoah HEZ2610F Other

Zenoah

Zenoah HEZ2610F Other

Craftsman 316.773800 Operator's manual

Craftsman

Craftsman 316.773800 Operator's manual

National Optronics Horizon II instruction manual

National Optronics

National Optronics Horizon II instruction manual

Husqvarna 426EX Operator's manual

Husqvarna

Husqvarna 426EX Operator's manual

luxvision HE-1000 user manual

luxvision

luxvision HE-1000 user manual

Little Wonder Xtra Operator owner's manual

Little Wonder

Little Wonder Xtra Operator owner's manual

Makita EE2650H instruction manual

Makita

Makita EE2650H instruction manual

Black & Decker GH1000 instruction manual

Black & Decker

Black & Decker GH1000 instruction manual

manuals.online logo
manuals.online logoBrands
  • About & Mission
  • Contact us
  • Privacy Policy
  • Terms and Conditions

Copyright 2025 Manuals.Online. All Rights Reserved.

Safety • Assembly • Operation • Tips &Techniques • Maintenance • Troubleshooting • Parts Lists • Warranty
OF AOA AL
\
\
\
Gas Lawn Edger- Model Series 520 & 550
iMPORTANT
READ SAFETY RULES AND iNSTRUCTiONS CAREFULLY BEFORE OPERATION
Warning: Thisunitisequippedwithan internalcombustionengineandshouldnotbeusedon or nearanyunimprovedforest-covered,brush-
coveredor grass-coveredlandunlesstheengine'sexhaustsystemisequippedwitha sparkarrestermeetingapplicablelocalor statelaws(if any).
If a sparkarresterisused,it shouldbemaintainedineffectiveworkingorderbytheoperator.IntheStateofCaliforniatheaboveisrequiredbylaw
(Section4442oftheCaliforniaPublicResourcesCode).Otherstatesmayhavesimilarlaws.Federallawsapplyonfederallands.A sparkarrester
forthemufflerisavailablethroughyournearestengineauthorizedservicedealeror contacttheservicedepartment,RO.Box361131Cleveland,
Ohio44136-0019.
PRINTEDIN U.S.A MTD LLC, P.O. BOX 361131 CLEVELAND, OHIO 44136-0019 FORMNO. 769-00527F
10/04/2004
This Operator's Manual is an important part of your new gas lawn edger, it will help you assemble,
prepare and maintain the unit for best performance. Please read and understand what it says.
Table of Contents
1. Safety Labels .................................................. 3
2. Safe Operation Practices ............................ 4-5
3. Setup & Assembly .......................................... 6
4. KnowYour Edger ............................................ 7
5. Operating Your Edger ..................................... 8
6. Making Adjustments ................................. 9-10
7. Maintaining & Servicing .......................... 11-12
8. Off-Season Storage ...................................... 12
9. Troubleshooting ............................................ 13
10. Parts List ................................................ 14-15
11. Warranty ...................................................... 16
Finding and Recording Model Number
BEFOREYOU STARTASSEMBLINGYOURNEW EQUIP-
MENT,please locatethe modelplateon the equipmentand
copy the informationto the sample modelplate providedto
the right.Youcan locate the modelplate bystanding at the
operating positionand lookingdownat the rearof the gas
lawnedger.This informationwill be necessaryto use the
manufacturer'sweb site and/or help fromthe CustomerSup-
port Departmentor anauthorizedservice dealer.
f
Model Number
®
www.mtdproducts.com
Serial Number
MTD LLC
P.O. BOX 361131
CLEVELAND, OH 44136
330 -220 -4683
800-800-7310
Customer Support
Please do NOTreturn the unit to the retailer from which it was
purchased, without first contacting Customer Support.
If you havedifficulty assemblingthis productor haveany
questions regardingthe controls,operation or maintenanceof
this unit,youcan seek helpfrom the experts. Choosefromthe
options below:
1. Visit mtdproducts.com for many usefulsuggestions.
Click on CustomerSupport button and youwill get the four
options reproducedinthis sampleto the right.Click onthe
appropriatebutton and help is immediatelyavailable.
2. Phone a Customer Support Representative
at 1(800)800-7310.
3. Theengine manufacturer isresponsiblefor all engine-
related issueswith regards to performance,power-rating,
specifications,warrantyand service. Pleaserefer tothe
enginemanufacturer'sOwner's/Operator'sManual, packed
separatelywith your unit,for more information.
Click here to search our knowledge base.
Search by product, keyword, or phrase.
Login to check the status of your questions, modify
your inquiries, or update your personal profile.
Need local assistance? Click here to find authorized
service centers in your area.
Need a manual and/or parts list? Download
literature from recent model years.
2
7"
YourSafetyLabels
Pleasetakeamomenttoreviewyoursafetylabels. LJ
Labels
S321
3
RNING
This symbol points
i out important safety
instructionswhich, if
notfollowed, could
endangerthe personal
i safetyand/or property
I ofyourself and others.
Readand follow all
instructionsinthis man-
ualbeforeattempting to
operatethis machine.
Failureto complywith
these instructionsmay
i resultin personalinjury.
i When youseethis
_symbol.
HEED ITS WARNING
Your
Responsibility
Restrictthe use
i ofthis powermachine
i to personswho read,
understand
andfollow the warnings
and instructions
inthis manual
andon the machine.
WARNING: EngineExhaust,some of itsconstituents,andcertain vehiclecompo-
nentscontain or emit chemicals knownto Stateof Californiato cause cancerand
birth defectsor other reproductiveharm.
DANGER: This machinewas builtto be operatedaccordingto the rulesfor safe operation in this
manual.As with anytype of powerequipment,carelessnessor erroronthe part ofthe operatorcan
result in seriousinjury.This machine iscapable of amputatinghands andfeet andthrowing objects.
Failureto observethe followingsafety instructionscould resultin serious injuryor death.
Children
Tragicaccidentscanoccurifoperatorisnotalertto presence
ofchildren.Childrenareoftenattractedtopowerequipment
suchas lawnedgers.Theydo notunderstandthe dangers.
Neverassumethatchildrenwill remainwhereyoulastsaw
them.
1. Keepchildrenoutofthe mowingareaandunderwatchful
careofa responsibleadultotherthanthe operator.
2. Bealertandturnlawnedgeroffif achildentersthearea.
3. Beforeand whilemovingbackwards,lookbehindanddown
forsmallchildren.
4. Useextremecarewhenapproachingblindcorners,
doorways,shrubs,trees,or otherobjectsthatmayobscure
yourvisionofa childwhomayrun intothe lawnedger.
5. Keepchildrenawayfromhotor runningengines.Theycan
sufferburnsfroma hotmuffler.
6, Neverallowchildrenunder14yearsoldto operatean
edger.Children14yearsoldandovershouldreadand
understandoperationinstructionsandsafetyrulesinthis
manualandshouldbetrainedandsupervisedbya parent.
Operation
Safe HandlingOf Gasoline:
1. Toavoidpersonalinjuryor propertydamageuse
extremecare in handlinggasoline,Gasolineisextremely
flammableand thevaporsareexplosive,Seriouspersonal
injurycanoccurwhengasolineisspilledon yourselfor
yourclotheswhichcan ignite,
2. Washyourskin andchangeclothesimmediately,
3. Useonlyanapprovedgasolinecontainer,
4. Neverfill containersinsideavehicleoron a truckortrailer
bedwith a plasticliner,Alwaysplacecontainersonthe
groundawayfromyourvehiclebeforefilling.
5. Removegas-poweredequipmentfromthetruckor
trailerandrefuelit onthe ground.Ifthis is notpossible,
thenrefuelsuchequipmenton atrailerwitha portable
container,ratherthanfromagasolinedispensernozzle.
6. Keepthe nozzleincontactwith the rimofthefuel tankor
containeropeningatalltimesuntilfuelingiscomplete.Do
notusea nozzlelock-opendevice.
7. Extinguishallcigarettes,cigars,pipesandothersources
ofignition.
8. Neverfuel machineindoorsbecauseflammablevapors
willaccumulateinthe area.
9. Neverremovegas caporaddfuel whileengineishotor
running. Allowengineto coolatleasttwominutesbefore
refueling.
10.Neveroverfillfueltank.Filltankto nomorethanY2inch
belowbottomoffiller neckto provideforfuelexpansion.
11.Replacegasolinecap andtightensecurely.
12.Ifgasolineisspilled,wipeitofftheengineandequipment.Move
unittoanotherarea.Wait5minutesbeforestartingengine.
13.Neverstorethe machineor fuelcontainernearanopen
flame,sparkorpilotlightasonawaterheater,space heater,
furnace,clothesdryeror othergasappliances.
14.Toreducefire hazard,keeplawnedgerfreeofgrass,
leaves,or otherdebrisbuild-up.Cleanupoilor fuelspillage
andremoveanyfuelsoakeddebris.
15.Allowalawnedgerto coolatleast5minutesbeforestoring.
General Operation:
1. Readthis operator'smanual carefullyinits entiretybefore
attemptingtoassemblethismachine.Read,understand,
andfollowall instructionsonthe machineandin the
manual(s) beforeoperation.Becompletelyfamiliarwith
thecontrolsandthe properuseofthis machinebefore
operatingit. Keepthis manualin a safeplaceforfuture and
regularreferenceandfor orderingreplacementparts.
2. Thismachineisaprecisionpieceof powerequipment,not a
plaything.Therefore,exerciseextremecautionatalltimes.
Yourunithasbeendesignedto performonejob:to mow
grass.Do notuse itfor anyotherpurpose.
3. Neverallow childrenunder 14yearsold to operatethis
machine.Children14yearsoldand overshouldreadand
understandthe instructionsinthis manualandshould
betrainedand supervisedbya parent.Onlyresponsible
individualswhoarefamiliarwiththeserulesofsafe opera-
tionshouldbeallowedtousethis machine.
4. Tohelpavoidbladecontactora thrownobjectinjury,stayin
operatorzonebehindhandlesand keepchildren,bystand-
ers,helpersandpetsatleast75feetfrom lawnedgerwhile
it isin operation.Stopmachineifanyoneentersarea.
5. Thoroughlyinspectthe areawherethe equipmentisto be
used.Removeallstones,sticks,wire,bones,toysandother
foreignobjectswhichcouldbetripped overor pickedup
andthrownbythe blade.Thrownobjectscan causeserious
personalinjury.
6. Alwayswearsafetyglassesor safetygogglesduringopera-
tionandwhile performinganadjustmentor repairto protect
youreyes.Thrownobjectswhich ricochetcancauseserious
injurytothe eyes.
7. Wearsturdy,rough-soledworkshoesand close-fitting
slacksandshirts. Shirtsand pantsthatcoverthe armsand
legsandsteel-toedshoesarerecommended.Neveroperate
this machinein barefeet,sandals,slipperyor lightweight
(e.g.canvas)shoes.
8. Neverattemptto makeanyadjustmentswhiletheengine
is running,exceptwherespecificallyrecommendedinthe
operator'smanual.
4
9. Toavoidpersonalinjuryor propertydamageuseextreme
carein handlinggasoline.Gasolineisextremelyflammable
and thevaporsareexplosive.Seriouspersonalinjury can
occurwhengasolineisspilledonyourselfor yourclothes
whichcanignite.Washeryourskinandchangeclothes
immediately.
10.Do notput handsor feet nearrotatingparts.Contactwith
the rotatingbladecanamputatehandsandfeet.
11.Thebladecontrolhandleisa safetydevice.Neverbypass
its operation.Doingso,makesthe machineunsafeand may
causepersonalinjury.
12.Neveroperatewithout bladeguard,debrisshieldand blade
controlhandlein placeand working.
13.Neveroperatewith damagedsafetydevices.Failureto do
so,can resultin personalinjury.
14.Neverrun anengineindoorsor ina poorlyventilatedarea.
Engineexhaustcontainscarbonmonoxide,an odorlessand
deadlygas.
15.Do notoperatemachinewhileunderthe influenceof alcohol
or drugs.
16.Mufflerand enginebecomehotandcancausea burn.Do
nottouch.
17.Neveroperatethis machinewithoutgoodvisibility or light.
Alwaysbesureofyourfootingand keepafirmhold onthe
handles.Walk,neverrun.
18.Donotoperatethis machineif it hasbeendroppedor dam-
aged. Returnmachinetoyournearestauthorizedservicing
dealerfor examinationandrepair.
19.Donotoperatethis machinewitha damagedorexcessively
worncuttingblade.
20.Neverattempttoclear materialfromthe bladeguardwhile
the engineisrunning.Shutthe engineoff,disconnectthe
sparkplugwireandgroundagainsttheengineto prevent
unintendedstarting.
21.Do notoverloadmachinecapacityby attemptingtoedgeat
toofast ofarate.
22.Stayalertfor unevensidewalks,terrainetc.Alwayspush
slowlyoverroughsurfaces.Do notusethismachineon
gravelsurfaces.
23.Do notoperatemachinein rain orwet soilconditions.
Alwaysoperatemachinefrom behindthe handlesand
positionyourselfwherethedirectlineofsighttocutting
bladeisblockedbyguards.
24.Alwaysstopenginewhenedgingortrimmingisdelayedor
whentransportingmachinefrom onelocationto another.
Neverleavearunningmachineunattended.Stopthe
engine,disconnectsparkplugwireand groundagainstthe
enginetopreventunintendedstarting.
25.Onlyusepartsandaccessoriesmadeforthis machineby
the manufacturer.Failureto doso,canresult in personal
injury.
26. Ifsituationsoccurwhicharenotcoveredinthis manual,use
careandgoodjudgment.Telephone330-220-4683 or
1-800-800-7310 for CustomerSupportandthe nameof
yournearestdealer. Service
1. Neverrunan engineindoorsor in a poorlyventilatedarea.
Engineexhaustcontainscarbonmonoxide,anodorlessand
deadlygas.
2. Beforecleaning,repairing,or inspecting,makecertainthe
bladeandall movingpartshavestopped.Disconnectthe
sparkplugwireandgroundagainstthe engineto prevent
unintendedstarting.
3. Checkthe bladeandenginemountingboltsatfrequent
intervalsfor propertightness.Also,visuallyinspectblade
fordamage(e.g.,bent,cracked,worn)Replacebladewith
theoriginalequipmentmanufacture's(O.E.M.)bladeonly,
listedin this manual."Useof partswhichdo notmeetthe
originalequipmentspecificationsmayleadto improper
performanceand compromisesafety!"
4. Lawnedgerbladesaresharpand cancut.Wrapthe blade
orweargloves,anduseextracautionwhenservicingthem.
5. Keepallnuts,bolts,andscrewstightto besurethe equip-
mentis insafeworkingcondition.
6. Nevertamperwithsafetydevices.Checktheirproper
operationregularly.
7. Afterstrikingaforeignobject,stopthe engine,discon-
nectthesparkplugwireandgroundagainsttheengine.
Thoroughlyinspectthe lawnedgerforanydamage.Repair
thedamagebeforestartingandoperatingthe lawnedger.
8. Neverattemptto makea wheelor cuttingheightadjust-
mentwhilethe engineisrunning.
9. Manycomponentsonyournewedgercanwearwith
continueduse. Forsafetyprotection,frequentlycheck
alledgercomponentsandreplaceimmediatelywith
originalequipmentmanufacturer's(O.E.M.)partsonly,
listedinthismanual."Useofpartswhichdo notmeetthe
originalequipmentspecificationsmayleadtoimproper
performanceand compromisesafety!"
10.Do notchangetheenginegovernorsettingor overspeed
theengine.Thegovernorcontrolsthemaximumsafe
operatingspeedoftheengine.
11.Maintainor replacesafetylabels,asnecessary.
12.Observeproperdisposallawsand regulations.Improper
disposaloffluidsandmaterialscanharmtheenvironment.
Practices
WARNING
This symbol points
out importantsafety
instructionswhich, if
notfollowed,could
endangerthe personal
safety and/or property
of yourselfand others.
Readand followall
instructions inthis man-
ual beforeattemptingto
operatethis machine.
Failuretocomply with
these instructionsmay
result in personalinjury.
Whenyou see this
symbol.
HEED ITS WARNING
Your
Responsibility
Restrictthe use
ofthis powermachine
to personswho read,
understand
and follow the warnings
and instructions
inthis manual
and onthe machine.
5
WARNING
The edger blade
WILL rotate when the
starter rope is pulled.
iMPORTANT:
This unitis shipped
WITHOUTGASOLINE.
_,ftersettingup the
unit,service engine
with gasoline as in-
structed in the separate
engine manual packed
with your unit. Besure
to service enginewith
the oilenclosed with
this unitas instructed
inthe separateengine
manual.
UpperHandle
\
RopeGuide Figure 1
HandKnobs
LowerHandle
WingKnob
Figure 2
UpperHandle
Securing the Handle
IMPORTANT:ThisunitisshippedWITHOUTGASOLINE.
Aftersettingup theunit,serviceenginewithgasolineas
instructedintheseparateenginemanualpackedwithyour
unit. Besuretoserviceenginewiththeoilenclosedwith
thisunitasinstructedinthe separateenginemanual.
NOTE: Referencetorightorlefthandsideoftheedgeris
observedfromtheoperatingposition.
Positioning the Edger Handles
1. Removeanddiscardanypackagingcardboardthat
maybepresentbetweentheupperhandleandthe
lowerhandle.
2. Depressthebladecontrolat thetopoftheupper
handleandpivottheupperhandleupwarduntilit
snapsintoplace.
3. Tightenthehandknobs,whichare locatedon boththe
leftand rightsidesofthehandle.SeeFigure2.
Attaching the Starter Rope
1. Locatetheropeguidefoundonthe rightsideofthe
upperhandle.
2. Loosen,butdo NOTremove,thewingknobwhich
securestheropeguidetotheupperhandle.See
Figure1.
3. Standbehindtheunitand holdthebladecontrol
againsttheupperhandleandgentlypullthestarter
ropeoutoftheengine.
WARNING: The edger blade WILL
rotatewhenthe starter ropeispulled.
NOTE: Thestarterropewillnotpulloutof
theengineunlessthebladecontrol(refertoFigure1)
isdepressedagainsttheupperhandle.
1. Slipthestarterropethroughthetopof theropeguide.
2. Retightenthewingknobwhichsecuresthe ropeguide
totheupperhandle.
6
Pull Rope/Recoil Starter
Depth Control Lever
(TransportPositionShown)
CurbWheelAdjustment Lever
(ifso equipped) BevelAdjustmentLever
(ifsoequipped)
NOTE: Wheelandbladestylesvarybymodel.
Yourmodelmaydifferslightly. Primer Belt Guard
Model550show here.
Figure 3
_ARNING:
Befamiliarwith all controls and
__ their properoperation. Knowhow
to stop the machine and disengage
them quickly.
NOTE: RefertotheEngineManualpackedwithyour
edgerfora detaileddescriptionofall engine-related
controlsandcomponents,
Starter Rope /Recoil Starter
Thepullrope/recoilstarterisusedto starttheengine.
Primer
Theprimerisusedto pumpgasintothecarburetorand
aidin startingtheengine.Useittostarta coldengine,
butdonotuseit torestarta warmengineaftera short
shutdown.
NOTE: RefertotheEngineManualpackedwithyour
edgerfora detaileddescriptionofall engine-related
controlsandcomponents.
Blade Control
Locatedon theupperhandle,the bladecontrolmustbe
depressedagainsttheupperhandlein ordertooperate
theunit.Releasingthebladecontrolstopstheengine
andtheedgerblade. SeeFigure3.
Blade Depth Control Lever
Thebladedepthcontrolleveris locatedon therightside
oftheupperhandle.It isusedtocontrolthedepthofthe
cut.Thefurtherforwardthebladedepthcontrolleveris
moved,thedeeperintothesoiltheedgerbladewillcut.
See Figure3.
Bevel Adjustment Lever (ifsoequipped)
Thebeveladjustmentlever,if soequipped,is located
on thefront,leftportionoftheedger,behindtheedger
blade.It isusedtovarytheangleoftheedgerblade
betweenoneofthreepositionsforedging/trenchingor
bevelededging.SeeFigure3.
Curb Height Adjustment Lever
(if so equipped)
Thecurbheightadjustmentlever,ifsoequipped,is
foundon therearportionoftheedger.Whenplacedin
an applicablenotch,it aidsin stabilizingtheedgerwhile
edginggrassalonga curb.SeeFigure3.
IMPORTANT:Becomefamiliarwithallthecontrols
beforeoperatingtheedger.
¸¸¸¸¸2
WARNING:
Be familiar with all
controls and their
proper operation.
Know how to stop the
machine and disen-
gage them quickly.
NOTE: Referto
theEngine Manual
packed withyour
edger for a detailed
descriptionof all en-
gine-related controls
and components.
IMPORTANT:
Becomefamiliarwith
allthe controls before
operatingthe edger.
7
_i:i_ii!!!.i!!_.... _ .............
_ iiii i i_ i_ i I iiii
opo ti°g
WARNING
Do not lowerblade
ifblade is over
concrete, asphalt,
rocksor the like.The
blade can strikethe
supporting surface,
resulting in personal
injuryor property
damage.
Never fill fuel tank
indoors,with engine
running or untilthe
engine has been
allowed to coolfor
at least two minutes
after running.
This control mecha-
nism is a safety
device. Never attempt
to bypass its opera-
tion.
Theoperationofanyedgercanresult
inforeignobjectsbeingthrown intothe
eyes,whichcanresultinsevereeye
damage.Alwayswearsafetyglasses
oreyeshields.We recommendwide
visionsafetymaskforoverspectaclesor
standardsafetyglasses.
WARNING: Donot lowerblade ifblade
isoverconcrete,asphalt,rocksor the
like.The bladecanstrikethesup-
portingsurface,resulting inpersonal
injuryor propertydamage.
AddingGasolineAnd Oil
Servicetheenginewithgasolineandoil asinstructed
inthe EngineManualpackedwithyouredger.Read
instructionscarefully.
_ARNING: Neverfill fuel tank indoors,
with enginerunningor until the engine
hasbeenallowed to coolfor at least
two minutesafter running.
Edging
Tobeginedging,proceedasfollows:
1. Movetheunitovertotheareatobe edged,making
surethattheleft rearwheelison a hardsurfaceand
thebladeisovertheareatobecut. SeeFigure4.
Starting The Engine
NOTE: RefertotheEngineManualpackedwithyour
edgerfora detaileddescriptionofall engine-related
controlsand components.
Tostarttheedger'sengine,proceedasfollows:
.
2.
Movethebladedepthcontrolleverbacktothe
STARTpositionin theadjacent(top)notch.
Depresstheprimerbulbthreetimes,pausingtwoto
threesecondsbetweeneachpush.Incoldweather
(below50°F/19°0), itmaybenecessarytodepress
theprimerbulbfouror fivetimes.
IMPORTANT:Usingtheprimertorestarta warm
engineaftera shortshutdownisusuallynotnecessary.
Doingsomayresultinafloodedengine.
3. Standingbehindtheunit,depressthebladecontrol
andholditagainsttheupperhandlewith yourleft
hand.
_ARNING: Thiscontrolmechanism
isasafetydevice.Neverattempt to
bypass itsoperation.
4. Withyourrighthand,grasptherecoilstarterhandle
andslowlypulltheropeoutwarduntilenginereaches
thestartof itscompressioncycle(theropewillpull
slightlyharderatthispoint).
5. Afterslowlyallowingthe ropeto recoil,pulltherope
witha rapid,continuous,fullarmstroke.Keepa firm
gripon starterhandlethroughouttheentirestroke.
6. Allowthestarterhandletoslowlyreturntotherope
guide.
NOTE: If theenginefailstostartafter threepulls,
depresstheprimeranadditionaltwotimesbefore
pullingthestarterropeagain.
Figure 4
.Movethebladedepthcontrollevertothe leftandplace
intothenextlowernotch. Thenmakea passalongthe
areato beedgedbeforeproceedingtothenextnotch.
Thefurtherforwardthebladedepthcontrolleveris
moved,thedeeperor lowerthebladewillcut intothe
ground. Severalpassesmaybenecessarytoobtain
thedesireddepthofcut. Donotlowertheblademore
thanonedepthnotchata timewithoutmakinga pass.
3. Forbestresults,proceedslowlyalongthepathbeing
edged,slowlymovingtheedgerbackandforththrough
thecuttingarea,againmakingsureto keeptheleft
rearwheelon thehardsurfaceandthebladeinthe
cuttingpath,closetobutnottouchingtheedgeofthe
hardsurface.
4. Onceyouhavereachedtheendofyourcuttingpath,
raisethebladecontrolleverbackintotheSTART
position,movetothenextareatobecut,andproceed
againfromstep1.
Stopping The Engine
Tostoptheedger'sengine,releasethe bladecontrol
handle.
NOTE: Seeyourenginemanualpackedwithyourunitfor
moredetailedinstructions.
8
EdgingAlongA Curb
NOTE: Edgerfeaturesvarybymodel.All edgermodels
do NOTcomeequippedtoedgealonga curbnoris there
a curbwheelkit availabletomodifyyouredgerifit was
notpurchasedequippedtodoso.
Onmodelssoequipped,theright,rearwheelofthe
edgercanbe loweredintooneoffivepositionstoease
thetaskofedgingalonga curb.
Toadjusttotheheightofthecurbwheel,proceedas
follows:
1. Lowerthe right,rearwheelbymovingthecurbheight
adjustmentleverslightlytotheleft.SeeFigure5.
2. Pivottheright,rearwheelintoanapplicablepositionin
relationtotheheightofthecurbtobeedgedalong.
3. Releasethecurbheightadjustmentlevertolockthe
wheelin position.SeeFigure6.
4. Proceedbacktostep1 underEdgingatthebeginning
ofthispage.
NOTE: Severalpassesmaybenecessarytoobtainthe
desireddepthofcut. Donotlowerblademorethanone
depthnotchata time.
Curb Neigh
Adjustment
Lever
ustment Lever
Figure 5
LoweredPosition
Figure 6
9
i
.Makng
Adjustments
WARNING
Rotatingcuttingblade
maythrowobjects
causingpersonal
injury.Keepareaclear
of bystanders anddo
not operatewithout
guardsin place.
BevelAdjustment
NOTE: Edgerfeaturesvarybymodel.All edgermodels
do NOTcomeequippedwitha bevel adjustmentnor
is therea beveladjustmentkitavailabletomodifyyour
edgerifit wasnotpurchasedequippedtodoso.
Theangleoftheedgerbladecanbeadjustedbyplacing
thebeveladjustmentin oneofthreepositionsforedging
or bevelededging.SeeFigure7.
Bevel Adjustment
Lever
Figure 7
,_ WARNING: Rotating cuttingblade may
throw objects causingpersonalinjury.
Keepareaclear of bystanders and do
not operatewithout guards inplace.
Beveling
inordertoachievea bevellededge,setthebevel
adjustmentlever(referto Figure7) inthefirst(left hand)
orthird(righthand)notchtoplacetheedgerbladein
_ositionforbeveling.Seepositionsbelowin Figure8.
LeftHandPosition Right HandPosition
Beveled Edging Positions
Figure 8
NOTES:
10