Estelon Forza User manual

Designed
by Alfred Vassilkov
Serial Number
Model Estelon Forza

Your ESTELON loudspeakers have passed our quality control:
– Technical test passed.
Marek Rajatalu
Production Manager
Estelon
– Listening test passed.
Alfred Vassilkov
Founder and Chief Designer
Estelon

Table of Contents
1. INTRODUCTION. . . . . . . . . . . . . . . . . . . . . . . . . . . . . . . . . . . . . . . . . . 4
2. SPECIFICATIONS .........................................7
3. UNPACKING INSTRUCTIONS..............................9
4. SET-UP..................................................12
5. PRODUCT CARE ........................................16
6. TECHNICAL SERVICES ...................................17

4
1. INTRODUCTION
Our Story
There can be few world-class rms that have been founded at the
breakfast table, but Estelon – from Tallinn, Estonia – is certainly one of
them. The high-end audio brand traces its origins back many decades
when a young boy obsessed with music, began to take apart radios
and adjust them to improve the sound quality.
Before Estelon, Alfred had been designing speakers for other compa-
nies for over 25 years and spent many years researching opportunities
to achieve his ambition.
He always sought perfection and overcame challenges: growing up
in Soviet era, when resources were limited, he dismantled radios to
rebuild and improve them.
He took his interest to university, studying electro-acoustics in St Pe-
tersburg. These experiences enabled Alfred to develop technologies
and nd materials with which to construct unique and innovative
products. These were combined with inspiration from nature – par-
ticularly from the lush and expansive forest landscapes of Estonia – to
create the perfect balance between engineering and design.
The result was Estelon, one of the world’s most luxurious speaker
brands. It derives aesthetic and acoustic excellence through the merg-
er of ingenious creativity and cutting-edge science. Each decision –
from engineering techniques to materials and components used in
the manufacturing process – is made with the perfect harmony of the
speakers as a whole in mind.

5
Estelon Forza
The Estelon Forza is an much awaited addition to the Estelon agship
series. Standing at nearly 1,7 metres in height, the elegant design of
the Forza features the very best of what Estelon has to oer. The per-
fect synergy between aesthetics and engineering. Using only the ma-
terials and components best suited for this model and manufacturing
it with the greatest detail, the Forza brings music to life. With a sleek
design and composed of a single cabinet, the Forza is just a bit smaller
in size than the Estelon Extreme.
Forza, as the name already suggests, is full of unimaginable rened
power. As the electric power passes through the driver elements, the
Forza becomes alive. Every nuance dances through the air, creating a
realistic soundstage, bringing rich emotions so you can close your eyes
and enjoy the best what music can oer.
Alfred Vassilkov, the Designer and Founder of Estelon

6
Engineering Concept
Each element and its characteristics play a crucial role in delivering
the purest sounds imaginable. All Estelon products are built from the
inside out. That means that the shape is the result of decades of engi-
neering and experiences on how to create the best conditions for mu-
sic reproduction. Taking this into account there are not many materials
in the world which can adhere to all of the necessary conditions.
Cabinet materials and nish
Our X-Series and our Flagship model cabinets are built using a propri-
etary marble based composite material. This allows to create the per-
fect form and shape of the speaker. The specic shape and materials
eliminate any extra internal resonances and difractions and therefore
the sound is pure and natural without coloration.
The same ideology is also used for the YB speaker, using only the ma-
terials that t best the speaker’s characteristics.
The nishing techniques of all our speakers come from the automo-
tive industry, which makes the coating very durable. The nishing is
handcrafted and consists of up to 12 layers and is then carefully hand
polished. The Estelon Forza is oered in a choice of liquid gloss, matte
or the optional nishes.

7
2. SPECIFICATIONS
Type: 4-way sealed box
Woofer: 2 x 250 mm CELL Aluminium Sandwich
Accuton (custom design)
Mid Woofer: 190 mm CELL Aluminium Sandwich
Accuton (custom design)
Midrange: 168 mm CELL Ceramic Accuton
Tweeter: 25 mm CELL Diamond Accuton
Internal Wiring: Kubala-Sosna
Frequency Response: 25 - 60 000 Hz
Power Rating: 400 W
Min Amplier Power: 20 W
Nominal Impedance: 3 Ohm (min 2,0 Ohm at 42 and 110 Hz)
Sensitivity: 90 dB/2.83 V
Height: 1675 mm
Width: 617 mm
Depth: 682 mm
Net Weight: 150 kg per speaker

8
Dimensions in Millimeters:

9
3. UNPACKING INSTRUCTIONS
Your Estelon loudspeakers come packaged individually in 2 separate
ight cases – we strongly recommend keeping these cases for possi-
ble future use / transport. Due to the substantial weight and slippery
surface of the loudspeakers we suggest that two persons assist in the
unpacking and positioning of them for listening.
Contents of the two ight cases:
•2 loudspeakers
•1 Accessories case
•1 user’s manual
•2 pairs of gloves
•8 feet
•8 spikes, recommended for carpet ooring
•4 jumpers
•1 polishing cloth
•1 impregnated polishing cloth (supplied only with
liquid gloss nish)
For unpacking, please follow the instructions described below and as
shown in the drawings:
1. Unlock / Open all six locks on the ight case cover. This
should only be done with the speaker / ight case in a hori-
zontal position.
2. Carefully lift the cover o the ight case and put it aside.
3. Be mindful of the warning signs on the drivers – excessive
pressure on the driver elements might cause damage to
them. Remove the foam plate and Accessories case from un-
der the speaker bottom as shown in drawing 3.

10
1
3
2
4. Gently, lift the ight case, with the speaker, as shown in drawing
4 and elevating it to a vertical position as shown in drawing 5.
5. Now in an upright position, please support the speaker and
slowly roll the speaker out of the case. At this time, please
put on the gloves that you nd included in the case. Now,
with the speaker upright and out of the ight case, roll it to
the desired position in your room.

11
54
6 7
6. Replace the transport wheels with the enclosed feet. Doing
one side at a time, carefully tilt the speaker to one side and
replace the wheels with the enclosed feet, as shown in draw-
ing 6. Please retain the wheels, once removed, in the event
that repackaging is required. If you are not certain of the nal
position, we recommend keeping the speakers on wheels
during the initial set-up.
7. Remove the cloth-bag from the speaker. Please note that the
cloth-bag should always be worn with the seams outside.

12
4. SET-UP
Initial positioning in the room
Model Estelon Forza - Suggested room size 40-125 m2
When positioning the speakers in your room, if possible, it is desir-
able to allow for “free” space around the speakers so as to assist in
minimizing sound reections from walls, furniture etc. This will help
in achieving correct tonality, realistic imaging, focus and dynamics.
The recommended minimum distance between the speaker and the
nearest reection point is 1.2 m.
A non-reective back wall will minimize imaging distortions. The dis-
tance between the back wall and the speaker should not be less than
0.6 m (1.8 ft), the distance from the tweeter to the back and side walls
must not be too similar.
Listening point: the best listening height is approx. 1 m (3 ft), while the
distance between the listener and the speakers should be similar or
longer to the distance between the two speakers.
The positioning of the speakers in the room must be symmetrical for
achieving a balanced sound stage – this is very important in a narrow
room. Expect the distance between the speakers to be approximately
2.5 – 4 m, depending on the size of the room and its reverberation
characteristics.
The recommended speaker’s direction is usually 3-7° towards the
listening position, depending on the listening room specics.
13
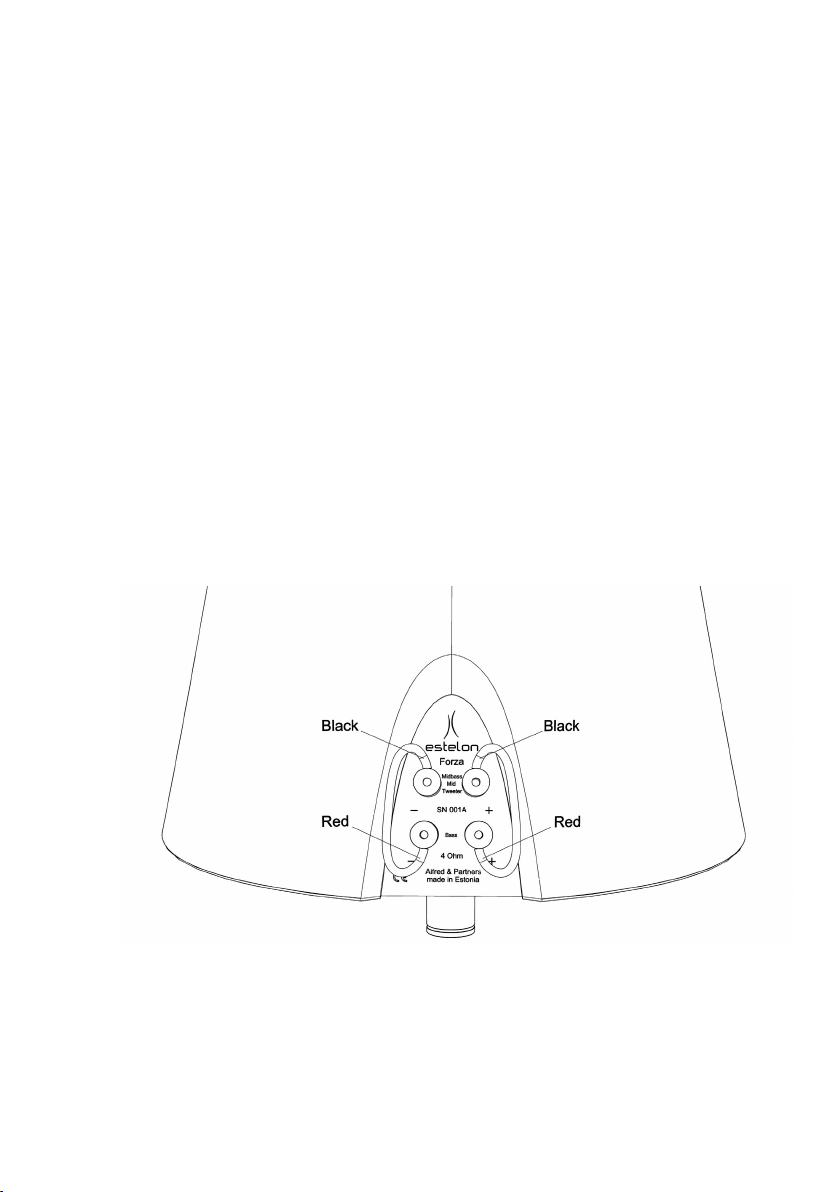
Wiring
When connecting the speaker to the amplier please make sure that
the amplier is in an o position.
Connect the speaker cable to the pole terminal on the back of the
speaker: speaker terminal „+“ with the amplier terminal „+“ and „-“
with „-“. For best performance we suggest using the upper pair of
connectors.
For signal ow, please follow the direction marked on the cable or in
the cable manufacturer’s instruction. Typically, the signal ow will be in
the same direction as the labeling / writing on the cable.
Estelon Forza can be bi-amped or bi-wired at your choice. Please
remove wire jumpers to be able to use the upper and lower connec-
tors separately.

14
Break-in period
Although your Estelon speakers had an initial break-in at the factory,
due to shipping conditions - pressure/temperature changes that they
may have incurred, the speakers will need to go through an additional
break-in process before their nal set-up.
All the mechanical and electrical connections will stabilize naturally
after playing a continuous music signal for approx. 24 hrs – e.g. use a
digital source in the repeat mode. After the initial break-in period you
can start setting-up the sound according to the recommendations
from Alfred Vassilkov.
Please note that the speakers will have reached their optimum level
of performance after playing in your system for approximately 300 hrs.
Recommendations from Alfred Vassilkov
for the set-up
The set-up of the sound consists of the balancing of many dierent
parameters: tonality, bass accuracy, focus, stage imaging, deepness
etc. This process is time consuming and depends on the listener’s ex-
perience or the qualication of the set-up specialist. Proper set-up will
maximize your Estelons’ performance.
During the nal set-up small changes may be made to the initial cho-
sen position, e.g. moving the speakers 10 cm towards the front wall,
then maybe a little bit inward and outward. Please evaluate the sound
carefully every time you make a small change in the positioning.
Then continue, making smaller changes in the positioning and eval-
uate again, until the proper position with a balanced, natural sound is
found. We suggest that you test and listen with dierent music styles
so as to avoid specic accents.

15
When changing the position of your speakers please keep in mind that:
•Close proximity to the back wall and corners will reinforce,
enhance, the bass performance, but can negatively inu-
ence the stereo image.
•A shorter distance between the two speakers, will create a
better focus and deeper imaging, but will at the same time
reduce the sound width.
•Pointing the speakers inward minimizes reections from the
side walls but has an impact on the imaging.
Once you have located the proper position replace the wheels with
the spikes included in the case.
For critical listening, each time you play the speakers, please allow 60-
90 minutes for the system to warm up for maximum performance.
WARNING! When played at excessive volume, you stand the risk
of doing damage to the drivers.

16
5. PRODUCT CARE
The multicoated nishes applied to Estelon speakers are considered
to be amongst the most advanced automotive nishes available. They
are extremely strong and durable. In order to assist you in maintaining
their stunning appearance, your Estelon loudspeakers come supplied,
from the factory, with special cleaning / polishing cloths. Please take
note - only dry cleaning is allowed - do not wash the speakers.
When the nature of a smudge or spot so necessitates, a soft moist
cloth may be used to gently remove smudges prior to a nal nishing
with the special cloths which accompany the speakers.
For the Liquid Gloss nish, please use only the polishing cloth included
in the ight case. Be careful not to apply the polish to the loudspeaker
drivers. The use of other materials can damage, scratch or destroy the
nish.
More detailed information regarding the polishing clothes and infor-
mation for obtaining additional product:
For all nishes:
3M Perfect-it™ III High Performance Polishing Cloth
Or other 3M Microber cloths
If needed, use it with Würth Active Windshield Cleaner*I Art. No. 0890 25
For additional information and guidance regarding cleaning / polish-
ing materials, please contact your dealer or distributor.

17
6. TECHNICAL SERVICES
Estelon Five Year Limited Warranty
Terms and Conditions
1. Limited Warranty - All Estelon products purchased from authorized
Estelon dealers are covered by a limited 5-year non-transferrable war-
ranty. This warranty includes all parts and labour charges as well as
return-shipping charges (product owner is responsible for all shipping
and insurance charges one-way to the Estelon repair facility).
Customers should consult with their original Estelon dealer or distrib-
utor for possible alternate repair instructions prior to contacting the
Estelon factory. Other Estelon dealers or distributors may refuse from
assisting the Customer under the limited warranty but under any and
all circumstances customers are welcome to contact our sales depart-
ment, listed on our web site www.Estelon.com for service assistance.
This limited warranty is valid only in the country where the product
was originally purchased. If the repair request that is covered under
this warranty comes from another country then the Manufacturer may
request the Customer to compensate to the Manufacturer additional
costs arising from providing this limited warranty in another country
than the country of original purchase.
This limited warranty shall not aect the statutory rights of the Cus-
tomer.
2. Limited to Original Purchaser - This warranty is for the sole ben-
et of the original purchaser of the covered product, and may not be
transferred to a subsequent purchaser of the product.
3. Conditions and Limitations - This warranty is subject to certain
conditions and limitations, as follows. This warranty is void and inap-
plicable if the product has not been used in accordance with the in-
structions found elsewhere in the owner’s manual, or if it has been

18
misused or abused, damaged by accident or neglect, or in transport
once in possession of the purchaser. The warranty is also deemed void
if the product has been repaired, modied, or tampered with by any-
one other than Estelon or its specically authorized agents. Please note
– if the fasteners to the cover of the crossover area, those covered with
multi coloured specialty epoxy seal, have been tampered with or the
epoxy removed – the warranty will considered to be void.
This warranty does not cover defects due to accidents or similar causes
arising after the risk for the product has passed to Customer, or normal
deterioration, wear and tear.
4. Remedy - If this product contains a materials, manufacturing, or
workmanship defect that cannot be repaired at the dealership where
the product was purchased, it must be packed in original packaging
and returned to Estelon via an insured freight, at the owner’s expense. If
replacement packaging materials are required, they may be purchased
from the factory at a charge. Returned products must be accompanied
by a written description of the defect, and a return authorization num-
ber (available from the factory via phone or email).
Upon receipt of defective product, Estelon agrees to repair the product
without charge for parts or labour. The product will then be returned
via prepaid, insured freight, with carrier at the sole determination of
Estelon This constitutes the purchasers sole remedy.
5. Design Changes - Estelon reserves the right to modify its products
or change specications at any time without obligation or liability to
previous purchasers.
6. Miscellaneous - Any implied warranties relating to the above prod-
uct shall be limited to the duration of this warranty. This warranty does
not extend to any incidental or consequential costs or damages to the
purchaser. This warranty gives you specic legal rights. You may also
have other rights which vary from country to country.

19
Instructions for Obtaining Repair Service
1. Complete the Return Authorization Request Form – contact
Estelon.
2. Crate and / or package the product in its ORIGINAL FLIGHT CASE CON-
TAINERS ONLY, according to the instructions included in the return e-mail,
and ship the product to the shipping address included in the e-mail. The
owner is responsible for paying the shipping and insurance charges (Estelon
will cover return shipping and insurance charges on warranty repairs).
4. In the case of non-warranty repairs, Estelon will physically inspect
the product and contact the customer for repair approval. Upon ap-
proval and completion of repair, the product owner will be informed
of the nal charges (including return shipping). Payment may be made
by bank / wire transfer prior to nal shipment). Payments not received
within 30 days of initial contact may incur storage fees.
•••
We strongly recommend that all product repairs should be conduct-
ed through the Estelon factory or an authorized Estelon repair facility.
Estelon products are designed and manufactured to the highest tol-
erances with numerous hand-picked components; for this reason, we
HIGHLY RECOMMEND that components not be serviced by non-au-
thorized repair facilities. Estelon values its loyal customers and will
make every attempt to return repaired products to their original facto-
ry specications. Customers should consult with their original Estelon
dealer or distributor for possible alternate repair instructions prior to
contacting the Estelon factory. BUT under any and all circumstances
customers are welcome to contact our sales department, as listed on
our web site www.estelon.com, for service assistance. All non-warranty
repairs are warranted for one year from the date of return shipment.

20
•••
Have we answered all your questions?
If not, please send us an email with your questions to
www.estelon.com
ESTELON is a trademark of Alfred & Partners OÜ
Alfred & Partners OÜ
Tanuma 126
13521 Tallinn
Estonia
Other manuals for Forza
1
Table of contents
Other Estelon Speakers manuals

Estelon
Estelon Alfred Vassilkov Limited YB Mk II User manual

Estelon
Estelon Extreme User manual

Estelon
Estelon Forza User manual

Estelon
Estelon Extreme User manual

Estelon
Estelon YB User manual

Estelon
Estelon XB User manual

Estelon
Estelon XA User manual

Estelon
Estelon XB Mk II User manual

Estelon
Estelon X Diamond User manual

Estelon
Estelon X Diamond Mk 2 User manual


