ETE ELECTRONICS K-202 series User manual

There'll be no technical notification for some
technical updated reason
PEEPHOLE VIDEO DOORBELL
INSTRUGTION MANUAL
Apply to K-202 series products

1
1
2
4
9
13
14
Contents
Introduction
Parts
I.
II.
III.Functions
IV.Operation Instruction
V.Installation Instruction
VI.Specifications
VII.Cautions
1
I. Introduction
Thanks for buying our product“Digital Video Peephole”.
The series of this item are based on our newest design with
multi function and easy installation way.According to theory
of closed circuit,door camera and indoor displaying, it has
memory function for viewing visitors' profile anytime.You can
view outdoor situation at times by the advanced visible light
assistant function.Visitors can be seen clearly at night.It is a
trusty shield for your home.The attractive and fashionable
design with feature of high resolution and easy installment
way.It must be your optional in security home system.
Please read the intruduction with care to know technique
details,both in installation and operation.
II. Parts
One package includes: One indoor monitor and
outdoor camera,wire,bracket,instruction manual,one
warranty card and installment parts.Lithium battery and
charger ; both of them will be packaged according to your
order.

K-202
Speaker
2indoor monitor
III. Functions
2.Outdoor Unit (K-202)
1.Indoor Monitor 2.Outdoor Camera
3.Bracket
4.Cable 5.Fittings 6.Instruction
manual
7.Lithium battery
and charger
Monitor Button
(K-202)
2 Video .Indoor Unit(K-02C/K-03C/K-05C)
3
K-05C outdoor station K-03C outdoor station
K-02C outdoor station
Camera Lens
Infrared Light
Light Sensor
Calling Button
Camera Lens
Infrared Light
Light Sensor
Calling Button
For SD card
K-202 indoor monitor
Switch Button
Menu Button
Touch LED TFT screen
For SIM card
Calling Button
Infrared Light
Camera Lens
Light Sensor
Motion Detection
PEEPHOLE VIDEO DOORBELL
INSTRUGTION MANUAL
Apply to 202C series products
(K-02C) (K-03C) (K-05C)

54
In monitor state, press camera button to take photo. Users
can delete it if quality is not good. Press “Back” button to
return to monitor state.
ATTENTION: SD CARD IS ESSENTIAL FOR STORING
PHOTOS, OTHERWISE, ONLY CAN TAKE ONE PHOTO.
D.Monitor Function
In the main interface, press button entering into monitor
state. Users can view outdoor situation through outdoor
camera. In monitor state, users can adjust exposure
compensation parameter, make display effect better. Press
“Back” button to enter into monitor state, press it again to
exit.
E.Take Photos:
C.Calling Function:
At standby or working state,visitors press the calling button
on the outdoor button,and photos will be taken and stored
automatically when the bell rings.Later it will turn back to
monitor state.Press for larger image(4X Zoom).
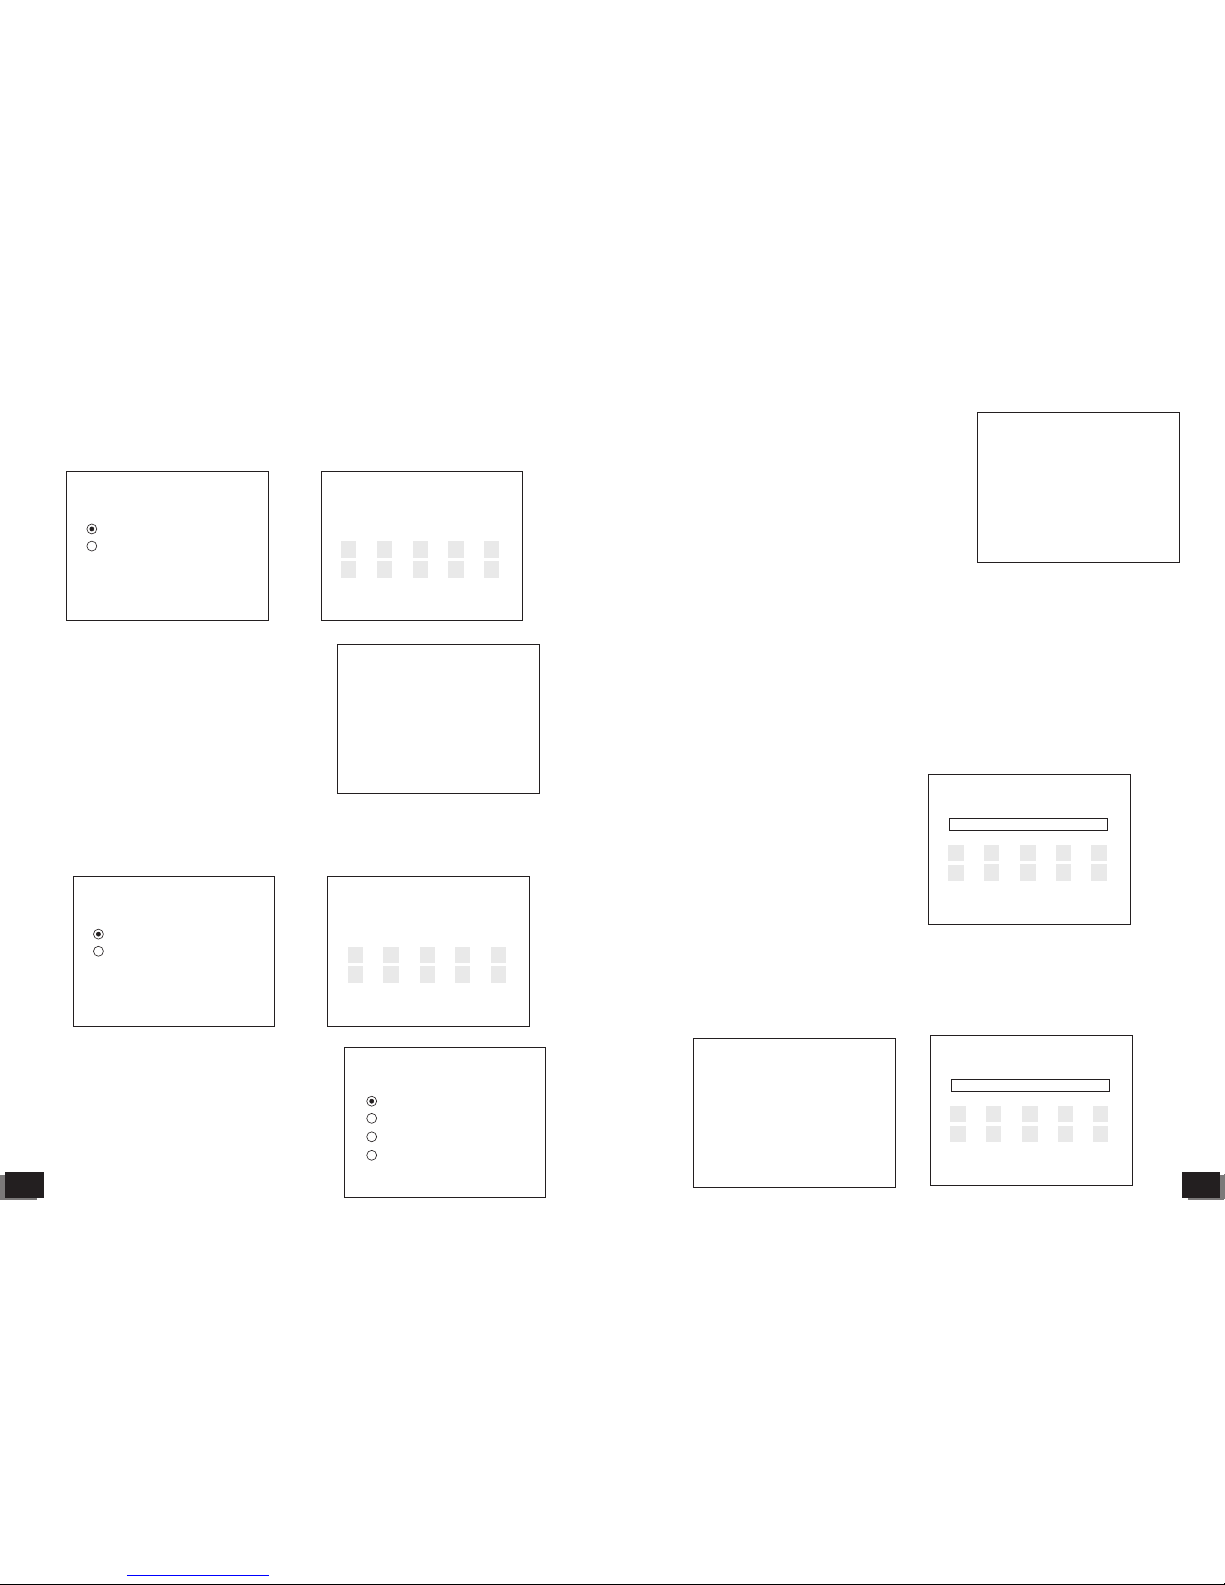
In work state, press
(menu button ) to enter into main
menu.
1.Visitor’s photos
1 view
2 delect
3 delect all document
4 storage locationl
OK BACK
OPTION
F.Menu setup function
Visitor ’s Photos
IMG0001A.JPG
11.01.01 21:48:55
IMG0002A.JPG
11.01.01 21:49:55
IMG0003A.JPG
11.01.01 21:58:25
OPTION BACK
You can view visitors' photos with exact time indicated.
Press“option” button, it comes“view”,“delete”,
“delete all”and“storage ”option.
A.Status Instruction:
Off state: Product is not working.
Standby state: Product is at sleep state while screen is off.
Working state: Operating,LCD screen is on.
B. On/Off State:
Press about 3 seconds to start the machineSwitch Button
IV. Operation Instruction
Monitor State: Displaying outdoor situation.
Menu state: On working state, press button to enter
into main menu.
Press about 3 seconds to turn off the machine.Switch Button
2.
Visitors video
1
2 delect
3 delect all document
play
CHOOSE
BACK
OPTION
MOVO175A.avi
10.01.01 03:20:04
OPTION BACK
In this menu, all recorded video and visiting time could
be checked . Press option button , you can choose play ,
delete and delete all document.
Visitors video
MOVO174A.avi
10.01.01 01:04:16
MOVO173A.avi
10.01.01 01:02:28

Date setup
OK
Y/M/D
Time setup
HOUR:MINUTE
3. Time/Date Setup
In this menu, you can set up the time and date. From the
first number, it will jump to the next one automatically.
Press save button to confirm and save it.
NOTE:PRESS “BACK” BUTTON,TIME/DATE SETUP
INFORMATION WILL NOT BE SAVED.
a. In ring setup menu, press option button to select the rings,
then save it.
b. In ring setup menu, press down button to set volume, then
save it. ATTENTION: MORE POWER LOST IF VOLUME
HIGHER.
In this menu, there are ring
tone and volume setup.
4.Ring Setup
Ring setup
OPTION SAVE
1.Ring
Ring 9
2.Volume
4
Ring option
BACK
1.Ring1
2.Ring 2
3.Ring 3
4.Ring 4
5.Ring 5
6.Ring 6
Ring setup
1.Ring
Ring 9
2.Volume
In this menu, you can choose different kinds of language.
Language option
OK BACK
Chinese
English
5、Language
6 Other Setup、
Other Setup
OK BACK
76
2010/05/25
01 2 3 4
56 7 8 9
2010/05/25
01 2 3 4
56 7 8 9
BACK
OK
BACK
SAVE
CHOOSE
Visiting MMS
OK BACK
1.
2.
Set MMS switch
mobile number receiving photos
This menu includes below settings:
1.Monitor Mode
2.Visiting MMS
3.Motion Detection setup
4.Zone Alarm
5.Match Code
6.LCD backlight
7.Change Password
8.Restore factory settings
a.Monitor Mode: Select Photo or Video function.
b.Visiting MMS:
Set MMS switch and mobile number receiving photos.
1.Monitor Mode
2.Visiting MMS
3.Motion Detection setup
4.Zone Alarm
5.Match Code
6.LCD backlight
7.Change Password
8.Restore factory settings
Note:only apply for D series,MD series,T series.
Turn on
567
Motion Detection
1 Motion Detection Switch
2 Motion Detection number set
3 Motion Detection time set
01234
56789
d.Zone Alarm
1 Zone alarm switch
2 Alarm mode
3 Alarm number set
4 Zone password set
01 2 34
56789
Alarm number set
1
034
89
2
01 2 34
56789
98
① Visiting MMS Switch: Turn on/off MMS function
② Visiting MMS number set: Setup the phone number
receiving MMS
Visiting MMS
OK BACK OK BACK
Turn off
① Motion Detection Switch: Turn on/off motion detection.
② Motion Detection number set: Setup the phone number
receiving the photos taken after motion detection activated.
OK BACK
OK BACK
Turn on
Turn off
Motion Detection
OK BACK
③ Motion Detection time set:
Setup 2—8 seconds. After 2—8
seconds, the motion detection
will be activated.(Set 2nds, the
sensitivity will be highest. If LCD
screen is on, motion detection
will not be activated)
Motion Detection
OK BACK
Zone Alarm
①Zone alarm switch: You should input the password”1122”
first. Then turn on/off the zone alarm.You can also send
message SF******(Six numbers) to turn on alarm function ,
and send message CF******(Six numbers) to turn off.Send
message SP** * ***( Six numbers ) to take one photo and
send back to your mobile phone.This mobile phone number
can be anyone of the three phone number you've set.
② Alarm mode: After input the password, you can select the
mode of alarm, including whistle, SMS and MMS.
BACK
OK BACK
① Alarm number set: You can set three mobile number here,
but only the first one can receive MMS.
② Zone password set: Send message to turn off alarm and
remote taking photo function.
BACK
This menu includes below
settings:
1.Motion detection switch
2.Motion detection number set
3.Motion detection time set
c.Motion Detection
This menu includes below settings:
1.Zone alarm switch
2.Alarm mode
3.Alarm number set
4.Zone password set
1.Alarm number 1 set
2.Alarm number 2 set
3.Alarm number 3 set
OK BACK
Input password
2nds
4nds
6nds
8nds
Input password
Note:only apply for M series,
MD series.
Note:only apply for T series.

V. Installation Instruction
K-05C Outdoor Station Installation Instruction
tear off
Pic 1 Pic 2
Pic 3
1. Bring off the tape from the outdoor unit.(Pic 1)
2. Install the outdoor unit right into the peephole, and past it
onto the door with the tape at the back.(Pic 2)
3. Install the bracket while the wire being through it, and fix it
with the screws.(Pic 3)
OK
LCD Backlight
4
Brightness
Default Factory Setting
98
****
012 3 4
567 8 9
BACK BACK
When machine being in stand-by status, if visitors press
call button, it rings. Meanwhile, it will take a photo and send
a MMS/SMS to master's mobilephone.
7、MMS/SMS function
g.Restore factory settings: Setup the factory original status,
code number is 1122.
e.Wireless match code setting:For connecting security equip
ment.
f.LCD backlight: Adjust the backlight of monitor for best
display effect. Note: More power consumption if reaching
high brightness.
Note:SIM card must be GSM 2G Card.

Please note: if the pipe of outdoor unit is in different size, the
hole on the bracket is also different.
1 .outdoor camera (K-02C)
2 .outdoor camera ( 03C)K-
3 . ( 05C)outdoor camera K-
(Pic 1) (Pic 2)
(Pic 3) (Pic 4)
(Pic 5)
K-02C Outdoor Station Installation Instruction
tear off
Pic 1 Pic 2
Pic 3
Note: K-03C is the same as above installation way.
1. Bring off the tape from the outdoor unit.(Pic 1)
2. Install the outdoor unit right into the peephole, and past it
onto the door with the tape at the back.(Pic 2)
3. Install the bracket while the wire being through it, and fix it
with the screws.(Pic 3)
1 11 0
Φ27 X L65mm
Φ14.5 X L38mm
Φ27 X L40mm
Φ14.5 X L60mm
Φ15X L85mm
Φ27 X L85mm
Φ27 X L65mm
Φ27 X L40mm
Φ27 X L85mm
Φ14.5 X L38mm
Φ14.5 X L60mm
Φ15X L85mm
Φ15 X L60mm
Φ15 X L35mm
Φ15 X L85mm
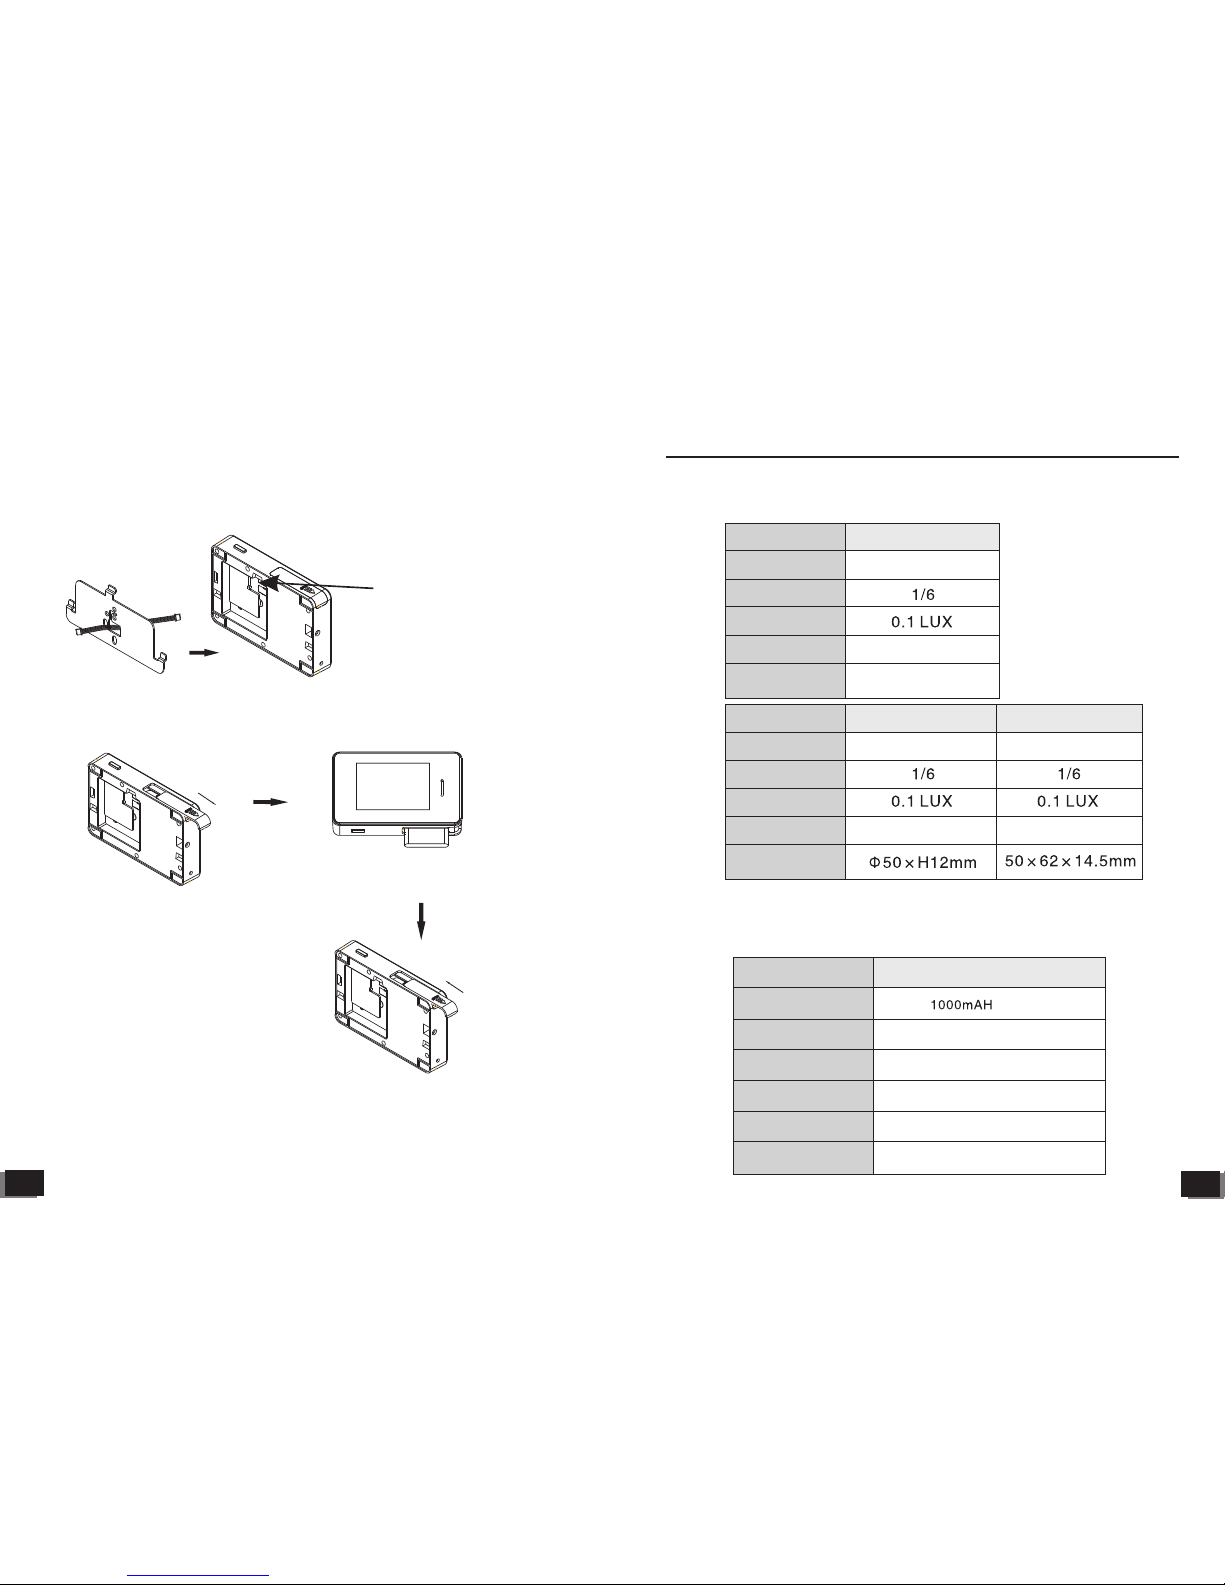
Install instruction For Indoor Monitor
Battery Installation Instruction
1. Put the wire through bracket.
2. Connect the wire with indoor monitor on the back. Attention
to the joint direction
3. If the wire is too long, put it in the back slot of indoor unit.
(As following pictures)
Note the direction
of wire joint
1. Pull down the battery cover.(Pic 1)
2. Put the battery into the slot carefully. Attention that the
touch point is on the left.(Pic 2)
3. Pull up the cover along with the slot carefully.(Pic 3)
left right
Attention to the battery touch point
Pull up
1 2
Pic 1 Pic 2
Pic 3
Pull down
VI. Specifications
Outdoor Station
IR LED
Indoor Monitor
Resolution:
Camera:
Light Source:
Size:
2 white light LEDs
Resolution:
Camera:
Light Source:
Size:
2 white light LEDs
Power Supply:
Screen:
Resolution:
Ring Type:
Size:
K-202
2.8" LCD screen
Standby1mW Working400mW
Power Consumption:
Battery
High Resolusion
16pcs chord melody
High resolution
High resolution High resolution
Lowest camera degree:
Lowest camera degree:
1 3
100.5×66.5×18mm
K-05C
63×63×17mm
K-02C K-03C

VII.Cautions
The product should be fixed on the door firmly.Do not
close the door too heavily.Note the using enviroment should
be well ventilated and not be wet.Please keep it away from
violent daylight,strong magnetic field and dust.When washing
its face,do not use chemical things,but clean ,soft and dry
cloth is strongly adviced.Do not keep such a long time for
monitor state.Do not press several buttons at one time.Do not
make the small metal objects get into the inner part.Do not
twist screws,for each of them is very important.
Instruction and notice of using battery
Please use it with our company’s product,do not match
with other products.
Non-professionals should not demolish inner construction.
If need to repair,please contact the distributor or our technical
department.
1.Do not throw the battery into fire,or it will explode.
2.Do not push too heavily when installing the battery,or it will
cause some danger.
3.Do not use wire or needle to make the battery short circuit.
And keep it away from the necklace or other metal things.
4.Do not weld the battery,or it will cause too hot and fire.
5.Battery liquid will cause lisomnia,please flush your eye with
clean water.
6.Do not disassemble or configure the battery,otherwise
some incident happens.
7.In high temperature place,like besides the fire,stopping use
the battery.
8.Stop using the battery if it gets hotter,color and shape
changes.
9.When Battery liquid touches the skin or clothes,it will cause
cauma.You should flush it and go to doctor.
10.Keep it away from fire when it smells bad.
1 4
11.Do not make the battery wet,or it will cause the battery
too hot or corrode.
12.Do not use the battery under sunshine or besides the
car,or it will shorten its life.
13.Do not charge beyond 24 hours one time.
14.Keep the battery away from sunshine and cool place.
15.Battery's using life is limited, it will shortened after
charging many times.If charge is infective after several
times,please change the battery with same model.
16.Do not throw the battery into common garbage series.
Keep the useless battery in indicated place.
Instruction and Notice of Charger
1. Put the battery in the charger first.”OK” indicate light is on,
then you can connect the charger with electricity for
recharge. If the light is not on, please check if the battery
connected well, adjust it until the light on.
2. After connected with electricity, the “OK” light on, “full” light
off, “charger” light blink, means charging is working.
3. If charge is coming to be full, “full” is gradually light on until
the “charge” light off.
4.Please use 100-240V alternating current. Electricity
leakage, fire or destroying the charger will be caused if use
other voltage.
5. Forbid short circuit, otherwise it causes body hurt, electric
shock, fire or destroy the charger.
6. Please clear the dust around the plug at times.
7. If water or other liquid engaged, cut off the electricity
immediately for some dangers.
8. Do not disassemble or modify the charger to avoid dangers
happen.
9.Do not use the charger in bathroom or some high
temperature place.
10. Do not charge in these place: High sunlight, temperature
below 5'C and above 40'C;Wet or dusty place; around TV,
radio or around other such equipment.
NOTE: This product can be used with BL-5C
Lithium battery. 1 5
Table of contents


