Etisalat DGA4231ETI Owner's manual

Quick Installation Guide &
Safety Instructions and Regulatory Information
Home Gateway
DGA4231ETI
www.Etisalat.ae

BEFORE YOU START 1
1 Before you start
Carefully read the “Safety Instructions and Regulatory Notices” on page 7.
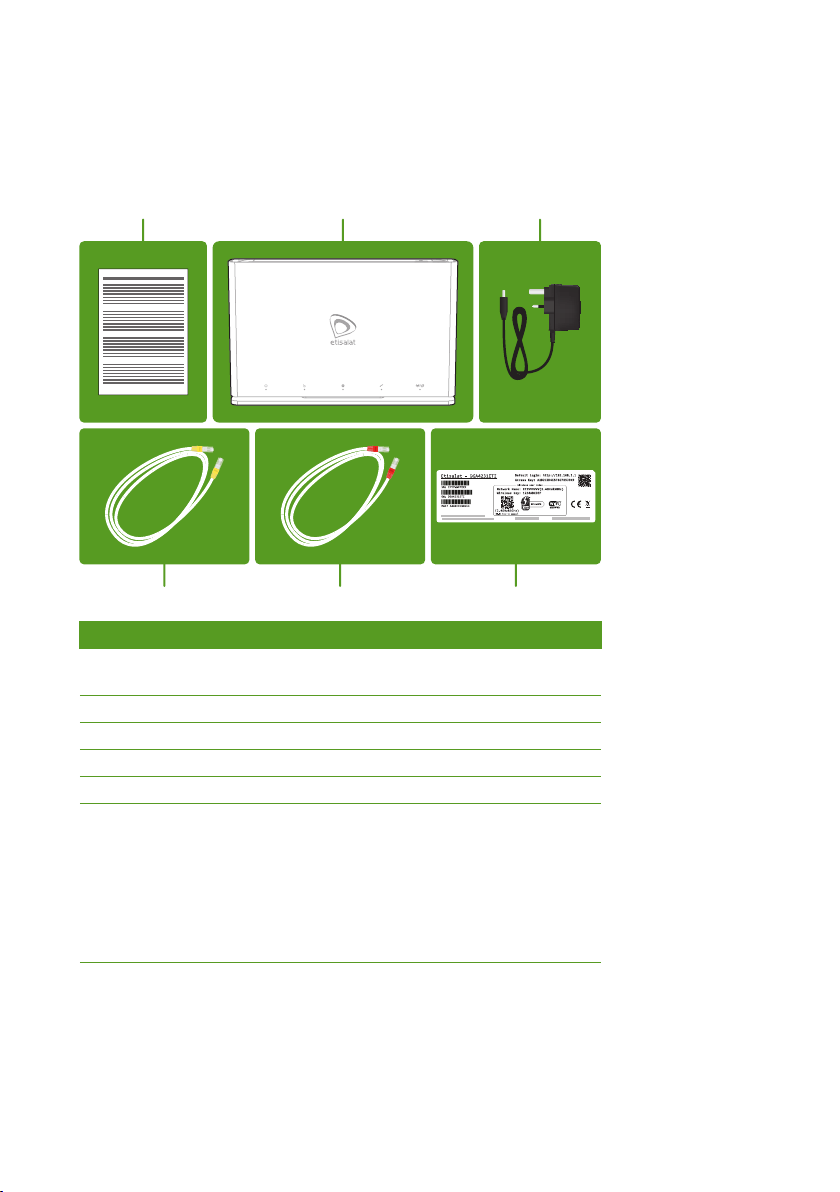
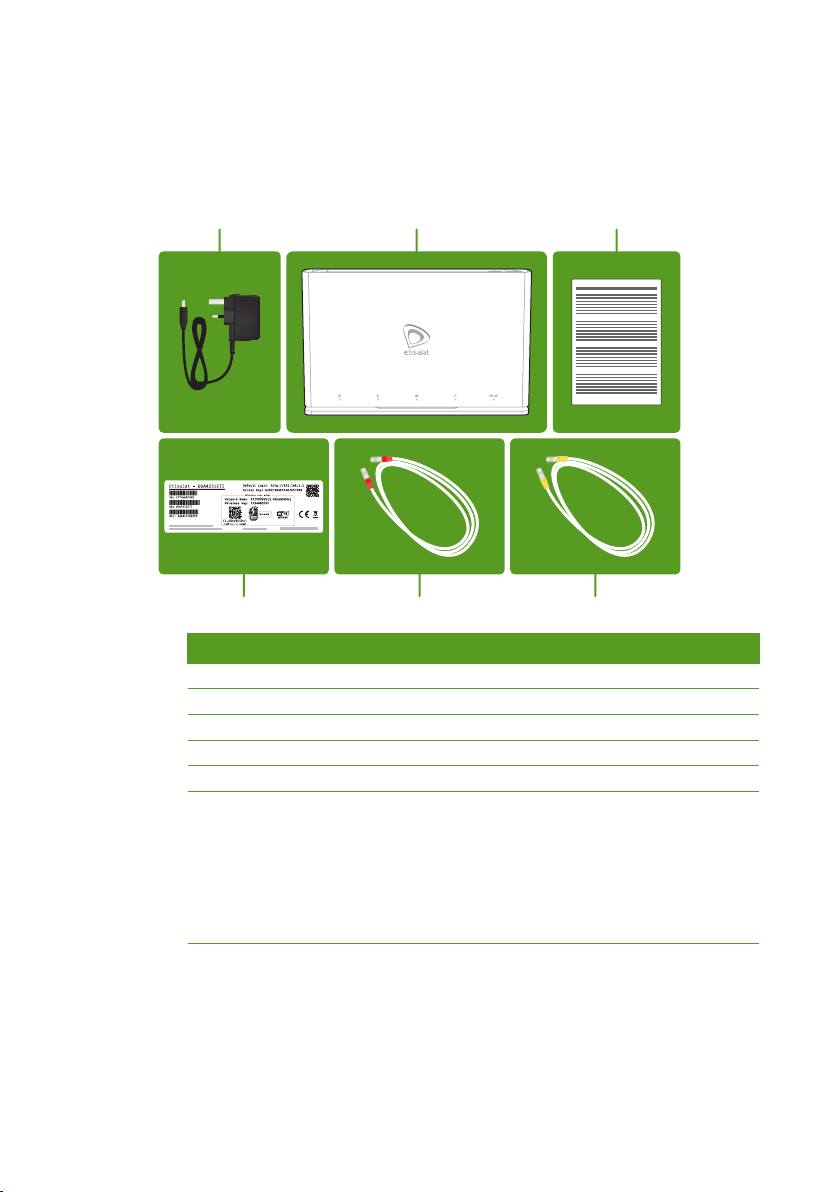
2 Check the content of your box
Your box should contain the following items:
BCA
E
DF
Item Description
AUser Documentation (this Quick Setup Guide,…). Other additional
documents may be included.
BOne Home Gateway (DGA4231ETI)
COne power supply adapter
DOne Ethernet cable with yellow connectors
EOne Ethernet cable with red connectors
FOne additional housing label with:
<The default wireless credentials needed to access the wireless
network of the Home Gateway.
<The default login credentials needed to access the web interface of
the Home Gateway.
For both items, a QR code is provided to facilitate access using a
tablets or smartphone.
BEFORE YOU START 1
1 Before you start
Carefully read the “Safety Instructions and Regulatory Notices” on page 7.
2 Check the content of your box
Your box should contain the following items:
BCA
E
DF
Item Description
AUser Documentation (this Quick Setup Guide,…). Other additional
documents may be included.
BOne Home Gateway (DGA4231ETI)
COne power supply adapter
DOne Ethernet cable with yellow connectors
EOne Ethernet cable with red connectors
FOne additional housing label with:
<The default wireless credentials needed to access the wireless
network of the Home Gateway.
<The default login credentials needed to access the web interface of
the Home Gateway.
For both items, a QR code is provided to facilitate access using a
tablets or smartphone.
CONNECT YOUR WIRELESS DEVICES 32 CONNECT THE HOME GATEWAY TO YOUR BROADBAND CONNECTION
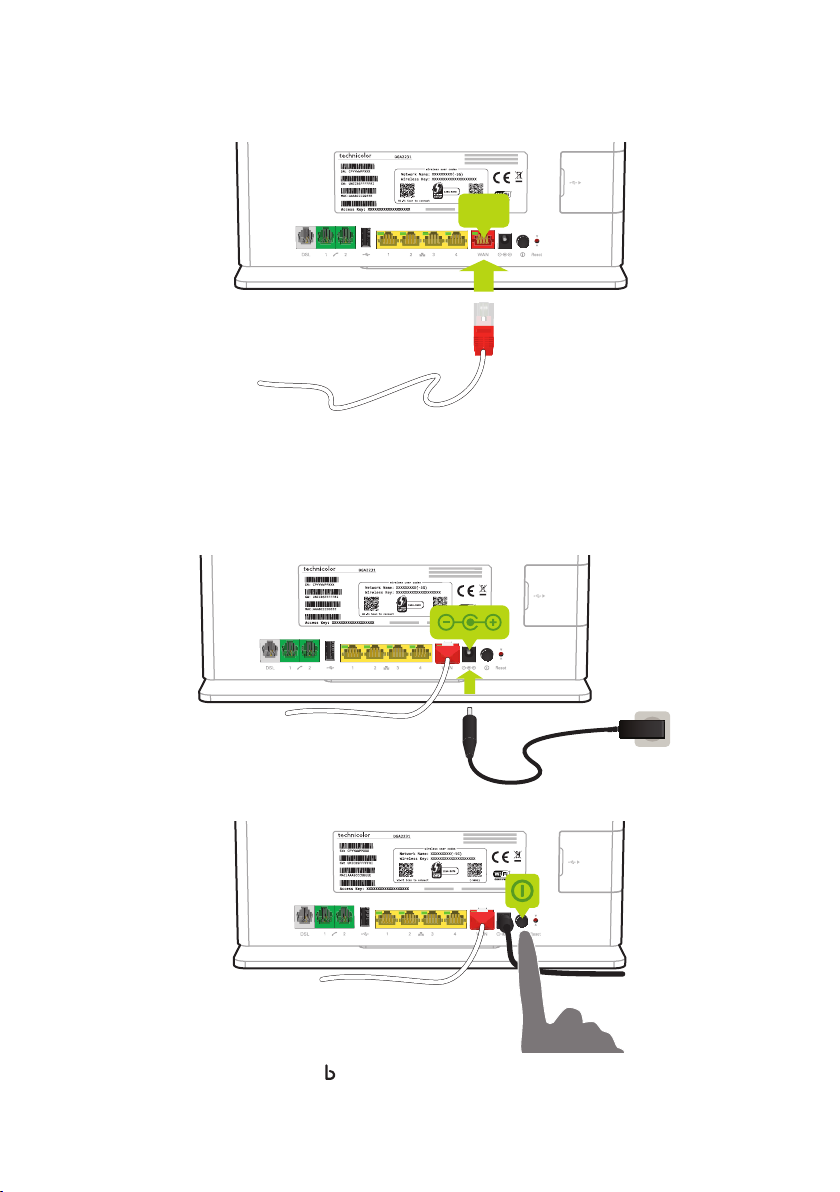
3 Connect the Home Gateway to your broadband connection
1 Take the Ethernet cable with the red connectors out of the box.
2 On back panel of the Home Gateway, plug the Ethernet cable into the red port labelled WAN.
WAN
3 Plug the other end of the Ethernet cable into the allocated UPLINK port on the Etisalat ONT device.
4 Power on the Home Gateway
1 Plug the connector of the power supply adapter into the Home Gateway power inlet port. Plug the adapter
into a nearby power outlet.
2 Turn on the Home Gateway.
3 After a few minutes the Broadband ( ) LED must be solid green.
If this is not the case, check the connections that you made in “3 Connect the Home Gateway to your
broadband connection” on page 2.
5 Connect your wireless devices
To do this:
<Automatically using WPS, continue with “5.1 WPS configuration” on page 3.
<Manually, continue with “5.2 Manual configuration” on page 4.
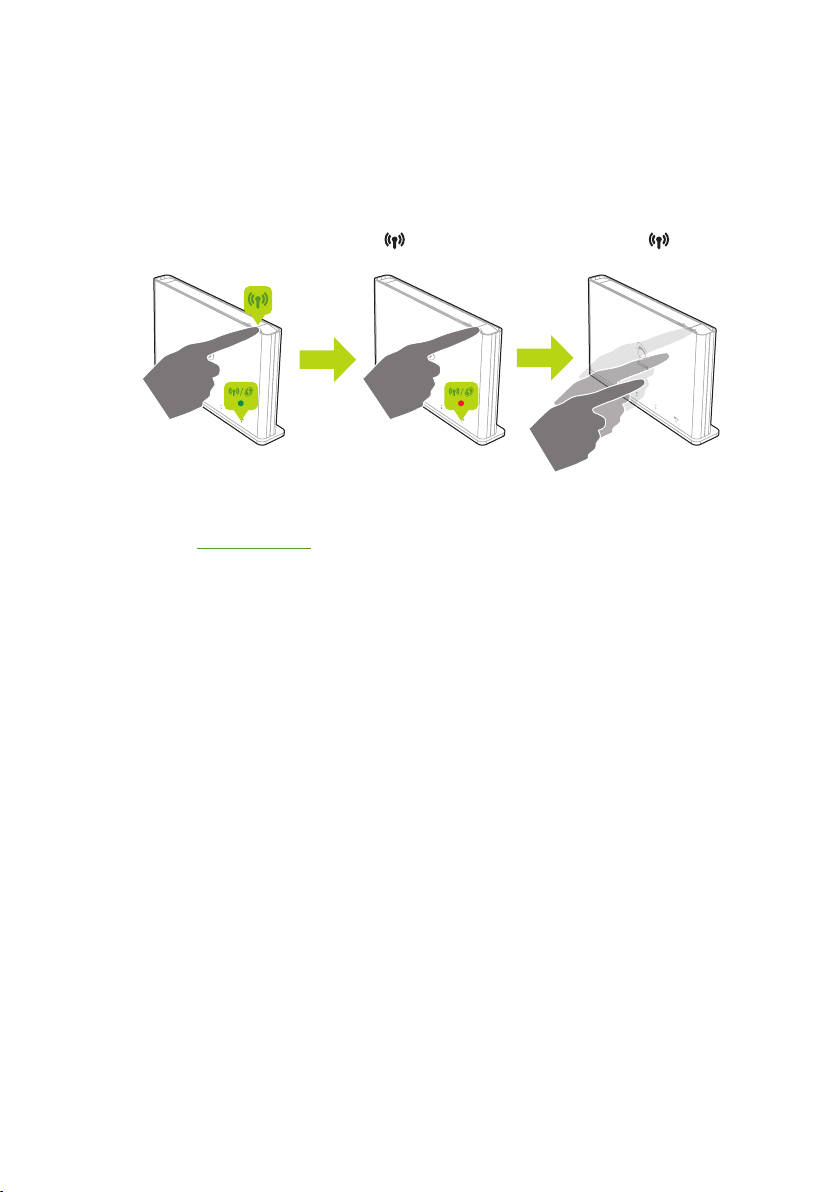
5.1 WPS conguration
WPS
Wi-Fi Protected Setup (WPS) allows you to add new wireless devices to your network in a swift and easy way,
without the need to enter all of your wireless settings (SSID, encryption,...).
You can only use this method if your wireless device supports WPS. Check the documentation of your wireless
device for this.
Procedure
1 Start WPS Push Button Configuration (PBC) on your wireless device.
If your wireless device prompts you to select your access point from a list, select the item that uses the
Network Name printed on the label on the back of your Home Gateway.
2 Shortly press the WPS button on the top panel of the Home Gateway.
WPS
3 The WPS LED on the front panel starts blinking orange.
4 After some time your wireless device prompts you that the registration was successful. You are now
connected to the Home Gateway network.
What if the WPS LED is blinking red?
This indicates that the Home Gateway could not find your wireless device.
Try again. If you still have trouble connecting to the Home Gateway, try connecting your wireless device
without WPS. For more information, see “5.2 Manual configuration” on page 4.

CONNECT YOUR WIRELESS DEVICES 32 CONNECT THE HOME GATEWAY TO YOUR BROADBAND CONNECTION
3 Connect the Home Gateway to your broadband connection
1 Take the Ethernet cable with the red connectors out of the box.
2 On back panel of the Home Gateway, plug the Ethernet cable into the red port labelled WAN.
WAN
3 Plug the other end of the Ethernet cable into the allocated UPLINK port on the Etisalat ONT device.
4 Power on the Home Gateway
1 Plug the connector of the power supply adapter into the Home Gateway power inlet port. Plug the adapter
into a nearby power outlet.
2 Turn on the Home Gateway.
3 After a few minutes the Broadband ( ) LED must be solid green.
If this is not the case, check the connections that you made in “3 Connect the Home Gateway to your
broadband connection” on page 2.
5 Connect your wireless devices
To do this:
<Automatically using WPS, continue with “5.1 WPS configuration” on page 3.
<Manually, continue with “5.2 Manual configuration” on page 4.
5.1 WPS conguration
WPS
Wi-Fi Protected Setup (WPS) allows you to add new wireless devices to your network in a swift and easy way,
without the need to enter all of your wireless settings (SSID, encryption,...).
You can only use this method if your wireless device supports WPS. Check the documentation of your wireless
device for this.
Procedure
1 Start WPS Push Button Configuration (PBC) on your wireless device.
If your wireless device prompts you to select your access point from a list, select the item that uses the
Network Name printed on the label on the back of your Home Gateway.
2 Shortly press the WPS button on the top panel of the Home Gateway.
WPS
3 The WPS LED on the front panel starts blinking orange.
4 After some time your wireless device prompts you that the registration was successful. You are now
connected to the Home Gateway network.
What if the WPS LED is blinking red?
This indicates that the Home Gateway could not find your wireless device.
Try again. If you still have trouble connecting to the Home Gateway, try connecting your wireless device
without WPS. For more information, see “5.2 Manual configuration” on page 4.

CHECK YOUR INTERNET CONNECTION 54 CONNECT YOUR WIRED DEVICES
5.2 Manual conguration
Network Name
Wireless Key
Configure your wireless device with the wireless settings printed on the back of your Home Gateway.
If your wireless device prompts you to select an encryption type, select WPA2-PSK.
6 Connect your wired devices
If you want to connect a device using a wired connection:
1 Take the Ethernet cable with the yellow connectors out of the box. This is the cable with the yellow
connectors.
2 Connect one end of the Ethernet cable to one of the yellow Ethernet ports on the back of your
Home Gateway.
3 Connect the other end of the Ethernet cable to your device.
7 Connect your telephones
Connect your traditional phone(s), DECT base station or fax to one of the phone ( ) ports on the back panel of
your Home Gateway.
8 Check your Internet connection
If the Internet (@) LED on the front panel of the Home Gateway is:
<Solid or blinking green then your internet connection is already configured and ready for use. All devices
that are connected to the Home Gateway can now access the Internet.
<Blinking red or off then the Home Gateway could not be auto-provisioned. If you subscribed for:
<For e-Life Plug & Play Router and Home Gateway installations (TV + Internet + Telephone), try to
re-provision the Home Gateway by proceeding as follows:
1 Press and hold the Wi-Fi On/Off button ( ) on the top panel until the Wi-Fi LED ( ) on the front
panel turns red.
2 Wait one minute to allow the Home Gateway to apply the settings .
<Internet only,proceed as follows:
1 Browse to http://192.168.1.1.
2 The Sign In page appears. Enter admin as user name and the Access Key printed on the back of your
Home Gateway as password.
3 The Easy Setup Wizard appears automatically (if not, click Etisalat Services > Setup Wizard). Click
Stand Alone Router and follow the instructions.
If your subscribed services are still not registered OR not working with the device, dial 800-101 for further
assistance

SAFETY INSTRUCTIONS AND REGULATORY NOTICES 76
Safety Instructions and Regulatory Notices
BEFORE YOU START INSTALLATION OR USE OF THIS PRODUCT, CAREFULLY READ THESE INSTRUCTIONS
!
When using this product, always follow the basic safety precautions to reduce the risk of fire, electric shock and injury to persons, including the
following:
<Always install the product as described in the documentation that is included with your product.
<Avoid using this product during an electrical storm. There may be a remote risk of electric shock from lightning.
<Do not use this product to report a gas leak in the vicinity of the leak.
Product Use
You must install and use this device in strict accordance with the manufacturer’s instructions as described in the user documentation that is included
with your product.
Before you start installation or use of this product, carefully read the contents of this document for device specific constraints or rules that may apply in
the country where you want to use this product.
Any change or modification made to this product that is not expressly approved by Technicolor will result in the loss of product warranty and may
void the user’s authority to operate this equipment. Technicolor disclaims all responsibility in the event of use that does not comply with the present
instructions.
In some situations or environments, the use of wireless devices may be restricted by the proprietor of the building or responsible representatives of the
organization. If you are uncertain of the policy that applies on the use of wireless equipment in a specific organization or environment (e.g. airports), you
are encouraged to ask for authorization to use this device prior to turning on the equipment. Technicolor is not responsible for any radio or television
interference caused by unauthorized modification of the device, or the substitution or attachment of connecting cables and equipment other than
specified by Technicolor. The correction of interference caused by such unauthorized modification, substitution or attachment will be the responsibility of
the user.
Technicolor and its authorized resellers or distributors are not liable for any damage or violation of government regulations that may arise from failing to
comply with these guidelines.
Open Source Software notication
The software of this product may contain certain open source software modules which are subject to Open Source Software license terms (see
https://opensource.org/osd for definition). Such Open Source Software components and/or versions may change in the future versions of the software
product.
A list of the Open Source Software used or provided as embedded into the current software of the product and their corresponding licenses and version
number are, to the extent required by applicable terms, available on Technicolor’s website at the following address: www.technicolor.com/opensource or
at another address as Technicolor may provide from time to time.
If and where applicable, depending on the terms of the applicable Open Source Software licenses, the source code of the Open Source Software is
available for free upon request.
For avoidance of doubt, Open Source Software is only licensed by the original owner of the Open Source Software under the terms set forth in the
designated Open Source License.
Safety Instructions
Climatic conditions
This product:
<Is intended for in-house stationary desktop use; the maximum ambient temperature may not exceed 40°C (104°F).
<Must not be mounted in a location exposed to direct or excessive solar and/or heat radiation.
<Must not be exposed to heat trap conditions and must not be subjected to water or condensation.
<Must be installed in a Pollution Degree 2 environment (Environment where there is no pollution or only dry, nonconductive pollution).
Cleaning
Unplug this product from the wall socket and computer before cleaning. Do not use liquid cleaners or aerosol cleaners. Use a damp cloth for cleaning.
Water and moisture
Do not use this product near water, for example near a bathtub, washbowl, kitchen sink, laundry tub, in a wet basement or near a swimming pool.
Transition of the product from a cold environment to a hot one may cause condensation on some of its internal parts. Allow it to dry by itself before
re-starting the product.
Interface classications
The external interfaces on the rear panel of the product are classified as follows:
<DSL: TNV circuit, subjected to over voltages (TNV-3)
<Phone, FXS: TNV circuit, not subjected to over voltages (TNV-2)
<All other interface ports (e.g. Ethernet, 10/100Base-T/MDI(-X), USB, Console, etc.), including the low voltage power input from the AC mains power
supply: SELV circuits.
Electrical powering
The powering of the product must adhere to the power specifications indicated on the marking labels.
The power supply must be Class II and a Limited Power Source in accordance with the requirements of IEC 60950-1/ EN 60950-1, Clause 2.5, or
IEC 62368-1/EN 62368-1, Annex Q and rated as indicated on the label on your product. It must be tested and approved to national or local standards.
The use of other types of supplies is prohibited. If you are not sure of the type of power supply needed, consult the product’s user documentation or
contact your local product dealer.

8 SAFETY INSTRUCTIONS AND REGULATORY NOTICES
Telephone cable
!CAUTION
To reduce the risk of fire, use only No 26 AWG wire size or larger telecommunication line cord.
Connect the telecommunication line cord only in the DSL or Line port of the product. Never plug the telecommunication line cord in another receptacle
of the product.
Follow the installation instructions in the sequence as outlined in the installation guide.
Central splitter / distributed lter(s) (if applicable)
If telephone service is required on the same line, a central splitter or distributed filter(s) must be installed for optimal DSL performance.
Depending on your DSL configuration and type of splitter / filters, installation must be carried out by qualified service personnel. Consult your telephone
service company or DSL service provider for instructions.
Accessibility
Be sure that the power socket outlet you plug the power supply into is easily accessible and located as close to the equipment as possible.
Overloading
Do not overload mains supply socket outlets and extension cords as this increases the risk of fire or electric shock.
Servicing
To reduce the risk of electric shock, do not disassemble this product. None of its internal parts are user-replaceable; therefore, there is no reason to
access its interior. Opening or removing covers may expose you to dangerous voltages. Incorrect reassembly could cause electric shock if the appliance is
subsequently used.
If service or repair work is required, take it to a qualified service dealer.
Damage requiring service
Unplug this product from the wall outlet and refer servicing to qualified service personnel under the following conditions:
<When the power supply or its plug are damaged.
<When the attached cords are damaged or frayed.
<If liquid has been spilled into the product.
<If the product has been exposed to rain or water.
<If the product does not operate normally.
<If the product has been dropped or damaged in any way.
<There are noticeable signs of overheating.
<If the product exhibits a distinct change in performance.
Immediately disconnect the product if you notice it giving off a smell of burning or smoke. Under no circumstances must you open the equipment
yourself; you run the risk of electrocution.
ﻊﻳﺮﺴﻟا ﺐﻴﻛﺮﺘﻟا ﻞﻴﻟد
ﺔﻴﻤﻴﻈﻨﺘﻟا تﺎﻣﻮﻠﻌﻤﻟاو ﺔﻣﻼﺴﻟا تﺎﻤﻴﻠﻌﺗو
Home Gateway
DGA4231ETI
www.Etisalat.ae *6249849A*
6249849A
Technicolor2019DMS3-QIG-25-600v1.0

1
.
بـﺟ أ
ـﻫود
)DGA4231ETI
>
>
QR
1
.
بـﺟ أ
ـﻫود
)DGA4231ETI
>
>
QR

3 2
Home Gateway
1
2.WAN
WAN
3.ONTUPLINK
Home Gateway
1
2
3BroadbandLED
.
>.
>.
WPS
WPS
SSID
1
Network Name
2.WPS
WPS
3WPSLED
4.
WPSLED
.

3 2
Home Gateway
1
2.WAN
WAN
3.ONTUPLINK
Home Gateway
1
2
3BroadbandLED
.
>.
>.
WPS
WPS
SSID
1
Network Name
2.WPS
WPS
3WPSLED
4.
WPSLED
.

5 4
Network Name
Wireless Key
.WPA2-PSK WPA-PSK
1
2.
3
.
@
>
>
>e-Life
1
2
>
1.
2admin
3Etisalat ServicesEasy Setup Wizard
Stand Alone RouterSetup Wizard
800-101

5 4
@
>
>
>e-Life
1
2
>
1.
2admin
3Etisalat ServicesEasy Setup Wizard
Stand Alone RouterSetup Wizard
800-101

7 6
!
>
>
>
Technicolor
Technicolor
Technicolor
Technicolor
Technicolor
Technicolor
Technicolor
>
>
>
>
>)TNV-3TNVDSL
>)TNV-2TNV
>.SELV
2.5
!
DSL
DSL
DSLDSL

7 6
!
>
>
>
Technicolor
Technicolor
Technicolor
Technicolor
Technicolor
Technicolor
Technicolor
>
>
>
>
>)TNV-3TNVDSL
>)TNV-2TNV
>.SELV
2.5
!
DSL
DSL
DSLDSL

8
>
>
>
>
>
>
>
>
Table of contents
Languages:
Popular Gateway manuals by other brands


Mi-Light
Mi-Light MiBoxer ZB-Box2 manual

ZyXEL Communications
ZyXEL Communications PRESTIGE 2302RL - quick start guide

Vbox Communications
Vbox Communications XLV Ex Series quick guide

Moxa Technologies
Moxa Technologies MGate 5114 Quick installation guide

NETGEAR
NETGEAR CVG824G installation guide

Power Inspired
Power Inspired GABY quick start guide