eufy Security EUFYCAM 2C User manual

Anker Innovations Limited. All rights reserved. eufy Security and eufy Security Logo are
trademarks of Anker Innovations Limited, registered in the United States and other
countries. All other trademarks are the property of their respective owners.
51005001817 V01
QUICK
START GUIDE
EUFYCAM 2C
WIRE-FREE HD SECURITY CAMERA SET

EN 01
TABLE OF
CONTENTS
Getting started 02
Product overview 03
Connecting the homebase 2 04
Setting up the system 05
06 Mounting the camera
10 Charging eufycam 2c
11 Satety statement
English 01
Deutsch 13
Español 23
Français 33
Italiano 43
Nederlands 53
Portuguese 63
73

02 EN EN 03
GETTING
STARTED
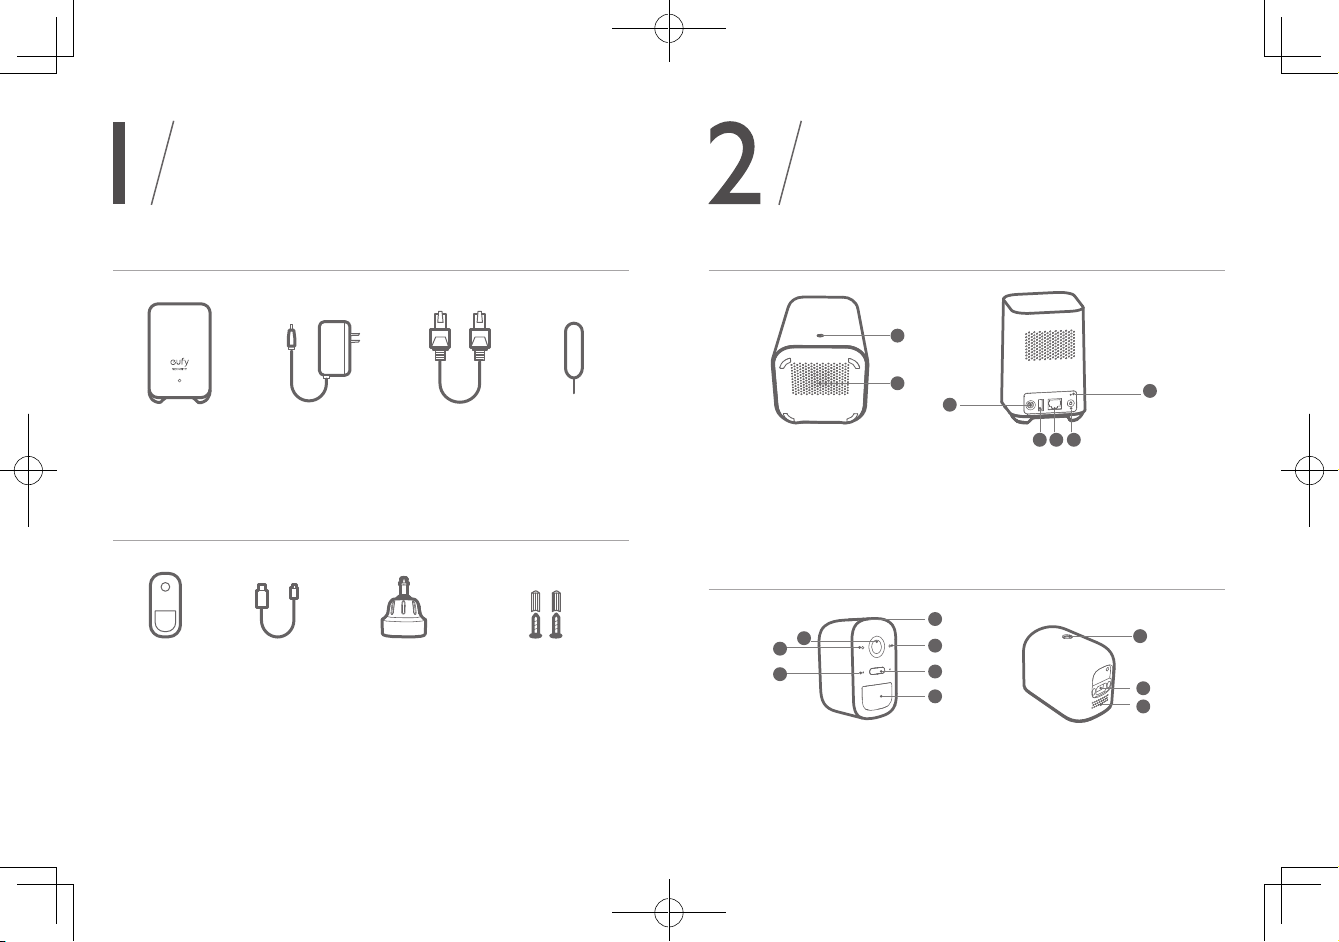
For HomeBase 2 installation
HomeBase 2
(T8010)
Power Adapter
for HomeBase 2
Ethernet
Cable
Metal Pin
for Resetting
For eufyCam 2C installation
eufyCam 2C
(T8113)
Micro-USB
Charging Cable
Mounting
Bracket
Mounting Screws
and Anchors
1. Camera quantity and accessories vary by bundle package.
2. HomeBase 2 power adapter varies by region.
PRODUCT
OVERVIEW
HomeBase 2
2
3
4 5 6
7
1
1. Status LED 5. Ethernet port
2. Speaker 6. SYNC/ALARM OFF button
3. Power port 7. Reset button
4. USB port
eufyCam 2C
3
21
5
4
6
10
9
8
7
1. Lens 5. Spotlight 9. Charging port
2. Light sensor 6. Status LED 10. Speaker
3. Microphone 7. SYNC button
4. Motion sensor 8. Mounting hole
04 EN EN 05
CONNECTING
THE HOMEBASE 2
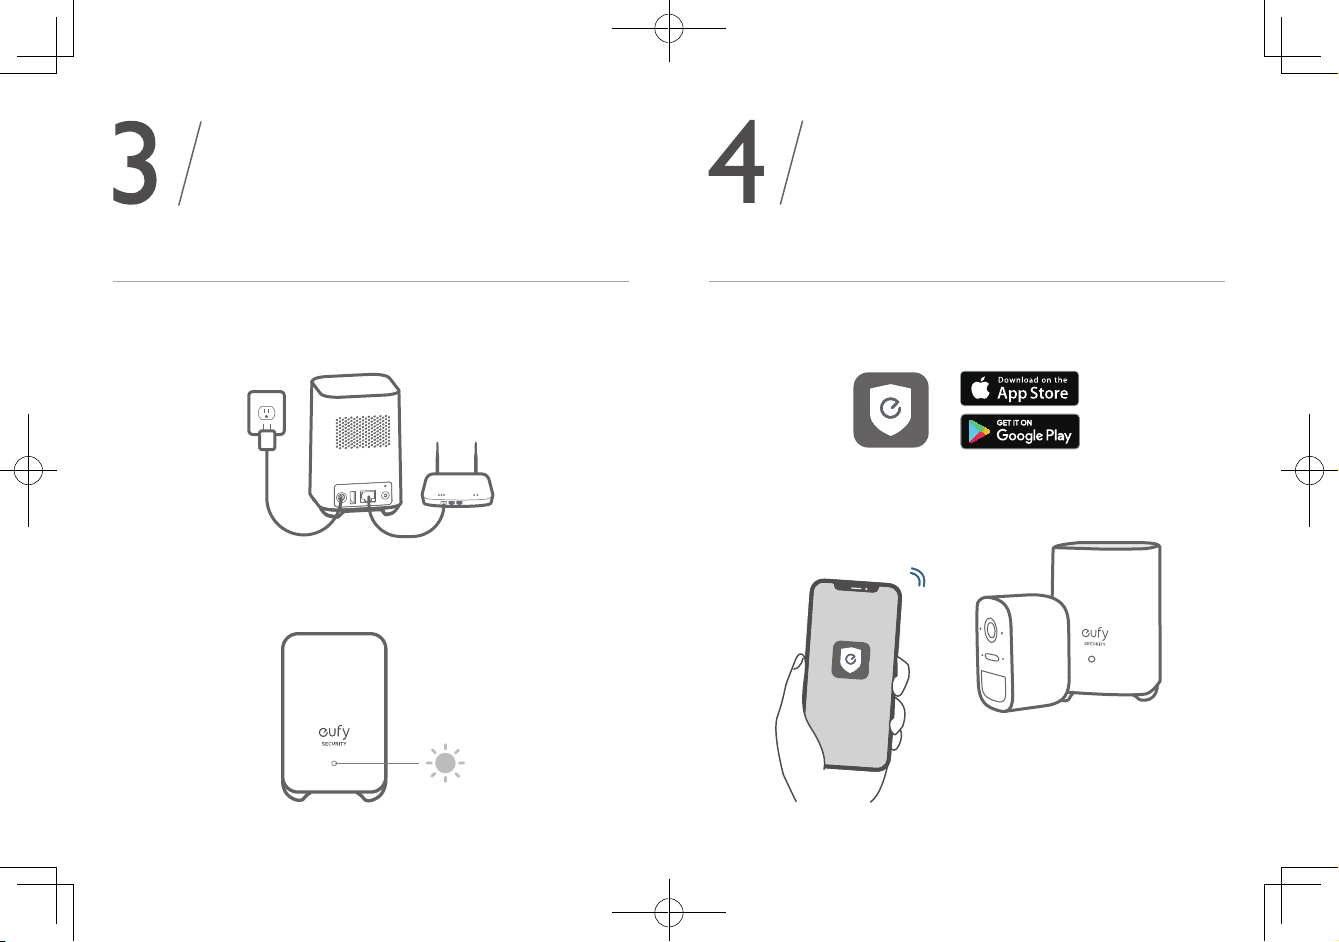
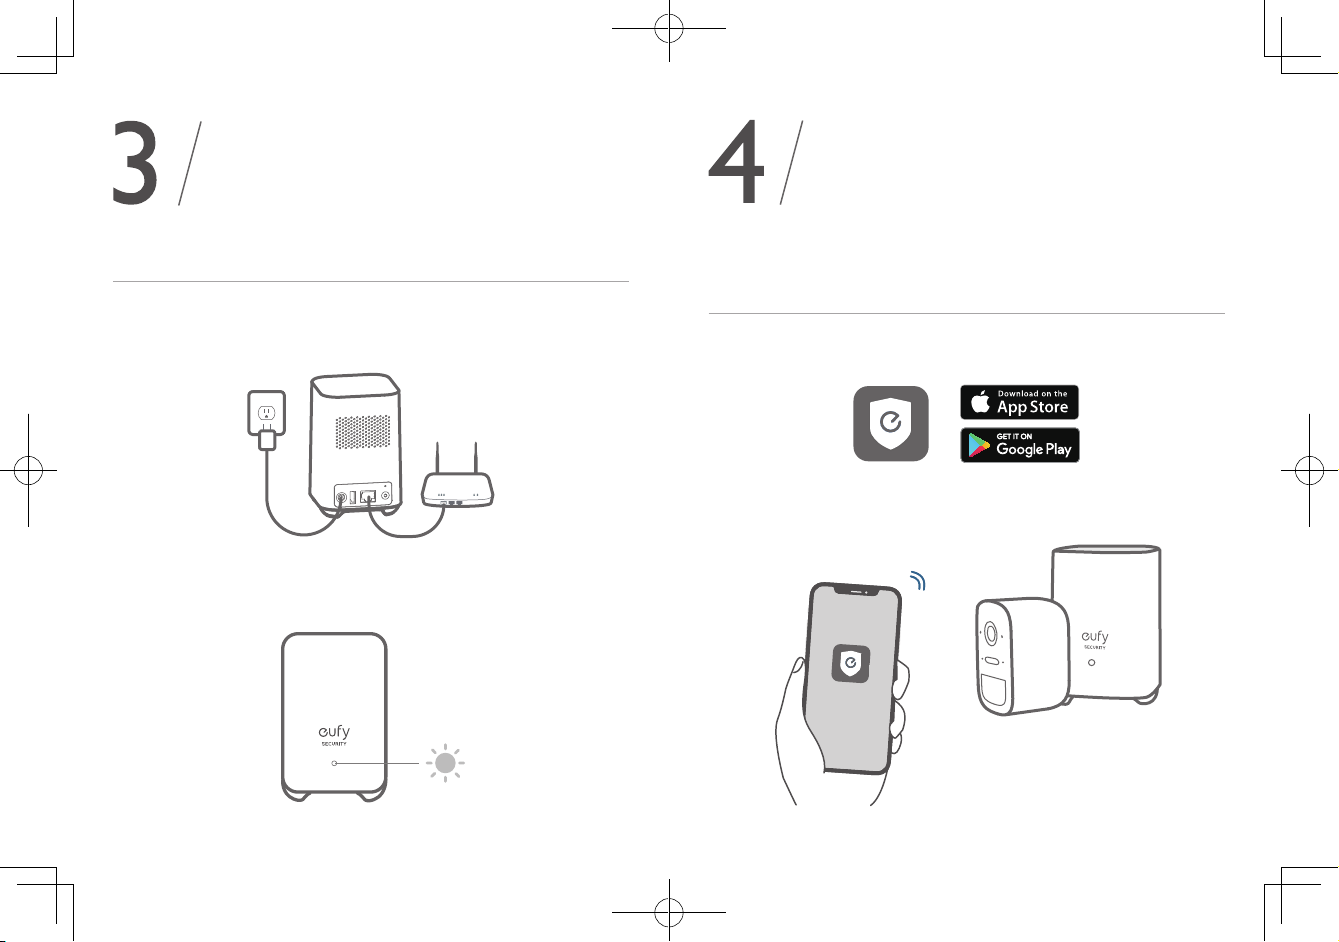
Connect the HomeBase 2 to the Internet
1. Power on the HomeBase 2, then use the ethernet cable provided to
connect the HomeBase 2 to your home router.
2. The LED indicator turns blue (this may take up to 1min) when
HomeBase 2 is ready for setup.
SETTING UP
THE SYSTEM
Download the App and Set up the System
Download the Eufy Security app from the App Store (iOS devices) or
Google Play (Android devices).
Sign up for a Eufy Security account, then follow the onscreen
instructions to complete the setup.

06 EN EN 07
MOUNTING
THE CAMERA
Find a Good Mounting Spot
To find a spot to mount eufyCam 2C, you need to test wireless signal strength.
①Open the Eufy Security app, go to Camera Settings > Mounting Guide.
②To test the wireless signal strength, take your camera and phone to
the location where you want to mount the camera.
③Move the camera as close to the HomeBase 2 as possible if the
wireless.
Select Height and Location
Hang eufyCam 2C 7-10 ft (2-3 m) above the ground. This height
maximizes the detection range of the motion sensor of eufyCam 2C.
Avoid placing eufyCam 2C under direct sunlight.
Up to 30 ft (10 m)
7-10 ft
(2 - 3 m)
Camera field
of view
Motion
Detection
Zone

08 EN EN 09
Mount the camera
The camera can be mounted both indoors and outdoors.
1. Turn the knob of the mounting bracket clockwise to loosen and
disassemble it.
2. Drill holes with a 15/64 inch (5.95mm) drill bit, then insert the
anchors into the holes; anchors are necessary for walls that are
made out of hard materials such as concrete, brick, or stucco.
Mount the camera
3. Firmly screw the base of the mounting bracket onto the wall. Fasten
the ball knob of the bracket to the base of the bracket.
4. Tighten eufyCam 2C to the mounting bracket and adjust the viewing
angle by checking the live stream feed in the Eufy Security app.
Tips:
1. The Homebase 2 pairs up to 16 cameras, you can repeat the steps mentioned
above to add more eufyCam 2C cameras to meet different needs of use.
2. For troubleshooting, check Help on the Eufy Security App. Refer to App page for
LED indicator status.
10 EN EN 11
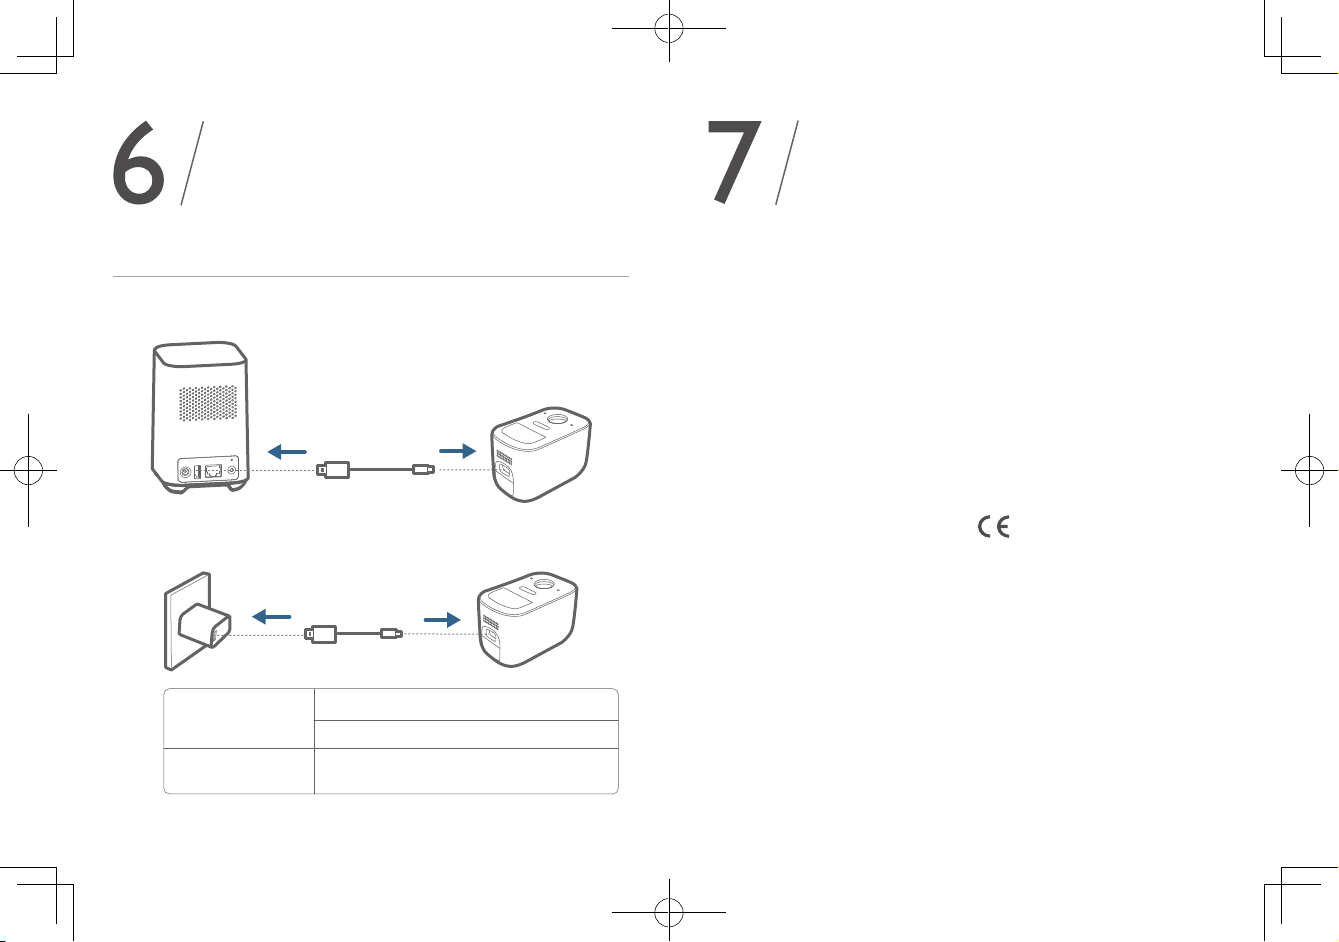
CHARGING
EUFYCAM 2C
Charge eufyCam 2C
Method 1
Method 2
5V USB Charger
LED indication
Charging time 5 hours
Fully charged: Off
Charging: Steady blue
NOTICE
FCC Statement
This device complies with Part 15 of the FCC
Rules. Operation is subject to the following two
conditions: (1) this device may not cause harmful
interference, and (2) this device must accept
any interference received, including interference
that may cause undesired operation.
Warning: Changes or modications not
expressly approved by the party responsible for
compliance could void the user's authority to
operate the equipment.
Note: This equipment has been tested and
found to comply with the limits for a Class
B digital device, pursuant to Part 15 of the
FCC Rules. These limits are designed to
provide reasonable protection against harmful
interference in a residential installation.
This equipment generates uses and can
radiate radio frequency energy and, if not
installed and used in accordance with the
instructions, may cause harmful interference
to radio communications. However, there is
no guarantee that interference will not occur
in a particular installation. If this equipment
does cause harmful interference to radio or
television reception, which can be determined
by turning the equipment off and on, the user
is encouraged to try to correct the interference
by one or more of the following measures: (1)
Reorient or relocate the receiving antenna. (2)
Increase the separation between the equipment
and receiver. (3) Connect the equipment into
an outlet on a circuit different from that to
which the receiver is connected. (4) Consult the
dealer or an experienced radio/TV technician
for help.
FCC Radio Frequency Exposure Statement
The device has been evaluated to meet general
RF exposure requirements. The device can be
used in xed/mobile exposure condition. The
min separation distance is 20cm.
Notice: Shielded cables
All connections to other computing devices
must be made using shielded cables to maintain
compliance with FCC regulations.
The following importer is the responsible party
Company Name: Fantasia Trading LLC
Address: 9155 Archibald Avenue, Suite 202,
Rancho Cucamonga, CA 91730, USA
Telephone:1-909-484-1530
This product complies with the radio
interference requirements of the
European Community.
Declaration of Conformity
Hereby, Anker Innovations Limited declares that
this device is in compliance with the essential
requirements and other relevant provisions of
Directive 2014/53/EU. For the declaration of
conformity, visit the Web site www.eufylife.com
Due to the used enclosure material, the product
shall only be connected to a USB Interface of
version 2.0 or higher.
The adapter shall be installed near the
equipment and shall be easily accessible.
Do not use the Device in the environment at
too high or too low temperature, never expose
the Device under strong sunshine or too wet
environment.

DE 1312 EN
The suitable temperature for HomeBase 2 and
accessories is -10°C-45°C.
The suitable temperature for eufyCam 2C and
accessories is -20°C-50°C.
When charging, please place the device in
an environment that has a normal room
temperature and good ventilation.
It is recommended to charge the device in an
environment with a temperature that ranges
from 5°C~25°C.
Please ensure to use only the charger offered by
the manufacturer. Using unauthorized charger
may cause danger and violate the authorization
of the device and the guarantee article.
This charger is for indoor use only
The charger type is ASSA67W-120200,
output voltage/current is 12Vdc/2A. The plug
considered as disconnect device of adapter.
RF exposure information: The Maximum
Permissible Exposure (MPE) level has been
calculated based on a distance of d=20 cm
between the device and the human body.
To maintain compliance with RF exposure
requirement, use product that maintain a 20cm
distance between the device and human body.
CAUTION RISK OF EXPLOSION IF BATTERY
IS REPLACED BY AN INCORRECT TYPE.
DISPOSE OF USED BATTERIES ACCORDING
TO THE INSTRUCTIONS.
Wi-Fi Operating Frequency
Range: 2412~2472MHz ; Wi-Fi Max
Output Power: 19dBm
SUB-1G Frequency range: 866~866.8MHz;
SUB-1G Output Power: 12.4dBm
The following importer is the responsible party
(contact for EU matters only)
Importer: Anker Technology (UK) Ltd
Importer Address: Suite B, Fairgate House, 205
Kings Road, Tyseley, Birmingham, B11 2AA,
United Kingdom
This product is designed and manufactured
with high quality materials and components,
which can be recycled and reused.
This symbol means the product must not be
discarded as household waste, and should
be delivered to an appropriate collection
facility for recycling. Proper disposal and
recycling helps protect natural resources,
human health and the environment.
For more information on disposal and
recycling of this product, contact your local
municipality, disposal service, or the shop
where you bought this product.
IC Statement
This device complies with Industry Canada
licence-exempt RSS standard(s). Operation is
subject to the following two conditions:
(1) this device may not cause interference, and
(2) this device must accept any interference,
including interference that may cause undesired
operation of the device."
Le présent appareil est conforme aux CNR
d'Industrie Canada applicables aux appareils
radio exempts de licence. L'exploitation est
autorisée aux deux conditions suivantes:
(1) l'appareil nedoit pas produire de brouillage, et
(2) l'utilisateur de l'appareil doit accepter tout
brouillage radioélectrique subi, même si le
brouillage est susceptible d'en compromettre le
fonctionnement."
This Class B digital apparatus complies with
Canadian ICES-003.
Cet appareil numérique de la classe B est
conforme à la norme NMB-003 du Canada.
IC RF Statement:
When using the product, maintain a distance of
20cm from the body to ensure compliance with
RF exposure requirements.
Lors de l'utilisation du produit, maintenez
une distance de 20 cm du corps an de
vous conformer aux exigences en matière
d'exposition RF.
INHALTSVERZEICHNIS
Im Lieferumfang enthalten 14
Produktübersicht 15
Anschliessen an HomeBase 2 16
Einrichten des Systems 17
18 Montieren der Kamera
22 Aufladen der eufyCam 2c

14 DE DE 15
IM LIEFERUMFANG
ENTHALTEN
Für die HomeBase 2-Installation
HomeBase 2
(T8010)
Netzteil für
HomeBase 2
Ethernet-
Kabel
Metallstift zum
Zurücksetzen
Fpr eufyCam 2C-Installation
eufyCam 2C.
(T8113)
Mikro-USB-
Ladekabel
Montage-
halterung
Befestigungsschrau-
ben und Dübel
1. Die Anzahl der Kameras und Zubehörteile variiert je nach Angebotspaket.
2. Das HomeBase 2-Netzteil ist je nach Region unterschiedlich..
PRODUKT-
ÜBERSICHT
HomeBase 2
2
3
4 5 6
7
1
1. Status-LED 5. Ethernet-Anschluss
2. Lautsprecher 6. SYNC/ALARM AUS-Taste
3. Stromversorgungs-Anschluss 7. Reset-Taste
4. USB-Anschluss
eufyCam 2C
3
21
5
4
6
10
9
8
7
1. Objektiv 5. Spotlight 9. Ladeanschluss
2. Lichtsensor 6. Status-LED 10. Lautsprecher
3. Mikrofon 7. SYNC-Taste
4. Bewegungssensor 8. Montagebohrung
16 DE DE 17
ANSCHLIESSEN
AN HOMEBASE 2
HomeBase 2 mit dem Internet verbinden
1. Schalten Sie die HomeBase 2 ein und schließen Sie sie über das im
Lieferumfang enthaltene Ethernet-Kabel an Ihren Heimrouter an.
2. Die LED-Anzeige leuchtet blau, wenn die HomeBase 2 bereit für die
Einrichtung ist (dies kann bis zu 1 Minute dauern).
EINRICHTEN
DES SYSTEMS
Laden Sie die App herunter und richten Sie das
System ein
Laden Sie die Eufy Security-App aus dem App Store (iOS-Geräte) oder
bei Google Play (Android-Geräte) herunter.
Melden Sie sich für ein Eufy Security-Konto an und befolgen Sie dann
die Anweisungen auf dem Bildschirm, um die Einrichtung abzuschließen.

18 DE DE 19
MONTIEREN
DER KAMERA
Einen geeigneten Befestigungsort finden
Um einen guten Befestigungsort für die eufyCam 2Czu finden, müssen Sie die
Stärke des WLAN-Signals prüfen.
①Öffnen Sie die Eufy Security-App, gehen Sie zu Kameraeinstellungen>
Montageanleitung.
②Um die Stärke des WLAN-Signals zu testen, bringen Sie Ihre Kamera und
Ihr Telefon an den Ort, an dem Sie die Kamera montieren möchten.
③Bewegen Sie die Kamera so nah wie möglich an die HomeBase 2, falls das
Signal schwach ist.
Höhe und Position wählen
Hängen Sie die eufyCam in einer Höhe von 2–3 m über dem Boden
auf. Dadurch wird der Erfassungsbereich des Bewegungssensors der
eufyCam 2C maximiert. Bringen Sie die eufyCam 2C nicht an Orten
mit direkter Sonneneinstrahlung an.
Bis zu 10 m
2 - 3 m
Sichtfeld der
Kamera
Bewegungser-
kennungsbereich

20 DE DE 21
Kamera montieren
Die Kamera kann sowohl im Innen- als auch im Außenbereich
montiert werden.
1. Drehen Sie den Knopf der Montagehalterung im Uhrzeigersinn, um
ihn zu lösen und zu demontieren.
2. Bohren Sie Löcher mit einem 6-mm-Bohrer in die Wand und
stecken Sie anschließend die Dübel in die Löcher. Dübel sind für
Wände erforderlich, die aus einem harten Material wie Beton,
Ziegel oder Stuck bestehen.
Kamera montieren
3. Schrauben Sie die Basis der Montagehalterung fest an die Wand.
Befestigen Sie den Kugelknopf der Halterung an die Basis der
Halterung.
4. Befestigen Sie die eufyCam 2C Kamera an der Montagehalterung
und passen Sie den Blickwinkel an, indem Sie den Live-Stream über
die Eufy Security-App prüfen.
Tipps:
1. Die Homebase 2 kann mit bis zu 16 Kameras gekoppelt werden. Je nach
Nutzungsanforderungen können Sie die obigen Schritte wiederholen, um weitere
eufyCam 2C-Kameras hinzuzufügen.
2. Tipps zur Fehlerbehebung finden Sie in der Hilfe der eufy Security-App.
Informationen zum Status der LED-Anzeige finden Sie auf der App-Seite.

ES 2322 DE
AUFLADEN DER
EUFYCAM 2C
eufyCam 2C aufladen
Methode 1
Methode 2
5V USB Charger
LED-Anzeige
Ladedauer 5 Stunden
Vollständig aufgeladen: Aus
Ladevorgang: Leuchtet blau
TABLA DE
CONTENIDO
Contenido 24
Descripción del producto 25
Conexión de homebase 2 26
Configuración del sistema 27
28 Montaje de la cámara
32 Carga de la eufycam 2c
24 ES ES 25
DESCRIPCIÓN
DEL PRODUCTO
HomeBase 2
2
3
4 5 6
7
1
1. Led de estado 5. Puerto Ethernet
2. Altavoz 6. Botón Sincronizar/Desactivar alarma
3. Puerto de alimentación 7. Botón Restablecer
4. Puerto USB
eufyCam 2C
3
21
5
4
6
10
9
8
7
1. Lente 5. Foco 9. Puerto de carga
2. Sensor de luz 6. Led de estado 10. Altavoz
3. Micrófono 7. Botón Sincronizar
4. Sensor de movimiento 8. Orificio de montaje
CONTENIDO
Para la instalación de HomeBase2
HomeBase 2
(T8010)
Adaptador de
alimentación para
HomeBase 2
Cable
Ethernet
Clavija metálica
para el
restablecimiento
Para la instalación de la eufyCam2C
eufyCam 2C
(T8113)
Cable de carga
micro-USB
Soporte de
montaje
Tornillos y anclajes
de montaje
1. La cantidad de cámaras y los accesorios varían en función del paquete.
2. El adaptador de alimentación de HomeBase 2 varía según la región.

26 ES ES 27
CONEXIÓN DE
HOMEBASE 2
Conexión de HomeBase 2 a Internet
1. Encienda el sistema HomeBase 2 y utilice el cable Ethernet
suministrado para conectarlo al router.
2. Cuando el sistema HomeBase 2 está listo para la configuración, el
indicador led se ilumina en color azul (puede tardar hasta 1 minuto).
CONFIGURACIÓN
DEL SISTEMA
Descarga de la aplicación y configuración del sistema
Descargue la aplicación eufy Security desde la App Store (dispositivos
iOS) o Google Play (dispositivos Android).
Regístrese para crear una cuenta de eufy Security y siga las
instrucciones que aparecen en pantalla para completar la configuración.

28 ES ES 29
MONTAJE DE LA
CÁMARA
Localización de un punto de montaje adecuado
Para localizar un punto de montaje para la cámara eufyCam 2C, debe probar la
intensidad de la señal inalámbrica.
①Abra la aplicación eufy Security, vaya a Configuración de la cámara > Guía
de montaje.
②Para probar la intensidad de la señal inalámbrica, diríjase al punto de
montaje deseado con su teléfono y la cámara.
③Si la intensidad de la señal inalámbrica es débil, acerque la cámara al sistema
HomeBase 2 lo máximo posible.
Selección de la altura y la ubicación
Coloque la eufyCam 2C de 2 a 3 m por encima del suelo. Esta altura
maximiza el alcance de detección del sensor de movimiento de la
eufyCam 2C. Evite colocar la eufyCam 2C bajo la luz solar directa.
Up to 30 ft (10 m)
7-10 ft
(2 - 3 m)
Campo de visión
de la cámara
Zona de
detección de
movimiento

30 ES ES 31
Montaje de la cámara
La cámara se puede instalar en interiores y en exteriores.
1. Gire la perilla del soporte de montaje hacia la derecha para aflojarlo
y desmontarlo.
2. Taladre orificios de 5,99 mm con una broca y, a continuación,
introduzca los anclajes en los orificios. Es necesario utilizar los
anclajes en paredes hechas de materiales duros como hormigón,
ladrillo o yeso.
Montaje de la cámara
3. Atornille firmemente la base del soporte de montaje a la pared. Fije
la perilla del soporte a la base del soporte.
4. Fije la eufyCam 2C al soporte de montaje y ajuste el ángulo de
visión con ayuda de la transmisión en directo disponible en la
aplicación eufy Security.
Consejos:
1. El sistema Homebase 2 se puede emparejar con un máximo de 16 cámaras.
Repita los pasos indicados anteriormente para añadir más cámaras eufyCam 2C y
satisfacer las distintas necesidades de uso.
2. Para solucionar problemas, consulte la sección Ayuda de la aplicación eufy Security.
Visite la página de la aplicación para consultar los estados del indicador led.

FR 3332 ES
CARGA DE LA
EUFYCAM 2C
Carga de la eufyCam 2C
Método 1
Método 2
5V USB Charger
Indicación led
Tiempo de carga 5 horas
Carga completa: apagado
Carga: azul fijo
SOMMAIRE
Contenu 34
Présentation du produit 35
Connexion du homebase 2 36
Configuration du système 37
38 Montage de la caméra
42 Charge de l'eufycam 2c

34 FR FR 35
CONTENU
Pour une installation HomeBase2
HomeBase 2
(T8010)
Adaptateur
d'alimentation
pour HomeBase 2
Câble
Ethernet
Tige métallique
pour
réinitialiser
Pour une installation eufyCam2C
eufyCam 2C
(T8113)
Câble de charge
micro-USB
Support de
montage
Vis de montage
et ancrages
1. La quantité de caméras et d'accessoires varie selon le pack.
2. L'adaptateur d'alimentation HomeBase 2 varie selon les régions.
PRÉSENTATION
DU PRODUIT
HomeBase 2
2
3
4 5 6
7
1
1. LED d'état 5. Port Ethernet
2. Haut-parleur 6. Bouton SYNC/ALARM OFF
3. Port d'alimentation 7. Bouton de réinitialisation
4. Port USB
eufyCam 2C
3
21
5
4
6
10
9
8
7
1. Objectif 5. Projecteur 9. Port de charge
2. Capteur de luminosité 6. LED d'état 10. Haut-parleur
3. Microphone 7. Bouton SYNC
4. Détecteur de mouvement
8. Trou de montage

36 FR FR 37
CONNEXION
DU HOMEBASE 2
Connecter la station HomeBase 2 à Internet
1. Mettez le HomeBase 2 sous tension, puis utilisez le câble Ethernet
fourni pour brancher le HomeBase 2 au routeur de votre domicile.
2. L'indicateur LED devient bleu (cela peut prendre une minute)
lorsque HomeBase 2 est prêt à être configuré.
CONFIGURATION
DU SYSTÈME
Télécharger l'application et configurer le système
Téléchargez l'application Eufy Security depuis l'App Store (appareils
iOS) ou Google Play (appareils Android).
Ouvrez un compte Eufy Security, puis suivez les instructions à l'écran
pour terminer la configuration.
Other manuals for EUFYCAM 2C
2
Table of contents
Languages:


