Euhomy IM-F User manual

Email:support@euhomy.com Facebook:@Euhomy.Official
Ice Maker
SKU:IM-F
Instruction Manual


Congratulations
Dear Customer:
Welcome to the Euhomy family. Thank you for purchasing one of our products.
Our goal is to provide you with superior service. If there is anything missing from or wrong with
your order, or if you have any questions about using our ice maker, PLEASE contact us.
Email: [email protected]
Facebook: @Euhomy.Official
The Euhomy team is available 24/7 to address your questions, comments, and concerns. Your
satisfaction is our ultimate goal. We want to make everything right so you'll share your positive
experience with other shoppers on Amazon.
Our mission:
* To be the most trusted appliance brand.
* To create practical, compact appliances that better your life.
Be sure to register at
www.euhomy.com/register
for updates, warranty, and other relevant information.

Q&A
1.How often do I need to clean my ice maker?
2.How should I clean the machine?
3.Why is my ice cube cloudy?
4.Can I put milk and juice into the water tank to make ice cubes?
5.Why does my ice cube melt easily?
6.Why is my ice so thick and difficult to fall from the ice tray?
What should I do?
7.Why does the ice cubes have a plastic smell?
8.Why is there noise in the operation of my machine?
9.Why is water leaking from my machine?
10.Why is there water flowing but not making ice?
Depending on how frequently you use it, it is recommended that you clean it at least once a week. Failure to clean the
machine will cause scale accumulation, which will eventually block the pump and cause the product to stop working
properly.
It is recommended to use lemon water or weak acid vinegar for cleaning. Drain immediately after cleaning, and then clean
it with pure water.
It is recommended to drain the water at least once every three days (pulling out the small hose on the right side of the
water tank). Draining will not only ensure that the hardness of the water is not too high, but also ensure that impurities
can be discharged well, and it is not easy to produce scale in the water tank.
It means that the water quality is turbid. It is recommended to use drinking water and distilled water. If your water quality
problem is serious, it is recommended that you install a water filter kit.
We recommend that you do not do that. Our research has found that the high concentration of milk and beverages can
easily block the pump and reduce the life span of the pump. At the same time, the protein in milk is prone to calcification,
which chemically reacts with the PU water pipe inside the machine, which easily breaks it, making the product unable to
continue working.
Since the ice maker is not a refrigerator, it does not have a heat preservation function. The high ambient temperature in
summer will accelerate the melting of ice cubes. You can close the lid of the machine to keep the internal temperature.
Some customers also put electric fans on the side of the machine to blow away the hot air surrounding the device, thus
solving the problem. Feel free to try it yourself. However, if you are not using ice cubes for a long time, we recommend
removing them from the ice basket and storing them in the refrigerator.
It may be that your ice making time is set for too long, or it may be that the temperature of your environment is very low.
You can reduce the time to 0 or -6 by pressing the minus key on the touch panel.
The ice cube itself has no taste. If you feel there is a plastic smell, try to clean the inside of the machine with lemon
water, then run a few cycles, and finally rinse with distilled water.
There is a faint sound when the machine is running. Closing the lid can reduce the noise. If the water pump makes a noise
during use, it is recommended to turn off the machine first, and then turn on the machine after cleaning the filter in the
water tank to observe whether or not the noise disappears.
It may be that the PUA tube inside the machine fell off during transportation. You can remove the back cover of the
machine and connect it by yourself. If you don't know how to operate, please contact the Euhomy team. We will give you
a professional video to help you solve the problem.
Please provide a video or picture and send it to us. The Euhomy team will assist you.

Contents
Tips & Maintenance 08
09
01
Safety Precautions 02-03
Operation & Installation
Specifications
04-07
11
Troubleshooting ([email protected])
Warranty 10

Safety Precautions
02
IMPORTANT SAFETY TIPS
Risk of Fire or Explosion: Flammable Refrigerant Used!
When using electrical appliances, basic safety precautions should be followed to reduce the risk of
fire, electric shock, and injury to persons or property. Read all instructions before using any
appliance:
Do not operate this or any other appliance with a damaged cord. If the supply cord is damaged, it
must be replaced by the manufacturer, its service agent, or a similarly qualified person to prevent
hazards.
This ice maker must be positioned so that the plug is accessible. Connect to properly polarized
outlets only. No other appliances should be plugged into the same outlet. Be sure that the plug is
fully inserted into the receptacle.
Do not run the power cord over carpeting or other heat insulators. Do not cover the cord. Keep the
cord away from traffic areas. Do not submerge the cord or the appliance in water.
We do not recommend the use of an extension cord, which may overheat and become a fire hazard. If
you must use an extension cord, use No. 14 AWG minimum size, rated no less than •1875 W.
Unplug the ice maker before cleaning, maintaining, or repairing it.
Exercise caution and use reasonable supervision when the appliance is used near children.
Do not use your ice maker outdoors. Place the ice maker out of direct sunlight. Be sure to leave at
least 6 inches of space between the back of your unit and the wall. Keep a minimum distance of 6
inches on each side of your unit free.
Do not try to make ice cubes with liquids other than water.
Do not clean your ice maker with flammable fluids. The fumes can create a fire hazard or explosion.
Do not tip over the ice maker or turn it upside down.
If the ice maker is brought in from outside in a cold season or climate, give it a few hours to warm up
to room temperature before plugging it in.
Do not use mechanical devices to defrost the ice maker.
Do not puncture the refrigerant tubing.
Appliance is to be repaired only by trained service personnel.
Consult the repair manual/owner's guide before attempting to install or service this product. All
safety precautions must be followed.
Dispose of this appliance in accordance with federal or local regulations.
Follow handling instructions carefully.
The ice maker should be installed in accordance with the safety standard for refrigeration systems,
ASHRAE 15.
The ice maker shall not be installed in corridors of public buildings.
If the unit needs maintenance or repairs, replace failed parts only with like parts. Service shall be
done only by factory-authorized service personnel to minimize the risk of possible ignition due to
incorrect parts or improper service.

Note:
The wires in this electrical cord are color-coded as follows:
Green or green with stripe
To prevent a hazard resulting from instability of the appliance, it must be placed on a flat,
level surface.
03
Safety Precautions
COLOR
Yellow
White
Black
WIRING
Grounding
Neutral
Live
04
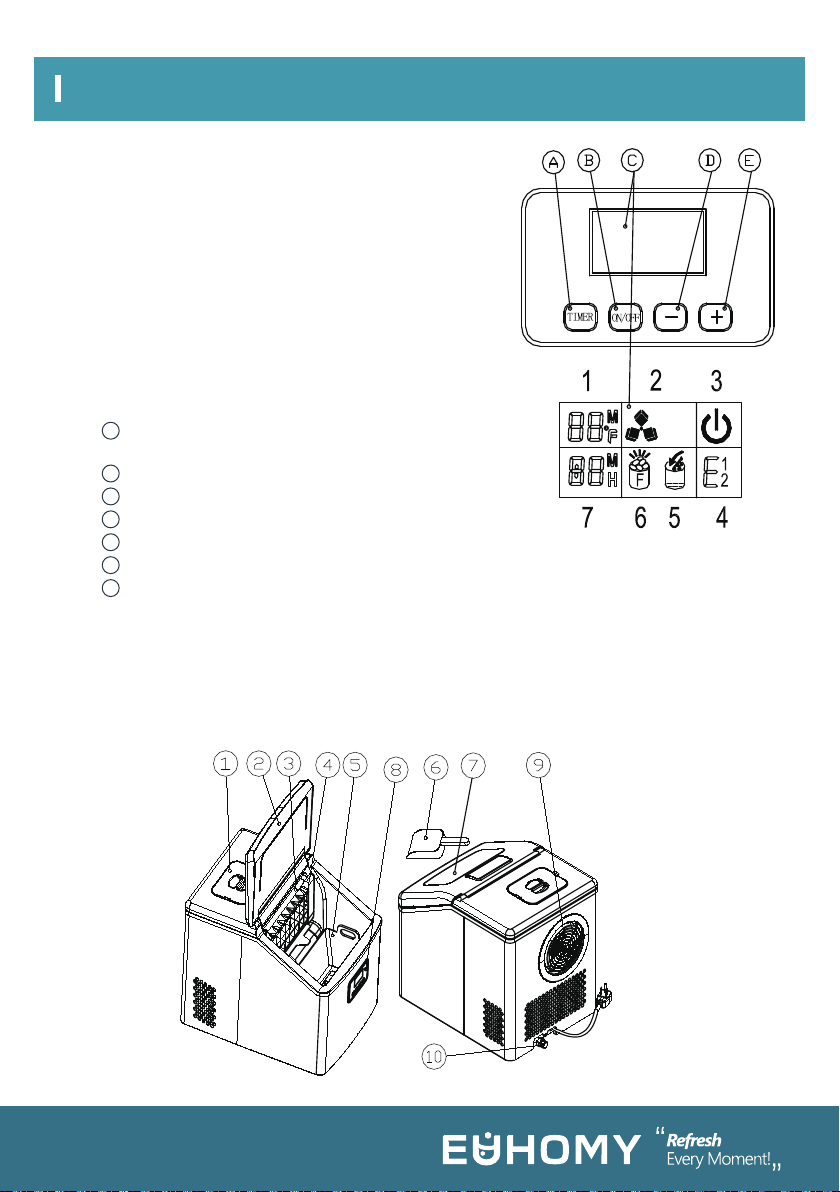
ASSEMBLY AND PARTS
1.Water tank cover
2.Unit top cover
3.Water separator pipe
4.Evaporator
5. Ice basket
6. Ice scoop
7.Window
8.Control panel
A.Timer button
B.Power button
C.LCD display
. Ambient temperature <M> and ice-making
countdown <°F> indicators.
. Ice-making (steady) or ice ready (flashing) indicator.
. ON/OFF indicator.
. Error codes: See “Troubleshooting” section on page 10.
. Water low warning indicator.
. Ice full warning indicator.
. Time setting indicator: <H> = timer ON/OFF;
<M> = ice-making cycle length
D.Ice-making and timer decrease button.
E.Ice-making and timer increase button.
9.Hot air vent
10.Water drainage port
Operation & Installation
1
2
3
4
5
6
7

Note: Fill with potable water only.
05
UNPACKING YOUR ICE MAKER
Remove the exterior and interior packaging. Check that the ice basket and ice scoop are included.
If any parts are missing, please contact Customer Service.
CONNECTING YOUR ICE MAKER
Improper use of the grounded plug can increase the risk of electrical shock. If the power cord is
damaged, please call Customer Service.
This unit should be properly grounded for your safety. The power cord of this appliance is equipped
with a three-prong plug, which mates with standard three-prong wall outlets to minimize the
possibility
of electric shock.
Plug your appliance into an exclusive, professionally installed, grounded wall outlet. Do not, under
any circumstances, cut or remove the third (ground) prong from the power cord. Any questions
concerning power and/or grounding should be directed to a certified electrician.
This appliance requires a standard 110–120V, 60Hz electrical outlet with three-prong ground.
Clean the interior with a soft cloth dampened with plain lukewarm water. Take out the ice basket and
scoop, and wash them in warm, soapy water. Then rinse, dry, and re-place the basket and scoop.
Find a location for your ice maker that is out of direct sunlight and away from other sources of heat
(e.g., a stove, furnace, or radiator).
Place the ice maker on a flat, level surface.
Be sure that there is at least 6 inches of space between the back and sides of your ice maker and any
walls.
After unpacking or moving the ice maker, allow 1 hour for the refrigerant fluid to settle before
plugging in the appliance.
The appliance must be positioned so that the plug is accessible.
Operation & Installation
Note:
06
Operation & Installation
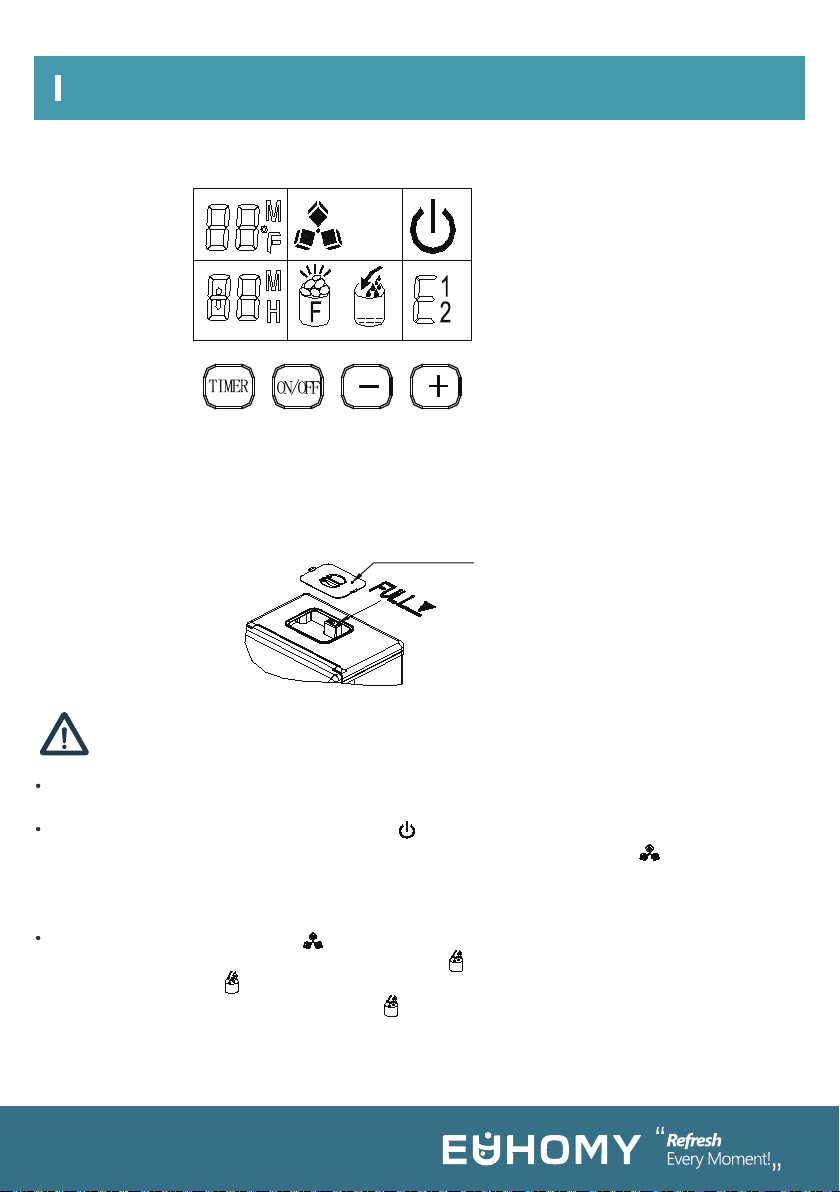
OPERATION PANEL AND DISPLAY AREA
Remove the water tank cover and pour potable water into tank.
Be sure to keep the water level below the max level. See the FULL mark in the following picture.
Re-place the cover at once to prevent foreign matter from entering the tank.
Do not pour water into the inner water tank located underneath the ice basket. This tank does not
hold enough water, so ice-making performance will be negatively affected.
When you plug in the unit, the power symbol < > will flash. Press the <ON/OFF> button to turn on
the ice maker. The unit will start making ice cubes, and the ice-making symbol < > will remain on
display. The upper left corner of the display shows the ambient temperature. After several minutes,
this area will show a flashing number to indicate the countdown for the ice-making cycle. For
example, “10M” means your ice will be ready in 10 minutes.
When the ice maker harvest, the < > indicator will flash. Water will flow from the top water tank to
the bottom tank through the solenoid valve, and the < > indicator will be on. When the bottom
water tank is full, the < > indicator will be off. Then the ice-making cycle will start again. When
there is no water in the top water tank, the < > indicator will stay on. Turn off the unit and fill the
tank with water again. Then restart the unit to make ice cubes. Or fill water directly and wait 20mins,
the unit will restart.
Water tank cover
DISPLAY
AREA
OPERATION AREA

07
Operation & Installation
Be sure the water tank, water filter, and water separator pipe are not clogged. If they are, clean them.
The water temperature will affect the ice-making capacity. The lower the water temperature, the
more ice cubes will be produced.
The cooler the ambient temperature, the more ice cubes will be produced.
Always use good-quality water to ensure smooth operation of the pump. Bad-quality water will
cause the pump to make noise but will not keep the unit from working.
The compressor restart 3mins later if you turn off the unit.
The ice-making cycle lasts about 13 to 25 minutes, depending on the ambient temperature. Depend-
ing on the initial water temperature, the first ice-making cycle may take a little longer. In an extreme-
ly hot environment, the ice-making cycle may vary but it will not exceed 35 minutes.
If the ice cubes are not thick or large enough, during ice-making, press the <+> or <–> to change the
ice�making cycle length in 1-minute increments to a maximum of 6 minutes. This can only be changed
before the cycle starts.
When the Ice Full indicator < > is on, the unit will stop. Take out the ice cubes and the unit will
start
working again.
Pressing the <ON/OFF> button for more than 5 seconds while the ice maker is working will start
harvest. Press the <ON/OFF> button again to turn off the unit.
There is a timer setting function on the machine. When the machine is working, you can set the
shutdown time at regular intervals. The appointment time would be invalid after shutdown. When the
machine is turned off you can make an appointment to turn on the machine.
Press the <TIMER> button. The display will show <1H>. Press <+> and <–> to set the time. The <H>
will flash while you are setting the time. After 5 seconds idle, the <H> will stay on and your time
setting will be saved.
Water drainage: Remove the drain plug cap on the back of unit. Take out the silicone plug. Then drain
out the water inside the ice maker. It is ideal to change the water every 24 hours and clean the unit
every 3 days.
Note:
Note:

08
Tips & Maintenance
CLEANING AND MAINTAINING YOUR ICE MAKER
Before using your ice maker, it is strongly recommended to clean it thoroughly.
Take out the ice basket.
Clean the interior with diluted detergent, warm water, and a soft cloth.
Rinse the interior with clean water. Drain out the water through the drainage port by removing the
drain cap on the back and taking out the silicone plug.
The outside of the ice maker should be cleaned regularly with a mild detergent solution and warm
water.
Dry the interior and exterior with a soft cloth.
When the machine will not be used for a long time, open the drain cap to drain water completely out
of the water tank.
After using your ice maker for about 3 days, we suggest that you clean the unit. The •water separator
pipe and water filters in particular must be cleaned periodically.
If you don’t hear liquid flowing while the compressor and water pump are running, the water
separator pipe may be clogged. Please turn off the unit. Then remove this pipe down and clean it.
Clean each hole along the pipe wall, as shown in the following picture. After cleaning, reinstall the
water separator pipe in its original orientation, making sure that the right end of the pipe is connected
to the silicone pipe well.
Clean both water tanks with diluted detergent, warm water, and a soft cloth. Use clean water to rinse
the inside of the unit. Drain out the water through the drainage port by removing the drain cap and
plug on the back. Regular cleaning will keep the unit and your ice cubes sanitary, and also help the
unit work normally.
If, when you are cleaning the ice maker, you find that ice cubes are frozen onto the evaporator and
cannot be removed easily, you can turn on the unit to start the ice-making process. Then press the
<ON/OFF> button for at least 5 seconds so the unit can start the ice harvest process and melt the ice
cubes. These steps will help you remove any stuck ice cubes.
How to completely drain the internal tank and large water tank: The water in the large water tank is
kept out of the drainage port by the water valve. If you want to drain out all the water, please plug on
the unit but do not start it. Then remove the drainage port cap at the back. Wait a few minutes and
then all of the water will flow out.

09
Specifications
TECHNICAL PARAMETERS
CIRCUIT DIAGRAM
SKU
Protection Type
Power
Ice-Making Current
Ice-Harvest Current
Refrigerant
Design Pressure
High Side
Low Side
Net Weight
Enclosure
IM-F
I
115V/60Hz
1.6A
2.6A
R600a 1.13oz/32g
260Psig
88Psig
11kg
Stainless steel
Relay
MCU
-PUMP+
-
FAN
+
DC Fan Motor
DC Water Pump
VALVE
Solenoid Valve
AW
MW
Start
Relay
Overload
Protector
COMPRESSOR
COMP
AC-L
POWER SUPPLY
sensor for suction pipe
sensor for
room temp.
AC-N 1 2
Liquid Level
Switch
WATERV
CKKG ROOM
LNSR
CN6
ELECTRICAL DIAGRAM
FOR ICE-MAKER
T1
DC Water valve
T1 water
1
6C
control panel
LCD
magnetic control
switch

10
Warranty
Euhomy offers a limited 1-year warranty (“ warranty period" ) on all of our products purchased new
and unused from Euhomy company, with an original proof of purchase and where a defect has arisen,
wholly or substantially, as a result of faulty manufacture, parts or workmanship during the warranty
period. The warranty does not apply where damage is caused by other factors, including without
limitation:
(a)normal wear and tear;
(b)abuse, mishandling, accident, or failure to follow operating instructions;
(c)exposure to liquid or infiltration of foreign particles;
(d)servicing or modifications of the product other than by Euhomy;
(e)commercial or non-household use.
The Euhomy warranty covers all costs related to restoring the proven defective product through
repair or replacement of any defective part and necessary labor so that it conforms to its original
specifications. A replacement product may be provided instead of repairing a defective product.
Euhomy' s exclusive obligation under this warranty is limited to such repair or replacement. A receipt
indicating the purchase date is requied for any claim, so please keep all receipts in a safe place.
Although greatly appreciated, the product registration is not required to activate any warranty and
product registration does not eliminate the need for the original proof of purchase.The warranty
becomes void if attempts at repair are made by non-authorized third parties and/or if spare parts,
other than those provided by Euhomy, are used.
You may also arrange for service after the warranty expires at an additional cost. These are our
general terms for warranty service, but we always urge our customers to reach out to us with any
issue, regardless of warranty terms. If you have an issue with a Euhomy product, please contact us

11
Problem Possible Cause Solution
< > is displayed
< > code is
displayed
Lack of water
Too much ice in the basket
Faulty inlet solenoid valve
Turn off the unit. Add water to the
<FULL> mark. Restart the unit.
Water tank contains
water but < > is
displayed
< E1 > code is
displayed
< E2 > code is
displayed
No water in the
water separator pipe
Thick or large ice
cubes cannot drop
into basket
Thin or small ice
cubes
Remove ice cubes from the basket.
Contact a technical service person
for repair.
The unit will still work, but the
sensor should be replaced
promptly.
The unit will still work, but the
sensor should be replaced
promptly.
Clean the water filter.
Press <–> to shorten the ice-mak-
ing cycle.
Press <+> to lengthen the
ice-making cycle.
The water temperature should be
no more than 25 °C (77 °F).
Move the unit to a cooler place.
Use a slim wire to prick each
opening so water can flow through
easily.
Faulty ambient tempera-
ture sensor
Faulty refrigerating tube
sensor
Blocked openings
Clogged water filter
Ice-making cycle too long
Ambient temperature too
high
Water temperature too
high
Ice-making cycle too short
Unit runs but does
not make ice
Contact a technical service person
for repair.
Contact a technical service person
for repair.
Move the unit to an area where the
ambient temperature is <30 °C
(<86 °F). Refill the tank with cool
water.
Ambient temperature or
water temperature too high
Refrigerant system leakage
Refrigerant system
blockage

Email:support@euhomy.com Facebook:@Euhomy.Official
Other manuals for IM-F
3
Table of contents
Other Euhomy Ice Maker manuals

Euhomy
Euhomy IM-01 User manual

Euhomy
Euhomy IM-FP User manual

Euhomy
Euhomy IM-02 User manual

Euhomy
Euhomy IM-03D User manual

Euhomy
Euhomy IM-01 User manual

Euhomy
Euhomy IM-01C User manual

Euhomy
Euhomy IM-02 User manual

Euhomy
Euhomy IM-01 User manual

Euhomy
Euhomy IM-01A User manual

Euhomy
Euhomy IM-F User manual

Euhomy
Euhomy IM-11D User manual

Euhomy
Euhomy IM-01D User manual

Euhomy
Euhomy IM-F User manual

Euhomy
Euhomy IM-03S User manual

Euhomy
Euhomy IM-F User manual

Euhomy
Euhomy IM-02P User manual

Euhomy
Euhomy IM-06D User manual

Euhomy
Euhomy IM-10S User manual

Euhomy
Euhomy IM-01B User manual

Euhomy
Euhomy IM-02 User manual


