Euhomy IM-02P User manual

Email:support@euhomy.com Facebook:@Euhomy.Official
Commercial Ice Maker
SKU:IM-02P
Instruction Manual


Congratulations
Dear Customer:
Welcome to the Euhomy family. Thank you for purchasing one of our products.
Our goal is to provide you with superior service. If there is anything missing from or wrong with
your order, or if you have any questions about using our ice maker, PLEASE contact us.
Email: [email protected]
Facebook: @Euhomy.Official
The Euhomy team is available 24/7 to address your questions, comments, and concerns. Your
satisfaction is our ultimate goal. We want to make everything right so you'll share your positive
experience with other shoppers on Amazon.
Our mission:
* To be the most trusted appliance brand.
* To create practical, compact appliances that better your life.
Be sure to register at
www.euhomy.com/register
for updates, warranty, and other relevant information.


Q&A
1.How often do I need to clean my ice maker?
2.How should I clean the machine?
3.Why is my ice cube cloudy?
4.Can I put milk and juice into the water tank to make ice cubes?
5.Why does my ice cube melt easily?
6.Why is my ice so thick and difficult to fall from the ice tray?
What should I do?
7.Why does the ice cubes have a plastic smell?
8.Why is there noise in the operation of my machine?
9.Why is water leaking from my machine?
10.Why is there water flowing but not making ice?
Depending on how frequently you use it, it is recommended that you clean it at least once a week. Failure to clean the
machine will cause scale accumulation, which will eventually block the pump and cause the product to stop working
properly.
It is recommended to use lemon water or weak acid vinegar for cleaning. Drain immediately after cleaning, and then clean
it with pure water.
It is recommended to drain the water at least once every three days (pulling out the small hose on the right side of the
water tank). Draining will not only ensure that the hardness of the water is not too high, but also ensure that impurities
can be discharged well, and it is not easy to produce scale in the water tank.
It means that the water quality is turbid. It is recommended to use drinking water and distilled water. If your water quality
problem is serious, it is recommended that you install a water filter kit.
We recommend that you do not do that. Our research has found that the high concentration of milk and beverages can
easily block the pump and reduce the life span of the pump. At the same time, the protein in milk is prone to calcification,
which chemically reacts with the PU water pipe inside the machine, which easily breaks it, making the product unable to
continue working.
Since the ice maker is not a refrigerator, it does not have a heat preservation function. The high ambient temperature in
summer will accelerate the melting of ice cubes. You can close the lid of the machine to keep the internal temperature.
Some customers also put electric fans on the side of the machine to blow away the hot air surrounding the device, thus
solving the problem. Feel free to try it yourself. However, if you are not using ice cubes for a long time, we recommend
removing them from the ice basket and storing them in the refrigerator.
It may be that your ice making time is set for too long, or it may be that the temperature of your environment is very low.
You can reduce the time to 0 or -6 by pressing the minus key on the touch panel.
The ice cube itself has no taste. If you feel there is a plastic smell, try to clean the inside of the machine with lemon
water, then run a few cycles, and finally rinse with distilled water.
There is a faint sound when the machine is running. Closing the lid can reduce the noise. If the water pump makes a noise
during use, it is recommended to turn off the machine first, and then turn on the machine after cleaning the filter in the
water tank to observe whether or not the noise disappears.
It may be that the PUA tube inside the machine fell off during transportation. You can remove the back cover of the
machine and connect it by yourself. If you don't know how to operate, please contact the Euhomy team. We will give you
a professional video to help you solve the problem.
Please provide a video or picture and send it to us. The Euhomy team will assist you.


Contents
Tips & Maintenance 17-21
22-23
01
Safety precautions 02-04
Operation & Installation
Specifications
05-16
25
Warranty 24

Safety Precautions
02
When using electrical appliances, basic safety precautions should be
followed to reduce the risk of fire, electric shock, and injury to persons
or property. Read all the instructions before using any appliance:
Use this appliance only for its intended purpose as described in this owners' manual.
This ice-maker must be properly installed in accordance with the installation instructions before it is
used.
This unit must be positioned so that the plug is accessible. Do not run the cord over carpeting or other
heat insulators. Do not cover the cord. Keep the cord away from areas with high traffic, and do not
submerge in water. No other appliance should be plugged into the same outlet, and be sure that the
plug is fully inserted into the receptacle.
We do not recommend the use of an extension cord as it may overheat and cause a fire. If you must
use an extension cord, use No.14AWG minimum size and rated no less than 1875 watts.
If the supply cord is damaged, it must be replaced by the manufacturer or its service agent or a
similarly qualified person in order to avoid a hazard.
Disconnect the mains plug from the supply socket when not in use for a long term, where supply
connection is via mains plug.
Remove the power plug or disconnect from the mains before cleaning or servicing the appliance.
NOTE: If for any reason this product requires service, we strongly recommend that a certified
technician performs the service.
Never unplug your unit by pulling on the power cord. Always grasp the plug firmly and pull straight
out from the outlet.
Do not use your unit outdoors. Keep the unit away from direct sunlight and make sure that there is a
space of at least 15 cm between the back of your unit and wall and keep the front free. Keep ventila-
tion opening in the appliance enclosure or in the built-in structure, clear of obstruction.
Do not tip over the unit as it may cause abnormal noisy and make the ice-cube size abnormal. And
seriously, it may cause water leakage from the unit.
If the unit is brought in from outside in the winter season, give it a few hours to warm up to room
temperature before plugging it in.
Do not use other liquid to make the ice-cube other than water.
Do not clean your ice maker with flammable fluids. The fumes can create a fire hazard or explosion.

Safety Precautions
Note:
Risk Of Fire or Explosion- Flammable Refrigerant Used
03
This appliance must be earthed. Use the proper power source according to the nameplate.
Keep all ventilation openings, in the appliance enclosure or in the built-in structure, clear of obstruc-
tion.
Do not damage the refrigerant circuit.
This appliance is not intended for use by persons (including children) with reduced physical, sensory
or mental capabilities, or lack of experience and knowledge, unless they have been given supervision
or instruction concerning use of the appliance by a person responsible for their safety.
Children should be supervised to ensure that they do not play with the appliance.
This appliance must be earthed. And use the 110-120V/60Hz earthed power supply.
Do not store explosive substances such as aerosol cans with a flammable propellant in this appliance.
Do Not Use Mechanical Devices To Defrost Ice Maker. Do Not Puncture Refrigerant Tubing.
To Be Repaired Only By Trained Service Personnel. Do Not Puncture Refrigerant Tubing.
Consult Repair Manual /Owner's Guide Before Attempting To Install or Service This Product. All
Safety Precautions Must be Followed.
Dispose Of Property In Accordance With Federal Or Local Regulations.
Follow Handling Instructions Carefully.
The ice maker should be installed in accordance with the safety standard for Refrigeration
Systems, ASHRAE15. The ice maker shall not be installed in corridors or hallways of public build-
ings.If the unit needs maintenance, replacing should be done with like components and the servicing
shall be done by factory authorized service personnel, so as to minimize the risk of possible ignition
due to incorrect parts or improper service.
This appliance must be earthed. Use the proper power source according to the nameplate.
Keep ventilation openings, in the appliance enclosure or in the built-in structure, clear of obstruction.
ASSEMBLY AND PARTS
Safety Precautions
04
Note:
Do not damage the refrigerant circuit.
This appliance is not intended for use by persons (including children) with reduced physical, sensory
or mental capacities, or lack of experience and knowledge, unless they have been given supervision or
instruction concerning the use of the appliance by a person responsible for their safety.
Children should be supervised to ensure that they do not play with the appliance.
This appliance must be earthed. Use a 110-120V/60Hz earthed power supply.
Do not store explosive substances such as aerosol cans with a flammable propellant in this appliance.
This appliance is intended to be used in household and similar applications such as staff kitchen areas
in shops, offices and other working environments, e.g., farmhouses and by clients in hotels, motels
and other residential type environments, e.g., bed and breakfast type environments, such as catering
and similar non-retail applications.
The wires in this mains lead are colored in accordance with the following code:
Green or Green with a strip
To avoid a hazard due to instability of the appliance, it must be placed on an even or flat surface.
COLOR WIRING
Yellow
White
Black
Grounding
Neutral
Live
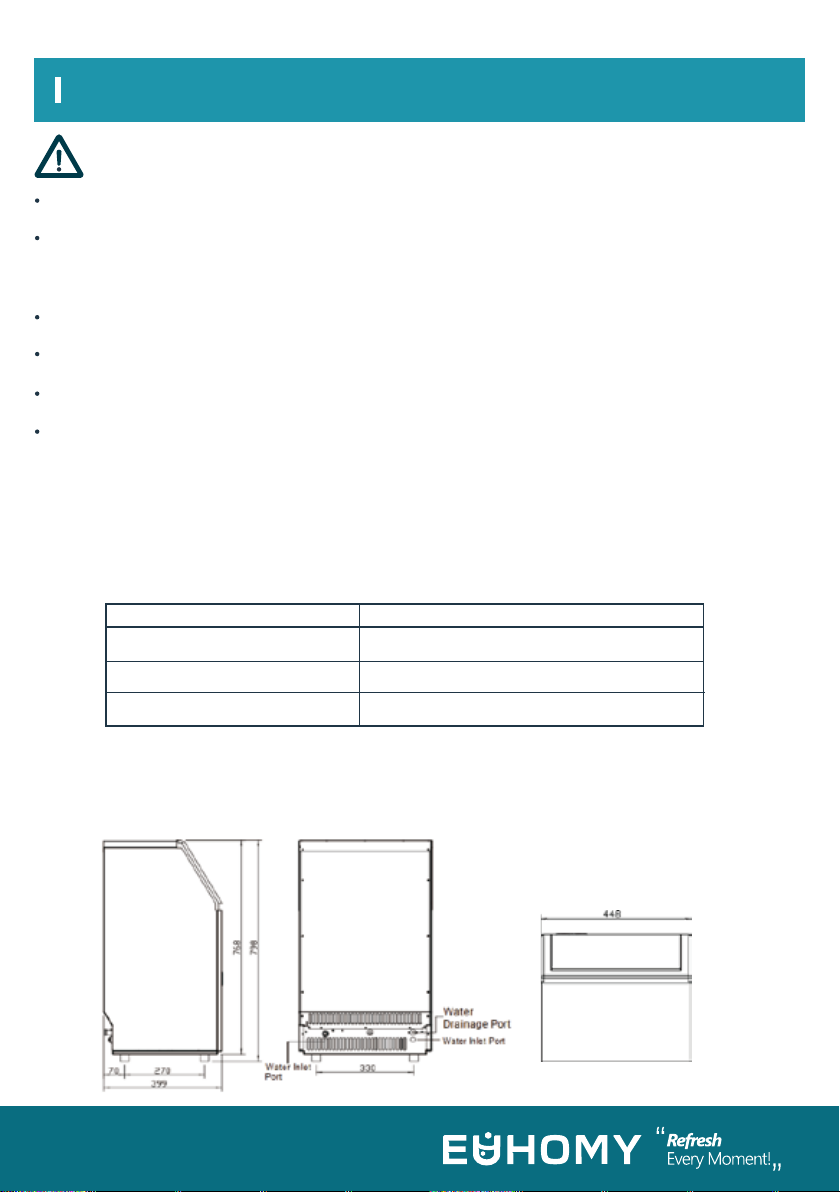
DIMENSIONS / CONNECTIONS

Operation & Installation
MAIN UNIT CONSTRUCTION
ICE-MAKING AND ITS WATER TANK PARTS
05
1.Top cover
2.Door for ice taking
3.Ice-making & its water tank assembly: Including ice-making evaporator, water tank, water pump
and some detecting parts
4.Front panel
5.Operation panel
6.Air outlet: Must keep the air circulate smoothly. Hot air will blow out when unit running.
7.Water draining port: Normal plugged with the cap. When the water needs to be drained, unplug the
cap.
And connect the white drain pipe.
8.Water inlet port for water supply: Use to connect the water supply pipe.
9.Water inlet port for bottled water supply: Use to no supply pipe, but has bottled water.
Accessory: 2 meters long and white color water drain pipe,
water quick connector of the water faucet,
¢6.35mm diameter and white color water supply pipe(3 meters long).
Operation & Installation
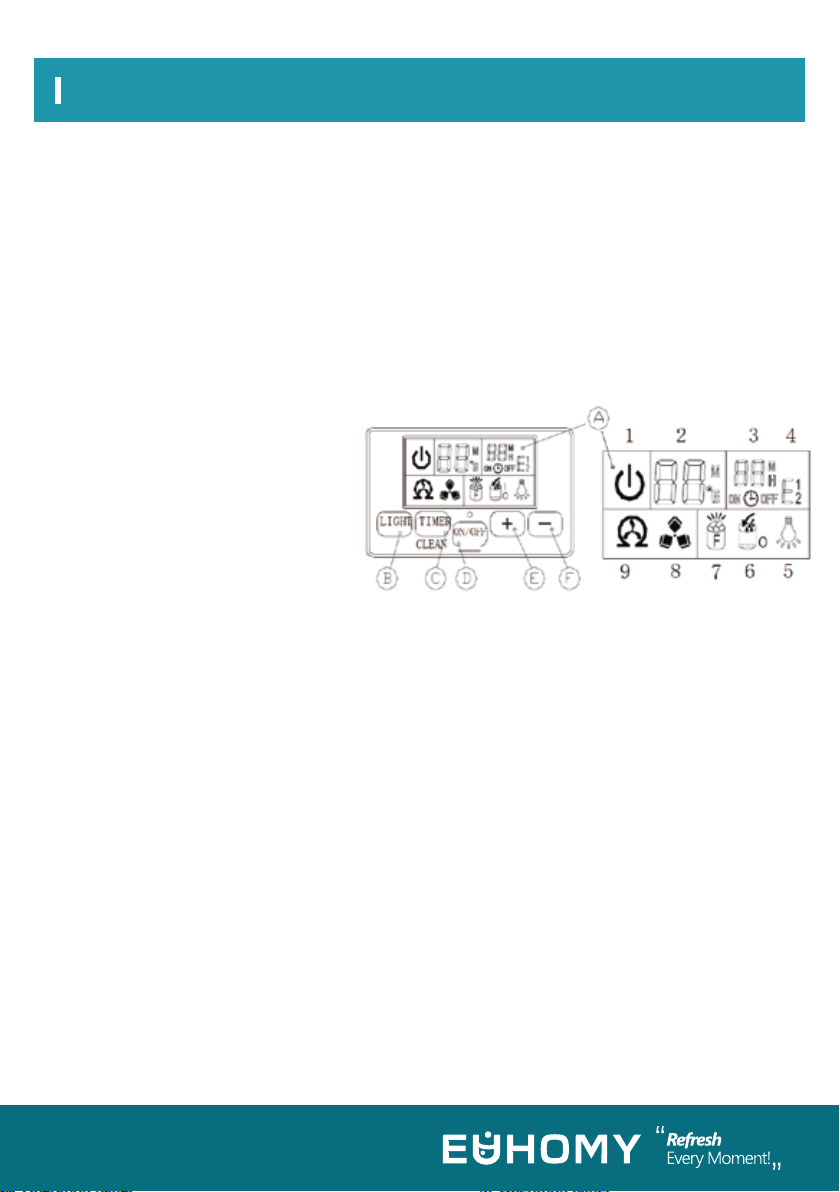
OPERATION PANEL
06
A.Water dividing pipe: with nine little holes, water will flow from these little holes. If no water flows
out, it can be disassembled and cleaned.
B.Evaporator (ice-making module)
C.Ice full detecting board: Use to detect if the inner cabinet is full of ice or not, and to check the
ice-harvest process is over or not.
D.Water tank:
E.Water supplying pipe:
F.Cover board on the right side of the evaporator:
G.Water level switch installing plate:
H.Water drainpipe of the water tank:when the unit is busy making ice, this pipe should be clamped
in the slot of the water tank wall. When draining, this pipe should be pulled out.
I.Water pump:
J.Water level detecting switch.
A.LCD display window
1. Unit ON or OFF state symbol:
When the unit is turned off (standby
mode), this symbol flashes, and when
the unit is working, the symbol will keep
lighting on.
2.Ambient temperature and ice-making countdown time display
3.Ice-making setting and Timer setting display
4.Error code:E1 means that the ambient temperature sensor is faulty E2 means that ice-making
process is abnormal;
5. Light symbol:When this symbol displays, the LED light inside the cabinet will be on;
6.Water flowing and water absence symbol: If the arrow of this symbol flashes, means the water is
flow in from main water supply. If the whole symbol keeps on, it means there is no water from main
water supply.
7.Ice-full display: When the ice storing cabinet is full of ice cubes, this symbol will display, and the
unit will stop the ice-making process.
8.Ice making and collecting display:When the ice cube symbol keeps rotating, it means the unit is
making the ice. If the symbol flashes, it means the unit is during the ice collecting process.
9.Self-cleaning display.
B.“LED light” button: To turn on or turn off the internal LED light;
Note: Keep pressing this button for more than 5 seconds, it is to change the ambient temperature
unit between Fahrenheit degree and Centigrade degree.
C.“Timer/Clean”button:Quickly press this button once to enter the Timer setting program. Press
this button for more than 5 seconds to let the unit enter the Self-Cleaning program.
Operation & Installation
07
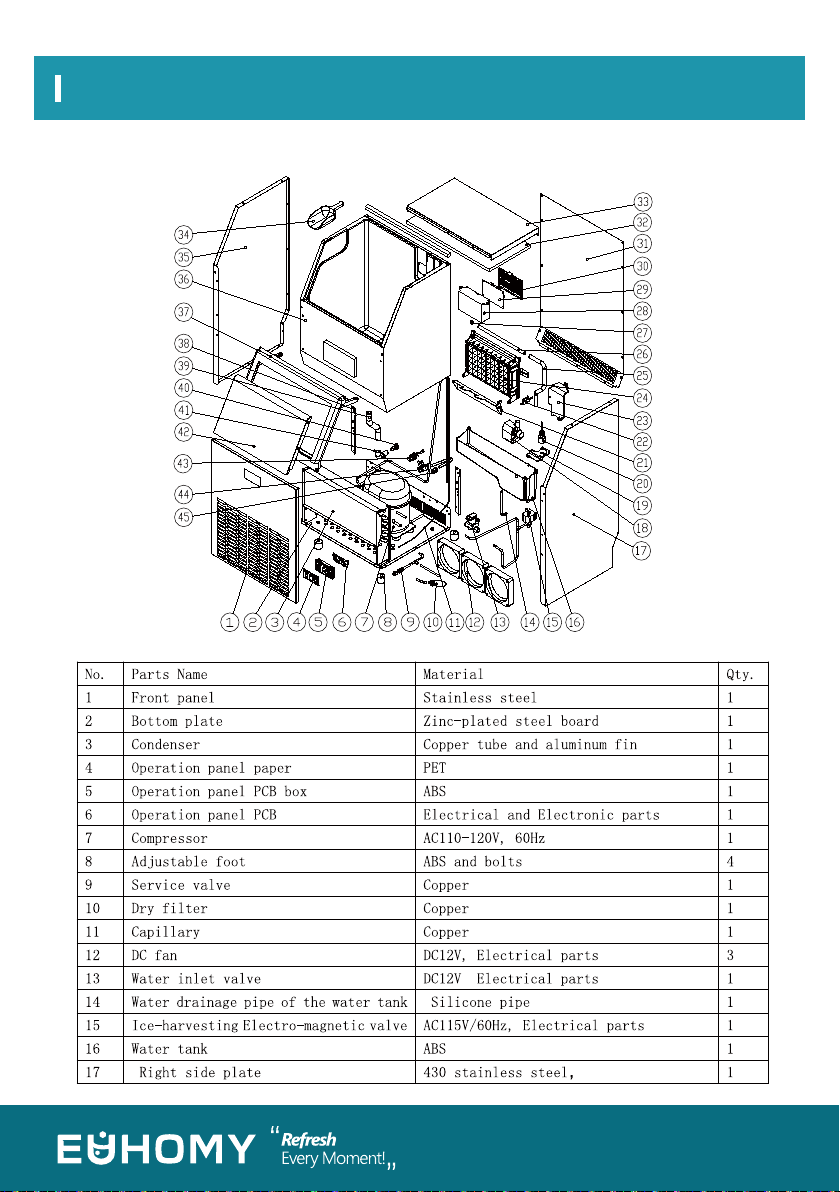
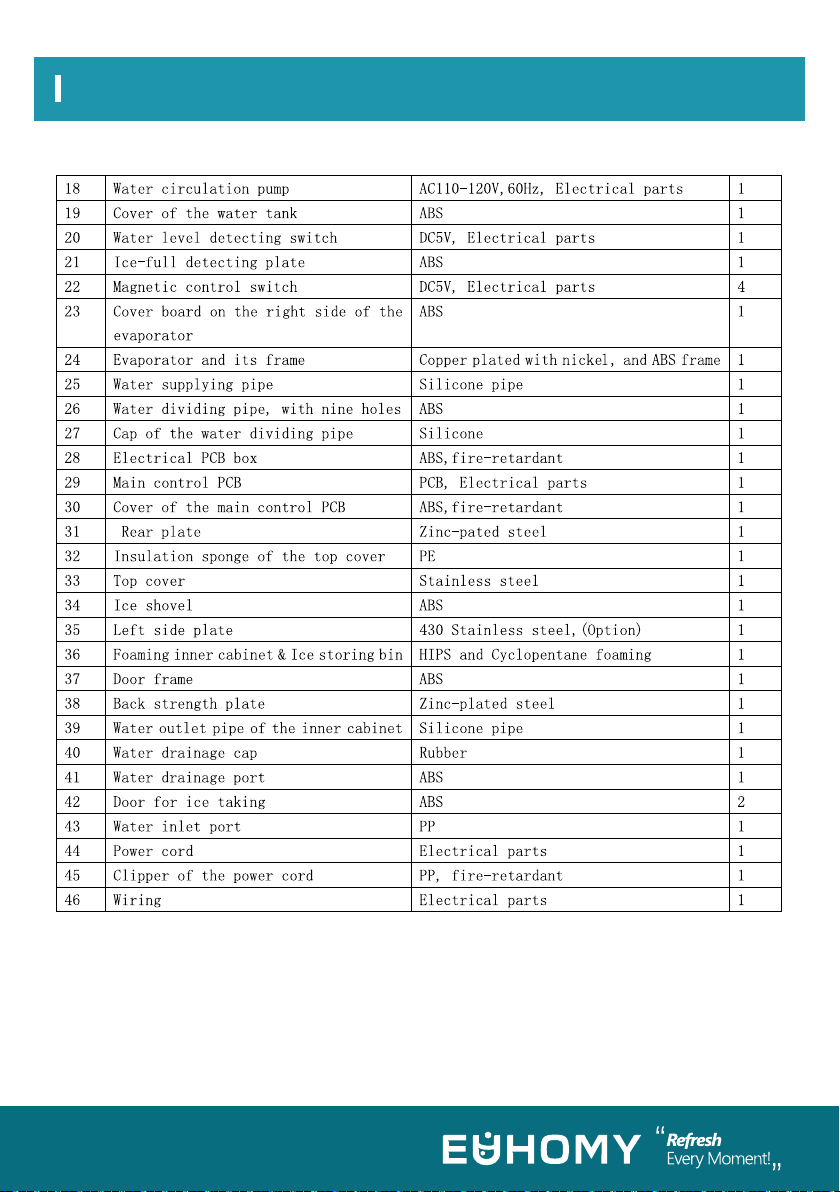
EXPLOSIVE DRAWINGS
(Option)
Operation & Installation
08

09
Operation & Installation
UNPACKING YOUR ICE MAKER
UNPACKING YOUR ICE MAKER
Remove the exterior and interior packaging. Check if all the accessories, including the instruction
manual, ice scoop, white water inlet pipe, 4 ways to 2 ways water quick connector and the water
draining pipe, etc., are present. If any parts are missing, please contact our customer service.
Remove the tape for fixing the door and inner cabinet, ice scoop, etc. Roughly clean the inner cabinet
& ice scoop with a wet cloth.
Put the ice maker on a level, flat surface, far from direct sunlight and other sources of heat (i.e., stove,
furnace, radiator). Make sure that there is at least 20cm gap between the air outlet and the obstacles,
and at least 5 cm between Left/Right side and the wall.
Allow 4 hours for the refrigerant fluid to settle before plugging the ice maker in case the unit tipped
over during shipping or transportation.
The appliance must be positioned so that the plug is accessible.
This unit is not for outdoor use. Keep the proper room temperature and inlet water temperature
according to the above specification table. Otherwise, it will affect the ice making performance.
This unit should not be placed near any heat resource.
The unit should be located on a firm and level surface at normal countertop height.
There must be at least 5cm clearance at rear side for connection and 25CM clearance in front to open
the door and keep good air circulation.
Do not put anything on the top of the ice maker
WARNING: connect to the potable water supply only. Only use drinking water.
是

Operation & Installation
10
Note: This unit must be earthed
Note: Recommended grounding method
UNPACKING YOUR ICE MAKER
To ensure proper ventilation for your ice maker, the front of the unit must be completely unobstructed
(at least 20CM free space). Allow at least 50 mm clearance at the back, and 50 mm at the top and sides
for proper air circulation. The installation should allow the ice maker to be pulled forward for servicing if
necessary.
When installing the ice maker under a counter, follow the recommended spacing dimensions as shown
above.
Place electrical and water supplies and drain fixtures in the recommended locations as directed.
Choose a well-ventilated area with temperatures above 50 Fahrenheit and below 90 Fahrenheit. This
unit MUST be installed in an area protected from elements such as wind, rain, water spray or drips.
The ice maker requires a continuous water supply with a pressure of 1-8 bar as required in above
specification table. The temperature of the water feeding into the ice maker should be between 41
Fahrenheit and 77 Fahrenheit for optimal operation.
Before you move your ice maker into its final position, it is important to make sure you have the proper
electrical connection.
It is recommended that a separate circuit, serving only your ice maker, be provided. Use receptacles that
cannot be turned off by a switch or pull chain. If the supply cord or plug needs to be replaced, it should
be done by a qualified service engineer.
This appliance requires a standard 110-120Volt, 60Hz electrical outlet with good grounding means.
For your personal safety, this appliance must be properly grounded. This appliance is equipped with a
power supply cord having a grounding plug. To minimize possible shock hazard, the cord must be
plugged into a mating grounding-type wall receptacle, grounded in accordance with the National
Electrical Code and local codes and ordinances. If a mating wall receptacle is not available, it is the
personal responsibility of the customer to have a properly grounding wall receptacle installed by a
qualified electrician.
Electrical Shock Hazard
Plug into a grounding wall outlet. Never remove the ground prong. Use separate power supply or
receptacle. Never use an adapter.
Never use an extension cord. Failure to follow these instructions may result in fire, electrical shock or
even death.
Operation & Installation
Before using your ice maker, it is strongly recommended to clean it thoroughly.
CLEANING YOUR ICE MAKER BEFROE USING FOR
THE FIRST TIME
UNPACKING YOUR ICE MAKER
Important: Be sure to use the new hose-sets supplied with the appliance to connect to water mains.
Old hose sets should not be reused.
Option#1 Connect the water supplying hose to the unit
Step 3: Connect the water hose to the water faucet of the water main supply system
Open the ice collecting door.
Clean with diluted detergent, warm water and a soft cloth.
Repeatedly clean the water contacting inner parts, you can pull the Water drainpipe of the water
tank indicating “IT” in above illustration to drain the cleaned water in the water tank. To clean
the inner ice-storing cabinet till all the inner parts are clean, drain out all of the cleaned water
from the water drain port located at unit back indicating "7"in above illustration. Now reinstall
the water drainpipe of the water tank and the cap of the unit water drain port, otherwise the unit
will not make the ice normally. We suggest that you discard the ice-cube made by the first ice
making cycle after cleaning.
The outside of the ice maker should be cleaned regularly with a mild detergent solution and
warm water.
Dry the interior and exterior with a clean, soft cloth.
11
Step 1: First remove the clipper on the water inlet port for water supply (indicated in the following
illustration “A”) located at unit back.
Step 2: Insert the one end of the white water hose into the water inlet port, and push inward
completely, and install back the clipper, then the water hose connection is completed.
First, install the supplied water quick-connector to the water faucet by screw thread; Second,
remove the clipper from the water quick-connector, and insert the another end of the water hose
into this quick-connector port completely. Next install back the clipper, and this step is completed.
Note: The water faucet should be supplied by the customer himself.

OPERATION THE ICE-MAKING PROCESS
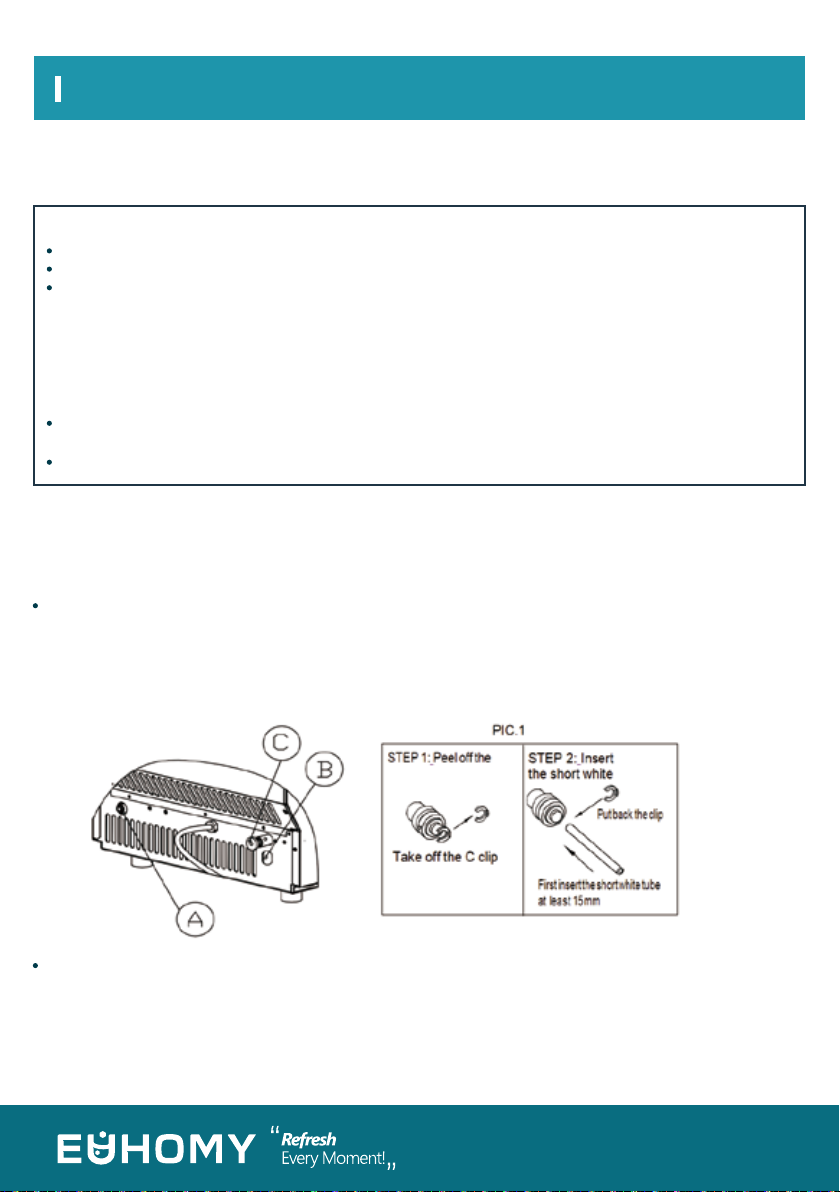
Option#2 Connect the water tube to use bottle water, use for part B
Connecting the water drain pipe
Ice making program is explained in following chart:
Operation & Installation
12
Important: The water pressure of main water supply system must be 0.04-0.6 MPa at least.
Pull out the water drainage cap with black color (indicated ○Cin above illustration), then
connect the white drainage pipe included in accessory. Now connect the other end of this
drainage to the main water drainage pipeline.
Push inwardsRemove the clipper
STEP 1: Quick-con-
nector and the
water faucet
STEP 2: Screw the
quick-connector on
the water faucet by
the screw thread, and
remove the clipper
STEP 3: Insert the
water hose
completely
STEP 4: Install back
the clipper
Take off the C clip
First insert the short white
tube at least 15mm
Put back the
clip
STEP 3: Insert the
long clear silicon tube,
put the other end to
the water bottle
STEP 2: Insert the
short white tube
STEP 1: Peel off the

Operation & Installation
13
Automatic water supplying symbol Arrow of symbol flashes and this means the water is
flowing
1.After completing the connection of the main water supplying hose with the unit, plug in the main
power supply plug. Then press the “ON/OFF” button on the control panel to begin the ice making cycle.
The unit ON/OFF state symbol will keep lighting on, and the left number in the LCD display window
displays the present ambient temperature. The right number displays the present ice-making setting,
and the ice-cube symbol rotates. When the left number starts flash, then the number means the
countdown time to complete one ice making cycle.
2.Each ice making cycle will last about 11 to 20 minutes, depending on the ambient temperature and
the water temperature. And for the first time, according to the initial water temperature, the ice-making
process time will be a little longer.
3.When the ice-making process is over, then switch to ice-collecting process. During the ice-collecting
process, the ICE cube symbol change rotating to flash. At same time, the arrow on the manual filling
water symbol will start to flash, and the water will flow into the water tank again till the floating ball of
water level switch rises up to the highest position. The water will stop flowing and the whole manual
filling water symbol will disappear.
When the ice-collection process is complete, the Ice-full detecting plate will rotate downward once,
and then recover to the original position and enter to the next ice-making process.
If the Ice-full detecting plate is pressed by ice blocks after rotation and cannot be restored to its
original position, it means that the ice storage bin is full of ice blocks and the ice making is automatical-
ly stopped.
into the water tank If this whole symbol keeps displaying, it means there is no main water
supplying at present.
Ice-cube symbol, when it rotates, it means the unit is making ice cubes; and it flashes, it means the
unit is in ice collecting process.
F Fahrenheit (ambient temperature)H unit of hour(setting the timer)
M unit of minute(ice-making setting and countdown time)
Press ON/FF
button to turn
on the unit
Step 1: Standby state Step 2: The arrow flashes,
and water flows in the unit
Step 3: Start to make ice, and
ice-cube symbol rotates.
Step 6: During ice-collection, the
water-flowing process finished to
start to make ice-cube again.
Step 5: Ice-collection starts and
the ice-cube symbol flashes; At the
same time the arrow flashes and
water flows into the water tank.
Step 4: Dispay the countdown
time of one ice-making
process

Automatic self-cleaning program
Timer setting operation
Operation & Installation
14
4.When the “ICE-FULL” symbol display is on, the unit stops running. And if you remove the ice cubes,
the unit will start to make ice cubes again. But it will restart only after a 3 minute interval of compres-
sor running.
5.During the ice-making process, press the “+” or “-” button to adjust the ice-making process duration
period length, and then to change the thickness of the ice cube. Press the “+” or “-” button, and the
right digit will flash. The default setting is zero, 1 minute will be add or decreased to each ice making
process per each pressing of “+” or “-” button. After 5 seconds of setting, the new setting will be
remembered by the system.
6.The bad water quality will cause bad quality ice cubes, and reduce the transparency of the ice cube.
Start the self-cleaning program: After connecting all of the water pipe, plug on the main power
supply plug, then press “TIMER /CLEAN” button on control panel for more than 5 seconds, to enter
the Self-Cleaning program. The “ ”symbol will always be on during this period, the left digit will
indicate the left time. The total duration time is 20 minutes for one self-cleaning program.
Cancel the self-cleaning program: It takes about 20 minutes to complete one self-cleaning
program. When the program is over, the system will be in standby mode automatically. You can press
the “ON/OFF” button on control panel to cancel the self-cleaning program by force.
the ON-Timer. The “ ” symbol will turn on, the number “1” above the symbol will flash to
display the set delay time. During the number flashing, press the +”、“-”button to change the delay time
of the timer, 1 hour increasing or decreasing per each pressing of “+” or “-” button. Five seconds after
setting it, your desired setting will be remembered.
How to cancel the ON-Timer: Press the “TIMER/TIMER” button, the number above the “
symbol will flash to display the present delay time of your ON-Timer. Press this button once again
to cancel the Timer setting, and the “ ” symbol and the number will disappear.And the second
easy way to cancel the ON-Timer is to press the “ON/OFF” button, it will cancel the ON-TIMER setting
by force.
How to set the OFF-Timer: When the unit is working, press the “TIMER/CLEAN” button to set the
OFF-Timer. The “ ” symbol will turn on, and the number “1” above the symbol
will flash to display the setting delay time. During the number flashing, press+”、“-” button to change
the delay time of the timer, 1 hour will be increasing or decreasing per each pressing of “+” or “-” button.
Five seconds after setting, your desired setting will be remembered.
How to cancel the OFF-Timer: Press the “TIMER/TIMER” button, and the number above the
“ ”symbol will flash to display the present delay time of your OFF-Timer. Press this button
once again to cancel the Timer setting. The “ ” and the above number will disappear. Another easy
way to cancel the OFF-Timer is to press the “ON/OFF” button, as it will cancel the ON-TIMER setting by
force, also will turn off the unit.
Delay time range: 1-24 hours, Default time: 1 hour
How to set the ON-Timer: When the unit is in standby mode, press the “TIMER/CLEAN” button to set
”
Operation & Installation
Table of contents
Other Euhomy Ice Maker manuals

Euhomy
Euhomy IM-01D User manual

Euhomy
Euhomy IM-F User manual

Euhomy
Euhomy IM-F User manual

Euhomy
Euhomy IM-02 User manual

Euhomy
Euhomy IM-01B User manual

Euhomy
Euhomy IM-F User manual

Euhomy
Euhomy IM-01 User manual

Euhomy
Euhomy IM-03D User manual

Euhomy
Euhomy IM-01 User manual

Euhomy
Euhomy IM-06D User manual

Euhomy
Euhomy IM-FP User manual

Euhomy
Euhomy IM-02 User manual

Euhomy
Euhomy IM-10S User manual

Euhomy
Euhomy IM-01 User manual

Euhomy
Euhomy IM-11D User manual

Euhomy
Euhomy IM-F User manual

Euhomy
Euhomy IM-12AR User manual

Euhomy
Euhomy IM-01C User manual

Euhomy
Euhomy IM-03S User manual

Euhomy
Euhomy IM-02 User manual


