euroline MICROVENT24 User manual

SAVE THESE INSTRUCTIONS CAREFULLY
Read these instructions carefully before using your
microwave oven,and keep it carefully.
If you follow the instructions, your oven will provide you with
many years of good service.
Model: MICROVENT24
EM038K6BD
V20210527

PRECAUTIONS TO AVOID POSSIBLE
EXPOSURE TO EXCESSIVE MICROWAVE
ENERGY
(a) Do not attempt to operate this oven with the door open since
operation can result in harmful exposure to microwave energy.
It is important not to defeat or tamper with the safety interlocks.
(b) Do not place any object between the oven front face and the door or allows soil or
cleaner residue to accumulate on sealing surfaces.
(c) Do not operate the oven if it is damaged. It is particular important that
the oven door close properly and that there is no damage to the:
(1) DOOR (bent)
(2) HINGES AND LATCHES (broken or loosened)
(3) DOOR SEALS AND SEALING SURFACE
(d) The oven should not be adjusted or repaired by anyone except properly
qualified service personnel.
open door
S
ly
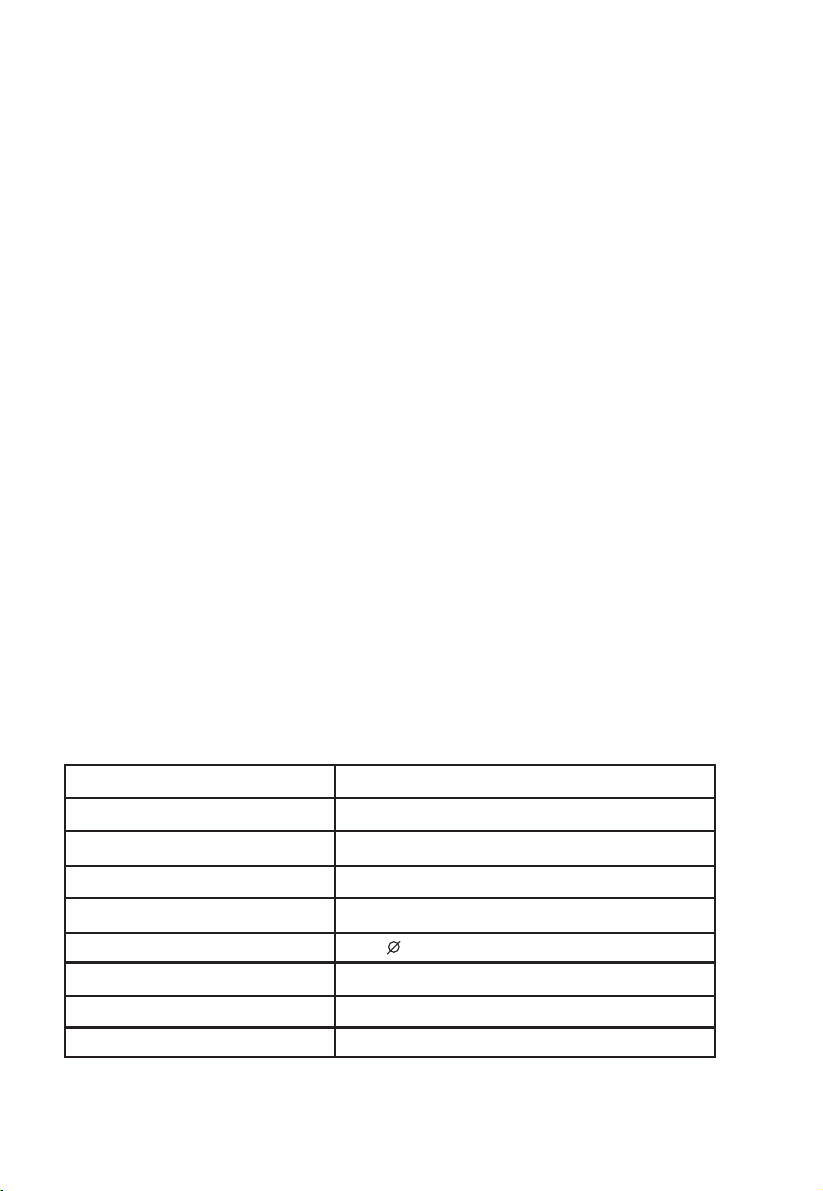
Specifications
Approx. 24.0kg
Model:
Rated Voltage:
Rated Input Power(Microwave):
Rated Output Power(Microwave):
Oven Capacity:
Turntable Diameter:
External Dimensions:
Net Weight:
V~ 60Hz
345 mm
1500W
120
1000 W
38 L
MICROVENT24
606x411x432mm
/EM038K6BD
Microvent Airflow 300 CFM
2

1. Read all instructions before using the
appliance.
2. Read and follow the specific:
EXCESSIVE MICROWAVE ENERGY"
found on page 2.
combustible materials are placed inside the oven to facilitate cooking.
only to properly grounded outlet. See
found on
page .
accordance with the provided installation
instructions.
3. This appliance must be grounded. Connect
"PRECAUTIONS TO AVOID POSSIBLE EXPOSURE TO
"GROUNDING INSTRUCTIONS"
4. Install or locate this appliance only in
5. Some products such as whole eggs and sealed containers - for example, closed glass
jars - are able to explode and should not be heated in this oven.
6. Use this appliance only for its intended use as described in the manual. Do not use
corrosive chemicals or vapors in this appliance. This type of oven is specifically
designed to heat, cook or dry food. It is not designed for industrial or laboratory use.
supervision is necessary when used
by children.
7. As with appliance, close
damaged cord or plug, if it is not
working
properly, or if it has been
damaged or dropped.
8. Do not operate this appliance if it has a
by qualified service personnel.
Contact nearest
authorized service
facility for examination, repair, or
adjustment.
9. This appliance should be serviced only
10. Do not cover or block any openings on the appliance.
11. Do not store this appliance outdoors. Do not use this product near water - for
example,
near a kitchen sink, in a wet
basement, near a swimming pool, or
similar location.
1 . Do not immerse cord or plug in water.2
1 . Keep cord away from heated surface.
14. Do not let cord hang over edge of
table or counter.
3
15. When cleaning surfaces of door and oven that comes together on closing the door, use
only mild, nonabrasive soaps, or detergent applied with a sponge or soft cloth.
16. To reduce the risk of fire in the oven cavity:
1). Do not overcook food. Carefully attend appliance when paper, plastic, or other
2). Remove wire twist-ties from paper or plastic bag before placing bag in oven.
3). If material inside of the oven ignite, keep oven door closed, turn oven off, and
disconnect the power cord, or shut off power at the fuse or circuit breaker panel.
4). Do not use the cavity for storage purposes. Do not leave paper products, cooking
utensils, or food in the cavity when not in use.
point without appearing to be boiling. Visible bubbling or boiling when the container is
removed from the microwave oven is not always present.
17. Liquids, such as water, coffee, or tea are able to be overheated beyond the boiling
IMPORTANT SAFETY INSTRUCTIONS
WARNING - To reduce the risk of burns, electric shock, fire, injury to persons or exposure
to excessive microwave energy:
precautions should be followed, including
When using electrical appliances basic safety
following:the
any
4
3

stand in the microwave oven for a short time
before removing the container. spoon or other utensil into the container.
GROUNDING INSTRUCTIONS
THIS COULD RESULT IN VERY HOT LIQUID SUDDENLY BOILING OVER WHEN
To reduce the risk of injury to persons:
1) Do not overheat the liquid.
2) Stir the liquid both before and halfway through heating it.
3) Do not use straight-sided containers with narrow necks.
4) After heating, allow the container to
5) Use extreme care when inserting a
SA E THESE INSTRUCTIONS
18. As with any appliance, close supervision is necessary when the microwave oven is
used by children.
19. If material inside of the oven should ignite, the oven door should be kept closed, the
appliance turned off, the power cord disconnected, or the power shut off at the fuse
or circuit breaker panel.
THE CONTAINER IS DISTURBED OR A UTENSIL IS INSERTED INTO THE LIQUID.
This appliance must be grounded. In the event of an electrical short circuit, grounding
of electric shock by providing an escape wire for the
appliance is equipped with a cord having a
plugged into an outlet that is properly installed and grounded.
grounding wire with a grounding plug.
reduces the risk electric current. This
The plug
must be
V
on top of the appliance surface when the appliance is in
22. Do not mount over sink.
2 Do not store anything directly
operation.
3.
ease should not be allowed to accumulate on
hood or filter.
Corrosive cleaning agents, such as lye-based
oven cleaners, may damage the filter
r use above both gas and electric cooking equipment.
24. Clean Ventilation Hoods Frequently - Gr
25. When flaming foods under the hood, turn the fan on.
26. Use care when cleaning the vent-hood filter.
27. Suitable fo
operate any heating or cooking appliance beneath the appliance.
(Exception: A microwave oven investigated for use above another heating appliance.)
(Exception: A microwave oven investigated for use above another heating appliance.)
20. Do not
21. Do not mount unit over or near any portion of heating or cooking appliance.
4

1. Operation of the microwave oven may cause interference to your radio, TV
or similar
2. When there is interference, it may be reduced or eliminated by taking the
following
1) Clean door and sealing surface of the oven
2) Reorient the receiving antenna of radio or television.
3) Relocate the microwave oven with respect to the receiver.
4) Move the microwave oven away from the receiver.
5) Plug the microwave oven into a different outlet so that microwave oven
are on different branch circuits.
RADIO INTERFERENCE
equipment.
measures:
and receiver
1. A short power supply cord is provided to reduce the risks resulting from becoming
entangled in or tripping over a longer cord.
2. Longer cord sets or extension cords are available and may be used if care is exercised
in their use.
3. If a long cord or extension cord is used:
1) The marked electrical rating of the cord set or extension cord should be at least as
great as the electrical rating of the appliance.
2) The extension cord must be a grounding-type 3-wire cord.
3) The longer cord should be arranged so that it will not drape over the counter top or
tabletop where it can be pulled on by children or tripped over unintentionally.
-
WARNING - Improper use of the grounding can result in a risk of electric shock.
Consult a qualified electrician or serviceman if the grounding instructions are not
completely or if doubt exists as to whether the appliance is properly grounded.
extension cord, use only a 3-wire extension cord that has a
The marked rating of the extension cord shall be equal to or greater than the electrical
appliance.
understood,
If it is necessary to use an
3-blade grounded plug, and 3-slot receptacle that will accept the plug on the appliance.
rating of the
Electric Shock Hazard
Touching some of the internal components can cause serious personal injury or death.
disassemble this appliance.
DANGER -
Do not
Electric Shock Hazard
Improper use of the grounding can result in electric shock. Do not plug into an outlet until
appliance is properly installed and grounded.
WARNING -
5

Personal Injury Hazard
Tightly-closed utensils could explode. Closed containers should be opened and plastic
pierced before cooking.
Utensil Test:
1. Fill a microwave-safe container with 1 cup of cold
water (250ml) along with the
2. Cook on maximum power for 1 minute.
3. Carefully feel the utensil. If the empty utensil is
warm, do not use it for microwave
4. Do not exceed 1 minute cooking time.
UTENSILS
See the instructions on "Materials you can use in microwave oven or to be avoided in
There may be certain non-metallic utensils that are not safe to use for microwaving. If
utensil in question following the procedure below.
CAUTION -
pouches should be
microwave oven."
in doubt, you can test the
utensil in question.
cooking.
Materials you can use in microwave oven
Utensils Remarks
Follow manufacturer's instructions. The bottom of browning dish must be
at least 3/16 inch (5mm) above the turntable. Incorrect usage may cause
the turntable to break.
Microwave-safe only. Follow manufacturer's instructions. Do not use
cracked or chipped dishes.
Always remove lid. Use only to heat food until just warm. Most glass jars
are not heat resistant and may break.
Heat-resistant oven glassware only. Make sure there is no metallic trim.
Do not use cracked or chipped dishes.
Follow manufacturer's instructions. Do not close with metal tie. Make
slits to allow steam to escape.
Use for shorterm cooking/warming only. Do not leave oven unattended
while cooking.
Use to cover food for reheating and absorbing fat. Use with supervision
for a short-term cooking only.
Use as a cover to prevent splattering or a wrap for steaming.
Browning dish
Glass jars
Glassware
Oven cooking
bags
Paper plates
and cups
Paper towels
Parchment
paper
Dinnerware
6

Materials you can use in microwave oven
Utensils Remarks
Microwave-safe only. Follow the manufacturer's instructions. Should be
labeled "Microwave Safe". Some plastic containers soften, as the food
inside gets hot. "Boiling bags" and tightly closed plastic bags should be
slit, pierced or vented as directed by package.
Microwave-safe only. Use to cover food during cooking to retain
moisture. Do not allow plastic wrap to touch food.
Thermometers Microwave-safe only (meat and candy thermometers).
Wax paper Use as a cover to prevent splattering and retain moisture.
Plastic
Plastic wrap
Materials to be avoided in microwave oven
Utensils Remarks
Aluminum tray
Food carton with
metal handle
Metal or metal-
trimmed utensils
Metal twist ties
Paper bags
Plastic foam
Wood
Metal shields the food from microwave energy. Metal trim may
cause arcing.
May cause a fire in the oven.
Plastic foam may melt or contaminate the liquid inside when exposed
to high temperature.
Wood will dry out when used in the microwave oven and may split
or crack.
May cause arcing. Transfer food into microwave-safe dish.
May cause arcing. Transfer food into microwave-safe dish.
May cause arcing and could cause a fire in the oven.
7

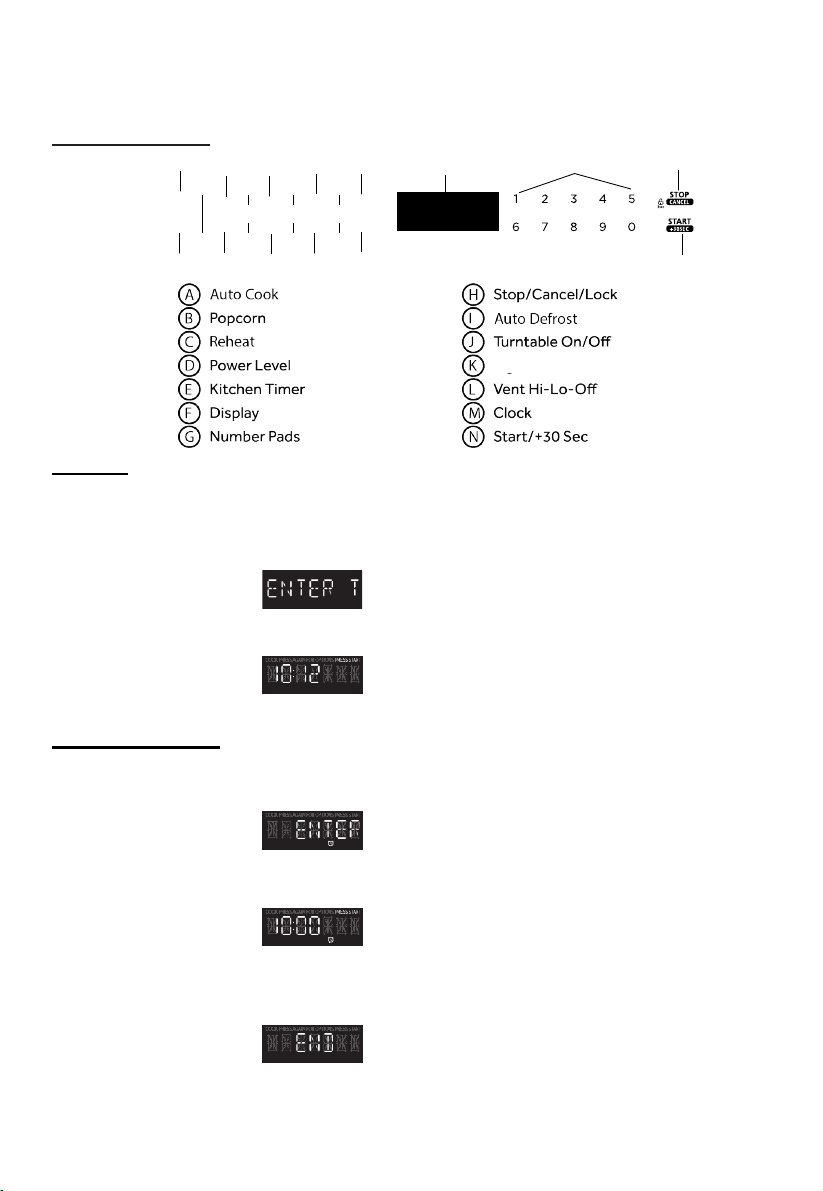
A) Control panel
B) Turntable shaft
C) Turntable ring assembly
D) Glass tray
E) Observation window
F) Door assembly
G) Safety interlock system
F
G
A
C B
ED
SETTING UP YOUR OVEN
Names of Oven Parts and Accessories
Remove the oven and all materials from the carton and oven cavity.
Your oven comes with the following accessories:
Glass tray 1
Turntable ring assembly 1
Instruction Manual 1
Hub (underside)
Glass tray
Turntable ring assembly
a. Never place the
glass tray
upside down. The glass
tray should never be restricted.
b. Both
glass tray
and
turntable ring assembly
must
always be used during cooking.
c. All food and containers of food are always placed
on the
glass tray
for cooking.
d. If
glass tray
or
turntable ring assembly
cracks or
breaks, contact your nearest authorized service
center.
Turntable Installation
Turntable shaft
8
OPERATION
CONTROL PANEL
CLOCK
Yourmodelfeaturesa12-hourclock.
SET TIME OF DAY
1.
Press CLOCK to enter the Clock Setting mode. “12:00 PRESS CLOCK ENTER
TIME” will appear in the display.
2.
to enter the correct time-of-day. For example, if the time is 10:12, press number
pads “1, 0, 1, 2” to enter the time.
Press the number pads
3.
Press START to confirm the time.
KITCHEN TIMER
The microwave features a convenient timer for your cooking needs.
1.
PressKITCHEN TIMER. “ENTER TIME” willappear inthe display.
2.
Pressthe numberpadstoinput the desiredcookingtime.
NOTE:
The maximum cooking time is 99 minutes and 99 seconds.
3.
Press START to begin counting down the time.
NOTE:
When the set time has expired, “END” will appear in the display and three long
alert tones will sound.
4.
Press STOP/CANCEL to exit the Kitchen Timer function.
AUTO
COOK POPCORN REHEAT POWER
LEVEL
KITCHEN
TIMER
CLOCK
VENT
HI-LO-OFF
LIGHTTURNTABLE
ON/OFF
AUTO
DEFROST
abc d efh
ijk l mn
g
Light Hi-Low-Off
HI-LO-OFF
9

FEATURES
VENT FAN
TheVent Fanfeatureallowsyouto exhaustheatandsteam from thecooking
surface
below.
•
Press VENT HI-LO-OFF to turn On/Off the fan, and to regulate the fan speed.
NOTE:
The fan speed cannot be adjusted if the control panel is locked.
•
When control is first “High”appears in the
HighSpeed- Pressonce
LowSpeed- Presstwice
Off-Pressthreetimes
SURFACE LIGHTING
The surface light feature illuminates the cooking surface below the microwave oven. Press
LIGHT to toggle among High, Low and Off.
CHILD CONTROL PANEL LOCK
The Child Lock feature allows you to lock the microwave control panel for easy cleaning
or to avoid unintentionally changing the settings or turning on the microwave oven.
To Lock/Unlock the control panel:
•
ToLock:
PressSTOP/CANCELfor 3 seconds.TheLockicon
willilluminateand
“LOCKED”willappearinthedisplayto
indicate thelockhasbeenactivated.
•
To Unlock:
Press STOP/CANCEL for 3 seconds. The Lock icon will disappear
and “UNLOCK” will appear in the display to
indicate the lock has been deactivated.
STATUS RECALL
TheStatusRecall featureallowsyoutochecktheTimeandPowersettings during
microwave cooking.
•
Press POWER LEVEL to display the set power level.
•
Press CLOCK to display the time.
IMPORTANT:
Never operate the microwave without food in the oven cavity; this can damage
the magnetron tube or glass turntable. You may wish to leave a cup filled with water inside
the oven when it is not in use to avoid damage if the oven is unintentionally turned on.
the pressed the time, display.
10

MICROWAVE COOKING
TIMED COOKING
1.
Pressthe numberpads to set thecooking time. For example,to cook for 10minutes,press“1,0,0,0”inturn.
NOTE:
•
The maximum cooking is 99 and
•
100% power is the default. If you wish to cook at 100% power, skip steps 2 and 3, and go directly to Step 4.
2.
Press POWER LEVEL to activate Power mode.
3.
Press the number pads or press POWER LEVEL repeatedly to select the desired power level. See “Power Levels” chart later in this
section.
4.
Press START to begin cooking. The time will count down.
NOTE:
When cooking is finished, an alert tone sounds 3 times and “End” appears in the
display.
Power Levels
Level
10
9
8
7
6
5
4
3
2
1
0
Power
100%
90%
80%
70%
60%
50%
40%
30%
20%
10%
0%
Display
PL- HI
PL- 90
PL-80 PL-70 PL-60 PL-50 PL-40 PL-30 PL-20 PL-10 PL-0
CONVENIENCE COOKING
Youcanbegincooking at 100%power bytouchingasinglecontrol.Forconvenience
cooking, use either theSTART/+ 30SEC control or the number touch pad.
NOTE:
During Convenience cooking, the microwave power level can be viewed, but not
adjusted.
•
Press START/+ 30 SEC to begin cooking at 100% microwave power for 30seconds.
•
Press START/+ 30 SEC, during microwave cooking, to increase the cooking time in30-secondincrements.
NOTE:
The maximum cooking time is 99 minutes and 99 seconds.
•
Press a number pad (1 to to start cooking with 100% microwave power for 1 to 9 minutes.
Eleven power levels are available.
9)
time minutes 99 seconds.
11
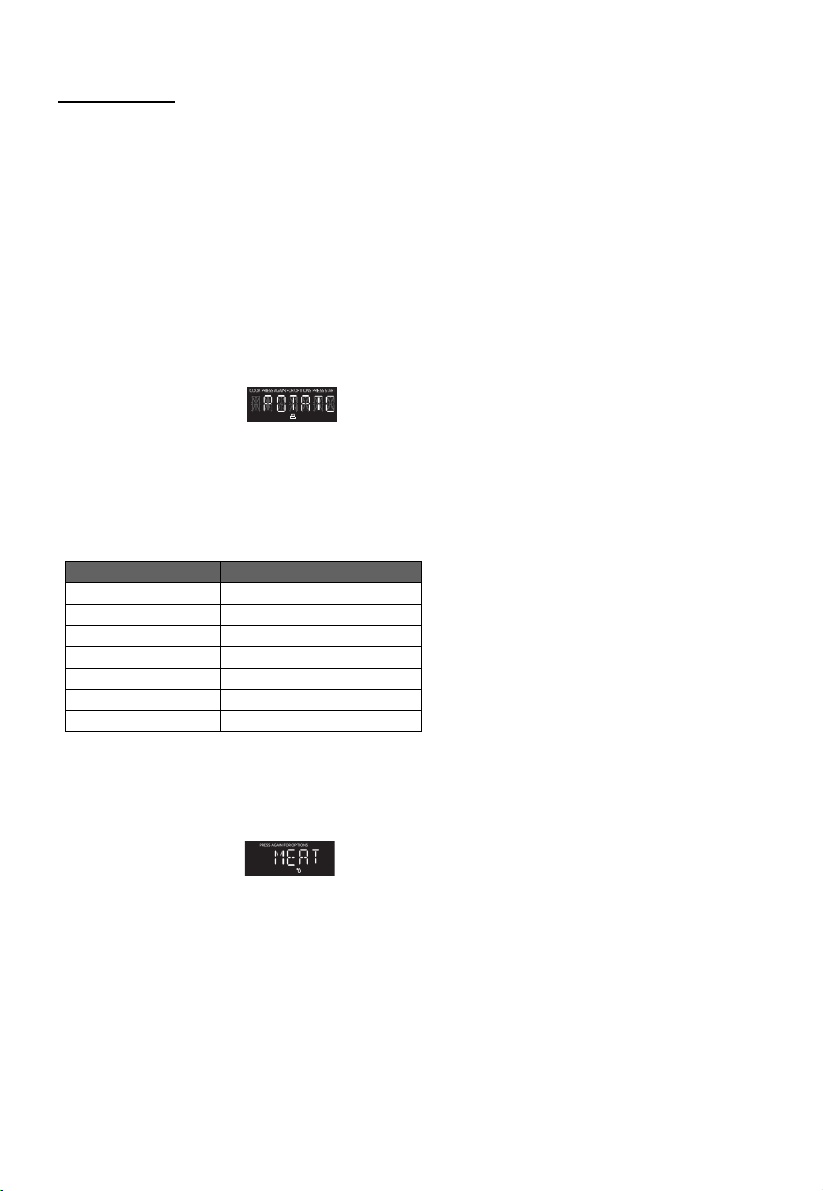
AUTO COOK
The AUTOCOOKfunction automaticallysets the appropriate cooking time calculated by
sensing the moisture levelof the food or beverage being cooked.
TheAUTOCOOKfunctionisprogrammedtocookthefollowingitems:Potato,Fresh
Vegetables,FrozenVegetables,FrozenDinner,White Rice,FrozenBreakfastand
Ground
Meat.
Forbestresultswhencooking,usemicrowave-safecontainersandcoverthe containers
withventedlidsorventedplasticwrap.
NOTE:
Donotusetight-sealingcoversthatwouldkeepthesteamfromescaping,andcause
thefoodtoovercook.
1.
Placethe coveredcontainerin the microwaveoven.
NOTE:
Makesuretheoutsideofthemicrowave-safecontainerandthe insideof the
ovenaredrybeforeplacingthecontainerinthemicrowave oven.Anymoisturewill
turnintosteamwhichcanmisleadthesensors.
2.
PressAUTO COOK once,“Potato”willappearonthedisplay.Continueto press AUTO COOK to toggleamong the choices until
the desireditemappears
in the display.
3.
PressSTARTto confirm, enter the number of potatoes to be cooked andbegincooking.
4.
Once Start is pressed, the process begins. When thesensing process iscompleted, alert tones will sound and the calculated cook
time will beginto countdown.
NOTE:
Do not open the door duringthe sensing process. If you do, the AUTO COOK
program willbe paused.
5.
Use the Timed or Convenience Cooking function to complete cooking food to desired degree of doneness, if the
food is under cooked the AUTO COOKtime has elapsed.
AUTO COOK Programs
Item Quantity
Potato
1 to 4 potatoes
Fresh Vegetables
1 to 4 cups (140 to 420 g)
Frozen Vegetables
1 to 4 cups (140 to 420 g)
Frozen Dinner
10 to 20 oz. (283 to 567 g)
White Rice
1 to 2 cups (185 to 370 g)
Frozen Breakfast
8 to 12 oz. (227 to 340 g)
Ground Meat
8 to 24 oz. (255 to 539 g)
DEFROST
The Defrost function is programmed to automatically defrost select items by weight.The
Defrostcontrolallowsyoutoselectamongthefollowingitems:Meat,
Poultry and Fish
1.
Press DEFROST once. “Meat” will appear on the display.
2.
Continue to press DEFROST to toggle among the choices until the desired item appears in the display.
3.
Press START to confirm your item selection. “Enter Weight” will appear in the display.
4.
Press the number pads to enter the weight of the item to be defrosted. For example, if the food weight is 1.2 lbs, press “1” and
then “2” to enter the weight.
NOTE:
Theweightofthe fooditemshouldbebetween0.1to6.0lbs. The maximum
weightthatwillbeacceptedis6.0Lbs.
5.
Press START to begin defrosting.
.
12
when
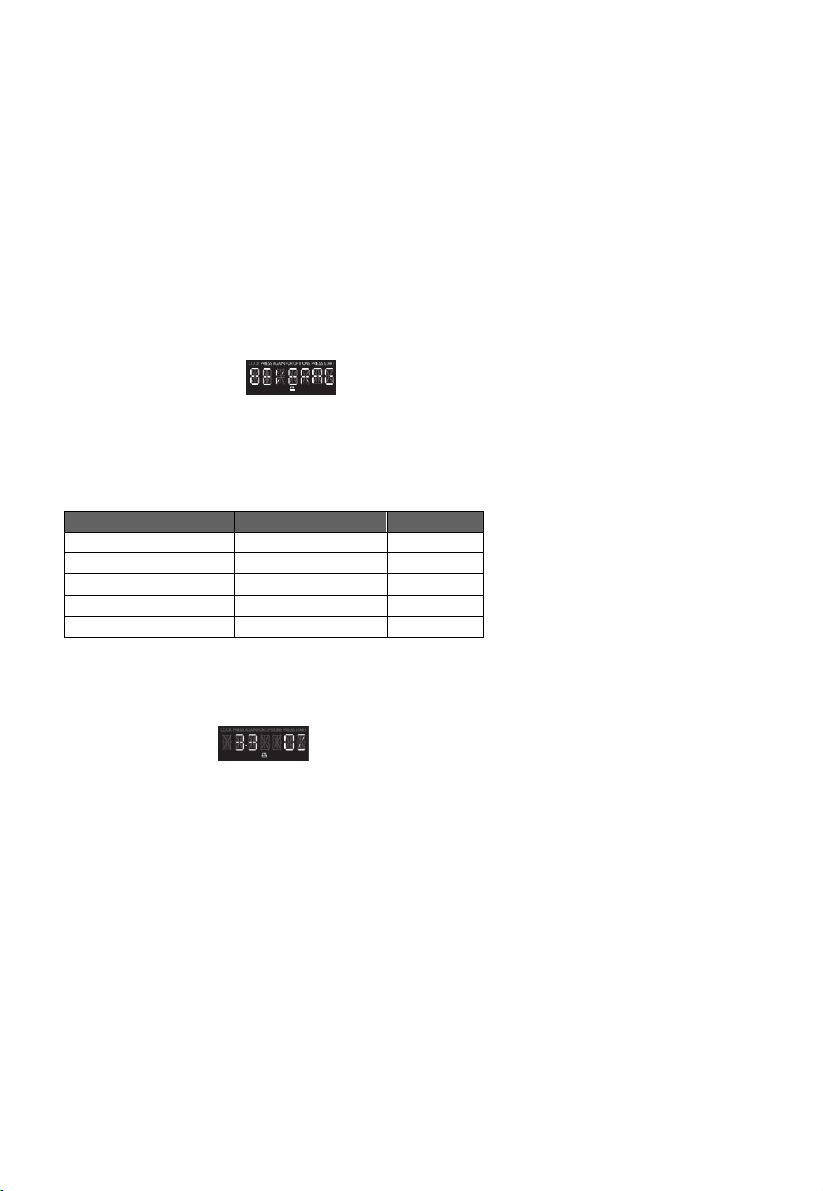
REHEAT
TheReheatfunctionisprogrammedtoreheatthefollowingitems:Beverage,Dinner Plate,
Pizza,Soup/SauceandCasserole.
The Reheat function sets the appropriate heating time automatically. Depending on the item
being reheated, the heating time is calculated by either the amount of food or beverage (Timed
Cooking).
NOTE:
•
Do not use tight-sealing covers that would keep the steam from escaping,
and cause the food to overcook.
•
Make sure the outside of the microwave-safe container and the inside of the oven are dry before placing the container in the
microwave oven. Any moisture will turn into steam which can mislead the sensors.
1.
Place the food or beverage item in the microwave oven.
2.
Press REHEAT once, “BEVERAGE” will appear on the display. Continue to press REHEAT to toggle among the choices until the
desired item appears in the display.
NOTE:
•
If the heating time for your item is calculated by sensing moisture, the
Sensing process begins once Start is pressed.
•
Do not open the door during the Sensing process. If you do, theReheat program will be paused.
•
When the Sensing process is completed, alert tones will sound and the
calculated reheat time will begin to count down.
Reheat Programs
Item Timed Cooking Quantity
Beverage (uncovered)
Timed
1 to 3 cups
Dinner Plate (covered)
1 to 2 plate
s
Pizza (uncovered)
1 to 4 slices
Soup/Sauce (covered)
Timed
1 to 3 cups
Casserole/Lasagna (covered)
Timed
10.5 oz. (298 g)
POPCORN
Thepopcorncontrolisprogrammedtopopmicrowavepopcornbasedonthesizeof thebag.
1.
Press POPCORN to toggle between the bag sizes.
2.
PressSTARTto
For the popcorn function there are three options:
Press 1: 3.3 Oz bag
Press 2: 3.0 Oz bag
Press 3: 1.75 Oz bag
3.
Press START to confirm
,then press number to enter quantity before pressing START again to reheat.
•
•
Press 1 time: To pop a 3.3 ounce bag of popcorn.
Press 2 times: To pop a 3.0 ounce bag of popcorn.
Press 3 times: To pop a 1.75 ounce bag of popcorn.
•
start cooking.
13
Timed
Timed
CLEANING
IMPORTANT:
•
Before cleaning, sure the is
cool. Always follow label instructions on cleaning
products.
•
To avoid damage to the microwave oven caused by arcing due to soil buildup, keep the oven cavity, top grille and the area
where the door touches the oven frame clean.
1.
Using a warm water and mild soap solution and a soft cloth or sponge, clean the oven cavity, frame and oven exterior.
2.
Rinse with clean warm water and dry with a soft cloth.
NOTE:
•
Do not use or rough scouring on the microwave.
•
The glass turntable may be washed and dried in the dishwasher.
•
For stainlesssteel models, a stainlesssteel cleanermay be used onthe exterior.
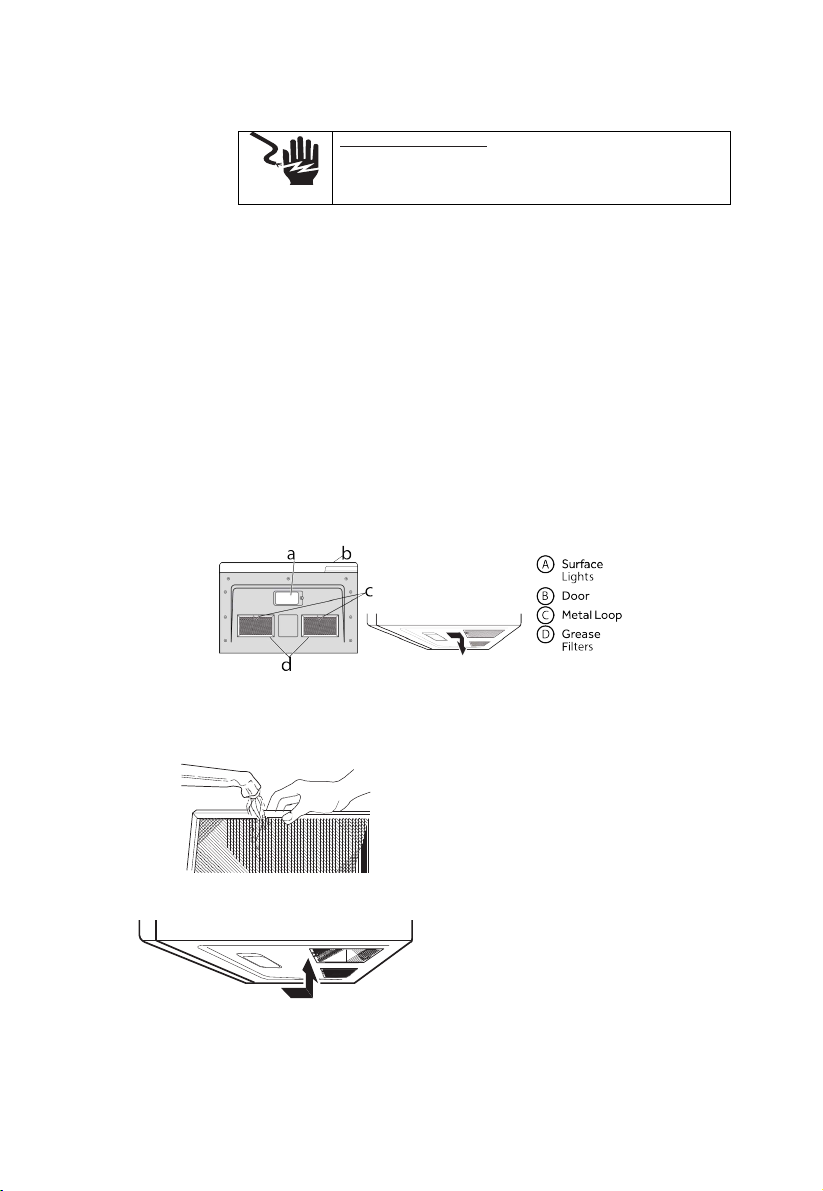
GREASE FILTER(S)
Grease filters are located on the underside of microwave oven. The grease filters should be
removed and cleaned often; generally at least once every month.
1.
Remove the grease filter. Grasp the metal ring, slide the filter toward the back, and then gently pull the filter downward. Repeat for
the second filter.
2.
Soak the grease filters in hot water with a mild detergent added. Rinse well and shake to dry.
NOTE:
Do not use ammonia or wash in a dishwasher. The aluminum on the filter will
corrode and darken.
3.
Reinstall the grease filter. Insert the back edge of the filter into the opening, and then gently push the filter up into place. Repeat
for the second filter.
Electrical Shock Hazard
Disconnect power before cleaning.
Failure to do so can result in death or electrical shock.
MICROWAVE OVEN CARE
14
make all controls are off and microwave oven
scouring powder pads

CHARCOAL FILTER
IMPORTANT:
A charcoal filter must be installed in the microwave oven when it is used in a non-
vented (recirculating) installation. Your microwave oven comes from the factory with the
charcoal filter installed.
The charcoal filter cannot be cleaned, so it must be replaced at least every 6 months or more
often depending on use. To order a replacement charcoal filter for your model, contact the
Customer Satisfaction Center. See “Back Cover” for contact information.
1.
Unplug or disconnect power.
2.
Using a Phillips screwdriver, remove screws from the top grille.
3.
Open the microwave door so you can grasp the top grille, and then pull the grille straight out to remove.
4.
Remove the used charcoal filter from the back of the grille, and then discard the filter.
5.
Align the holes in the new charcoal filter with the five posts on the back of the grille, and gently press down toattach.
A Charcoal Filter
6.
Align the top edge of the grille so that when the grille is pushed into place the screw hole tabs on the the grille will align with the
holes in the microwave cabinet. Gently push on the grille until it snaps into place and the screw holes are aligned.
NOTE:
Make sure that the wire harness, located near the door hinge, is not pinched
when you are replacing the top grille.
a b b
A
Wire Harness (not shown)
B
Screw HoleTab (2)
7.
Replace the two and screws.
LIGHTS
IMPORTANT:
Your microwave oven features LED interior lighting as well as LED surface
lighting. These lights are designed to last for the life of your microwave oven. However, if
the lights stop illuminating, please contact a qualified technician for replacement or the
Customer Satisfaction Center for service. See the back cover for contact information.
15
screws removed earlier, completely tighten the

Troubleshooting
Check your problem by using the chart below and try the solutions for each problem. If the
microwave oven still does not work properly, contact the nearest authorized service center.
TROUBLE
Oven will not start
POSSIBLE CAUSE POSSIBLE REMEDY
a. Electrical cord for oven is
not plugged in.
b. Door is open.
c. Wrong operation is set.
a. Plug into the outlet.
b. Close the door and try
again.
c. Check instructions.
Arcing or sparking
a. Materials to be avoided in
microwave oven were
used.
b. The oven is operated when
empty.
c. Spilled food remains in the
cavity.
a. Use microwave-safe
cookware only.
b. Do not operate with oven
empty.
c. Clean cavity with wet towel.
Unevenly cooked
foods
a. Materials to be avoided in
microwave oven were
used.
b. Food is not defrosted
completely.
c. Cooking time, power level
is not sui tble.
d. Food is not turned or stirred.
a. Use microwave-safe
cookware only.
b. Completely defrost food.
c. Use correct cooking time,
power level.
d. Turn or stir food.
Overcooked foods Cooking time, power level is
not suitable. Use correct cooking time,
power level.
Undercooked foods
a. Materials to be avoided in
microwave oven were used.
b. Food is not defrosted
completely.
c. Oven ventilation ports are
restricted.
d. Cooking time, power level is
not suitable.
a. Use microwave-safe
cookware only.
b. Completely defrost food.
c. Check to see that oven venti-
lation ports are not restricted.
d. Use correct cooking time,
power level.
Improper defrosting
a. Materials to be avoided in
microwave oven were used.
b. Cooking time, power level is
not suitable.
c. Food is not turned or stirred.
a. Use microwave-safe
cookware only.
b. Use correct cooking time,
power level.
c. Turn or stir food.
MAINTENANCE
a
16

EURO-LINE MICROVENT24 EM038K6BD Warranty
LENGTH OF WARRANTY:
THIS GUARANTEE DOES NOT COVER COMMERCIAL USE
The name EURO-LINE, for service matters, incorporates work performed by authorized service agents or service
companies.
EXCEPTIONS: EURO-LINE WILL NOT PAY FOR THE FOLLOWING SERVICE CALLS:
1. To install or correct the installation of an appliance
2. To instruct the use of an appliance
3. To replace house fuses, re-set circuit breakers, or correct house wiring
4. To repair an appliance if it fails due to misuse or abuse
5. To repair cosmetic damage to the appliance, unless such damage results from a defect in the workmanship or
materials. Such damage must be reported to EURO-LINE within 5 days from the date of purchase.
EURO-LINE WILL NOT PAY WHEN THE FOLLOWING OCCURS:
1. Damage resulting from fires, acts of God, alteration, improper installation, or installation not in accordance with
building codes
2. Pick up or delivery of major appliances requiring service. The appliances are designed to be repaired in the
home. However, EURO-LINE will not be responsible for travelling and labour costs if the customer lives in
excess of 50km/30 miles, or if the travel time is in excess of 30 minutes from the nearest service centre. Any
excess to this will not be covered by the warranty.
3. The consumer shall ensure that all filters are replaced in accordance with the manufacturer’s specifications and
ensures that all electrical wiring meets local codes and conforms to the manufacture’s’ specifications.
4. In no event will EURO-LINE, or its parents, subsidiaries or affiliates, be responsible for (i) damages which are
caused in whole or in part by the consumer’s failure to comply with the foregoing obligations, (ii) incidental,
consequential, punitive, exemplary or special damages, or (iii) damages in excess of the price paid for the
product for which a claim is made. For warranty service and parts, contact EURO-PARTS (see contact below).
Service will be provided during normal business hours.
SERVICE & SUPPORT
Distributed by: EURO-LINE APPLIANCES INC.
871 Cranberry Court, Oakville, ON L6L 6J7
Canada
1-800-421-6332
Tel: 905-829-3980
Fax: 905-829-3985
Service & Parts: EURO-PARTS
Belgrave, ON
Canada
1-800-678-8352)
www.euro-parts.ca
TWO YEAR FULL WARRANTY From original date of
purchase, including parts and labour, to the first
purchaser of this appliance.
EURO-LINE WILL PAY FOR: Replacement parts and/or
labour to repair defects in materials or workmanship.
Service must be provided by an authorized Euro-Line
company (unless advised otherwise).
www.ela.ca

USER INSTRUCTIONS AND INSTALLATION MANUAL | SERVICE AND REPAIR
To save you time and money, please have the following information ready in case you have to call for service:
Name of the dealer from whom you purchased the appliance
Model number (shown on the rating plate)
Serial number (shown on the rating plate)
Date of purchase
You should retain your invoice to quote should you require service assistance. This will identify your product for
our priority service back-up. Please attach your invoice to your manual for easy future reference.
In order to assist you better, please complete the warranty card below.
Important: Please record details of your purchase below and mail/fax/email to EURO-LINE APPLIANCES INC.
-----------------------------------------------------------------------------------------cut along line ------------------------------------------------------------------------------------
Name: ________________________________________ Tel No: ___________________________________
Address: ________________________________________________________________________________
City : _________________________ Prov/State: __________________ Postal Code/ZIP: _____________
Where purchased: ______________________________ Purchase date: _____________________________
Items purchased: _________________________________________________________________________
Serial No’s: ______________________________________________________________________________

This manual suits for next models
1
Table of contents


