Euromaid EFD474S User manual

User Manual
/)UHQFK'RRU)ULGJH)UHH]HU6WDLQOHVV6WHHO
()'6

2
CONTENTS
SAFETY AND WARNINGS................................................................................................................. 3
Usage Conditions and Restrictions .......................................................................................................3
Electrical Safety ...................................................................................................................................4
Children...............................................................................................................................................5
Unpacking ...........................................................................................................................................5
Risk of Fire...........................................................................................................................................5
Disposal...............................................................................................................................................5
PRODUCT OVERVIEW ...................................................................................................................... 6
Dimensions..........................................................................................................................................6
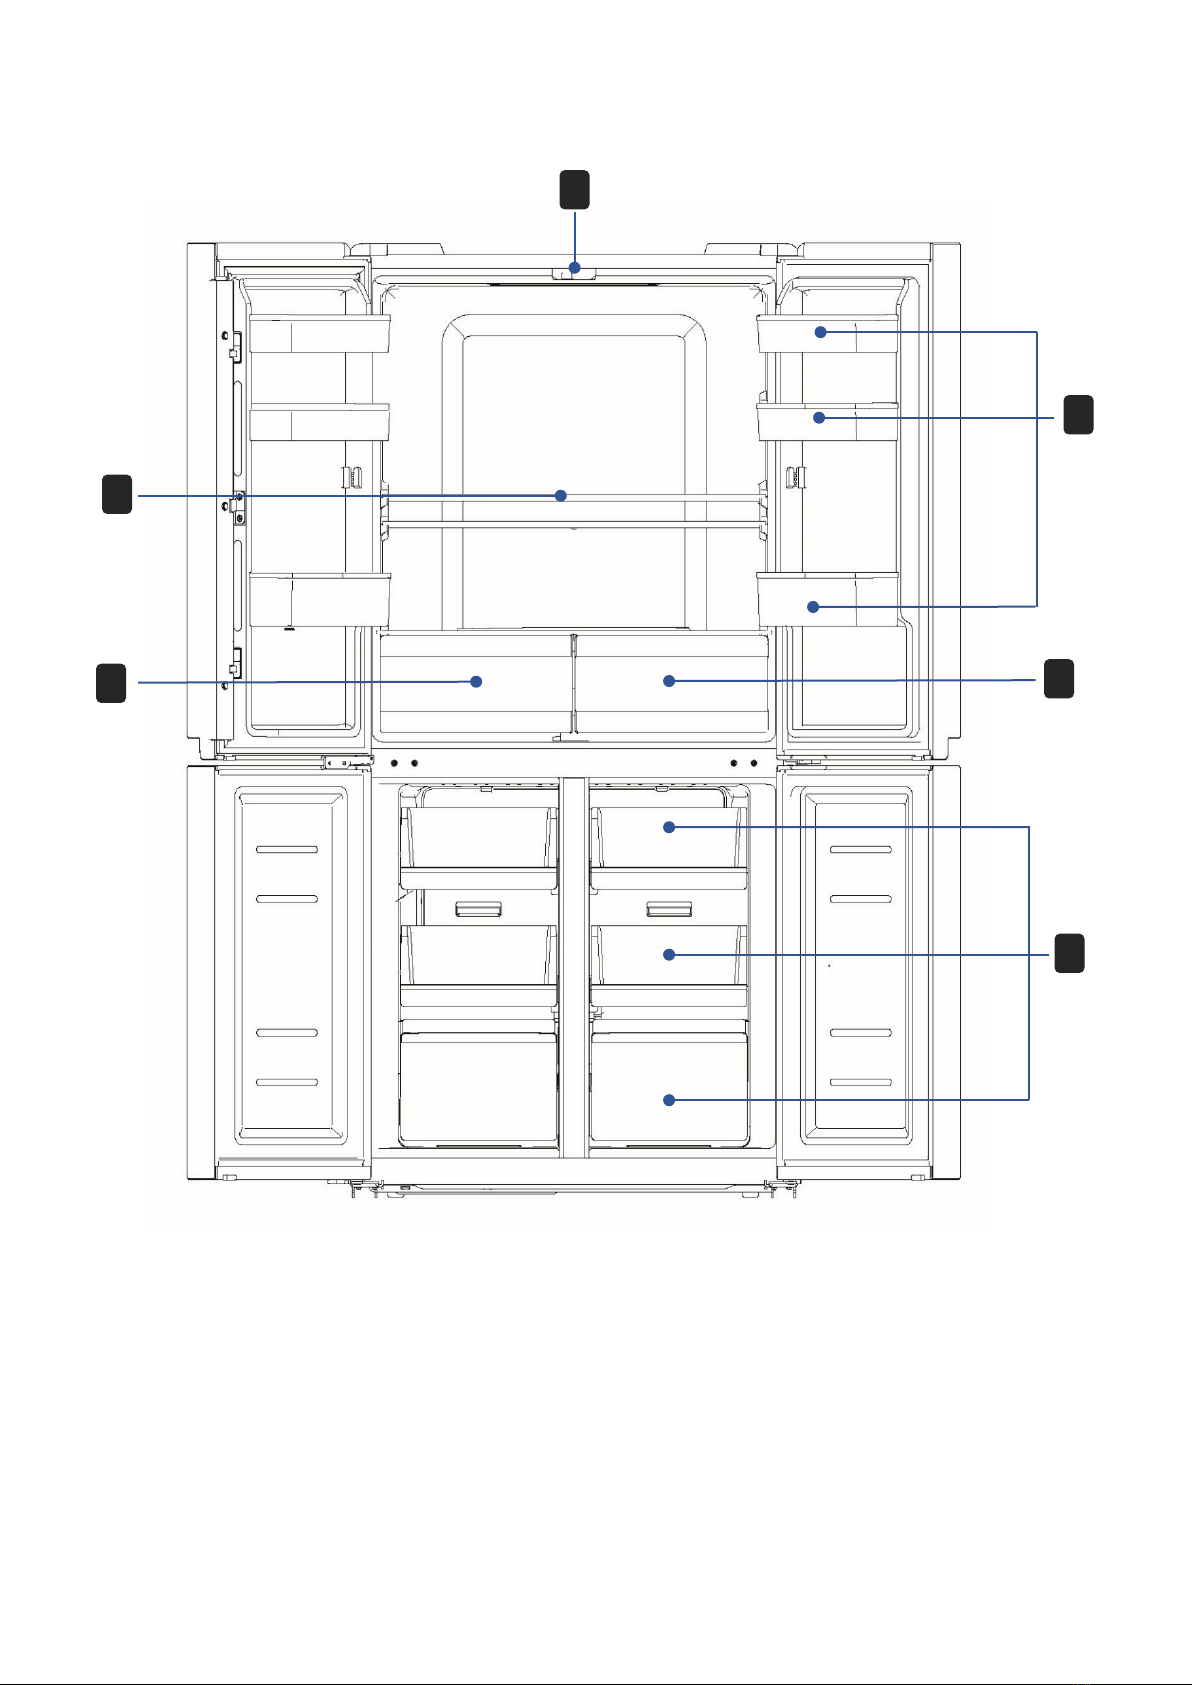
Key Components .................................................................................................................................7
Control Panel.......................................................................................................................................8
INSTALLATION ................................................................................................................................. 9
Selecting a Suitable Location................................................................................................................9
Door Space Requirements ...................................................................................................................9
Levelling the Unit..................................................................................................................................9
FIRST TIME USE ............................................................................................................................. 10
Power Source and Grounding ............................................................................................................10
Cleaning Before Use ..........................................................................................................................10
Before Using your Appliance ..............................................................................................................10
Noise from the Fridge.........................................................................................................................11
Tips for Keeping Food within the Fridge ..............................................................................................11
OPERATION ................................................................................................................................... 12
Display...............................................................................................................................................12
Operating Instructions ........................................................................................................................12
CLEANING AND MAINTENANCE .................................................................................................... 14
Cleaning your Appliance.....................................................................................................................14
Removal of the door shelves ..............................................................................................................14
Care When Handling / Moving Your Unit.............................................................................................14
Servicing............................................................................................................................................14
LED Replacement ..............................................................................................................................15
Normal Operation...............................................................................................................................15
Tips for Energy Saving .......................................................................................................................15
BASIC TROUBLESHOOTING .......................................................................................................... 16
SPECIFICATIONS ........................................................................................................................... 17
MANUFACTURER GUARANTEE...................................................................................................... 18

3
SAFETY AND WARNINGS
Thank you for buying this Euromaid product. Please read all safety instructions before using your fridge or
freezer.
•Read this manual thoroughly before first use, even if you are familiar with this type of product.
The safety precautions enclosed herein reduce the risk of fire, electric shock and injury when
correctly adhered to.
•Make sure you understand all instructions and warnings.
•Always follow basic safety precautions and accident prevention measures when using an
electrical appliance, including the following:
•IMPORTANT: Pay particular attention to messages that contain the words DANGER,
WARNING or CAUTION. These words are used to alert you to a potential hazard that can
seriously injure you and others. The instructions will tell you how to reduce the chance of injury
and let you know what can happen if the instructions are not followed.
•The refrigerant isobutane (R600a) is contained within the refrigerant circuit of the appliance, a
gas with a high level of environmental compatibility, which is nevertheless flammable. During
transportation and installation of the appliance, ensure that none of the components of the
refrigerant circuit become damaged.
•WARNING: Do not damage the refrigerant circuit. Never use an appliance with a damaged
refrigerant circuit. If the refrigerant circuit becomes damaged, avoid proximity to open fires and
all types of heat and ignition sources. Thoroughly ventilate the room in which the appliance is
located.
•DANGER: It is hazardous for anyone other than an authorised service person to service this
appliance. In Queensland, the authorised service person MUST hold a Gas Work Authorisation
for hydrocarbon refrigerants to carry out servicing or repairs which involve the removal of
covers.
Usage Conditions and Restrictions
•This appliance is only intended for use within a domestic environment only.
•If the supply cord is damaged, it must be replaced by Glen Dimplex or an authorised service
agent on Glen Dimplex’s behalf in order to avoid a hazard.
•Do not store explosive substances such as aerosol cans with a flammable propellant in this
appliance.
•The appliance must be unplugged after use and before carrying out user maintenance on the
appliance.

4
•WARNING: Keep ventilation openings in the appliance enclosure or in the built-in structure
clear of obstruction.
•WARNING: Do not use mechanical devices or other means to accelerate the defrosting
process, other than those recommended by the manufacturer.
•WARNING: Do not damage the refrigerant circuit.
•WARNING: Do not use electrical appliances inside the food storage compartments of the
appliance, unless they are of the type recommended by the manufacturer.
•WARNING: When positioning the appliance, ensure the power cord is not trapped or
damaged.
•WARNING: Do not locate multiple portable socket-outlets or portable power supplies at the
rear of the appliance.
•Do not use extension cords or power boards.
•This appliance is designed to be standing only and should not be recessed.
Electrical Safety
•Before connecting and turning on the appliance, ensure the electrical voltage and circuit
frequency correspond to that indicated on the appliance rating label.
•This appliance should be properly earthed for your safety. The power cord of this appliance is
equipped with a three-prong plug for use in standard wall outlets to minimise the possibility of
electrical shock. Do not modify the cord and/or plug provided with the appliance. Improper use
of the earthed plug can result in the risk of electric shock.
•This appliance requires a standard 220-240V AC 50Hz electrical outlet. Do not overload the
electrical circuit.
•Do not kink or damage the power cord; do not leave it exposed or dangling. Secure it at the
back of the appliance so no one steps on or places anything on the cord or against it. Keep the
cord out of reach of children. When moving the appliance, make sure not to damage the power
cord.
•Do not use an inverter, adaptor or extension cord with this appliance. If the cord is too short,
have a qualified electrician install an outlet near the appliance. Use of an extension cord and an
inverter can negatively affect the performance of the unit.
•To protect against the risk of electric shock, do not immerse the unit, cord or plug in water or
spray it with any other liquid. Do not connect or disconnect the electric plug when your hands
are wet. Turn the power switch off before removing the plug from the socket.
•WARNING: To reduce the risk of fire, electric shock or personal injury, always unplug the
appliance from the socket when not in use, when moving and before cleaning or servicing.
Never unplug the unit by pulling the power cord. Always grip the plug firmly and pull straight out
from the power point.

5
Children
•This appliance is not intended for use by persons (including children) with reduced physical,
sensory or mental capabilities, or lack of experience and knowledge, unless they have been
given supervision or instruction concerning use of the appliance by a person responsible for
their safety.
•Children should be supervised to ensure that they do not play with the appliance.
Unpacking
•During transportation, protective packaging was used to protect the appliance against any
damage. After unpacking, please dispose of all elements of packaging in a way that will not
cause damage to the environment.
•CAUTION: During unpacking, the packaging materials (polythene bags, polystyrene pieces,
etc.) should be kept out of reach of children.
•This appliance is heavy, take care when moving it. To avoid back or other injury, consider a two
person lift or mechanical aid when installing it.
•When unpacking, check the appliance carefully for damage. If it is damaged, do not install the
appliance
Risk of Fire
•If the refrigerant circuit should become damaged. Avoid open flames and sources of ignition.
Disconnect the appliance from the mains power. Thoroughly ventilate the room in which the
appliance is situated for several minutes.
Disposal
•Old appliances should not simply be disposed of with normal household waste, but should be
delivered to a collection and recycling centre for electric and electronic equipment. A symbol
shown on the product, the instruction manual or the packaging shows that it is suitable for
recycling.
•Materials used inside the appliance are recyclable and are labelled with information concerning
this. By recycling materials or other parts from used devices you are making a significant
contribution to the protection of our environment.
•Information on appropriate disposal centres for used devices can be provided by your local
authority

6
PRODUCT OVERVIEW
Dimensions
Description
Code
Size (mm)
Height to top of cabinet A 1775
Width B 833
Depth C 653
Depth (Door open 90 degrees wide) D 1000
Width (Door open 90 degrees wide) E 920
Depth (Door open 135 degrees wide) F 845
Width (Door open 135 degrees wide) G 1400

7
Key Components
1 LED Light 2 Door Shelves
3 Glass Shelves 4 Flexible Zone
5 Vegetable Crisper 6 Freezer Draws
2
1
5
4
3
6

8
Control Panel
LCD Screen Icons
1 Refrigerator Selection 2 Freezer Selection
3 Super Cool / Super Freezing 4 Temperature Indicator
5 Flexible Zone – Vegetables & Fruit (6°) 6 Flexible Zone – Meat (-1°)
7 Flexible Zone – Drinks (2°)
Control Buttons
A Temperature Increase B Fridge / Freezer Zone Selection
C Temperature Decrease D Super Cool / Super Freezing Mode
E Flexible Zone Control F Lock / Unlock Button

9
INSTALLATION
Selecting a Suitable Location
When selecting a position for your unit, ensure the floor is flat and firm, and the room is well ventilated.
Avoid placing your unit near a heat source (i.e., oven, radiator, or hot water system). Avoid direct sunlight
as it may increase the electrical consumption. Extreme cold temperatures may also cause the unit to not
perform correctly. This unit is not designed for use in a garage or outdoors. Do not drape the unit with any
covering.
When installing the unit, ensure that 10cm of free space is allowed to the left, right and rear of the unit, and
30cm at the top. This will allow cold air to circulate around the unit and improve the efficiency of the
cooling process.
Door Space Requirements
Levelling the Unit
Figure 1a
The unit’s door must be able to open fully as pictured in
Figure 1a.
To level the unit, adjust the two feet at the front of the
unit – turning clockwise to extend and counter-
clockwise to reduce as shown in
Figure 1b.
If the unit is not level, the door and magnetic seal
alignments will not be covered properly, leading to
inefficient refrigeration performance
Ensure that the feet all touch the ground before use.
Figure 1b

10
FIRST TIME USE
Power Source and Grounding
It’s recommended to use the fridge on its own dedicated power outlet for both convenience and safety.
The power outlet must be grounded.
Important! If the supply cord is damaged, cease use and ensure the appliance is completely disconnected
from the power supply.
The power cord must be replaced by Glen Dimplex or an authorised service agent on Glen Dimplex’s
behalf before it is reconnected.
Cleaning Before Use
Wipe the inside of the unit with a weak solution of bicarbonate soda, then rinse with warm water using a
soft fibre cloth or sponge. Wash the shelves and drawers in warm soapy water and dry completely before
replacing in the unit. Clean the exterior of the unit with a damp cloth. Further cleaning instructions and tips
can be found on page 14.
Before Using your Appliance
•You must wait at least two hours after moving the unit, before turning the appliance on.
•Do not use when the power cord is damaged or the plug is worn.
•Do not alter the power cord under any circumstances, so as to ensure safe use.
•Do not put flammable, explosive, volatile and highly corrosive items in the refrigerator to prevent
damages to the product or fire accidents.
•Do not place flammable items near the refrigerator to avoid fires.
•This product is a household refrigerator and is only suitable for the storage of foods.
•According to national standards, household refrigerators shall not be used for other purposes,
such as storage of blood, drugs or biological products.
•Before placing any food in your unit, turn it on and wait for 24 hours, to make sure it is working
properly and to allow it time to fall to the correct temperature. Your unit should not be overfilled.
•To remove any excess odour, place a small container of Bi-Carb soda on the middle shelf of
the fridge towards the back for 24 hours.
•Important! Before plugging in your fridge, you must check that you have a power outlet which
is compatible with the plug supplied on the appliance lead.

11
Noise from the Fridge
You may notice that your fridge makes some unusual noises. This is completely normal for refrigerators
and freezers, and the noises are caused by the circulation of the refrigerant liquid within the cooling
system.
Tips for Keeping Food within the Fridge
•Cooked meats & fish should always be stored on a shelf above raw meat/fish to avoid bacterial
transfer. Keep raw meat/fish in a container which is large enough to collect juices and cover
properly, placing the container onto the lowest shelf.
•Leave space around your food to allow air to circulate inside the unit.
•Ensure all parts of the appliance are kept cool.
•To prevent transfer of flavours and drying out, pack or cover the food separately. Fruit and
vegetables do not need to be wrapped.
•Always let pre-cooked food cool down before you place into the fridge. This will help to
maintain the internal temperature of the fridge.
•To prevent cold air from escaping the fridge, try to limit the number of times you open the door.

12
OPERATION
Display
When the unit is first powered on, the display will light up and the start-up tone rings, and then after 3
seconds the panel will display return to normal operation. When first powered on, default temperatures of
refrigerating and freezing compartments are 4°C and -18°C, respectively.
During the first power-on, if the ambient temperature is above 38°C, it is recommended that the unit be set
to 2°C refrigeration and -16°C freezing for fast and balanced cooling.
If an error occurs, the fault code will display instead of temperature, fault codes are referenced on pg.13.
Under normal circumstances, if the panel is not touched and the door isn’t opened, then the display will be
locked.
Operating Instructions
1. Setting the Temperature of the Refrigerator
When control panel is unlocked, press the TEMP. SELECT (B) button to select the refrigerator zone, the
REF. (1) icon will light up on the on the LCD screen. Once selected, press UP (A) or DOWN (C) to adjust
the temperature.
The range of temperature available is 2°C ~ 8°C.
2. Setting the Temperature of the Freezer
When control panel is unlocked, press the TEMP. SELECT (B) button to select the freezer zone, the FRZ.
(2) icon will light up on the on the LCD screen. Once selected, press UP (A) or DOWN (C) to adjust the
temperature.
The range of temperature available is -24°C ~ -16°C.

13
3. Setting the Temperature of the Flexible Zone
Press the VARIO. TEMP (E) button to change temperature of the flexible zone. Pressing the button
repeatedly will cycle the temperature between 6° (Vegetables & Fruit), 2° (Drinks) and -1° (Meat).
4. Pre-Set Programmes
To engage the pre-set programmes, whilst the control panel is unlocked, press the SUPER COOL/SUPER
FRZ. (D) button to cycle through the following options:
a. Super Cool – Sets the temperature of the refrigerator to 2°. The program will run for 6
hours and then the refrigerator will return to the previously set temperature.
b. Super Freeze – Sets the temperature of the freezer to -24°. The program will run for 32
hours and then the freezer will return to the previously set temperature.
The recommended temperature setting of the fridge is 4° and -18° for the freezer.
5. Sabbath Mode
To engage the sabbath mode, unlock the control panel and press the DOWN (C) and UNLOCK (F)
buttons at the same time for 4 seconds. Press any button to exit this mode. The following actions occur
during sabbath mode
a. Control panel, lights and alarm is muted.
b. The fridge and freezer cool normally.
6. Opening Warning and Alarm Mute
When the refrigerator door is opened a musical tone will be heard. When the door remains open for longer
than two minutes, an alarm will sound once every minute until the door is closed.
Press any button on the control panel to mute the alarm.
7. List of Fault Codes
The following warnings appearing on the display indicate corresponding faults of the refrigerator. Although
the refrigerator may still have cold storage function with the following faults, it is advised to contact Glen
Dimplex for maintenance, so to ensure optimized operation of the appliance.
Error Code
Error Description
Error Code
Error Description
E1 Temperature sensor failure of
refrigerating chamber E2 Temperature sensor failure of
freezing chamber
E3 Temperature sensor failure of variable
temperature chamber E4 Failure of defrosting sensor in
refrigerating chamber
E5 Freezing defrost sensor detection
circuit error E6 Communication error
E7 Circulation of temperature detection
circuit error EH Moisture sensor error

14
CLEANING AND MAINTENANCE
WARNING! To avoid an electric shock, always unplug your fridge before cleaning.
Cleaning your Appliance
•Caution: Before using any cleaning products, please read and follow the manufacturer’s
instructions and warnings to avoid any damage to your fridge or personal injury.
•Upon installation of your new appliance, it is recommended that it be cleaned thoroughly.
•Wash the inside with a damp warm cloth containing a water and baking soda solution.
•The solution should be about 2 tablespoons of baking soda to 2L of water.
•Wash the storage basket with a mild detergent solution.
•Be sure to keep the door seal clean to keep the unit running efficiently.
•The outside of the fridge should be cleaned with mild detergent and warm water.
•Dry the interior and exterior with a soft cloth.
•The condenser coils should be carefully vacuumed when they are dusty or dirty.
•Clean your door gasket seals every 3 months using the same warm water solution described
above.
Removal of the door shelves
Care When Handling / Moving Your Unit
Hold the unit around its sides or base when moving it. Under no circumstances should it be lifted or
moved by holding the doors or hinges.
Servicing
The unit should be serviced by an authorised technician and only genuine spare parts should be used.
Under no circumstances should you attempt to repair the unit yourself. Repairs carried out by
inexperienced persons may cause injury or serious malfunction. Contact Glen Dimplex for all service and
fault related enquiries.
According to the direction arrow in the figure 1c, use both
hands to squeeze the tray, and push it upward, then it can be
removed for cleaning.
Figure 1c

15
LED Replacement
The LED light in this product needs to be replaced by an authorised service person, in the instance of a
failure, please contact Glen Dimplex to lodge a service call.
Normal Operation
•The refrigerator enclosure may emit heat during operation specially in summer, this is caused
by the radiation of the condenser, and it is a normal phenomenon.
•Condensation phenomenon will be detected on the exterior surface and door seals of the
refrigerator when the ambient humidity is large. This is a normal phenomenon, and the
condensation can be wiped away with a dry towel.
•A buzzing noise may be heard when the compressor is running, especially when starting up or
shutting down.
Tips for Energy Saving
•Try not to open the door too often, especially when the weather is wet and hot. Once you open
the door, close it as soon as possible.
•Every now and then check if the appliance is sufficiently ventilated (adequate air circulation
behind the appliance).
•Before loading the appliance with packages of fresh food, make sure they are cooled to
ambient temperature.
•If it is the outer condenser, the rear wall should be always clean free of dust or any impurities.
•The appliance should be located in the coolest area of the room, away from heat producing
appliances or heating ducts, and out of the direct sunlight.
•Let hot foods cool to room temperature before placing in the appliance. Overloading the
appliance forces the compressor to run longer. Foods that freeze too slowly may lose quality,
or spoil.
•Be sure to wrap foods properly, and wipe containers dry before placing them in the appliance.
This cuts down on frost build-up inside the appliance.
•Appliance storage bin should not be lined with aluminium foil, wax paper, or paper towel. Liners
interfere with cold air circulation, making the appliance less efficient.
•Organise and label food to reduce door openings and extended searches. Remove as many
items as needed at one time, and close the door as soon as possible.

16
BASIC TROUBLESHOOTING
Fridge isn’t operating
•Check that the fridge is plugged in and connected to
power.
•Check whether voltage is too low.
•Check that a fuse hasn’t blown or circuit tripped.
Fridge is making strange odour
•Odourous foods should be tightly wrapped and sealed in
containers.
•Ensure that the interior is clean. Refer to cleaning
instructions.
Fridge compressor is
continuously running
•It is normal for the fridge compressor to operate for longer
periods of time when the ambient temperature is higher
(i.e. Summer).
•Do not put too much food in the fridge at one time.
•Do not put warm/hot foods into the fridge.
•Try to minimize the frequency of the door opening.
Illuminating light does not work
•Ensure the fridge is connected to power.
•Check that the globe hasn’t blown.
The fridge door doesn’t close
properly
•Ensure that food isn’t preventing the door from closing.
•Ensure that the fridge is completely level and feet adjusted
to touch the floor.
•Ensure the fridge door gaskets/seals are clean.
The fridge is making loud noises
•It’s normal for the fridge to make noises when refrigerant
coolant is being circulated.
•Check that the fridge is correctly levelled.

17
SPECIFICATIONS
CAPACITY
Total Volume 474L
Fridge Volume 305L
Freezer Volume 169L
DIMENSIONS
Boxed Dimensions (W x D x H) 885 x 710 x 1900mm
Unit Dimensions (W x D x H) 833 x 653 x 1775mm
Minimum Space Required 1033 x 753 x 2075mm
Gross Weight 100kg
Net Weight 91kg
GENERAL
Colour/Finish Stainless Steel
COOLING
Refrigerant R600a
Fridge Temperature Range 2°C ~ 8°C.
Freezer Temperature Range -24°C ~ -16°C.
ELECTRICAL
Connection 10A Plug
Power 220 – 240V / 50Hz
kWh Per Year 420
Energy Rating 3.5 Stars

18
MANUFACTURER GUARANTEE
This warranty is provided in Australia by Glen Dimplex Australia Pty Limited ABN 69 118 275 460 (Phone
number 1300 556 816)and in New Zealand by Glen Dimplex New Zealand Limited NZBN
9429000069823 (Phone number 09 274 8265) in respect of the Euromaid product.
1. Euromaid Express Warranty
Subject to the exclusions below, we warrant that the product will not have any electrical or mechanical
breakdowns within:
a. In the case of Euromaid products used for personal, domestic or household purposes, a period of
2years from the date the product is purchased as a brand-new product from a retailer located in
Australia / New Zealand.
b. In the case of Euromaid products used for purposes other than personal, domestic or household
purposes (including business or commercial use), a period of 90 days from the date the product is
purchased as a brand-new product from a retailer located in Australia / New Zealand. Euromaid
products are designed and intended for domestic use only; and
c. All warranty repairs must be carried out by Glen Dimplex or their nominated service agent
Note: warranty periods detailed above may vary in line with agreements with select retail and builder
partners and may differ between Australia and New Zealand.
The benefits conferred by this express warranty are in addition to the Consumer Guarantees referred to in
section 3 and any other statutory rights you may have under the Australian / New Zealand Consumer Law
and/or other applicable laws.
2. Warranty Exclusions
This express warranty does not apply where:
a. The product has been installed, used or operated otherwise than in accordance with the product
manual or other similar documentation provided to you with the product;
b. The product requires repairs due to damage resulting from accident, misuse, incorrect installation,
insect or vermin infestation, improper liquid spillage, cleaning or maintenance, unauthorised
modification, use on an incorrect voltage, power surges and dips, voltage supply problems,
tampering or unauthorised repairs by any persons, use of defective or incompatible accessories or
exposure to abnormally corrosive conditions, events independent of human control which occurred
after the goods left the control of Glen Dimplex;
c. The repair relates to the replacement of consumable parts such as fuses and bulbs or any other
parts of the product which require routine replacement;
d. You are unable to provide us with reasonable proof of purchase for the product;
e. the breakdown occurs after the expiry of the express warranty period set out in section 1 or
f. the product was not purchased in Australia / New Zealand as a brand-new product.

19
3. Consumer guarantees
Our goods come with guarantees that cannot be excluded under the Australian / New Zealand Consumer
Law. You are entitled to a replacement or refund for a major failure and for compensation for any other
reasonably foreseeable loss or damage. You are also entitled to have the goods repaired or replaced if the
goods fail to be of acceptable quality and the failure does not amount to a major failure.
4. How to make a claim
You may make a claim under this warranty through our website, contacting our customer care line or via
email. Contact details for Glen Dimplex Australia and New Zealand can be found at the end of this
document
To make a valid claim under this warranty, you must:
a. Lodge the claim with us as soon as possible and no later than 14 days after you first become
aware of the breakdown;
b. Provide us with the product serial number;
c. Provide us with reasonable proof of purchase for the product. This can take the form of a store
receipt, new home handover form or other payment receipt documentation; and
d. If required by us, provide us (or any person nominated by us) with access to the premises at which
the product is located at times nominated by us (so that we can inspect the product).
5. Warranty Claims
If you make a valid claim under this warranty and none of the exclusions set out in section 2 apply, we will,
at our election, either repair the product or replace the product with a product of identical specification (or
where the product is superseded or no longer in stock, with a product of as close a specification as
possible).
Goods presented for repair may be replaced by refurbished goods of the same type rather than being
repaired. Refurbished parts may be used to repair the goods.
Products are designed and supplied for normal domestic use. We will not be liable to you under this
warranty for business loss or damage of any kind whatsoever.
Glen Dimplex Australia Pty Ltd Glen Dimplex New Zealand Ltd
www.glendimplex.com.au www.glendimplex.co.nz
Australia New Zealand
Ph: 1300 556 816 Ph: 09 274 8265
customer.care.ha@glendimplex.com.au nztechserv@glendimplex.co.nz

20
READ THE INSTRUCTION BOOKLET BEFORE INSTALLING AND USING THE APPLIANCE.
The manufacturer will not be responsible for any damage to property or to persons caused by incorrect
installation or improper use of the appliance.
The manufacturer is not responsible for any inaccuracies, due to printing or transcription errors, contained
in this manual. In addition, the appearance of the figures reported is also purely indicative.
The manufacturer reserves the right to make changes to its products when considered necessary and
useful, without affecting the essential safety and operating characteristics.
Glen Dimplex constantly seeks ways to improve the specifications and designs of their products.
Whilst every effort is made to produce up to date literature, this document should not be regarded as an
infallible guide. Actual product only should be used to derive cut out sizes.
All appliances must be installed by a qualified person/s with adherence to the relevant electrical, plumbing
and building codes, with compliance being issued as required by state or national legislation.
Additionally, all upright cookers must have the anti-tilt device installed correctly in adherence to the relevant
standards by a licenced installer.
For maximum effectiveness and efficiency all rangehoods should be installed with the use of ductwork, by
a licenced installer with adherence to the relevant state and national building codes and regulations.
All Glen Dimplex appliances are for Domestic use only, and must be installed by a licence installer into
Domestic Applications only, without exception and to the required Authorities guidelines. Any installation
outside of this will VOID warranty. Alfresco areas are not a Domestic application.
Distributed by:
Glen Dimplex Australia Pty Ltd Glen Dimplex New Zealand Ltd
www.glendimplex.com.au www.glendimplex.co.nz
For service advice, please contact the Customer Care Centre by phone or email below.
Australia New Zealand
Ph: 1300 556 816 Ph: 09 274 8265
customer.care.ha@glendimplex.com.au nztechserv@glendimplex.co.nz
VERSION 1 REVISION 20210506
Table of contents
Other Euromaid Freezer manuals