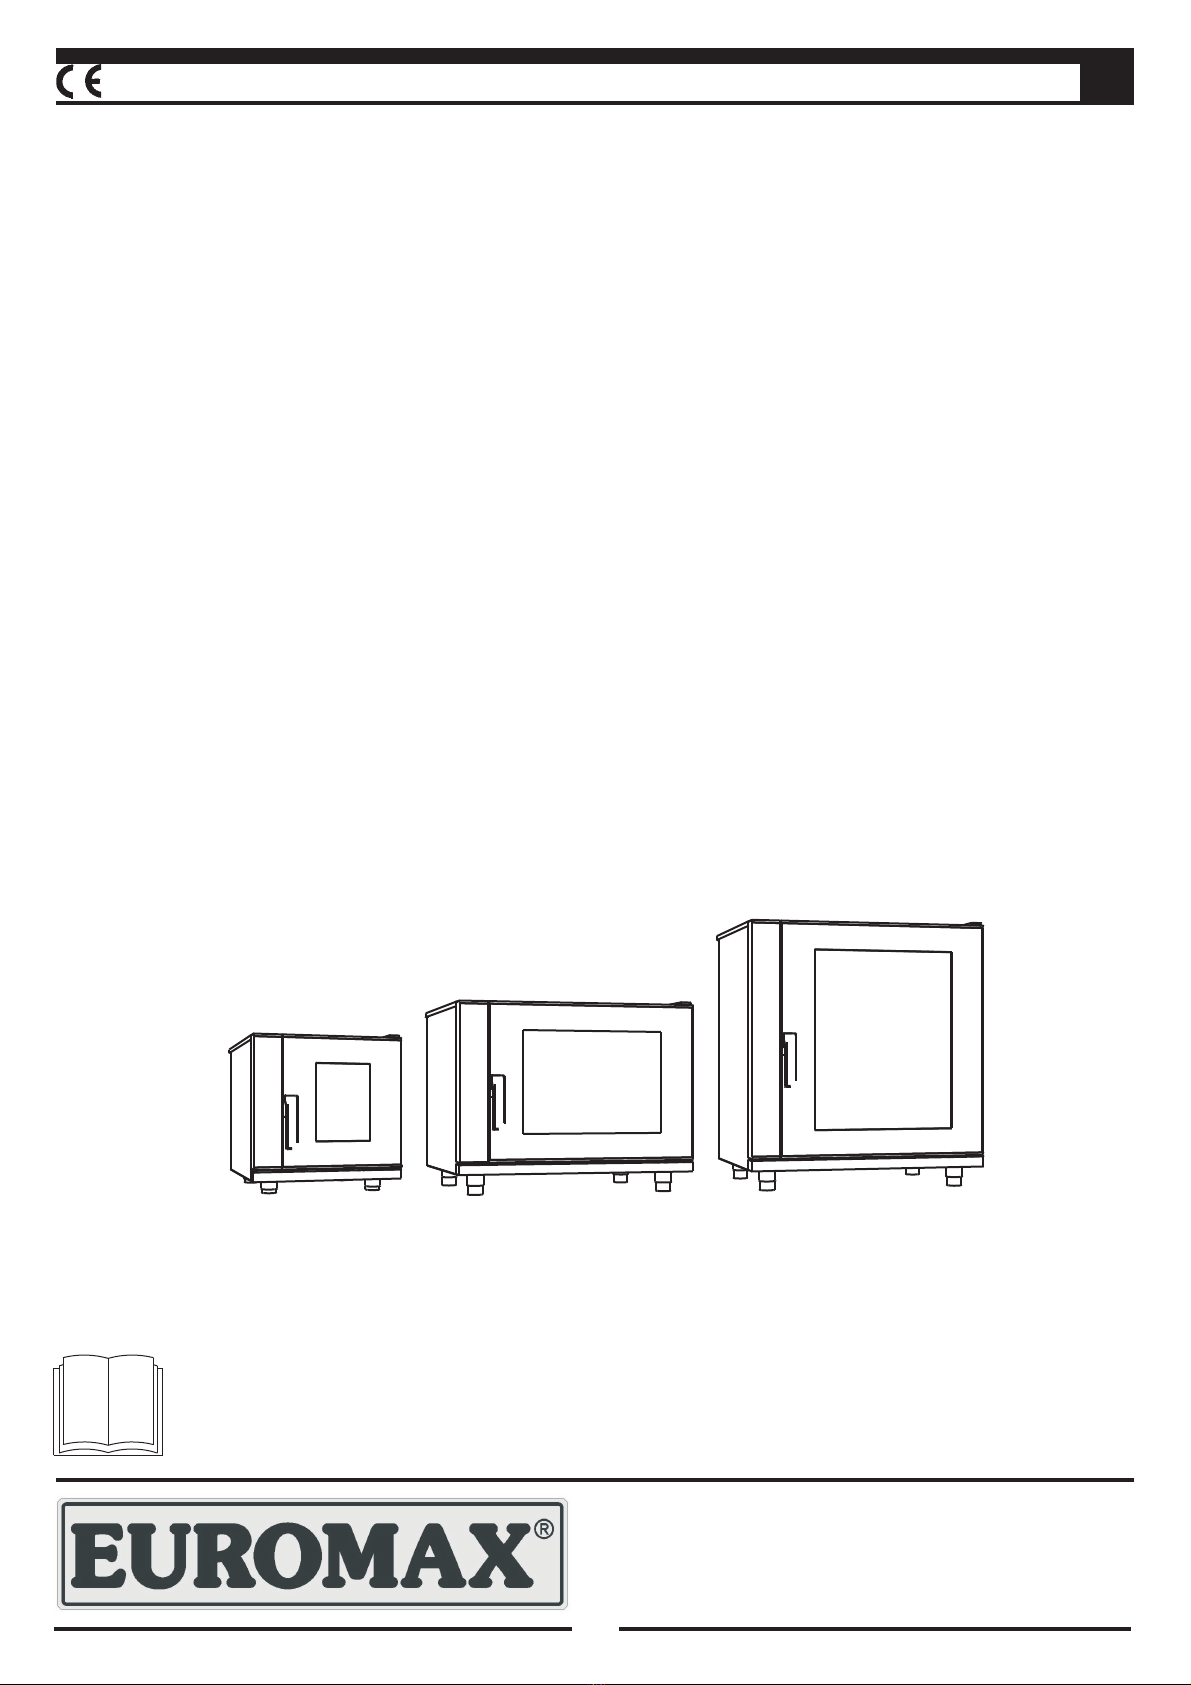
Euromax D9523PBH Parts list manual
1
IT
ISTRUZIONI PER L’INSTALLAZIONE,
L’USO E LA MANUTENZIONE
FORNI A CONVEZIONE-
UMIDIFICAZIONE AD USO
DIGITALI
Modelli:
Leggere attentamente le seguenti istruzioni prima di installare ed avviare le apparecchiature
D9523PBH
D9806PBH
D9810PBH
2
IT
CAPITOLO I - INTRODUZIONE
Guida alla consultazione
Nel ringraziare per la fiducia accordataci nell’acquisto di un nostro prodotto, raccomandiamo, prima di
mettere in funzione i forni, di leggere attentamente i manuali che trovate in dotazione.
Questa pubblicazione contiene tutte le informazioni necessarie per l’uso corretto e la manutenzione del
forno. Scopo del presente manuale è quello di consentire all’utente, soprattutto al diretto utilizzatore di
prendere ogni provvedimento e predisporre tutti i mezzi, le risorse umane e i materiali necessari per un
uso sicuro e duraturo del forno.
Questo manuale deve essere consegnato alla persona preposta all’uso, il quale provvederà alla sua
conservazione in luogo adeguato, al fine di renderlo disponibile per la consultazione e per la
manutenzione ordinaria del forno. In caso il forno fosse rivenduto, il libretto dovrà essere fornito a
corredo dello stesso.
Questo manuale è rivolto anche all’installatore per le operazioni di messa in servizio e manutenzione
straordinaria.
La destinazione d’uso e le configurazioni previste delle macchine sono le uniche ammesse dal
costruttore, non tentare di utilizzare le macchine in disaccordo con le indicazioni fornite.
La destinazione d’uso indicata è valida solo per macchine in piena efficienza strutturale, meccanica ed
impiantistica.
Il costruttore declina ogni responsabilità derivante da uso improprio o da parte di personale non
addestrato, da modifiche e/o riparazioni eseguite in proprio o da personale non autorizzato e dall’utilizzo
di componenti di ricambio non originali o non specifici per il modello di forno in oggetto.
Il manuale deve essere custodito sino allo smaltimento finale della macchina in luogo idoneo, affinché
esso risulti sempre disponibile per la consultazione nel miglior stato di conservazione. In caso di
smarrimento o deterioramento, la documentazione sostitutiva dovrà essere richiesta direttamente alla
ditta produttrice o rivenditore.
Queste pagine contengono, nello specifico, le spiegazioni per l’uso dei comandi digitali dei forni.
Devono sempre essere abbinate al manuale dei forni elettromeccanici per completare le istruzioni di
installazione, d’uso e di manutenzione.
Per qualsiasi incomprensione nelle traduzioni che seguono, si prega di fare
riferimento al testo in lingua italiana.
Le pagine che seguono devono sempre essere abbinate al manuale dei forni
elettromeccanici per completare le istruzioni di installazione, d’uso e di
manutenzione.
3
IT
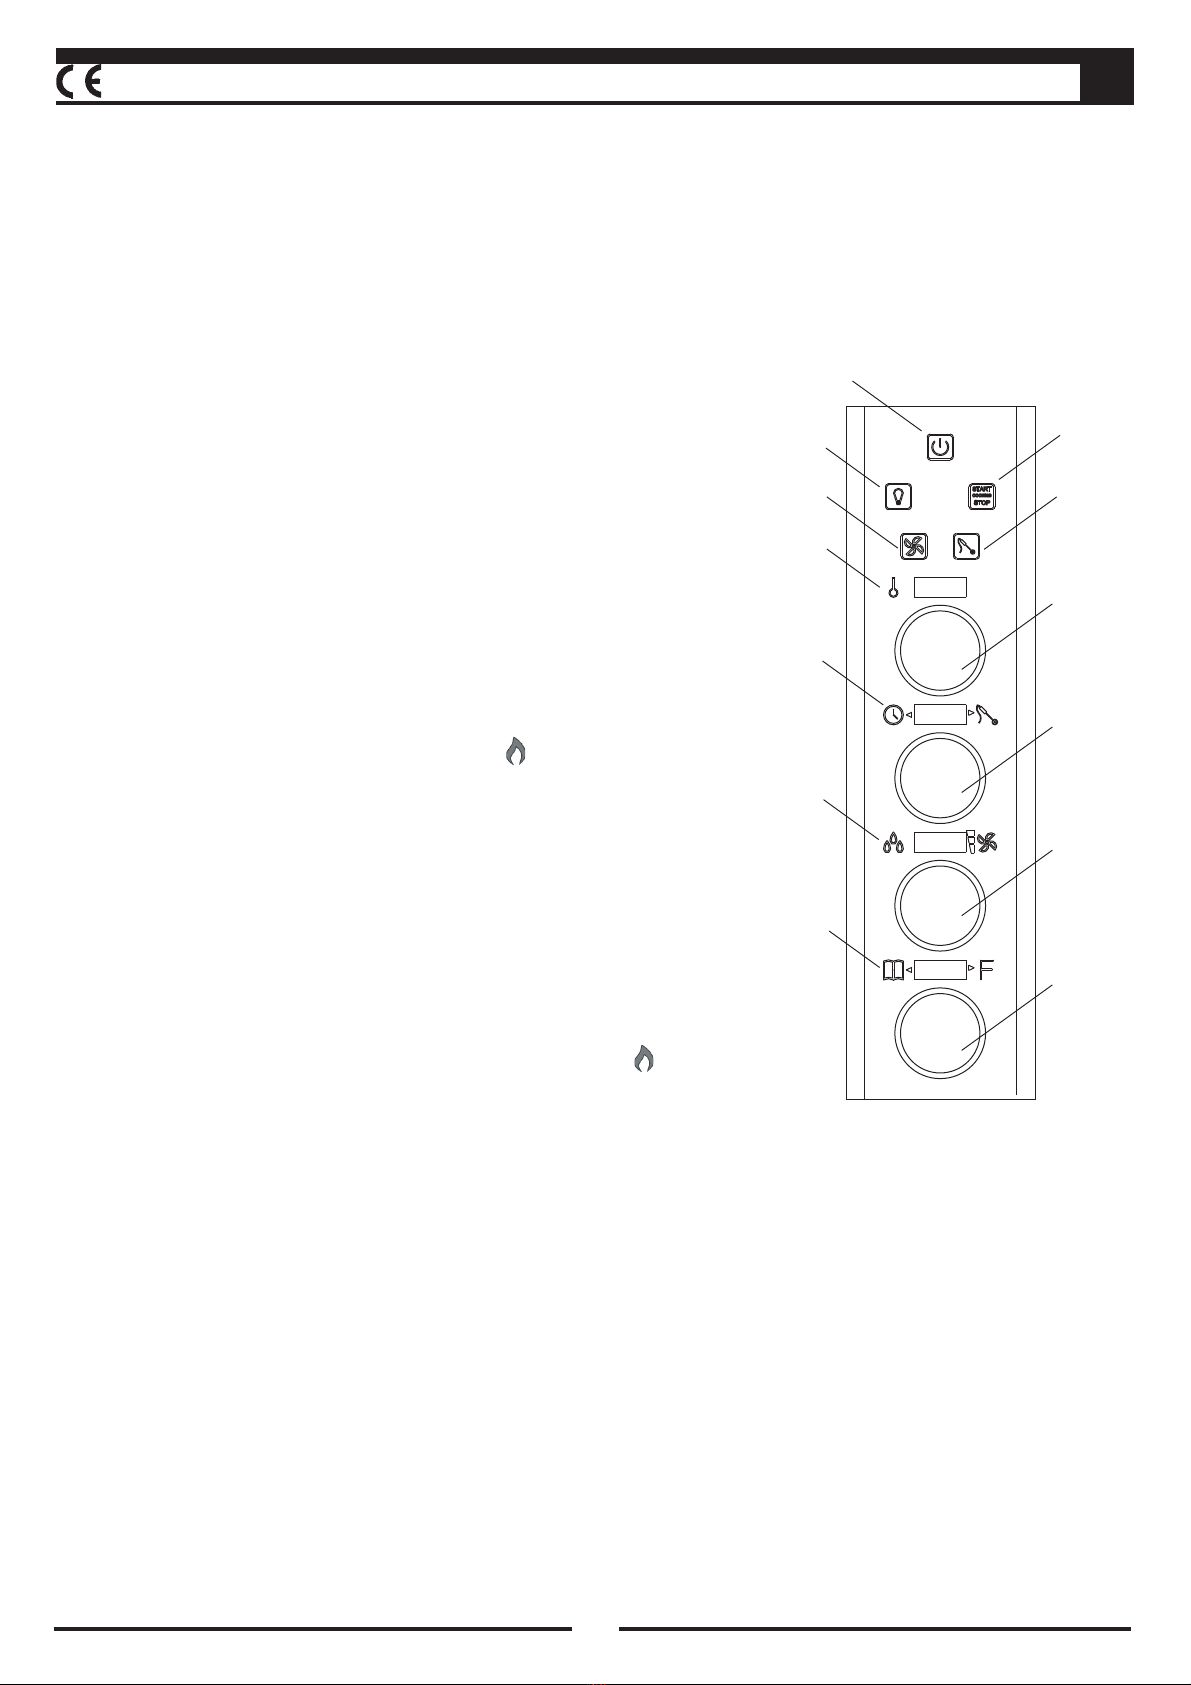
P1
P2 P3
P4 P5
D1
E1
D2
E2
D3
E3
D4
E4
START
COOKING
STOP
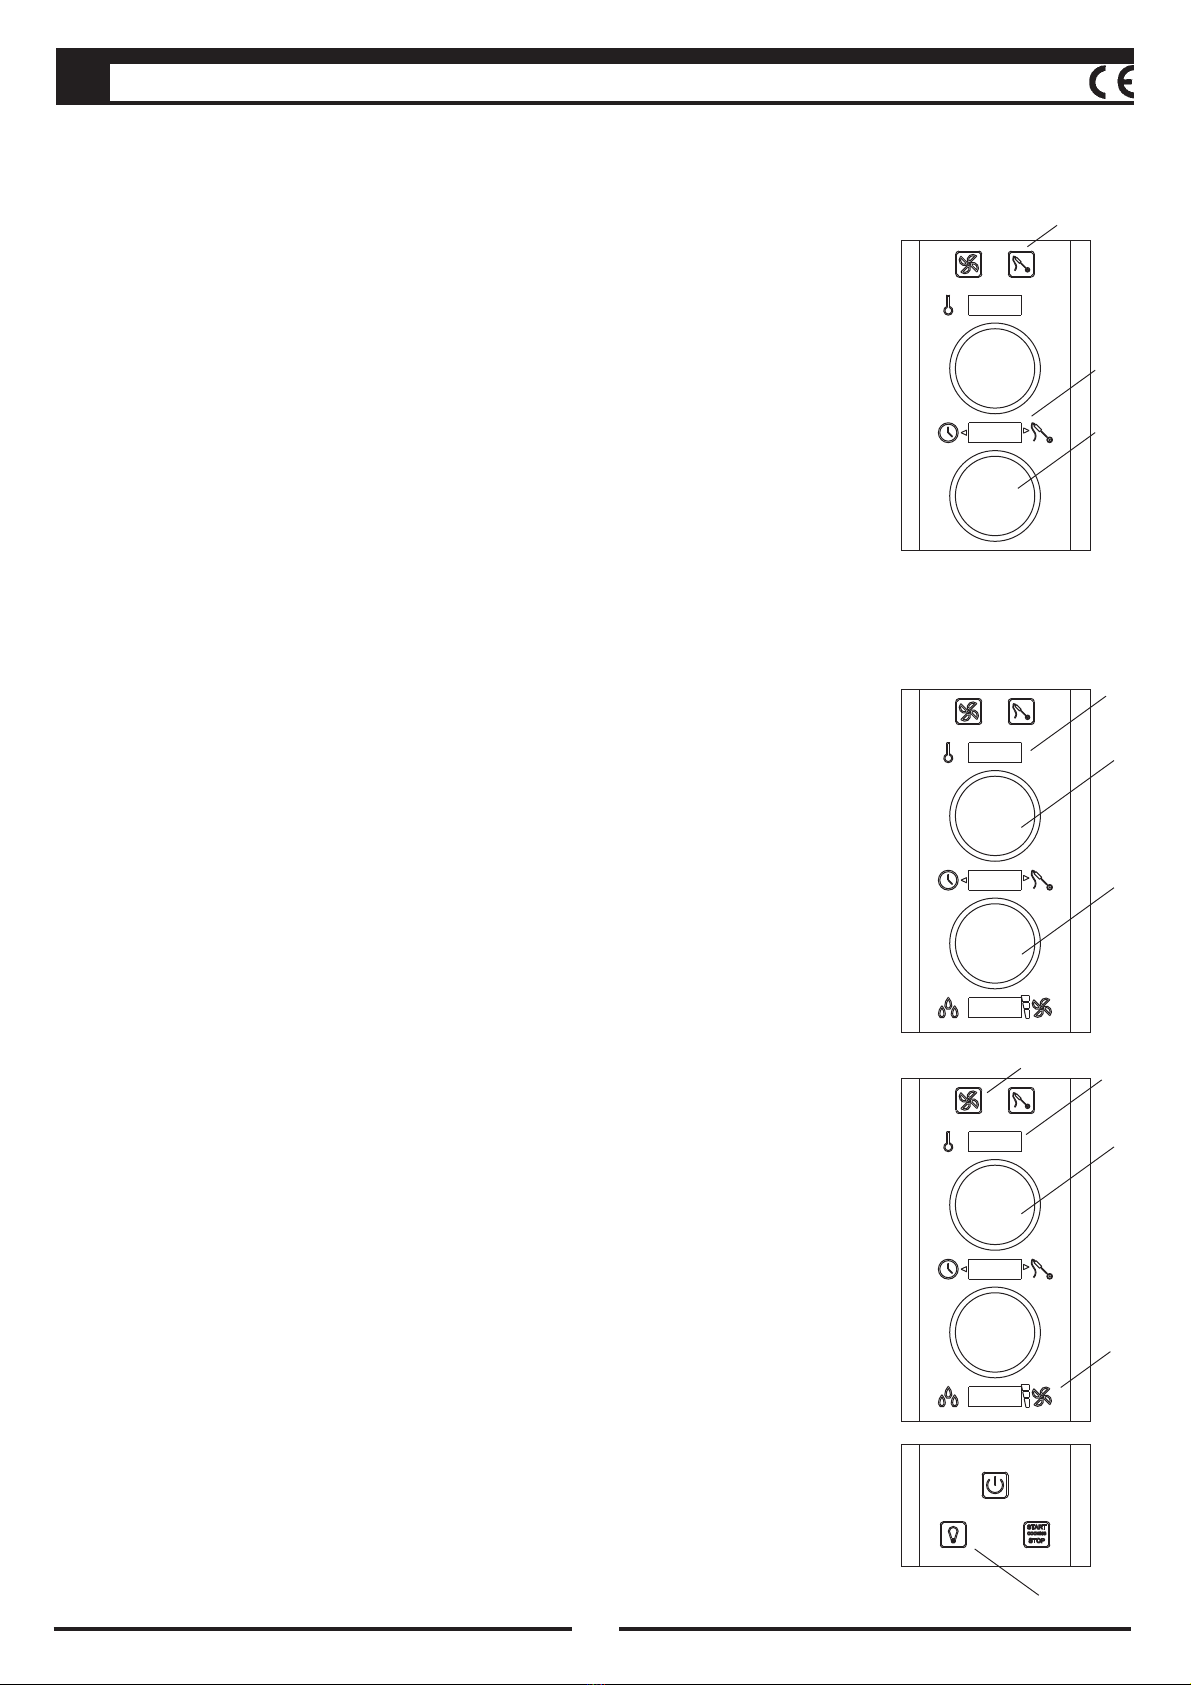
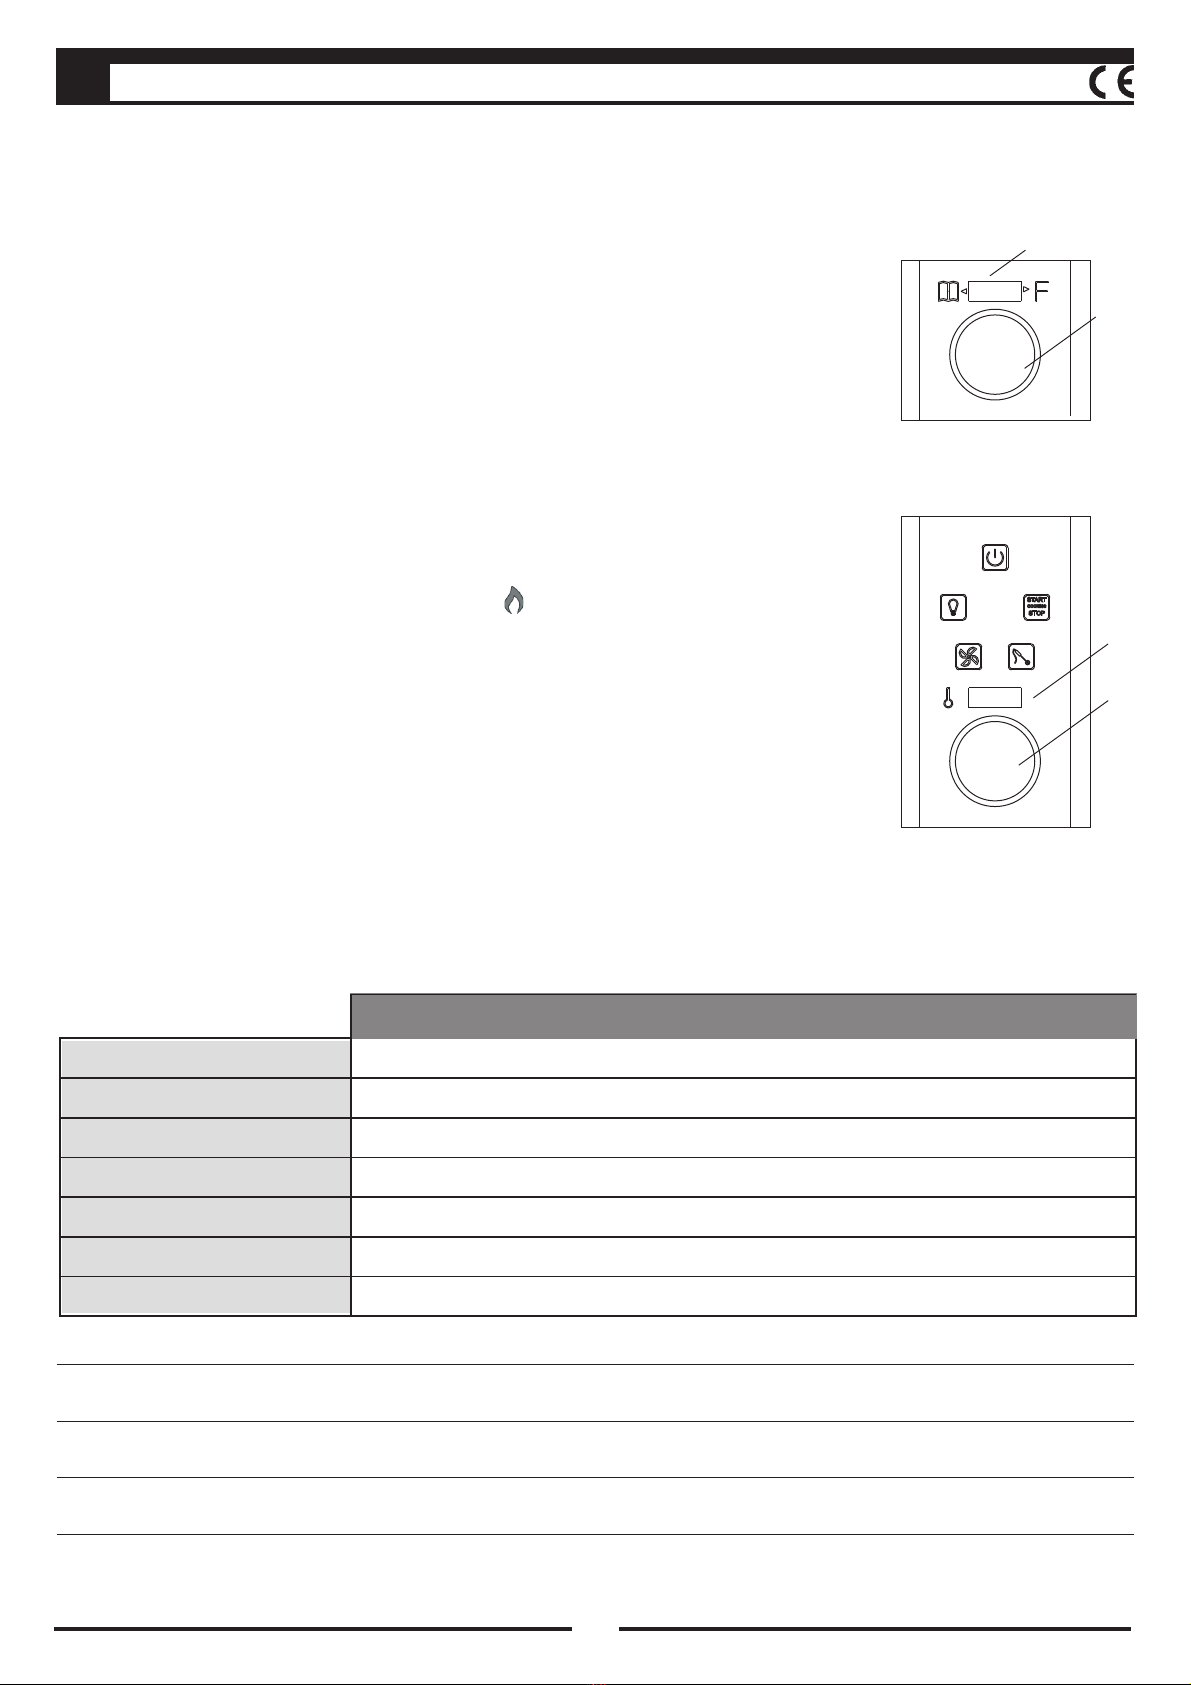
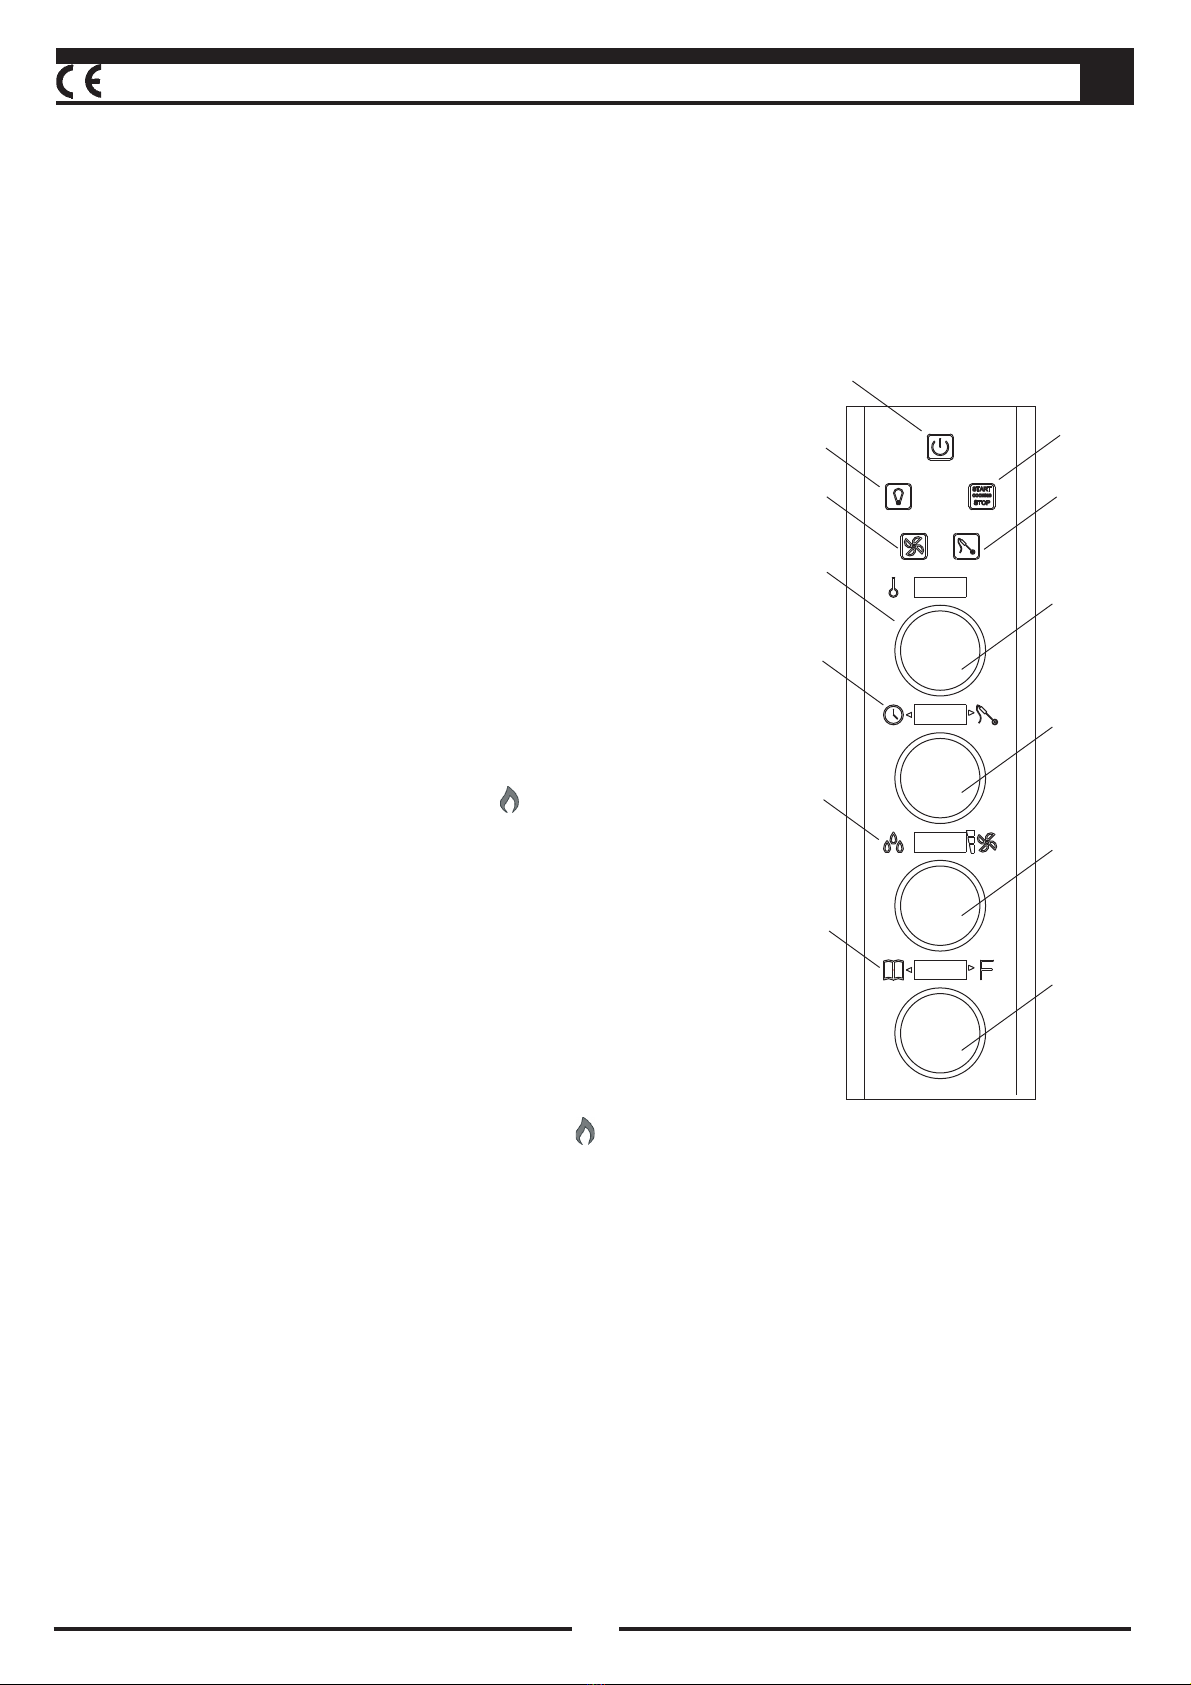
CAPITOLO III - ISTRUZIONI PER L’USO
Pannello di controllo ed istruzioni comandi
digitali
P1
P2
P3
P4
P5 OPTIONAL
D1 -
D2
D3
D4
E1 -
E2 ,
E3
E4
Tasto accensione/spegnimento
Tasto accensione/ spegnimento luce camera
Tasto start/stop cottura
Tasto velocità motore e raffreddamento rapido
Tasto cottura sonda al cuore ( )
Display temperatura allarme gas
Display tempo, preriscaldo e funzione sonda al cuore
Display umidificazione, velocità ventole e
raffreddamento rapido
Display funzione programmi
Manopola regolazione temperatura reset gas
Manopola tempo preriscaldo e temperatura sonda al
cuore
Manopola umidificazione e velocità ventole
Manopola gestione funzione programmi
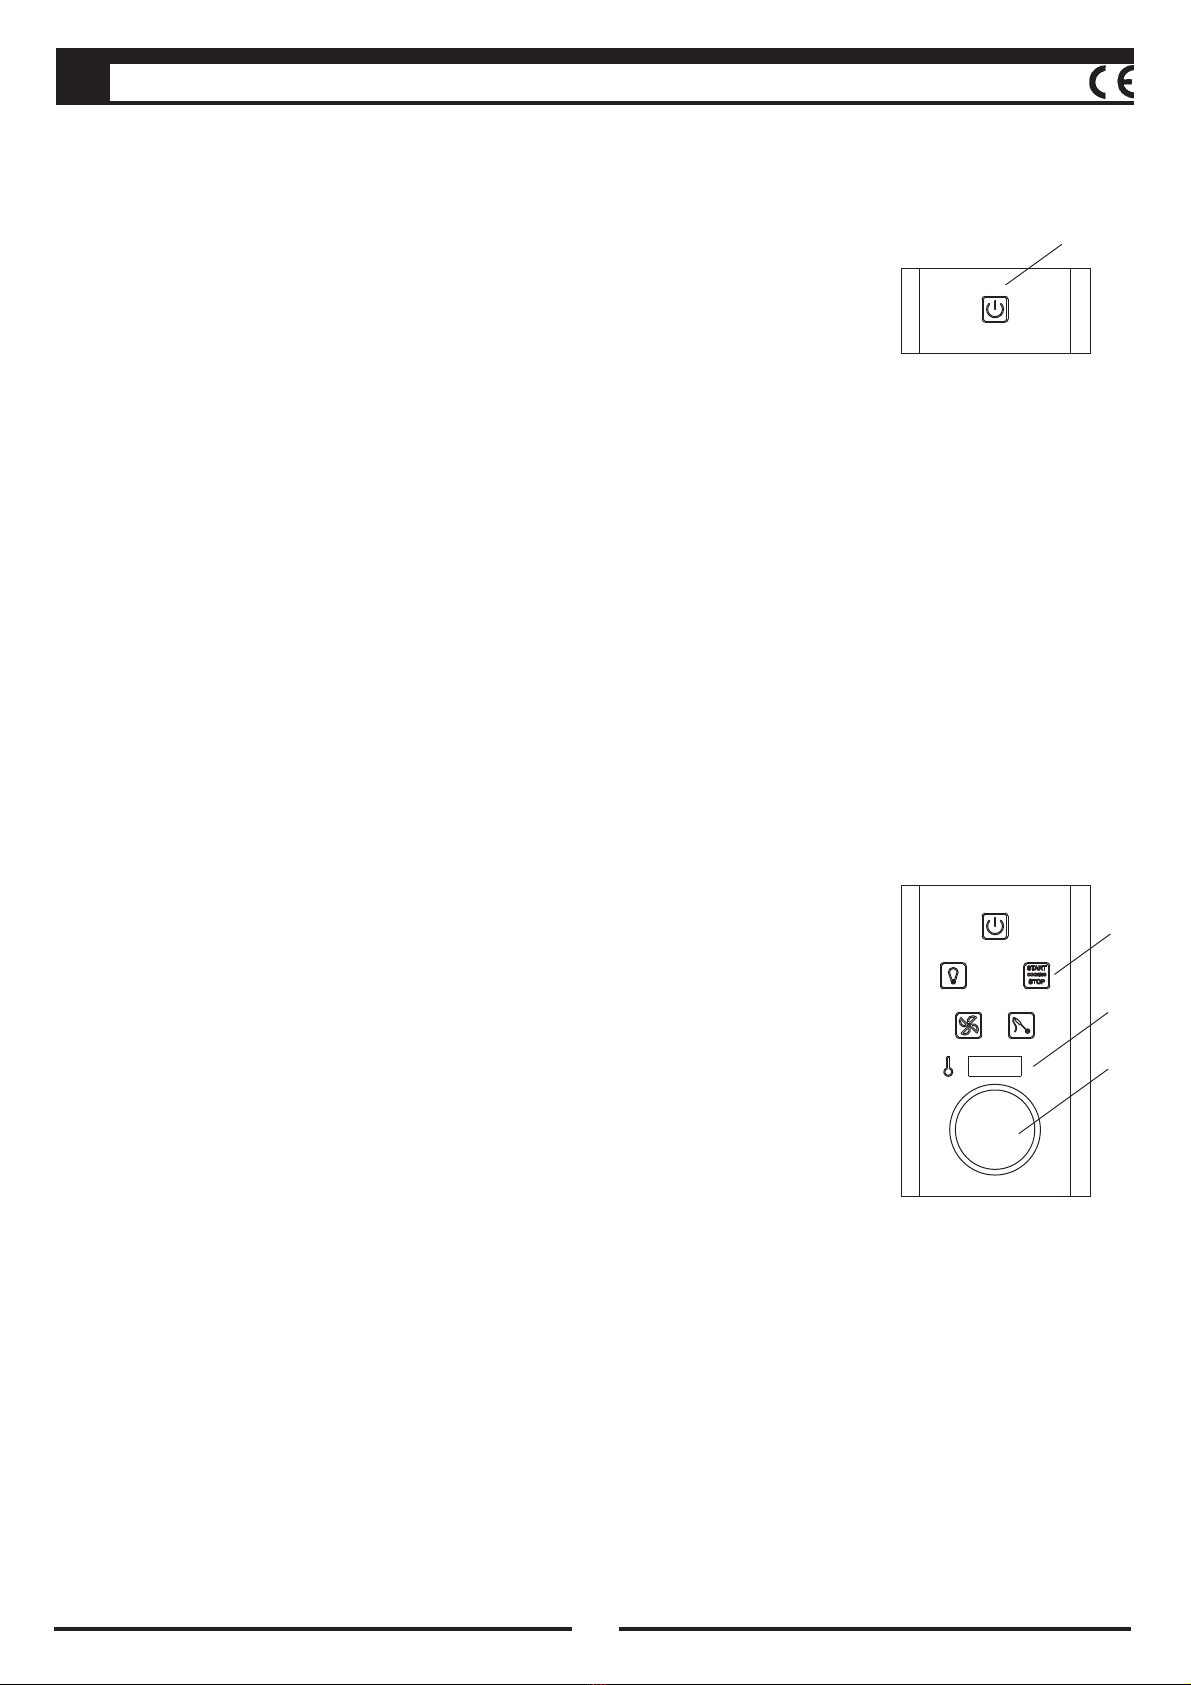
4
IT
START
COOKING
STOP
P1
ACCENSIONE E SPEGNIMENTO
Dopo aver dato tensione tramite l'interruttore di rete, il tasto lampeggia per
indicare che il forno è attivo ma in stato di attesa.
Premendo questo tasto, l'apparecchio si accende; la camera di cottura viene
illuminata e il pannello di comando si porta automaticamente nella modalità di
inserimento dei parametri di cottura.
Per spegnere il forno premere nuovamente il tasto .
Se non viene eseguita alcuna operazione, dopo un tempo prestabilito il forno si
porta automaticamente in stato di attesa.
P1
P1
IMPOSTAZIONI PARAMETRI
All'accensione del forno, il pannello display viene attivato; i tasti attivi vengono
illuminati e i display visualizzano i valori di default.
L'inserimento dei parametri di cottura avviene in maniera guidata; in
automatico quando viene confermato un valore si passa da un parametro
all'altro in fase di inserimento dati.
Per confermare subito dopo l'accensione i parametri di default visualizzati
premere il tasto start/stop.
A questo punto inizia a lampeggiare perché è possibile avviare una cottura.
E' possibile comunque sia prima di avviare la cottura che durante la cottura
modificare i parametri inseriti.
P3
P3
Avvio/arresto di un ciclo di cottura
Temperatura
Dopo aver impostato tutti i parametri di cottura, il tasto risulterà
lampeggiante a segnalare che con la pressione dello stesso si può avviare il ciclo
con i parametri inseriti.
Durante la cottura si possono modificare tutti i parametri inseriti in qualsiasi
momento.
Per arrestare una cottura basta premere il tasto , il forno bloccherà la cottura
in corso mostrando i parametri inseriti all'avvio del ciclo.
Se durante la cottura viene aperta la porta, il ciclo in corso verrà
momentaneamente sospeso per essere poi ripreso alla chiusura della stessa.
Dopo l'accensione il display temperatura lampeggia, così come i led
corrispondenti alla manopola di regolazione . Questo ad indicare che si sta
modificando il parametro relativo alla temperatura.
Per impostare il dato desiderato diverso da quello di default ruotare la manopola
e premerla per confermare. Se invece si accetta il dato di default premere
subito .
Dopo 10 secondi viene automaticamente confermato il dato relativo alla
temperatura se non vengono fatte altre operazioni.
Il valore della temperatura può essere variato in qualsiasi momento; premendo
la manopola relativa il display lampeggia e si può inserire il valore
desiderato.
Durante la cottura sul display viene visualizzata la temperatura rilevata; se
viene premuto si visualizza invece il dato impostato e può essere variato
ruotando la manopola. Per la conferma ripremere o attendere 10 secondi.
Il valore di temperatura massimo che si può selezionare è di 270°C .
P3
P3
D1
E1
E1
E1
E1
D1
E1
E1
P3
E1
D1

5
IT
Tempo di cottura
Velocità ventole
Quando il display e i led corrispondenti alla manopola lampeggiano, si
può impostare il valore di temperatura desiderato.
Per regolare il valore del tempo di cottura basta ruotare la manopola e
premerla per confermare il dato inserito.
Trascorsi 10 secondi il parametro viene memorizzato in automatico se non si
esegue nessuna operazione.
Il valore può essere variato in qualsiasi momento premendo e ruotando la
manopola .
Si può inserire un valore di tempo fino a 9 ore e 59 minuti ma anche selezionare
la modalità di tempo infinito (scritta “Inf” sul display).
Durante la cottura il display esegue un conto alla rovescia per il valore del tempo
impostato.
Al termine della cottura compare una scritta lampeggiante sui display e viene
emesso un segnale acustico intermittente. Per interrompere il suono premere
un qualsiasi tasto o manopola.
Il display indica il grado di umidificazione impostato durante la cottura. A
display lampeggiante si può impostare il valore desiderato su una scala che va
da 10 a 100.
Se non viene impostato alcun valore sul display compare la scritta “PUSH” che
sta ad indicare la possibilità di immettere del vapore in camera manualmente.
Questa operazione si esegue tenendo premuta la manopola per il tempo
desiderato di immissione vapore.
Al rilascio se si vuole modificare il parametro e quindi passare ad una
immissione di acqua automatica, basta regolare il valore ruotando la manopola
e confermare il dato con la pressione della manopola.
Il valore di umidificazione si può modificare anche durante la cottura.
Sempre sul display viene visualizzato anche il valore di velocità delle ventole
del forno attraverso una scala graduata posta a lato del display.
Quando le tacche della scala risultano lampeggianti, si può modificare il
parametro ruotando la manopola e selezionando il valore desiderato.
I valori che si possono scegliere sono tre; rispettivamente dall'alto verso il
basso di velocità massima, mezza velocità e velocità minima della ventola.
Per la conferma del parametro basta ripremere la manopola oppure premere
il tasto o semplicemente attendere 10 secondi senza eseguire nessuna
operazione.
La velocità delle ventole può essere selezionata prima della cottura oppure può
essere variata durante la cottura premendo il tasto e regolando il valore con
la manopola
D2 E2
E2
E2
D3
E3
E3
D3
E3
E3
P4
P4
E3.
Umidificazione
P4
E2
D2
E3
D3
6
IT
START
COOKING
STOP
E1
E1
E2
D1
D1
D3
P4
Sonda al cuore (optional)
Attraverso il tasto può essere selezionata la cottura con sonda al cuore. Sul
display , attraverso il relativo indicatore viene segnalato se si sta eseguendo
una cottura a tempo oppure una cottura con sonda al cuore.
La modalità sonda al cuore può essere selezionata al momento dell'inserimento
dei parametri di cottura; quando il display lampeggia, con la pressione del
tasto si seleziona questo tipo di cottura.
Attraverso la manopola si procede con la regolazione della temperatura che
si vuole raggiungere e successivamente si conferma il parametro con la
pressione della stessa manopola.
I valori di lettura impostabili per la sonda al cuore variano da 30°C a 99°C.
Per passare dalla modalità tempo alla modalità sonda al cuore durante una
cottura, si deve prima arrestare il ciclo in corso poi, con la pressione del tasto
si va a selezionare la modalità di cottura voluta come sopra descritto.
Al raggiungimento della temperatura impostata compare una scritta
lampeggiante sui display e viene emesso un segnale acustico intermittente.
Per interrompere il suono premere un qualsiasi tasto o manopola
P5
D2
D2
P5
E2
P5
D2
.
P5
D2
E2
P2
FUNZIONE PRERISCALDO
Il forno offre la possibilità di eseguire un preriscaldo prima di avviare un ciclo di
cottura.
Per entrare nella modalità preriscaldo, al momento dell'impostazione del
parametro del tempo di cottura, se si tiene premuto per 5 secondi la manopola
, sul display compare la scritta “PrE” che sta ad indicare l'attivazione della
funzione preriscaldo del forno.
Attraverso la pressione della manopola si regola la temperatura che si vuole
raggiungere nel preriscaldo e che viene visualizzata sul display .
Il termine di questo ciclo viene segnalato con una scritta lampeggiante sui
display e con un segnale acustico intermittente.
Una volta finito il ciclo di preriscaldo, se l'operatore non interagisce con il forno
aprendo la porta o impostando i parametri di cottura, automaticamente viene
attivato il mantenimento della temperatura impostata per il preriscaldo.
E2
E1
D1
FUNZIONE RAFFREDDAMENTO
Al termine di un ciclo di cottura può essere selezionata la funzione di
raffreddamento del forno. Questa si attiva tenendo premuto per 5 secondi il
tasto . Sul display verrà visualizzata la scritta “raFF” che sta ad indicare
l'attivazione della funzione.
Sul display viene visualizzata la temperatura che si vuole raggiungere con il
raffreddamento, impostabile con la pressione della manopola e successiva
regolazione.
All'avviamento del raffreddamento comparirà una scritta sui display che indica
di aprire la porta del forno, se non è già aperta, per poter avviare la funzione
selezionata.
P4 D3
D1
E1
ACCENSIONE/SPEGNIMENTO LUCI
Attraverso il tasto è possibile in qualsiasi momento accendere o spegnere le
luci che illuminano la camera di cottura del forno.
P2

7
IT
START
COOKING
STOP
E4
D4
P3
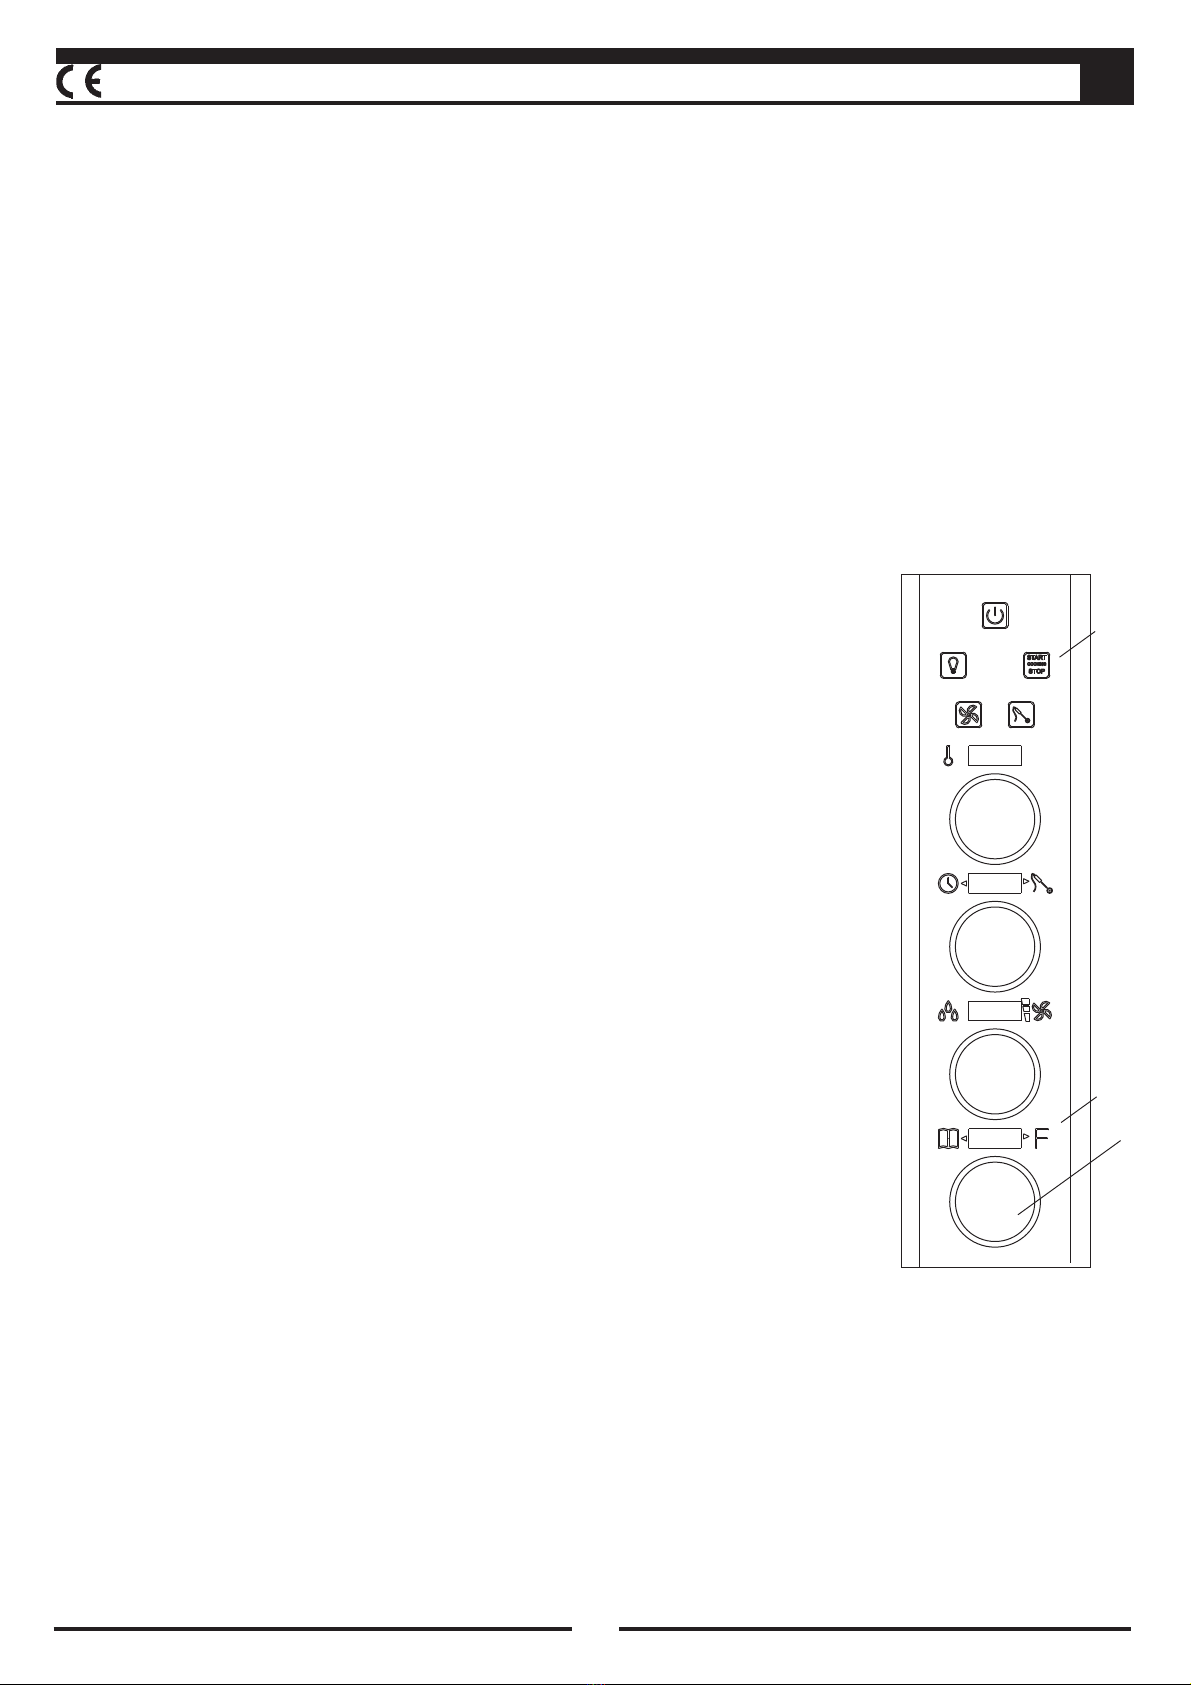
GESTIONE PROGRAMMI
Inserimento nuovo programma
Avvio/arresto programma di cottura
Il forno permette di gestire 60 programmi ricetta con 5 fasi di cottura ciascuno.
Per entrare nel menù di gestione dei programmi, a forno acceso, si deve
premere la manopola .
Automaticamente l'indicatore ricetta sul display metterà in evidenza che si
sta scegliendo una ricetta e le due cifre di identificazione dei programmi
risultano lampeggianti per permettere la selezione del programma desiderato.
Oltre all'indicatore ricetta è presente anche l'indicatore fase che compare
quando si sta scegliendo appunto una fase di un programma.
Premendo quando si è all'interno del menù ricette, si passa dalla selezione di
un programma alla selezione di una fase, questo evidenziato dai relativi
indicatori.
L'uscita dalla parte programmabile si esegue riportando il numero ricetta sulla
posizione “- -“.
Per creare una nuova ricetta selezionare la posizione libera desiderata con la
manopola (i programmi vuoti si identificano perché la cifra che indica il
numero di fasi dalle quali è composta la ricetta risulta essere zero) e confermare
con la stessa; automaticamente si entra nella fase auto-guidata per inserire i
parametri della prima fase. Una volta inserito tutti i dati della fase creata,
memorizzare quanto impostato tenendo premuto la manopola fino a che non
compare la scritta “MEM” sul display . Se si desidera cambiare qualche dato
inserito basta premere la manopola relativa al parametro che si vuole
modificare, eseguire la variazione e memorizzare i cambiamenti.
Sulla prima fase di cottura di ogni programma è possibile inserire il preriscaldo
automatico; per l'impostazione si fa riferimento al paragrafo “Funzione
preriscaldo”.
Eseguito questo si può procedere con la creazione di altre fasi del programma;
premendo si accenderà l'indicatore fase e il numero relativo inizierà a
lampeggiare per indicare che si può scegliere la prossima fase da memorizzare.
A questo punto procedere con l'inserimento dei dati relativi alla fase scelta e alla
fine eseguire la memorizzazione come sopra riportato. Se si preme la manopola
dopo aver scelto la fase da impostare, in automatico viene data la possibilità
di cambiare ricetta ma, se si preme nuovamente , si rientra nell'inserimento
guidato dei parametri sulla fase della ricetta scelta poco prima.
Per ogni fase da creare procedere come sopra riportato.
Entrati nel menù di gestione ricette, dopo la pressione della manopola , si
procede con la selezione del programma di cottura desiderato.
Per l'avvio basta premere semplicemente il tasto di start e automaticamente
viene avviata la cottura scelta.
Sul display viene visualizzato il numero della fase in corso lampeggiante e
quello delle fasi totali della ricetta.
Nell'eventualità che durante il ciclo di cottura si desideri passare alla fase
successiva in maniera manuale, tenere premuto la manopola fino a che sul
display viene visualizzato il numero della fase seguente.
Per arrestare un programma in corso basta premere il pulsante di stop
mentre se si apre la porta del forno a ciclo in corso, alla chiusura
automaticamente viene ripreso dal momento in cui era stato interrotto.
E4
D4
E4
E4
E4
D4
E4
E4
E4
E4
P3
D4
E4
D4
P3

8
IT
Modifica parametri fasi del programma
Una volta entrati nel menù di gestione ricette, è possibile modificare i parametri
delle fasi di cottura di un programma.
Per eseguire questa operazione basta selezionare con la manopola la ricetta
da variare, scegliere poi la fase dove eseguire il cambiamento e, attraverso le
relative manopole di regolazione, eseguire la variazione desiderata.
Una volta fatto questo e aver confermato il dato con la pressione della relativa
manopola, per memorizzare il cambiamento tenere premuto fino a che non
compare la scritta “MEM” sul display .
Durante la cottura inoltre è possibile in qualsiasi momento variare i parametri
della fase in corso.
E4
E4
D4
Finito il ciclo se sono state eseguite delle modifiche tenere premuta la
manopola fino a che non compare la scritta “ME M” sul display .
,
E4 D4
RESET GAS(attivo solo nelle versioni a gas)
Nei modelli di forno alimentati a gas, se appare l’allarme “ ”, premere la
manopola la centralina di gestione del riscaldamento.
Se dopo aver eseguito il reset, il problema si ripresenta consultare la tabella
“Diagnosi di alcuni guasti” o contattare il servizio di assistenza.
reset
E1 per sbloccare
D4
E4
•Intervento o mal funzionamento del termostato di sicurezza.
•Sonda camera cottura aperta od in corto.
• .
Errore di comunicazione con la scheda madre
• .Segnalazione porta aperta
•Sonda al cuore aperta od in corto.
•Parametri inseriti per la cottura non validi.
•Temperatura scheda madre elevata.
Possibili cause
ERR1
ERR4
ERR5
ERR6
ERR7
ERR8
ERR13
SEGNALAZIONI ED ALLARMI
L'apparecchio prevede la segnalazione di alcuni allarmi che possono essere bloccanti o meno, questi sono
sempre accompagnati da un segnale acustico.
START
COOKING
STOP
E1
D1
9
GB
Models:
CONVECTION HUMIDIFICATION
OVENS WITH DIGITAL
CONTROL
Read the following instructions carefully before installing and switching on the appliances
INSTRUCTIONS FOR INSTALLATION, USE
AND MAINTENANCE
D9523PBH
D9806PBH
D9810PBH

GB
10
CHAPTER I - INTRODUCTION
About this manual
In thanking you for the trust you have shown us in buying one of our products, we wish to suggest that
you read the provided instruction booklets very carefully before using the oven.
These pages specifically contain explanations for the use of the oven digital controls.
They must always accompany the electromechanical oven manual to complete installation, operation
and maintenance instructions.
This manual contains all the information you may need for a proper use and maintenance of the oven.
The purpose of this manual is to let the user take every step and to arrange all the means, human
resources and materials necessary for a safe and lasting use of the oven.
This manual must be handed over to the person in charge of the use and of the regular maintenance of
the appliances, who is required to keep it in a safe, dry and suitable place, available for consultation and
for routine oven maintenance. In the event the oven is sold, the handbook must always accompany the
appliance.
This manual is also addressed to the operators for installation and extraordinary maintenance service.
The intended purpose and configurations of the provided appliances are the only ones allowed by the
manufacturer: do not attempt to use the appliances in any other way.
The intended purpose indicated is valid only for appliances in a perfect state of repair in terms of
construction, mechanics and engineering.
The Manufacturer declines any and all responsibility due to improper use or operation by untrained
personnel, from changes and/or repairs performed by the user or by unauthorized personnel, and from
use of non-original spare parts or spare parts that are not specific for the oven model.
The manual must be kept until the final accurate disposal of the appliance, it must be kept in good
conditions and available for consultation all the time. In case of lost or damage of this manual, an extra
copy can be provided directly by the Manufacturer or the retailer.
.
In case of misunderstandings in the following translation, please refer to the Italian
version.
The pages below must always accompany the electromechanical oven manual to
complete installation, operation and maintenance instructions.

GB
11
P1
P2 P3
P4 P5
E1
D2
E2
D3
E3
D4
E4
START
COOKING
STOP
CHAPTER III - OPERATING INSTRUCTIONS
Control panel and digital control instructions
P1
P2
P3
P4
P5 OPTIONAL
D1
D2
D3
D4
E1
E2
E3
E4
ON/OFF button
ON/OFF light button
Start/stop cooking
Fan speed setting and fast cool down selection
Core probe function ( )
Temperatura display - gas allarm
Timer, automatic pre-heating display and core probe
function
Steam and fan speed display
Programs display
Temperature setting - reset gas
Timer and core probe temperature setting and pre-
heating selection
Steam and fan speed setting
Programs setting
D1

GB
12
START
COOKING
STOP
P1
P3
E1
D1
ON/OFF
After giving voltage by network supply to the unit, the button flashes to
show that the oven is activated but in stand-by. Pushing this button, the oven
lights; the cooking chamber is illuminated and the control panel moves
automatically on the mode for insertion of cooking parameters. To turn off the
oven, push again the button .
If there isn't any action, after a per-established time, the oven moves
automatically in stand-by.
P1
P1
SETTINGS
When you switch on the oven, the display is activated; the active buttons are
illuminated and the displays show the default values.
The insertion of setting values is guided; when a value is confirmed
automatically it switches from a parameter to another during insertions.
To confirm the default or new parameters, push the key start/stop.
At this point starts blinking because you can start cooking.
Anyway, it is possible before or during the cooking, to change any parameters.
P3
P3
Start/stop of cooking cycle
Temperature
After introducing all the cooking parameters, the button starts blinking and
it shows that you can start the cooking cycle with the included parameters by
pushing it.
During the cooking, it is possible to change at any time all the included
parameters.
To stop cooking it is only necessary to push button and the oven will stop the
current cooking showing the parameters included at the start of the cycle.
If during the cooking the door will be opened, the cycle is temporarily
suspended and it starts when the door will be closed again.
After having turned on the unit, the temperature's display blinks, as well as
the led associated to the respective adjustment knob . This indicates that you
are allowed to change the temperature's parameter.
To set a different value from the default's one you have to rotate the knob
and push it to confirm. If you accept the default's value you have to push the
knob or after 10 seconds the temperature's value will be automatically
confirmed without any action.
The temperature's value can be changed at any moment by pushing knob.
Its display starts blinking and then you can insert the new preferred value.
During cooking, on the display, you can see the value of the real
temperature inside the chamber; if you push the button you can see the pre-
set temperature which can be changed by turning the knob. To confirm it you
have to push the button and wait approx. 10 seconds.
The highest temperature's value is 270°C .
P3
P3
D1
E1
E1
E1
E1
D1
E1
E1
GB
13
P4
E2
D2
E3
D3
Cooking time
Fan speed
When display and the led that indicate the knob blink, you can choose
your desired
temperature's valor. To set the value of the cooking time it is necessary to rotate
the knob and push to confirm it. After 10 seconds this parameter will be
automatically saved if no further action will be executed. The value can be
change in each moment by pushing and rotating the knob . It is possible to
insert a time value up to 9 hours and 59 minutes as well as the infinity mode
(“Inf” on the display).
During cooking, on the display appears a countdown of the chosen pre-set time.
At the end of cooking appears a blinking notice on the display and you can hear
also an
intermittent beep alarm. To stop the beep you have to push the button or the
knob.
Display shows the humidification's level parameters during the cooking
cycle. When the display is flashing you can set up the desired value on a scale
from 10% to 100%.
If you don't set up any value it appears on the display the notice “PUSH” that
indicates the possibility to insert some steam “manually” inside the cooking
chamber. To make this operation you have to push the knob .
If you wish to change the setting to mixed or steam mode, you can set the new
values by rotating the knob and confirm them by pushing it.
You can change the humidification values at any time during the cooking cycle.
On the right side of the display you can see a graduate led scale (3 steps) of
the oven's speed fan.
When the marks on the scale blink, you can change the parameter turning the
knob and choose the desired value, respectively from maximum (up) to
middle and minimum (down) fan speed.
To confirm this parameter you have to push another time the knob or the
button , waiting for 10 seconds without doing any further action
D2 E2
E2
E2
D3
E3
E3
D3
E3
E3
P4 .
Umidification & steam

GB
14
START
COOKING
STOP
E1
E1
E2
D1
D1
D3
P4
P5
D2
E2
P2
Core probe (optional)
With the button you can choose the core probe cooking mode. Therefore on
display it will be shown the core probe temperature.
After pushing button when display blinks you can set the core probe
temperature values by the knob and then you confirm it pushing the knob.
The temperature value for the core probe is from 30°C up to 99°C.
If you want to change from time mode to core probe one, you have to stop the
current cycle and then, pushing the button , set your desired cooking mode
as above described.
Upon reaching the set temperature for cooking it appears a lighting notice on
the display with an intermittent acoustic signal. To stop the signal you have
to push a button or a knob.
P5
D2
P5 D2
E2
P5
D2
PREHEATING
The oven control gives you the possibility to set the preheating before start
cooking.
To enter the preheating, when you choose cooking time parameters, you may
push for 5 seconds the knob until appears on the display the notice “PrE” that
indicates the preheating activation function.
With the pressure of the knob you may enter the preheating temperature
which will be displayed on . The end of this function is indicated with a
blinking notice and an acoustic beep.
When the preheating cycle ends, if you don't open the oven door or you don't set
up any different cooking temperature, it will be automatically saved the
preheating temperature for cooking.
E2
E1
D1
COOLING
When cooking cycle ends, you can decide for fast cooling function of the oven by
pushing for 5 seconds the knob . On display you will see the notice “raFF”
that shows the activation of this mode.
On display appears the temperature that you decide for cooling; you can set
up it by pushing the knob .
When cooling starts, a notice to open the oven's door appears on the display, to
enter the desired function.
P4 D3
D1
E1
ON/ OFF LIGHTS
It is possible, at any time, to switch ON or OFF the lights inside the oven's
cooking chamber by pressing the button .P2
GB
15
START
COOKING
STOP
E4
D4
P3
PROGRAM SETTINGS
New program settings
Start/stop of cooking program
The electronic control is provided to manage 60 recipe programs of 5 cooking
phases each. To enter in the program menu, when the oven is on, you have to
push the knob .
Automatically on display two identification numbers are lighting to permit
you to choose the program and a phase indicator to choose the phase.
If you push when you are on recipe's menu, you move from program to
phases.
You can exit from this mode on position “- -“.
To enter a new recipe you have to choose a free position with knob (you can
identify empty programs when on the phases display the number is “0”) and
then confirm it by pushing again the knob ; therefore you enter automatically
on a self-guided mode to introduce the first cooking parameters. To memorize
these values it is necessary to push the knob until it appears the notice “ME
M” on display . If you want to change these values you have to push the knob
, change the values and memorize it as above.
On the first cooking phase of each program you can enter the automatic
preheating as reported at the point “Preheating Function”.
After pushing the button the phase display starts flashing with the
respective numbers to indicate that you can choose the next phase to be
memorized. At this point you can enter the cooking values of the new phase
and, at the end, you have to confirm and memorize them by pushing the knob
.
You may move to a new recipe/phase by pushing the knob again.
Enter into the recipe menu by pushing the knob , select your cooking
program and start the cooking cycle by pushing the button . On display
you can see the blinking number of the current phase and the number of the
total phases.
If, during the cooking cycle, you want to go to the next phase manually, push
the knob until it appears the number of the next phase on display . If you
want to stop a
running program you have to push the button .
If you open the oven door during cooking, the cooking cycle stops and, when
you close the door it starts again from the same point.
E4
D4
E4
E4
E4
E4
D4
E4
E4
E4
E4
E4
P3 D4
E4 D4
P3
GB
16
D4
E4
START
COOKING
STOP
Change of program parameters
You may change the parameters of a program cooking phase at any time. Enter
into the program menu by pushing the button ; select the recipe and the
phase you want to modify. Then, you may proceed to modify the parameters
with the relative knob.
To memorize the new parameters you have to push until it appears the
notice “ME M” on display .
E4
E4
D4
During cooking it is also possible, at any time, to edit the parameters of the phase
underway.
If some changes are made, when the cycle is over, hold down knob E4 until text
“ME M” appears on display D4.
•Intervention or failure of the safety thermostat.
•Chamber probe open or short-circuited.
•Error or failure of electronic power board.
• .Signal of “door open
•Core temperature probe open or short-circuited .
•Error on cooking parameter settings.
• .High mother-board temperature
Possible causes
ERR1
ERR4
ERR5
ERR6
ERR7
ERR8
ERR13
WARNING SIGNALS
The oven has some allarm and they stop or not the working of the oven. This allarm are always combined
with an acoustic signal.
RESET GAS (in gas verions only)
In the gas oven models, if the alarm appears “ ”, press the knob to
unlock the heating control unit.
If the problem occurs again after reset with the reset key, please consult table
“Troubleshooting” or contact the customer service.
reset E1
E1
D1

17
FR
FOURS CONVECTION-HUMIDIFICATION
À USAGE PROFESSIONNEL
INSTRUCTIONS D’INSTALLATION,
D’UTILISATION D’ENTRETIEN
Modèles:
Lire attentivement les instructions avant d’installer et d’utiliser les appareils
D9523PBH
D9806PBH
D9810PBH

18
FR
CHAPITRE I - INTRODUCTION
Nous vous remercions pour la confiance que vous nous avez accordée en achetant l'un de nos produits.
Avant de faire fonctionner les fours, nous vous recommandons de lire attentivement les manuels fournis.
Cette publication contient toutes les explications pour l'utilisation des commandes digitales des fours.
Il faut toujours l'associer au manuel des fours électromécaniques pour compléter les instructions
d'installation, d'utilisation et de maintenance.
Il contient toutes les informations nécessaires à l’utilisation et à l’entretien des fours.
Le but de ce manuel est de permettre à l’utilisateur, surtout à l’utilisateur direct de prendre toutes les
mesures et de prévoir tous les moyens, les ressources humaines et les matériaux nécessaires pur une
utilisation sûre et durable des fours. Il est remis à la personne à la quelle sont confiés, l’utilisation et
l’etretien du four et doit être conservé en bon état, à un endroit à l’abri de l’humidité de telle sorte qu’il
puisse être consulté à tout moment.
Ce manuel doit être remis à la personne qui s’en sevira et qui se chargera de le garder en un lieu approprié
afin de le rendre disponible pour la consultation et pour l’entretien ordinaire du four. Au cas où le four
devrait être revendu, le manuel devra accompagner ce dernier.
Ce manuel est destiné à l’installateur, à la mise en service et la maintenance.
L’utilisation et les configurations indiquées dans le présent manuel sont les seules admises par le
fabricant: en uaucun cas le four ne doit être utilisé sans respecter les indications et recommandations
fournies.
L’utilisation prévue suppose que les appareils soient en parfait état, au plan structurel et mécanique ainsi
qu’en ce qui concrene les circuits d’alimentation.
Le fabricant décline toute responsabilité en cas d’utilisation impropre, en cas d’utilisation par un
personnel ne possédant pas les compétences nécessaires à cet effet ainsi qu’en cas d’utilisation de piéces
détachées non originale voire non adatées aux modèles spécifiques de four.
Le manuel doit être conservé pendant toute la durée de vie de l’appareil, à un endroit prévu à cet effet de
telle sorte qu’il puisse être consulté en bon état. En cas de perte ou de détérioration, adresser au
fabricant ou au revendeur une demande de fourniture d’un nouvel exemplaire.
Pour tout malentendu dans la traduction, s’il vous plaît se référer à la langue
italienne.
Les pages suivantes doivent toujours être associées au manuel des fours
électromécaniques pour compléter les instructions d'installation, d'utilisation et de
maintenance.
19
FR
P1
P2 P3
P4 P5
D1 E1
D2
E2
D3
E3
D4
E4
START
COOKING
STOP
CHAPITRE III - INSTRUCTIONS
D’UTILISATION
Panneau de contrôle et instructions de
commandes digitales
P1
P2
P3
P4
P5
D1
D2
D3
D4
E1 -
E2
E3
E4
Touche marche/arrêt
Touche marche/arrêt lumière chambre de cuisson
Touche marche/arrêt cuisson
Touche vitesse moteur et refroidissement rapide
Touche cuisson thermo-sonde de cuisson (OPTION)
Display température - alarme gaz
Display temps, préchauffage et fonction thermo-
sonde de cuisson
Display humidification, vitesse ventilateurs et
refroidissement rapide
Display fonction programmes
Manette réglage température reset gas
Manette temps, préchauffage et thermo-sonde de
cuisson
Manette humidification et vitesse ventilateurs
Manette fonction programmes

20
FR
START
COOKING
STOP
P1
P3
E1
D1
MARCHE ET ARRÊT
Après avoir fourni la tension par le biais de l'interrupteur de réseau, la touche
clignote pour indiquer que le four est actif mais en phase d'attente.
En appuyant sur cette touche, l'appareil se met en marche ; la chambre de
cuisson est illuminée et le panneau de commande se met automatiquement
dans la modalité de saisie des paramètres de cuisson.
Pour éteindre le four, appuyer de nouveau sur la touche .
Si aucune opération n'est effectuée, après un temps donné, le four se met
automatiquement en phase d'attente
P1
P1
PROGRAMMATION PARAMÈTRES
Le display est activé à l'allumage du four ; les touches actives sont illuminées et
les display affichent les valeurs par défaut.
La saisie des paramètres de cuisson se fait de manière guidée ; en
automatique lorsqu'est confirmée une valeur, on passe d'un paramètre à
l'autre en phase de saisie des données.
Pour confirmer immédiatement après l'allumage les paramètres affichés par
défaut, appuyer sur la touche marche/arrêt.
À ce stade commence à clignoter car il est possible de commencer une
cuisson.
Il est de toute façon possible de modifier les paramètres saisis tant avant de
commencer la cuisson que pendant.
P3
P3
Marche/arrêt d'un cycle de cuisson
Température
Après avoir programmé tous les paramètres de cuisson, la touche clignotera
pour signaler qu'en appuyant sur cette même manette, il est possible de lancer
le cycle avec les paramètres saisis.
Pendant la cuisson les paramètres saisis peuvent être modifiés à tout
moment.
Pour arrêter une cuisson, il suffit d'appuyer sur la touche , le four
bloquera la cuisson en affichant les paramètres saisis au moment du
lancement du cycle.
Si la porte est ouverte pendant la cuisson, le cycle en cours sera
momentanément interrompu et repartira à la fermeture de la porte.
Après l'éclairage le display température clignote ainsi que les voyants
correspondants à la manette de réglage . Cela indique que le paramètre
relatif à la température est en train de se modifier.
Pour régler la donnée souhaitée, différente de la donnée par défaut, tourner
la manette et appuyer pour confirmer. Si la donnée par défaut convient,
appuyer immédiatement sur .
Après 10 secondes, la donnée relative à la température est
automatiquement confirmée si aucune autre opération n'est effectuée.
La valeur de la température peut être changée à tout moment ; en appuyant
sur la manette correspondante , le display clignote et la valeur souhaitée
peut être saisie.
Pendant la cuisson, le display affiche la température relevée ; en
appuyant sur est en revanche affichée la donnée programmée qui peut
être changée en tournant la manette. Pour la confirmation, appuyer à
nouveau ou attendre 10 secondes.
La valeur de température maximum que l'on peut sélectionner est 270°C.
P3
P3
D1
E1
E1
E1
E1
D1
E1
E1
This manual suits for next models
2
Table of contents
Languages:
Popular Convection Oven manuals by other brands

Black & Decker
Black & Decker TO3215SS manual

MKN
MKN FlexiCombi MagicPilot Series installation instructions

Black & Decker
Black & Decker CTO7100B Use and care book

Bakers Pride
Bakers Pride Cyclone BCO-E1 Brochure & specs

Moffat
Moffat Bakbar E35 Brochure & specs

Vulcan-Hart
Vulcan-Hart ML-126743 Replacement parts catalog


