Eurotech ED-BIO11FT BK User manual
ED-BIO11FT BK
Cod:0040305934
Safety instructions......................................................................................................4
How to save energy.............................................................................................................5
Disposal of the appliance....................................................................................................5
Unpacking.............................................................................................................................5
Description of the appliance..................................................................................6
Installation......................................................................................................................8
Operation.......................................................................................................................10
Prior first use........................................................................................................................10
Electronic programmer.......................................................................................................10
Oven.....................................................................................................................................15
Cleaning and maintenance....................................................................................17
Operation in case of emergency.........................................................................19
Baking in the oven....................................................................................................20
Technical information..............................................................................................26
The appliance and its accessible parts become hot
during use.
Care should be taken to avoid touching heating elements.
Children less than 8 years of age shall be kept away unless
supervised.continuously
During use the appliance becomes hot. Care should be taken
touching heating elements inside the ovento avoid
WARNING: Accessible parts may become hot during use.
Young children should be kept away
This appliance can be used by children aged from 8 years and
above and persons with reduced physical, sensory or mental
capabilities or lack of experience and knowledge if they have
been given supervision or instruction concerning use of the
appliance in a safe way and understand the hazards involved.
Children shall not play with the appliance. Cleaning and user
maintenance shall not be made by children without supervision.
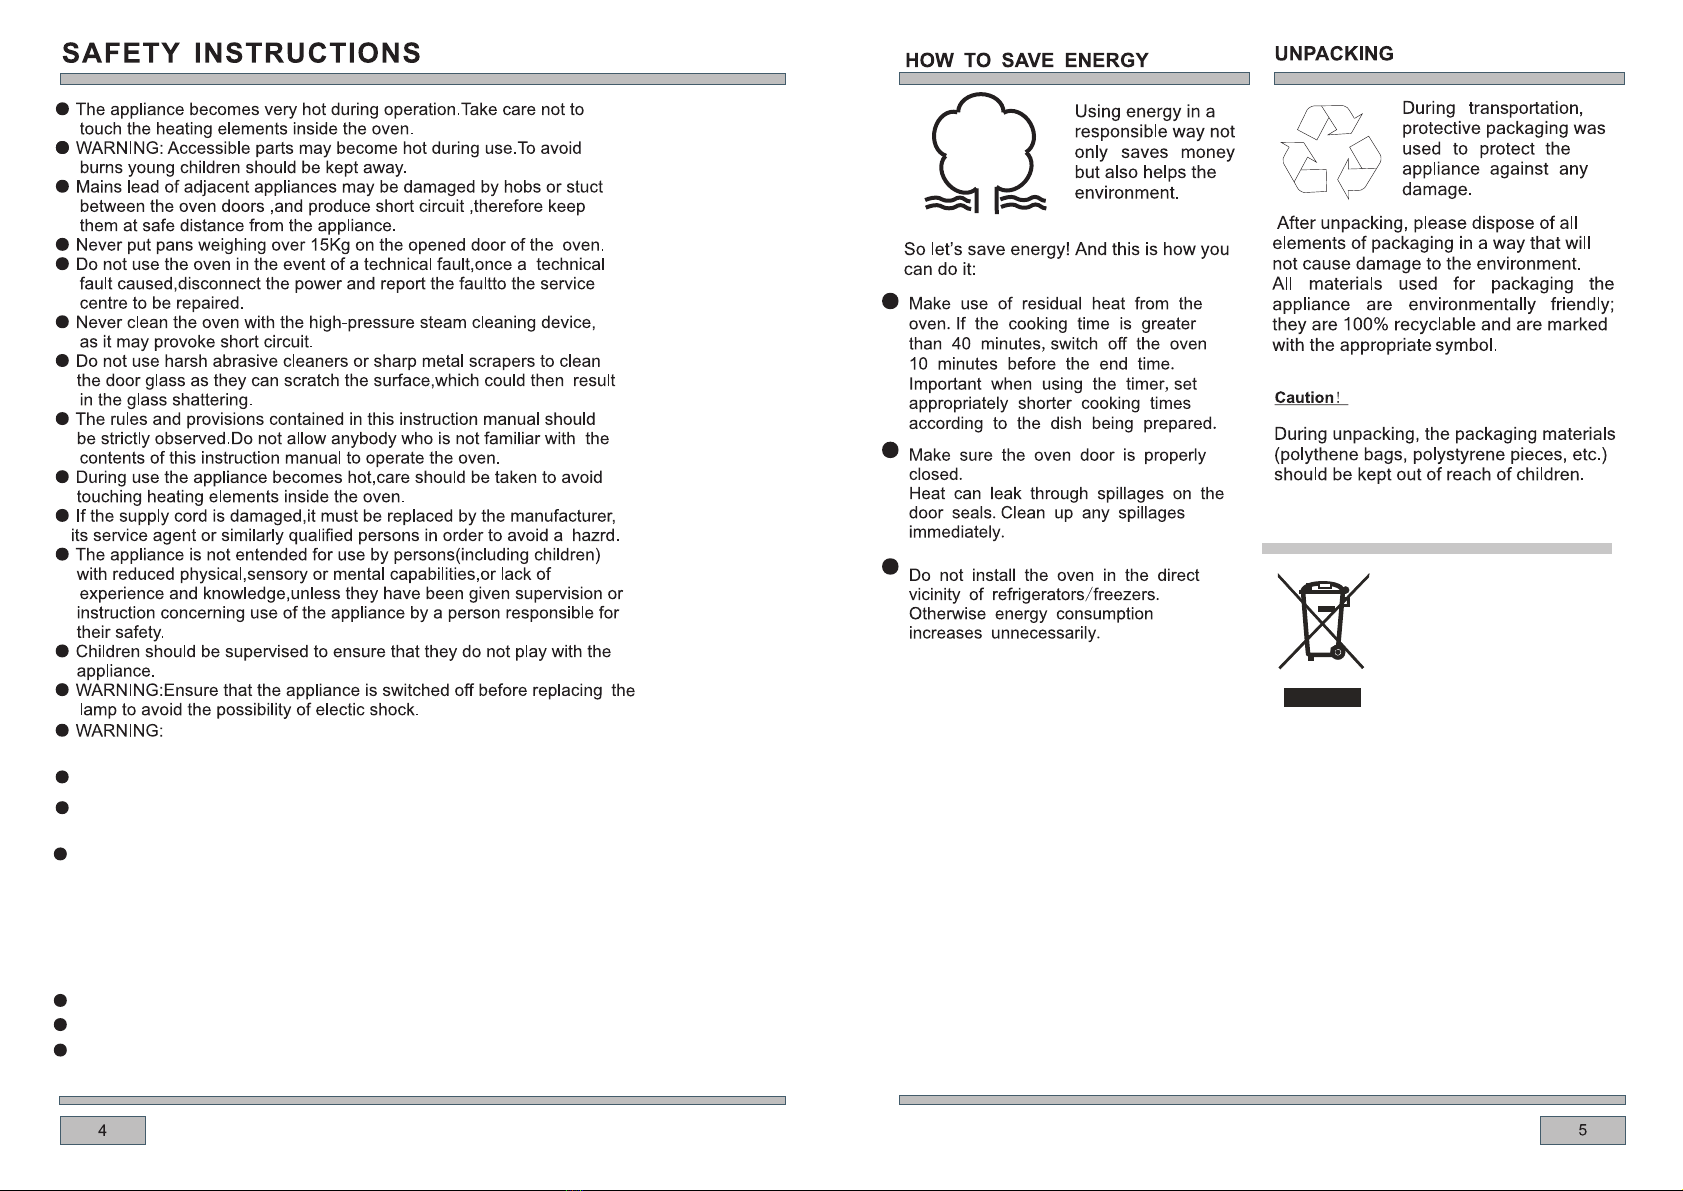
DISPOSAL OF THE APPLIANCE
Old appliances should not
simply be disposed of with
normal household waste,
but should be delivered to
a collection and recycling
centre for electric and
electronic equipment.
A symbol shown on the product, the
instruction manual or the packaging shows
that it is suitable for recycling.
Materials used inside the appliance are
recyclable and are labeled with information
concerning this. By recycling materials or
other parts from used devices you are
making a significant contribution to the
protection of our environment.
Information on appropriate disposal
centes for used devices can be provided r
by your local authority.
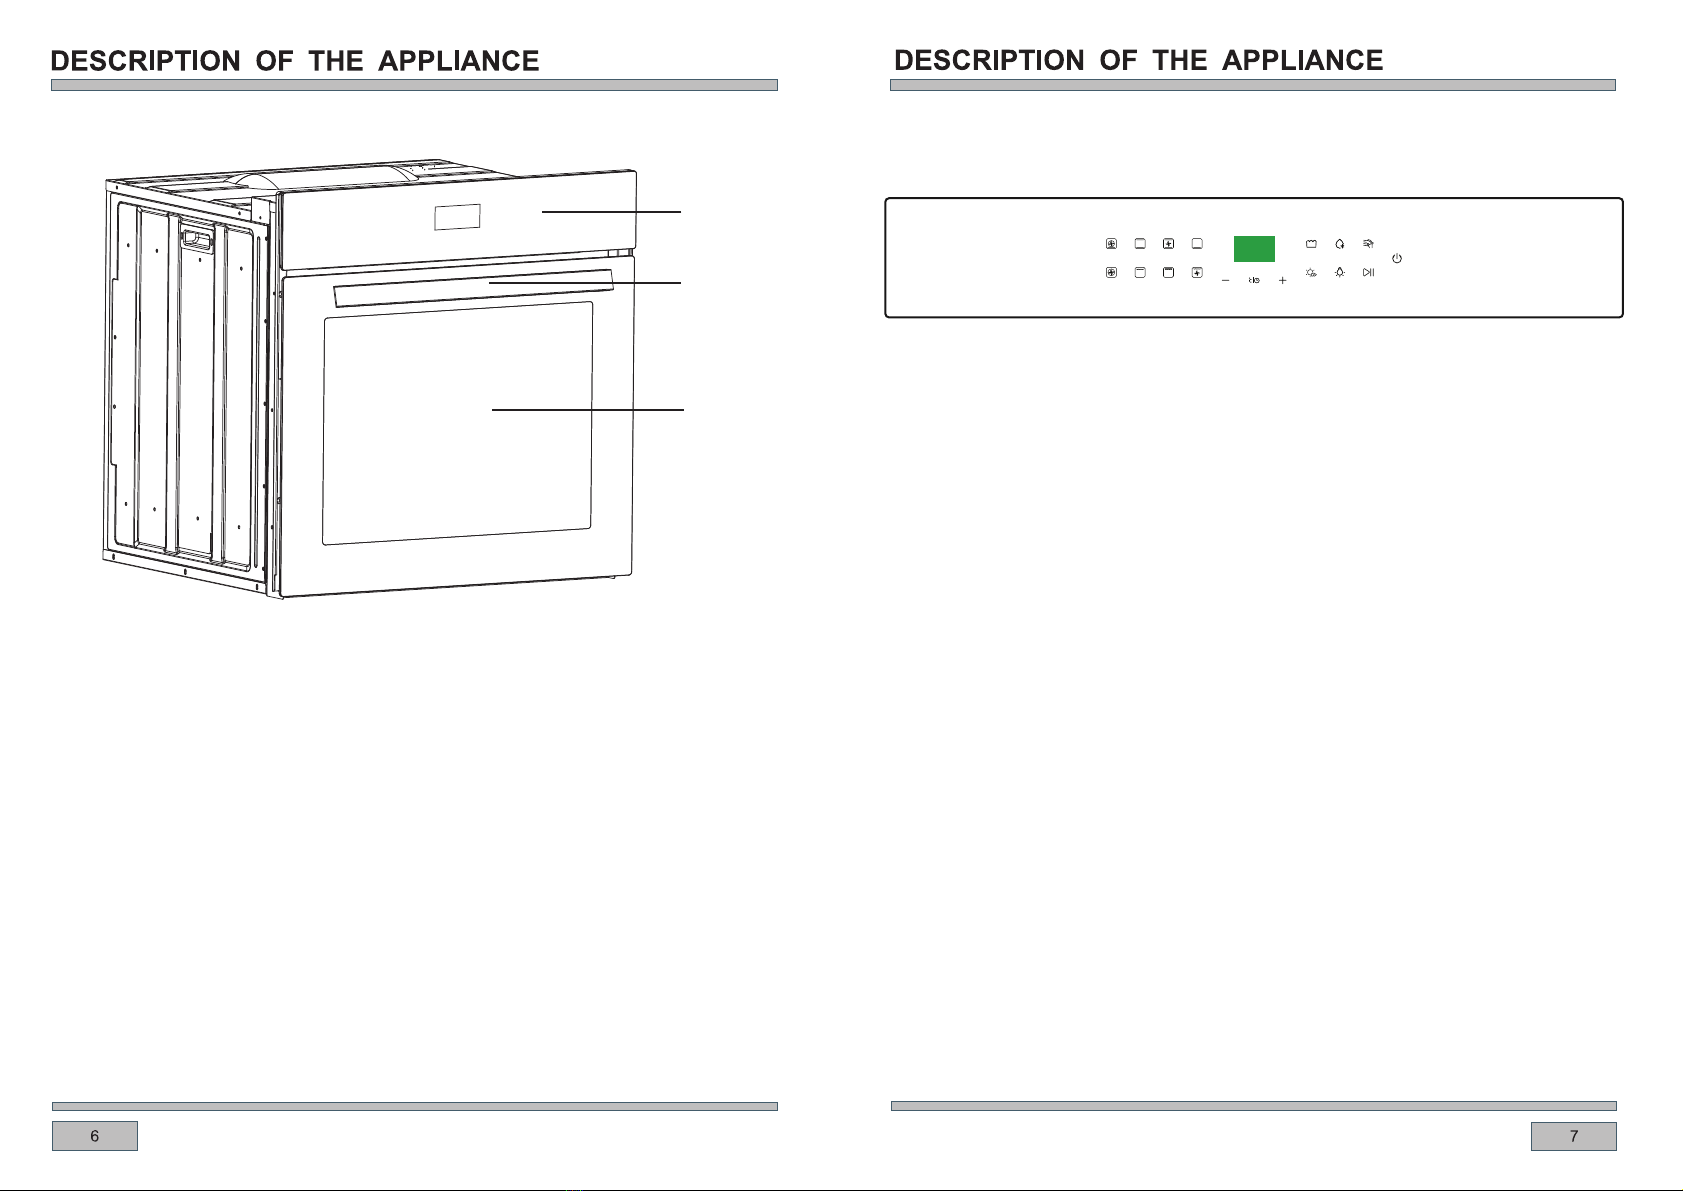
2
3
1
1. Control panel
2. Oven door handle
3. Oven door

The means for disconnection from
the supply mains having a contact
separation in all poles that provide
full disconnection under over voltage
the grounding wire shall be
longer than the other wires.
fixed wiring in accordance with the
wiring rules.
HO5VV-F
564
600
560
40
564
600
560
40
-zzzz
570
20
547
595 558
570
20
547
595 558
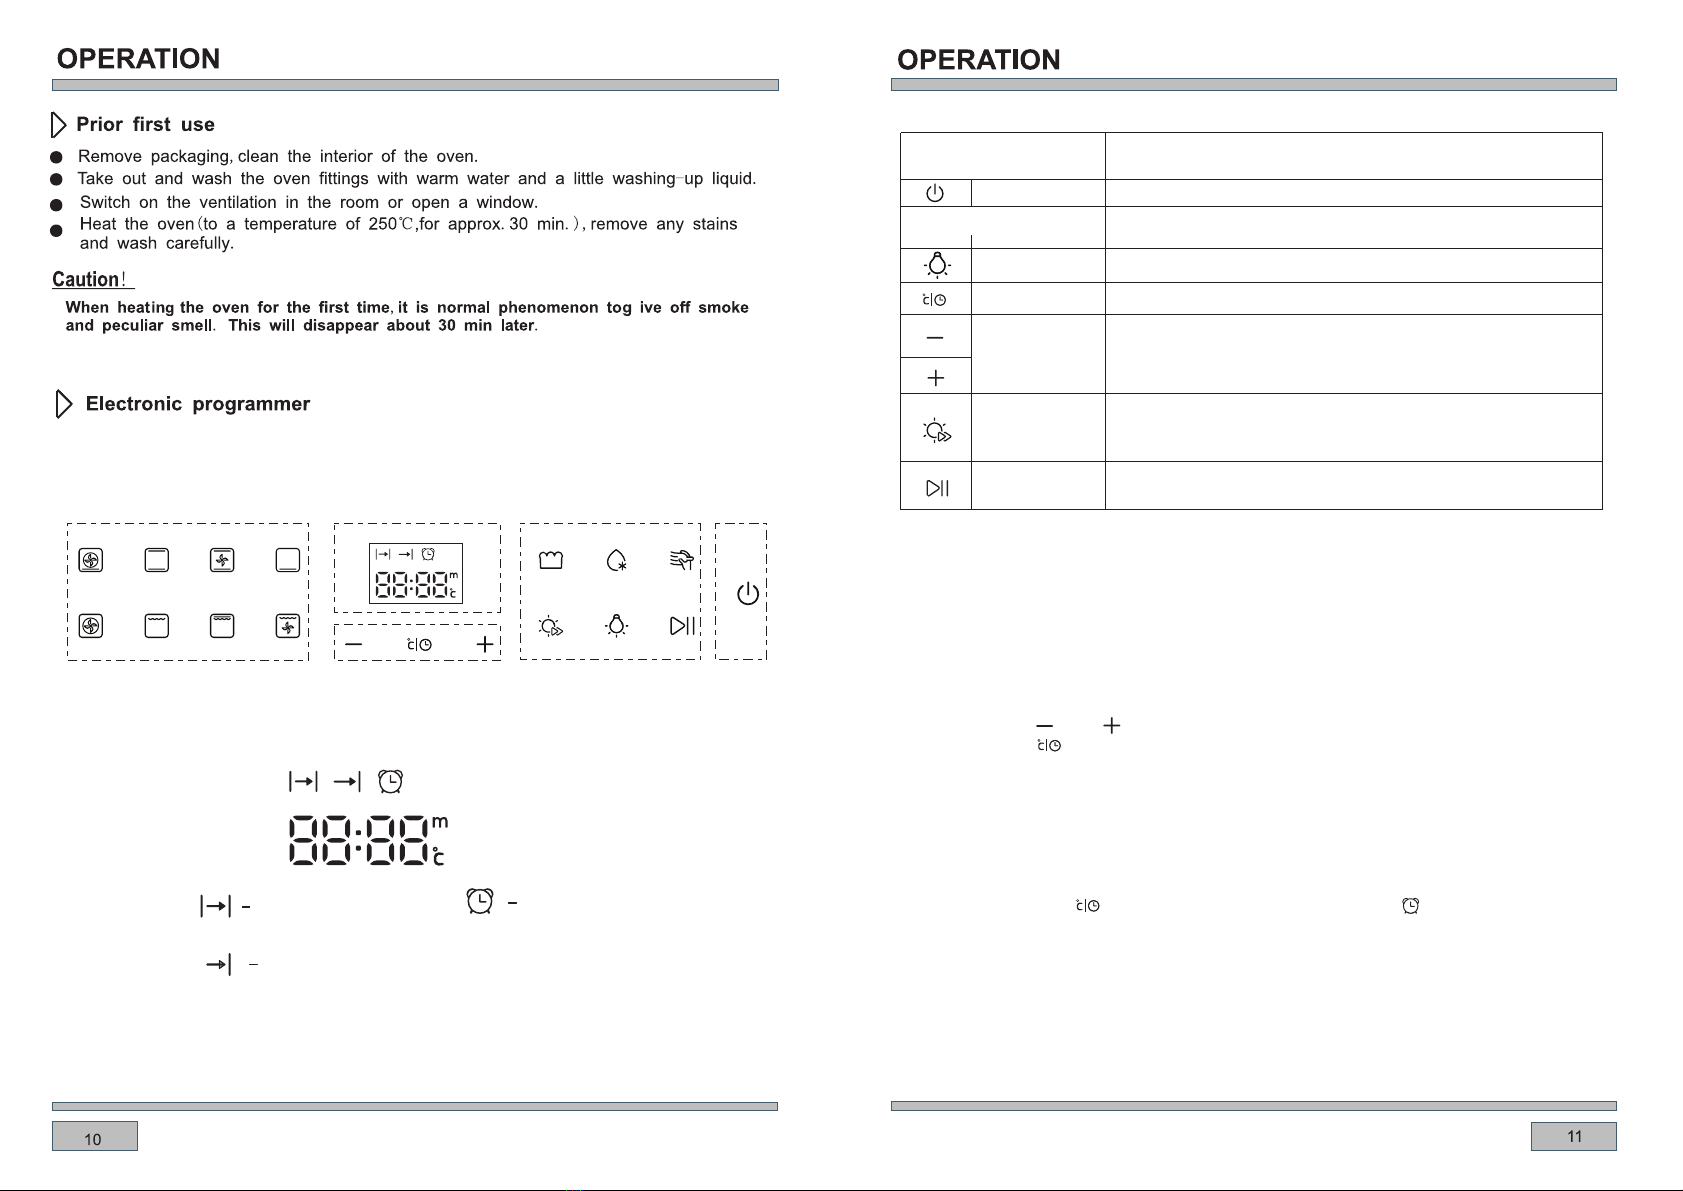
Time /Temperature displayFunction Auxiliary function
Time /Temperature adjustment
On/Off button
Timer
Cooking time
End of cooking time
Button
ON/OFF button
Clock Function
Oven lamp
Selector Buttons
Speedcook
Start / pause key After set the temperature and function, touch the button, you can
Explanation
For selection of functional.
For on /off oven lamp; touch the button, the light will turn on
When set the clock, alarm, cooking time,end
After set a functions, touch this type you can set different
temperatures.
of cooking time,touch this key time of addition and
subtraction can be realized
To enable rapid heating.After setting the function and
temperature, touch this button allows the oven temperature
reaches the set temperature quickly
Used to set the clock, alarm, cooking time,end of cooking time.
For on / off the oven.
Baking mode
or turn off.
Start or Pause the oven.
Setting the clock
The clock is preset to “00:00” , and will revert to this after apower
failure.
To change the clock time
•Ensure the oven is in standby mode.
•.
•
Touch button “ ” or “ ” to set the clock.
Touch button “ ” to confirm, or it will auto confirm after 5 seconds.
The minute minder can be used when the oven is switched on.
It can be set for up to 23 hours and 59 minutes.
To set the minute minder
•Touch the button “ ” until the “Minute Minder” symbol “ ” appear.
While the “Minute Minder” symbol is still flashing, use the “+or
- keys to scroll the display to the required countdown time.
•”
“ ”
•When the time has elapsed, the oven will beep for
The beep can be turned off by touching the “+” or “-”key.
The minute minder

•At the end of the countdown, the minute minder will not switch off
the oven. Remember to turn off the oven manually.
•Cancel the minute minder, you must be pause the oven, then touch the button
“ ” until the “Minute Minder” symbol “ ” appear,touch the “-”key set the
minder to “00:00”.
Setting the cooking time
The oven can be set to switch off automatically at apreset time up to a
maximum of 23 hours and 59 minutes from when you set it.
To set acooking time:
•Select the oven function and temperature.
•While the display is still flashing, touch the key repeatedly
until the Cooking Time symbol lights up.
•While the Cooking Time symbol is still flashing, use the + or -
keys to scroll the display to the required cooking time.
Touch the key “ ” to start the cooking.
When the time has elapsed, the oven will turn off and beep .
The beep can be turned off by touching the key .
Please note :
At the end of the cooking programme, remember to turn off the oven
manually.
Automatic cooking
After the cooking time has been set, the finish time can also be set so
the cooking starts and finishes automatically.
To set an automatic cooking programme:
Select the oven function and temperature.
“ ”
“ ”
“ ” “ ” “ ”
•
•
“ ”
•
•Set the cooking time required by following the instructions in “Setting the cooking
time” above.
•While the display is still flashing, touch the key “ ” repeatedly until the
“Finish Time” symbol lights up.
•While the “Finish Time” symbol “ ” is still flashing, use the “+”or “-”keys to
scroll the display to the required finish time.
•Touch the key “ ” to start the cooking.
•When the time has elapsed, the oven will turn off and beep .
The beep can be turned off by touching the key .“ ”
Please note:
At the end of the cooking programme, remember to turn off the oven manually.
After setting the function, temperature and the time, close the door, touch the key “ ”,
then the cooking starts.
When the oven is working, if you the door , the oven will stop work; you must closed
the door and touch the key “ ” to start the oven.
open
When the oven is working, touch the key “ ” to pause the oven, touch the key “ ”
to adjust the temperature, timer, cooking time and the end of cooking time by touch
touch the key “ ” to start the oven.
“ + ”
or “ - ”key.
You can canclle the working by touching the key “ ”.
Booster Function
The oven is equipped with a booster function to heat it up to operating temperature as
fast as possible.
After selecting the oven function and setting the temperature, as above, touch the
key “ ” briefly.
The booster function works with all cooking functions, but is not required with the
pyrolytic function.
When the booster is operating, all three sections of the “Thermometer” symbol
flash together.
The booster will continue until the oven reaches its set temperature, then the oven
will automatically return to normal heating.
Important:Do not put any food in the oven while the booster is operating, wait until
the oven has reached temperature then insert the food containers carefully.

Auto Cut- Off Feature
There is an auto cut-off feature on all cooking functions for added safety.
Whenever the oven is running it will automatically switch off after a set time,
depending on the temperature setting.
Selected Temperature Time to Cut-Off (hours)
20-120℃24 h
121-200℃6 h
201-250℃3 h
Key Lock
The oven is equipped with a key lock to lock the controls.This can be used when
the oven is cooking.
To switch on the key lock
Touch for approximately 3 seconds, until the “Lock” symbol
illuminates and the oven beeps to confirm the key lock is switched on.
To switch off the key lock
s, until the “Lock” symbol
goes out and the oven beeps to confirm the key lock is switched off.
When the key lock is on, any key is not touched except ON/OFF button and
lamp button.
Key lock after power outage.
The key lock can be set to do one of two things after the power to the
oven is cut then re-instated:-
Key lock automatically unlocks after power outage
Key lock remains activated after power outage
key “ + ”or “ - ”
Touch key “ + ”or “ - ”for approximately 3 second
Fan,grill element
top heater
Economy Grill (variable)
Use the economy grill to grill or brown
small amounts of food. Locate the grill
pan in the 4th or 5thshelf position .
pre-heat the grill for 5 minutes before
use .
Circular heater Fan
with Bottom Element
This operates the fan oven with the
convection element and the bottom
element allowing for cooking with
increased temperature from the
of the dish when using shelf
or 4 . touch the function
the default temperatureof 220 is
displayed and can be adjusted and
button.
bottom
position 3
For each cooking function please note:
•After selecting a cooking function and
temperature the display flashes for 5
seconds, then when it stops flashing
the function starts to run.
•The slowly raising animation of the
“Thermometer” symbol means that the
oven is heating up.

6
100
6
Ferment
At this function is ferment mode.
Before any maintenance is started
involving electrical parts, the
appliance must be disconnected
from the power supply.
If the oven has been in use, let the
oven cavity and the heating elements
cool down before attempting any
maintenance.
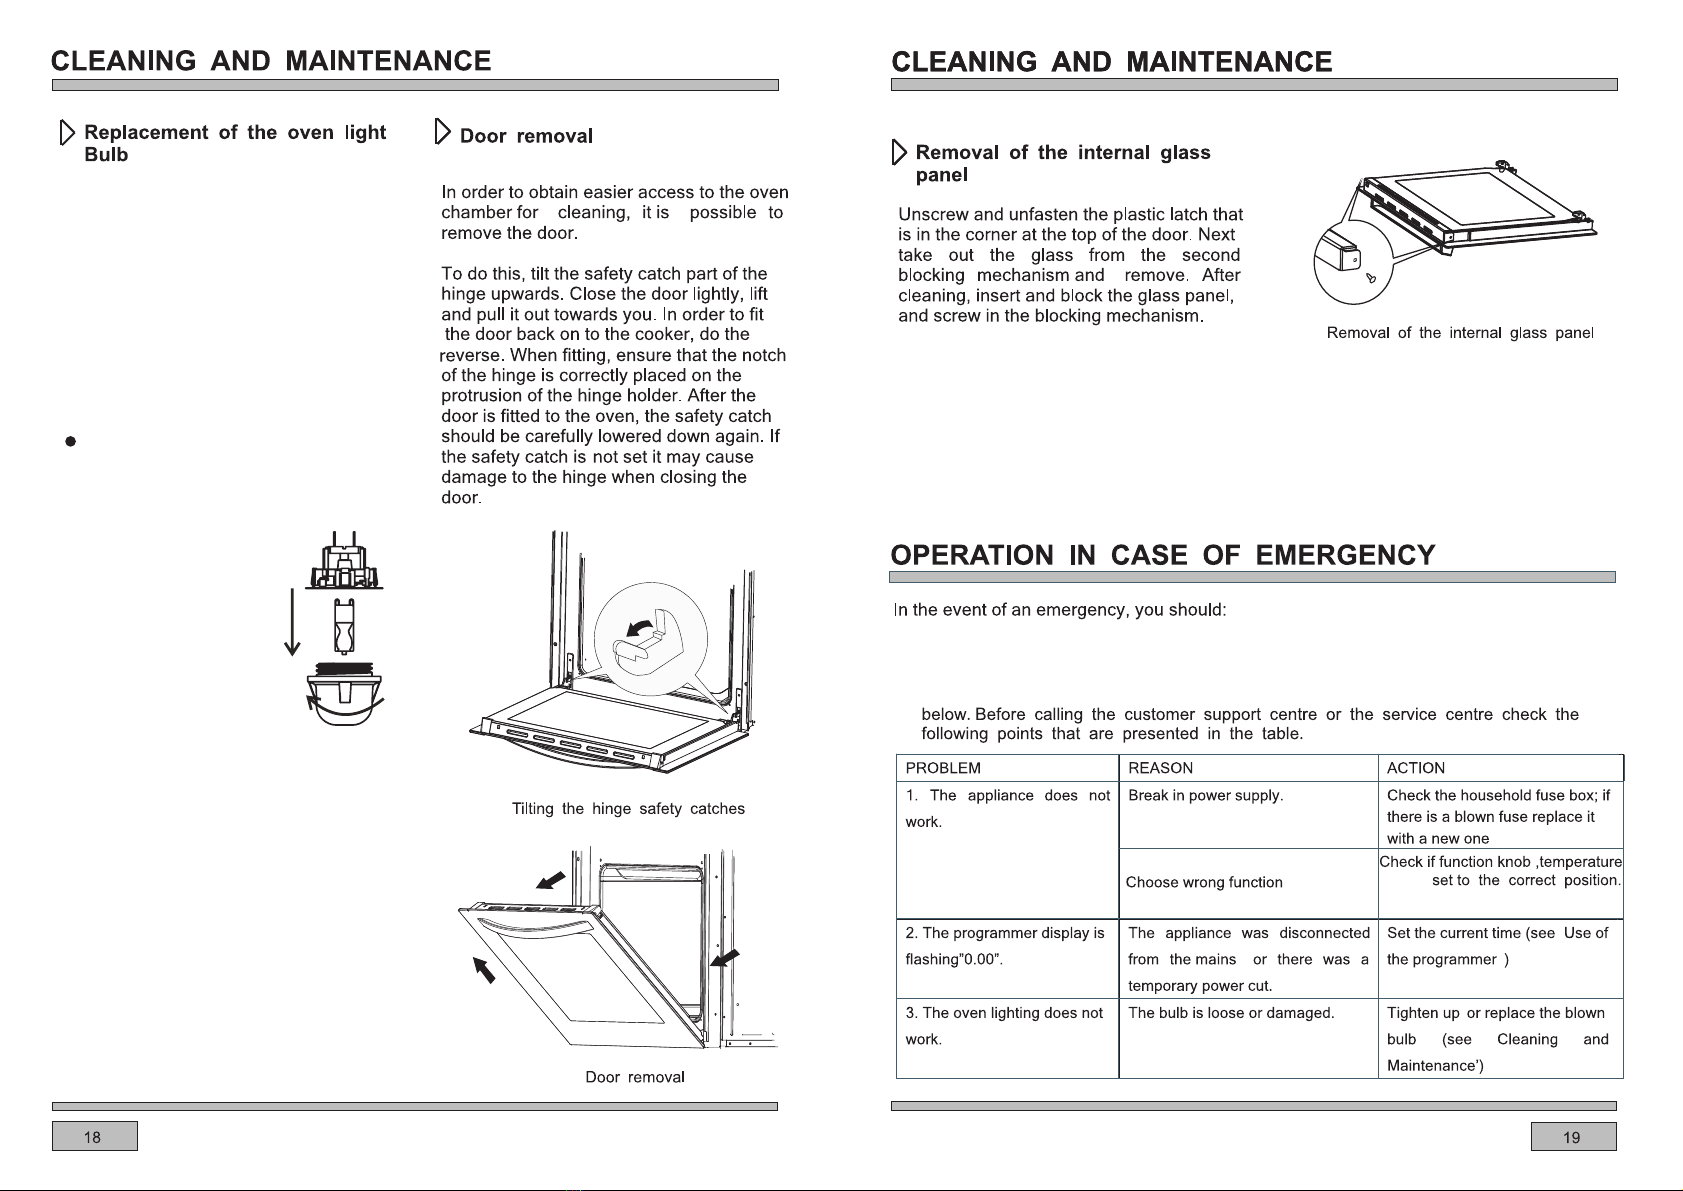
Changing the bulb
Unscrew the protective cover. We
recommend that you wash and dry the
glass cover at this point.
Carefully remove the old bulb and
insert the new bulb suitable for high
temperatures (300ºC) having the
following specifications: 220-240V,
50Hz, 25W, G9 fitting.
Refit the protective cover.
IMPORTANT
Never use screwdrivers or other
utensils to remove the light cover.
This could damage the enamel of the
oven or the lampholder. Remove only
by hand.
IMPORTANT
Never replace the bulb with bare
hands as contamination from your
fingers can cause premature failure.
Always use a clean cloth or gloves.
Please note:
The bulb replacement is not covered
by your guarantee
● Switch off all working units of the oven
● Call the service centre
● Some minor faults can be fixed by referring to the instructions given in the table
Knob is
.
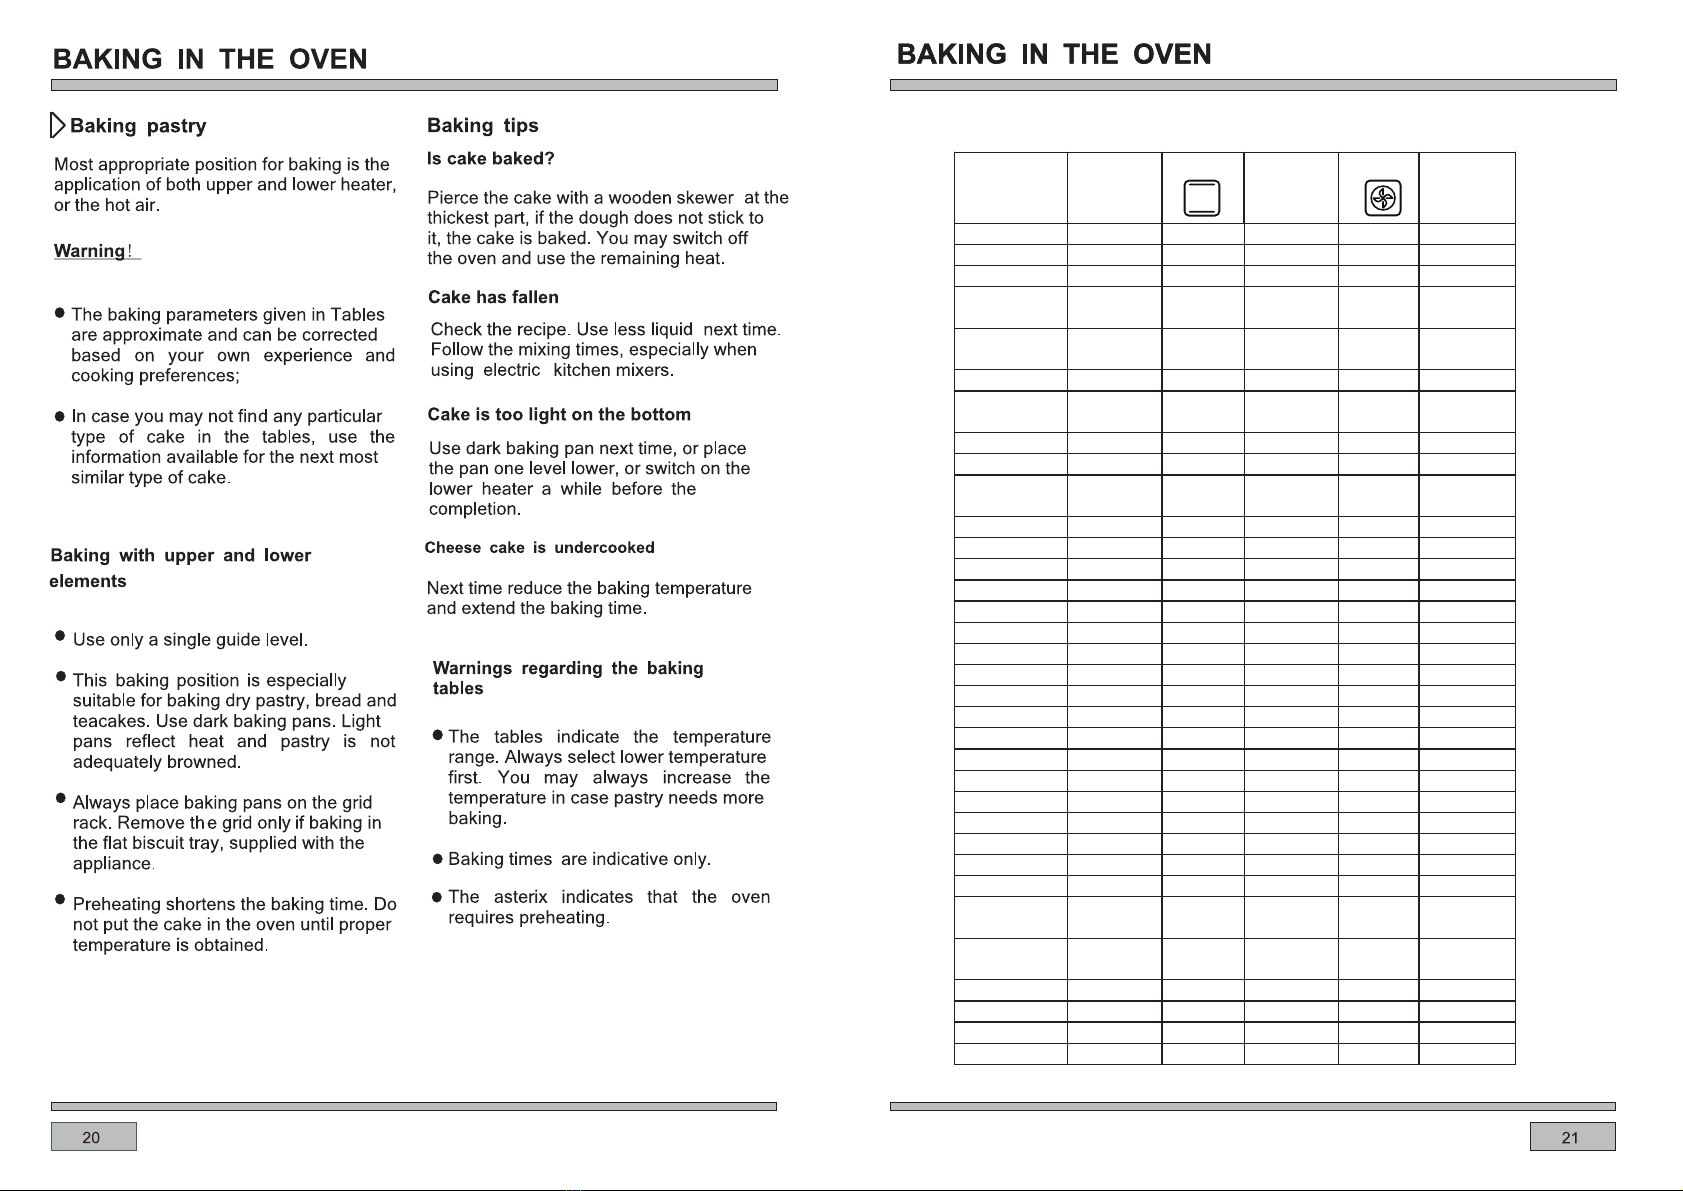
Pastry Baking Table
Type of pastry Guide level
(from down
upwards)
Temp(℃) Guide level
(from down
upwards)
Temp(℃) Baking time
(in min.)
Sweet pastry
Raisin cake 2 160-170 2 150-160 55-70
Ring cake 2 160-170 2 150-160 60-70
Tree cake (tart
form)
2 160-170 2 150-160 45-60
Cheese cake
(tart form)
2 180-190 3 160-170 60-80
Fruit cake 2 190-200 3 170-180 50-70
Fruit cake with
icing
2 180-190 3 160-170 60-70
Sponge cake 2 180-190 2 160-170 30-40
Flake cake 3 190-200 3 170-180 25-35
Fruit cake mix
dough
3 180-190 3 160-170 50-70
Cherry cake 3 190-210 3 170-200 30-50
Jelly roll 3 190-200 3 170-180 15-25
Fruit fan 3 160-170 3 150-160 25-35
Plait bun 2 190-210 3 180-210 35-50
Christmas cake 2 180-190 3 170-200 45-70
Apple pie 2 190-210 3 170-200 40-60
Puff paste 2 180-190 3 160-170 40-60
Salted pastry
Bacon roll 2 190-200 3 170-180 45-60
Pizza 2 220-240 3 210-230 30-45
Bread 2 200-220 3 180-210 50-60
Rolls 2 210-230 3 200-220 30-40
Cookies
Caraway roll 3 180-190 3 160-170 15-25
Biscuits 3 180-190 3 160-170 20-30
Danish pastry 3 190-210 3 170-200 20-35
Flaky pastry 3 200-210 3 180-200 20-30
Cream puff 3 190-210 3 170-200 25-45
Deep frozen
pastry
Apple pie,
cheese pie
2 190-210 3 170-200 50-70
Cheese cake 2 190-200 3 170-180 65-85
Pizza 2 210-230 3 200-220 20-30
Chips for oven 2 210-230 3 200-220 20-35
Potato fries for 2 210-230 3 200-220 20-35
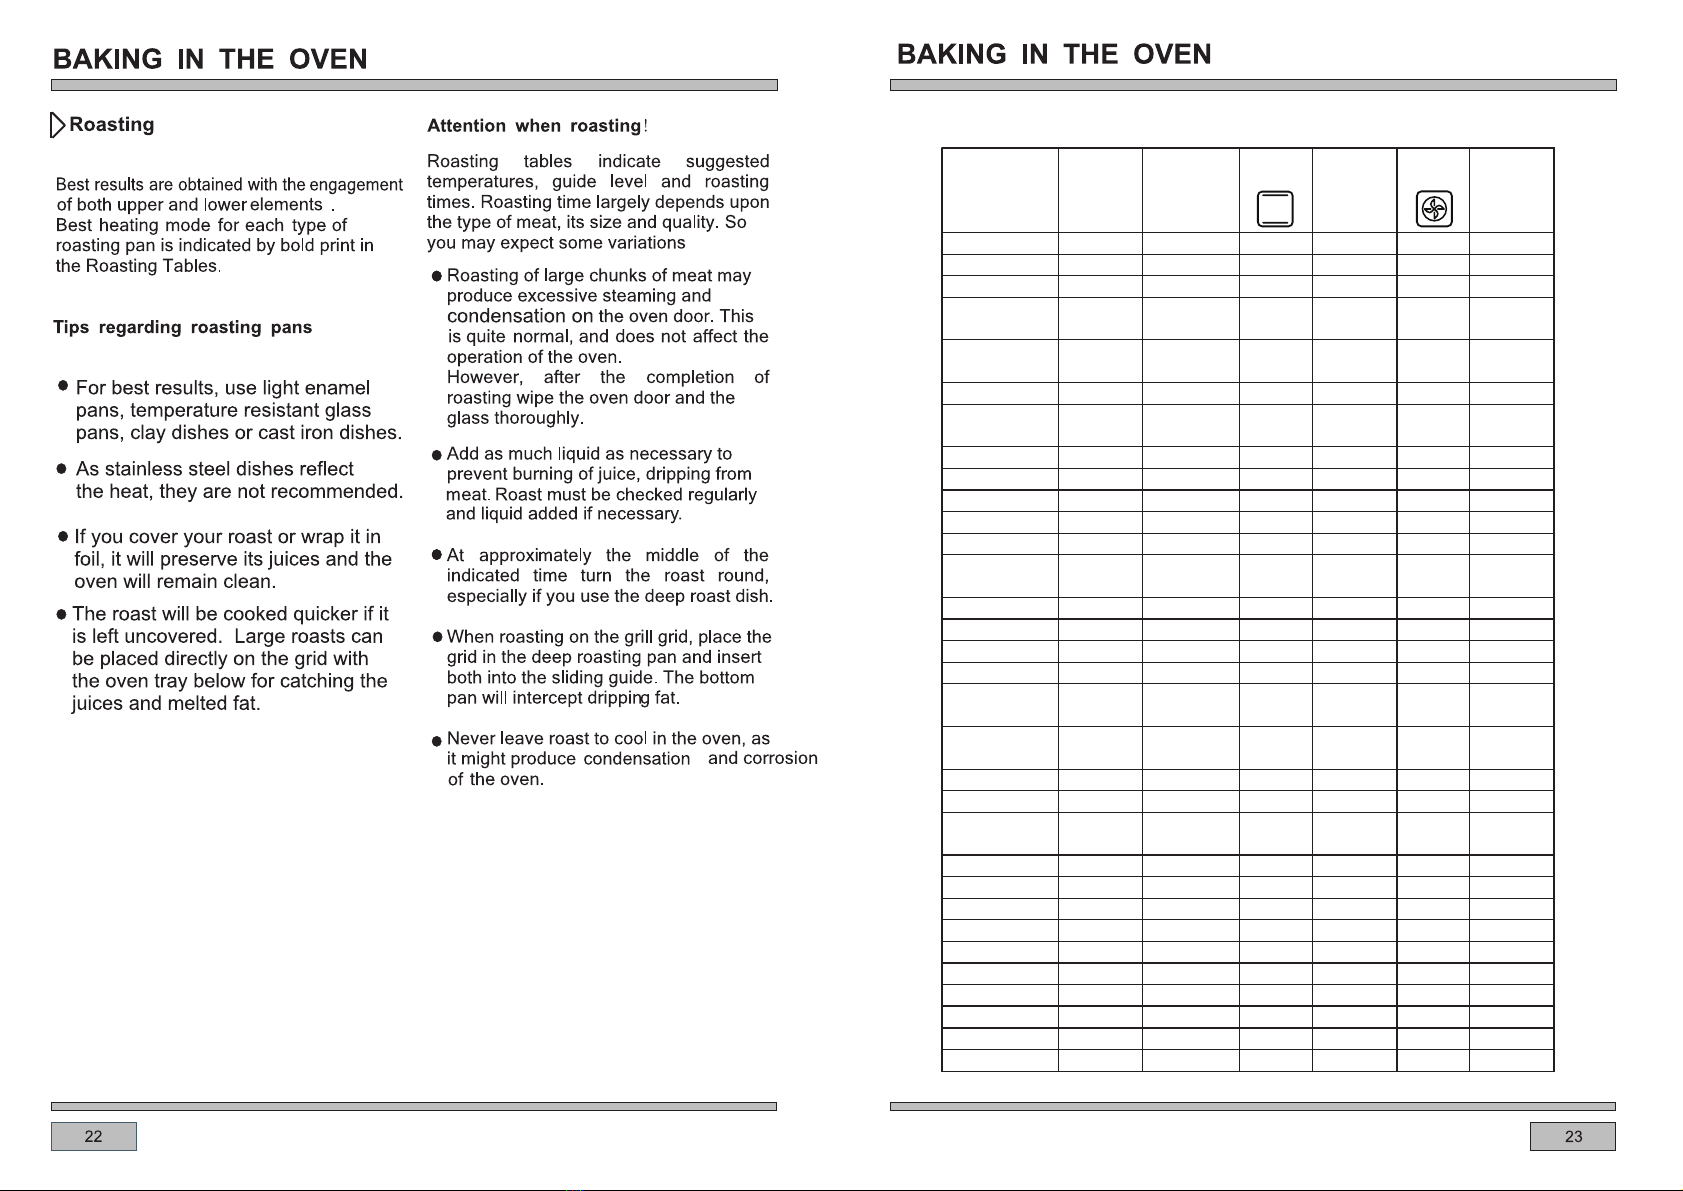
Roasting table
Type of meat Weight
(in grams)
Guide level
(from
bottom up)
Temp
(℃)
Roasting
time
(in min.)
temp
(℃)
Roasting
time
(in min.)
Beef
Beef loin 1000 2 210-230 2 200-220 100-120
Beef loin 1500 2 210-230 2 200-220 120-150
Roast beef,
rare
1000 2 230-240 2 220-230 30-40
Roast beef,
well done
1000 2 230-240 2 220-230 40-50
Pork
Pork roast with
skin
1500 2 190-200 2 170-180 140-160
Flank 1500 2 200-210 2 180-190 120-150
Flank 2000 2 190-210 2 170-200 150-180
Pork loin 1500 2 210-230 2 200-220 120-140
Meat roll 1500 2 210-230 2 200-220 120-140
Pork cutlet 1500 2 190-210 2 170-200 100-120
Minced meat
roast
1500 2 220-230 2 210-220 60-70
Veal
Veal roll 1500 2 190-210 2 170-200 90-120
Veal knuckle 1700 2 190-210 2 170-200 120-130
Lamp
Lamp prime
ribs
1500 2 200-210 2 180-200 100-120
Mutton blade
bone
1500 2 200-210 2 180-200 120-130
Venison
Hare ribs 1500 2 200-220 2 180-210 100-120
Hare blade
bone
1500 2 200-220 2 180-210 100-120
Boar ham 1500 2 200-220 2 180-210 100-120
Poultry
Chicken entire 1200 2 210-220 2 200-210 60-70
Hen 1500 2 210-220 2 200-210 70-90
Duck 1700 2 190-210 2 170-200 120-150
Goose 4000 2 170-180 2 150-160 180-200
Turkey 5000 2 160-170 2 140-150 180-240
Fish
Fish, entire 1000 2 210-220 2 200-210 50-60
Fish soufflé 1500 2 190-210 2 170-200 50-70

rating 220-240V
Z
ED-BIO11FT BK
2800W
800W
1000W
1000W
1600W
Table of contents
Other Eurotech Oven manuals


