Eurotops Versand 29957 User manual
EP644 LIGHTER CAMERA
INSTRUCTION MANUAL
PLEASE READ THE MANUAL BEFORE FIRST USE. SAVE IT FOR FUTURE
REFERENCE!
THE LIGHTER CAMERA IS DELIVERED UNCHARGED. ON FIRST TIME USE, CHARGE IT
FOR 6 HOURS.
WHEN RECORDING A VIDEO OR TAKING A PHOTO, MAKE SURE THAT THE SIDE OF
THE DEVICE CONTAINING THE SLOT FOR MICRO SD CARD (8) SHOULD BE FACING
DOWNWARDS. THIS WILL AVOID THE VIDEOS AND PHOTOS BEING UPSIDE DOWN
WHEN VIEWING.
SYSTEM REQUIREMENTS
•Windows operating system : Windows XP/Vista/Windows 7 or later version.
•Macintosh operating system : Mac OS X version10.4.11/10.5.8/10.6.4 or later version.
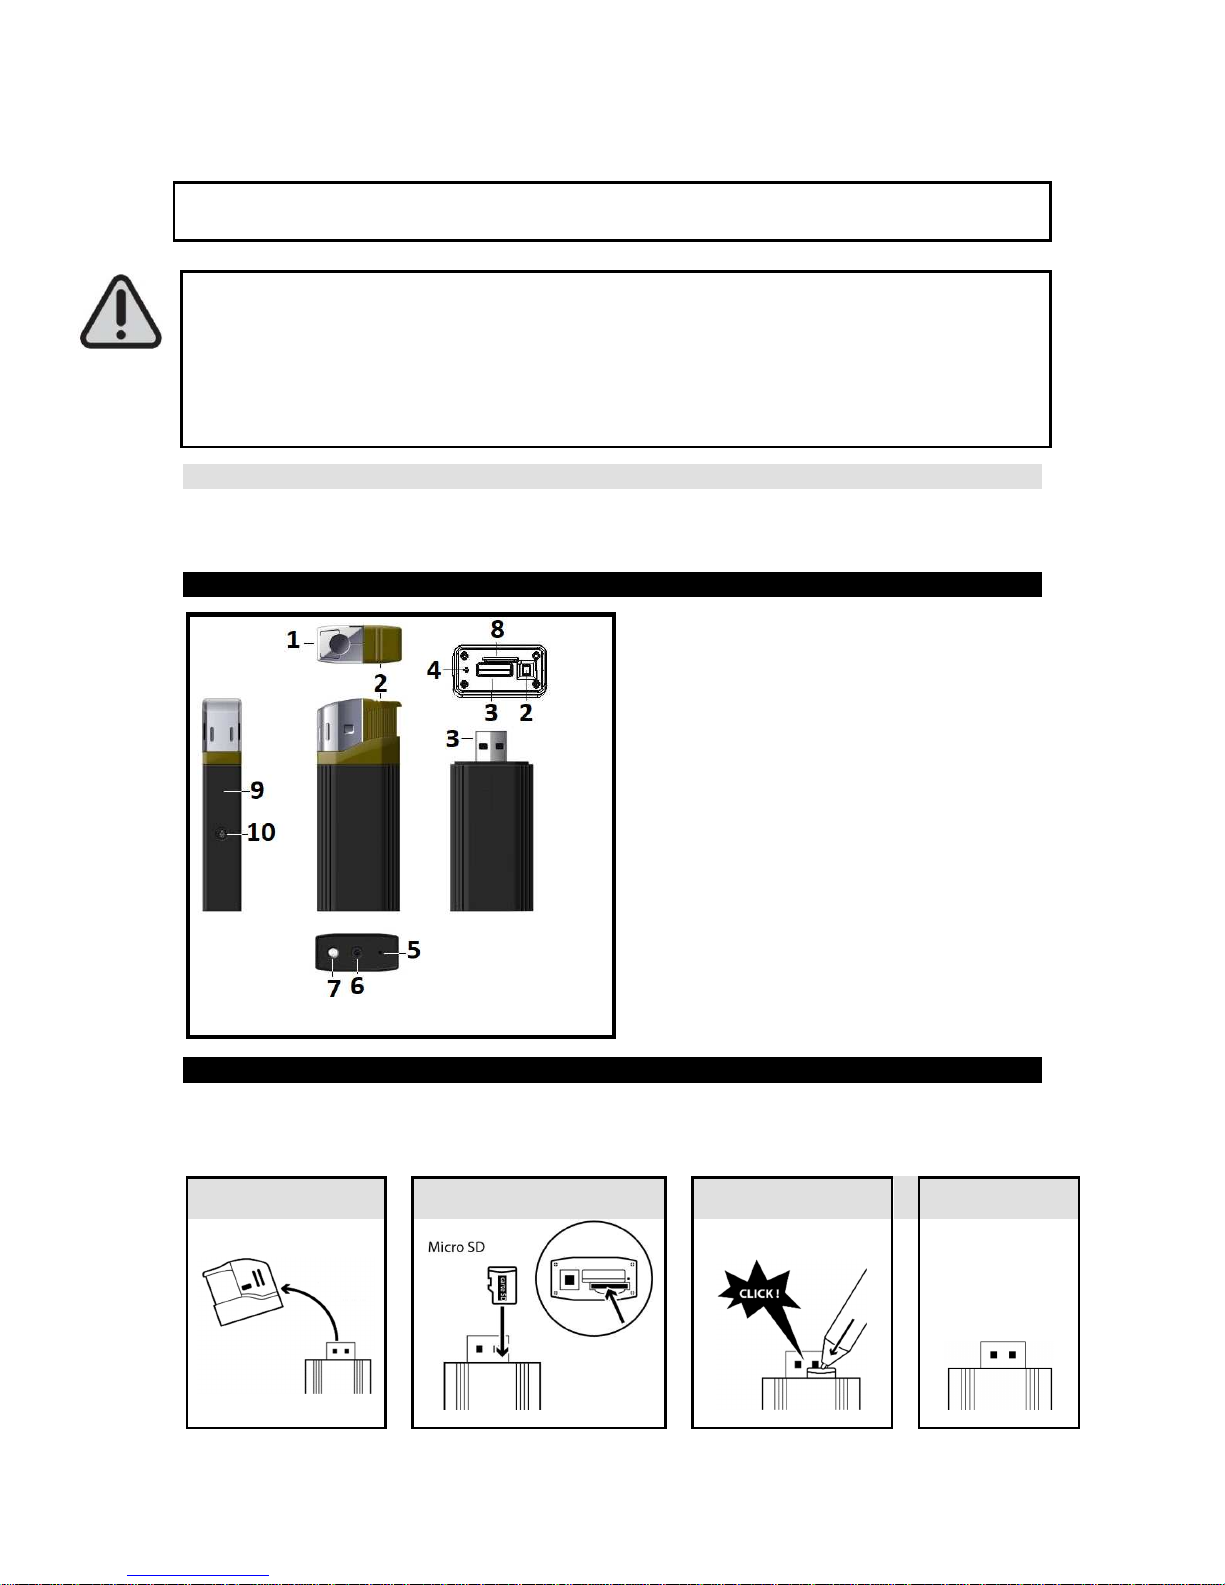
PRODUCT DESCRIPTION
1. Lighter’s head
2. Ignition switch
3. USB port
4. Reset hole
5. ON/ OFF button/ video recording
6. Camera lens: Do not cover the camera
lens when you are taking pictures or
recording videos.
7. LED flashlight
8. Slot for micro SD card
9. LED indicator
10.
Flashlight ON/ OFF
Accessories included: USB cable + CD Driver
INSERTING THE MICRO SD CARD
Before first use, insert a micro SD card (maximum capacity: 32 GB, not included).
Note: To remove the SD card, also proceed as step 2.
1
2
3 4
When the card is
fully inserted, you
will hear a click

CHARGING THE LIGHTER CAMERA
Charging time: About 5-6 hours
NOTES :
- To preserve your battery, please use the device until the battery discharges totally, and charge
at its maximum capacity during the 5 first times of use.
- If the device has not been used for a long time, please fully recharge it before use.
-In order to maximize the capacity of the battery storage, please continue to charge for 30mins
to one hour after the indicator light becomes blue.
CONNECTION TO USB CABLE (included)
CHARGING
1. After connection to USB port of computer, the red LED indicator turns on. A few
seconds later, the unit vibrates and flashes 3 times in red and blue, and then the
indicator becomes red and blue when charging.
Note: If no memory card is inserted, the blue indicator will be solid red, flashing in blue
when charging.
2. When fully charged, it becomes blue.
3. Then disconnect it to USB port of computer, it vibrates twice and the LED turns off.
SETTING TIME AND DATE
- If the battery is not charged enough, discharged or has not been charged for several
days, the time may reset to factory default settings. In that case, set the correct date and
time again.
-
Always make sure that the device is sufficiently charged to allow the update of the time and
date So if you plan to make photos and videos regularly, charge it regularly
Setting recording hour and date (For PC only)
1. Connect the device to your computer.
2. The file directory containing the photos and videos automatically displays. If it does not
display, go to “My Computer” and double-click the removable drive corresponding to the
memory of the device.
3. Right-click just next to DCIM file.
4. Click “NEW” and then “Text document”.
5. Open it and write date and time in the format below: YEAR.MONTH. DAY
HOUR:MINUTES:SECONDS (for example: if the date is 31 January 2013 and time is 9:30:30,
write 2013.01.31 9:30:30).
6. Save it under file name: “time”.
7. Unplug the device.
8. Turn it on to confirm the file backup. The file will be saved, deleted from file directory and will
not display in file directory.
9. Take a video to ensure the date and time are correct.
OPERATION
HOW TO TURN ON THE LIGHTER CAMERA
1. Long press ON/ OFF button (5) till the blue indicator is on.
2. After a few seconds, the indicator flashes and the device vibrates 3 times at the same time. Then
the indicator is blue: the device enters standby mode.
Auto Power off
When the device enters stand-by mode and is not used for about 2 minutes, it will vibrate and
shut down automatically.
HOW TO TURN IT OFF
Note: To power off the device, you should be in video mode. See procedure below.
1. Long press ON/ OFF button (5) till the blue indicator flashes twice and the device vibrates twice at
the same time. The indicator is in video mode.
2. Short press power button (5), the indicator flashes twice, and the device vibrates twice at the
same time. Then the indicator turns off indicating the device is off.
Note: The latest photos and videos will be saved and then the device will turn off.
TAKING PHOTOS
DO NOT COVER THE CAMERA LENS WHEN YOU ARE TAKING PICTURES OR RECORDING
VIDEOS.
1. Turn on your lighter camera if it is off.
2. In standby mode (blue light), short press the power button (5). The indicator flashes once; the
photo is taken and saved.
Note: Repeat step 2 to take other photos.
RECORDING A VIDEO
Recording a video
In standby mode (blue light), long press the power button (5). The indicator light flashes twice and the
device vibrates twice at the same time. Video recording starts when the indicator turns off.
Stopping a video
Short press power button (5), the indicator flashes twice and the device vibrates twice at the same
time. The indicator turns off indicating the video is saved.
WEBCAM FUNCTION
•In order to get the webcam function, you should install the
STK03N 2
driver (for WINDOWS 7, 8
or 10) or STK02N 2.3. (for WIN XP/ 2000)
contained in the included CD,
into your computer.
•Make sure that a video communication software such as Skype, MSN, Messenger, Facebook,
etc. is initially installed.
•WEBCAM function does not work on MAC systems.
•If you use Facebook, make sure to shut down the Client’s software named “amcap.exe” first if
it is opened.
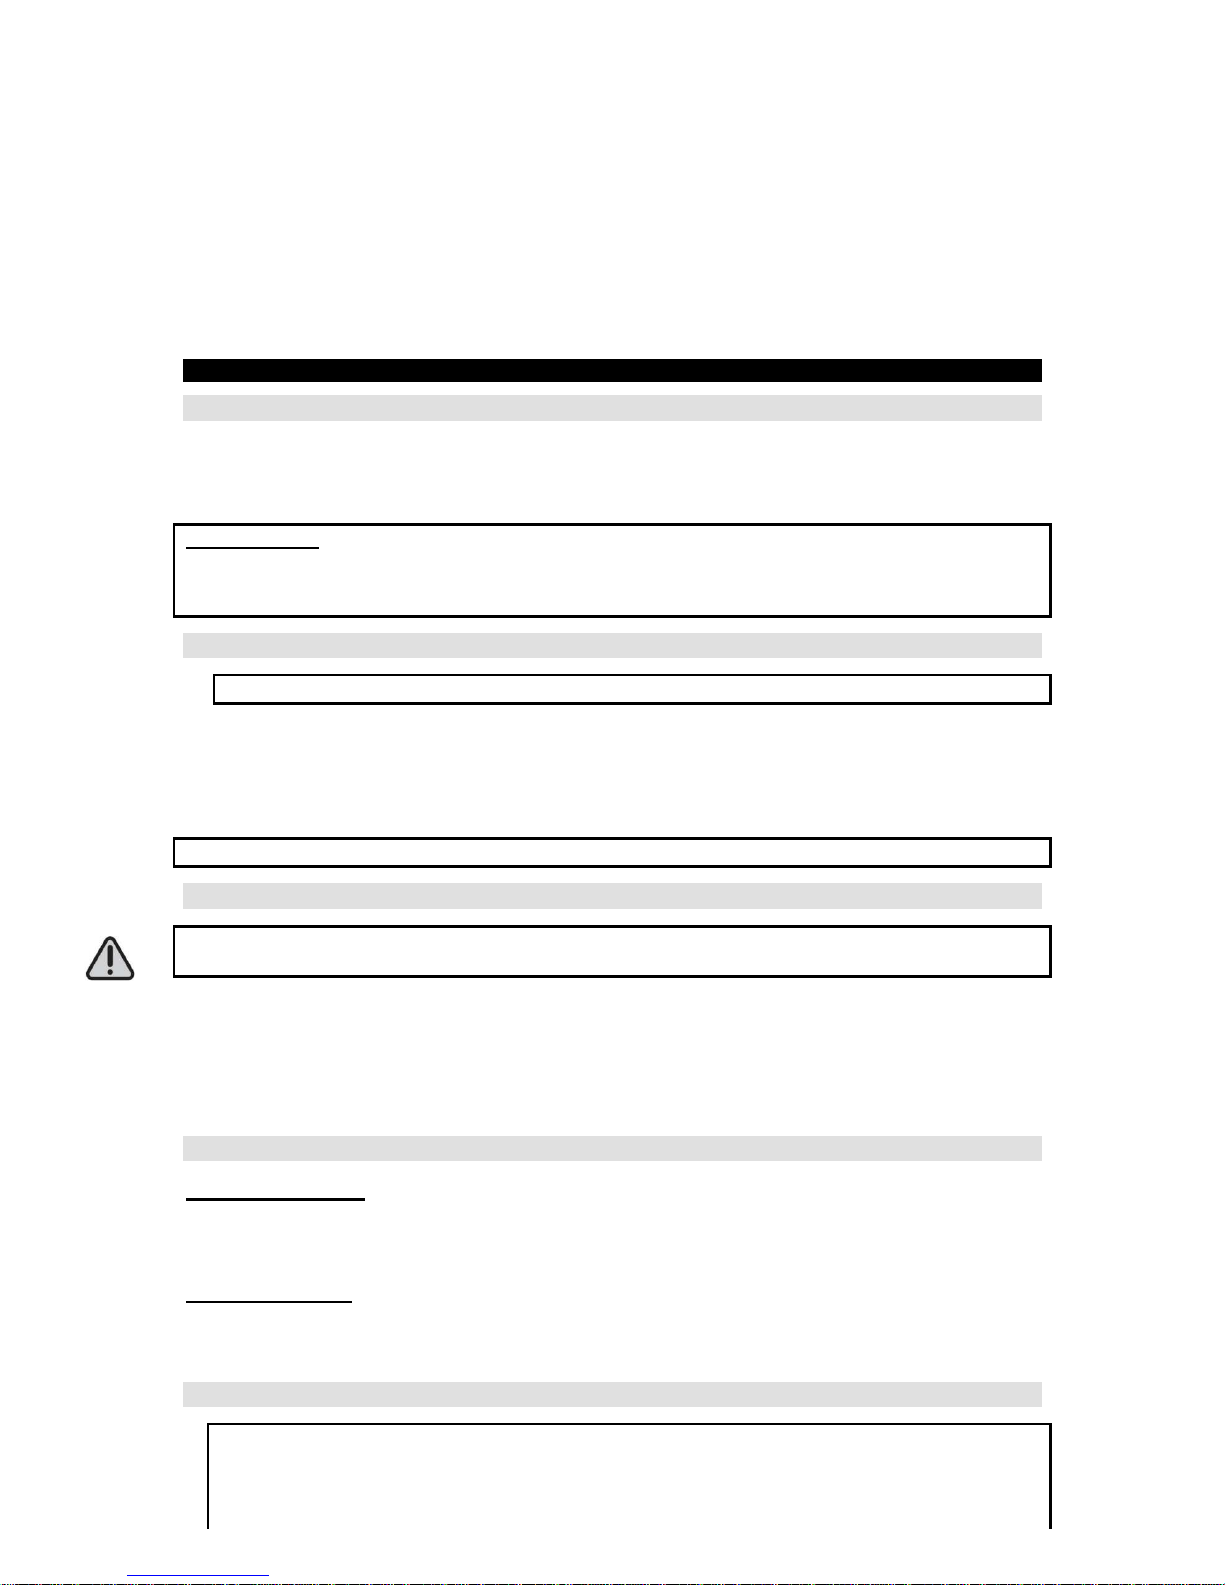
WINDOWS 7, 8 and 10
1. Double-click .
2. Install the
STK03N
driver by double-clicking .
3. After installing the driver, extract the “Webcam driver” and double-click it.
4. Double-click icon. Then select “Options” and “Preview”.
5. Connect the device to the computer.
Note: Before connecting the device, make sure that there is no SD card.
6. Shut down “amcap”. Open communication software. Open the video communication software
and use the device connected to USB port of computer via included USB cable for online chat
videos.
WIN XP/ 2000
1. Repeat steps 1 and 2 of procedure of WINDOWS 7-8-10.
Note: The driver name is STK02N 2.3.
2. Connect the device to the computer.
Note: Before connecting the device, make sure that there is no SD card.
3. Double-click “My Computer” icon, and then icon .
Note: This procedure is necessary to check whether the webcamera correctly works.
4. Shut down . Open the video communication software and use the device
connected to USB port of computer via included USB cable for online chat videos.
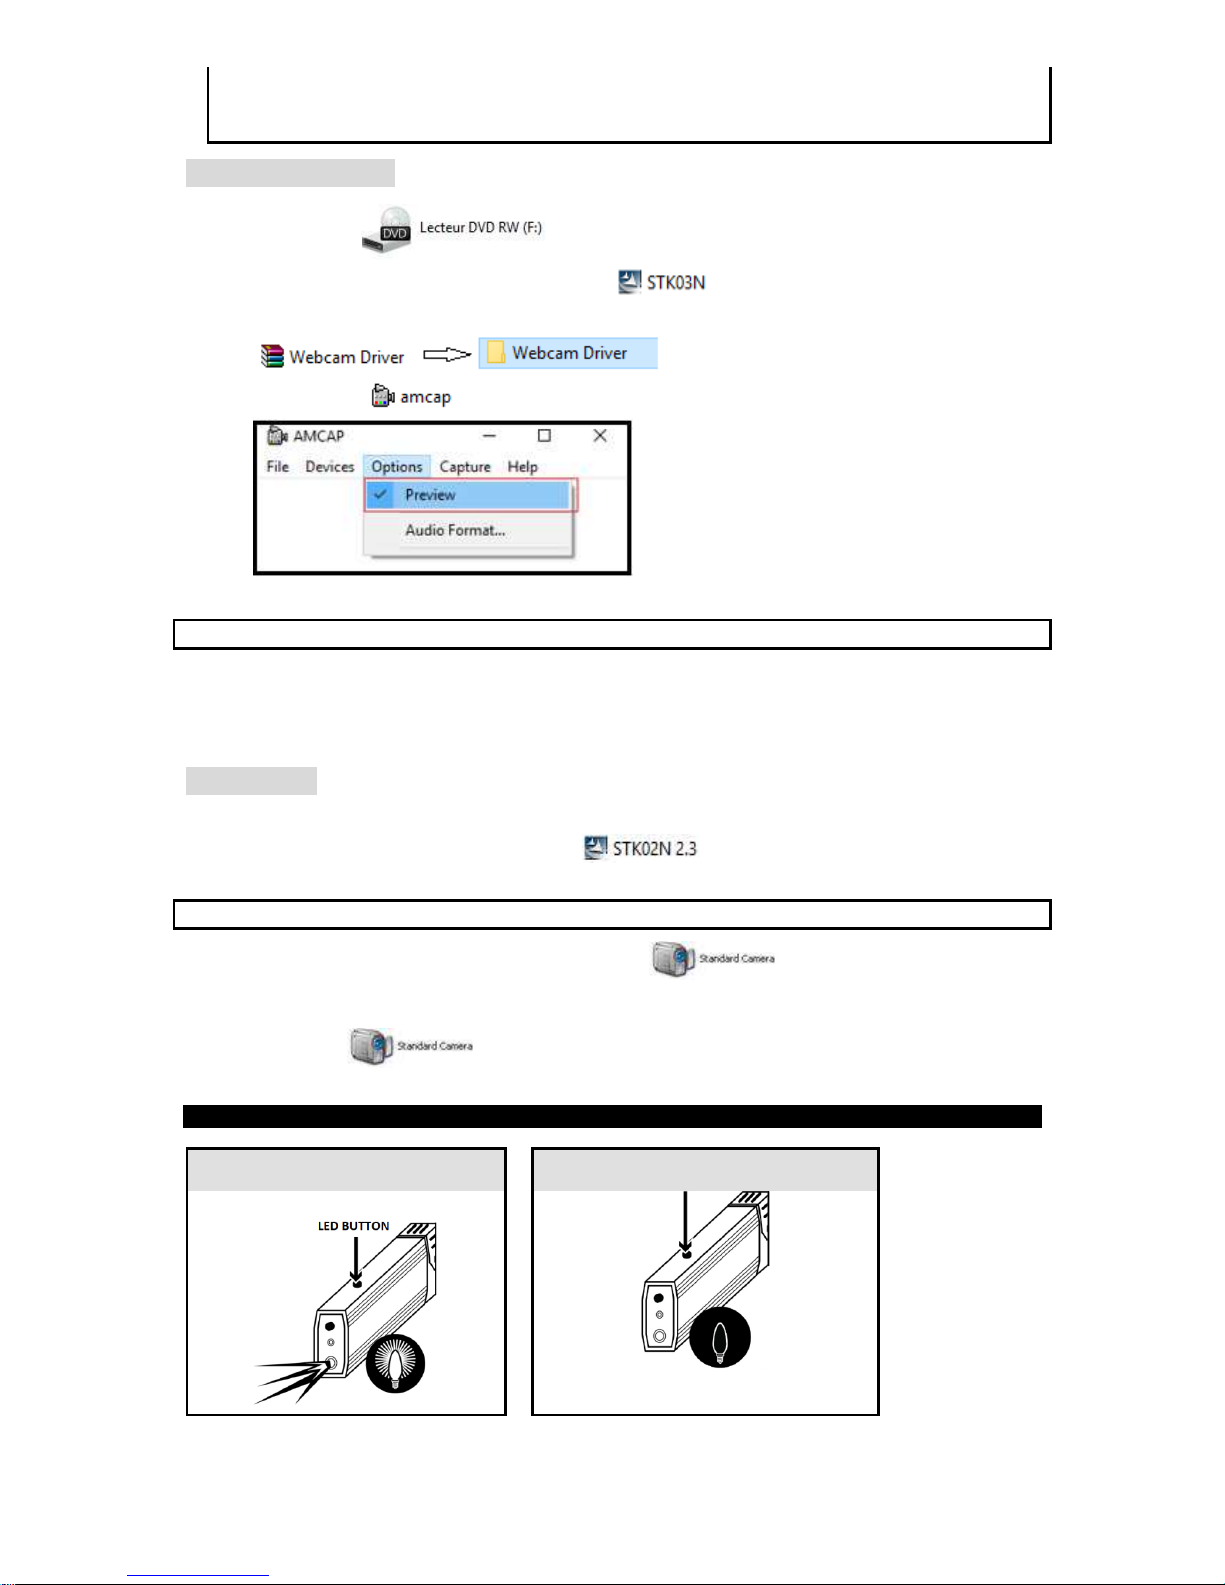
LED FUNCTION
ON
OFF
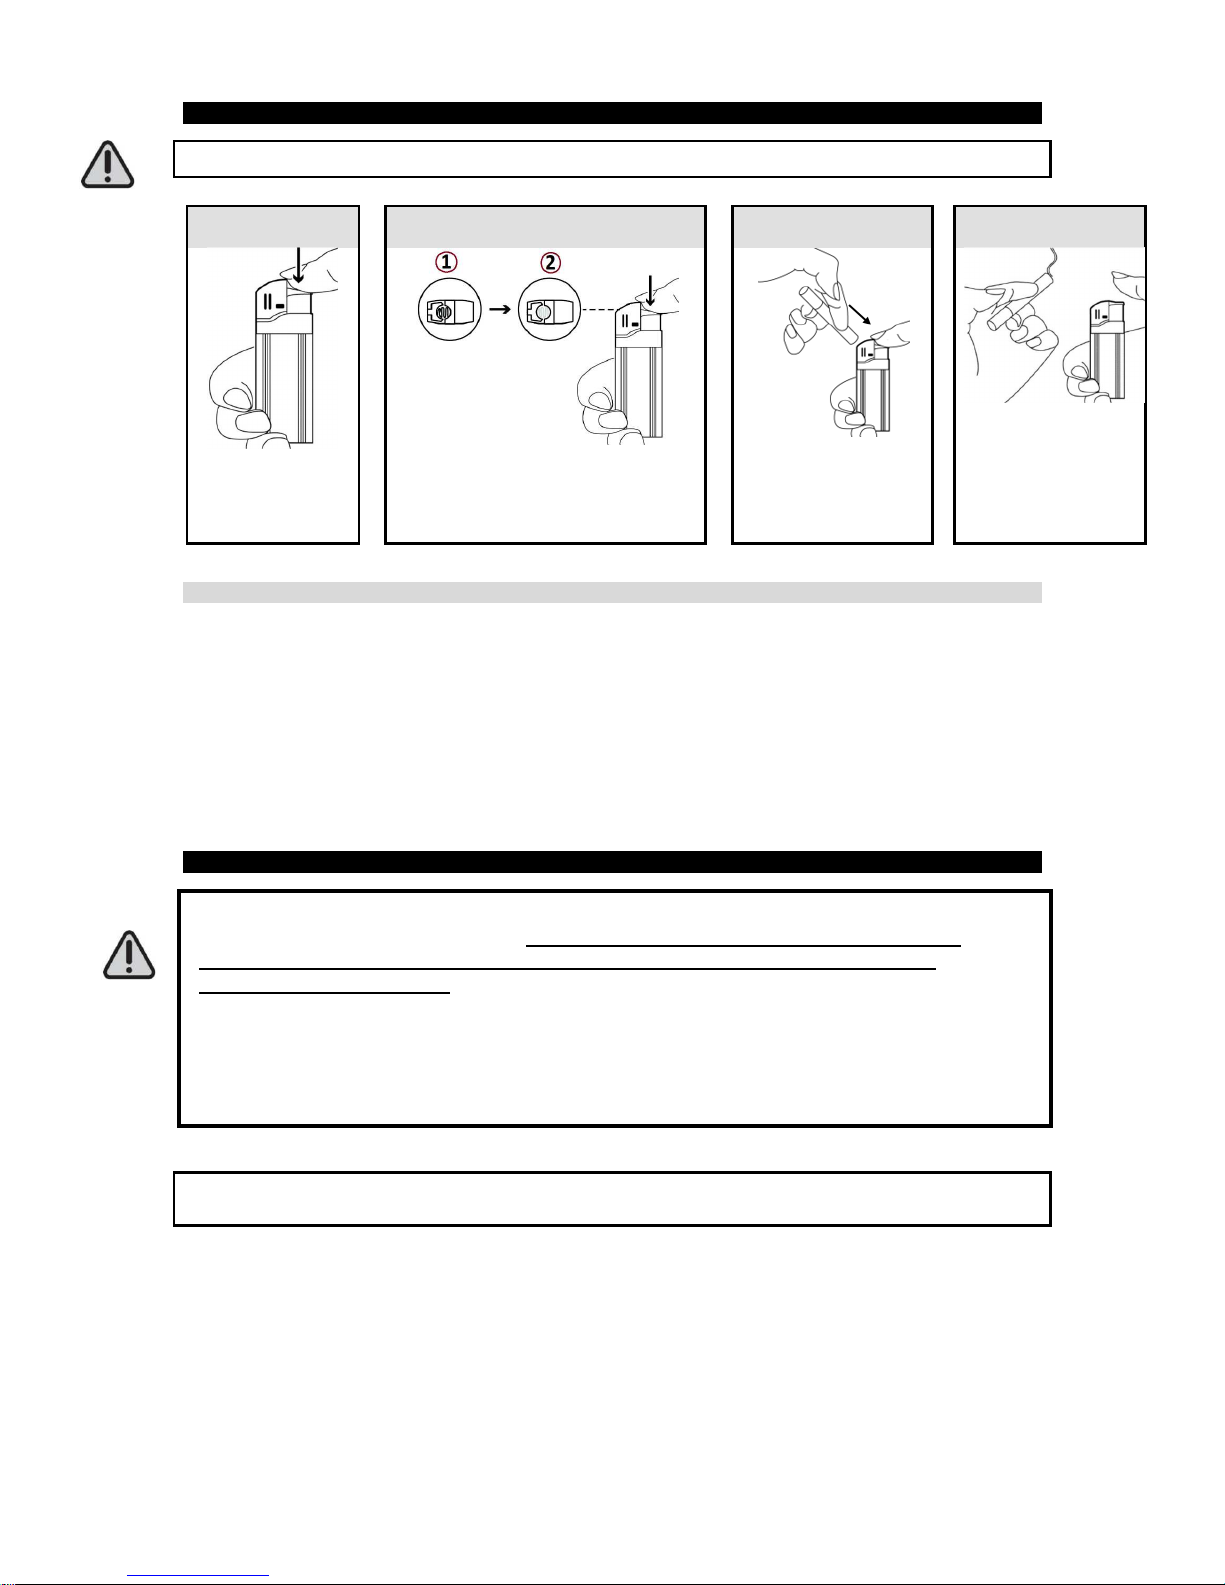
LIGHTER FUNCTION
Ensure the device is well charged before using lighter function!
WARNINGS
·The device works as a classic cigarette-lighter once charged. It is not a toy. Keep out of
reach of children and persons with reduced physical, sensory or mental capabilities.
·Make sure that the head of the lighter is correctly inserted before using the lighter.
·DO NOT insert any object inside the lighter. Only cigarettes should be inserted when it is
lit.
·Release the ignition switch once the cigarette is lit.
HOW TO VIEW RECORDED DATA ON COMPUTER
- Make sure the device is well inserted into the USB port of your computer.
- When connecting it to computer, wait a few minutes so that the computer can
recognize it as a removable disk. Do not carry out any operation during the
procedure of recognition.
- If the computer fails to recognize it, connect it to another USB port of computer. If
this other attempt also fails, restart the computer and connect the device to its USB
port.
- Before removing the device from the computer, the removeable disk must be
removed properly and safely.
IMPORTANT: Make sure to transfer your photos and videos regularly onto your computer before the
memory card gets full, otherwise your device will overwrite the photos and videos on your former ones.
Connect the lighter camera to USB port of your computer. Once recognized, you can visualize/ delete/
transfer the photos and videos contained in the DCIM file.
1
2
3
4

TECHNICAL SPECIFICATIONS
VIDEO FORMAT AVI
VIDEO RESOLUTION 1920*1080
VIDEO CODING MJPEG
PICTURE FORMAT JPG 1280*720
IMAGE PIX 5M
AUDIO FORMAT WAV
USB USB 2.0
WORKING HOURS AFTER A
FULL CHARGE About 60 minutes (Video recordings)
CHARGING VOLTAGE DC5V
BATTERY Lithium-ion, 300mAh, 3.7V
TROUBLESHOOTING
Problems Solutions
Low battery: Blue light flashing during 3
seconds (the device will first save the current
recording file, and then shut down).
- Charge the device for 5 hours.
No card: Blue light flashing -Insert the card
No video: Card is badly inserted or
damaged. -Insert the card properly or replace with a
new card.
The device malfunctions or does not work. -Insert tip of a pen in reset hole.
WARNINGS
Keep away from sources of heat, direct sunlight, humidity, water or other liquids.
Do not immerse in water.
Do not subject it to strong impacts and do not throw it.
Do not drop, short-circuit, modify, disassemble or puncture it.
It is not a toy. Keep out of reach of children.
Store in a cool, dry and well-ventilated place.
WARNING: You should not dispose of this device with your household waste. A
selective collection system for this type of product is implemented by your local
authorities. Please contact your local authorities to find out how and where collection
takes place. These restrictions apply because electrical and electronic devices
contain dangerous substances that have harmful effects on the environment or on
human health and must be recycled.
This symbol indicates that electrical and electronic devices are collected selectively. The
symbol shows a waste container crossed out with an X symbol.
Imported by PRODIS SAS, 1 rue de Rome, 93110 Rosny-sous-Bois, France/ Made in P.R.C
Marketed by EUROTOPS VERSAND GMBH D-40764 LANGENFELD
Table of contents


